1
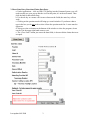
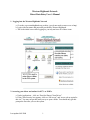
Western Highlands Network
Direct Data Entry User’s Manual
1. Logging into the Western Highlands Network
a. Go to the csg.westernhighlands.org website, (you do not need to enter www or http).
b. Login with user name and password provided by Western Highlands.
c. This is the initial screen after logging in; you may not have all of these icons.
2. Accessing your inbox and outbox for 837’s or EOB’s.
a. Under Applications – click on “Provider Shares Client Drives”.
b. If the Citrix Security box appears, click on “full access” and “never ask me again for
this site” You may not get this until you try to open a folder. You should only get this
prompt the first time you use the system.
Last updated 4/4/2008
1
If the security box
appears select “Full
Access” at the top and
“Never ask me again
for this site” at the
bottom and then click
OK.
c. Provider folders will appear. Click on your folder on the left tab (folder name will be
provided by Western Highlands and contain your provider ID). There will be an inbox
and an outbox.
d. Click on “c$ on Client (V)”. This is your hard drive. Copy your 837 file from there
and then paste it into the inbox. Please name your files with the submission date, the first
four letters of your provider name, and A, B, C, etc. For example, Smith Group Home
would be 080506SMITA, 080506SMITB, etc. Then notify Western Highlands
([email protected]) that you have put an 837 file in the folder and it’s ready to
be picked up. Western Highlands staff will notify you when it has been picked up and
when it’s been processed. Pick up your EOB in the outbox. It can be copied and pasted to
your computer through the same “c$ on client” link.
Last updated 4/4/2008
2
3. Direct Data Entry Functions/Claims Data Entry
a. Under Applications – click on WH CCIS and log into the Netsmart System, you will
need to make sure your pop up blocker is off at this point, it’s in the tools menu. Then
click the link for direct data entry.
b. Use the tab key or a mouse click to move between the fields, the enter key will not
work.
c. Clicking on the question mark will bring up a search window. If you know what to
type in the box you do not need to select it from the question mark list. Letters must be
uppercase.
d. Always use the exit button at the bottom of the window to close the program, do not
use the X in the upper right hand corner to exit.
e. The “Clear Form” button just erases the data fields; it does not delete claims that were
accepted.
Last updated 4/4/2008
3
4. Field Definitions
1 – Clear Form Button: Click here to clear the contents of all fields, this will not remove
any successfully entered claims but is designed to allows you to start over with a clean form.
You can also just type over existing text to start a new claim.
2 - Client ID: Type the Western Highlands six-digit client identification number and tab,
you should either see the client’s name or initials.
3 - Service Date: Either type the date or click on the question mark for a calendar. Type the
numbers without slashes to speed things up. For example if you type 102506 and tab it will
correctly format to 10/25/2006 automatically.
4 - Procedure Code: Type the correct code or click on the question mark for a picklist.
Include applicable modifiers. Letters must be uppercase, don’t use spaces or dashes.
5 – Secondary Modifier: Secondary Modifiers identify units of service provided by the
Qualified Professional (QP) and Non-Qualified Professional (non-QP) staff members. If
your claim submission does not require Secondary Modifiers, tab to the next field.
Secondary Modifiers are two characters long, and all capital letters:
Type “U3” when billing a service provided by Qualified Professionals
Type “U4” when billing for a service provided by Non-Qualified Professionals
Denial error (077) Missing / Invalid 2nd Modifier: appears when incorrect data has been
been entered for the 2nd modifier.
Denial error (078) Secondary procedure modifier invalid for procedure on date of
service: appears when a 2nd modifier is entered and it’s not required for the procedure
code and / or date of service billed.
6 – Units: Enter the specified billing units.
7 - Amount Billed: Enter your usual/customary fee. Do not enter the $ but do use a
decimal and cents if applicable.
8 - Authorization Number: Type the Western Highlands authorization number. This
number is present on the Western Highland’s Letter of Notification you received authorizing
the service.
9 – Attending Provider NPI: This is the NPI representing the attending provider.
If billing Enhanced Services enter the NPI number associated with the DMA Community
Intervention Number registered with WH and DMA.
If billing Outpatient Behavioral Health (OBH) codes, enter the NPI number associated
with the DMA Individual Clinician’s Direct Enrolled Number you have registered with
WH and DMA.
Last updated 4/4/2008
4
If billing neither an Enhanced Service nor OBH procedure code, enter the NPI number
associated with the Western Highlands provider number registered with Western
Highlands.
10 – Taxonomy Number: This is the attending provider Taxonomy number. Choose from
the list provider. Contact Western Highlands to add a Taxonomy if not present within the
list.
11 – Service Facility Location NPI: This is the NPI representing the service location were
services were provided as registered with Western Highlands and/or DMA.
12 – Service Facility Location Zip + 4: This is the zip+4 Western Highlands has registered
within the chosen Service Facility Location NPI.
13 & 14 – Optional Fields: The optional fields are not needed by Western Highlands but
are available to help you link claims to your own numbers.
15 – Use the Add Claim button to submit each claim and the Exit button when you are
finished.
5. After the form is filled out click the Add Claim button. If there are no errors your claim will
be displayed at the bottom of the page. You may need to scroll down to see this. If there is an
error you will receive a brief explanation and will need to correct the issue before that claim can
be entered. You may continue to submit new claims or click exit if you are finished. The
successfully entered claims will have an edit and a delete button to make corrections, you can
make corrections at anytime during the day but each new day you start off with a clean page.
6. If you entered claims you will be given the opportunity to print a report that summarizes what
you have entered. Click Exit at the bottom of the screen, then choose which type of report you
want. The best choice is usually “print all successfully submitted claims entered today”.
If you need help:
Toll Free: 800-671-6560
Local: 828-225-2785
Ext 2139 is Don Petit in the IS department (Logging in, passwords, access to clients)
Ext 2191 is Marlene Lewis in the Claims department (billing errors and issues)
Last updated 4/4/2008
5