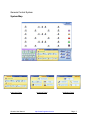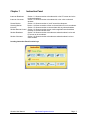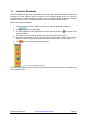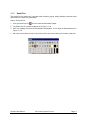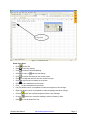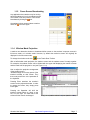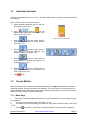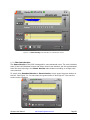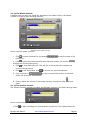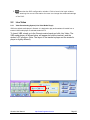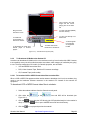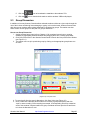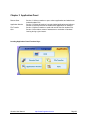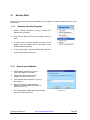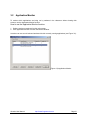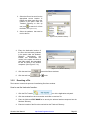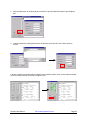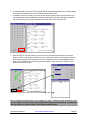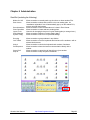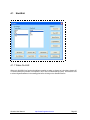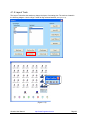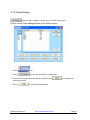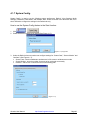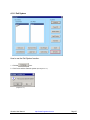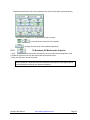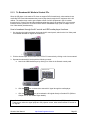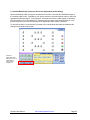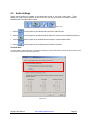
1
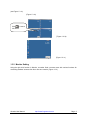
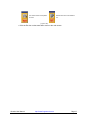
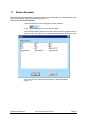
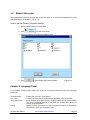
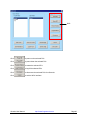
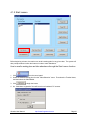
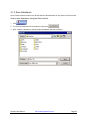
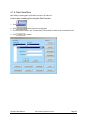
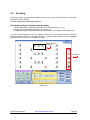
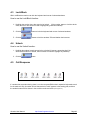
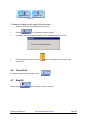
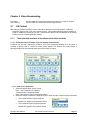
Classroom Control System
User Manual
Table of Contents
System Map...................................................................................................................................................................2
Chapter 1
1.1
1.1
1.2
1.3
1.4
1.5
1.7
1.8
Instruction Panel................................................................................................................................3
Instructor Broadcast........................................................................................................................................................................................3
Instructor Broadcast........................................................................................................................................................................................4
Instructor Voicecast...........................................................................................................................................................................................8
Screen Monitor...................................................................................................................................................................................................8
Listening Monitor..............................................................................................................................................................................................10
Intercom..............................................................................................................................................................................................................10
Student Broadcast........................................................................................................................................................................................13
Student Voicecast.........................................................................................................................................................................................14
Chapter 2
Language Panel................................................................................................................................14
2.1 Virtual Recorder.............................................................................................................................................................................................15
2.2 Live Video........................................................................................................................................................................................................23
2.3 Group Discussion.........................................................................................................................................................................................25
2.4 Pairing................................................................................................................................................................................................................26
2.5 Random Pairing...................................................................................................................................................................................................27
Chapter 3
3.1
3.2
3.3
3.4
Remote Start..................................................................................................................................................................................................29
Application Monitor.......................................................................................................................................................................................31
File Transfer.....................................................................................................................................................................................................33
Quiz....................................................................................................................................................................................................................35
Chapter 4
4.1
4.2
4.3
4.4
4.5
4.6
4.7
Application Panel.............................................................................................................................28
Administration...................................................................................................................................38
Start/Exit............................................................................................................................................................................................................39
Grouping..........................................................................................................................................................................................................48
Lock/Black.......................................................................................................................................................................................................49
Unlock...............................................................................................................................................................................................................49
Call Response................................................................................................................................................................................................49
Cancel Call......................................................................................................................................................................................................50
Stop/All..............................................................................................................................................................................................................50
Chapter 5
Video Broadcasting.........................................................................................................................51
5.1 AV Control..........................................................................................................................................................................................................51
5.2 Audio Settings................................................................................................................................................................................................55
Genesis User Manual
http://www.linguatronics.com
Page 1
Genesis Control System
System Map
Instruction Panel
Genesis User Manual
Language Panel
http://www.linguatronics.com
Application Panel
Page 2
Chapter 1
Instruction Panel
Instructor Broadcast
Section 1.1 Allows a teacher to broadcast his or her PC screen and voice
to selected students.
Instructor Voicecast
Section 1.2 Allows a teacher to broadcast his or her voice to selected
students.
Screen Monitor
Section 1.3 Allows a teacher to “stroll” around the classroom.
Listening Monitor
Section 1.4 Allows a teacher to listen to the activities of his or her students.
Intercom
Section 1.5 Allows a teacher to communicate with any selected student.
Student Remote Control Section 1.6 Allows a teacher to open various applications and websites
remotely on selected student PCs.
Student Broadcast
Section 1.8 Allows a teacher to broadcast a selected student’s voice and
PC screen to other students.
Student Voicecast
Section 1.8 Allows a teacher to broadcast a selected student’s voice to
other students.
Locating Instruction Panel function keys
Genesis User Manual
http://www.linguatronics.com
Page 3
1.1
Instructor Broadcast
Instructor Broadcast is one of the major functions in Genesis. With Instructor Broadcast a teacher can
broadcast his or her computer screen in real-time to an individual student screen, to a group of
student screens, or to all the students in the lab. Once the Instructor Broadcast function is initiated,
the teacher’s screen is then immediately broadcasted to the selected student’s screens.
How to use Instructor Broadcast:
1. Select a student or group of students to receive the Instructor Broadcast broadcast.
from the Main Panel.
2. Click
will remain on the
3. The main Classroom Control Panel will be minimized and the small icon
Windows Taskbar.
4. The teacher’s screen is now being delivered to the selected student’s screens.
5. Move the mouse pointer to the top right hand corner of the teacher’s screen. The Instructor
Broadcast Toolbar will appear as long as the teacher’s pointer stays on it (see Figure 1.1).
6. Click
to end the Instructor Broadcast function.
7.
(Figure 1.1 Instructor Broadcast Toolbar)
The Instructor Broadcast toolbar consists of useful features that help a teacher to more skilfully carry
out a smoother lesson.
Genesis User Manual
http://www.linguatronics.com
Page 4
1.1.1
Smart Pen
The Smart Pen is a marker tool. It provides tools of drawing, typing, editing, deleting, as well as some
useful items for a teacher’s presentation.
How to use Smart Pen:
1. Click the Smart Pen icon
from the Instructor Broadcast Toolbar.
2. The Smart Pen Tool screen will appear as in Figure 1.1.2a.
3. Click any drawing tools from the Annotated Demonstration Tool to begin a demonstration as in
Figure 1.1.1b.
4. Move the mouse pointer on top of any of the tools to view some hints on the function of that tool.
(Figure 1.1.1a) Annotated Demonstration Tool
Genesis User Manual
http://www.linguatronics.com
Page 5
(Figure 1.1.1b) Smart Pen Tool
Some of the hints:
•
Click
•
•
Click
Click
•
Click
•
•
•
Click
Click
Click
•
Click
•
•
•
Click
to get a whiteboard on the screen.
Left click another colour on the palette to make the foreground colour change.
Right click another colour on the palette to make the background colour change.
•
Click the
check box to add a transparent effect to any drawings.
•
Click the
check box to cause the drawing to exhibit a “flashing” effect.
•
Click
to open file.
to save any drawing.
to erase all unwanted drawing.
to undo or
redo the last change.
to remove all drawing on the current screen.
to change the text font, font size, and/or font style.
to type words or numbers on the screen.
to get a blackboard on the screen.
to exit the Smart Pen Tool.
Genesis User Manual
http://www.linguatronics.com
Page 6
1.1.2
Pause Screen Broadcasting
Any application that a teacher may be running
can be broadcast to his or her student screens.
The teacher’s can then pause or “hold” these
broadcasts by clicking the icon.
A broadcast is then resumed when a teacher
clicks the
icon once again.
1.1.4
Window Mode Projection
A teacher can determine whether to broadcast his/her screen to the students’ computer screens in
full-screen mode or in window mode. However, by default the teacher’s screen will originally be
displayed in the full-screen mode.
To change the window mode click
on the Teach Show Toolbar.
With a half-window mode projection, the teacher screen and the student screen fit neatly together.
For example, the student screen can be divided with the upper half displaying the teacher’s screen
and the lower half the program in use (see Figure 1.1.4).
How to adjust the projection arrangement
of the student screen:
Students simply click on any space of the
teacher’s window on their screen. They
then must press Enter or the spacebar on
the keyboard.
Pressing Enter stretches the teacher’s
screen into the projected window. In order
to restore the screen, they simply press
Enter again.
Pressing the Spacebar will shift the
teacher’s screen either up, down, to the
left, or to the right. The lower half of the
screen will then remain unchanged.
Genesis User Manual
(Figure 1.1.4) Half Window Mode Projection (Student’s Screen)
http://www.linguatronics.com
Page 7
1.2
Instructor Voicecast
A teacher can broadcast his or her voice or any other audio source in real-time to as many students
as is required.
How to use the Instructor Voicecast function:
1. Select students (individuals, group, or all) from
the teacher’s main screen.
and the
icon will
2. Click
appear at the upper right hand corner of the
screen. (see Figure 1.2a)
(Figure 1.2a) Voicecast Toolbar
from the control panel to
3. Choose
allow students to receive AV audio sources.
(see Figure 1.2b)
4. Choose
from the control panel to
allow students to hear the teacher’s voice
through headsets (see Figure 1.2b).
(Figure 1.2b) Select audio sources
from the control panel to
5. Choose
allow students to receive the teacher’s PC
audio (see Figure 1.2b).
6. Choose
from the control panel to
allow students to receive the teacher’s CD
audio. (see Figure 1.2b).
7. Click
1.3
to quit.
Screen Monitor
With the Screen Monitor a teacher can simultaneously view up to eight student screens in real-time
(individual students, a group of students, or all students). This can be done in full screen mode or in
multiple-window mode. If the teacher’s class has more than eight students, he or she can also set the
system to monitor screens in a preset polling time.
1.3.1 Basic Keys
1.
Select the icons of the students that need to be monitored (whether it is an individual, a group,
or all students).
2.
Click on the Screen Monitor button (see Figure 1.3.1a).
3.
The teacher’s screen will display the screens of the student’s selected earlier (see Figure
1.3.1b).
icon from the control box of a selected student to have full screen monitoring
4.
Click the
Genesis User Manual
http://www.linguatronics.com
Page 8
(see Figure 1.3.1c).
(Figure 1.3.1a)
to launch
Click
full screen.
(Figure 1.3.1b)
(Figure 1.3.1c)
1.3.2 Monitor Setting
Using the right click function in Monitor, a teacher finds a context menu with various functions for
monitoring students’ screens from his or her own console. (Figure 1.3.2)
Genesis User Manual
http://www.linguatronics.com
Page 9
(Figure 1.3.2)
1.3.3 Resizing Monitoring Screens
Teacher’s can change the window size of monitored screens displayed in their own screens. This is
feature is achieved by moving the mouse pointer to the edge of the monitored window until the mouse
pointer has changed into a double-ended arrow. Now the teacher must click and drag to resize the
window to suit his or her viewing preferences.
For a full screen display, right click the mouse button on the target student’s screen. This brings onto
the screen the context menu. All the teacher needs to do now is to click on the Window/Full Mode
prompt to view the selected student’s full screen.
1.3.4 Exit Screen Monitor
1.To close a selected student screen right-click the monitored window and choose the Close
Window icon.
2. To close all the monitored screens select the Close All icon.
1.4
Listening Monitor
A teacher can listen to a student through his or her headset by using the Listening Monitor function.
How to use Listening Monitor:
Simply select a student.
click the Listening Monitor icon to hear the student ‘s voice.
1.5
Intercom
The intercom function allows a teacher o communicate with a selected student in real-time without
disturbing the rest of the class.
Genesis User Manual
http://www.linguatronics.com
Page 10
How to use the Intercom feature:
1. select a student to communicate with from the main
screen.
2. click the Intercom icon to place the following screen in
the selected student’s PC (see Figure 1.5).
3 click on the End icon to stop the Intercom.
(Figure 1.5)
Intercom
1.6 Student Remote Control
The Student Remote Control command allows the teacher to take control of a student’s computer.
With this versatile function the teacher runs the student’s computer as if it was his or her own
computer. Note: The selected student’s keyboard and mouse is locked by default once a teacher
applies the Student Remote Control command.
In some learning situations, a teacher may find certain students unable to comprehend what he or
she are teaching. Student Remote Control allows the teacher to guide the student without
embarrassment. The teacher is also able to communicate with the student privately to provide
immediate feedback and instruction.
To use Student Remote Control follow these four steps:
1. Select a student on the Classroom Control Panel.
2. Click the Student Remote Control icon on the main screen. The selected student’s
screen will then appear on the teacher’s screen (see Figure 1.6a). The status bar will
also appear at the top right hand corner of the student’s screen.
The Status Bar of student PC
under <Student Remote Control
( Figure 1.6a)
3. Click the Lock icon to lock and unlock the student’s keyboard and mouse
( see Figure 1.6b).
Genesis User Manual
http://www.linguatronics.com
Page 11
Lock student mouse and keyboard
& control
Release the control of the student’s
PC.
( Figure 1.6b)
4. Click the Exit icon on the status bar to return to the main screen.
Genesis User Manual
http://www.linguatronics.com
Page 12
1.7
Student Broadcast
With the Student Broadcast feature a student may carry out a presentation by broadcasting his or her
voice and PC screen to selected students (see Figure 1.7).
How to use Student Broadcast:
1. Select a student from the seating plan to be the presenter.
2. Click
from the Teaching sub panel.
3. Select which students should receive the student presenter’s computer screen
and voice. Note: The teacher’s voice may also be sent with the presenter’s voice.
4. Click the OK icon to start the demonstration in Student Broadcast.
(Figure 1.7)
Genesis User Manual
http://www.linguatronics.com
Page 13
1.8
Student Voicecast
Using the Student Voicecast function, the student can have his or her voice broadcasted out to the
selected audience via headset. (Figure 1.8)
How to use the Student Voicecast function:
1. Select a student from the seating plan.
2. Click
from the main screen.
3. Select an audience to receive the student’s voice.
4. Click
to start Student Voicecast broadcast.
(Figure 1.8)
Chapter 2 Language Panel
In this chapter, we will introduce teachers a number of tools that are particularly useful in a language
classroom.
Virtual Recorder
Live Video
Group Discussion
Pairing
Genesis User Manual
Please refer to the DLL User Manual.
Contains the tools that are useful when broadcasting video to students.
Allows students of the same group to verbally interact through their headsets.
The Voice Recording function in the teacher’s console then stores the
various group discussions.
Similar to Group Discussion but with the distinctive feature of auto-pairing.
This feature is set to pair students in order.
http://www.linguatronics.com
Page 14
Random Pairing
Is similar to Group Discussion but designed instead to pair students together
randomly.
Language Panel
2.1
Virtual Recorder
The Virtual Recorder has two important modes or functions. The first is for the
teachers and the second is geared for the students.
• Teaching Mode: Allows teachers to custom-tailor their teaching materials for
specific learning courses.
• Self-Learning Mode: Allows students to practice listening and recording drills in
the lab.
The Digital Virtual Recorder:
The Digital Virtual Recorder (DVR) can be used to replace the traditional sound recording system in a
language lab. The teacher can either tailor-make his or her teaching material in real-time during
class or prepare a suite of lessons (including audio and text) before class so that students in the
class can use it on their own PCs. During lessons students can also store their recordings
separately either on their local hard disks or zip disks.
The DVR is useful because it can produce customized teaching materials for the teachers
and it provides language practice opportunities for the students.
Genesis User Manual
http://www.linguatronics.com
Page 15
2.1.1 Switching from Teaching Mode to Self-learning Mode
To switch between the Teaching Mode and the Self-learning Mode of the DVR, click the
green Teaching or Self-learning buttons in the DVR interface.
Genesis User Manual
http://www.linguatronics.com
Page 16
2.1.2 Teaching Mode
Using the Teaching Mode Master Console of the Digital Virtual Recorder (DVR), teachers
can customize teaching materials through using the record commands. Teachers can
also choose to record their own voice or use existing digital audio in wave format.
Additionally, selected audio can be broadcast to students immediately for real-time
listening practice or recording purposes. The audio can also be saved to the hard disk
for later use.
After launching DVR, teachers enter Teaching Mode by default (Figure 2.1.1).
Figure 2.1.1 Teaching Tool Mode of DVR
2.1.3 Producing Recordings To Assist in Teaching.
How to use Teaching Mode for Recording:
Knowing the DVR
Genesis User Manual
http://www.linguatronics.com
Page 17
In Teaching Mode the DVR works like any mechanical cassette
recorders on the market. However, in addition to the conventional
Play l Record l Pause buttons on the control panel, a teacher will
also find the New File l Open File and Save buttons. Below is a
description of these buttons.
Click
to start recording.
Click
to pause.
Click
to play what you have recorded.
Click
Click
to create a new file for recording.
to open a file in a folder/directory.
Click
to save a file.
2.1.4 Broadcast a Recording While Students Listen Only
If a teacher wants the students in the lab to hear his or her audio track at the same time
they are recording it, choose the Broadcast and Play mode and then click Record.
2.1.5 Broadcast a Recording While Students Record Their Own Voices
If a teacher want the students in the lab to hear his or her audio track while
simultaneously recording their own voices, choose the Broadcast and Students
Record mode and then click Record.
2.1.6
Setting Bookmarks
It is useful to segment teacher’s recordings into meaningful sections so that students
can practice and record them one after one. Bookmarks allow one to do this.
a. Choose either
Genesis User Manual
or
mode to launch the bookmark tools
http://www.linguatronics.com
Page 18
b. While playing the track, click Set at the position where one wants to place a
bookmark.
c. Click Clear to any previous bookmarks and begin again.
2.1.7
Tracking Bookmarks
After setting bookmarks, the teacher can also jump to any corresponding passage by
clicking on that bookmark number.
2.1.8
Remote Close
A teacher can also close the students’ DVR devices by clicking Remote Close icon or by
clicking the
button. The message box below is then shown (Figure
2.1.2):
(Figure 2.1.2) message box
Once this message box has appeared click Yes to close the students’ DVRs.
2.1.9 Using Other Audio Sources For Students’ Practice and Recordings
To record and broadcast external audio sources, choose the Line In icon in the DVR.
Make sure the external source is connected to the Line Input of the sound card.
2.1.10 Self-Learning Mode
As mentioned in Section 5.1, the Self-Learning mode of the DVR is solely for a student’s
self-directed learning. That is why when the classroom makes a switch from Teaching
mode to Self-Learning mode, the DVR interface will disappear from the teacher’s PC
screen. In other words, when the Teaching mode button is turned on, the teacher is
launching the DVR device on the student computers in the classroom.
The Self-Learning mode DVR interface is very similar to the Teaching mode interface.
The main difference is the additional Master console used in Teaching mode, which
serves as the input source for listening and speaking practice.
Hint: Teachers may find it very useful to conduct role-plays, dialogue practices
and language drills. In addition, using DVR for oral tests can save teacher’s a
lot of class time.
Genesis User Manual
http://www.linguatronics.com
Page 19
Figure 2.1.3 Self-Learning mode Interface on a Student PC screen
2.1.11 The Smart Version
The Smart Version of the DVR is designed for more advanced users. The main interface
tools of both the Standard Version and Smart Version are identical, but the sophisticated
tools like Auto Learning in the Smart Version make student recording on a large scale
more practical.
To switch from Standard Version to Smart Version, simply press the green button on
the left. See Figure 2.1.3 to see where the green button is and Figure 2.1.4to see the
smart version interface.
Figure 2.1.4 The Smart Version of DVR
Genesis User Manual
http://www.linguatronics.com
Page 20
2.1.12 The Master Console
A student user can play any preset file assigned to the master track in the Master
Console for listening and recording practice.
Standard Mode of Self-Learning
How to use The Master Console:
1.
Click
to open a desired file; the display
shows the name of the
chosen file.
2. Click
to play the master track file that has been chosen; the counter
displays the current playing time;
3. Click
to stop playing the file. The red line in the sound wave indicates the
current playing position.
4. Click
to set bookmarks and
5. Click a number in
to remove any preset bookmarks.
to jump to a particular section of the track,
which was previously bookmarked.
6. Finally, adjust the volume of the master track by moving the slider
up and
down.
2.1.13 The Student Console
The Student Console provides recording and playback controls in the Self-Learning mode.
How to use the Student Console:
1.Click
to start recording from the student’s microphone. The display shows the
Genesis User Manual
http://www.linguatronics.com
Page 21
name of the student track and the current recording time.
2. Click
to stop recording or playing the file. The red line, as in the Master
Console, indicates the current playing position.
3. Click
to play the student track after recording. The student will hear his
recording from the headset.
4. Click
to create a new student file. Any unsaved data will be erased.
5. Click
to open a previously recorded student track. Note: one must open the
master track before opening the student track.
6.
Click
to save the student track into a file on the student hard disk. 7.
Adjust
the volume of the student track by moving the slider up and down.
2.1.14 The Terminal Panel
The panel shown below is the terminal for Self-Learning in the Smart Version of DVR. It
provides smartly built co-working functionalities such as activating simultaneous play
and record functions in both tracks.
How to use the Terminal Panel:
1. Click
to play the master and student tracks one after another.
2. Click
to play the master track and record the student track simultaneously.
3. Click
to stop playing both tracks.
2.1.15 More on Smart Version Specialties
is a powerful bookmark editor. With the editor launched, a user can create or
1.
delete bookmarks on both the master and student tracks.
2.
is a digital voice activation detector. It serves to detect a pause in a
student’s speech while recording so that the user need not press the Stop button
all the time.
3.
is an automatic bookmark tool. The system detects the student’s different
voice levels and determines where to put the bookmarks.
4.
launches a text box. The student can listen and then type the written form
of the oral text while he or she listens, or they can also type the scripts in the
text box for more accurate pronunciation practices. Both Chinese and English
modes are available.
Genesis User Manual
http://www.linguatronics.com
Page 22
5.
launches the DVR configuration window. Click to launch the login window.
After entering the correct information the user can change the advanced settings
of the DVR.
2.2
Live Video
2.2.1
Video Broadcasting System (Live Video Media Player)
VBS is the default media player in Genesis. It is designed to play and broadcast AV media from a
teacher’s VBS media player to selected student’s PCs.
To launch VBS, simply go to the Genesis control panel and click Live Video. The
VBS media player, as shown below, will appear on both the teacher’s and the
student’s PC monitors. (Note: The layout of the teacher’s player and the student’s
player is slightly different).
Genesis User Manual
http://www.linguatronics.com
Page 23
Timer showing the total
length and the current
playing time of the video
file
To open video files (MPEG)
from the directory.
Drag to browse
around the movie.
To play VCD directly from
teacher PC.
To enable fullscreen display on
teacher PC monitor.
To enable Full-screen
broadcast on student PC
To broadcast AV media from
teacher player to student
players.
To divert signals
from selected
AV equipment
to VBS
(Figure 2.2.1) Video Broadcast System (VBS)
2.2.2
To Broadcast AV Media to the Student PC
A teacher can broadcast AV Media to his or her students once they have launched the VBS. However,
to successfully convey the AV media the teacher must select, which category of media they are going
to use. The three categories of AV media, for Genesis purposes, are as follows:
VCD and MPEG format video files.
DVD, Video Cassette Tape, Real-time DV camera recordings.
CD, Cassette Tape (audio media).
2.2.2.1 To broadcast VCD or MPEG format video files to student PCs:
When a VCD or MPEG file appears and the teacher wants to broadcast it to his or her students, they
need to use the hardware/ software resources in the teacher’s PC instead of the external AV
equipment.
To broadcast VCD or MPEG format video files to students:
1. Select the student audience from the Genesis control panel.
2. Click either the
Figure 2.2.1).
3. Click the
or the
icon to play the VCD directly (the VCD should already be in the teacher’s
drive) or Click the
4. Click the
Genesis User Manual
icon and VBS will be launched (see
icon to open a MPEG format file from the directory.
icon to play and preview the material.
http://www.linguatronics.com
Page 24
2.3
5. Click the
icon to broadcast the materials to the students’ PCs.
6. Click the
icon to close both the teacher and the students’ VBS media players.
Group Discussion
In addition to its many features, Genesis allows selected students to discuss a given topic through the
use of their voices and through text messaging or typing. In this environment, students communicate
with other group members without being disturbed by neighbouring groups. The teacher can also
either monitor current groups or take part in a group’s discussion.
How to use Group Discussion
1. Assign students into groups (refer to Chapter 4.2 for complete instructions on grouping
students) by highlighting selected students and dragging them into a chosen group letter.
2. Click Group Discussion in the Genesis Control Panel to launch the Group Discussion Window
(see Figure 3-1).
3. The teacher can now join a particular group by clicking on the appropriate group button one
at a time.
(Figure2.3a) Group Discussion
4. To record audio from the group’s discussion, click Save Voice (see Figure 3.2).
5. Next, Create both a directory and file name for recording s group’s discussion and click
“open” to start recording. Once recording has started, a corresponding file will be created on
each of the students’ computers within the group. Students can then open the file and listen
to it when the discussion is over.
Genesis User Manual
http://www.linguatronics.com
Page 25
(Figure2.3b) Save Voice
6. To stop recording, click the Save Voice button again.
2.4
Pairing
Pairing is almost identical to Group Discussion. The only distinctive feature lies in its auto-pairing
capabilities, which automatically group students into pairs. This feature puts students of consecutive
numbers into groups of two (as shown in Figure. 3.3). However, if the total number of students is odd,
then the last group will contain three students.
(Figure 2.4) Discussions in Pairing
Genesis User Manual
http://www.linguatronics.com
Page 26
2.5 Random Pairing
Random Pairing is almost identical to Pairing. The only difference between Pairing and Random
Pairing is that one gathers students of consecutive numbers in one pair and the other gathers them
randomly.
Genesis User Manual
http://www.linguatronics.com
Page 27
Chapter 3 Application Panel
Remote Start
Application Monitor
File Transfer
Quiz
Section 3.1 Allows a teacher to open various applications and websites on
selected student PCs.
Section 3.2 Shows all students’ currently loaded applications and allows a
teacher to remotely terminate or disable those applications or websites.
Section 3.3 Allows a teacher to send and receive files from student PCs.
Section 3.4 Provides a means of assessment or evaluation of students’
learning during a given lesson.
Locating Application Panel Function Keys:
Genesis User Manual
http://www.linguatronics.com
Page 28
3.1
Remote Start
Genesis allows a teacher to send commands to run programs in student computers from his or her
own console.
3.1.1
Remotely Opening Programs
1. Select a student (individual or group) to receive The
Remote Start command.
2. Click Remote Start and choose the program from the
menu.
3. A check mark will appear beside the name of the
program and the program will be launched on the
selected student computers.
(Figure 3.1.1) Remote Start
4. To close the program, click the Remote Start again and
choose the program to be closed.
3.1.2
Remote open Websites
1. Select student (individual or group) to
receive the teacher’s command.
2. Click Remote Start and choose the
program from the context menu.
3. Click “Remote Internet Explorer” to pop up
this diagram.
4. Enter or search the previous website
address the teacher would like to open for
students. (Figure 3.1.2)
5. The corresponding website will be automatically
opened in student computers.
Genesis User Manual
http://www.linguatronics.com
(Figure 3.1.2)
Page 29
3.1.3
Edit the Context Menu
To Edit the Context Menu:
1.
2.
3.
4.
Click Remote Start on the Application Panel and choose a program from the context menu.
Click Define Remote Menu to launch the edit box (see Figure 3.1.3a).
Click the Add button to add either programs or websites to the context menu (see Figure 3.1.3b).
Click the Browse column next to “Program Path” to search for the applications file (see Figure
3.1.3c).
5. Enter the name of the corresponding program or website in the “Menu Name” column.
6. If a teacher wants to add a website, he or she should enter the website address in the “File Path.”
Area.
7. Click OK to finish and the program or website will be added to the context menu.
(Figure 3.1.3a) Define Remote Menu
(Figure 3.1.3b) Add to the context menu)
(Figure 3.1.3c) Browse the Program Command
Genesis User Manual
http://www.linguatronics.com
Page 30
3.2
Application Monitor
To monitor which applications are being run by students in the classroom without viewing their
screens, use the Application Monitor function
How to use the Application Monitor function:
1. Select a student or students from the main screen.
2. Click Application Monitor to launch the Monitor Window.
A teacher can now see all selected students with their currently running applications (see Figure 3.2).
(Figure 3.2) Application Monitor
Genesis User Manual
http://www.linguatronics.com
Page 31
3.2.1 Application Program Termination
From the Application Monitor, a teacher can then terminate selected students’ applications.
How to terminate a student’s applications using the Application Monitor function:
1. Select the student(s) whose application(s) that need to be terminated.
. One will then be asked to confirm termination.
2. Click the Terminate button.
3. Click OK to confirm or Cancel to cancel the termination.
4. Click Exit to end the Application Monitor function and all the functions will be restored.
3.2.2 Disable Running Other Application Programs
From the Application Monitor, a teacher can stop selected students from launching other applications.
This will force them to concentrate on the tasks at hand.
How to terminate other applications using the Application Monitor function:
1. Select the student(s) whose programs a teacher need to be disabled.
2. Click the Disable Run
button. A window list will then show whether the students are
disabled or not.
3. Click Exit to end the Application Monitor and subsequently all functions will be restored to the
students.
3.2.3 Disable Browsing from the Internet
Note: Students must have access to the Internet through a proxy server before using this feature.
How to terminate student browsing from the internet using the Application Monitor
function:
1. Select the student(s) whose Internet access needs to be disabled.
button. Now if the student(s) open Internet Explorer or
2. Click the Disable WWW
Netscape to browse the Internet, they will not be able to access it. The window list also shows
the teacher which students are locked out from viewing the internet.
3. Click Exit to end the Application Monitor and subsequently all functions will be restored to the
students.
Genesis User Manual
http://www.linguatronics.com
Page 32
3.3
File Transfer
An instructor can transfer one or multiple files to his or her students. The files selected are copied to
the designated location on the student computers. Subsequently, the instructor can receive files from
student computers stored in designated locations.
3.3.1
Sending a File
How to send a file using the File Transfer function:
1. Click File Transfer in the Genesis control panel and launch the File Transfer Manager
(see Figure 3.3.1a).
(Figure 3.3.1)
Genesis User Manual
File Transfer
http://www.linguatronics.com
Page 33
2. Select the files to be sent from the
appropriate source location. A
teacher can either enter his or her
location in the space under the
Teacher’s Directory or click up
one level
to search for it from
the folder. (See Figure 3.3.1b)
3. Select the students that need to
receive the file.
(Figure 3.3.1b) Teacher’s Directory
4. Enter the destination location of
the file to be received by students
in the space under the Students’
Directory.
Alternatively,
the
teacher can double-click the
mouse in the space and enter a
new folder where the transmitted
file will be saved in the student
computers. (See Figure 3.3.1c)
(Figure 3.3.1c) Student’s Directory
5. Click the send icon
to send the files to students.
or
6. Click the end icon
3.3.2
to exit.
Receiving a File
The Instructor controls the process of transferring files from students.
How to use the Instructor function:
1. Click the File Transfer
icon in the Application sub-panel.
2. Click the students from whom a teacher would like to receive a file.
3. Enter the folder and FILE NAME to be sent by the selected student computers into the
Students’ Directory.
4. Enter the location of the file to be received into the Teacher’s Directory.
Genesis User Manual
http://www.linguatronics.com
Page 34
5. Click the Receive
icon and the system will automatically assign different
folders from each of the students under the designated receipt directory.
6.
3.4
Click End icon
or
to exit.
Quiz
Quiz is an easy-to-use assessment instrument. It provides a real-time test for the whole class or for a
selected group of students. It monitors the test time and scores the questions for the teacher (See
Figure 3.4).
How to use the Quiz function:
1. To start, click the Quiz button in the teachers control panel.
(Figure 3.4) To start Quiz
Genesis User Manual
http://www.linguatronics.com
Page 35
2. Click the New button in the Quiz panel to monitor the quiz and load the teacher’s pre-designed
test.
3. Load the teachers pre-designed test from the directory and click OK in the monitor panel to
confirm.
4. Now the teacher’s questions will be loaded into the question palette. Next, set the teachers answer
key as a marking tool then click start to begin the quiz.
Genesis User Manual
http://www.linguatronics.com
Page 36
4. The students will now see the full Quiz panel with the questions displayed on the question palette.
Of course, the students won’t see the answers like the teacher can!
5. In addition, once the quiz starts, the timer will also begin counting. When the pre-set time is up,
the students’ work will automatically be submitted. Alternatively, students who have completed
the quiz early may click the submit button to send their work to the instructor’s PC.
6. When the Quiz is over the teacher may now click on the Result button located in the monitor
panel in order to evaluate the students’ scores on a particular question. Percentage bars help in
this process by showing the student ratio of correct answers to their corresponding questions.
7. Next, click the Details button to identify particular students. Then click the Info button to view
student scores after the quiz.
Hint: Currently the Quiz function only supports txt. Files. Pictures cannot be shown in the
question palette. A teacher may always adapt by switching to word documents, spread sheets
and web resources to take the place of the default question palette.
Genesis User Manual
http://www.linguatronics.com
Page 37
Chapter 4 Administration
Start/Exit (including the following):
Wake-On-LAN
Start Lesson
Save Attendance
Class Save/New
Layout Tools
Class Manager
System Config.
Grouping
Lock / Black
Unlock
Call Response
Cancel Call
Stop All
Genesis User Manual
Allows a teacher to remotely wake up, shut down or reboot student PCs.
Allows a teacher to select and recall his or her own seating plan. An
“attendance registration” box will automatically pop up on the student PCs,
so they can enter their names.
Allows a teacher to save the attendance of a class in Excel format.
Allows a teacher to create and save seating plans.
Has tools for changing the layout of a given seating plan (re-arrange icons.)
Allows a teacher to delete or rename seating plans.
Allows a teacher to set his or her preferred settings.
Allows a teacher to group students in any fashion.
Allows a teacher to lock the keyboards and monitors of the students—with or
without black screens.
Allows a teacher to unlock the keyboards and monitors of students.
Allows a teacher to have the intercom communication directly with a
student.
Allows a teacher to cancel the call signal from a given student.
Allows a teacher to stop all system commands.
http://www.linguatronics.com
Page 38
4.1
Start/Exit
4.1.1 Wake-On-LAN
Wake-on-LAN (WOL) is a function that allows a teacher to wake up (power on), shut down (power off)
or restart (reboot) any number of computers in his or her local area network (LAN). One must be sure
to select targeted students in the seating plan before clicking on the Start/Exit button.
Genesis User Manual
http://www.linguatronics.com
Page 39
WOL
Click
to power on the selected PCs.
Click
to power down the selected PCs.
Click
to restart the selected PCs.
Click
to logoff the selected PCs.
Click
to disconnect the selected PCs from Genesis.
Click
to exit the WOL interface.
Genesis User Manual
http://www.linguatronics.com
Page 40
4.1.2 Start Lesson
Before beginning a lesson, the teacher can recall a seating plan for any given class. The system will
also prompt students to enter their names in order to track attendance.
How to recall a seating plan and take attendance through the Start Lesson function:
1. Click
from the control panel.
2. Select the desired seating plan from the “Class Selection” menu. First select the Teacher Name,
and then select the Class Model.
3. Click
to begin the lesson.
4. An “Attendance registration” box will launch on all students’ PC screens.
Genesis User Manual
http://www.linguatronics.com
Page 41
4.1.3 Save Attendance
Once a lesson starts the teacher can record and save the attendance of any class in an Excel format.
How to save attendance using the Start function:
1. Click
.
2. To record the attendance of the students, simply click
.
3. Next, create the file name to save this day’s attendance and then click Save.
Genesis User Manual
http://www.linguatronics.com
Page 42
4.1.4 Class Save/New
After editing a seating plan, the teacher can save it for later use.
How to save a seating plan using the Start Function:
1. Click
2. Click
button to save the seating plan.
3. Put the teachers name in the “Teacher Name” box and the file name in the “Class Model” box.
4. Click
Genesis User Manual
to confirm.
http://www.linguatronics.com
Page 43
4.1.5 Layout Tools
The Layout Tools allow the teacher to change the layout of a seating plan. The tools are located in
the following diagram. Use the Align Toolbar to align selected stations (See Figure 4.1.5).
(Figure
Genesis User Manual
4.1.5)
http://www.linguatronics.com
Page 44
4.1.6 Class Manager
allows a teacher to delete or rename his or her saved seating plans.
How to use the Class Manager feature of the Start Function:
1. Click the
2. Click the
icon.
icon to modify the details of a seating plan.
3. Select the seating plans that need editing, and then click the
detailed information.
4. Click the
Genesis User Manual
icon to change the
icon to delete the seating plan.
http://www.linguatronics.com
Page 45
4.1.7 System Config.
System Config. is used to set the following system preferences: Default, Voice Settings (Audio
Settings), Password, Class Model, and Network. Note: Unless a teacher is an advanced user, he or
she is advised to configure the settings in the Default tab only.
How to use the System Config feature in the Start function:
|.
1. Click
2. Please note that no password is needed (See Figure 4.1.7).
( Figure 4.1.7) Pop-up Box
3. Under the Default column a teacher can configure settings for “Screen Cast”, “Screen Monitor” and
“Interface” (See Figure 4.1.7).
• Screen Cast – Movie broadcasts to students are in full screen or window screen mode.
• Screen Monitor - enter the number of screens to be monitored concurrently.
• Interface – Either lock or unlock the icons on the seating plan.
(Figure 4.1.7)
Genesis User Manual
http://www.linguatronics.com
Page 46
4.1.8 Exit System
How to use the Exit System function:
1. Click the
icon.
2. Click Yes to exit the Genesis system (See Diagram 4.1.8).
(Diagram 4.1.8)
Genesis User Manual
http://www.linguatronics.com
Page 47
4.2
Grouping
General grouping is an important step before one can carry out any group activities, such as Group
Discussion and File Transfer.
How to use general grouping functions:
Use “drag and drop” techniques for grouping.
1. Drag to highlight those students that need to be in the same group (see Fig 4.2).
2. Drop any of the selected student icons into a group icon.
3. A designated group can be identified by its colour and by the markings on the student icons.
To select several students that are not together, press Ctrl on the keyboard and then click each
individual student needing to be grouped. As before, a teacher needs to drop one of the highlighted
student icons into a group icon, to establish a group.
Drag & drop for
grouping
Group icon
(Figure 4.2)
Genesis User Manual
http://www.linguatronics.com
Page 48
4.3
Lock/Black
With Lock/Black the teacher can lock the keyboard and mouse of selected students.
How to use the Lock/Block function:
1. Highlight the student icons that need to be locked. (If the teacher wants to lock the whole
class, then he or she does not need to highlight any particular students).
2. Click the
button to lock the keyboard and mouse of selected students.
3. Click the
button to lock the students’ PCs and darken their screens.
4.4
Unlock
How to use the Unlock function:
1. Highlight the student icons that need to be unlocked. (However, remember that if the
whole class needs to be locked, then one does not need to highlight any students).
2. Click the
4.5
button.
Call Response
If a student has a question during class, he or she can press F12 on their respective keyboards to ask
for the teacher’s help. A teacher will see that student’s “hand” appears in the seating plan, and that
the student’s name will be shown in the scroll box as shown below (see Figure 4.5).
Genesis User Manual
http://www.linguatronics.com
Page 49
(Figure 4.5)
To answer the hand-up call, simply follow the steps:
1.
Select one of the hand-up students in the scroll box.
2.
Click the
3.
An indicator box will automatically appear on the selected students PC screen.
4.
To end the intercom session, click the
teacher’s PC.
4.6
Cancel Call
icon to begin the intercom function.
button in the right-top hand corner of the
To delete the hand-up call information, click
4.7
Stop/All
Simply click the
Genesis User Manual
icon to stop all current commands.
http://www.linguatronics.com
Page 50
Chapter 5 Video Broadcasting
AV Control
Audio Setting
5.1
allows a teacher to control AV systems or projectors by using AV Control
allows a teacher to select different recording sources.
AV Control
With Genesis teachers are able to control external AV devices such as DVD players, VCRs and
projectors right from his or her own computer screen. This provides teachers with the flexibility of
using AV media from virtually any source. Connected AV devices can be broadcast out to student
screens or to an overhead projection system.
5.1.1
Tools that help teachers to broadcast out to their students
5.1.1.1 AV Control Panel (Teachers All-in-one Remote-Control Panel)
A teacher may still feel it daunting to master a suite of AV equipments whether he or she does it
manually or with the aid of ‘numerous’ remote control panels. The Genesis AV Control Panel is
specially designed to help alleviate these fears with its ease of control.
5.1.1.2 How to Use AV Control
1. Select the desired Input source—either
DVD / VHS / Cassette / DV Camera /
Teacher Monitor / Notebook Monitor
(Note: Other devices may be connected as well.)
2. Select the source to send to the projector screen—either a Video or Screen Project command.
The command Video Project sends the
teacher’s PC display to the projector screen.
The command Screen Project projects the
selected AV signals to the projector screen.
Genesis User Manual
http://www.linguatronics.com
Page 51
3. Operate the selected AV device by switching to the virtual control panel (as shown below)
The following operations can be preformed by the AV device:
to mute the sound coming out of the speaker
to adjust the noise level of the amplifiers (speakers),
5.1.2
To Broadcast AV Media to the Projector
1. Click
the desired AV source device from the Input Devices drop-down menu.
2. Select the Projector Icon from the Output Devices drop-down menu.
3. Click the Play button to play the media.
Notes: By default, if a teacher chooses to broadcast via a projector, audio signals will be
heard simultaneously though the classroom speakers.
Genesis User Manual
http://www.linguatronics.com
Page 52
5.1.3
To Broadcast AV Media to Student PCs
Since the CD-player in the teacher PC does not support DVD format directly, when teachers have
media like DVD’s and videocassettes they need to play them through the AV equipment in the AV
cabinet. The teacher then need to get complete control of all AV equipments in the AV cabinet
through the AV Control Panel and then broadcast what they play to the student PCs. In this context,
teachers need to operate the AV Control Panel and the VBS Media Player (refer to chapter 2.2 for
Live Video details) simultaneously.
How to broadcast through the AV control and VBS media player functions:
1. On choosing the right input/output devices at the AV control panel, switch to the Live Video panel
to broadcast selected AV signals to student PCs
i.
2. Pick the desired Input device either DVD, VCR or DV camcorder by clicking on the icon as named.
3. Operate the selected AV device with the following controls:
a. Launch the VBS Media Player by clicking Live Video in the Genesis control panel.
Video and AV
signals selection
b. Click the
c.
icon to channel the external AV signal through the media player.
icon to broadcast the AV signal directly to Student PCs (Refer to
Click the
Chapter 2.2 for VBS Media Player details).
Notes: Student PCs will receive AV signals only when the Live Video function (VBS) is activated.
Teachers can select the signal projects to the projector screen, either select teacher PC screen or
AV signals.
Genesis User Manual
http://www.linguatronics.com
Page 53
5.1.4 Audio Media Player (Instructor Voicecast+ Appropriate Audio Setting)
When broadcasting audio-only signals, teachers do not need to use either the VBS Media Player or
the external audio control. Instead they can use the Instructor Voicecast function and then select the
appropriate audio input signal. In the Instructor Voicecast environment, audio signals are delivered
from the teacher’s PC to the students’ PC. Students can then listen to the songs, dialogues, or live
instructions given by the instructor-as long as the appropriate audio source is selected.
To launch this function, click Instructor Voicecast in the control panel and select the desired audio
setting from the audio control panel
Select the
appropriate audio
setting. For more on
audio settings,
please refer to
Chapter 5.2
Genesis User Manual
http://www.linguatronics.com
Page 54
5.2
Audio Settings
System audio settings are located in the bottom-right corner of the main control panel. These
settings are used to select different audio sources for use with the Instructor Voicecast, Instructor
Broadcast and Virtual Recorder functions.
(Figure 5.2a)
1. Choose
from the panel to let students hear external AV audio sources.
2. Choose
from the panel to let students hear the teacher’s voice (from the headset microphone).
3.
Choose
4. Choose
from the panel to let students hear the teacher’s computer based audio.
from the panel to let students hear the teacher’s CD audio.
Technical Note:
To ensure that the audio settings are synchronized the following volume bars allow the teacher to set the master, wave
and microphone volumes at the same input level.
(Figure 5.2b)
Genesis User Manual
http://www.linguatronics.com
Page 55