1
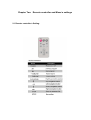
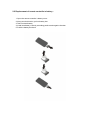
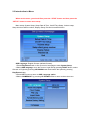
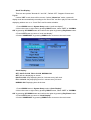
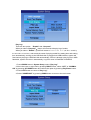
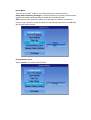
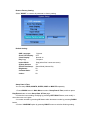
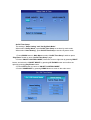
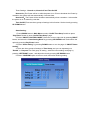
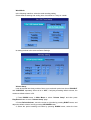
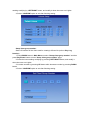
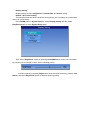
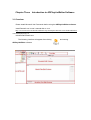
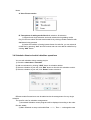
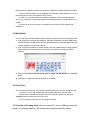
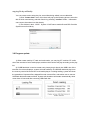
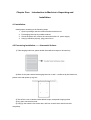
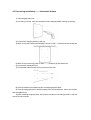
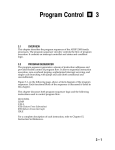
SPECIFICATION
PF1.0.1
Mode: PF19H1 / PF32H1 / PF40H1
Contents
Chapter One Introduction to Shape and Interface ..............................................................2
1.1 Introduction to use:....................................................................................................2
1.2 Packing list: ...............................................................................................................2
1.3 Precaution in using CF、SD、USB Interfaces:........................................................2
1.4 Programs-importing method by USB flash disk:.......................................................3
1.5 Scroll Text Editor: ......................................................................................................3
Chapter Two Remote controller and Menu’s settings.......................................................4
2.1 Remote controller’s Setting: ...................................................................................4
2.2 Replacement of remote controller’s battery : .........................................................5
2.3 Introduction to Menu: ................................................................................................6
Chapter Three Introduction to ADPlayListEditor Software ................................................16
3.1 Overview: ................................................................................................................16
3.2 Menu Introduction: ..................................................................................................17
3.3 Introduction to creating play list: .............................................................................17
3.4 Schedule: About schedule/ date/time operations ...................................................18
3.5 Multi-Media:.............................................................................................................19
3.6 Scroll Text:...............................................................................................................19
3.8 Program update: .....................................................................................................20
Chapter Four Introduction to Machine’s Unpacking and Installation..............................22
4.1 Installation: ..............................................................................................................22
4.2 Puncturing Installation--------Unsmooth Surface:....................................................22
4.3 Puncturing Installation--------Unsmooth Surface.....................................................23
Chapter One
Introduction to Shape and Interface
1.1 Introduction to use:
Our product can display programs of multi- file formats.
Benefiting customers , most operation can be done by remote controller.
To new users:
Before turning on the Digital Poster, please check whether the power line is already
plug-in and the multimedia card is right put.
It displays pictures automatically when power is on. If there is no program, it shows the
main menu or boot screen.
Precaution in using:
1. Do not change any parameters when it is not necessary.
2. “LOOP” File folder storing all media documents and “System” systematic file folder
storing font library are all stored in memory card or flash disk drive.
3. Keep far from the water when installing or using the product.
4. Precaution in using CF card: please turn off machine’s power before plug in CF card ,
create sure the contact pin match right and please don’t plug in it with over strength lest bend
the contact pin and burn machine’s decoder board or driver board easily.
1.2 Packing list:
1. Multi-media player host x 1
2. Power cable x 1
3. CD(User’s manual, software) x 1
4. Remote Controller x 1
5. Key x 1
If any damage and shortage of accessories is found, please contact dealers or
manufacturer in time.
1.3 Precaution in using CF、SD、USB Interfaces:
1. SD and CF card can’t be used at the same time
2. When there is CF card in the machine, contents in flash disk drive can be directly
imported to the memory card after plugging in flash disk drive.
3. Read contents in flash disk drive when there is no CF or SD card.
4. When import program by flash disk drive, the content of LOOP and SYSTEM file are
imported according to parameter set.
5. When display video file , CF card is the best option.
Postscript: The content of flash disk drive will be copied to CF/ SD card when the CF or
SD card is plugged in.
1.4 Programs-importing method by USB flash disk:
You can import programs to memory card by USB flash disk, and plug in or pull out it
while the machine is working.
1. Create programs of flash disk drive and update documents through play list.
2. Start up the machine, unlock the machine and plug USB flash disk in.
3. System modify the set parameter and copy the contents of USB flash disk into memory card
automatically.
4. After finishing copying, the machine presents the information of copied and skipped quantity
and restart up automatically in ten seconds after pulling out USB flash disk. If there is no play list,
machine displays high definition pictures in a loop automatically; If there is a play list, machine
displays according to the contents of the play list.
1.5 Scroll Text Editor:
Text documents are stored in “LOOP” file, the root directory of memory card. “SYSTEM” file
stores systematic font library .You must use “AD Play List Editor” editor software to add scroll text.
( the specific operating steps are seen in specification of “AD Play List Editor” editor software)
1. Create a text file
2. Edit the words ,needing displaying, in created file (support both Chinese and English display)
3. Under single schedule, select “add text” check box to add a “scroll text” text file
4. You can add a “scroll text” text file for each schedule
5. Select create card after editing,, editor software will send the loading file created
automatically to removable disk
6. After starting up, the lower part of screen displays the contents of text.(you can select on or
off in system menu )
Note:The media format that the multi-media player support::
1.Video:
- MPEG-1(VCD;SVCD;.mpg;dat format);
- MPEG-2 MP@ML(720x480@60Hz/720x576@50Hz 1.5Mbps-8Mbps);
- MPEG-4 SP/ASP(720x480@60Hz/720x576@50Hz 100Kbps-2Mbps);
- Dix3.11/4.x/5.0x(compatible);
- MPEG-4(.asf、.avi);
2.Audio:
- LPCM(Sampling Frequency:32-48KHZ, Accuracy:16-24Bit);
- MPEG1 Layer3(Sampling Frequency:32-48KHz, Bitrate:32-320Kbps);
3.Picture:
- JPEG(Baseline:5120x3840, Progressive:2048x1536);
- BMP;
4.Scroll Text:
- .txt file(ASCII and GB2312 Character Set);
Chapter Two
Remote controller and Menu’s settings
2.1 Remote controller’s Setting:
2.2 Replacement of remote controller’s battery :
1. Open the remote controller’s battery-cover
2. Along arrow’s direction, pull out battery box
3. Take out dead battery
4. Install new battery correctly according positive and negative direction
5. Push the battery box back
2.3 Introduction to Menu:
When set the menu, you should first press the “STOP” button and then press the
“SETUP” button to enter menu setup.
Menu setup: System Setup, Setup Date & Time, On/Off Time Setup, Volume setup,
Setup client‘s machine number, Display Setup, Preview list and Exit Menu.
OSD Language: English,Chinese (default Chinese).
1.Press Play/Pause button in Set up menu’s homepage to enter System Setup.
2.Select OSD language, move the cursor to right side by pressing RIGHT button, select
Chinese or English by pressing UP /DOWN button and confirm the option by pressing
Play/Pause button.
3.Press LEFT button to return to OSD Language option.
4.Select “HOMEPAGE” by pressing UP /DOWN button to return to the main menu.
Scroll Text Display:
There are two options:”Normal On” and “Off “, Default: OFF. Support: Chinese and
English.
If select "OFF" mode, there will be no text; If select “Normal on” mode, system will
display scroll text automatically according to the “Scroll Text” text file in play list. No scroll text
displaying without GPL list or “Scroll Text” text file under schedule.
1. Press DOWN button in System Setup, select “scroll text display”.
2. Move the cursor to right side by pressing RIGHT button, select “OFF” or ”NORMAL
ON” by pressing UP /DOWN button and confirm the option by pressing Play/Pause button.
3. Press LEFT button to return to “scroll text display”.
4. Select “HOMEPAGE” by pressing DOWN button to return to the main menu.
Clock Display:
OFF, HALF CLOCK, FULL CLOCK, NORMAL ON
OFF: NO time displaying on screen.
HALF CLOCK: Only displaying time for 2 minutes every half clock.
FULL CLOCK: Only displaying time for 2 minutes every full clock.
NORMAL ON: Displaying time all the time.
1. Press DOWN button in System Setup, select “Clock Display”.
2. Move the cursor to right side by pressing RIGHT button, select “OFF” or ”NORMAL
ON” by pressing UP /DOWN button and confirm the option by pressing Play/Pause button.
3. Press LEFT button to return to “Clock Display”.
4. Select “HOMEPAGE” by pressing DOWN button to return to the main menu.
Play Log:
There are two option: “Enable” And “Suspend”.
When you select “Suspend”,player will not record the play log of media;
When you select“Enable”, system will create a “xxxxxx.LOG file” (the file is named by
the ID number of machine),and record the name of playing media file, starting time and ending
time automatically ,as long as the USB flash disk is plugged into USB interface, system will
first lead out play log to USB flash disk automatically, if there is already a play log file in USB
flash disk, system will cover it automatically. Log file is seen in WordPad of WINDOS.
1. Press DOWN button in System Setup, select “Play Log”.
2. Move the cursor to right side by pressing RIGHT button, select “OFF” or ”NORMAL
ON” by pressing UP /DOWN button and confirm the option by pressing Play/Pause button.
3. Press LEFT button to return to “Play Log”.
4. Select “HOMEPAGE” by pressing DOWN button to return to the main menu.
Import Mode:
There are two options: “EMPTY” and “SKIP (when files’ names are same)”.
Empty before importing /leading in: It means that all files in memory card should be
emptied first before importing/leading in media files by USB flash disk.
SKIP (when the files’ names are same): If the file name of media file in machine’s
memory card is the same as the file name of media file imported/ lead in by USB flash
disk, there will be no import.
Format Memory Card:
Select “Format “ to format CF and SD card.
Restore Factory Setting:
Select "RESET" to restore all parameter to factory setting.
Default Setting:
OSD Language:
Scroll Text Display:
Clock Display:
Play Log:
Import Mode:
System Volume:
On/Off Time Setup:
Brightness:
Contrast Ratio:
Colour:
Chinese
OFF
Normal on
Suspend
Skip (when files’ names are same)
50
Same Mode (Normal On)
50
50
50
Setup Date & Time
You can setup YEAR, MONTH, WEEK, HOUR or MINUTE separately.
1. Press DOWN button in Main Menu to select “Setup Date & Time, and then press
Play/Pause button to enter Setup Date & Time page.
2. Select the item needing modifying by pressing LEFT/RIGHT button, and modify it
when the cursor on it lights.
3. Increase number by pressing UP button while decrease number by pressing DOWN
button.
4. Select “CONFIRM” option by pressing RIGHT button to exit after finishing setting.
On/Off Time Setup:
Two settings: "Same Setting" and "Set By Week Mode".
When select "Set By Week", open On/Off Time Setup to set time by week mode.
When select "Same Setting", open On/Off Time Setup to set time by same mode.
1. Press DOWN button in Main Menu to select “On/Off Time Setup" and then press
“Play/Pause” button to enter “On/Off Time Setup” page.
2. Select “ON/OFF CONTROL MODE”, Move the cursor to right side by pressing RIGHT
button, and select the “ON/OFF MODE” by pressing UP /DOWN button and confirm the
option by pressing Play/Pause button.
3. Press LEFT button to return to “ON/OFF CONTROL MODE”.
4. Select “HOMEPAGE” by pressing DOWN button to return to the main menu.
Three Settings:Normal on, Normal off and Time On/Off
Normal On:The Poster will be on while the power is on. Even to shutdown the Poster by
controller, the system will start automatically 2 minutes later.
Normal Off:The Poster will be shutdown automatically when countdown 1 minute after
the power is on or started by controller.
Time On/Off:There are three groups of settings in this function. Set the time by pressing
UP /DOWN button.
Same Setting:
1. Press DOWN button in Main Menu to select “On/Off Time Setup” and then press
“Play/Pause” button to enter “On/Off Time Setup” page.
2. Select “ON/OFF CONTROL MODE”, Move the cursor to right side by pressing RIGHT
button, and select the “Same Setting Mode” by pressing UP /DOWN button and confirm the
option by pressing Play/Pause button.
3. Select “Same Setting” by pressing DOWN button to enter the page of “ON/OFF Same
Setting”.
4. There are three groups of settings in Time Setup, and you can separately set
"Enable” or “Suspend” for each group of setting , select the item needing modifying by
pressing LEFT/RIGHT button , and adjust the time by pressing UP /DOWN button.
5. Select “CONFIRM" option to return to main menu after finishing setting.
Week Mode:
In the following interface, select the week needing setting.
Create different starting and ending time of machine for 7 days in a week.
Its setting method is the same as Same Setting’s
Volume Setup
It can be divided into three periods of time to set, and each period can be set “ENABLE”
and “SUSPEND” separately. When all is in “OFF”, it will play according default volume, the
maximum default volume is 50.
1. Press DOWN button in Main Menu to select “Volume Setup” and then press
Play/Pause button to enter “Volume Setup” page.
2. Select Default Volume , move the cursor to right side by pressing RIGHT button, and
adjust the default volume level by pressing UP /DOWN button.
3. Select the period needing set button by pressing DOWN button, select the item
needing modifying by LEFT/RIGHT button, and modify it when the cursor on it lights.
4. Select “CONFIRM” option to exit after finishing setting.
Setup client group number:
Set the ID number of the client used for creating LOG text file (refer to Play Log
function).
1. Press DOWN button in Main Menu to select "Setup client group number” and then
press Play/Pause button to enter “Setup client group number” page.
2. Select the item needing modifying by pressing LEFT/RIGHT button, and modify it
when the cursor on it lights.
3. Increase number by pressing UP button while decrease number by pressing DOWN
button.
4. Select “CONFIRM” option to exit after finishing setting.
Display Setting
Display Setting includes: Brightness, Contrast Ratio and Colour setting.
Default : 50 for each setting.
The best parameter has been set before leaving factory, do not change any parameters
when it is not necessary
Press DOWN button in System Setup to select Display Setting and then press
Play/Pause button to enter System Setup page.
Then select "Brightness" option by pressing UP /DOWN button, and to save new data
by pressing “PLAY/ PAUSE” button. AS the following picture.
Increase number by pressing Right button while decrease number by pressing Left
Button, and select Play/Pause option to exit after finishing setting.
Chapter Three
Introduction to ADPlayListEditor Software
3.1 Overview:
Please install Microsoft .Net Framework before using the ADPlayListEditor software .
Install Dotnetfx.exe in user’s manual disk or click:
http://www.microsoft.com/downloads/details.aspx?FamilyID=0856eacb-4362-4b0d-8edd-aab15
c5e04f5&displayLang=en
to download Dotnetfx.exe.
The following interface will appear after clicking
ADPlayListEditor software.
and running
3.2 Menu Introduction:
1. File:Create, Open, Close, Save, Save as, Exit.
2. Tools:Option, Preview, Language.
1) Pictures interval and switch mode:
Click: tool— option, to setup interval time and switch mode’ s default.
2) Language : English ,Chinese
3.3 Introduction to creating play list:
1) Run“ADPlayListEditor.exe”,click the shortcut key of “Create” to create a play list
named “Untitled-1.gpl”.
2) Select the storage path in which media file is in local disk’s browse frame, all valid
media files under the present storage path will appear in media file’s browse frame below.
3) Click “Add” button after selecting the needed media file, add this file to media edit bar
on right side.
4) Click the shortcut key of “SAVE”, rename the play list and create the save path, and
then save.
5) Click the shortcut key of “Create Card”, select the used movable disk, and software
create card automatically after confirming.
Notes:
A. View: Picture modes
B. Two options of adding media files:Multi-selection, All-selection
1) Support both single selection and multi-selection during adding media
file,you can once select and add multi-media file by clicking needed media file with
Ctrl button being pressed.
2) Under the condition of acting browse frame of media file, you can select all
media files by pressing “Ctrl” and “A” buttons and can once add all media files by
clicking “Add” button.
3.4 Schedule: About schedule/ date/time operations
You can edit schedule during creating play list
1) Check the check box of schedule.
2) Add new schedule by clicking “ADD” button in schedule edit bar.
3) Select a schedule at your will, click “Edit” button or dbl-click this schedule to edit it.
4) Select a schedule at your will, click “Delete” button to delete it.
Different media files and texts can be added under the arrangement of every single
schedule.
The specific rules for schedule arrangements:
1) Unmarked Schedule means programs will be displayed according to the order
files are added;
2) Mark Schedule to setup a schedule:Date ----/--/--, Time--:-- unchanged means
the schedule is a default schedule,and at least a media file is added under this schedule.
3) Add: to add a schedule. No overlapping time allowed in two schedules. There is a
red exclamation mark in edit window if error comes.
4) If there is a schedule setup for a playlist, programs in the list will be played on
time; if not, programs in the default schedule will be played when no other playlist is on
errand.
5) There are at most 30 pieces of schedules, and each can most possess 200
media files.
3.5 Multi-Media:
You can edit the media file added to media edit bar during the period of creating play list.
1) Add: Select the corresponding schedule, add new media file by clicking “add” button ,
and all added media will play in the corresponding period of schedule; Media file also
can be added by conventional method.
2) Edit:: Select the media file in media edit bar, and click “edit “button to setup program
path, interval time and switch mode, and also can edit the media file by doubleclicking.
3) Remove: to remove selected media files in media edit bar by clicking “remove”
button.
4) Up/Down: to adjust the order of program to be shown.
3.6 Scroll Text:
You can add a scroll text for every single schedule during the period of editing play list.
1) Create a “xxx.txt” file and edit the text needing displaying, and then save.
2) When add media file to schedule, select the scroll text check box, and click
"browse" button to select the path of “txt” text.
3) You can add a scroll text for every single schedule.
3.7 Function of Creating Card: User can create CF card or USB importing disk
directly on software platform, and system write card automatically without
copying file by artificiality
You can create card to write play list, saved after being edited, into movable disk.
1) Click “Create Card” menu, then there will pop up the following picture, select the
disk in which need writing ,and then finish it by pressing “confirm” button,information
come next to be written into disk directly.
2) Two folders in disk : LOOP、System. LOOP stores media file and GPL file while
System stores font library.
3.8 Program update:
1) When create card by CF card and card reader, you can plug CF card into CF card’s
slot of the terminal of multi-media player, and then the machine will play according to the play
list.
2) If USB flash disk is used to create card, please plug it directly into USB’s slot of the
terminal of multi-media player, system will load media file in USB flash disk and play list to
the memory card of the terminal of multi-media player. Finishing loading, system will show
the quantities of imported files, skipped files and covered files, and advise user to remove
USB flash disk and restart machine. System will shutdown and restart automatically when
count down 10 seconds after removing USB flash disk.
Chapter Four
Introduction to Machine’s Unpacking and
Installation
4.1 Installation:
Install iposter according to the following steps:
1. Open its package, take the machine and accessories out.
2. Put hanging board up by suitable method.
3. Check the power line, ensure the connection with A.C. power supply.
4. Hang up machine properly, plug power line in.
4.2 Puncturing Installation--------Unsmooth Surface:
1) Take hanging board out, paste double faced adhesive tape on its back fully.
2) Mark out the place where the hanging board is on wall ---confirmed by horizontal rule,
please clean wall space by rag first.
3) Tear off the cover of double faced adhesive tape, and paste hanging board.
4) Lay glass cement all around.
5) Hang up the machine four hours later, and four screws’ holes should coincide
completely.
4.3 Puncturing Installation--------Unsmooth Surface
1) Take hanging board out
2) According to needs, mark out the places where hanging board needing puncturing
3) Puncture the hanging board by drill gun
4) Mark out the place where the hanging board is on wall ---confirmed by horizontal rule
5) Mark out the puncturing place on wall-------- confirmed by horizontal rule
6) Puncture the wall by drill gun
7) Plug wooden nails into the holes punctured in the wall
8) Paste up double faced adhesive tape on hanging board’s back
9) Paste up hanging board on wall according to the confirmed place, then insert screws
and strengthen them
10) After installing hanging board , hang up the machine on the hanging board , and four
screws should coincide