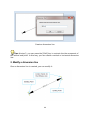
1
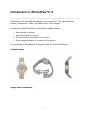
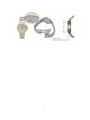
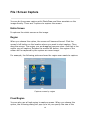
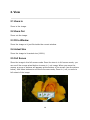
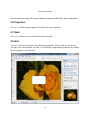
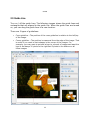
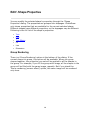
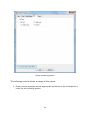
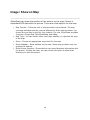
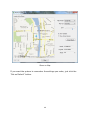
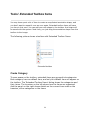
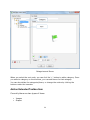
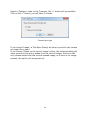
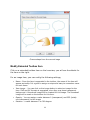
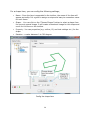
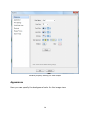
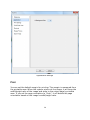
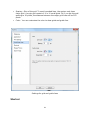
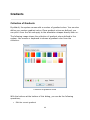
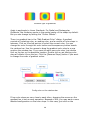
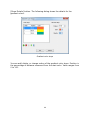
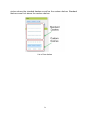
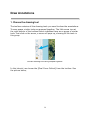
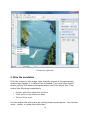
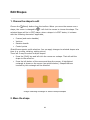
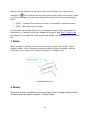
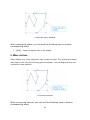
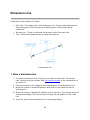
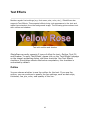
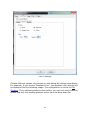
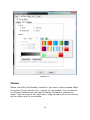
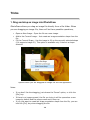
iPhotoDraw iPhotoDraw v1.8 User Manual ©2011 - 2014 Simen Wu 1 2 Contents Introduction to iPhotoDraw V1.8.................................................................................................................. 1 Features ........................................................................................................................................................ 3 System Requirements ................................................................................................................................... 4 User Interface ............................................................................................................................................... 5 Main Interface............................................................................................................................................... 6 1. Main panel ............................................................................................................................................ 6 2. Toolbar buttons..................................................................................................................................... 7 3. Toolbox.................................................................................................................................................. 7 4. Property panel ...................................................................................................................................... 7 5. Overview image .................................................................................................................................... 7 6. Ruler ...................................................................................................................................................... 7 7. Status bar .............................................................................................................................................. 7 Menu ............................................................................................................................................................. 8 1. File ............................................................................................................................................................. 9 1.1 New ..................................................................................................................................................... 9 1.2 Open.................................................................................................................................................... 9 1.3 Close .................................................................................................................................................... 9 1.4 Save ..................................................................................................................................................... 9 1.5 Export .................................................................................................................................................. 9 1.6 Send / Ftp ............................................................................................................................................ 9 1.7 Screen Capture .................................................................................................................................... 9 1.8 Snapshot ........................................................................................................................................... 10 1.9 Print ................................................................................................................................................... 10 File \ New .................................................................................................................................................... 11 1 File \ Export ................................................................................................................................................. 13 File \ Send \ Ftp ........................................................................................................................................... 15 File \ Screen Capture................................................................................................................................... 16 Entire Screen ........................................................................................................................................... 16 Region ..................................................................................................................................................... 16 Fixed Region ............................................................................................................................................ 16 File \ Snapshot ............................................................................................................................................ 18 Create Snapshot ...................................................................................................................................... 18 Restore Snapshot .................................................................................................................................... 18 2. View ........................................................................................................................................................ 20 2.1 Zoom In ............................................................................................................................................. 20 2.2 Zoom Out .......................................................................................................................................... 20 2.3 Fit to Window.................................................................................................................................... 20 2.4 Actual Size ......................................................................................................................................... 20 2.5 Full Screen ......................................................................................................................................... 20 2.6 Properties .......................................................................................................................................... 21 2.7 Ruler .................................................................................................................................................. 21 2.8 Grid.................................................................................................................................................... 21 2.9 Guide Line ......................................................................................................................................... 22 3. Edit .......................................................................................................................................................... 24 3.1 Undo.................................................................................................................................................. 24 3.2 Redo .................................................................................................................................................. 24 3.3 Cut ..................................................................................................................................................... 24 3.4 Copy .................................................................................................................................................. 24 3.5 Paste.................................................................................................................................................. 24 2 3.6 Delete ................................................................................................................................................ 24 3.7 Select ................................................................................................................................................. 24 3.8 Lock Shapes ....................................................................................................................................... 25 3.9 Align .................................................................................................................................................. 25 3.10 Make Same Size .............................................................................................................................. 25 3.11 Make Center.................................................................................................................................... 25 3.12 Spacing ............................................................................................................................................ 25 3.13 Order ............................................................................................................................................... 26 3.14 Grouping ......................................................................................................................................... 26 3.15 Shape Properties ............................................................................................................................. 26 3.16 Save as Picture ................................................................................................................................ 26 Edit \ Shape Properties ............................................................................................................................... 28 Group Rendering ..................................................................................................................................... 28 Shape Properties \ Text .............................................................................................................................. 33 Shape Properties \ Font .............................................................................................................................. 34 Shape Properties \ Text Effects................................................................................................................... 35 4. Shape Effects ........................................................................................................................................... 38 4.1 Shadow.............................................................................................................................................. 38 4.2 Glow .................................................................................................................................................. 39 5. Image....................................................................................................................................................... 41 5.1 Information ....................................................................................................................................... 41 5.2 Copy Image to Clipboard ................................................................................................................... 42 5.3 Show on Map .................................................................................................................................... 42 5.4 Config Canvas .................................................................................................................................... 43 5.5 Flip ..................................................................................................................................................... 43 3 5.6 Rotate Image ..................................................................................................................................... 43 5.7 Brightness / Contrast ........................................................................................................................ 43 5.8 Hue / Saturation ................................................................................................................................ 44 5.9 Greyscale ........................................................................................................................................... 45 5.10 Sepia ................................................................................................................................................ 45 5.11 Invert Colors .................................................................................................................................... 45 Image \ Config Canvas................................................................................................................................. 46 Image \ Show on Map ................................................................................................................................. 48 6. Tools ........................................................................................................................................................ 50 6.1 Extended Toolbox Items ................................................................................................................... 50 6.2 Options .............................................................................................................................................. 50 6.3 Language Settings ............................................................................................................................. 50 Tools \ Extended Toolbox Items ................................................................................................................. 52 Create Category ...................................................................................................................................... 52 Add an Extended Toolbox Item............................................................................................................... 53 Modify Extended Toolbox Item .............................................................................................................. 55 Tools \ Options ............................................................................................................................................ 57 Preference............................................................................................................................................... 57 Appearance ............................................................................................................................................. 58 Print......................................................................................................................................................... 59 Grid / Guide Lines ................................................................................................................................... 60 Shortcut................................................................................................................................................... 61 Shapes Picture......................................................................................................................................... 63 Export Image ........................................................................................................................................... 64 Tools \ Styles ............................................................................................................................................... 65 4 Gradients..................................................................................................................................................... 66 Collection of Gradients ........................................................................................................................... 66 Edit Gradient ........................................................................................................................................... 67 Dash Styles .................................................................................................................................................. 70 Tutorials ...................................................................................................................................................... 72 Open Image File .......................................................................................................................................... 73 Step 1. Open Image File .......................................................................................................................... 73 Step 2. Zoom the image to the appropriate level ................................................................................... 73 Draw Annotations ....................................................................................................................................... 75 1. Choose the drawing tool ..................................................................................................................... 75 2. Draw the annotation ........................................................................................................................... 76 3. Set properties...................................................................................................................................... 77 4. Set the inset image for callout box ..................................................................................................... 78 5. The final result .................................................................................................................................... 80 Export Image ............................................................................................................................................... 82 Edit .............................................................................................................................................................. 82 Edit Shapes .................................................................................................................................................. 83 1. Choose the shape to edit .................................................................................................................... 83 2. Move the shape .................................................................................................................................. 83 3. Rotate .................................................................................................................................................. 84 4. Resize .................................................................................................................................................. 84 5. Move vertices...................................................................................................................................... 85 6. Add / Remove vertex .......................................................................................................................... 86 7. Move the control points ..................................................................................................................... 86 Edit Text ...................................................................................................................................................... 88 5 Dimension Line............................................................................................................................................ 89 1. Draw a dimension line ........................................................................................................................ 89 2. Modify a dimension line...................................................................................................................... 90 2.1 Change the starting/ending point .................................................................................. 91 2.2 Change the witness lines ................................................................................................... 91 Bezier Curve ................................................................................................................................................ 93 1. Draw a Bezier curve ............................................................................................................................ 93 2. Modify a Bezier curve ......................................................................................................................... 93 2.1 Change the starting/ending point .................................................................................. 94 2.2 Change the arc of the curve............................................................................................. 94 Text Effects.................................................................................................................................................. 95 Outline .................................................................................................................................................... 95 Text Fill .................................................................................................................................................... 96 Shadow.................................................................................................................................................... 98 Tricks ......................................................................................................................................................... 100 1. Drag and drop an image into iPhotoDraw ........................................................................................ 100 Other ......................................................................................................................................................... 101 Technical Support ..................................................................................................................................... 102 Bug Report ............................................................................................................................................ 102 Feedback / Suggestion .......................................................................................................................... 103 License....................................................................................................................................................... 104 Frequently Asked Questions ..................................................................................................................... 105 6 Introduction to iPhotoDraw V1.8 iPhotoDraw lets you add annotation to an image file. You can add texts, arrows, dimensions, lines, and ballons etc. to an image. People are using iPhotoDraw's annotation capabilities to: Name people in photos. Add descriptions for objects. Show dimension information of an object. Show enlarged details of an object in the bollons. The following is an example of what we can do with iPhotoDraw. Original image, Image with annotations, 1 2 Features Some key features of iPhotoDraw are: Simple, intuitive user interface Every feature and user interface element has been designed to be immediately intuitive and easily learned without assistance. iPhotoDraw is designed to be immediately familiar to users of MS Office and any other commercial graphics software. Instant visual effect when setting properties When configuring the properties of annotation objects, you will see the instant effect without having to click the [Ok] button. Annotation data is stored in a separated file from the original image Annotation is not writen directly on the image. Actually they are stored in a separated xml file. So you don't need to worry that the original image will be messed up. 3 System Requirements Software Requirements Windows XP SP3 or later (e.g. Windows Vista, Windows 7, Windows Server 2008), 32 bit / 64 bit .Net Framework 3.0 or later Hardware Requirements 800 MHz processor 512MB of RAM 1024 x 768 screen resolution 100+ MB hard drive space 4 User Interface iPhotoDraw provides standard and easy-to-use user interface. Operations are very straight forward. 5 Main Interface The main user interface includes the following parts, Main panel Toolbar buttons Toolbox Property panel Overview Ruler Status bar 1. Main panel 6 The main panel is at the center of the application's UI. It shows the image that's being edited. 2. Toolbar buttons The toolbar buttons provide common operations for editing such as open, save, print, cut/copy/paste, redo/undo, and zoom etc. 3. Toolbox Toolbox provides all the annotations (e.g. lines, rectangles, text, and callout boxes etc.) you can add to the image. It also provides operations like selection, zoom-in, and image panning. 4. Property panel Property panel shows the basic properties for the currently selected annotation object. It's context sensitive. For example, if you are editing a line object, the Fill property is greyed out. To see / modify the all the properties for the current object, you can right click on the object in the main panel, from the pop-up menu, choose [properties]. 5. Overview image The Overview shows the whole image. The yellow box is the current focused part in the main panel. You can drag the yellow box to move the focused part in the main panel. It's handy when you are editing a big image or zoom in to details. You can drag the yellow box 6. Ruler The ruler shows the size of the image (in pixels) and the current position of the mouse cursor. 7. Status bar Status bar shows information about the current image, such as storage size and the space size (in pixels). 7 Menu iPhotoDraw's menu consists of the followings, File View Edit Shape Effects Image Tools 8 1. File 1.1 New Create a new image on the fly. Choose this menu if you already have an image on clipboard and you want to add annotation to this image right away. See File \ New for details. 1.2 Open Open an image file to add annotation. The following image format are currently supported: BMP, PNG, JPG, TIF, and GIF. You can also open file by drag-and-drop the file from Windows File Explorerer. Or right click the image file on File Explorerer, choose [Open With] option and then choose iPhotoDraw from the application list. 1.3 Close Close the current image file. 1.4 Save Save the data to the annotation file. This is an xml-format file. 1.5 Export Once you finish editing the annotation on the image, you can export it to a new image file. The possible export image formats include BMP, PNG, JPG, and GIF. See File \ Export for details. 1.6 Send / Ftp You can upload image (with annotations) to ftp servers. See File\Send\Ftp for details. 1.7 Screen Capture 9 iPhotoDraw allows you to do the screen capture and there are 3 options here: entire screen, region, and fixed region. See File\ScreenCapture for more details. 1.8 Snapshot Snapshot allows you to keep a copy of the current edit status so you can restore to it in the future. See File\Snapshot for more details. 1.9 Print Print the content of the current image. 10 File \ New Sometimes you want to make a screenshot and add annotations to the screenshot directly. When you choose menu [File\New], the followng dialog pops up. Dialog for creating new image By default, you will get a 320 x 240 blank image. If you have made a screenshot, you can click the button [Get Image from Clipboard]. Once the image is fetched from the clipboard, the width and height will be automatically set to the same as the image. You can change the size to whatever you want. If the actual image is smaller than the size you specify, the outer space will be filled with background color. Enlarge the dialog to have a better view for a big image. 11 Get image from clipboard Once you click [OK], a new image is created on the fly. You can add annotations on this image. Finally you can save this new image on the disk, or export (with annotations) to a new file. 12 File \ Export After finish editing the annotations, you can export the image. By doing this, the annotations are burned on the exported image. Export to a new image file You can click on the folder icon to specify the path / file of the exported image. Click on the [Image Options...] button to open up the following dialog to config the options for image exporting. 13 Options for image exporting In this dialog, you can specify the quality of the exported image. This option is only available if the exported image is a JPG. By default, the exported image is the same size of the original image. You can resize the image. The aspect ratio of the image is maintained when you change the size. 14 File \ Send \ Ftp iPhotoDraw allows you to upload image to the FTP server. Choose menu item [File]\[Send]\[FTP] to open up the following dialog. Upload image to ftp server In this dialog, you can set the image name (without file name extension), the image type (currently only jpg, png, bmp, and bmp are supported). Click on the [Imae Options...] button if you want to change the quality for the jpg image, or resize the image. In the "Ftp Connection" groupbox, please enter the following information for ftp uploading, Upload Path : This is the network address of the ftp server, followed by the path to where you want to upload the image. User Name : Account of the FTP server. Password : Password of the FTP account. Click on [OK] button to start uploading the image. 15 File \ Screen Capture You can do the screen capture with iPhotoDraw and then annotate on the image directly. There are 3 options to capture the screen. Entire Screen It captures the whole screen as the image. Region When you choose this option, the screen will become blurred. Click the mouse's left button on the location where you want to start capture. Then drag the mouse. The region you are dragging becomes clear. And that is the region you will capture. Release the mouse left button, the region of the screen will be captured by the system as a new image. For example, the following pictures shows the region user wants to capture. Capture screen by region Fixed Region You can also use a fixed region to capture screen. When you choose this option, the following dialog will pop up to let you specify the size of the 16 region. After specifying the size of the region, you then move the region in the screen. Click the mouse. The region at which you click will be captured by the system. Specify the size of the capture region Note: The size you specify will be persisted by the system and used as the default value for the next capture. 17 File \ Snapshot Taking a snapshot saves the current state of annotation editing, so you can return to it at any time. You can take multiple snapshots of the editing, to save any state you might want to return to. A simple scenario is like this, you have several ideas of editing an image, but you are not quite sure which one your client may want. So you create snapshots and show it to your client and let her / him pick the right one. Create Snapshot Creating a snapshot is easy. Just choose menu item File\Snapshot\Create Snapshot. The following dialog will pop up. Give the snapshot a rememberable name and maybe some descriptions. Click [OK], the snapshot is then created. Note: Durimg the above steps, the snapshot is created in memory. If you want to save it with the file you are editing, please click the [Save] button on the main UI's toolbar. Enter the information for the new snapsnot Restore Snapshot 18 Once you created snapshots, you can restore this snapshot at any time. Open the 'Restore Snapshot' dialog and pick the one you want to restore. Click [OK] button, and then the system will restore to that snapshot. To save storeage space, you can also delete snapshots that you don't need any more here. Restore a snapshot Note: If you have made some changes on the current imag, before restoring a snapshot, it's better to create a snapshot for current edit status. Otherwise, when the application restores to the snapshot you choose, you will lose the current changes. 19 2. View 2.1 Zoom In Zoom in the image. 2.2 Zoom Out Zoom out the image. 2.3 Fit to Window Zoom the image so it just fits inside the current window. 2.4 Actual Size Zoom the image to its actual size (100%). 2.5 Full Screen Show the image in the full screen mode. Once the view is in full screen mode, you can scroll the mouse wheel button to zoom in / out image. When you move the mouse, a group of buttons will appears at the bottom of the screen (see the picture below). Use these buttons to exit the full screen mode, Zoom in / out, or zoom to full extent of the image. 20 Full screen mode You can also exit the full screen mode by pushing the [Esc] key at anytime. 2.6 Properties Turn on / off the property panel from the main user interface. 2.7 Ruler Turn on / off the ruler from the main user interface. 2.8 Grid Turn on / off the grids when you edit the annotations. When grids are turned on, you can only move shapes on grids. The following image shows grids and a rectagle that is aligned on the grid line. 21 Grids 2.9 Guide Line Turn on / off the guide lines. The following images shows the guide lines and rectangles that are aligned to the guide line. When the guide lines are turned on, you can drag the guide lines to a new location. There are 2 types of guidelines: Cross guideline : The position of the cross guideline is relative to the left/top of the image. Corner guideline : The position is measured from the edge of the image. That is useful if you want to dock shapes in the corner of the images. For example, you may want to put add a logo to a bunch of images and want the logo to be always 10 pixels to the right and 5 pixels to the bottom on all these images. 22 Guide lines 23 3. Edit 3.1 Undo This command undoes the most recent action that you've taken when editing the annotation on the the image, if any. 3.2 Redo This command redoes the most recent action that you've undone, if any. 3.3 Cut This command puts the selected annotation object onto the clipboard and remove it from the image as well. 3.4 Copy This command puts the selected annotation object onto the clipboard. 3.5 Paste This command gets the data from the clipboard (if any) and puts it on the image. 3.6 Delete This command deletes the selected aannotation object from the image. 3.7 Select iPhotoDraw provides serveral ways for you to select shapes for editing. Select All - Select all the shapes. Select None - Unselect the selected shapes. Inverse - Inverse the selection. That is, select the unselected shapes, and unselect the selected ones. Select Next - Select the next shape (in Z-order). Select Previous - Select the previous shape (in Z-order). 24 Select First - Select the first shape (in Z-order). Select Last - Select the last shape (in Z-order). 3.8 Lock Shapes Sometimes when you are editing shapes on the image, there are some of the shape that you don't want to touch. In this case, you can lock them up. Once a shape is locked, it cannot be edited (selected, moved, or deleted etc). Lock - Lock the currently selected shapes, so they cannot be edited. Lock All - Lock all the shapes in the current image. Unlock - Unlock the shapes, so they can be edited again. Note: When you save the image, the lock will be saved as well. 3.9 Align Once you select multiple shapes, you can do alignment operation for them. Alignment operations include, Align Lefts Align (Horizontal) Centers Align Rights Align Tops Align (Vertical) Middles Align Bottom 3.10 Make Same Size You can make several shapes the same width, same height, or same size in both direction. 3.11 Make Center You can put select shape(s) to the horizontal or vretical center on the current image. 3.12 Spacing You can control the space between selected shapes. There are serverl operations here, 25 Make Horizontal Spacing Equal : Horizontal space between shapes are of the same. Make Vertical Spacing Equal : Vertical space between shapes are of the same. Remove Horizontal Space : Shapes are horizontally adjacent to each other (no space between each of them). Remove Vertical Sapce : Shapes are vertically adjacent to each other (no space between each of them). 3.13 Order You can change the z-order of the shapes onthe image. Bring Forward : Move the selected shape one-step forward. Bring to Front : Move the selected shape to the top of others. Send Backward : Move the selected shape one-step backward.. Send to Back : Move the selected shape to the bottom of others.. 3.14 Grouping You can group multiple shapes into a group. Group : Group selected shapes together. The benefit of grouping shapes together is, you can apply properties to them at a time. You can also move, deleted them all together. Ungroup : Ungroup the grouped shapes. 3.15 Shape Properties Once you select a shape (or a group of shapes), you can open up the property dialog by choosing menu item [Edit\Shape Properties], or double-clicking, or just simplily hitting the [Return] keyboard. The 'Shape Properties' dialog shows more details than the 'Property' panel on the main UI. Please see Edit \ Shape Properties for more details. 3.16 Save as Picture You can choose a shape or a group of shapes and save it (them) as image file. Supported image formats include PNG, BMP, JPG, and GIF. 26 Note: You can control the properties of the newly created image, such as background color, transparency, margin. See Tools \ Option \ Shapes Picture for details. 27 Edit \ Shape Properties You can modify the selected shape's properties through the 'Shape Properties' dialog. The properties are grouped into tabpages. iPhotoDraw only shows properties that are available for the current selected shape. Different shapes have different properties, so the tappages may be different. Following is the full list of the shape's properties. Text Font Text Effects Fill Line Dimension Group Rendering There is a 'Group Rendering' option at the bottom of the dialog. If the current shape is a group, this option will be available. When you group shapes together, the properties you set will be applied to all the shapes in the group. For example, if you fill the group with image, all the shapes in the group will be filled with the same image, repeatly. But if you check the 'Group rendering (mosaic effect)' option, the same image will be rendered only once. 28 Group rendering option The following tutorial shows a usage of this option. 1. Draw a round rectangle and set appropriate properties of the rectangle so it looks like the following picture. 29 Round rectangle 2. Copy the rectangle (use menu Edit\Copy, Edit\Paste) so you have 9 rectangles. Arrange the position for these rectangle so they look like the following picture. 9 round rectangles 3. Group all the rectangles together (through menu item Edit\Grouping\Group). 4. Make sure the grouped shapes are selected. Open the 'Shape Properties' dialog. Switch to the 'Fill' tabpage. 5. Check the 'Group rendering (mosaic effect)' option. Set the 'Fill Type' to 'Picture'. Click on the folder icon to load an image from your hard drive. The selected image will be applied to the grouped shapes just like the picture below. 30 Apply the Group Rendering to the grouped shapes Note: At the last step, if you don't check the 'Group rendering (mosaic effect)' option, the image will be repeatly applied to each of the shapes in the group. The following picture shows the difference between using and not using this option. The left uses group rendering, while the right doesn't. 31 Difference between using and not using Group Rendering 32 Shape Properties \ Text This tabpage provides basic settings for the text of the shape. Here are the settings: Text: Text of the shape. Text Margin: Margin between the text and each side of shape. Alignment: It includes the horizontal and vertical alignment for the text. Text properties If you want advanced settings for the text, please use Text Effects. 33 Shape Properties \ Font On this tabpage, you can config the font properties for the selected shape(s). Font name and size Font style: Bold, italic, underline, and strikeout. Font color and transparency Font properties 34 Shape Properties \ Text Effects Comparing to the Text properties, Text Effects provides more advanced settings for the text. On this tabpage, you can set: Outline: There are 2 options here, no outline or solid line. If you choose solid line, then you can specify the properties for the line such as dash style, thickness, line join, and color. Text Fill: There are 4 options for the fill of the text: No fill, solid color, gradient color, and picture. Shadow: It is similiar to the shadow settings for the shape, but it's dedicated to the text of the shape. See for Shape Effect\ Shadow details. Glow: It's similiar to the glow settings for the shape, but it's dedicated to the text of the shape. See Shape Effects / Glowfor details. 35 Text Effect properties The following picture shows some text effects applied to the text. 36 Text with glow, shadow, gradient color, and picture fill Note: These settings are available only when you check the 'Use text effects' checkbox. 37 4. Shape Effects These menu items allow you to apply specifial effects to the selected shape(s). 4.1 Shadow The following picture shows the settings for a shadow. If you want shadow for a shape, please check the "Has shadow" checkbox. Color - Usually shadow is in black or grey. But you can specify other color (and transparency) for the shadow. Distance - Distance between the shadow and the original shape. It's measured in pixels. Angle - Angle of the shadow. It starts from the horizontal right and increases clockwise. Size - Size of the shadow comparing to the shape. 100% means the same size of the shape. Blur - Blur ranges from 0 to 100. When blur is 0, it means a hard shadow. Shadow settings 38 The following picture shows the same shape with two different shadows. Hard shadow and soft shadow 4.2 Glow Glow is a little bit similar to shadow in the sense that both of them have soft and blur edge. The following dialog shows the settings you can config for the glow. Color - color (including the transparency) for the glow. Size - Size of the shadow comparing to the shape. 100% means the same size of the shape. Thickness - How thick the glow is. Blur - Value ranges from 0 to 100. 0 means no blur. Glow settings 39 The following picture shows a shape with glow effect. Glow effect 40 5. Image 5.1 Information iPhotoDraw shows the information for the current opened image. There are 2 types of information, Basic information, which includes name, path, file size, image size etc. Basic information for the image 41 Extended information - iPhotoDraw reads the meta data (mainly Exif) from the image. Different images will have different extended information. For example, the following dialog shows the Equipment Make, model, Resolution, Picture Time, and other rich information about the image. Extended information for the image 5.2 Copy Image to Clipboard You can copy the whole image as well as the annotations to clipboard and then paste it to any image processing software. 5.3 Show on Map 42 If you take pictures with smartphone, tablet or GPS camera, the picture may contain location information. This menu item will show the location of the picture on the map. To make it work, you need access to internet. Please see Image \ Show on Map for details. 5.4 Config Canvas Usually the size of the canvas is the same as the image. But you can change that. It will affect the exported image. In some cases, annotation shapes are located outside of the image, you want to enlarge the canvas so the annotation shapes won't get cut off. In other cases, you may want to make the canvas smaller to just expose part of the image. Please see Image \ Config Canvas for details. 5.5 Flip You can flip the image horizontally or vertically by choosing this menu item. 5.6 Rotate Image You can rotate image by 90 degree or 180 degree. 5.7 Brightness / Contrast You can adjust the brightness and contrast value for the image by opening up the 'Brightness/Contrast' dialog. Change the value by dragging the sliders. It shows the result in the preview panel. Once you are OK with that, just click [OK] button and the effect will finally apply to the image. 43 Adjust brightness and contrast for the image 5.8 Hue / Saturation You can adjust the image's hue/saturation/lightness by opening up the 'Hue / Saturation' dialog. Adjust the hue/saturation/lightness value by dragging the slider. The system shows the would-be result in the preview panel. Once you are OK with that, just click [OK] button and the effect will finally apply to the image. 44 Adjust brightness and contrast for the image 5.9 Greyscale It changes a colorful image to greyscale image. 5.10 Sepia This filter adds some degree of brown color to the image and thus makes it looks aged. 5.11 Invert Colors 45 Choose this menu item if you want to change a negative image to positive, or vice versa. Image \ Config Canvas Canvas is the background of the image. It decides the content when exporting the image. Usually it's the same size of the image, so you don't need to worry about its existence. But you may want to change that for the following reasons, Enlarge the canvas so it can contain annotations which lay outside of the image. Set the canvas to a particular part of the image so it just exposes a portion of the image and filters out the remainings. Config Canvas 46 The canvas is shown as an editable box with the image. You can use the mouse to resize it and move it. To have a precise settings, you can manually enter the value through the edit boxes. By default, canvas is in white color. Click on the [Canvas Color] button if you want to change that. Display a portion of the image You can set the canvas so that it only exposes a portion of the image. The remaining of the image (beyond the canvas box) will be ignored. The dialog shows you the would-be effect. Choose the [Anchor] combobox if you want to fix the canvas box to a specific location, e.g. left/top or center of the image. Click the [Reset] button will reset the canvas box to its initial status, which is the same size as the image. 47 Image \ Show on Map iPhotoDraw can show the position of the picture on the map if there is embedded GPS data with the picture. There are a few options for the map. Map Provider : There are a lot of map providers in the market. The map coverage and data accuracy may be different for these map providers. You choose the one that is good for your location. For now, iPhotoDraw provides 3 options: Google Map, OpenStreetMap, and AMap. Map Type : You can choose either road map, satellite, or hybrid as the type of the map. Zoom : Choose the appropriate zoom level for the map. Show Scalebar : Show scalebar on the map. Some map providers may not support this feature. Show Picture Direction : Some devices can record direction information with the picture. If that's the case, you can choose this option to show what direction you shot the picture. 48 Show on Map If you want the system to remember the settings you make, just click the "Set as Default" button. 49 6. Tools 6.1 Extended Toolbox Items iPhotoDraw will provide more and more drawing tools to meet users' need. But chances are, it's impossible to meet everybody's need. So we allow user to extend the drawing tools by defining their own. These custom tools will be appended to the toolbox like the other regular drawing items. You can choose these extended toolbox items like any other regular items, and then drag it to the image you are editing. It's a time saver - you define once, and reuse over and over again. See Extended Toolbox Items for details. 6.2 Options This command opens up the [Options] dialog and allows you to config the system settings for iPhotoDraw. Thse settings will apply to the application immediately. See Options for details. 6.3 Language Settings iPhotoDraw is a MUI (Multilingual User Interface) application. By default, it auto detects the current culture of the operating system and tries to use that language. You can change that by manually set the language settings. Once you make the change, the application will automatically restart to let the change take effect. 50 Set language 51 Tools \ Extended Toolbox Items You may have spent a lot of time to create a complicated annotation shape, and you don't want to repeat it over an over again. Extended toolbox items will save you time in this case. You can add your own shape to the toolbox. And shape will be saved with the system. Next time, you just drag the annotation shape from the toolbox to the image. The following picture shows a toolbox with Extended Toolbox Items. Extended toolbox Create Category To save space on the toolbox, extended items are grouped into categories. Each category has one default item, and only this default item will appear on the toolbox. The 'Extended Toolbox Items' dialog shows the categories and their items. The treeview on the left shows how the items are organized. And the panel on the right shows details on the current tree node on the treeview, either categories or the items. 52 Categories and Items When you select the root node, you can click the '+' button to add a category. Once you select a category on the treeview, you can add items for that category. You can also delete the categories/items, or change the orders by clicking the buttons under the treeview. Add an Extended Toolbox Item Currently there are two types of items Images Shapes 53 Select a 'Category' node on the Treeview, the '+' button will be available. Click on the '+' button, you will have 2 choices. Choose item type If you choose 'Image', a 'File Open Dialog' will show up and let you choose an image file to open. If you choose 'Shape on the current image' option, the following dialog will show up and let you pick a shape from the current image. Since you can only choose shape from the current opened image, so if there is no image opened, this option will be greyed out. 54 Choose shape from the current inage Modify Extended Toolbox Item Click on a extended toolbox item on the hreeview, you will see the details for the item on the right. For an image item, you can config the following settings, Name - Once the item is appended to the toolbox, the name of the item will appear as tooltip. It's a good to assign a unique and easy-to-remember name for each items. Item image - You can click on the image button to select an image for the item. PNG and Gif formate is suggested, since they may have transparent background. A thumbnail image will be created for this image. The thumbnail image will be used on the toolbox for this item. Opacity - You can assign a value between 0 (transparent) and 255 (totally non-transparent) to the image. Rotation - a value between 0 to 360 degree. 55 For a shape item, you can config the following settings, Name - Once the item is appended to the toolbox, the name of the item will appear as tooltip. It's a good to assign a unique and easy-to-remember name for each items. Shape - You can click on the "Choose Shapes" button to select a shape from the current opened image. It will create a thumbnail image for this shape and use it for this item on the toolbox. Property - You can properties (e.g. outline, fill, and text settings etc.) for the shape. Rotation - a value between 0 to 360 degree. Config the shape item 56 Tools \ Options Preference You can save the most often used shape properties as default properties. When you create a new shape, these default properties will automatically apply to it. So you don't need to manually set them one by one, and thus save you time. Currently you can save the following properties as default: font, line color, fill color, and text alignment. If you don't want to current settings, just click the "Reset" button, and the system will clear the current value and reload the factory settings. 57 Default property setting for new shape Appearance Here you can specify the background color for the image view. 58 Appearance settings Print You can set the default margin for printing. The margin is measured from the printable area. When the system prints out the image, it will keep the width/height ratio of the image and scale to the output page's printable area. If you set the page orientation to "Auto", it will decide the page orientation based on the image's width/height ratio. 59 Default settings for printing Grid / Guide Lines Grids and guide lines are useful tools to help you align annotation shapes. When grids are turned on, you can only move shapes on grids. On the other hand, you can align shapes to the guide lines. The dialog below shows the settings you can make for grids and guide lines. Snap buffer : If you move a shape close to the guide lines (within the distance specified by snap buffer), the shape will be snapped to the guide line. 60 Spacing : Size of the grid. To avoid crowded lines, the system only draw major grid. A mojor grid consist of 10 x 10 small grids. So if you set the grid spacing to 20 pixels, the distance between the major grid lines will be 200 pixels. Color : You can customize the color to draw grids and guide line. Settings for grid and guide lines Shortcut 61 Just like other software, iPhotoDraw provides shortcuts to frequently used commands (menu items). Besides that, iPhotoDraw also allows you to extend the default by assigning your own shortcuts to other commands, or change the shortcuts for personal convenience. The following pictures shows the UI for shortcut settings. All the commands are listed in a table. Please select the command you want to change the shortcut, and then change the shortcut in the "Shortcut definition" box below. If you want to reverse the change and use the original settings provided by the system, please click on the "Reset" button. Config shortcuts 62 Shapes Picture The purpose of this settings is for saving shapes as picture or pasting shapes on the clipboard. Default picture format - You can choose from PNG, BMP, JPG, and GIF as the default format when you save the selected shapes as pictures. Picture background - Background of the pictures. For PNG picture format, you can choose transparent background. If you want to past shapes to clipboard, you'd better to specify the background color (either using the canvas back color or a specified color), since Windows have problems of handling transparent image in clipboard. Picture margin - Space between the body of the shapes and the border of the picture. 63 Settings for saving shapes as pictures Export Image You can store the default settings for exporting image, so you don't need to input this information over and over again when you export images. Settings for exporting image 64 Tools \ Styles You can define styles aforehand and then apply them to the annotation shapes directly. This is a time-saver since by doing this, you don't need to manually config the same styles for each annotation shapes. For the time being, the system supports the following styles, Gradients Dash Patterns 65 Gradients Collection of Gradients By default, the system comes with a number of gradient colors. You can also define your custom gradient colors. Once gradient colors are defined, you can pick it from the list and apply to the annotation shapes directly later on. The following image shows the collection of gradient colors defined in the system. Use mouse or keyboard to choose a gradient color from the collection. Collection of gradient colors With the buttons at the bottom of this dialog, you can do the following operations, Edit the current gradient 66 Add a new gradient Delete the current gradient Create a new gradient by cloning the current gradient Move up the current gradient Move down the current gradient Edit Gradient The following dialog shows the details about the current selected gradient color, Edit gradient color We support 3 types of gradients, Linear Radial Rectangular The following picture shows these 3 types of gradients respectively, 67 Different type of gradients Angle is applicagle to Linear Gradients. For Radial and Rectangular Gradients, the rendering center is the spatial center of the shape by default. But you can change by setting the "Center Offsets". There is a gradient bar in the "Edit Gradient Color" dialog. A gradient consists of a starting color, an ending color, and a number of color stops in between. Click on the slide pointer to select the current color. You can change the color through the color button and transparency button beside the rainbow bar. Use the mouse to drag the gradient color stop to a new position the rainbow bar. If you want to add a new color stop, just double click on the bar on the desirable location. Double click on an existing color stop will delete it from the bar. Click the [Reverse Stops] button if you want to change the order of gradient colors. Config color on the rainbow bar If two color stops are very close to each other, dragging the mouse on the gradient bar is not an easy operation. Because of this, you may want a more detailed configuration on the color stops. In this case, just click on the 68 [Stops Details] button. The following dialog shows the details for the gradient colors. Gradient color stops You can add, delete, or change orders of the gradient color stops. Position is the percentage of distance measured from the start color. Value ranges from 0 to 100. 69 Dash Styles By default, the system provides the following standard dash style for line drawings : Solid, Dash, Dot, Dash Dot, and Dash Dot Dot. Besides this, you can create your own dash styles to meet your actual requirement. Choose menu item Tools\Styles\Line Dash Patterns, the following dialog will pop up to let you config your own dash styles. Config the dash styles The left panel lists all the custom dash styles. You can add/delete or change order of these dash style items by clicking the buttons underneath. The right panel shows the details of the current dash style item. It shows the dash patterns in the enlarged view. One box represents one pixel. The black boxes represents the solid part of the dash, while the white one represents the empty part. To change the length for each dash interval, just click the last box of the concerned interval and drag it to the desired length. The configuration will be saved with the system and they will be ready for being picked up in the Line Dash ComboBox. For example, the following 70 picture shows the stardard dashes as well as the custom dashes. Standard dashes come first above the custom dashes. List of line dashes 71 Tutorials iPhotoDraw allows you to draw annotations on images. By using different drawing tools and selecting appropriate properties, you can easily add annotations to the image. This tutorial uses a very simple case as an example to walk you through some of the basic functionalities iPhotoDraw. 72 Open Image File Step 1. Open Image File Choose the menu item File>Open or the [Open] icon from the toolbar buttons. Toolbar buttons From the 'Open File' dialog, choose the image file you want to open. Step 2. Zoom the image to the appropriate level Once the image is opened, by default it's zoomed to the full extent so that the whole content is displayed. You can change the zoom level by setting the [Zoom Level] combobox in the Toolbar. You can also do that by scrolling the mouse wheel button. 73 After the image is opened 74 Draw Annotations 1. Choose the drawing tool The toolbox contains all the drawing tools you need to draw the annotations. To save space, similar tools are grouped together. The little arrow icon at the right bottom of the toolbox button indicates there are a group of similar tools. Just click on the arrow, a menu will pops up, showing all the tools in this group. Similar drawing tools are grouped together In this tutorial, we choose the [Oval Curve Callout] from the toolbox. See the picture below, 75 Choose the right tool 2. Draw the annotation Click the mouse on the image, then drag the mouse to the appropriate position and release it. A callout box is created. There are three control points (yellow little diamond-shaped points) with this callout box. They control the followings respectively, Position where the callout box points to Touch point on the callout box body The arc of the curve You can adjust the callout box by moving these control points. You can also move , resize, or rotate the callout box. 76 Draw a Callout Box 3. Set properties From the 'Properties' panel (on the right side of the dialog), do the followings Change the color of line to red. Choose the appropriate arrow type for the line. After you make this changes, the callout box will look like this, 77 After setting the line color and arrow type for the callout box 4. Set the inset image for callout box Right click on the callout box, from the popup menu choose [Properties] item. The Properties dialog will pop up. The Properties dialog provides more detailed settings than the Properties panel which we used in the previous step. On the 'Properties' dialog, choose the [Fill] tabpage. Choose 'Picture' in the [Fill Type] group box. Click on the [Load Picture] button and load the picture which is used to fill the callout box. Choose 'Stretch' in the [Picture] group box. 78 The Properties dialog Select [Keep Original Size] option in the [Stretch Settings] groupbox. For the [Align] option, you can choose either [Left/Top] or [Center] for your need. When you are configuring all these settings, the content of the image will change accordingly thus give you an instant feedback. Click [OK] to apply the changes. 79 The Stretch Settings dialog 5. The final result After fowllowing the above steps, you will get the final result like the picture showed below. 80 The final result of the callout box 81 Export Image Choose menu item [File\Export]. From the "Export Image" dialog, specify the image format (currently only bmp, jpg, png, and gif are supported) and the file name. Once you click [Save] button, a new image file with the annotations will be created. There is also an [Export] button on the toolbar (see picture below). It gives you a shortcut for image exporting. Export button on toolbar Edit iPhotoDraw supports a variety of annotation shapes. Different shapes may have different charateristics. But the editing operation follows the same rules. And these rules are similar to any graphic editing software in the market. So the operation is very straight forward and easy to follow. 82 Edit Shapes 1. Choose the shape to edit Choose the (Select) button from the toolbox. When you move the mouse over a shape, the cursor is changed to . Left click the mouse to choose the shape. The selected shape will be in EDIT status. when a shape is in EDIT status, it is drawn with the following elements if applicable, Frames (and resize handles) Vertices Rotation handle Control points iPhotoDraw supports multi-selection. You can apply changes to selected shapes at a time (e.g. moving, deleting, setting colors). There are 2 ways to select multiple shapes. Press the [Shift] key and left click the mouse on a shape. That will add the shape to the selection. Press the left button of the mouse and drag the mouse. A highlighted rectangle is drawn on the screen (see picture below). Shapes that are touched by this rectangle will be selected. Drag a selecting rectangle to select multiple shapes 2. Move the shape 83 After a shape is selected, move the mouse over the shape, the cursor will be changed to . You can drag and drop the whole shape to the new location. When you move the shape, you can press the following keys to achieve corresponding effect. [Shift] - Constrain the movement either in horizontal or vertical direction. [Ctrl] - Move and copy the shape. You can also use Arrow keys to move shapes as well. When you push the Arrow keys, it actually move the shape on the grid. See Grid / Guide lines for details. If you want to move shapes by pixels, you can use [Ctrl] + Arrow key. 3. Rotate When a shape is selected, you will see a red circle on top of the shape. This is rotation handle. You can drag the rotation handle to rotate the shape. Hold the [Shift] key if you want to the rotation changes by 15 degree only. A rotated callout box 4. Resize There are 8 resize handles that are associated with the shape being edited. Drag and drop the resize handles to resize shape. 84 A line with resize handles When resizing the shape, you can hold the following keys to achieve corresponding effect. [Shift] - Keep the aspect ratio of the shape. 5. Move vertices Some shapes (e.g. lines, polygons) may contain vertices. The vertices are drawn with small circles (like the following pictures shows). You can drag and drop the vertices to a new position. A line with vertices When moving the vertices, you can hold the following keys to achieve corresponding effect. 85 [Shift] - The line angle of the previous vertex and the current vertex will be the multiple of 15 degree. So if you want to make a horizontal or vertical line, please press the [Shift] key. 6. Add / Remove vertex You can add / delete vertices for line-based shapes including lines, spline curves, polygons, and smooth polygons. To add / remvove vertices, you need to select the line shape first. Then choose either the [Add Vertex] or [Delete Vertex] button in the toolbox. To add vertex to the line, you can move the mouse close to the line and left-click the mouse. A new vertex will be added at that position. To delete a vertex on the line, you just mouse the mouse close to the vertex and left-click the mouse. The vertex then is deleted from the line. The Add Vertex in Toolbox 7. Move the control points Different shapes have different control points. Control points are displayed as little yellow dimonds. You can drag the control points to move them to new position. The following picture shows the control point for a callout box. 86 Control point for the callout box Tips: At anytime, press [Esc] will cancel the editing operation. 87 Edit Text Some annotation shapes may contain text. To input or modify the text content, just right click on the shape and choose [Properties] from the popup menu. Choose the [Text] tabpage on the "Shape Properties" dialog. You can input the text, specify the text margin and alignment. Input text 88 Dimension Line A dimension line consists of 3 parts, Main line - The major part of the dimension line. It shows the starting point and ending point of the which has a starting point of the object being measured. Witness line - There is a witness line at each end of the main line. Text - Shows the measurement or other information. A dimension line 1. Draw a dimension line 1. To create a dimension line, first of all you need to select the "Dimension Line" button from the toolbox. See the toolbox section in the introduction of the main UI. 2. Click the mouse on the image as the starting point of the dimension line. 3. Move the mouse to a desired position and click on the mouse to set the ending point. 4. Move the mouse to decide the position of the main line. The witness lines will change accordingly. Click the mouse to finally set the position of the main line. 5. Input the text for the dimension line in the popup dialog. 89 Create a dimension line Tips: At step 3, you can press the [Shift] key to contrain the the movement of the second end point. In this way, you can create a vertical or horizontal dimension line. 2. Modify a dimension line Once a dimension line is created, you can modify it. 90 Edit a dimension line 2.1 Change the starting/ending point Starting / ending point of the dimension line is drawn with a circle. You can drag them to a new location. 2.2 Change the witness lines There are 2 witness lines with the dimension line. Each has 2 vertices. You can drag them to change the length and the rotation of the witness line. By default, The witness lines are kept in the same length. That means when you drag the control point for a witness line, the length of 4 segments of the witness lines will be changed all together. The witness lines are vertical to the mainline. You can change these default settings modifing the dimension line properties. Right click on the dimension line, and choose "Properties" from the popup menu. Choose the "Dimension" tabpage in the popup dialog. 91 Modify the property of the a dimension line In the "Witness Lines" group box, uncheck the "Keep Same Length" if you want witness line has different length. In this case, you can freely move a witness line's control point without changing other witness line segments. After uncheck the "Vertical to Main Line" option, the witness line will be rotated when you move the control point. Tips: If you want two witness line parallel to each other, just hold the [Shift] key while dragging the witness line control point. 92 Bezier Curve A Bezier Curve consists of a starting point and an ending point. A control point controls the arc of the curve. A Bezier curve 1. Draw a Bezier curve 1. To create a Bezier curve, first of all you need to select the "Bezier Curve" button from the toolbox. See the toolbox section in the introduction of the main UI. 2. Click the mouse on the image as the starting point of the curve. 3. Move the mouse to the desired position and click the mouse to set the ending point. 4. Move the mouse and you see the change of the arc. Click the mouse to finish the operation. 2. Modify a Bezier curve Once a Bezier curve is created, you can modify it. 93 2.1 Change the starting/ending point Starting / ending point of the Bezier curve is shown as a small circle. You can drag them to a new location. 2.2 Change the arc of the curve You can drag the little yellow control point to change the arc of the Bezier curve. 94 Text Effects Besides regular font settings (e.g. font name, size, color, etc.), iPhotoDraw also supports Text Effects. These special effects bring rich appearance to the text and make them standout from the background image. The following picture shows text with outline and shadow. Text with outline and shadow iPhotoDraw currently supports 3 types of effect for text : Outline, Text Fill, and Shadow. To apply Text Effects, please click on the 'Text Effects' tabpage on the shape's properties dialog, and then check the 'Use Text Effects' checkbox. Since these effects need extra computation, this checkbox is unchecked by default. Outline You can choose whether to use the outline for the text. If you use the outline, you can continue to specify the line settings, such as dash style, thickness, line join, color, and opacity of the line. 95 Outline settings for the text Text Fill There are 4 options for the text fill - no fill, solid color, gradient color and picture. 96 Text fill settings Choose different options, the content on this dialog will change accordingly. For example, If you choose "Gradient Color", the gradient color settings will be displayed like the following image. The configuration is similar to Edit Gradient. If you defined gradient colors before, you can click the [Gradient] button and pick the existing gradient colors from the drop down list. 97 Gradient Fill Shadow Please check the 'Has Shadow' checkbox if you want to apply shadow effect to the text.You can set the color / opacity for the shadow. You can also set the Distance between the text and its shadow. Distance is measured in pixels. Type the value in the Angle box or drag the red point on the circle to set the angle value for the shadow. 98 Settings for shadow 99 Tricks 1. Drag and drop an image into iPhotoDraw iPhotoDraw allows you drag an image file directly from a file folder. When you are dragging an image file, there will be there possible operations, Open as New Image - Open the file as a new image. Add to the Current Image - Just create an image annotation shape from the file. Fill the Current Shape - Use the image to fill up the currently selected shape (if it supports image fill). This option is available only if there is a shape selected. Options when you are draggina an image file into the application Notes: If you don't like the dragging, just choose the 'Cancel' option, or click the [Esc] key. If there is no image opened, the file you bring in will be opened as a new image by default and the popup menu won't show up. If you just want to create an image annotation shape from the file, you can hold the [Ctrl] key when dragging the file. 100 Other 101 Technical Support Bug Report If you find errors during the usage of the application, Please following the steps to report the bug to the author. That will help us to improve the quality of the software. And your effort will be appreciated. Step 1 - Expand the error dialog to show the detailed information. Step 2 - Copy the details of the error to clipboard. 102 Step 3 - Email the error message to the author by [email protected]. It will be very helpful if you could describe the scenario when the error happens in the email. Feedback / Suggestion If you have any ideas of improving the current iPhotoDraw, or there are any other features you would like to see in the future version, please email the author by [email protected]. 103 License iPhotoDraw is provided free-of-charge with generous licensing terms. You may use iPhotoDraw for personal, commercial, education, and government use -- the iPhotoDraw application is free for all of these purposes. You may install it on as many systems as you'd like. The main restriction is that you may not modify the iPhotoDraw software itself (e.g. change the name, add/remove features, "don't modify the DLL or EXE files"), and as a corollary you may not distribute modified copies of iPhotoDraw. THE SOFTWARE IS PROVIDED "AS IS", WITHOUT WARRANTY OF ANY KIND, EXPRESS OR IMPLIED, INCLUDING BUT NOT LIMITED TO THE WARRANTIES OF MERCHANTABILITY, FITNESS FOR A PARTICULAR PURPOSE AND NONINFRINGEMENT. IN NO EVENT SHALL THE AUTHORS OR COPYRIGHT HOLDERS BE LIABLE FOR ANY CLAIM, DAMAGES OR OTHER LIABILITY, WHETHER IN AN ACTION OF CONTRACT, TORT OR OTHERWISE, ARISING FROM, OUT OF OR IN CONNECTION WITH THE SOFTWARE OR THE USE OR OTHER DEALINGS IN THE SOFTWARE. 104 Frequently Asked Questions When I click [Save], why iPhotoDraw just saves annotation objects in a separated file? Why not save to the original image file? That's by purpose. We save the annotation data into a separated xml file (in the format of xxx_data.xml) so the original image file is intact. Once you decide the work is done, you can choose menu item [File\Export] to export the image as well as the annotation to a new image file. What's the technology you use in iPhotoDraw? iPhotoDraw is developed with pure .Net technology. It based on Microsoft .Net 3.0 framework and no other 3rd party Dlls/Components are needed. Does iPhotoDraw support multi-language? For the time being, we only support English and Simplified Chinese. Supports on other languages (e.g. French) are underway. Volunteers on the translation are very wellcome. Please see the Technical Support session. Will it ever be ported to Mac OS, iOS, Android, Linux, or any other nonWindows operating systems? There is no plan for that in the near future. For now, we only focus on Windows. 105