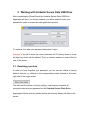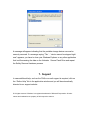
1
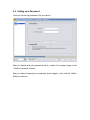
Verbatim Secure Data USB Drive
User Guide
User Guide Version 2.0
© All rights reserved
Table of Contents
Table of Contents.................................................................................................. 2
1.
Introduction to Verbatim Secure Data USB Drive .......................................... 3
2.
System Requirements ................................................................................... 4
3.
Installation...................................................................................................... 5
4.
Getting Started............................................................................................... 5
5.
4.1
Starting Verbatim Secure Data USB Drive ............................................. 5
4.2
Setup Wizard .......................................................................................... 6
4.3
Setting up a Password ............................................................................ 7
Working with Verbatim Secure Data USB Drive ............................................ 9
5.1
Resetting your drive ................................................................................ 9
5.2
Security Settings ................................................................................... 10
5.3
Encrypting files and folders................................................................... 11
5.4
Exiting Verbatim Secure Data USB Drive ............................................. 12
6.
Safely Remove Hardware ............................................................................ 12
7.
Support ........................................................................................................ 13
1. Introduction to Verbatim Secure Data USB Drive
Verbatim Secure Data USB Drive will enhance the functionality of your portable
storage device and help you keep your personal data safe and portable when on
the road.
With Verbatim Secure Data USB Drive and your portable storage device you
can simply copy data on your Verbatim Secure Flash Drive and it will be
automatically encrypted using hardware-based AES 256bit encryption. All data
saved on your Verbatim Secure Flash Drive will be protected by the highest
standards.
Attention!
While using Verbatim Secure Data USB Drive, you should never disconnect
your device without closing Verbatim Secure Data USB Drive first properly
by clicking the taskbar icon of Verbatim Secure Data USB Drive and
selecting “Unmount Verbatim Secure Data USB Drive”. After that use the
“Safely Remove Hardware” option from Windows (see description below).
Warning!
If you fail to enter the correct password for 20 (twenty) times in a row, all
data from device will be deleted. This is a security measure in case of theft
or loss of the device.
2. System Requirements
Operating Systems:
o Windows 2000 Service Pack 4
o Windows XP (Service Pack 2 is recommended)
o Windows Vista
o Windows 7
Available USB port
Verbatim Secure Flash Drive
3. Installation
Verbatim Secure Data USB Drive is pre-installed on your Verbatim Secure
Flash Drive. No installation process is needed on your PC.
When connecting your Verbatim Secure Flash Drive, the Verbatim Secure Data
USB Drive software will start itself automatically.
4. Getting Started
4.1 Starting Verbatim Secure Data USB Drive
The Verbatim Secure Data USB Drive application will start automatically as soon
as you plug in your Verbatim Secure Flash Drive.
In case the application does not start automatically, open My Computer
(Windows Explorer), open the CD-ROM of the Verbatim Secure Flash Drive
with the drive letter e.g. D: (or F: depending on your computer) and double-click
on the SecureDataUSBDrive.exe file to start the application.
The SecureDataUSBDrive.exe file will remain on your CD-ROM in order to be
able to use the application when you switch between different computers.
4.2 Setup Wizard
When you start the application for the first time you will be greeted by the Setup
Wizard.
With the help of the Setup Wizard you can set up a password that will secure
your data.
Just follow the simple instructions and you’ll be encrypting your data in minutes.
4.3 Setting up a Password
Here you can set up a password for your device.
After you decide what your password will be, confirm it by typing it again in the
“Confirm Password” window.
After you have introduced your password, press <Apply>, then click the <Next>
button to continue.
Once the security parameters have been saved, click <Finish> to complete the
setup process.
5. Working with Verbatim Secure Data USB Drive
After completing the Setup Wizard the Verbatim Secure Data USB Drive
application will start. For security reasons, you will be asked to enter your
password in order to access the main application window.
To continue, first enter your password and press <Login>.
Attention! If you fail to enter the correct password for 20 (twenty) times in a row,
all data from device will be deleted. This is a security measure in case of theft or
loss of the device.
5.1 Resetting your drive
In case you have forgotten your password, you can use the <Reset to factory
default> function, by clicking on the corresponding button situated in the lowerright side of the Login screen
This will reset the device to factory settings. It will securely overwrite all
encryption data and your password on the Verbatim Secure Flash Drive.
Applying the Reset to factory default feature will securely destroy all data on the
device.
5.2 Security Settings
The security settings can be modified from within Verbatim Secure Data USB
Drive. You can access the security settings menu by selecting “Security
Settings…” from the toolbar area.
5.3 Encrypting files and folders
Keeping your files safe and protected has never been easier. Simply copy the
files you wish to protect on your Verbatim
Secure Flash Drive and they will be
encrypted automatically.
Please note that the encryption takes place seamlessly on a lower level by
device hardware, not from within Verbatim Secure Data USB Drive. Files that are
stored on the devices memory are encrypted with 256bit AES encryption. This
means that you will be able to work with the files already copied on your
Verbatim Secure Flash Drive, without having to manually decrypt them.
Also, the files are saved on the private partition of your Verbatim
Secure Flash
Drive and they are only accessible when Verbatim Secure Data USB Drive is
running and you provided the correct password.
The AES encryption used by Verbatim Secure Data USB Drive is hardwarebased 256 bit encryption and can withstand latest methods of high-tech hacking.
Even if by some means, the memory of the device is read, the data on it is still
not compromised.
When you exit the application, Verbatim Secure Data USB Drive will revert back
to the public partition.
5.4 Exiting Verbatim Secure Data USB Drive
To exit Verbatim Secure Data USB Drive, right-click on the taskbar icon of
Verbatim Secure Data USB Drive and select “Exit Verbatim Secure Data USB
Drive” from the menu.
6. Safely Remove Hardware
Before you unplug your Verbatim Secure Flash Drive from the USB Port of your
computer, you have to use the “Safely Remove Hardware” option from the
system tray, otherwise you risk corrupting the data on your USB Drive. This is
especially important when using the device on a Windows 2000 PC.
To Safely Remove Hardware, double-click on the system tray icon, then select
the USB Drive you want to remove from the list and click on the “Stop” button.
A message will appear indicating that the portable storage device can now be
securely removed. If a message saying “The ‘…’ device cannot be stopped right
now” appears, you have to close your Windows Explorer or any other application
that is still accessing the data on the Verbatim Secure Flash Drive and repeat
the Safely Remove Hardware process.
7. Support
In case additional help, such as the FAQs or e-mail support is required, click on
the “Online Help” link in the application window and you will be automatically
directed to our support website.
© All rights reserved. Windows is a registered trademark of Microsoft Corporation. All other
names and trademarks are property of their respective owners.