1
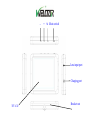
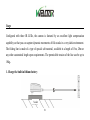
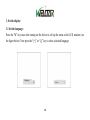
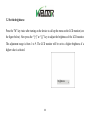
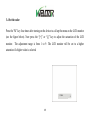
F18C User Manual FISH FINDER CAMERA Functions Congratulations on your purchase of a Fishing Partner F18C. We would like to express our sincere gratitude for your trust on our products. In order to optimize the performance of the product and prolong its life time, we strongly recommend you carefully read this user manual before use. This user's manual has referred to the latest information during compiling. This user manual has included some screen displays and figures to provide detailed descriptions for the product in a more specific and direct manner. These displays and figures may slightly differ from the product you actually use due to different technology innovations and production batches. Please always use your product base on its actual functions. Provided with three IR LEDs, the camera is featured by an excellent light compensation capability so that you can capture dynamic movements of fish stocks in a very dark environment. The fishing line is made of a type of special soft material, available in a length of 15m, 20m or any other customized length upon requirements. The permissible tension of the line can be up to 2 10kg. First insert the plug of the camera firmly into the main unit, and turn on the main switch, then the images transferred from the camera will be shown on the LCD monitor. Video camera The underwater camera and 3.5-inch monitor are provided as a complete package, and designed to monitor movements of fish stocks under the water. It is an ideal choice for fishing lovers as you can easily determine the location of fish stocks and biting state through the images transferred from the camera to the monitor. 3 Notes Please carefully read these precautions before using the product, in order to operate it in a proper and safety manner, optimize its performance and prolong its life time. Take good care of the product all the times. Prevent water or sand particles from entering into the product while using it on the beach or waterside. That is because the water, sand particles, dusts or salt components may cause damages to the product. Keep the product free of dusts and chemical materials. Always store it in a cool, dry and well-ventilated place. Never expose the product under high-temperature/humidity or dusty conditions which may cause malfunctions of the product. Turn off the product when it is not used for a long time. First insert the plug of the camera firmly into the main unit, and turn on the main switch, 4 then the images transferred from the camera will be shown on the LCD monitor. Make sure to fully charge the battery for 8 hours before first use. Don’t disassemble the monitor (main unit) during consequent uses. 5 Appe arance and Keypad Lens Lens neck Lens housing IR LED IR LED IR LED 6 _ M Main switch + Lens input port 快门键 Charging port Bracket nut TFT LCD 7 Usage Configured with three IR LEDs, the camera is featured by an excellent light compensation capability so that you can capture dynamic movements of fish stocks in a very dark environment. The fishing line is made of a type of special soft material, available in a length of 15m, 20m or any other customized length upon requirements. The permissible tension of the line can be up to 10kg. 1. Charge the built-in lithium battery Socket 8 To charge the battery, connect the charging adapter supplied as an accessory with the power supply (see the figure above) and insert its another end into the DC in port on the device. Make sure to fully charge the battery for 8 hours before first use. 2. Turn on the device To turn on the device, pull the main switch from the “OFF” position to the “ON” position. The images transferred from the camera will be visible immediately after the device is turned on (assuming the camera has been connected properly before turning on the device). 9 3. Set the display: 3.1 Set the language: Press the "M” key once after turning on the device to call up the menu on the LCD monitor (see the figure below). Now press the “[+]” or “[-]” key to select a desired language. Language 10 3.2 Set the brightness: Press the "M” key twice after turning on the device to call up the menu on the LCD monitor (see the figure below). Now press the “[+]” or “[-]” key to adjust the brightness of the LCD monitor. The adjustment range is from 1 to 9. The LCD monitor will be set to a higher brightness if a higher value is selected. brightness 11 3.3 Set the contrast: Press the "M” key three times after turning on the device to call up the menu on the LCD monitor (see the figure below). Now press the “[+]” or “[-]” key to adjust the contrast of the LCD monitor. The adjustment range is from 1 to 9. The LCD monitor will be set to a higher contrast if a higher value is selected. Contrast 12 3.4 Set the color: Press the "M” key four times after turning on the device to call up the menu on the LCD monitor (see the figure below). Now press the “[+]” or “[-]” key to adjust the saturation of the LCD monitor. The adjustment range is from 1 to 9. The LCD monitor will be set to a higher saturation if a higher value is selected Color 13 3.5 Reset: Press the "M” key five times after turning on the device to call up the menu on the LCD monitor (see the figure below). Now press the “[+]” key to confirm to restore the factory default parameters. The LCD monitor will then be reset to the factory default parameters. Reset 14 4 With the pole in hand use: 4.1 Keiryu lead wire to tie the camera, as shown: 4.2 Display host monitor stand fixed to the pole, as shown: 15 4.3 First insert the plug of the camera firmly into the main unit, and turn on the main switch, then the images transferred from the camera will be shown on the LCD monitor. 16 Technical Data – Camera: Overall dimensions 30mmx17.8mm (L x DN) Weight Approx. 10g Power supply Power supplied by the main unit: 3.7V lithium battery Sensor 1/4 inch (3M pixels) sensor wafer Resolution 640x480 (3M pixels) Horizontal angle ≥130° Working temperature -10℃~40℃ Working depth 10m – 50m below the water surface Length of line 10m-50M Tension 10KG-40KG Diameter of line 1.0mm-1.9MM 17 Technical Data – Monitor: Overall dimensions: 103mmx72mmx17mm(W x H x T) Display 3.5-inch LCD Resolution 960x240 Backlight brightness 300cd\㎡ Power supply Rechargeable lithium battery 2000mA/H Voltage 3.7V Power consumption 1.7W Battery capacity (for continuous use) 7 - 8 hours ((fully charged) Weight 150g Working temperature -10℃~40℃ 18 Special precautions before use: Make sure to fully charge the battery for 8 hours before first use, and insert the plug of the camera firmly into the main unit, and then turn on the main switch. Packing list (standard): 1 User Manual 1PCS 2 Charging adapter 1PCS 3 Camera (with cable) 1PCS 4 Monitor (main unit) 1PCS 5 Monitor bracket 1PCS 19