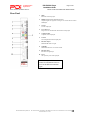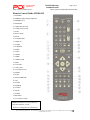
1
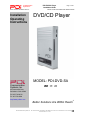
Communication Systems Inc. Better Solutions Are Within Reach™ Installation Operating Instructions PDI-DVD-SA Player Installation Guide Page 1 of 26 INSTALLATION and OPERATING INSTRUCTIONS DVD/CD Player MODEL: PDI-DVD-SA Communication Systems, Inc. 40 Greenwood Lane Springboro, Ohio 45066 PH: 937-743-6010 FX: 937-743-5664 http://www.pdiarm.com Better Solutions Are Within Reach® PDi Communication Systems, Inc. 40 Greenwood Lane Springboro, Ohio 45066 USA PH +1-937-743-6010 FX +1-937-743-5664 Document Number: PD196-058R4 Communication Systems Inc. Better Solutions Are Within Reach™ PDI-DVD-SA Player Installation Guide Page 2 of 26 INSTALLATION and OPERATING INSTRUCTIONS Introduction: The PDI-DVD-SA is designed for educational and entertainment purposes. It has standard ports and uses standard connectors, so it can be connected to most TVs, including PAL and NTSC television systems. It can handle a diversity of disc formats, such as DVD-AUDIO, DVD-VIDEO, CD, MP3, CD-R, CD-RW, Picture-CD discs etc. in size 8 or 12. It can show subtitles and play audio in several languages, if you are playing discs with these capabilities. It has a card reader that can handle Secure Digital Cards, Multi-Media Cards, Memory Sticks, and USB drives. This player can read WMA, MP3, and JPEG files. The user’s guide identifies the features of the PDI-DVD-SA and describes its various features with discs and other types of compatible media. Please read through this guide carefully, with a PDI-DVD-SA in front of you, as you begin the process of learning how to install and use the various features of this DVD player. Also keep the guide handy, so you can refer to it, for future programming changes. PDi Communication Systems, Inc. 40 Greenwood Lane Springboro, Ohio 45066 USA PH +1-937-743-6010 FX +1-937-743-5664 Document Number: PD196-058R4 Communication Systems Inc. PDI-DVD-SA Player Installation Guide Page 3 of 26 INSTALLATION and OPERATING INSTRUCTIONS Better Solutions Are Within Reach™ WARNINGS To reduce the risk of electric shock, DO NOT perform any servicing other than what is explained in the operating instructions unless you are qualified to do so. This symbol is intended to alert the user of the presence of un-insulated ‘dangerous voltage’ within the product’s enclosure that may be of sufficient magnitude to constitute a risk of electric shock to persons. This symbol is intended to alert the user of the presence of important operating and maintenance (servicing) instructions in the literature accompanying the appliance. SAFETY INSTRUCTIONS Be sure to read, follow, and keep these instructions. Heed all the warnings Wet Location DO NOT use near wet locations. This includes but is not limited to the following: DO NOT place containers with DO NOT place near locations where liquid on the unit. there is dripping or splashing DO NOT expose to rain or moisture DO NOT place near tub, sink, etc. Stacking If storing the unit horizontally, DO NOT lay anything heavy on it. DO NOT place the unit on hot equipment. Placement Avoid placing the unit in surroundings with: • Direct sunlight or heat sources like heating radiators, or ovens etc. • High temperature (over 40 C) or high humidity (over 90%). • • • Excessive dust. High magnetic or electro-static effect. Vibration, impact or tilted surface. Otherwise the internal parts may be damaged. Non-use Periods Turn off the power when the unit is not used. It should be unplugged from the AC outlet when the unit shall be idle for a long period of time. Protect the power cord Hold firmly to connect/disconnect DO NOT connect/disconnect while hands are wet Keep power cord away from heat sources Never put heavy object on power cord DO NOT attempt repair/reconstruct Remove dust, dirt periodically Dropped/damaged turn off power, disconnect power cord If smoke, unusual noises, or odors are coming from unit, disconnect power cord DVD Safety Keep fingers and objects outside player NOTE: The appropriate power supply for this player should be ~120-230V, 50/60Hz Laser Caution This DVD/CD player is a class 1 laser product utilizing a visible laser beam, which may cause radiation hazard if it is directly pointed at the human body. However, it is safe enough to use as long as you follow the operation instructions closely and never open the casing or loader cover when operating it. DO NOT look closely at the disc tray or other openings on the apparatus or look into it when it is working. Failing to follow the operation instructions and heeding the cautions and warnings listed herein when using the unit may lead to a radiation hazard. Leave the service for this player to qualified and authorized technician PDi Communication Systems, Inc. 40 Greenwood Lane Springboro, Ohio 45066 USA PH +1-937-743-6010 FX +1-937-743-5664 Document Number: PD196-058R4 Communication Systems Inc. PDI-DVD-SA Player Installation Guide Page 4 of 26 INSTALLATION and OPERATING INSTRUCTIONS Better Solutions Are Within Reach™ Oxygen Environment WARNING: DO NOT use in an oxygen tent or an oxygen chamber. Such use may cause a fire hazard. Cleaning and Disinfection Clean the exterior of this TV by removing dust with a lint-free cloth. CAUTION: DO NOT use abrasive or chemical cleaning agents. Clean only with a dry cloth. Maintenance and Service Refer all service issues to qualified personnel. Service required if damaged in any way. DO NOT attempt to service this unit yourself. There are no service parts in it. DO NOT attempt to modify this product in any way without written authorization. Unauthorized modification could void the the warranty of this product. Other Equipment Use only with the cart, stand, tripod, bracket or table specified by the manufacturer, or sold with the apparatus. Use caution when moving the cart / apparatus. Only use attachments/accessories specified by the manufacturer. Overhead Falling Hazard WARNING: To prevent injury, this apparatus must be securely placed. Electronics can pose a striking hazard when mounted at an elevated position. Note TO Cable TV Installer This reminder is provided to call the cable TV systems installer’s attention to Article 820-40 of the National Electrical Code. The code provides guidelines for proper grounding and, in particular, specifies that the cable ground shall be connected to the grounding system of the building, as close to the point of the cable entry as practical. Copyright, Disclaimer, & Trademarks FCC This equipment has been tested and found to comply with the limits for a Class B digital device, pursuant to part 15 of the FCC Rules. These limits are designed to provide reasonable protection against harmful interference when the equipment is operated in a residential or commercial installation. If this equipment does cause harmful interference to radio or TV reception, which can be determined by turning the equipment off and on, the user is encouraged to try to correct the interference by one of more of the following measures: Reorient or relocate the receiving antenna. Increase the separation between the equipment and receiver. Connect the equipment into an outlet on a circuit different from that to which the receiver is connected. Consult the dealer or an experienced radio/TV technician for help. COPYRIGHT PDI Communication Systems, Inc. claims proprietary right to the material disclosed in this user manual. This manual is issued for user information only and may not be used to manufacture anything shown herein. Copyright 2009 by PDI Communication Systems, Inc. All rights reserved. This DVD player supports Macrovison copy protection. On DVD discs that include a copy protection code, if the contents of the DVD disc are copied using a VCR, the copy protection code prevents the videotape copy from playing normally. This product incorporates copyright protection technology that is protected by U.S. patents and other intellectual property rights. Use of this copyright protection technology must be authorized by Macrovision, and is intended for home and other limited viewing uses only unless otherwise authorized by Macrovision. Reverse engineering or disassembly is prohibited. DISCLAIMER The author and publisher have used their best efforts in preparing this manual. PDI Communication Systems, Inc. make no representation or warranties with respect to the accuracy or completeness of the contents of this manual and specifically disclaim any implied warranties or merchantability or fitness for any particular purpose and shall in no event be liable for any loss of profit or any other damages. The information contained herein is believed to be accurate, but is not warranted, and is subject to change without notice or obligation. TRADEMARKS Manufactured under license from Dolby Laboratories. Dolby and the double-D symbol are trademarks of Dolby Laboratories. All other brand names and product names used in this manual are trademarks, registered trademarks, or trade names of their respective holder. PDI and Better Solutions Are Within Reach are registered trademarks of PDI Communication Systems, Inc., Springboro, Ohio. PDi Communication Systems, Inc. 40 Greenwood Lane Springboro, Ohio 45066 USA PH +1-937-743-6010 FX +1-937-743-5664 Document Number: PD196-058R4 Communication Systems Inc. Better Solutions Are Within Reach™ PDI-DVD-SA Player Installation Guide Page 5 of 26 INSTALLATION and OPERATING INSTRUCTIONS Table of Contents Introduction..................................................................................................................................................... 2 Warnings ......................................................................................................................................................... 3 Safety Instructions .......................................................................................................................................... 3 Wet Location ............................................................................................................................................. 3 Stacking .................................................................................................................................................... 3 Placement .................................................................................................................................................. 3 Non-use Periods ........................................................................................................................................ 3 Protect the power cord............................................................................................................................... 3 DVD Safety..................................................................................................................................................... 3 Laser Caution ............................................................................................................................................ 3 Oxygen Environment ................................................................................................................................ 4 Cleaning and Disinfection............................................................................................................................... 4 Maintenance and Service ................................................................................................................................ 4 Other Equipment............................................................................................................................................. 4 Overhead Falling Hazard ................................................................................................................................ 4 Note to Cable TV Installer .............................................................................................................................. 4 Copyright, Disclaimer, Trademarks ................................................................................................................ 4 Included in box.............................................................................................................................................. 7 Connecting to a TV ....................................................................................................................................... 7 Rear Panel...................................................................................................................................................... 8 Front Panel .................................................................................................................................................... 9 Remote Control Guide................................................................................................................................ 10 Inserting/Ejecting Disc ............................................................................................................................... 11 Inserting disc ........................................................................................................................................... 11 Ejecting disc ............................................................................................................................................ 11 DVD Player Display Screen Messages....................................................................................................... 11 DVD.............................................................................................................................................................. 12 Basic controls .......................................................................................................................................... 12 Play.................................................................................................................................................... 12 Pause.................................................................................................................................................. 12 Stop.................................................................................................................................................... 12 Advancing chapters/restarting or returning to chapters ..................................................................... 12 Fast forward/Fast rewind ................................................................................................................... 12 Navigating menus.................................................................................................................................... 12 Other DVD controls ................................................................................................................................ 12 Dimmer.............................................................................................................................................. 12 Step -by-Step playback...................................................................................................................... 12 Slow playback ................................................................................................................................... 12 Zoom ................................................................................................................................................. 12 Selecting subtitles and audio features on a disc................................................................................. 13 Subtitles ....................................................................................................................................... 13 Audio ........................................................................................................................................... 13 Returning to the menus...................................................................................................................... 13 Menu ............................................................................................................................................ 13 Title.............................................................................................................................................. 13 Bookmarking segments of video ....................................................................................................... 13 Creating customized clip in a video that repeats ............................................................................... 13 Setting up DVD so certain Titles and Chapters can be displayed in the order you want................... 14 Choosing different angles of a scene ................................................................................................. 14 Advancing to a desired title, chapter or time on the disc directly...................................................... 14 Audio CD ..................................................................................................................................................... 15 Screen Display......................................................................................................................................... 15 Basic Controls ......................................................................................................................................... 16 Play.................................................................................................................................................... 16 Pause.................................................................................................................................................. 16 PDi Communication Systems, Inc. 40 Greenwood Lane Springboro, Ohio 45066 USA PH +1-937-743-6010 FX +1-937-743-5664 Document Number: PD196-058R4 Communication Systems Inc. Better Solutions Are Within Reach™ PDI-DVD-SA Player Installation Guide Page 6 of 26 INSTALLATION and OPERATING INSTRUCTIONS Stop.................................................................................................................................................... 16 Advancing tracks/restarting or returning to tracks............................................................................. 16 Fast forward/Fast rewind ................................................................................................................... 16 Other CD controls ................................................................................................................................... 16 Advancing to a desired track, time in a track, or time in the disc directly......................................... 16 Bookmarking segments of a CD........................................................................................................ 17 Creating customized clip sound in a CD that repeats ........................................................................ 17 Filters................................................................................................................................................. 17 Putting tracks on an CD in desired order........................................................................................... 18 Removing tracks from the playlist..................................................................................................... 18 Media Card/USB Drive/Data CD .............................................................................................................. 18 File types ................................................................................................................................................. 18 Inserting SD/MS/MMC cards ................................................................................................................. 19 Inserting USB drive................................................................................................................................. 19 Photos...................................................................................................................................................... 20 Accessing photos ............................................................................................................................... 20 Adjusting slideshow operation .......................................................................................................... 20 Rotating pictures while slideshow is playing..................................................................................... 20 Zoom in on photos............................................................................................................................. 21 Audio Files .............................................................................................................................................. 21 Play.................................................................................................................................................... 21 Pause.................................................................................................................................................. 21 Stop.................................................................................................................................................... 21 Advancing chapters/restarting or returning to chapters ..................................................................... 21 Filters................................................................................................................................................. 22 Putting tracks on an CD in desired order........................................................................................... 23 Removing files from the playlist ....................................................................................................... 23 Creating customized sound clip in an MP3 file that repeats.............................................................. 23 Fast forward/Fast rewind ................................................................................................................... 23 Setup Menu.................................................................................................................................................. 24 Appendix- Running Signal through DVD player ..................................................................................... 26 PDi Communication Systems, Inc. 40 Greenwood Lane Springboro, Ohio 45066 USA PH +1-937-743-6010 FX +1-937-743-5664 Document Number: PD196-058R4 Communication Systems Inc. PDI-DVD-SA Player Installation Guide Page 7 of 26 INSTALLATION and OPERATING INSTRUCTIONS Better Solutions Are Within Reach™ Included in box DVD player Power cord Manual IR sensor Remote control Composite Video cable Connecting to a TV The DVD player can be connected to a TV with a digital HDMI connection or one of three analog connections. It is designed to be mounted vertically, but it can also be mounted horizontally. 1. Connect this unit to your TV via the Composite Video, S-Video, Connecting Notes YUV(YPbPr), or HDMI output jacks. (See Rear Panel on page 8) • Be sure that DVD player, TV, and other equipment are turned off before connecting. • Observe the color-coding when connecting audio and video cables • If you are using an S-Video connection, you will also need to connect audio cable to the L&R jacks on the DVD player and on the TV. • HDMI does not require a separate audio connection 2. Connect the DVD player power cord to the DVD and to the wall outlet. 3. Power on the DVD player and TV. 4. Be sure the TV is set up for the type of source you connected to it. (*Review your TV manual.) PDi Communication Systems, Inc. 40 Greenwood Lane Springboro, Ohio 45066 USA PH +1-937-743-6010 FX +1-937-743-5664 Document Number: PD196-058R4 Communication Systems Inc. PDI-DVD-SA Player Installation Guide Page 8 of 26 INSTALLATION and OPERATING INSTRUCTIONS Better Solutions Are Within Reach™ Rear Panel 1. IR IN Remote IR sensor input jack. 2. HDMI (High-Definition Multimedia Interface) Outputs a digital A/V signal for viewing on a TV or other devices with an HDMI jack. 3. S-Video S-Video output jack. 4. Pr/Cr/ Pb/Cb/Y Progressive scan and chromatic aberration Pr/Cr output jack. 5. Composite Video Composite video output jack. 6. L and R Left and right audio channel output jacks. 7. RF Cable Output Modulated RF cable TV signal. 8. CH4/CH3 Modulate RF channel 3 or 4 selector switch. 9. RF Cable Input RF Cable TV signal input. 10. Power IEC styled AC power cord input jack. NOTE: Read your TV instruction manual for information on how to set it for the different connection types. PDi Communication Systems, Inc. 40 Greenwood Lane Springboro, Ohio 45066 USA PH +1-937-743-6010 FX +1-937-743-5664 Document Number: PD196-058R4 Communication Systems Inc. Better Solutions Are Within Reach™ PDI-DVD-SA Player Installation Guide Page 9 of 26 INSTALLATION and OPERATING INSTRUCTIONS Front Panel 1. DISPLAY SCREEN Indicates the relevant status of the player any time when the unit is powered. 2. STANDBY INDICATOR 3. PLAY button 4. PAUSE button 5. FR button Fast rewind a CD or DVD 6. FF button Fast forward a CD or DVD 7. EJECT button Press Once to eject the disc. 8. POWER button 9. SD/MMC/MS card slot 10. USB interface 11. Disc slot PDi Communication Systems, Inc. 40 Greenwood Lane Springboro, Ohio 45066 USA PH +1-937-743-6010 FX +1-937-743-5664 Document Number: PD196-058R4 Communication Systems Inc. PDI-DVD-SA Player Installation Guide Page 10 of 26 INSTALLATION and OPERATING INSTRUCTIONS Better Solutions Are Within Reach™ Remote Control Guide: PD108-425 1. STANDBY 2. DIMMER (Adjust display brightness) 3.NUMBERS (0-9) 4. PROGRAM 5. F.RWD (Fast Rewind) 6 .F.FWD (Fast Forward) 7. SLOW 8. PLAY/PAUSE 9. SETUP 10. NAVIGATION 11. DISPLAY 12. AUDIO 13. SUBTITLE 14. MENU 15. TITLE 16. VIDEO 17. HDMI 18. OPEN/CLOSE 19. SKIP 20. VOLUME 21. CLR (Clear) 22. A-B (Repeat A-B) 23. MODE 24. STOP 25. DVD/CARD/USB 26. OK 27. ZOOM 28. SEARCH 29. ANGLE 30. MUTE 31. MARK 32. RETURN 33. YUV (Input switch) NOTE: Install batteries for the remote: size AAA/UM-4 batteries (2 each) Do not use rechargeable (Ni-Cd) batteries. PDi Communication Systems, Inc. 40 Greenwood Lane Springboro, Ohio 45066 USA PH +1-937-743-6010 FX +1-937-743-5664 Document Number: PD196-058R4 Communication Systems Inc. PDI-DVD-SA Player Installation Guide Page 11 of 26 INSTALLATION and OPERATING INSTRUCTIONS Better Solutions Are Within Reach™ Inserting/Ejecting Disc Inserting disc Power on the DVD player. Insert disc with label side facing the same direction as the side of the player with the disc image. “Close” will appear on the display screen while the disc is being drawn into the player. “Load” will appear as the player initially reads the disc. Disc image Ejecting disc Remove the disc by pressing the Eject button on the unit or the Open/Close button on the remote DVD Display Screen Messages The DVD player’s display screen gives you several messages about a disc’s status. 1. “OPEN” indicates that the disc tray is open 2. “CLOSE” indicates that the disc tray is closed 3. “LOAD” indicates that a disc is loaded 4. “NO DISC” appears when no disc is loaded 5. A disc or file from a media card/USB drive is playing. This can be a DVD, CD, MP3, or other type of disc. The display screen will display the type of disc or audio file on the top row. PDi Communication Systems, Inc. 40 Greenwood Lane Springboro, Ohio 45066 USA PH +1-937-743-6010 FX +1-937-743-5664 Document Number: PD196-058R4 Communication Systems Inc. Better Solutions Are Within Reach™ PDI-DVD-SA Player Installation Guide Page 12 of 26 INSTALLATION and OPERATING INSTRUCTIONS DVD Basic controls Basic controls are located on the side of the DVD player or on the PD108-425 remote. NOTE: It is recommended to use the remote for basic controls. Play: Press Play/Pause (►/) on the remote to start a video. NOTE: When the disc is first inserted, it may start to play automatically. You may also be taken to a menu. If so, use navigational buttons. (See Navigating menus). Pause: Press Play/Pause (►/) on the remote while a video is playing to pause it. Stop: Press Stop (■) on the remote to end playback. Press it twice to cancel memory (This will allow playback to start at the beginning of the DVD rather than at the place last stopped.) Advancing chapters/restarting or returning to chapters: Press Skip+ on the remote to advance to the next chapter. Press Skip- to start at the beginning of the current chapter. Press Skip- twice to return to the previous chapter. Fast forward/Fast rewind: Press F.FWD to advance through the DVD. Press F.RWD to rewind through a DVD. The F.FWD and F.RWD speeds are 2x, 4x, 8x, 16x, and 32x. Press Play/Pause to return to normal play mode. Navigating menus Use the four directional buttons surrounding the OK button on the remote to navigate through menus and highlight their selections. Press OK when you are on the desired selection. Other DVD controls Besides the basic functions, there are more features that can be used during playback. Dimmer: Press DIMMER to adjust the brightness of the text on the DVD player’s display screen. The button needs to be pressed repeatedly to cycle through the choices. 1. Dimmer 2. Dimmer 3. Dimmer 4. Dimmer High Normal Low Off Step-by-Step playback: This is enabled by repeatedly pressing Pause () on the DVD unit. NOTE: Play/Pause on remote does not control Step-by-Step playback. Slow playback: This allows video to be played at a rate slower than normal playback. The rates of speed are 1/2, 1/4, 1/6, and 1/8. 1. Press SLOW on the remote to cycle through the four rates of speed. 2. Press PLAY/PAUSE to return to the normal playback rate. Zoom: You can zoom in on video and move it around on the TV screen. You can zoom in 1x, 2x, or 3x. 1. Press ZOOM to zoom in on the video: 1x, 2x, or 3x. 2. When zoomed in 1x, 2x, or 3x, use the directional buttons to move the video around on the screen. 3. To return normal viewing, press ZOOM until Zoom Off appears on the screen. PDi Communication Systems, Inc. 40 Greenwood Lane Springboro, Ohio 45066 USA PH +1-937-743-6010 FX +1-937-743-5664 Document Number: PD196-058R4 Communication Systems Inc. Better Solutions Are Within Reach™ PDI-DVD-SA Player Installation Guide Page 13 of 26 INSTALLATION and OPERATING INSTRUCTIONS Selecting subtitles and audio features on a disc: You can switch between the subtitles and audio features that are stored on a disc. Subtitles: Press SUBTITLE on the remote to cycle through the available subtitles (e.g. French) that are stored on a disc. Audio: Press AUDIO on the remote to cycle through the available audio settings (e.g. French) that are stored on a disc. Returning to the menus: You can return to the root and sub-menus of a disc while it is playing. Pressing TITLE or MENU on the remote will return you to the menus of a DVD. MENU will return you to the menu you found the video that is playing. Example: If a video is from “Special Features,” pressing MENU will return you to “Special Features.” TITLE will return you to the main menu. Example: If you press TITLE while watching the video from “Special Features,” you will return to the main menu, not “Special Features.” Bookmarking segments of video: You can temporarily store up to three places on a video you want to easily return to. NOTE: When the disc is ejected the bookmarks are erased automatically. 1. Select a place on disc you want to bookmark. i. Use SKIP+ and F.FWD/F.RWD to get to the desired place. ii. Press Pause when the desired spot is reached. 2. Press the MARK button on remote to display a menu with Bookmark 1, Bookmark 2, and Bookmark 3. i. Bookmark 1 is highlighted. If no time is entered, press OK and the time of the place in the video you selected while doing Step 1 will be entered. ii. If you want to enter a second and third place in a video, press MARK to exit the menu and select another place in the video. iii. Press MARK to return to the menu. iv. Press the down directional button to highlight Bookmark 2 or 3. v. Press OK and the time of the place in the video you selected while doing Step 1 will be entered. 3. Erase bookmarks i. Press MARK to display Bookmark menu ii. Press the down directional button to highlight Bookmark 2 and 3, if you want to erase them. NOTE: Bookmark 1 is already highlighted. iii. Press CLR on remote to clear highlighted bookmark setting iv. To set new bookmarks, follow steps 1 and 2 Creating customized clip in a video that repeats: You can create a clip in a video that starts and stops at desired points. 1. Press A-B at the place in the video you want clip to start. Rep A- appears on the screen. 2. Press A-B at the place in the video you want clip to end. Rep A-B appears on the screen. 3. Press A-B again to cancel clip setting. Rep A-B Off appears on the screen. PDi Communication Systems, Inc. 40 Greenwood Lane Springboro, Ohio 45066 USA PH +1-937-743-6010 FX +1-937-743-5664 Document Number: PD196-058R4 Communication Systems Inc. Better Solutions Are Within Reach™ PDI-DVD-SA Player Installation Guide Page 14 of 26 INSTALLATION and OPERATING INSTRUCTIONS Setting up DVD so certain Titles and Chapters can be displayed in the order you want: You can control what chapters on a disc play and in what order they play by setting up a customized program. 1. Setup Titles and chapters. i. Press PRG to display Program menu on the TV screen. ii. Press the down directional button to highlight the desired title. iii. Press OK to select it. iv. Press the down directional button to highlight the desired chapter. v. Press OK to select it. It is entered in the next available slot in the right column. There are 16 total slots. vi. Press the right directional button to highlight Play. vii. Press OK to select it. The list of chapters will now play. 2. Clear choice/s i. Press the right directional button to highlight Clear to delete one selection at a time. ii. Press OK. The programmed chapters will be deleted from last on list to first on list. iii. To delete all choices, press the right directional button to highlight Clear All. iv. Press OK. 3. Press PRG to exit the Program menu. Choosing different angles of a scene: Some DVDs have multiple angles for various scenes. Press ANGLE on to cycle through different angles Advancing to a desired title, chapter or time on the disc directly: You can advance directly to a desired chapter, title, or time on a disc by using the numeric buttons on the remote. 1. Press SEARCH. 2. The Search menu appears on screen 3. If you want to go to a certain title, enter it in the highlighted Title field with the numeric buttons. For Chapter or Time, press down directional button to highlight Chapter or Time. 4. Use the numeric buttons to enter the desired chapter number or time on the disc. NOTE: Time is for an entire title. Format is hours:minutes:seconds. Numbers will be filled in the seconds spaces first. 5. Press OK PDi Communication Systems, Inc. 40 Greenwood Lane Springboro, Ohio 45066 USA PH +1-937-743-6010 FX +1-937-743-5664 Document Number: PD196-058R4 Communication Systems Inc. Better Solutions Are Within Reach™ Page 15 of 26 PDI-DVD-SA Player Installation Guide INSTALLATION and OPERATING INSTRUCTIONS Audio CD Pre-recorded audio CDs or ones made by music management software on a computer can be played on the DVD player. Screen Display The screen display appears after an audio CD has been inserted and loaded into the DVD player. Screen Display Function Window Display Window Document Window PDi Communication Systems, Inc. 40 Greenwood Lane Springboro, Ohio 45066 USA PH +1-937-743-6010 FX +1-937-743-5664 Document Number: PD196-058R4 Communication Systems Inc. Better Solutions Are Within Reach™ PDI-DVD-SA Player Installation Guide Page 16 of 26 INSTALLATION and OPERATING INSTRUCTIONS Basic Controls Play: Most CDs will start to play automatically after the disc is loaded. If the CD is stopped or paused, press PLAY/PAUSE. Pause: Press PLAY/PAUSE. Stop: Press STOP. Advancing tracks/restarting or returning to tracks: Press SKIP+ on the remote to advance to the next track. Press SKIP- to start at the beginning of the current track. Press SKIP- twice to return to a previous track. Fast forward/Fast rewind: Press F.FWD to advance through the CD. Press F.RWD to rewind through a CD. The F.FWD and F.RWD speeds are 2x, 4x, 8x, and 16x. Press PLAY/PAUSE to return to normal play mode. Other CD controls Besides the basic functions, there are more features that can be used during playback. Advancing to a desired track, time in a track, or time in the disc directly: You can advance directly to a desired track, time in a track, or time on a disc by using the numeric buttons. 1. Press SEARCH. 2. The Search menu appears on the screen 3. If you want to go to a certain track, enter it in the highlighted Track field with the numeric buttons. For Time (time in a track) or Disc Time, press down directional button to highlight Chapter or Time 4. Use the numeric keys to enter the desired time in a track or time on the disc. NOTE: Format is hours:minutes:seconds. Numbers will be entered in the seconds spaces first. 5. Press OK. PDi Communication Systems, Inc. 40 Greenwood Lane Springboro, Ohio 45066 USA PH +1-937-743-6010 FX +1-937-743-5664 Document Number: PD196-058R4 Communication Systems Inc. PDI-DVD-SA Player Installation Guide Page 17 of 26 INSTALLATION and OPERATING INSTRUCTIONS Better Solutions Are Within Reach™ Bookmarking segments of a CD: You can temporarily store up to three places on a CD you want to easily return to. Bookmarks will be erased when the disc is ejected. 1. Select place on disc you want to bookmark. i. You can use SKIP+ and F.FWD/F.RWD to get to spot ii. Press Pause when desired spot reached. 2. Press the MARK button on remote to display a menu with Bookmark 1, Bookmark 2, and Bookmark 3. i. Bookmark 1 is highlighted. If no time is entered, press OK and the time of the place in the video you selected while doing Step 1will be entered. ii. If you want to enter a second and third place in a video, press MARK and select another place in the video. iii. Return to the menu. iv. Press the down directional button to highlight Bookmark 2 or 3. 3. Press OK and the time of the place in the video you selected will be entered 3. Erase or reset the bookmarks. i. Press MARK to display Bookmark menu ii. Press CLR to erase Bookmark 1. iii. Press the down directional button to highlight Bookmark 2 or 3. iv. Press CLR to clear highlighted bookmark setting. v. To set new bookmark, follow steps 1 and 2. Creating customized sound clip on a CD that repeats: You can create a clip in a CD that starts and stops at desired points. 1. Press A-B at the place in the video you want clip to start. Rep A- appears on the screen 2. Press A-B at the place in the video you want clip to end. Rep A-B appears on the screen 3. Press A-B again to cancel clip setting. Rep A-B Off appears on the screen NOTE: The DVD player does not allow you to start an audio clip in one track and end it in the subsequent track. (e.g. If you press A-B in track 1, it will cancel A-B at the start of track 2.). Filters With filters you can control how the CD replays. There are two sections in filter that can be set Repeat and Mode. 1. Press the right directional button to enter the Function Window. NOTE: If you have created a program (See Putting tracks on a CD in desired order section on page 18), you will already be in the Function Window. Press the up directional buttons to highlight the Filter adjustments. 2. Press the down directional button to highlight Repeat and/or Mode. 3. Press OK to see the menu choices. (See descriptions below.) 4. Press the down directional button to highlight the desired choice. 5. Press OK. 6. Press the left directional button to return to the Document Window and press PLAY/PAUSE to play. Repeat allows you to set how the CD will play. Off: CD will play through once. Single: Repeats 1 track. All: Repeats entire CD. Mode allows you to shuffle the tracks on a CD. Off: The tracks play in the order that they are on the disc. Shuffle: The tracks are played randomly. Music Intro.: Plays the first 10 seconds of a track. NOTE: In the setting Repeat: Off and Mode: Shuffle, all the tracks on a CD are played once in random order. PDi Communication Systems, Inc. 40 Greenwood Lane Springboro, Ohio 45066 USA PH +1-937-743-6010 FX +1-937-743-5664 Document Number: PD196-058R4 Communication Systems Inc. Better Solutions Are Within Reach™ PDI-DVD-SA Player Installation Guide Page 18 of 26 INSTALLATION and OPERATING INSTRUCTIONS Putting tracks on a CD in desired order: You can put the tracks on a CD in the order you desire by creating a program. Example: If you only like tracks 3, 5, 7, and 9 on a CD you can create a program that allows only those tracks to be played without having to advance to the next track manually. You can have the tracks play in any order e.g. 9, 3, 7, and 5. 1. Press the right directional button to enter the Function Window. 2. Press the down directional button until Edit is highlighted. 3. Press OK. 4. Press the left directional button to return to the Document Window. 5. Press the down or up directional buttons to highlight the track you want to be first on the program. 6. Press OK. A check mark will appear to the left of the track. 7. Repeat these two steps until all the tracks you want in a program have check marks to the left of them. The tracks will be placed in order of the selection. e.g. track 7 will be before track 5, if you select it first. 8. Press the right directional button to re-enter the Function Window. 9. Press the down directional button to highlight Add to Program. 10. Press OK. 11. Press the down directional button to highlight Program View. 12. Press OK. A list of tracks in the order you selected them will appear in the Document Window. 13. Adjust the Filters to control how the tracks are played (See Filters section on page 17.) 14. Press the left directional button to enter the Document Window. 15. Press the up or down directional buttons to highlight the track you want to start playing. 16. Press PLAY/PAUSE to start playing the track. Removing tracks from the playlist NOTE: You cannot remove tracks from a playlist while a track is being played. If a track is playing, press STOP twice before doing the following procedure. 1. In the Document Window of Program View, press the up or down directional buttons to highlight the track you want to erase from the playlist. 2. Press OK. A check mark will appear to the left of the track. If you want to erase more than one track, repeat steps 1 and 2. 3. Press the right directional button to return to the Function Window. 4. Press the down directional button to highlight Clear Program 5. Press OK. The tracks with check marks next to them will disappear from the list. 6. Press the up directional button to highlight Browser View. 7. Press OK. PDi Communication Systems, Inc. 40 Greenwood Lane Springboro, Ohio 45066 USA PH +1-937-743-6010 FX +1-937-743-5664 Document Number: PD196-058R4 Communication Systems Inc. PDI-DVD-SA Player Installation Guide Page 19 of 26 INSTALLATION and OPERATING INSTRUCTIONS Better Solutions Are Within Reach™ Media Card/USB Drive/Data CD Besides being able to play DVDs and audio CDs, the DVD Player can handle audio and pictures that are stored on a CD-ROM, SD/MS/MMC card, or USB drive. File types Photo JPEG Audio WMA MP3 Inserting SD/MS/MMC cards An SD/MS/MMC Card is inserted into the narrow, vertically positioned slot at the top of the DVD Player. Make sure the label side is facing the side of the player with the disc image. Disc image 1. After inserting the card, press DVD/CARD/USB on the remote. 2. If SD/MMC is not highlighted in the on-screen menu, press the down directional button to highlight it. 3. Press OK to access the Display Screen. Inserting USB drive A USB drive is inserted into the rectangular, vertically positioned port at the top of the DVD Player. Disc image 1. After inserting the drive, press DVD/CARD/USB on the remote. 2. If USB is not highlighted in the on-screen menu, press the down directional button to highlight it. 3. Press OK to access the Display Screen. PDi Communication Systems, Inc. 40 Greenwood Lane Springboro, Ohio 45066 USA PH +1-937-743-6010 FX +1-937-743-5664 Document Number: PD196-058R4 Communication Systems Inc. Better Solutions Are Within Reach™ PDI-DVD-SA Player Installation Guide Page 20 of 26 INSTALLATION and OPERATING INSTRUCTIONS Photos The DVD player can display JPEG images on a SD/MS/MMC card, CD, or USB drive. The photos can be shown individually or in a slideshow. Display Screen Function Window Display Window Document Window Accessing photos 1. In the Document Window of the display screen, press the up or down directional buttons to highlight the desired photo or folder. A thumbnail of the image will be in the Display Window. NOTE: To back out of a folder press the up or down directional buttons to highlight a folder icon with an up arrow in it. Then press OK. 2. Press OK or PLAY/PAUSE to view the photo full screen or enter the folder. NOTE: If there are several photos in the folder they will all be displayed full screen in a slideshow. 3. Press STOP to end the slideshow and return to the menu. Adjusting slideshow operation 1. Press the right directional button to enter the Functional Window. 2. Press the down directional button to highlight Repeat. 3. Press OK to select Off, Single, or All. NOTE: If Single is selected make sure the JPEG image you want to view is highlighted in the Document Window. 4. Press the down directional button to highlight Off or Shuffle. NOTE: Music Intro is not an active choice. 5. Press the left directional button to return to the Document Window and view the desired photo full screen or in a slideshow. Rotating pictures while slideshow is playing While the slideshow is playing, press one of the four directional buttons to rotate pictures clockwise or counter-clockwise. The angle being rotated to will appear on the screen. PDi Communication Systems, Inc. 40 Greenwood Lane Springboro, Ohio 45066 USA PH +1-937-743-6010 FX +1-937-743-5664 Document Number: PD196-058R4 Communication Systems Inc. Better Solutions Are Within Reach™ PDI-DVD-SA Player Installation Guide Page 21 of 26 INSTALLATION and OPERATING INSTRUCTIONS Zoom in on photos 1. Press ZOOM. Zoom to 1x, 2x, 3x, or Off. 2. Use the four directional buttons to move the picture on the screen. 3. Press STOP to return to the menu Audio Files The DVD player can play audio files that are on a SD/MS/MMC card, data CD, or USB drive. Available audio files will appear in the Document Window. Display Screen Function Window Display Window Document Window The DVD player can play WMA and MP3 files. Even if there are other files on the media, the DVD player will play all of the MP3 and WMA files on the media in a playlist. NOTE: If there are audio files in a separate folder they will not be part of the play list. To access content in those folders, highlight the folder by using the directional buttons. Then press OK. To back out of a folder, press the up or down directional buttons to highlight the folder icon with an arrow in it. Then press OK. Play: 1. Press the down directional button to highlight the desired audio file 2. Press PLAY/PAUSE. Pause: Press PLAY/PAUSE. Stop: Press STOP. Advancing chapters/restarting or returning to chapters: Press SKIP+ button on the remote to advance to the next file. Press SKIP- button to start at the beginning of the current file. Press SKIPbutton twice to return to a previous file. PDi Communication Systems, Inc. 40 Greenwood Lane Springboro, Ohio 45066 USA PH +1-937-743-6010 FX +1-937-743-5664 Document Number: PD196-058R4 Communication Systems Inc. PDI-DVD-SA Player Installation Guide Page 22 of 26 INSTALLATION and OPERATING INSTRUCTIONS Better Solutions Are Within Reach™ Filters: With filters you can control how the playlist or file replays. There are two sections in filter that can be set: Repeat and Mode. 1. Press the right directional button to enter the Function Window NOTE: If you have created a program (See Putting files in a playlist in desired order on page 23), you will already be in the Function Window. Press the up directional buttons to highlight Repeat and/or Mode. Skip step 2. 2. Press the down directional button to highlight Repeat and/or Mode. 3. Press OK to see the menu choices. (See descriptions below.) 4. Press the down directional button to highlight desired choice. 5. Press OK. 6. Press the left directional button to return to the Document Window and press Play. Repeat allows you to set how the playlist will play. Off: Playlist will play through once. Single: Repeats 1 file All: Repeats entire playlist. Mode allows you to shuffle the files on a playlist. Off: The files play in the order that they are on the media. Shuffle: The files are played randomly. Music Intro.: Plays the first 10 seconds of a file. NOTE: In the settings Repeat: Off and Mode: Shuffle, all the files are played once in random order. PDi Communication Systems, Inc. 40 Greenwood Lane Springboro, Ohio 45066 USA PH +1-937-743-6010 FX +1-937-743-5664 Document Number: PD196-058R4 Communication Systems Inc. Better Solutions Are Within Reach™ PDI-DVD-SA Player Installation Guide Page 23 of 26 INSTALLATION and OPERATING INSTRUCTIONS Putting files in a playlist in desired order: You can put the files in the playlist in the desired order by creating a program. Example: If you only like files 3, 5, 7, and 9 you can create a program that allows only those to be played without having to manually advance to the next file. You have the tracks play in any order e.g. 9, 3, 7, and 5. 1. Press the right directional button to enter the Function Window. 2. Press the down directional button until Edit is highlighted. 3. Press OK. 4. Press the left directional button to return to the Document Window. 5. Press the down directional button or up directional button to highlight the file you want to be first on the program. 6. Press OK. A check mark will appear to the left of the track. 7. Repeat these two steps until all the tracks you want in a program have check marks to the left of them. The tracks will be placed in order of selection. 8. Press the right directional button to re-enter the Function Window. 9. Press the down directional button to highlight Add to Program. 10. Press OK. 11. Press the down directional button to highlight Program View. 12. Press OK. A list of tracks in the order you selected them will appear in the Document Window. 13. Adjust the Filters to control how the files are played (See Filter section on page 22.) 14. Press the left directional button to enter the Document Window. 15. Press the up or down directional buttons to highlight the file you want to start playing. 16. Press PLAY/PAUSE to start playing the file. Removing files from the playlist NOTE: You cannot remove files from the playlist while a file is being played. If a file is playing, press STOP twice before doing the following procedure. 1. In the Document Window of Program View, press the up or down directional buttons to highlight the file you want to erase from the playlist. 2. Press OK. A check mark will appear to the left of the file. If you want to erase more than one file, repeat steps 1 and 2. 3. Press the right directional button to return to the Function Window. 4. Press the down directional button to highlight Clear Program. 5. Press OK. The files with check marks next to them will disappear from the list. 6. Press the up directional button to highlight Browser View. 7. Press OK. There are several functions that can be done with an MP3 file that cannot be done with a WMA file. Creating customized sound clip in an MP3 that repeats: You can create a clip in an MP3 file that starts and stops at desired points. 1. Press A-B at the place in video you want clip to start. Rep A appears on the screen 2. Press A-B at the place in video you want clip to end. Rep A-B appears on the screen 3. Press A-B again to cancel clip setting. Rep A-B Off appears on the screen NOTE: The DVD player does not allow you to start an audio clip on one file and end it in the subsequent file. (Example: If you press A-B in file 1, it will cancel at the start of file 2.). Fast forward/Fast rewind: Press F.FWD to advance through the audio file. Press F.RWD to rewind through an audio file. The F.FWD and F.RWD speeds are 2x, 4x, 8x, or 16x. Press Play/Pause to return to normal play mode. PDi Communication Systems, Inc. 40 Greenwood Lane Springboro, Ohio 45066 USA PH +1-937-743-6010 FX +1-937-743-5664 Document Number: PD196-058R4 Communication Systems Inc. PDI-DVD-SA Player Installation Guide Page 24 of 26 INSTALLATION and OPERATING INSTRUCTIONS Better Solutions Are Within Reach™ Setup Menu The menu allows you to make adjustments to various settings on the DVD player including language of menus and setting the password. 1. Press SETUP on the remote to access the menu. 2. Press the up and down directional buttons to highlight the main menu item you want to access. 3. Press the right directional button to enter the menu item 4. Press the up and down directional buttons to highlight the sub-menu item you want to access. 5. Press OK NOTE: You may be required to enter the password before changing a setting. The factory preset password is 8888. If you are required to enter the password, enter the four digits with the number keys. Then press OK. 6. Press the up and down directional buttons to highlight the option you want to be set. Or press the left or right directional buttons to set a meter to a desired number. 7. Press OK. 8. Press SETUP to exit. *Can only be set if disc offers feature . Main Menu Sub-menu OSD LANGUAGE DVD MENU SUBTITLE AUDIO LANGUAGE DivX Subtitle VIDEO DivX SUB BACKGROU ASPECT VIEW MODE Options English French Spanish English French Spanish English French Spanish Auto Off English French Spanish UNICODE (UTF-8) WESTERN EUROPEN TURKISH CENTRAL EUROPEAN CYRILLIC GREEK HEBREW ARABIC BALTIC VIENAM NONE GRAY 4:3 /16:9 FILL ORIGINAL HEIGHT FIT WIDTH FIT Description English On Screen Display French On Screen Display Spanish On Screen Display English DVD MENU* French DVD MENU* Spanish DVD MENU* English DVD SUBTITLE* French DVD SUBTITLE* Spanish DVD SUBTITLE* Automatic subtitle Deactivate subtitle display English subtitle* French subtitle* Spanish subtitle* UNICODE (UTF-8) as DivX subtitle* WESTERN EUROPEN as DivX subtitle* TURKISH as DivX subtitle* CENTRAL EUROPEAN as DivX subtitle* CYRILLIC as DivX subtitle* GREEK as DivX subtitle* HEBREW as DivX subtitle* ARABIC as DivX subtitle* BALTIC as DivX subtitle* VIENAM as DivX subtitle* Set no subtitle background Set subtitle background in gray Set TV screen shape at 4:3/16:9 Set View Mode to Fill Set View Mode to Original Set View Mode to Height Fit Set View Mode to Width Fit PDi Communication Systems, Inc. 40 Greenwood Lane Springboro, Ohio 45066 USA PH +1-937-743-6010 FX +1-937-743-5664 Document Number: PD196-058R4 Communication Systems Inc. PDI-DVD-SA Player Installation Guide INSTALLATION and OPERATING INSTRUCTIONS Better Solutions Are Within Reach™ TV SYSTEM VIDEO OUT BRIGHTNESS SHARPNESS HD RESOLUTION AUDIO HD JPEG Digital Output Night Mode RATING Parental Control AUTO FIT PAN SCAN NTSC PAL MULTI COMPONENT Set View Mode to Auto Fit Set View Mode to Pan Scan Set TV system to NTSC Set TV system to PAL Set TV system to MULTI Set video-out to Component P-SCAN Set video-out to P-Scan HDMI Set video out to HD VGA 0-16 0-16 Auto Set video out to VGA Adjust brightness, 8 is default setting value Adjust sharpness, 8 is default setting value Set HD resolution to Auto 480PK/576P Set HD resolution to 480P/576P 720P Set HD resolution to 720P 1080i ON/OFF OFF PCM RAW OFF Set HD resolution to 1080i Set HD JPEG Mode to ON/ OFF Turn off Digital output Set Digital output to PCM Set Digital output to RAW Turn off the Night Mode ON G PG- 13 Adult Turn on the Night Mode Show for general audience Suitable only for audiences above 13 Show at this level only suitable for adults Enter the right password preset and press to confirm Use the settings of the factory Setup the relevant settings at user’s will Put the playback of DVD-Audio disc in priority Put the playback of DVD-Video disc in priority Set password MISC Use default settings DVD Priority Page 25 of 26 Yes No DVD-AUDIO DVD-VIDEO PDi Communication Systems, Inc. 40 Greenwood Lane Springboro, Ohio 45066 USA PH +1-937-743-6010 FX +1-937-743-5664 Document Number: PD196-058R4 Communication Systems Inc. Better Solutions Are Within Reach™ PDI-DVD-SA Player Installation Guide Page 26 of 26 INSTALLATION and OPERATING INSTRUCTIONS Appendix- Running TV Signal through DVD player You can connect a TV signal coaxial cable to the DVD player and have it send the reception signal to the TV. NOTE: This is not the recommended setup. You will get better reception if you connect the signal source directly to the TV. It is also recommended that you play DVD/CDs and read media cards and USB drives through one of the other source ports (S-Video, HDMI, and Composite Video) on the DVD Player. 1. Connect the coaxial cable to the RF In connector on the DVD Player. 2. Connect another coaxial cable to the RF Out connector on the DVD Player and the other end to the TV/Antenna connector on the TV. 3. Set the switch on the back of the TV to CH3 or CH4. 4. Set the TV channel according to the switch on the DVD Player: CH3 is channel 3; CH4 is channel 4. PDi Communication Systems, Inc. 40 Greenwood Lane Springboro, Ohio 45066 USA PH +1-937-743-6010 FX +1-937-743-5664 Document Number: PD196-058R4