1
the possibilities
Thank you for purcnas_ng this Samsung product.
To recewe more comolete service,
please register your product at
www. samsu ng ,com/register
,f
Infolrm ion
TO REDUCETHERISKOF ELECTRIC
SHOCK,DO NOTREMOVETHECOVER(ORRACK).
NO USER-SERVICEABLE
PARTSARE INSIDE.REFERSERVICING
TO QUALIFIED
SERVICE
PERSONNEL.
,&
The lightingflashandArrowheadwithin
TriangleIs awarningsign alertingyoud
dangerousvoltageInsidethe product.
,&
CAUTION : TOREDUCE
THERISK
OFELECTRICThe explanationpoint within the triangleis
SHOCK,
DOHOTREMOVE
COVER
(ORBACK)
NO
a warningsign alertingyouof important
USER
SERVICEABLE
PARTS
IHSDEREFER
instructions accompanyingthe product.
SERVICIHG
TOQUALIFIED
SERVICE
PERSONNEL.
CAUTION
WARNING
• To reduce the risk of fire or electric shock, do not
expose this appliance to rain or moisture.
Apparatusshall not be exposedto dripping or splashingand
no objectsfilled with liquids,such as vases, shall beplaced on
the apparatus.
The Mainsplug is used as a disconnectdevice and shall stay
readilyoperableat any time.
DANG ER
VISIBLEANDINVISIBLELASERRADIATIONWHEN OPEN.
AVOIDDIRECTEXPOSURETO BEAM.(FDA21 CFR)
CLASS
1 LASER
PRODUCT
This product is classified as a CLASS 1 LASER
product.
Use of controls, adjustments or performance of
procedures other than those specified herein may result
in hazardous radiation exposure.
Complies with 21CFR 1040.10 except for deviations
pursuant to Laser Notice No. 50, dated ,June24, 2007.
CAUTION
CLASS3B VISIBLEAND INVISIBLELASERRADIATION
WHEN OPEN.AVOIDEXPOSURETO THE BEAM (lEO
60825-1)
THISPRODUCTUTILIZESA LASER.USE OF CONTROLS
ORADJUSTMENTSOR PERFORMANCEOF PROCEDURES
OTHERTHANTHOSESPEOIFEDHEREINMAYRESULTIN
HAZARDOUSRADIATIONEXPOSURE.DO NOTOPEN
COVERANDDO NOTREPAIRYOURSELF.REFER
SERVICINGTO QUALIFIEDPERSONNEL.
This product satisfies FCC regulations when shielded cables and connectors are used to connect the unit to other
equipment. To prevent electromagnetic interference with electric appliances, such as radios and televisions, use shielded
cables and connectors for connections.
FCC NOTE (for U.S.A)
This equipment has been tested and found to comply with the limits for a Class B digital device, pursuant to Part 15 of the
FCC Rules. These limits are designed to provide reasonable protection against harmful interference in a residential
installation.
This equipment generates, uses and can radiate radio frequency energy and, if not installed and used in accordance with the
instructions, may cause harmful interference to radio communications. However, there is no guarantee that interference will
not occur in a particular installation,
If this equipment does cause harmful interference to radio or television reception, which can be determined by turning the
equipment off and on, the user is encouraged to try to correct the interference by one or more of the following measures:
Reorient or relocate the receiving antenna.
Increase the separation between the equipment and receiver.
Connect the equipment into an outlet on a circuit different from that to which the receiver is connected.
Consult the dealer or an experienced radio/TV technician for help.
CAUTION : FCC regulations state that any unauthorized changes or modifications to this equipment may void the user's
authority to operate it.
:2
English
RF Radiation
Exposure Statement
This equipment complies with FCC RF Radiation Exposure limits set forth for an uncontrolled environment.
This equipment should be installed and operated with a minimum distance of 20cm between the radiator and your body.
This transmitter must not be coqocated or operating in coniunction with any other antenna or transmitter.
This device complies with part 15 of the FCC Rules. Operation is subject to the following two conditions:
(1)This device may not cause harmful interference, and
(2)this device must accept any interference received, including interference that may cause undesired operation.
Changes or modifications not expressly approved
authority to operate the equipment.
by the party responsible
To comply with the FCC RF exposure compliance
located or operated in conjunction
requirements,
for compliance
could void the user's
this device and its antenna must not be co-
The final device into which this transmitter module is installed must be labeled with the following statement:
"This device contains TX FCC D: A3LDNUBS1 ." If this transmitter will be configured as a pc peripheral, it will be the
OEM's r_sponsibility to obtain authorization as such (either through Certification of Declaration of Conformity) prior to
marketing of the device.
Read these operating instructions carefully before using the
unit. Follow all the safety instructions listed below. Keep these
operating instructions handy for future reference.
• Ensure that the AC power supply in your house complies
with the identification sticker located on the back of your
product.
Install your product horizontally,on a suitable base
(furniture),with enough space around it for ventilation (3-4
inches).
1) Read these instructions.
2) Keep these instructions.
3) Heed all warnings.
Do not place the product on amplifiersor other equipment
which may become hot.
Make sure the ventilation slots arenot covered.
4) Follow all instructions.
5) Do not use this apparatus near water.
6) Clean only with dry cloth.
7) Do not block _y ventilationopenings. Installin accordance
with the manufacturer's instructions.
8) Do not install near any heatsources such as radiators,
heat registers,stoves, or other apparatus (including
amplifiers)that produce heat.
9) Do not defeat the safety purpose of the polarized or
grounding-type plug. A polarized plug has two blades with
one wider th_ the other. A grounding type plug has two
blades and a third grounding prong. The wide blade or the
third prong are provided for your safety. If the provided plug
does not fi t into your outlet, consult an electrician for
replacement of the obsolete outlet.
• Do not stack anything on top of the product.
• Before moving the product, ensure the Disc Insert Hole is
empty.
• In order to disconnect the product completely from the
power supply, remove the main plug from the wall outlet,
especially when left unused for a long period of time.
• During thunderstorms, disconnect the AC main plug from
the wall outlet. Voltage pe_s due to lightning could
damage the product,
• Do not expose the product to direct sunlight or other heat
sources. This could lead to overheating and malfunction of
the product.
10) Protect the power cord from being walked on or pinched
particularly at plugs, convenience receptacles, and the point
where they exit from the apparatus.
•
11)Only use attachmenl/accessories specified by the
manufacturer.
• Dieconnect the power cable from the AC supply if the
product malfunctions.
12) Useonly with the cart, stand, tripod,
bracket, or table specified by the
manufacturer, or sold with the apparatus.
When a cart is used, use caution when
moving the caWapparatus combination to
aveid injury from tip-over.
• Your product is not intended fer industrial use. Use of this
product is for personal use only.
13) Unplug this apparatus during lightning storms or when
unused for long periods of time.
14) Referall servicing to qualified service personnel. Servicing
is required when the aoparatus has been damaged in any
way, such as power supply cord or plug is damaged, liquid
has been spilled or objects have fallen into the apparatus, the
apparatus has been exposed to rain or moisture, does not
operate normally, or has been dropped.
Protect the product from moisture, and excess heat or
equipment creating strong magnetic or electric fields (i.e.
speakers.).
• Condensation may occur if your product or disc has been
stored in cold temperatures. If transporting the product
during the winter, wait approximately 2 hours until the
product has reached room temperature before using.
• The batteries used with this product contain chemicals
that are harmful to the envirenment,
Do not dispose of batteries in the general household trash.
English
3
,f
Inform ion
Small scratches on the disc may reduce sound
and picture quality or cause skipping.
Be especially careful not to scratch discs when
handling them,
HoJding discs ........................
,, Donot touchtheplaybacksideofthe disc,
,, Holdthe disc by theedges sothat fingerprintswillnot
get on the surface.
o Do not stick paperor tape on the
disc.
Disc Storage
Do not keep in direct sunlight
Keep in a cool ventilated area
Keep in a clean Protection jacket.
Store vertically.
NOTE
_ Do not allowthe discsto becomecontaminatedwith
dirt,
_ Do not loadcrackedor scratcheddiscs,
Thisproduct
iscovered
byoneormoreofthefollowing
U.S.patents:
5,060,220
5,457,669
5,561,649
5,705,762
6,043,912
6,438,099
6,467,061
6,556,521
6,578,163
6,697,307
6,728,474
6,771,891
6,894,963
6,895,593
6,937,815
6,996,327
7,009,926
7,085,221
7,088,649
7,092,327
7,099,566
7,123,564
7,142,493
7,142,495
7,145,861
7,146,624
7,151,729
7,161,879
7,164,647
7,167,437
7,173,891
7,177,250
7,194,187
7,203,891
7,209,423
7,210,067
7,228,062
7,245,566
7,245,567
7,257,065
7,263,045
7,269,110
7,272,086
7,272,106
7,280,460
7,283,729
7,286,454
7,304,938
Thisproduct
incorporates
copyright
protection
technology
thatis
proteded
byU.S.patents
andotherintellectual
property
rights.Useof
thiscopyright
protection
technology
mustbeauthorized
by
Macrovision,
andis intended
forhome
andotherlimitedviewing
uses
onlyunlessotherwise
authorized
byMacrovision.
Reverse
engineering
or@assembly
is prohibited.
ABOUT
DIVX
VIDEO:
aivX®isadigital
videoformat
created
byDivX,Inc.
ThisisanofficialDivX
Certified
de'v@
thatphysDivXvideo,
Visitwww,divx,com
for
more
information
andsoftware
toolstoconvert
your
filesintoDivX
video,
ABOUT
DIVX
VIDEO-ON-DEMAND:
his DivX
Certified®
device
mustbe
registered
inordertoplayDivXVideo-on-Demand
(VOD)
content.
To
generate
theregistration
code,locate
theDivX
%a section
inthe
de'v@
setupmenu.Gotovod,divx.com
withthiscodetocomplete
the
registration
process
andlearnmoreabout
DivX
voa.
DivXCertified
toplayaivXvideo
uptoHD108%inchding
premium
content.
iPodisatrademark
ofApple
Inc.,registered
intheU.S.and _/
Handl!ng and Storing D!scs ............................................
othercountries.
iPhone
isatrademark
ofAppleInc.
Ifyou get fingerprintsor dirt on the disc, dean it with a
mild detergentdiluted inwater and wipe with a soft cloth.
- When cleaning, wipe gently from the inside to
the outside of the disc
NOTE
_ Condensationmay form if warm aircomes into
contact with cold partsinside the product. When
condensationformsinside the product, it may not
operatecorrectly.If this occurs,removethe disc
and let the productstand for 1 or 2 hourswiththe
power on.
Manufactured
underlicensefromDolbyLaboratories,
Doby,
ProLogicandthedouble-Dsymbolaretrademarks
of Doby
Laboratories,
Manufactured
underlicenseunderU,S,Patent#'s: 5,451,942;
5,956,674;5,974,380;
5,978,762;6,226,616;6,487,535;
7,212,872;7,333,929;7,392,195;7,272,567& otherU,S,
andworldwidepatentsissued& pending,
DTSandtheSymbolareregistered
trademarks,
& DTS-HD,
DTS-HD
MasterAudio,andtheDTSIogosaretrademarks
of
DTS,Inc,Productincludes
software,© DTS,Inc,AllRights
Reserved,
© 2010 Samsung Electronics Co,, Ltd, All rights
reserved,
4'
English
Colqt iqt
2
3
3
Safety Warnings
Important Safety Instructions
Precautions
4
4
4
Cautions on Handling and Storing Discs
License
Copyright
7
8
9
13
14
14
15
16
Key featurss of your new Blu-ray Home Theater
Icons that will be used in manual
Disc Types and Characteristics
Accessories
Description
Front Panel
Rear Panel
Remote control
18
23
25
26
27
28
Connecting the Speakers
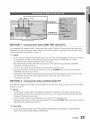
Connecting External Devices/your TV via HDMI
Connecting the Video Out to your TV
Connecting Audio from External Components
Connecting to the Network
Connecting the FM Antenna
29
30
31
31
31
31
33
Before Starting (Initial settings)
Setting the Menu
Display
TV Aspect Ratio
BD Wise (Samsung Products only)
Resolution
HDMI Format
33
33
33
Movie Frame (24 Fs)
Progressive Mode
Still Mode
33
34
HDMI Deep Color
Audio
34
35
35
35
36
37
37
37
37
37
Speaker Setting
Musical Room Calibration
EQ Optimizer
HDMI Audio
Digital Output
Dynamic Range Control
AV Sync
System
Initial Settings
Intemet@TV Screen Size
37
37
38
Anynet+ (HDMI-CEC)
BD Data Management
Clock
38
38
39
39
42
42
42
43
43
43
DivX(R) Registration
DivX(R) Deactivation
Network Setup
Network Settings
Network Status
BD-LIVE Intemet Connection
Language
Security
Parental Rating
Change Password
iiiiiiiiiiiiiiiiiiiiiiiiiiiiiiiiiiiiiiiiiiiiiiiiiiiiiiiiiiiiiiiiiiiiiiiiiiiiiiiiiiiiiiiiiiiiiiiiiiiiiiiiiiiiiiiiiiiiiiiiiiiiiiiiiiiiiiiiiiiiiiiiiiiiiiiiiiiiiiiiiiiiiiiiiiii
English
5
CoNt nt
43
General
43
43
43
43
43
44
44
44
Background
Energy Saving
Front Display
Power On/Off Sound
Light Effect
Support
Software Upgrade
Contact Samsung
45
45
46
47
47
48
50
52
53
54
54
55
55
Playing a Disc
Using the Disc menu / Title menu / Popup menu
Using the Search and Skip Functions
Slow Motion Play/Step Motion Play
Repeat Playback
Using the TOOLS button
Listening to Music
Sound Mode
Playing back a Pictur_
Playing Back a USB Storage Device
Listening to Radio
Simple Playback of Intemet Radio (Pandora)
Using an iPod
57
61
Using Intemet@TV
BD-LIVE TM
61
61
Software Upgrade Notification
Using the AIIShare Function
63
66
67
Troubleshooting
index
Specifications
Figures and illustrations in this User Manual are provided for reference on!y and may differ from actua! product appearance.
6
English
Product
Features
Playback of many disc types, plus an FM tuner
This product allows you to play various discs, including BD-ROM/RE/R, DVD-VIDEO, DVD-RW/-R
(V mode), DVD+RW/+R, MP3/WMA, JPEG, DivX/MKV/MP4, and CD-R/RW, and has a sophisticated
FM tuner, all in a single player.
Full HD audio decoding
support
(Dolby Digital, Dolby Pro Logic IIx, Dolby Pro Logic
Dolby Digital Plus, Dolby TrueHD, DTS, DTS-HD HRA, DTS-HD MA Essential)
Please refer to www.DOLBY.COM and DTS.COM for more detail.
IIz,
HDMI
HDMI transmits Blu-Ray/DVD video and audio signals simultaneously, and provides a clearer picture.
The 1080p (Full HD) resolution provides even clearer pictures.
AV SYNC function
Video may lag behind the audio if the product is connected to a digital TV.
To compensate for this, you can adjust the audio delay time to sync up with the video.
Wireless receiver module
Samsung's rear-channel wireless receiver module does away with cables running between the product
and rear-channel speakers. Instead, the rear speakers connect to a compact wireless receiver module
that communicates with the product.
iPod & iPhone support
You can enjoy music files by connecting your iPod to the product with the supplied iPod dock.
BD Wise
BD Wise automatically adjusts BD Wise-compliant Samsung products to their optimal settings.
This feature is enabled only if BD Wise-compliant Samsung products are connected to each other using
an HDMI cable.
Internet@TV
You can download various fee charged or free of charge applications through the network connection.
Various internet services and content are provided, including news, weather forecast, stock
market, games, movies and music.
Blu-ray
Disc Features
Blu-ray Discs support the highest quality HD video available in the industry - Large capacity means no
compromise in video quality. Furthermore, a Blu-ray Disc has the same familiar size and look as a DVD.
* The following Blu-ray Disc features are disc dependant and will vary. Appearance and navigation of
features will also vary from disc to disc. Not all discs will have the features described below.
Video highlights
The BD-ROM format for movie distribution supports three highly advanced video codecs, including AVC,
VC-1, and MPEG-2.
HD video resolutions are also available:
1920x 1080 HD
1280 x 720 HD
For high-definition
playback
To view high-definition content on a Blu-ray disc, an HDTV (High Definition Television) is required.
Some discs may require using the product's HDMI OUT to view high-definition content. The ability to view
high-definition content on Blu-ray disc may be limited depending on the resolution of your TV.
BD-LIVE
You can use a Blu-ray Disc supporting BD-LIVE through the network connection to enjoy special content
provided by the disc manufacturer.
English
7
etting Stai ted
Make sure to check the following terms before reading the user manual,
Thisindicatesa functionavailabbon a BD-ROM.
BD:RE/B
Thisindicatesa functionavaiBbb on a BD-RE/-Rdisc recordedinthe
BD-REforrnat.
.
Thisindicatesa functionavailabbon a DVD-VIDEO.
DVD-RW (V)ow
DVDq_
r,R_
Thisindicatesa functionavaiBbb on recordedDVD+RWor DVD-RW6/)/
DVD+RW
DVD-R/+Rdiscsthat havebeenrecordedand fi nalized.
Thisindicatesa functionavaiBbb on an audioOD-RW/-R(CD-DAformat
Thisindicatesa functionavailabbina CD-RW/-R,DVD-RW/-Rdisc or a
USBstoragemediacontainingMP3or WMA contents.
Thisindicatesa functionavaiBbb ina CD-RW/-R,DVD-RW/-Rdisc or a
USBstoragemediacontainingJPEGcontents.
Thisindicatesa functionavaiBbb ina CD-RW/-R,DVD-RW/-Rdisc or a
USBstoragemediacontainingDivXcontents.
Thisindicatesa functionavaiBbb on a USBstoragedevice.
OAUTION
'_'t_-
'
.
I
I
'
.
I
I
_
Thisindicatesa situationwherea functiondoes not operateor settingsrnay
be cancelled.
This indicates tips or instructions on the page that help each function
operate.
This indicates a button on the remote that providesdirect and easy
access to a function.
o This product is compatible with the NTSC color system only,
PAL discs will not play,
8
English
Logos of Discs that can be played
Biu-ray
Disc Compatib!litY
...............................................
Bb-ray is a new and evoMng format. Accordingly, disc
compatibilityissuesare possible.Not all discs are
compatble and not every disc will play back. For
additionalinformation,referto the Disc Types and
Characteristicssection of this Manual, Ifyou encounter
compatibilityproblems, pleasecontact the SAMSUNG
customer care centerat 1-800 SAMSUNG.
/
i_i
i_ _ i i_i/ ii
iii_i_ii _i_
NOTE
_ Playbackmay not work for some types of discs, or
when specificoperations,such as angle change
and aspect ratioadjustment,are being performed.
Informationabout the discs is written indetail on
the box, Pleasereferto this if necessary.
_ Do not allow the discto become dirty or scratched,
Fingerprints,dirt, dust, scratchesor deposits of
cigarettesmoke on the recording surfacemay
make it impossibleto use the disc for playback,
_ When a BD-Javatitle is played,loadingmay take
longerthan a normaltitle, or some functions may
perform slowly,
Discs that cannot
be played .....................................
- HD DVD Disc
- DVD-RAM
- 3,9 GB DVD-R Disc for Authoring,
- DVD-RW (VR mode)
- Super Audio CD (except CD layer)
- DVD-ROM/PD/MV-Disc, etc CVD/CD-ROM/
CDV/CD-G/CD-I/LD
- CDGs play audio only, not graphics,
NOTE
_ Some commercialdiscsand DVDdiscs purchased
outsideyour regionmay not be playablewiththis
product. Whenthese discs are played,either"No
disc." or "Pleasecheck the regionalcode of the
disc." willbe dfsplayed.
_ If a DVD-R/-RWdisc has not beenrecorded
properlyin DVDvideoformat, it willnot be playable.
English
9
etting Started
Region
code ....................................................................................................................................
Disc Types .................................................................
Both this product and the discs are coded by
region. These regional codes must match in
order to play the disc. If the codes do not match,
the disc will not play.
DiscType
Area
Region
Code
NorthAmerica,CentralAmerica,
South America,Korea,Japan,
Taiwan,HongKengandSouth
EarlAsia.
Blu-ray
.......
I_r,I
Europe, Greenland, French
territories,MiddleEast,Africa,
AustraliaandNewZealand.
India,China,Russia,Centraland
SouthAsia,
The U.S., U.S. territories and
Canada
Europe,Japan,theMiddleEast,
Egypt,SouthAfrba,Greenland
Taiwan,Korea,the Philippines,
Indonesia,HongKong
DVD-VIDEO
Mexico,SouthAmerica,Central
America,Australia,NewZealand,
PacificIslands,Caribbean
Russia,EasternEurope,India,
most of Africa, North Korea,
Mongolia
China
BD-ROM
Blu-ray Disc Read Only Memory. A BD-ROM disc
contains pre-recorded data. Although a BD-ROM
may contain any form of data, most BD-ROM discs
will contain movies in High Definition format, for
playback on the product. This product can play
back pre-recorded commercial BD-ROM discs.
BD-RE/BD-R
Blu-ray Disc Rewritable/Blu-ray Disc Recordable.
BD-RE/BD-R is the ideal format for making
backups, or recording personal video.
DVD-VIDEO
- A digital versatiledisc (DVD)can containup to 135minutesof images,8 audio languagesand 32 subtitle
languages.It is equipped with MPEG-2picture
compressionand Delby Digitalsurround,allowingyou
to enjoyvivid and clear quality images.
* When switching from the first layer to the second
layer of a dual-layered DVD Video disc, there may
be momentary distortion in the image and sound.
This is not a malfunction of the product.
* Once a DVD-RW/-R recorded in Video Mode is
finalized, it becomes DVD-Video. Prerecorded
(pre-stamped) commercial DVDs with movies are
also referred to as DVD-Videos. This product can
play back pre-recorded commercial DVD discs
(DVD-Video discs) with movies.
DVD-R/-RW
- Once a DVD-R/-RW recorded in Video Mode is
finalized, it becomes DVD-Video. Ability to play
back may depend on recording conditions.
* This product can play back DVD-R disc recorded
and finalized with a Samsung DVD video recorder.
* Playback can be perfomed with DVD-RW discs in
the Video Mode and finalized only.
DVD+RW
* This product can play back a DVD+RW disc
recorded with a DVD Video recorder. Ability to
play back may depend on recording conditions.
DVD+R
* This product can play back a DVD+R disc recorded
and finalizedwith a DVDVideo recorder, Ability to
play back may depend on recording conditions,
10
English
Audio CD
DivX (Digital video express)
., An audio disc on which 44.1kHz PCM Audio is
recorded.
DivXis a video file format developed by Microsoft and is
based on MPEG4 compression technology to provide
audio and video data over the Internet inreal-time.
., This product can play back CD-DA format audio
CD-R and CD-RW discs.
., The product may not be able to play some CD-R or
CD-RW discs due to the condition of the recording.
MPEG4 is used for video encoding and MP3 for audio
encoding so that the users can watch a movieat near
DVD-qualityvideo and audio.
CD-R/-RW
Supported
., Usea 700MB (80 minute)CD-R/-RW disc.
If possible,do not use a 800MB (90 minute)or above
disc, asthe disc may not playback.
., Ifthe CD-R/-RW disc was not recorded as a closed
This product only supports the following media formats.
If both video and audio formats are not supported, the
user may experience problems such as broken images
or no sound.
session,you may experience delays when playing
back the beginningof the disc or all recorded files
may not play.
., Some CD-R/-RW discs may not be playablewith this
product, depending on the device which was used to
burn them. Forcontents recorded on CD-R/-RW
mediafrom CDsfor your personaluse, playability
Formats
(DivX)
Supported Video Formats
SupportedVersions
DivX3,11_DivX5,1,XviD
Supported Audio Formats
may vary depending on contents and discs.
Disc Format
Using MP3 discs
MP3
80_384kbps
44,1khz
., CD-R/-RW, DVD-RW/-R recordedwith UDF,
ISO9660or JOLIETformat can be played back.
AC3
128_384kbps
44,1/48khz
DTS
1,5Mbps
44,1khz
., OnlyMP3 fileswith the ".mp3" or ".MP3" extension
can be played.
., Playablebit rate range is from 56 Kbps to 320 Kbps.
., Playablesample-rate is 32KHz to 48KHz.
., The productcan handlea maximumof 1500filesand
foldersundera parentfolder,ForMP3filesrecordedwith
aVBR(VariableBit Rates),thesoundmay cutinand out,
Using JPEG discs
., CD-R/-RW, DVD-RW/-R recorded with UDF,
ISO9660 or JOLIET format can be played back.
., DivX files, including audio and video files, created
in the DTS format can only support up to 6Mbps.
., Aspect Ratio : Although the default DivX resolution
is 640x480 pixels (4:3),this product supports up
to 800x600 pixels (16:9). TV screen resolutions
higher than 800 are not supported.
., When you play a disc whose sampling frequency is
higherthan 48khz or 320kbps, you may experience
shaking on the screen during playback.
., Opel and gmc is not supported.
., Only JPEG files with the ".jpg", ".JPG", ".jpeg" or
"JPEG" extension can be displayed.
MKV, MP4
., Progressive JPEG is supported.
., CD-R/-RW,
DVD-RW/-R
., Video Files with the following extensions can be
played. : .avi, .divx, .mkv, .mp4, .AVI, .DIVX,
.MKV, .MP4
(V)
., This is a format that is used for recording data on a
DVD-RWor DVD-Rdisc. The disc can be played by
this product once it has been finalized.
., If a disc has has been recorded in Video Mode by a
different maker's recorder but has not been finalized,
it cannot be played bythis product.
DVD-R/-RW, USB, PC streaming
NOTE
_ Some DivX, MKV and MP4 format discs may
not play, depending on the video resolution and
frame rate condition.
English
11
Supported
File Formats
Video File Support
Divx3,11/4,x/5,1/6,0
XviD
*,avi
AVl
MP4v3
H,264BP/MP/HP
MP3
AC3
DTS
WMA
PCM
*,mkv
MKV
XviD
MP3
AC3
DTS
VC-1AP
1920x1080
1920x1080
WMA
1920x1080
MP4(mp4v)
MP4
1920x1080
AAC
H,264BP/MP/HP
MPEG1
*,mpg
*,mpeg
1920x1080
1920x1080
WMV
VC-1SM
*,mp4
1920x1080
1920x1080
H,264BP/MP/HP
*,wmv
1920x1080
1920x1080
VC-1AP(wmvl)
DivX5,1/6,0
1920x1080
PS
MPEG2
H,264BP/MP/HP
1920x1080
MP1,2
AC3
DTS
1920x1080
1920x1080
1920x1080
Music File Support
!!ii!!ii!!ii!!ii!!ii!!ii!!ii!!ii!!ii!!ii!!ii!!i_ii_ii_i_!_!_i_i_!_!_!_!_!_!_
_!_!_!_!_!_!_!_!_!_!_!_!_!_!_!_!_!_!_
¸_iii:i,i_i_i!!i!i:!i:!i:!i:!i:!i:!i:!
:i:i:i:i:i:i:i:i:i:i:i:i:
.....
*,mp3
MP3
MP3
Compliant
with WMAversion10
*,wma
WMA
WMA
*Samplingrates(inkHz)- 8, 11, 16, 22,32,
44,1,48
* Bit rates- All bit-ratesintherange5kbpsto
384kbps
1.:2
English
USB Host Spec!fication
- CBI (Control/Bulk/Interrupt)
USB Host Specification
- Digital Cameras that use PTP protocol or
require additional program installation when
connected to a PC are not supported.
• Supports USB 1.1 or USB 2.0 compliant devices.
• Supports devices connected using the USB
A type cable.
• Supports UMS (USB Mass Storage Device)
V1.0 compliant devices.
• Supports FAT (FAT, FAT16, FAT32) file
is not supported.
- A device using the NTFS file system is not
supported. (Only the FAT 16/32 (File Allocation
Table 16/32) file system is supported.)
- Does not operate with Janus enabled MTP
(Media Transfer Protocol) devices.
system formatting.
Non-compliance
USB Devices that can be used with the
product
• Does not support a device that requires installing
a separate driver on the PC (Windows).
• Does not support connection to a USB hub.
• A USB device that is connected using a USB
extension cable may not be recognized.
2.
MP3 Player
3.
DigitalCamera
4.
RemovableHDD
Operational
1. USB Storage Device
Limitations
- RemovableHDDs containing lessthan 160
Gbytes are supported, RemovableHDDs
containing 160Gbytes or more may not be
recognized, depending on the device,
- Ifthe connected device does not work because
• If the connected device has multiple drives
(or partitions) installed, only one drive
(or partition) can be connected.
• A device supporting USB 1.1 alone may
cause a difference in the picture quality,
depending
Supported
the USBjack does not supply enough power,
you can use a separate power cable to supply
power so that it can work properly, The USB
cable connector may differ, depending on the
manufacturer of the USB device,
on the device.
file Formats
JPG
MP3
JPG,JPEG
,MP3
-
80-384kbps
640x480
-
44,1kHz
5.
USB card Reader: One slot USB card reader and
Multi-slot USB card reader,
- The USB card reader may not be supported,
depending on the manufacturer,
- Ifyou installmultiple memo,/devices into a
multi-card reader, you may experience
problems,
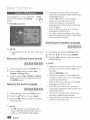
Check for the supplied accessories below.
English
13
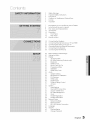
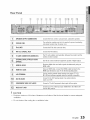
ttir <3
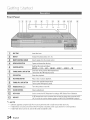
Front Panel
\
1
_}
_
DiSCTRAY
Insertdischere,
DISPLAY
Displaysthe playingstatus,time, etc,
REMOTECONTROL
SENSOR
[4"
Detectssignalsfromtheremotecontrol,
OPENICLOSE
BUTTON
Opensandclosesthe disctray,
FUNCTION
BUTTON
Switchesthe modeasfollows:
BDIDVD-, D. IN -, AUX-, ONLINE"-', NDMII --' NDMI2 --' FM
1 61
Goesbackto the previoustitle/chapter/track,
TUNING
DOWN
& SKIPBUTTON Tunesdownthe FMfrequencyband,
7'
STOP
BUTTON
Stopsdiscplayback,
8
PI.AY/PAUSE
BUTTON
Playsa discor pausesplayback,
9_
TUNING
UP& SKIPBUTTON
Goesto the nexttitle/chapter/track,
Tunesup the FMfrequencyband,
POWER
BUTTON
(_)
Turnsthe producton andoff,
111
VOLUME
CONTROL
Volumeadjustment,
1_
ASCINJACK
Usedto connect
theASCMicrophone
forsettingup MRC(MusicalRoomCalibration).
I13/
,_
USBPORT
A U% storagedevicecanbeconnected
hereandusedasstoragewhenconnected
toBDLIVE.it canalsobeusedfor softwareupgrades
andMP3/JPEG/DivX/MKV/MP4
playback.
1_}
NOTE
_ Seffwareupgradesusingthe USBPortmust be performedwith a USBmemoryflash stickonly.
_ A USBdevice consumingmore than500mA requiresa separatepower supplydevicefor normaloperation.
_ A USB HDDdevicecannot be used for BD Datastorage(BD-LIVE).
14'
English
Rear Panel
1
SPEAKEROUTPUTCONNECTORS
Connectthe front, center,surroundback,subwooferspeakers,
COOLINGFAN
Thecoolingfall suppliescoolairto theproductto preventoverheating
an(]alwaysrevolveswhenthepoweris on,
iPod JACK
Connectthe iPoddockconnectorhere,
FM 75[3 COAXIALJACK
Connectthe FM antenna,
TXCARDCONNECTION
(WIRELESS)
TheTXcardenablescommunicationbetweenthe productandthe
_lrelessreceivermodule,
EXTERNAL
DIGITAL
OPTICAL
INJACKS
(OPTICAL)
use [nls [o connectexternalequipmentcapableof digitaloutput,
7"
----o
HDMIIN JACKS
Receivesdigitalvideoandaudiosignalssimultaneouslyusingan
HDIk cable,
8
.
HDMIOUTJACK
Usingan HDMIcable,connectthis HDMIoutputterminalto the
HDI_ inputterminalonyourTVfor the bestqualitypicture,
9
.
LANTERMINAL
Canbe usedfor networkbasedservices(seepages57-62),
BD-LIVEand softwareupgradeunderthe networkconnection,
X
AUXIN JACKS
Connectto the 2OHanalogoutputof an externaldevice
sucnasa VCR)
111
COMPONENT
VIDEOOUTJACKS
Connecta TVwithComponentvideoinputsto thesejacks,
12
VIDEOOUTJACK
ConnedyourTV'sVideoInputjack(VIDEOIN)to the VIDEOOUT
Jackonthis product,
4
5
.
! CAUTION
_ Providea minimumof 4 inchesof clearanceon allsidesof the the hometheaterto ensureadequate
ventillation.
_ Do not obstructthe coolingfan or ventilationholes,
English
1-.5
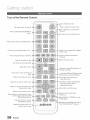
Q ttin
tart ct
Tour of the Remote
Control
Use to select the mode.
Turn the product on and off.
Press to select BD RECEIVER/TV
mode.
Press to select TV's video mode.
Set a Sleep time to shut off the
_rocuct.
To open and close the disc tray.
Press numeric buttons to operate options.
Press this to see the full screen on a TV.
Press to skip backwards or forwards.
Press to stop/play a disc.
Allowsyou to repeata title, chapter,
or disc.
Press to search backwards or
Press to pause a disc.
Cut off the sound temporarily.
Adjust the volume.
stationsand
channels.
Press this to move to the home
menu.
Press to view the disc menu.
Press this to use the Tools menu.
Selecton-screen menuitems and
change menuvalue.
YoucansettheSFE(Sound
Field
Effect)
mode
best
suited
forthetypeofmusicyouareIlsteqing
to.
Use this to enter the popup
menu/title menu.
Use this to display the playback
information when playing
a Blu-ray/DVD disc.
Press this to exit the menu.
Return to the previous menu.
These buttons are used both for menus
on the product and also several
Blu-ray Disc functions.
Press this to link to various
Internet@TV services.
Select the desired Doiby Pro
Logic 1I audio mode.
16
English
Used to set a preset radio
MONO or STEREOfor radio
g.
Jlate and stabilize the volume
(Digital Signal ProcessoO
Installing batteries in the Remote Control
TV Brand Code
List ........................................
* Battery size: AAA
%
%
e
_'
Admiral
(M.Wards)
56, 57, 58
Mitsubishi/
MGA
A Mark
01, 15
MTC
18
01,02, 03, 04, 05,
NEC
18,19,20,40,59,50
06, 87, 08, 09, 10,
Nikei
O3
11, 12, 16, 14
Onking
O3
AOC
01, 18, 40, 48
Onwa
O3
Bell &
Howell
(M.Wards)
57, 58, 81
Panasonie
06, 07, 08, 09, 54,
66, 67, 73, 74
Brocsonic
59, 60
Penney
Candle
18
Philco
Anam
NOTE
_ Make sure to match the "+" and "-" ends of
the batteries with the diagram inside the
compartment.
_ Assuming typical TV usage, the batteries last
for about one year,
_ The remote control can be used up to
approximately 23 feet (7 meters)in a straight line.
Setting
the Remote
1.
a TV with the remote control
Press the BD RECEIVER/TV button to set the
remote control to TV mode.
2. Turn on the TV,
3. While holding down the POWER button, enter
the code corresponding to your brand of TV.
If there is more than one code listed for
your TV in the table, enter one at a time to
determine which code works,
Example : For a Samsung TV
While holding down the POWER button, use the
number buttons to enter 00, 15, 16, 17, or 40.
4.
O3
Citizen
08, 18, 25
Cinema
Classic
If the TV turns off, the setting is complete,
You can use the TV POWER, VOLUME,
CHANNEL, and Numeric buttons (0_9),
_a NOTE
_ The remote control may not work on some
brands of TV's, Also, some operations may not
be possible, depending on your brand of TV.
_sThe remote control will work with Samsung TVs
by default.
18
03,15,17,18,48,
54,59,62, 69,90
Philips
15, 17, 18, 40,
48, 54, 62, 72
97
Pioneer
63, 66, 80, 91
03
Portland
15, 18, 59
Concerto
18
Proton
40
Contee
46
Quasar
06, 66, 67
Coronado
15
08,05,61,82,83,84
Radio
Shack
17, 48, 56, 60,
61,75
Craig
Croslex
62
RCA/
Proscan
18,59,67,76,77,
78, 92, 93, 94
Realistic
03, 19
Control ...........................................
Crown
O3
You can control certain functions of your TVwith
this remote control.
When operating
Cetronic
18,40,59,60,75
Curtis
Mates
59, 61, 63
CXC
O3
Daewoo
02,03,04,15,16,
17,18,19,20,21,
22,28,24,25,26,
27,28,29,30,32,
34,%, 36,48,59,D0
Sampo
40
Samsung
00, 15, 16, 17,40,
43, 46, 47,48, 49,
59, 60, 98
19, 61,65
Sanyo
Scott
03, 40, 60, 61
Daytron
4O
Sears
15, 18, 19
Dynasty
03
Sharp
15, 57, 64
Emerson
@, 15,40,46,59,81,
64,8£83,84,85
Signature
2000
(M.Wards)
57, 58
Sony
50, 51,52, 53, 55
Fisher
Funai
Futuretech
General
Electric (GE)
19, 65
03
03
06, 40, 56, 59,
66, 67, 68
Hall Mark
40
Hitachi
15, 18, 50, 59, 69
Inkel
45
JC Penny
56, 59, 67, 86
JVC
70
Soundesign
03, 40
Spectricon
01
18
SSS
18,40,48,54,
59, 60, 62
Sylvania
Symphonic
61,95, 96
Tatung
O6
Techwood
Teknika
18
03,15,18,25
KTV
59, 61, 87, 88
KEC
03, 15, 40
KMC
15
Vidteeh
18
LG
(Goldstar)
01,15,16,17,87,38,
89,40,41,42,43,44
Videch
59, 60, 69
Luxman
18
Wards
LXl
15,17,18,40,
48,54,60,64
19, 54, 56, 59,
60, 62, 63, 65, 71
(Sears)
Magnavox
15, 17, 18,48, 54,
59,60, 62, 72, 89
Marantz
40, 54
TMK
18, 40
Toshiba
19,57,63,71
18
Yamaha
York
40
Yupiteru
O3
Zenith
58, 79
Matsui
54
Zonda
01
MGA
18, 40
Dongyang
03, 54
English
17
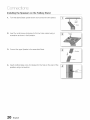
Th's sectl'or"involves variousmethods of connecting the productto other externalcomponents,
Before moving or i'nstalh'ng
the product, be sureto turn off the power and dl'sconnectthe power cord,
Position of the product
Placeit on a stand or cabinetshelf, or under the TV stand
Selecting the Listening Position
The listeningpositionshould be locatedabout 2.5 to 3 times the distanceof the TV's screensizeaway from the TV.
Example : For 32" W's 6,56 - 7,87 feet (2-2,4m)
For 55"W's 115- 131 feet (35_4m)
Placethesespeakersinfrontof yourlisteningposition,facinginwards(about450)
towardyou.Placethe speakerssothattheirtweeterswillbe atthe sameheightasyour
ear.Alignthefrontfaceof thefrontspeakerswiththefrontfaceof thecenterspeakeror
placethemslightlyinfrontof thecenterspeakers.
itis best to installit at thesameheightasthefrontspeakers.Youcan alsoinstallit
directlyoveror undertheTV.
Placethesespeakersto the sidesof yourlisteningposition.Ifthereisn't enough
room,placethese speakerssothey faceeach other.Placethemabout2 to 3 feet
(60to 90cm)aboveyourear,facingslightlydownward.
Unlikethe front andcenterspeakers,the surroundspeakersare usedto handle
mainlysoundeffectsandsoundwillnot come fromthemall thetime.
If you areusingtwo backsurroundspeakers,placethembehindthe listeningposition
andabout2.3-3.3feet(70cm to 1 m)aboveyourears.
Thepositionof thesubwooferisnot socritical.Placeit anywhereyou like.
18
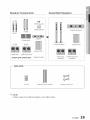
English
Speaker
Components
.........................................................................
Assembled
Speakers
(L)(R)
SCRBA!
(Large):
2EA
IWlW
SORBA!
(Small):
8EA
CENTER SPEAKER
STAND
FRONT
CENTER
STAND BASE
(L)(R)
(L)(R)
FRONT SPEAKER
SUBWOOFER
SUBWOOFER
SURROUND
SURROUND BACK
SPEAKER CABLE
SURROUND
SPEAKER
SURROUND BACK
SPEAKER
_-- SWA-5000
TX Card
Wireless Receiver Module
Speaker Cable (2EA)
NOTE
_ Referto page20 to installthe Speakerson the TallboyStand.
English
19
2,
Insertfour smallscrews clockwise into the four holes marked using a
screwdriver as shown inthe illustration.
3,
Connect the upper Speakerto the assembled Stand,
4,
Insert another large screw clockwise into the hole on the rear of the
speaker using a screwdriver.
20
English
UA/
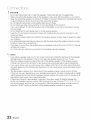
Connecting
1.
2.
The Speakers
Press down the terminal tab on the back of the speaker.
Insert the black wire into the black terminal (-) and the red wire into
the red (+) terminal, and then release the tab.
3.
Connect the connecting
plugs to the back of the product by
matching the colors of the speaker plugs to the speaker jacks.
4. With the product turned off, insert the TX card into the TX Card
Connection (WIRELESS) on the back of the product.
o Hold the TX card so that the label "WIRELESS" faces upward and
insert the card into the port.
The TX card enables communication
and the wireless receiver module.
5.
between the product
Connect the left and right surround speakers to the wireless
receiver module.
6.
Plug the power cord of the wireless receiver module into the
wall outlet.
TX card
7. Turn on the product. The product and wireless receiver
module will now communicate
with each other and you will
hear sound from the Surround speakers.
Front
Speaker
(R)
FrontSpeaker
(L)
Center Speaker
Surrou'sd
Back
Speaker
(R)
_urr0und
Speaker
(L)
Surround
Back
Speaker
L/
Surround
Speaker
(R)
English
21
Coi i eotioi s
! CAUTION
_ Do not let children play with or near the speakers. They could get hurt if a speaker falls.
_ When connecting the speaker wires to the speakers, make sure that the polarity (+/-) is correct.
_ Keep the subwoofer speaker out of reach of children to prevent children from inserting their hands
or alien substances into the duct (hole) of the subwoofer speaker.
_ Do not hang the subwoofer on the wall through the duct (hole).
_ Do not insert any other card except the TX card specifically for this product.
If you use a different TX card, the product may be damaged or you may not be able to remove
the card easily.
_ Do not insert the TX card upside down or in the reverse direction.
_ Insert the TX card when the product is turned off. Inserting the card when it is turned on may
cause a problem.
_ The wireless receiving antenna is built into the wireless receiver module. Keep it away from water
and moisture.
_ For optimal listening performance, make sure that the area around the wireless receiver module
location is clear of any obstructions.
_ If you hear no sound from the wireless surround speakers, switch the mode to DVD 5.1 channel
or Dolby Pro Logic II.
_ In 2-CH mode, you will hear no sound from the wireless surround speakers.
NOTE
_ If you place a speaker near your TV set, screen color may be distorted because of the magnetic
field generated by the speaker. If this occurs, place the speaker away from your TV set.
_ Place the wireless receiver module at the rear of the listening position. If the wireless receiver
module is too close to the product, it may cause some sound interruption due to interference.
_ If you use a device such as a microwave oven, wireless LAN Card or any other device that uses
the same frequency (2.4/5.8GHz) near the product, it may cause some sound interruption due to
interference.
_ The transmission distance from the product to the wireless receiver module is about 33 feet
(10m), but may vary depending on your operating environment. If a steel-concrete wall or metallic
wall is between the product and the wireless receiver module, the system may not operate at all,
because the radio wave cannot penetrate metal.
_ If the product doesn't make wireless connection, the system needs ID Setting between the
product and wireless receiver module. With the product turned off, press "0"->"1 "->"3"->"5" on
the remote control, and then turn on the product. With the wireless receiver module turned on,
press the "ID SET" button on the back of the wireless receiver module for 5 seconds.
22
English
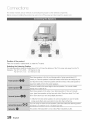
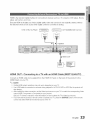
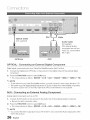
HDMI is the standard digital interface for connecting to devices such as a TV, projector, DVD player, Blu-ray
player, set top box, and more.
Becuase HDMI is all digital, you'll enjoy digital quality video and sound as it was originally created, without
the distortions that can be caused when digital content is converted to analog.
DVD or Blu-ray Player
[_j
SAT (Satellite/Set top box)
HDMI IN
_ HDMI OUT
HDMI OUT i Connect!ng
to a TV with an HDMI Cable (BEST QUALI_
...................
Connect an HDMI cable (not supplied) from the HDMI OUT jack on the back of the product to the
HDMI IN jack on your TV.
NOTE
_s CertainHDMI output resolutions may not work, depending on your]V,
_s If an HDMI cable is connected or removed during playback of a CD-DA, MP3 or JPEG file, the product will
stop playing,
_s After makingthe video connection, set the Video input source on your ]V to match the correspondingVideo
output (HDMI, Component or Composite) on your product,
See your ]V owner's manualfor more information on how to select the ]v's Video Inputsource,
_s Ifyou have set the product's remote control to operate your ]V, press the SOURCE button on the remote
control and select HDMI as the external source of the ]V,
English
23
HDMI
IN • Connecting
to an External Component
with an HDMI Cable
1.
Connect an HDMIcable (not supplied)from the HDMI IN jack on the back of the product to the HDMIOUT jack
on your digital device.
2.
Pressthe FUNCTION button to select HDMI 1 or HDMI 2 input.
The mode switches as follows : BD/DVD "_ D. IN "_ AUX "_ ONLINE "_ HDMI 1 "_ HDMI 2 "_ FM
HDMI Auto Detection
Function
The product's video output will automatically change to HDMI mode when connecting an HDMI cable
while power is on. For possible HDMI resolutions, see page 32.
o HDMI connection description
- HDMI outputs only a pure digital signal to the TV.
- If your TV does not support HDCP, random noise appears on the screen.
What is the HDCP?
HDCP (High-bandwidth DigitalContent Protection)is a system for preventingBD/DVD content outputted via
HDMIfrom being copied. It provides a secure digital link between a video source (PC, DVD etc) and a display
device _,
made
projector etc) Content is encrypted at the source device to preventunauthorizedcopies from being
! CAUTION
_ TheAnynet+functionis supportedonlywhen an HDMICableis connectedto the HDMIOUTof the
product,
24
English
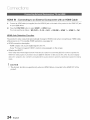
!
Red
Blue
Green
METHOD1
LAN
METHOD2
®
METHOD
1 • Component
Video (BETTER
QUALITY)
If your television is equipped with Component Video inputs, connect a Component video cable (not
supplied) from the Component Video Output (Pr, Pb and Y) jacks on the back of the product to the
Component Video Input Jacks on your TV,
NOTE
_ Youcanselectfroma varietyofresohtionsettingssuchas1080i,720p,480pand480i,depending
onthedisctype.(Seepage32)
_ TheactualresohtionmaydifferfromthesettingintheSetupmenuifbothComponent
andHDMIcablesareconnected.
Theresolution
mayalsobedifferentdepending
onthedisc.(Seepage32)
_ Aftermakingthevideoconnection,
settheVideoinputsourceonyourTVtomatchthecorresponding
Videooutput(HDMI,
Component
orComposite)
onyourproduct.
SeeyourTVowner'smanualfor moreinformation
onhowto selecttheTV'sVideoInputsource.
_ Ifyouhavesettheproduct'sremotecontroltooperateyourTV,presstheiV SOURCE
buttonontheremotecontrolandselect
COMPONENT
astheexternal
sourceof theTV.
_ InDVDphyback,if bothHDMIandComponent
jacksareconnected
andyouselecttheComponent
1080p,1080i,720por 480p
mode,theDisplaySetupmenuwillshowtheoutputresolution
as108%,1080i,720por 480pinthemenu.
Theresolution
is actually
480i.
METHOD
2 1 Composite
V!deo
(GOOD QUALITY) ........................................................
Connect the supplied Video cable from the VIDEO OUT jack on the back of the product to the VIDEO
IN jack on your TV,
NOTE
_ TheVIDEO
sourceis alwaysoutputin480i resolutionregardless
of theresolutionsetintheSetupmenu,(Seepage32)
_ Aftermakingthevideoconnection,
settheVideoinputsourceonyourTVto matchthecorresponding
Videooutput(HDMI,
Component
or Composite)
onyourproduct,
SeeyourTVowner'smanualfor moreinformation
onhowto selecttheTV'sVideoInputsource,
_ Ifyou havesetthe product'sremotecontrolto operateyourTV, pressthe "iVSOURCE
buttonon the remotecontroland
selectVIDEOasthe externalsourceof theTV,
! CAUTION
_ Donot connectthe unit througha VCR,Videosignalsfed throughVCRsmaybe affectedbycopyrightprotection
systemsandthe picturewill bedistortedon thetelevision,
English
25
Coi i eotioi s
Red
White
Optical Cable
(not supplied)
Audio Cable
(not supplied)
Ifthe externalanalog
componenthas only one
AudioOut, connect either
left or right,
OPTICAL
OPTICAL
AUX
• Connecting
an External
Digital
Component
Digital signal components such as a Cable Box/Satellite receiver (Set-Top Box).
1. Connect the Digital Input (OPTICAL) on the product to the Digital Output of the external digital
component.
2.
Press the FUNCTION button to select D.IN input.
o The mode switches as follows : BD/DVD -_ D. IN -_ AUX -_ ONLINE -_ HDMI 1 -_ HDMI 2 -_ FM
NOTE
_ To see video from your Cable Box/Satellite receiver, you must connect it's video output directly to a TV.
_ This system supports Digital sampling frequencies of 32 kHz of higher from external digital components.
_ This system supports only DTSand Dolby Digitalaudio, MPEGaudio (Utstream)is not supported.
AUX"
Connecting
an External
Analog
Component
.........................................................
Analog signal components such as a VCR.
1. Connect AUX IN (Audio) on the product to the Audio Out of the external analog component.
Be sure to match connector colors.
2.
Press the FUNCTION button to select AUX input.
The mode switches as follows : BD/DVD - D. IN - AUX - ONLINE - HDMI 1 - HDMI 2 - FM
NOTE
_ You connect the Video Output jack of your VCR to the TV, and connect the Audio Output jacks of the
VCR to this product.
26
English
Thisproduct
enables
youtoviewnetwork
based
services
(See
pages
57-62)
such
asIntemet@TV
and
BD-LIVE,
aswellasreceive
software
upgrades
when
anetwork
connection
ismade.
Werecommend
using
anAP(Access
Point)
orIProuter
fortheconnection.
Formore
information
onrouter
connection,
refer
totheuser
manual
oftherouter
orcontact
therouter
manufacturer
fortechnical
assistance.
Cable Network
1.
Using the Direct LAN Cable (UTP cable), connect the LAN terminal of the product to the LAN
terminal of your modem.
2.
Set the network options. (See page 39)
©
@
©
Broadband modem
(with integrated router)
Broadband
service
Networking with PC for
AIIShare function
(See pages 61-62)
NOTE
_s Intemetaccessto Samsung'ssoftwareupdateservermay not be allowed,dependingon the routeryou use or the
ISP'spolicy Formoreinformafbn,contact your ISP(InternetServiceProvider)
_s ForDSLusers,pleaseusea routerto make a networkconnection.
_s For the AIIShare function, a PC must be connected in the network as shown in the figure.
English
:27
Coi iq otioi
Wireless
Network
Networking with PC for
AIIShare function
(See pages 61-62)
You can connect the player to your network with a Wireless IP sharer. A wireless AP/IP router is
required to make a wireless network connection. To set the network options, see page 39.
NOTE
_ Youmustusea wirelessIPsharerthatsupportslEEES02,11a/b/g/n,(n is recommended
for stableoperationof the
wirelessnetwork,)
_ V_relessLAN,byitsnature,maycauseinterference,
dependingontheoperatingconditions(APperformance,
distance,
obstacles,interferencebyotherradiodevices,etc),
_ SetthewirelessIPsharerto Infrastructure
mode,Ad-hocmodeis not supported,
_ Vvhenapplyingthe securitykeyfor theAP(wireless
IPshare&onlythefollowingsecurityprotocolsaresupported:
1) AuthenticationMode: WEP,WPAPSK,WPA2PSK
2) Encryption
Type: WEP,TKIP,AES
_ For the AIIShare function, a PC must be connected in the network as shown in the figure.
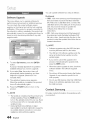
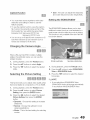
1. Connect the FM antenna supplied to the FM 750 COAXIAL jack.
2. Slowly move the antenna wire around until you find a location where reception is good, then fasten
it to a wall or other rigid surface.
FM Antenna
(supplied)
NOTE
_7
28
English
_ This product does not receive AM
broadcasts.
, ¢tup
7,
Press the 411_ buttons to select the desired
Network Settings : Wired, Wireless or PBC
(WPS), and then press the ENTER button.
If you do net know your Network Settings,
press the BLUE (D) button on your remote
instead to skip Network Settings here, finish the
Initial Settings, and go to the Home menu. If
1. Turn on your TV after connecting the product
(Whenthe product is connected to TV for the first
time, the product will turn on automatically and
display the InitialSettings screen.)
you selected a Network Setting, go to pages
39-42 for more information about the Network
settings. When done, go to Step 8.
2.
Press the A T buttons to select the desired
language,then press the ENTER button.
3.
Press the ENTER button to Start.
8,
Press the OK button.
The home menu appears. (For more
information about home menu, please see
page 30)
• Home Menu
4.
Press the A T buttons to select the desired TV
aspect ratio,then press the ENTER button.
(Seepage 31)
The Musical Room Calibration screenappears.
5.
Plug the ASC microphone into the ASC IN jack
on the product. (See page 35)
6.
Press the ENTER button to Start.
iiiii_
NOTE
_ When the product is connected to TV for the
first time, product will turn on automatically.
This is not a malfunction.
t_ The home menu will not appear if you do not
configure the initial settings.
_* If you press the BLUE(D) button during the
Musical Room Calibration/Network setup, you
can access the home menu even if the
Setting the Musical Room Calibrationfunction
takes about 3 minutes.
network setup is net completed yet.
_* When you return to the home menu, the full
screen mode is cancelled automatically.
English
29
Setup
_* If you want to display Initial Settings screen
again to make changes, press the STOP(I)
button on the front panel of the product for
more than 5 seconds with no disc inserted.
1. Press the POWER button.
The Home Menu appears.
• Home Menu
_* Use the HDMI cable to connect the product to
an Anynet+(HBMI-CEC)-compliantSamsung TV.
If the TV uses a language supported by the
product, that language will be set to a
preferred language automatically.
For this to work, the Anynet+(HDMI-CEC)
feature must be set to Onin both TV and the
product.
_ If the product is left in the stop mode for more
than 5 minutes without being operated, a
screen saver will appear on your TV. If the
product is left in the screen saver mode for
more than 25 minutes, the power will
automatically turn off except during playback
of a CD-DA (Automatic Power-Off Function).
SebctstheIntemet@TV.
SelectstheVideos.
0
SelectstheMusic.
O
SelectsthePhotos.
0
SebctstheSettings.
O
Displaysbuttonsavailabb.
2.
i¸
O
!!
t
MENUButton: Press
thisto moveto thehomemenu.
RETURN
Button: Return
totheprevious
menu.
ENTER
/ DIRECTION
Button:
Pressthearrowbuttons
to movethecursorandselect
anLtem.
PresstheENTER
buttontoLaunch
theselected
itemor
confirmthesetting.
EXITButton: Pressthistoexitthemenu.
30
English
3.
Press the 4 I_ buttons to select Settings,
then press the ENTER button.
Press the A. T buttons to select the desired
4.
submenu, then press the ENTER button.
Press the ,i, T buttons to select the desired
5.
item, then press the ENTER button.
Press the EXIT button to exit the menu.
_.
NOTE
_ When the product is connected to the network,
select Internet@TVfrom the home menu.
Download desired content from SamsungAppS.
_s The access steps may differ depending on the
selected menu.
_s The OSD (On Screen Display) may change in
this product after yeu upgrade the software
version.
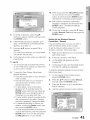
You can configure various display options such as
the TV Aspect Ratio, the Resolution, etc.
TV Aspect
_ Ifyou selectthe 16:9Normal,4:3 Pilbrboxmay be
displayed,Inthis case,youcan't seefullscreenby
pressingthe FULL
SCREEN
buttonon theremotecontrol,
BD Wise (Samsung
Ratio
Products
only)
BDWiseis Samsung'slatestinter-connectivity
feature,
Depending on the type of television you have, you
may want to adjust the screen aspect ratio.
When you connect Samsung products with
BD-Wise to each other via HDMI, the optimum
resolution is set automatically,
Certainmovies(4:3 source)
aredisplayedin4:3 Pillarbex
(black bars on sides of
picture) if 16:9 normal is
selected.
o Off : The output resolution is fixed according to
the resolution previously set, regardless of the
resolution of the disc.
On : The original resolution of the BD/DVD disc
is output to the TV,
NOTE
Select when you want to
seethefull 16:9ratioscreen
suppliedby a Blu-rayDisc/
DVD,eventhoughyou have
a TVwitha 4:3 ratioscreen.
Black bars will appear at
the top and bottom of the
screen.
Blu-rayDisc/DVDwithoutthe
blackbarsontopandbottom,
eventhoughyou havea TV
with a 4:3 ratioscreen,The
extremeleftandrightportion
ofthemoviepicturewillbecut
off,
NOTE
If you want to change the resolution in BD
Wise, you must set BD Wise to Offin advance.
_ If you set BD Wise to off, the resolution of the
connected TV will be adjusted to its maximum
resolution automatically,
_ If the product is connected to a device that
does not support BD Wise, you can not use
the BD Wise function.
_ Fora properoperationof BD Wise,settheBDWise
menuof boththe productandthe TVto On,
Resolution
Sets the output resolution of the Component and
HDMI video signal,
The number in 1080p, 1080i, 720p, 480p, or
480i indicates the number of lines of video.
The i and p indicate interlaced and progressive
scan, respectively,
Auto : Automatically checks and sets the optimal
resolution. (HDMI only)
BD Wise : Automatically sets the optimal
resolution when connected via HDMI to a TV with
the BD Wise feature. (The BD Wise menu item
appears only if BD Wise is set to On.) HDMI only.
- 1080p : Outputs1080linesofprogressive
video,(HDMIonly)
- 1080i : Outputs 1080 lines of interlaced video.
_ Depending on the disc type, some aspect ratios
may not be available.
_ If you select an aspect ratio and option which is
different than the aspect ratio of your TV screen,
the picture might appear distorted,
_ If you select the 4:3 Pan-Scan or 4:3 Letter Box,
you can't see full screen by pressing the FULL
SCREEN
button on the remote control,
o 720p : Outputs 720 lines of progressive video,
- 480p : Outputs 480 lines of progressive video,
- 480i : Outputs 480 lines of interlaced video.
(Component & VIDEO only)
English
31
Resolution
according
to the output mode
., Blu-ray Disc playback
i!i: !i i i i!i!!i!! !!i!! !!i
Auto
1080p,Movie
Frame
(24Fs)
0ff
Movie
Frame
(24Fs)
on
Op_malResolu_on
480i
1080p@60F
480i
1080p@24F
480i
1080i
480i
1080i
480i
720p
720p
480i
720p
480i
480p
480p
480i
480p
480i
480i
480i
1080i,M0vie
Frame
(24Fs)
0ff
480i
- DVD playback
Auto
1080p
OptimalResohtion
1080p@60F
480i
10801
1080i
480i
480p
480i
720p
720p
480i
480p
480i
480p
480p
480i
480p
480i
480i
480i
480i
NOTE
_* If the connected TV does not support Movie
Frame or the selected resolution, the message
"If no pictures are shown after the selection,
please wait for 15 seconds. And then, the
resolution will be reverted to the previous value
automatically. Would you like to make a
selection?" will be displayed.
If you select Yes and the resolution is not
supported, the TV's screen will be blank.
Pleasewait for 15 seconds and the resolution
reverts to the previous value automatically.
_* If the screen is blank, press and hold the
STOP (I) button on the front of the product
for more than 5 seconds (no disc inserted).
All settings are restored to the factory default.
Follow the steps on the previous page to
access each mode and select the Display
Setup that your TV will support.
32
480i
English
When the factory default settings are restored,
all user BD data is deleted.
The Blu-ray Disc must have the 24 frame
feature in order to use the Movie Frame (24Fs)
mode.
If both HDMI and Component jacks are
connected and you are currently viewing
component output, there may be a difference
between the resolution listed in the table and
actual resolution depending on your TV.
If the HDMI Auto Detection feature does not
work, you can't select the 1080p resolution or
Movie Frame (24Fs).
HDMI
Format
You can optimize the color setting from the HDMI
output by selecting a connected device Type:
o TV : Select if connected to a TV via HDMI.
Monitor
: Select if connected to a Monitor via
HDMI.
Progressive
Mode
Set to improve picture quality when you view DVDs.
Auto : Select to have the product automatically
set the best picture for the DVD you're
watching.
Video : Select for the best picture from
Concert or TV show DVDs.
NOTE
_ A TV or monitor has to be connected to the
product before you select this option.
Still Mode
Set the type of picture the home theater shows
Movie
Frame (24 Fs)
Setting the Movie Frame (24Fs) feature to On
allows you to adjust the product's HDMI output to
24 frames per second for improved picture quality.
You can enjoy the Movie Frame (24Fs) feature only
on a TV supporting this frame rate. This menu can
only be selected in 1080i or 1080p HDMI output
resolution modes.
when you pause DVD playback.
Auto: Automatically show the best still picture
depending on the content.
Frame : Select when pausing a scene with a
little action.
Field : Select when pausing a scene with a lot
of action.
Off : Movie Frame (24Fs) function is off.
HDMI
On : Movie Frame (24Fs) function is on.
Set to output the picture from the HDMI OUT jack
NOTE
_ Two types of frame rates may be included,
depending on the disc: Movie material (24
frame) and Video material (30 frame). When the
setting switches between Movie (24 frame) and
Video (30 frame), the screen may blink for a
few seconds.
Deep Color ..............
with Deep Color or without. Deep Color allows more
accurate color reproduction with deeper color depth.
Auto: The picture will be output with Deep
Color to the connected TV which supports
HDMI Deep Color.
Off : The picture will be output without Deep
Color.
_ If your TV does net support Movie Frame
(24Fs) function, a pop-up message is
displayed.
English
33
, ¢tup
Distance
If the speakers cannot be placed at equal
distances from the listening position, you can
adjust the delay time of the audio signals from the
front, center, surround, surround back and
DPL iiz
subwoofer speakers.
- Off : Select when you place the Surround Back
speakers as shown,
o On: Provide a more realistic 3D surround
You can set the Speaker Distance between
lft (0.3m) and 30ft (9.0m).
sound with vertical surround system.
i!!i!!
Test Tone
Level
Use the Test Tone feature to check the speaker
connections,
You can adjust the balance and level for each
speaker,
Press the 4 or I_ button to select All.
A test tone will be sent to Front Left -_
Adjusting Front/Center/Surround
/Surround BacWSubwoofer Speaker Level
Center -_ Front Right -_ Surround Right -_
Surround Back L -_ Surround Back R -_
• The volume level can be adjusted in steps from
+6dB to -6dB.
Surround Left -_ Subwoofer in order so you can
make sure the speakers are set up correctly.
• The sound gets louder as you move closer to
+6dB and quieter as you get closer to -6dB.
To stop the test tone, pressthe 4 or _ button to
select Off,
NOTE
_* When HDMI Audio is ON, audio is produced
through the TV speakers, The Test Tone
function is not available,
34
English
Musical Room Calibration
NOTE
By setting the Musical Room Calibration (MRC)
function just once when you relocate or install the
product, you can have the product automatically
recognize the distance between speakers, levels
_ Setting the Musical Room Calibration
function takes about 3 minutes.
_ You can only use the Musical Room Calibration
setup ifthere is no disc in the player,
_ If the ASC microphone is disconnected during the
between channels, and frequency characteristics
to create a 7.1 -channel sound field optimized for
your environment,
Musical Room Calibrationsetup, the setup will be
canceled.
_ When the Musical Room Calibrationfunction is
activated,the DSP, Doby Pro Logic IIand SFE
Mode will not work,
_ If the product is connected to external devicesor
other components (such as an iPod, AUX, DJN),
the Musical Room CalibrationSetup may not work
properly.
EQ Optimizer
Set optimal EQ automatically depending on the
region,
Off : Turn EQ Optimizer off,
On : Turn EQ Optimizer on,
HDMI Audio
The audio signals transmitted over the HDMI
Cable can be toggled On and Off,
Musical Room Calibration
Turns the Musical Room Calibration mode
on and off,
o Off: You hear the speakers set to the User
Speaker Setting values.
On: You hear the speakers set to the Musical
Room Calibration mode values,
Musical Room Calibration
Setting
Off : Video is transmitted over the HDMI
connection cable only, and audio is output
through your product speakers only.
On : Both video and audio signals are
transmitted over the HDMI connection cable,
and audio is output through your TV speakers
only,
NOTE
Plug the ASC microphone into the ASC IN jack,
2.
Placethe ASCmicrophoneat the listeningposition,
_ HDMI Audio is automatically down-mixed to
2ch for TV speakers.
Musical Room Calibration runs automatically
in the following sequence:
Front Left -_ Center -_ Front Right --*
Surround Right -_ Surround Back L
•-*Surround Back R -_ Surround Left -_
Subwoofer
Press the RETURN button to cancel the
Musical Room Calibration Setting,
When the message "REMOVE MIC" appears
in the display, unplug the ASC microphone,
English
35
NOTE
DigitaJ Output ....................................................................................................................................
Set Digital output depending on the connected
receiver, (For more details, please refer to the
digital output selection),
* PCM
_* Be sure to select the correct Digital Output
or you will hear no sound or a loud noise.
_* Ifthe HDMI device (Receiver,TV)is not compatible
with a compressed format (Dolby digital, DTS),the
audio signal outputs as PCM,
- Bistream (Re-encode)
* Bistream (Audiophile)
_ RegularDVDs do not have Secondary and Effect
audio,
Blu-ray Discs may include three audio streams.
_* Some BID-rayDiscs do not have Secondaryand
Effectaudio,
- Primary Audio : The audio soundtrack of the
main feature.
- Secondary
Audio : Additional soundtrack
such as dkector
or actor's commentary.
- Interactive Audio : Interactive sounds will be
heard when selected. Interactive Audio is
different on each Blu-ray Disc.
_ This DigitalOutput setup does not affect the
analog (L/R)audio or HDMI audio output to your
TV,
It affects the optical and HDMIaudio output when
the home theater is connected to a receiver,
_ If you play MPEGaudio soundtracks, audio signal
outputs PCM regardlessof DigitalOutput
Selections (PCMor Bitstream),
Digital Output Selection
PCM
Upto7.1ch
PCM
2ch
DTSre-encoded
PCM
PCM2ch
DolbyDigital
Upto5.1ch
PCM
2ch
DTSre-encoded
DolbyDigital
DolbyDigital
UolbyDigital
Plus
Upto7.1ch
PCM
2ch
DTSre-encoded
Uolby
Digital
Plus
DolbyDigital
onBh-rayDisc Dolby
TruemD Upto7.1ch
PCM
2ch
DTSre-encoded
Dolby
TruemD
DolbyDigital
DTS
Upto6.1ch
PCM
2ch
DTSre-encoded
DTS
DTS
DTS-HD
HRA
Upto7.1ch
PCM
2ch
DTSre-encoded
DTS-HD
HRA
DTS
DTS-HD
MR
Upto7.1ch
PCM
2ch
DTSre-encoded
DTS-HD
MR
DTS
PCM
PCM2ch
POM
2ch
PCM
2ch
PCM
2ch
PCM2ch
Upto5.1ch
Upto6.1ch
PCM
2ch
PCM
2ch
UolbyDigital
DTS
UolbyDigital
DTS
DolbyDigital
DTS
AudioStream
AudioStream
onDVD
UolbyDigital
DTS
DefinitionBh_ray
Discf°r
Any
36
English
Outputs
onlythePrimary
audio
Decodes
Primary,
Secondary
and soundtrack
(mainsoundtrack
ofthe
Decodes
Primary,
Secondary
and Effect
audiostreams
together
into movie)
sothatyourreceiver
candecode
Effect
audiOpcMStreamSaudio.tOgether
into PCMaudio,
thenre-encodes
the theaudiobftstream.
Youwillnothear
PCMaudiointoDTSbitstream.
Secondary
andEffect
audio.
Dynamic
Range
ControJ
Anynet+
(HDMI-CEC)
.....................................
You can listen at low volumes but still hear dialog
clearly, This is only active when a Dolby Digital
signal is detected,
Anynet+ is a convenient function that offers linked
operations with other Samsung products that
have the Anynet+ feature,
o Off : You can enjoy the movie with the
standard Dynamic Range,
To operate this function, connect this product to
a Samsung TV with an HDMI cable.
You can operate this product using a Samsung
TV remote control and start disc playback simply
by pressing the PLAY (_) button on the TV's
remote control,
On : When Movie soundtracks are played at
low volume or from smaller speakers, the
system can apply appropriate compression to
make low-level content more intelligible and
prevent dramatic passages from getting too
loud,
For more information, please see the TV user
manual,
Off : Anynet+ function is off,
On : Anynet+ function is on,
AV Sync
Video may not sync with the audio when the
product is connected to a digital TV, If this occurs,
adjust the audio delay time to match the video.
You can set the audio delay time between
0 msec and 300 msec, Adjust it to the optimal
setting.
Initial Settings
NOTE
_ This function is net available if the HDMI cable
does not support CEC.
_ If your Samsung TV has an _4_x,,_t÷ logo, then
it supports the Anynet+ function.
_ Depending on your TV, certain HDMI output
resolutions may net work.
Please refer to the user manual of your TV.
The Anynet+ function is supported only when
an HDMI Cable is connected to the HDMI OUT
.................................................................................................................
of the product,
By using the Initial Settings, you can set
language, TV aspect, Musical Room Calibration
and Network setting, etc.
For more information on the settings, refer to the
corresponding section in this user manual.
Internet@TV
Screen
Size
Set the Intemet@TV Screen to the optimal size.
- Size 1 : Display smaller application icons, You
may see some black on the sides of the
screen.
Size 2 : Display normal application icons. The
image may be too large for your TV screen,
Size 3 : Display larger application icons. The
image may be too large for your TV screen,
BD Data Management
Letsyou managethe downloadedcontentsfrom a Bb-ray
Discthat supportsthe BD-LIVEservice.
Youcan check the deviceinformationincludingthe
storagesize,deletethe BD dataor changethe Flash
memorydevice.ChangeDeviceallowsyou to selecteither
the product's InternalMemoryor ExternalMemory
(connectedUSBDevice).If the datato be storedfrom
BD-LIVEis greaterthanthe sizeof the remainingmemory
or the InternalMemoryis full, connectan ExternalUSB
device,thenselect ExternalDeviceinthe menu.
Description of Device (Storage) Information
on the Product
DivX(R)
- TotalSize:Totalsizeof theDevice(Storage).
AvailableSize:Available
sizeoftheDevice(Storage).
View DivX(R)VOD Registration Code to purchase
and play DivX(R) VOD content.
Registration
.............................................
NOTE
_* In the external memory mode, disc playback
will be stopped if you disconnect the USB
device in the middle of the playback.
_* Only those USB devices formatted in FAT file
system (DOS 8.3 volume label) are supported.
We recommend you use USB devices that
support USB 2.0 protocol with a 4 MB/sec or
iiiii
faster read/write speed.
_ A USB HDD device cannot be used for BD
Data storage (BD-LIVE).
_ The Resume Play function may not work after
you format the storage device.
_ The total size of BD Data Management may
differ, depending on the software version.
Clock
_ This option is not activated if you select OK.
To activate this option, please activate the
DivX(R)Deactivation.
DivX(R)
Set time-related functions.
_, Clock Mode : You can select Auto or Manual.
If you select Manual, the Clock Set menu will
be activated while DST will be deactivated.
_, Clock Set : You can specify the current time
and date manually.
_, Time Zone : You can specify the time zone
that is applicable to your area.
_, DST : You can set DST (Daylight Saving Time)
1 hour, 2 hour and off.
38
NOTE
English
Dea ct! v atio n............................................
Select this to get a new registration code.
NOTE
_* This function can be operated when DivX(R)
Registration function is deactivated.
To begin setting up the network connection for
your product, follow these steps:
1.
In the Home menu, press the _1_ buttons to
select the Settings, and then press the
ENTER button.
2.
Press the A _' buttons to select Network,
and then press the ENTER button.
3.
Press the A T buttons to select Network
Settings, and then press the ENTER button.
4.
2.
network values, press the RETURN button.
Then, run a Network Test to ensure the
Press the A T buttons to select Network
Type, and then press the ENTER button.
5.
Go to the next section.
Network
In the Network Settings menu, press the
A T buttons to select Network Settings,
and then press the ENTER button.
The Internet Protocol Setup screen appears.
Press the _ button, then select Auto or
Manual, and then press the ENTER button.
Setting
1.
If the Network Function does not acquire the
Settings
Wired Network
2.
3.
network values or you selected Manual, go to
the directions for Manual Setup.
Please contact your ISP to find out if your IP
address is static or dynamic. If it is dynamic, we
recommend using the Auto setting. This is the
easiest and will work in the majority of cases. If it is
static, you must use the manual set up procedure.
Directions for wired networks are below. Directions
for wireless networks are after the directions for
wired networks.
1.
product has connected to your network (See
page 42).
Press the A T buttons to select Wired or
Wireless, and then press the ENTER button.
6.
After the Network Function has acquired the
Up a Wired Connecton
- Auto
If you selected Auto, the Network Function
acquires and fills in the values for IP Address,
Subnet Mask, etc. automatically.
Setting
Up a Wired Connecton
- Manual
If the Auto Setting does not work, you'll need to set
the Network Setting values manually.
To get the Network setting values from most
Windows computers, follow these steps:
1. Right click the Network icon on the bottom
right of the screen.
2.
In the pop-up menu, click Status.
3.
On the dialog that appears, click the Support
tab.
4.
On the Support tab, click the Details button.
The Network settings are displayed.
To enter the Network settings into your product,
follow these steps:
1. On the Internet Protocol Setup screen, press
the ENTER button.
2.
Press the A T buttons to select Manual,
and then press the ENTER button.
3.
Press the T button to go to the first entry
field (IP Address).
NOTE
_ This process can take up to fiveminutes.
English
39
2.
Press the RED (A) button on the remote
control.
3.
Press the PBC (WPS) button on your router
within two minutes, Your product displays
the Network Selection Screen, and
automatically acquires all the network
setting values it needs and connects to your
network, When it is done, it displays an OK
button, Press the ENTER button on your
remote,
4.
Use the number buttons on your remote to
enter numbers,
5.
When done with each field, use the I_
button to move successively to the next
field,
You can also use the other arrow buttons to
move up, down, and back.
6.
Enter the IP Address,
Subnet Mask, and
Gateway values,
7.
Press the T button to go to DNS.
8.
Press the T button to go to the first DNS
entry field. Enter the numbers as above.
9.
Press the RETURN button on your remote.
10. Run a Network Test to ensure the product
has connected to your network (See page
42).
Wireless Network
You can setup the wireless connection three ways:
• Using PBC (WPS)
4.
Setting Up the Wireless Network
Connection
- Auto Network Search
Most wireless networks have an optional security
system that requires devices that access the
network to transmit an encrypted security code
called an Access or Security Key. The Security Key
is based on a Pass Phrase, typically a word or a
series of letters and numbers of a specified length
you were asked to enter when you set up security
for your wireless network, If you use this method
of setting up the network connection, and have
a Security Key for your wireless network, you will
have to enter the Pass Phrase during the setup
process.
[] Setting Up the Network Connection
To set up the wireless connection using Auto
Network Search, follow these steps:
1.
• Using the Auto Network Search function.
Setting Up the Wireless Network
Connection
- PBC (WPS)
The easiest way to set up the wireless network
connection is using the PBC (WPS) function.
If your wireless router has a PBC (WPS) button,
follow these steps:
1.
40
In the Network Settings menu, press the
A T buttons to select Network Settings,
and then press the ENTER button.
The Intemet Protocol Setup screen appears.
English
In the Network Settings menu, press the
A T buttons to select Network Settings,
and then press the ENTER button.
The Intemet Protocol Setup screen appears.
• Manually.
Each method is described below.
After the network connection is set up,
press the RETURN button to exit the
Network Setting screen,
2.
Press the A T buttons to select the
Internet Protocol Setup, and then press
the ENTER button.
3.
Press the A T buttons to select Auto or
Manual, and then press the ENTER button.
4.
If you selected Auto, press the A button to
go to Access Point Selection, and then
press the ENTER button.
The Network function searches for available
wireless networks.
When done, it displays a list of the available
networks.
10. When done, press the YELLOW (C) button
on your remote, or move to the Done
button, and then press the ENTER button,
The Network Connecting screen appears,
11. Wait until the connection confirmation
message is displayed, and then press the
ENTER button. The Network Settings
screen reappears,
12. To test the connection, press the V button
to select Network Test, and then press the
ENTER button,
5. Inthelistofnetworks,
press
theAT
buttons
toselect
anetwork,
andthenpress
theENTER
button,
Setting Up the Wireless Network
Connection
- Manual
6. IfthePIN/Security
pop-up
appears,
goto
Step7.IftheNetwork
Connecting
Screen If the Auto Setting does not work, you need to
appears,
gotoStep11.
enter the Network settng values manually.
7. Press
theAT buttons
toselect
PIN
or
To get the Network setting values from most
Windows computers, follow these steps:
Security.
Formost
home
networks,
youwould
select 1. Right click the Network icon on the bottom
Security
(forSecurity
Key),
right of the screen.
8. OntheSecurity
screen,
enter
your
network's2. In the pop-up menu, click Status,
Pass
Phrase,
3. On the dialog that appears, click the
NOTE
Support tab.
_ Youshould
beable
tofindthePass
Phrase 4. On the Support tab, click the Details button,
ononeofthesetupscreens
youused
toset
The Network settings are displayed,
upyour
router
ormodem.
To Enter the Network settings into your product,
9.
To enter the Pass Phrase, follow these
general directions:
• Press the number keys on your remote to
enter numbers,
• Use the arrow keys on your remote to
move from button to button on the
Security Key screen,
• To enter letters, move to the button
labeled a/A/U*,
and then press the
ENTER button. Each time you press the
ENTER button, you change the kind of
follow these steps:
1.
On the Intemet Protocol Setup screen,
press the ENTER button,
2.
Press the A T buttons to select Manual,
and then press the ENTER button,
3.
Press the T button to go to the first entry
field (IP Address),
4.
Use the number buttons to enter numbers,
characters you can enter (a/A/I/*).
• To enter a letter, press the number button
that corresponds to the letter. Pressing
the button repeatedly changes the letter,
iiii
• To delete the last letter or number you
entered, move to the Delete button, and
then press the ENTER button,
• To clear all entered letters and numbers,
move to the Clear key, and then press the
ENTER button. You can also just press
the RED (A) button on your remote,
English
41
5.
When done with each field, use the I_
BD-LIVE
button to move successively to the next
field.
You can also use the other arrow buttons to
Select whether to allow an Intemet connection
when BD-LIVE service is used.
move up, down, and back.
6.
Enter the IP Address,
Gateway values.
Subnet Mask, and
7.
Press the T to go to DNS.
8.
Press the T button to go to the first DNS
entry field. Enter the numbers as above.
9.
When done, press the A button to return to
Access Point Selection. Select the network,
and then press the ENTER button.
10. Go to Step 6 in the Automatic Wireless
procedure above, and follow the directions
from that point on.
Network Test
Internet
Connection
- Allow (All) : The Intemet connection will be
allowed for all BD-LIVE contents.
- Allow (Valid Only) : The Intemet connection
will be allowed only for BD-LIVE contents
containing a valid certificate.
- Prohibit : No Intemet connection will be
allowed for any BD-LIVE content.
NOTE
_* What is a valid certificate?
When the product uses BD-LIVE to send the
disc data and request to the server to certify
the disc, the server uses the transferred data
to check if the disc is valid and sends the
certificate back to the product.
Use this menu to connect the wired network or
check whether your network connection is
_* The Internet connection may be restricted
while you are using BD-LIVE contents.
working or not.
You can select the language you prefer for home
menu, disc menu, etc.
• On-Screen Menu : Select the language for the
on-screen displays.
- Disc Menu : Select the language for the disc
menu displays.
o Audio
: Select the language for disc audio.
Subtitle : Select the language for disc subtitles.
Network
Status
Check whether a connection to the network and
the Intemet have been established,
42
English
NOTE
_ The selected languagewill only appear if it is
supported on the disc,
When you operate this menu for the first time, the
password setup screen appears. Enter the
desired 4-digit password using the number
buttons. (Default password is set to 0000.)
Parental
Background
Ohange the background theme of the menu screen.
Rating .........................................................................................................................
This function works in conjunction with Blu-ray
Disc/DVDs that have been assigned a rating,
which helps you control the types of Blu-ray Disc/
DVDs that your family can watch.
Select the rating level you want. A larger number
indicates that the program is intended for adult
use only. For example, if you select up to Level 6,
discs rated at Level 7 or 8 will not play.
Energy Saving
You can reduce power consumption by setting
the front panel to turn off automatically when
there is no operation for 5 seconds.
- Off : Energy Saving function is off.
- On : The front panel will automatically turn off
when there is no operation for 5 seconds.
Change
Password
Front Display
...........................................................................................................
Change the 4-digit password used to access
security functions.
Change the brightness of the front panel.
• Auto : Dim during playback only.
• Dim : Dim the display window.
• Bright : Brighten the display window.
Power
On/Off
Sound
Play a melody when the product is turned on and
off.
- Off : Turn Power Sound Off.
- On : Turn Power Sound On.
Light
If you forgot
your
password
Effect ........................................................
You can activate or deactivate the light effect on the
1.
Remove the disc.
top of the product,
2.
Press and hold the STOP (m) button on the
front panel for 5 seconds or more.
All settings will revert to the factory settings.
- Always On : Activate Light Effect at all times,
Select this for retail display,
NOTE
- Auto : Activate Light Effect when turning the
product on and off or when moving the tray.
Select when installing the product in your home,
_ When the factorydefaultsettingsare restored,all the
userdatastoredin the BDdata will bedeleted.
- Off : Turn Light Effect off at all times,
English
43
, ¢tup
You can update software two ways as follows:
By Internet
Software Upgrade .......................................................................................................................
o USB : Visit www.samsung.com/bluraysupport,
This menu allows you to upgrade software for
performance improvements or additional services.
You can check the current software version,
then download and store the latest software
upgrade on the Internet and set the Auto upgrade
notification. If the product is properly connected to
the network by cable or wirelessly, the product will
(RUF file) onto a USB flash drive. Connect the
USB flash drive to the USB port of the product
(disc tray must be empty) to update the
software, then follow the on-screen
instructions.
automatically connect to our website each time it is
turned on and download update files if any valid
upgrade exists.
CD : Visit www.samsung.com/bluraysupport,
download and write the latest software (RUF
file) onto a disc. Insert and play the disc in the
product to start the update, then follow the onscreen instructions.
NOTE
_ Software upgrades using the USB Host jack
must be performed with no disc inside.
iiiii
1. To select By Intemet, press the ENTER
button.
A popup message appears if an update is
available asking if you want to upgrade.
2.
If you select Yes, the product turns off
automatically before restarting, and then
begins the upgrade. (Never turn it on
manually here.)
3. The update progress popup appears.
When the update is completed, the product
turns off automatically again.
4.
_ The USB and CD software updates work the
same as the By Internet update once the
update begins.
_ If you want to cancel the upgrade in the
process of downloading the upgrade data,
press the ENTERbutton.
_ When the system upgrade is done, check the
software details in the software Upgrade
menu.
_ Do not turn oft the product during the System
Upgrade. It may cause the product to not
work properly.
_* Do not use USB devices other than USB Flash
Drives to do software upgrades when using
the USB Host jack.
Press the POWER button to turn on the
product.
_.
NOTE
_* The Update is complete when the product turns
off after restarting. Press the POWERbutton to
turn on the updated product fer your use. Never
turn the product off er en manually during the
update process.
_* Samsung Electronics shalltake ne legal
responsibility fer product malfunction caused by
an unstable Internet connection or consumer
negligence during software upgrade.
4'4
English
Contact
Samsung
Provides contact information for assistance with
your product.
BasicFunctions
Disc Structure
...................................................
The contents of disc are usually divided as below.
Playback
o Blu-ray Disc, DVD-VlDEO
1.
Press the OPEN/CLOSE
the disc tray.
(A) button to open
2.
Place a disc gently into the tray with the
disc's label facing up.
3.
Press the PLAY (_) button or OPEN/
CLOSE (A) button to close the disc tray.
_
tit,e 1 -_,-_tit,e 2
1,_ chapter
2-_, chapter
1-_ chapter
2-_, chapter
3 ,_
- Audio CD (CD-DA)
track I _[- track2 _1_track 3 _[- track 4 -_ track5 4
MP3, WMA, DivX, MKV and MP4
Playback related buttons
PLAY (I_)
-- folder(group)I --*_
folder(group)2
file1 ,._ file2 ,._, file1 ,.p file2 ,-_, fib3
4
Starts playback.
Stops playback.
ill i_iiii _ _i i • If you press the button once:
stop position will be
_ _i}i_iiiiII_
{_!i!I i_i The
memorized.
• If you press the button
twice: The stop position will
be not memorized.
Using the Disc Menu
s oPi,i
With some Blu-ray discs (BD-J),
this function may not work.
PAUSE (|l)
Pauses playback.
1. During playback, press the DISC
MENU button on the remote
control.
2.
Press the A'v _ _ buttons to make
DI80 MENU
Z
the desired selection, then press the
ENTER button.
NOTE
NOTE
_ "Not Available" will appear when an invalid
Depending on the disc, the menu items may
differ and this menu may not be available.
button is pressed.
English
4'_
BasicFunctions
During playback, you can search quickly through
a chapter or track, and use the skip function to
1.
During playback, press the TITLE
MENU button on the remote
control.
2.
jump to the next selection.
TITLEUENU
¢'------h
I_u_l
Search!ng
for a Desired
Press the A'v _1 _ buttons to
make the desired selection, then
;_
_
®®
press the ENTER button.
_* Depending on the disc, the menu items may
differ and this menu may not be available.
_* The Title Menu will only be displayed if there
are at least two titles on the disc.
1.
Each time you press the SEARCH (_
MENU or TITLE MENU button.
_)
button, the playback speed will change as
follows.
BD-ROM,
BD_RB'-R,
DVD_RW/-R,
DVD÷RW/+R,
DVD-VIDEO
the Title List
During playback, press the DISC
2.
®
_ _;_:," F_I_
,, During playback, press the SEARCH (_ _)
button.
NOTE
Playing
scene
_1_2_3_
_ 4_ _ 5_ _
6---,_
7
_ 1 ---__ 2---__ 3 _
_4_5_6_7
_1_2_3
D_SOMENUDivX,MKV,MR4
_1_2_3
I
J
Press the A v buttons to select an
TITLEMENU
entry you want to play from Title
List, then press the ENTER
button.
IPWPI
T1
• To returnto normalspeed playback,press the
PLAY (_) button,
NOTE
_ No sound is played in search mode.
Using the Popup
Menu ..........................................................................
Skipping
1.
2.
During playback, press the POPUP
TITLETvlENU
button on the remote control.
IPWPI
Press the A v _ _ buttons or
ENTER button to select the desired
menu.
NOTE
_* Depending on the disc, the menu items may
differ and this menu may not be available.
4'_
English
Chapters
- During playback, press the SKIP (1_1)
button.
If you press the SKIP (_1) button, the disc
moves to the next chapter.
If you press the SKIP (1_) button, the disc
moves to the beginning of the chapter. One
more press makes it move to the beginning of
the previous chapter.
Slow Mot!on
Play ................................................................................................................
In pause mode, press the SEARCH (_)
button.
3.
To return to normal play, press the REPEAT
button again.
4.
Press the A T buttons to select Off, then
press the ENTER button.
If you press the SEARCH (D._)button, the
playback speed is reduced to
I_, 1/8 I_, 1/4 I_, 1/2
NOTE
To return to normal speed playback, press the
PLAY (_) button.
_ Depending on the disc, the Repeat function
may net be available.
NOTE
Repeat
the Section .........................................
_ No sound is played in slow mode.
_ Slow motion operates only in the forward
direction.
Step Motion
Play
button on the remote control.
2. Press the • T buttons to select
1. During playback, press the REPEAT
REPEAT A-B,
In pause mode, press the PAUSE ( l| ) button.
Each time you press the PAUSE ( l| ) button, a
new frame appears.
To return to normal speed playback, press the
PLAY ( I_ ) button.
NOTE
_ Nosoundis playedinstep mode.
_ Step motionoperatesonlyinthe forward
direction.
Repeat
3.
Press the ENTER button at the point where
you want repeat play to start (A).
4.
Press the ENTER button at the point where
you want repeat play to stop (B).
5.
To return to normal play, press the REPEAT
button again.
6.
Press the ENTER button.
the Title or Chapter
NOTE
_ Ifyou set point(B)before5 secondshas
elapsed,the prohibitionmessagewill appear.
Repeat
the disc title or chapter.
REPS_T
1.
During playback, press the REPEAT |
button on the remote control.
L__.
2.
Press the A T buttons to select
Chapter or Title, then press the
ENTER button.
_.
"
/
'
English
4'7
BasicFunctions
_s Information about the primary / secondary
mode is also displayed if the Blu-ray Disc has a
BONUSVIEW section.
Use the 41_ button to switch between
During playback, you can operate the
disc menu by pressing the TOOLS
button.
primary and secondary audio modes.
_ This function depends on what audio
o TOOLS Menu Screen
languages are encoded on the disc and may
not be available.
A Blu-ray Disc can contain up to 32 audio
languages and a DVD up to 8.
_ Some Blu-ray Discs may allow you to select
either the multi-channel LPCM or Dolby digital
audio soundtrack in English.
Selecting
the Subtitl e Language
%,
NOTE
m Dependingon the disc,the TOOLSmenumay
differ,
Moving to a Des!red Scene Direct!y ......
1. During playback, press the TOOLS button.
2.
Press the A _' buttons to select Subtitle.
3.
Press the _1_ buttons to select the desired
subtitle language.
NOTE
_s Depending on the Blu-ray Disc / DVD, you may
1.
2.
During playback, press the TOOLS button.
be able to change the desired subtitle in the
Press the A T buttons to select Title,
Disc Menu.
Chapter
3.
or Playing Time.
Enter the desired Title, Chapter or Playing
Time using the number buttons, then press
the ENTER button.
Press the DISCMENUbutton.
_s This function depends on what subtitles are
encoded on the disc and may not be available
on all Blu-ray Discs/DVDs.
_s A Blu-ray Disc can contain up to 255 subtitle
Se!ecting
languages and a DVD up to 32.
the Audio Language ......................................
_s Information about the primary / secondary
mode is also displayed if the Blu-ray Disc has a
BONUSVIEW section.
1.
During playback, press the TOOLS button.
2.
Press the A T buttons to select Audio.
3.
Press the 4 _ buttons to select the desired
audio language.
_.
NOTE
_s The _11
_ indicator is not displayed on the
screen if the BONUSVIEW section does not
contain any BONUSVIEW audio settings.
48
English
_s This function changes both the primary and
secondary subtitles at the same time.
_s The total number of subtitles is the sum of the
primary and secondary ones.
Caption
Function
- User : The user can adjust the sharpness
and noise reduction function respectively.
o You must have some experience with video
extraction and editing in order to use this
Settin gth e BO N USVIE W ..............................
feature properly.
To use the caption function, save the caption
file (Lsmi) in the same file name as that of the
DivX media f le (*.avi) within the same folder.
Example. Root Samsung_OO7CDl.avi
Samsung_OO7CD1 .smi
You can use up to 60 alphanumericcharacters or 30
EastAsian characters (2 byte characterssuch as
Koreanand Chinese)for the file name.
Changing
the Camera
The BONUSVIEW feature allows you to view
additional content (such as commentaries)in a
small screen window while the movie is playing.
This function is only available if the disc has the
bonusview feature.
Angle .....................................
When a Blu-ray Disc/DVD contains multiple
angles of a particular scene, you can use the
ANGLE function.
Primarya audio/video
Secondary a audio/video
1.
During playback, press the TOOLS button.
2.
Press the A T buttons to select Angle.
3.
Press the 4 _ buttons to select the desired
1. During playback, press the TOOLS button.
angle.
2.
Selecting
the Picture
Press the A T buttons to select BONUSVIEW
Video or BONUSVIEW Audio,
3. Press the _1_
Setting ..................................
buttons to select the desired
bonusview.
NOTE
This function lets you to adjust video quality when
the home theater is connected to a TV via HDMI.
1.
During playback, press the TOOLS button.
2.
Press the A T buttons to select Picture
_ If you switch from BONUSVIEW Video,
BONUSVIEW Audio will change automatically
in accordance with BONUSVIEW Video.
Setting, then press the ENTER button.
3.
Press the 4 _ buttons to select the desired
Picture Setting, then press the ENTER
button.
Dynamic : Choose this setting to increase
Sharpness.
Normal : Choose this setting for most
viewing applications.
Movie : This is the best setting for watching
movies.
English
4'9
BasicFunctions
valw
¸
ENTERbutton: Playsand pausestheselected
track.
STOPbutton:Stops a track.
Buttons
on the Remote
used for Music
Control
Playback
O
SKiP(_l) button: Duringplayback,movesto
the next pageinthe MusicList or movesto the
nexttrack inthe Pbylist.
SKIP(l_)button : Duringplayback,movesto the
previouspagein theMusic Listor movesto the
previoustrackinthe Pbylist.
Ifyou pressthis buttonafterthreeseconds
of playbackinthe Pbylist,thecurrenttrackis
repbyedfromthe beginning.But,ifyou pressthis
buttonwithinthreesecondsafterplaybackstarts
inthe Pbylist,theprevioustrackis played.
NUMBERbutton: Duringthe Playlistplayback,
pressthedesiredtrack number,The selected
track is played,
O
iiiil}ii!iiiiii!i!i
{Z}
iI O
REPEATbuttons: Selectsthe playmodeinthe
Pbylist,
SEARCHbuttons: FastPby.
(AudioCD (CD-DA)only)
O
PAUSEbutton: Pausesplayback.
e
PLAYbutton: Playsthe currentlyselectedtrack.
O
A T buttons: Selectsa track inthe Music List
or Playlist,
O
YELLOW(C) button: Selector @selecta track
in themusic list,
50
English
Playing an Audio CD (CD-DA)!MP3
Repeat an Audio CD (CD-DA)/MP3
Insert an Audio CD (CD-DA) or an MP3 Disc
into the disc tray.
1. During the Playlist playback, press
o Audio CDs (CD-DA) play automatically.
2.
the REPEAT button.
To start an MP3 disc, press the _
buttons to select Music, then press the
ENTER button.
_..J
Selectthe desired play mode by pressing
the REPEAT button repeatedly.
Tr
Audio CD (CD-DA)/MP3 Screen Elements
REPEAT
I
Audio
CD Trackson
adisc
arepWed
.
(CD-DA)/MP3 intheorderinwhich they
were recordedon thedisc.
AudioCD
(Q")) Track (CD-DA)
Currenttrack is repeated.
(QO) One
MP3
Currenttrack is repeated.
(O1 _i
AudioCD
(CD-DA)/MP3 Alltracksare repeated.
Therandomoptionplays
AudioCD
(::X_)Shuffli (OD-DA)!MP3a disc'stracksinrandom
.
order.
Playlist .................................................................
Insert an Audio CD (CD-DA) or an MP3 Disc
into the disc tray.
{O
Displaysthemusicinformation.
Audio CDs (CD-DA) play automatically.
0
Displaystheplaylist.
To start an MP3 disc, press the _ _ buttons
to select Music, then press the ENTER
button.
0
Showsthecurrenttrack/totaltracks.
2.
Dispbyscontrd buttonsavaibbb.
Showsthecurrentplaytime/totalplaytime.
O
Displaysthecurrentplaybackstatus.
To move to the Music List, press the STOP (I)
or RETURN button.
The Music List screen appears.
3.
Press the A T 4 _. buttons to move to the
desired track, then press the YELLOW (C) button
to check desired tracks.
Repeatthis procedure to select additional tracks.
Displaystherepeatedplaybackstatus.
2.
Press the A T buttons to select the track
you want to play, and then press the ENTER
button.
English
51
BasicFunctions
4.
If there is an undesired track in the playlist,
press the YELLOW (C) button again.
The selected track will be deleted.
5.
Press the ENTER button to play the selected
tracks.
DSP (Digital Signal Processor) Function
DSP regulates the volume level and decreases
drastic volume changes when you change
channels or during a scene transitions.
The selected track play automatically,
DSP
iiiiiiiili!iiil
iiiiii,!,£iiiiiiii_!i_
_@_iiiii_iiiiii@_
SMARTSOUND _MP3 ENHANCER
Press the DSP button.
POWER BASS _ DSP MODEOFF
i!iiiiiiii• SMART
!_!i
!
6. To go to the Music List, press the STOP (u)
or RETURN button.
7. To go to the Playlist, press the ENTER
button.
SOUND : Regulates the volume level
and deceases drastic volume changes when
you change channels or during a scene
transition.
• MP3 ENHANCER : This also helps enhance
your sound experience (ex. mp3 music). You
can upscale your MP3 level sound (24 kHz,
8bit) to CD level sound (44.1 kHz, 16bit).
• POWER BASS : This function stresses low
tones providing deep, powerful sound effects.
NOTE
_ You can create a playlist with up to 99 tracks
on Audio CD (CD-DA).
SFE (Sound Field Effect) MODE ............................
You can set the SFE mode best suited for the
type of music you are listening to.
SFE_,IODE
Press the SFE MODE button.
L__
\
Provides a clear vocal as if
listening in a concert hall.
Also provides a clear vocal as if
listening in a concert hall but, less
powerful than HALL1.
Recommended setting for Jazz,
Gives the feel of being in a grand
church,
Recommended setting for Rock,
Select this for normal listening,
_2
English
€
Dolby Pro Logic
II Mode .............................................................
Using the TOOLS button ..............................
You can select the desired Dolby Pro
Logic II audio mode,
Press the Fill PL II button,
_PL-_
L__rt._,
!:-/
During the slide show playback, you
can use various function by pressing
the TOOLS button.
Whenlistening
tomusic,
youcanexpedence
s0undeffectsasify0uarelistening
t0the
actualperformance,
Addsrealism
tothemovie
s0undtrack.
Youwillexperience
arealistic
multi-channel
effect,asif using
sixspeakers,
whileusing
justthefrontleftandrightspeakers,
Youwillhearmultichannel
surround
sound,
Select
thistolistentosoundfromthefrontleft
anddghtspeakers
andthesubwoofer
only,
Youcanhearlikegamesound,
NOTE
_, Start Slide Show : Select if you want to start
the slide show,
_, Slide Show Speed : Select if you want to
adjust the Slide Show speed,
_, Background
_ When selecting Dolby Pro Logic II mode,
connect your external device to the AUDIO
INPUTjacks (L and R)on the product, Ifyou
connect to only one of the inputs (L or R),you
cannot listento surround sound.
_ This mode is availableonly with 2 channel audio,
Music : Select if you want to
listen to music while viewing a picture,
_, Zoom : Select if you want to enlarge the
current picture, (Enlarged up to 4 times)
_, Rotate : Select if you want to rotate the
picture, (This will rotate the picture either
clockwise or counter clockwise,)
_, Information : Shows the picture information
including the name and size, etc,
NOTE
Playing
a JPEG Disc
1.
Insert a JPEG disc into the disc tray.
2.
Press the 4 _ buttons to select Photos,
and then press the ENTER button.
3.
_ To enable the Background Music function,
both music and MP3 files must be contained in
the same folder. However, the sound quality
can be affected by the bit rate of the MP3 file,
the size of the photo, and the encoding
method.
Press the A T 4 _. buttons to select the
folder you want to play, and then press the
ENTER button.
4.
Press the A T _ _. buttons to select the
photo you want to play, and then press the
ENTER button.
NOTE
_ You can't enlarge the subtitle and PG graphic
in the full screen mode.
English
53
BasicFunctions
NOTE
You must remove the USB storage device
safely by performing the "Safe to Remove
Hardware" function to prevent possible
damage to the USB memory. Press the MENU
button te move to the main screen, press the
YELLOW(O)button, and then press the ENTER
button.
You can use the USB connection to play multimedia
files (MP3, JPEG, DivX,etc.) downloaded from a USB
storage device.
1. Move to the Home menu.
2. InStop mode, connect the USB storage device
to the USB port on the front panel of the product.
The message"Do you want to access the
device?" appears.
3. Press the 41_. button to select Yes, then
press the ENTER button.
4. Press the RED (A) button or the BLUE (D)
button. If you pressed the RED (A) button,
go to Step 5. If you pressed the BLUE (D)
button, go to Step 4 1>
_
When the Audio-OD (CD-DA), MP3, or JPEG
files are in stop mode, you can't see the full
screen by pressing the FULLSCREENbutton on
the remote control.
_ If you insert a disc when playing a USB storage
device, the device mode is changed to "DVD
or CD" automatically.
_ To listento your musicfileswith 7.1 channelsound,
you must setthe DolbyPro Logic IImodeto Matrix.
(Seepage53)
Using buttons on the Remote Control
1,
Press the FUNCTION button to select FM.
2. Tune in to the desired station.
S,
* Automatic Tuning 1 : When the I_ p¢,lbutton
is pressed,a preset broadcaststationis selected.
Press the A T buttons to select USB, then
press the ENTER button.
6. Press the _1_ buttons to select the desired
Videos, Music or Photos, then press the
ENTER button. Go to Step 7.
4-1, Press the BLUE (D) button, the screen
below appears. Go to 5 4,
* Automatic Tuning 2 : Press and hold the
TUNING/OH (^ v) button to search for active
broadcasting stations automatically.
* Manual Tuning : Press the TUNING/OH
(^ v) button to increase or decrease the
frequency incrementally.
Using the buttons
on the home theater
iiiii_
FUNC.
1,
Pressthe FUNCTION ( • ) button to select FM,
2. Select a broadcast station.
• Automatic Tuning 1 : Press the STOP ( [] )
button to select PRESET and then press the
I_ _,¢qbutton to select the preset station.
5-1, Press the 4 1_ buttons to select USB, then
press the ENTER button.
6-1, Press the A T buttons to select the desired
Videos, Music or Photos, then press the
ENTER button.
7.
54'
For playing back Video, Music or Photo
files, refer to pages 45-53.
English
• Automatic Tuning 2 : Press the STOP ( [] )
button to select MANUAL and then press and
hold the I_ _¢q button search the band
automatically
• Manual Tuning : Pressthe STOP ( [] ) button to
select MANUAL and then press the I_ _1
button to tune in to a lower or higherfrequency.
Setting
Mono/Stereo
........................................................................................
Press the MO/ST button.
o Each time the button is pressed, the
sound switches between STEREO
and MONO.
MOIST
L_
You can enjoy music and video filesfrom an iPod
through the product.
- In a poor reception area, select
MONO for a clear, interference-free reception.
Presetting
Stations
Example : Presetting FM 89.10 into memory
1.
2.
Press the FUNCTION button to select FM.
Press the TUNING/CH (^v) button to select
<89.10>.
3.
Press the TUNER MEMORY button.
4.
NUMBER flashes on the display.
Press the I_ _,_1button to select
TUNER
MEI_IOR
v
preset number.
You can select between 1 and 15
Listening
to Music ...........................................
You can play music files stored in the iPod player by
connecting it to the product.
presets.
5.
Press the TUNER MEMORY button again.
- Press the TUNER MEMORY button before
NUMBER disappears from the display.
NUMBER disappears from the display and
the station is stored in memory.
6. To preset another station, repeat steps 2 to 5.
To tunein to a presetstation,press the I_ p¢_l
button on the remotecontrol to select a channel.
1.
Simple Playback is an extended feature of
Pandora. It offers easy access to Pandora
QuickMix. You do not need to turn the TV on to
Connect the iPod dock connector to the iPod
jack on the rear panel of the product.
2.
Place the iPod in the supplied iPod Dock.
Your iPod is automatically turned on.
enjoy this feature.
"iPod" message appears on the TV screen.
1. Turn on the product.
2. Press the FUNCTION button to select the
ONLINE mode.
3.
Press the RED (A) button.
4.
Press the J, T buttons to select iPod, then press
the ENTER button.
You can use the remote control or the
5.
Press the 4 _. buttons to select Music, then
product to control simple playback functions
such as the PLAY, PAUSE and _.1 buttons.
NOTE
_ Once entered, Simple Playback is limited to
VFD display only. The TV will not display
anything while this feature is active.
_ Network connection and Pandora activation
press the ENTER button.
6. Select the music file to play.
- You can use the remote control or product to
control simple playback functions such as the
PLAY, PAUSE, STOP, 1_4/_1, ._.4/_ and
REPEAT buttons. See page 16.
are also required prior to accessing.
English
55
BasicFunctions
NOTE
WatcMng
_s Adjust the volume to a moderate level before
you connect your iPod and product.
_s When the product is powered on and you
connect an iPod, the product charges your
iPod's battery.
_s Make sure to connect the dock connector so
You can play video files stored in the iPod player
by connecting it to the product.
1. Connect the iPod dock connector to the
iPod jack on the rear panel of the product.
2.
that the label "SAMSUNG" faces upward.
_s "Made for iPod" means that an electronic
accessory has been designed to connect
specifically to the iPod and has been certified
by the developer to meet Apple performance
standards,
_ "Workswith iPhone"meansthat an electronic
accessoryhas beendesignedto connectspecifically
to an iPhoneand has beencertifiedby the developer
to meetApple performancestandards.
a Movie .................................................
In the iPod screen, move to Settings
>
Videos, then set the TV Out option and the
TV signal.
3.
Place the iPod in the supplied iPod Dock.
4.
Press the RED (A) button,
5.
Press the A • buttons to select iPod, then press
the ENTER button.
6.
Press the 4 P. buttons to select Videos, then
- "iPod" message appears on the TV screen,
press the ENTER button.
iPod Music categories
File information including the artist name, album
name, music title and genre is displayed
according to the ID3 Tag information on each
music file,
Playsa recentlyplayedfileor
movesto the playbackscreenof
the currentfile.
To play by artist.
To play innumericor alphabetical
order
To play by Playlist.
To play by album.
To play by genre.
To play by composer.
_.
NOTE
_s The category list may differ, depending on the
iPod model.
_ What is an ID3 Tag?
This is what is attached to an MP3 to carry
information relevant to the file such as the title,
artist, album, year, genre and a comment field,
7.
Select the video file to play.
- You can use the remote control or the
product to control simple playback functions
such as the PLAY, PAUSE, STOP, 14,_/_1
and _'_/_,_
buttons. (See page 16.)
iPod models that can be used with
this product
iPod nano
3rd generation
(video)
iPod touch
iPod
5th generation
(video)
iPod touch
1st generation
2nd generation
iPod classic
iPhone
iPod nano
4th generation
(video)
iPhone 3G
NOTE
_s You must have the VIDEO output (Composite)
connected to your TV to view iPod video (See
page 25),
_ Ifyou want to view an iPod video via VIDEO
output, set Anynet+ (HDMPCEC)to off,
_s No other screen than the playback screen
appears on the TV screen, View other iPod
screens on the iPod player,
_ Ifthe connected iPod does not support video
playback,the "Cannot play video fibs saved on
this iPod" messageappears when you select the
Video menu,
_ Apple is not responsibb for the operation of this
device or its compliance with safety and
regulatory standards.
56
English
NetworkServices
You can enjoy various network services such as
Intemet@TV or BD-LIVE by connecting the
product to the network system.
4.
When you have signed off on the service
agreement, the Intemet@TV service starts
updating. It takes several minutes.
When the update is complete, you will see
the Intemet@TV menu screen,
Internet@TV at a GJance
Connect this product to the network to download
various for a fee or free-of-charge applications,
Intemet@TV brings useful and entertaining
content and services directly from the web to
your product such as news, weather forecast,
stock market, games, movies, and music.
O
Recommended: Displaysrecommended
contentsmanagedby Samsung.
G e tt ingSt a rt ed wi thl n t e rnet@ TV ....
1.
Move to the home menu,
Commercial: DisplaysIntemet@TV
Guide,
productintroductionand newapplication
introduction.
O
MyApplication : Displaysyourpersonalgallery
in whichyou can add anddeleteapplications.
Navigation Help: Displaystheremotecontrol
buttonsavailable,
o RED (A) : To log in to to Internet@TV,
O
• BLUE (B) : To mark the application as a
favorite,
o GREEN (D) : To sort the applications.
o Return : To return to the previous
menu.
Settings : Youcan set up thesystemandcreate
accounts,etc.
2.
Press the _ I_ buttons to select Internet@
TV and press the ENTER button,
3.
SamsungAppS : Youcan downloadvariousfor
a feeor free-of-chargeapplicationservices.
In the start screen of the Intemet@TV service,
you will see the service agreement screen,
You must agree to the service terms and
conditions before you can use the Intemet@
TV service,
English
57
NetworkServices
Using the On-Screen
Keypad
Through your remote, you can use the OnScreen Keypad in several Internet@TV
applications to enter text.
Pressing the FULL SCREEN button on the
remote while you are using the Screen Keypad
lets you change the text fields to lower case,
upper case, numbers, and icons.
13. Press the ENTER button.
14. The map and address appear on the screen.
NOTE
_ Samsung Electronics shall take no legal
responsibility for any interruption of the
Internet@TVservice caused by the service
provider for any reasons.
_s The Internet@TV service is to download and
process data via the Intemet so that you can
enjoy the contents on the TV screen.
If the Internet connection is unstable, the
service may be delayed or interrupted.
Furthermore, the product may be turned off
automatically,
If this is the case, check the Internet
connection and try again,
For example, here is how to use the Keypad to
search for an address in Google Maps:
1.
Press the ENTER button on the remote at
_s The application service may be provided in
English only and the contents available may
vary, depending on the area.
the Google Maps icon at the Intemet@TV,
_ For more information about the Internet@TV
2.
Press the GREEN (B) button to use the
SEARCH function.
service, visit the web site of the applicable
service provider.
3.
Press the _1D. buttons to move to the
"Search or address" window.
4.
Press the ENTER button to use the Search
or address function.
_s The services provided are subject to change,
depending on the Internet@TVservice
provider.
5.
Let's say that you want to input "105
Challenger Rd., Ridgefield Park NJ',
6.
Press the FULL SCREEN button on the
remote twice to change the input mode from
lower case to numbers.
7.
Press '1', '0', '5'.
8.
Press the YELLOW (C) button on the remote
to input a blank space,
9.
Press the FULL SCREEN button on the
remote 3 times to change the input mode
from numbers to upper case,
10. Press '2' button on the remote 3 times to
input C.
11. Press the FULL SCREEN button on the
remote 3 times to change the input mode
from upper case to lower case.
12. Press buttons on the remote to input the rest
of 'Challenger Rd., Ridgefield Park NJ'.
58
English
_s The Internet@TV service contents may differ
according to the firmware version.
_s Pay to play DivX contents with copy protection
can only be played using HDMI cable.
If you connect your player to your TV using
Component or video cables, the video signal
will not output or the popup message" cannot
play current file" appears.
Account
Login
For a more enjoyable application experience,
register and log in to your account.
To do this, you must create an account first. (For
instructions on creating an account, refer to
Intemet@TV ID on this page)
1.
Press the A T 4 _. buttons to select the
desired application and press the RED (A)
button.
System Setup
Reset
Resets Intemet@TV settings to factory default
settings.
NOTE
_ If you forgot your password, press the STOP
(m) button on the front panel of the product for
more than 5 seconds with no disc inserted.
Jnternet@'rV JD
User Account:
Use this menu to create or delete an account and
enter or delete account information.
Password:
@iii!i@iii
!i@iii
!i@iii
You can control your account including the
content site's account information.
This account is only for Intemet@TV.
Create
2.
Enter the user account and password.
Create an account and link it with desired service
applications.
Settings
Create IDs and configure Intemet@TV settings on
this screen.
NOTE
_ The account name must be at least 1
character in length but no more than 8.
_ You can register up to 10 User Account
Names.
Manager
o Service Site : Register Iogin information for
service sites.
Change Password : Change account
password.
Delete : Delete the account.
English
59
NetworkServices
Service
Manager
Using the color buttons
with the Samsung
Apps
Delete and lock applications installed in Internet@
TV,
- RED (A) (Login) : To log in to the internet
service.
o GREEN (B) (Thumbnail
the view mode.
Lock
Lock the application. Accessing a locked
application requires a password.
View) : To change
BLUE (D) (Sort By) : To sort the applications
by Featured, Most Downloaded, Most Recent
or Name.
Delete
Delete the application.
Intemet@TV
Services
Available
YouTube/Pandora!Netflix/Blockbuster/USA
Properties
Display information about Internet@TV. Use the
"Check the speed of your internet connection"
option to test your network connection.
Today News
- Blockbuster : You can view movies streamed
by Bloxckbuster.
- YouTube : You can view video streamed by
YouTube.
- Netflix : You can view movies streamed by
Samsung
Netflix.
AppS ..............................................................................................................................
- Pandora : You can listen to Internet radio.
Various applications are available from here,
organized into different categories. Some
applications have a download fee.
- USA Today News : You can read news
streamed by USA Today News.
- AccuWeather : You can view weather
information by AccuWeather.
- Google Maps : You can view maps by
Google Maps and search for locations.
NOTE
_ The available Internet contents services may
be added or deleted,
My Application
Displays the application list.
Help
If you questions about Internet@TV, check this
section first. If none of the tips apply, please visit
the help website.
60
English
Once the product is connected to the network,
you can enjoy various movie-related service
contents using a BD-LIVE compliant disc.
1.
Check the size of the remaining memory.
The memory device must have at least 1GB
of free space to accommodate the BD-LIVE
services.
2.
Insert a Blu-ray disc that supports BD-LIVE.
3.
Select an item from various BD-LIVE service
contents provided by the disc manufacturer.
_.
AIISharelets lets you play music, video and photo
files in your PC using the )roduct.
To use AIIShare, you must connect the product to
your PC via the network (See pages 27-28) and
install the SAMSUNG PC Share Manager on the
PC. To install Share Manager, follow these steps.
1. Visit the Samsung website at www.samsung.
COrn,
2.
Manager and install it on the PC.
3.
NOTE
_ The way you use BD-LIVE and the provided
contents may differ, depending on the disc
manufacturer.
Download the SAMSUNG PC Share
When the installation is completed, you will
see the SAMSUNG PC Share Manager icon
on your desktop. Double-click the icon to
launch the application.
Application
Program at a Glance
When connected to the network, the product can
notify you of any new software version with a
popup message.
1. Turn on the product.
2.
In the Software Upgrade menu, set Auto
Upgrade Notification to On. (See page 44)
If there is a new software version available,
the product notifies you with a popup
message.
3. To upgrade the firmware, select Yes on the
pop-up.
The product turns off automatically, then
restarts, and begins the download.
(Never turn it on manually.)
Menu Bar
Share Folder Enabled icon : Usethis ifyou
want to select a folder inyour PC to share.
4. The update progress popup appears.
When the update is completed, the product
turns off again automatically.
5.
Pressthe POWER button to turn on the product.
Share Folder Disabled icon: Usethis ifyou
want to setfolder sharingoff.
O
Refresh icon : Usethis ifyou want to refresh
listof folders and filesin My Computer.
O
Update icon : Selecta folder to shareand
don't forgetto pressthis button.
The updated state willbe appliedto the server.
_. NOTE
_ Update is complete when the product turns off
after downloading and then restarting. Press
the POWER button to turn on the updated
product for your use.
Never turn the product off or on manually
during the update process.
_ Samsung Electronics shall take no legal
responsibilityfor product malfunction caused by
unstable of internet connection or consumer
Server : Displaysthe name of the sharing
server.
O
Shared Folder : Displaysa list of the shared
folders.
My Computer: Displaysa listof the folders
and files inthe PC.
negligence during software upgrade.
English
6_
NetworkServices
4. Select a folder to share from the My
computer pane, and click the Share Folder
Enabled icon (_).
(To remove a shared folder : Select a folder
to remove from the shared folders, and click
the Share Folder Disabled icon (_).)
5. To apply the updated sharing state to the
server, click the Set Change State icon (_1' ),
6. To enable the product to locate a PC server,
click Share from the menu bar.
_s AIIShare does net support the following
functions.
- The Background Music and Background
Music Setting functions.
- Sorting files by preference in the Photo,
Music, and Movie folders.
- The Change Group function,
- The Safe Remove function,
_ The Sorting method may differ depending on
the server function.
Click Set Device Policy and click Accept.
_ The search and skip operation may differ
depending on the server function.
_ During video playback, play time is net
displayed.
_ To use the AIIShare function, please place both
this product and the PC in the same subnet.
iii?
7. Click the Set Change State icon (_i_) and
move to the home menu on the product.
8. To select a device, use the RED (A) or
BLUE (D) button to select a file to play.
(For playing back Video, Music or Photos files,
see pages 45-53.)
NOTE
_ Depending on the performance of the external
modem or router, HD video may net play
properly.
_s If your system uses a firewall, the product may
net locate your PC on the TV screen.
62
English
Otherinformation
Refer to the chart below when this product does not function properly, If the problem you are
experiencing is not listed below or if the instructions below do not help, turn off the product,
disconnect the power cord, and contact Samsung Electronics at 1-800-SAMSUNG,
I cannot eject the disc.
• Isthe powercordpluggedsecurelyinto the outlet?
• Turnoffthe powerandthenturn it backon,
Playbackdoes not start.
• Checkthe regionnumberof the BD/DVD,
BD/DVDdiscs purchasedfrom abroadmaynot be playable,
• CD-ROMsandDVD-ROMscannotbe playedonthis Product,
• Makesurethatthe ratinglevelis correct,
Playback
doesnotstart
immediately
whenthe
Play/Pause
buttonis pressed.
• Areyou usinga deformeddisc or a discwithscratcheson thesurface?
• Wipethe discclean,
Soundis not produced.
• Nosoundis hearddudngfastplayback,
slowplayback,
andstepmotionplayback,
• Arethespeakers
connected
properly?
Isthespeaker
setupcorrectlycustomized?
• Isthe discseverelydamaged?
Soundcanbe heardonlyfroma
fewspeakersandnetall 8.
•
•
•
•
DolbyDigital7,1CHSurround
Soundis not produced.
• Isthere"Dolby
Digital
7.1CH"markonthedisc?Dolby
Digital
7.1OHSurround
Sound
is
produced
onlyifthediscisrecorded
with7.1channel
sound.
• Istheaudiolanguage
correctly
settoDolbyDigital7.1-0Hintheinformation
display?
Theremotecontroldoesnotwork.
• Istheremote
controlbeingoperated
withinitsoperational
angleanddistance
ranges?
• Arethe batteriesdrained?
OncertainBD/DVDdiscs,soundis outputfrom thefront speakersonly,
Checkifthe speakersare connectedproperly,
Adjustthevolume,
Whenlisteningto a CD,radioorTV, soundis outputto thefront speakersonly,
Select"PROLOGICII" bypressing[][]PL II (DolbyProLogicII) onthe remote
controlto use all sixspeakers,
• Have
youselected
themode
_dBD)fundionsoftheremote
control
_' orBD)correctly?
• Discis rotatingbut no
pictureis produced.
• Isthe TVpoweron?
• Arethe videocablesconnectedproperly?
• Picturequalityis poorand
pictureis shaking.
• Isthe discdirty or damaged?
• A poorlymanufactureddiscmay notbe playable,
Audiolanguage
andsubtitlesdo
notwork.
• Audiolanguage
andsubtitles
willnotworkif thediscdoesnotcontain
them,
Menuscreendoesnotappear
evenwhenthe menufunctionis
selected,
• Areyouusingadiscthatdoesnotcontainmenus?
English
63
Otherinbrrn ion
Aspect ratio cannot be changed.
• Youcan play16:9 BD/DVDsin 16:9 Widemode,4:3 LetterBoxmode,or 4:3
Pan- Scanmode,but 4:3 BD/DVDscan beseen in4:3 ratioonly,Referto the
Blu-rayDiscjacket andthenselectthe appropriatefunction,
Theproductis notworking.
(Example:
Thepowergoesout
or astrangenoiseis heard.)
• Turnoff the power,andpressandholdthe STOP( [] ) buttonon the product
for longerthan5 seconds,
TheProduct
isnotworking
normally.
Theratinglevelpasswordhas
beenforgotten.
- Usingthe RESETfunctionwill eraseall storedsettings,
Donot usethis unlessnecessary,
• Withno discinthe product,pressand holdthe product'sSTOP( [] ) buttonfor
longerthan5 seconds,INITappearson thedisplayandall settingswill return
to the defaultvalues,
Andthen pressthe POWERbutton,
- Usingthe RESETfunctionwill eraseall storedsettings,
Donot usethis unlessnecessary,
Can'treceiveradiobroadcasts.
• Isthe antennaconnectedproperly?
• If the antenna'sinputsignal is weak,installan externalFMantennainan area
withgoodreception,
Whilelisteningto TVaudio
throughthe Product.nosoundis
heard.
• If theOPEN/CLOSE
(A) buttonis pressedwhilelisteningto TVaudiousingthe
D,INor AUXfunctions,theBD/DVDfunctionsareturnedonandtheTVaudiois
muted,
"NotAvailable"appearson
screen,
• Thefeaturesor actioncannotbe completedat thistime because:
1, TheBD/DVD'ssoftwarerestrictsit,
2, TheBD/DVD'ssoftwaredoesn'tsupportthe feature(e,g,,angles)
3, Thefeatureis notavailableat the moment,
4, You'verequested
a titleorchapternumberor searchtimethatisoutof range,
No NDIVIIoutput.
• Checkthe connectionbetweenthe TVandthe HDMIjack of the Product,
• Checkif yourTVsupports480p/720p/1080i/1080pHDMIinputresolution,
Abnormal HDMIoutput screen.
• If randomnoiseappearsonthe screen,it meansthat TVdoesnot support
HDCP(High-bandwidthDigitalContentProtection),
IftheHDMI
output
issettoaresolution • Pressthe STOP(m) button(onfront panel)for morethan 5 secondswith no
yourTVcannot
support
(forexample,
discinside,All settingswill revertto the factorysettings,
1080p),
youmaynotseeapicture
on
• Whenthefactorydefaultsettingsare restored,allthe userdatastoredin the
yourTV.
BDdatawill bedeleted,
64'
English
I Can
see
folders
shared
through
the
PCShare
Manager,
but
Icannot
see
the
files.
• Sinceit showsonlyfilescorrespondingto the Image,Music,and Movie
categories,filesthat do notcorrespondto thesecategoriesmay notbe
displayed,
• Checkif the networkis stable,
Video
isplayed
intermittently.
• Checkif the networkcable is properly connectedand if the networkis not
overloaded,
• Wirelessconnectionbetweenthe serverandthe productis unstable,
Checkthe connection,
Allshare
c0nnection
between
TV
and
PC
isunstable:
• IP address under the same subnel)Jvorkshould be unique, otherwise IP
collisioncan resultsin such a phenomenon,
• Checkif you havea firewallenabled,
If so,disablethe firewallfunction,
Icannot
connect
totheBD-LIVE• Checkwhetherthe networkconnectionis successfulor not byusingNetwork
server.
Testmenu,(Seepage42)
• Checkwhetherthe USBmemorydeviceis connectedwithproductor not,
• Thememorydevicemusthaveat least 1GBof free spaceto accommodatethe
BD-LIVEservice,
Youcan checkthe availablesizein BDDataManagement,(Seepage37)
• PleasecheckwhethertheBD-LIVEInternetConnectionmenuis setto Allow
(All),
• If all abovefails,contactthe contentsprovideror updatethe latestfirmware,
When
using
theBD-LIVE
service.• Thememorydevicemust haveat least1GBof free spaceto accommodatethe
anerror
occurs.
BD-LIVEservice,
Youcan checkthe availablesizeinBDDataManagement,
(Seepage37)
NOTE
_ Whenthe factorydefaultsettingsarerestored,allthe userdatastoredinthe BD data will be deleted,
English
65
Otherinformation
A
D
P
Accessories
13
Digital Output
36
Parental Rating
43
AIIShare
61
Disc menu
45
Playlist
51
Angle
49
Display
31
Popup menu
46
Anynet+ (HDMI-CEC)
37
DivX(R) Deactivation
38
Power On/Off Sound
43
Audio
Audio Language
34
48
DivX(R) Registration
Dolby Pro Logic II Mode
38
53
Progressive Mode
33
AV Sync
37
DSP
52
Dynamic Range Control
37
B
R
Region code
Remote Control
Background
43
E
BD-Live
61
Energy Saving
43
Repeat
BD-LIVEInternet Connection
BD Data Management
BD Wise
42
37
31
EQ Optimizer
35
Resolution
Before Starting (Initialsettings) 29
Front Display
BONUSVIEW
49
C
Remote control sensor
F
Change Password
Clock
43
38
H
Connections
14
47, 51
31
S
43
Search
Security
Setting the Menu
46
43
30
43
Setup
29
SFE
Skip
52
46
G
General
10
16
18
HDMI Audio
35
SLEEP (timer)
16
Speaker
Wireless receiver module
18
21
HDMI Deep Color
HDMI Format
33
33
Slow motion
Software Upgrade
47
44
TV
HDMI
23
23
I
Speaker Setting
Step motion
34
47
Component
Composite
25
25
Initial Settings
Internet@TV
37
57
Still Mode
Subtitle Language
33
48
Set-Top Box
26
Internet@TV Screen Size
37
Support
44
OPTICAL
26
iPod
55
System
37
AUX
Network
LAN Cable
26
27
27
L
Language
42
Title menu
46
Wireless Network
28
Light Effect
43
Title list
46
FM Antenna
28
M
TV Aspect
31
Contact Samsung
44
TV Screen Saver
30
T
Mono/Stereo
55
Movie Frame (24 Fs)
33
U
Musical Room Calibration
MUTE
35
16
USB Storage
54
Z
N
Zoom
66
English
Network Setup
39
Network Settings
Network Status
39
42
53
i
PowerRequirements
AC120V,60Hz
PowerConsumption
75W
:
831bs
Dimensions
16.9(W)x 2,4 (H)x 13.0(D)inches
Operating
Temperature
Range
+41°F to +95°F
operatingHumidityRange
10%to7B %
Signal/noise
ratio
70 dB
Usablesensitivity
10 dB
Totalharmonicdistortion
0.5 %
BD(Blu-rayDisc)
ReadingSpeed: 4.917_m/see
DVD(DigitalveisatileDisc)Reading
Speed:3.49- 4.06m/see.
Approxm
PlayTime(SingleSided_
SingleLayerDisc): 135 min.
CD
inches
,,_,_,v,_,_,irr_@£rT
DISC)
ReadingSpeed:4.8 - 5.6 m/see.
MaximumPlayTime: 74 rain.
_,,_,J/npr(
_
_
S :
CDi3 !i2 inCheS(€OMPACT
MaximumPlayTime: 20 min.
compositeVideo
1 channel:1.0Vp-p(750 load)
Blu-rayDisc: 480i
DVD: 480i
Y : 1.0Vp-p(75 0 load)
Pr : 0.70Vp--p(75 0 load)
Component
Video ................
Pb: 0.70Vp-p(750 load)
Blu-rayDisc: 108q, 720p,48%, 480i
HDMI
DVD:480p,480i
1080p,1080i,720p,480p
PCMmultbhannelaudio,Bitstreamaudio,PCMaudio
Frontspeaker
output
165Wx 2 (30)
Center
speaker
output
170W(30)
Surround
speaker
output
165Wx 2 (30)
Surround
BackSpeakeroutput
165Wx 2 (30)
Subwoofer
speaker
output
Frequency
response
170W(30)
Analoginput
20Hz-20kHz(s:3dB)
Digitalinput
20Hz-44kHz(:±:3dB)
S!NRatio
70dB
Channel
separation
60dB
inputsensitivity
(AUX)SOOmV
English
67
Otherinformation
7.1ch speakersystem
Front
Surround/Surround
back Center
Subwoofer
Impedance
30
30
30
Frequency
range
140Hz~
20kHz 140Hz-20kHz
140Hz-20kHz40Hz_ 160Hz
Outputsoundpressurelevel
87dB/W/M
87dB/W/M
87dB/W/M
88dBA_//M
Ratedinput
165W
165W
170W
170W
Maximuminput
330W
330W
340W
340W
30
Front:3.54x 51.18x 4.69inches(Standbase: 9.84x 9.84inches)
Surround/Surround
back: 3.54x5.57x 2.7 inches
Dimensions/Wx Hx DI
Center: 14.17x 2.93x 2.7inches
Subwoofer
: 6.61x 13.78x 11.61inches
Front: 7.21Ibs, Surround/Surround
back: 1.28Ibs
Center: 1.28Ibs, Subwoofer
: 9.92 Ibs
Weights
*: Nominal specification
- Samsung Electronics Co., Ltd reserves the right to change the specifications without notice.
- Weight and dimensions are approximate.
- Design and specifications are subject to change without prior notice.
--
SWA-5000
Power Requirements
AC 120 ,-60Hz
Power Consumption
50 W
Weight
2.52 Ibs
Dimensions
(W X H x D)
Operating Temperature
Operating
68
3 x 9 x 6 inches
Range
Humidity Range
+41 °F to +95°F
10% ,- 75%
Output
165W x 2 OH
Frequency range
20Hz,-2OKHz
S/N Ratio
65dB
English
This SAMSUNG brand product, as supplied and distributed by Samsung Electronics America, Inc. (SAMSUNG) and delivered
new, in the originalcarton to the original consumer purchaser, is warranted by SAMSUNG against manufacturing defects in
materials and workmanship for a limited warranty period of:
One (1) Year Parts and Labor*
(*90 Days Parts and Labor for Commercial
Use)
This limited warranty begins on the original date of purchase, and is valid only on products purchased and used in the United
States. To receive warranty service, the purchaser must contact SAMSUNG for problem determination and service procedures.
Warranty service can only be performed by a SAMSUNG authorized service center. The original dated bill of sale must be
presented upon request as proof of purchase to SAMSUNG or SAMSUNG's authorized service center. Transportation of the
product to and from the service center is the responsibility of the purchaser.
SAMSUNG will repair or replace this product, at our option and at no charge as stipulated herein, with new or reconditioned
parts or products if found to be defective during the limited warranty period specified above. All replaced parts and products
become the property of SAMSUNG and must be returned to SAMSUNG. Replacement pars and products assume the
remaining original warranty, or ninety (90) days, whichever is longer.
SAMSUNG'sobligationswith respect to softwareproducts distributedby SAMSUNGunder the SAMSUNGbrand name are set forth in
the applicableend user licenseagreement.Non-SAMSUNGhardwareand softwareproducts, if provided, areon an "AS IS" basis.
Non-SAMSUNGmanufacturers,suppliers,publishers,and serviceprodders may providetheirown warranties.
This limited warranty covers manufacturing defects in materials and workmanship encountered in normal, and except to
the extent otherwise expressly provided for in this statement, noncommercial use of this product, and shall not apply to the
following, including, but not limited to: damage which occurs in shipment; delivery and installation; applications and uses for
which this product was not intended; altered product or serial numbers; cosmetic damage or exterior finish; accidents, abuse,
neglect, fire, water, lightning or other acts of nature; use of products, equipment, systems, utilities, services, parts, supplies,
accessories, applications, installations, repairs, external wiring or connectors not supplied and authorized by SAMSUNG, or
which damage this product or result in service problems; incorrect electrical line voltage, fluctuations and surges; customer
adjustments and failure to follow operating instructions, cleaning, maintenance and environmental instructions that are covered
and prescribed in the instruction book; product removal or reinstallation; reception problems and distortion related to noise,
echo, interference or other signal transmission and delivery problems. SAMSUNG does not warrant uninterrupted or error-free
operation of the product.
THERE ARE NO EXPRESS WARRANTIES OTHER THAN THOSE LISTED AND DESCRIBED ABOVE, AND NO WARRANTIES
WHETHER EXPRESS OR iMPLiED, iNCLUDING, BUT NOT LIMITED TO, ANY IMPLIED WARRANTIES OF MERCHANTABILITY
OR FITNESS FORA PARTICULAR PURPOSE, SHALL APPLY AFTER THE EXPRESS WARRANTY PERIODS STATED
ABOVE, AND NO OTHER EXPRESS WARRANTY OR GUARANTY GIVEN BY ANY PERSON, FIRM OR CORPORATION WITH
RESPECT TO THIS PRODUCTSHALL BE BiNDiNG ON SAMSUNG. SAMSUNG SHALL NOT BE LIABLE FOR LOSS OF
REVENUEOR PROFITS, FAILURE TO REALIZE SAVINGS OR OTHER BENEFITS,OR ANY OTHER SPECIAL, iNCiDENTAL
OR CONSEQUENTIAL DAMAGES CAUSED BY THE USE, MISUSE OR INABILITY TO USE THiS PRODUCT, REGARDLESS
OF THE LEGAL THEORY ON WHICH THE CLAIM IS BASED, AND EVEN IF SAMSUNG HAS BEEN ADVISED OF THE
POSSIBILITYOF SUCH DAMAGES. NOR SHALL RECOVERYOF ANY KiND AGAINST SAMSUNG BE GREATER IN AMOUNT
THAN THE PURCHASE PRICE OF THE PRODUCT SOLD BY SAMSUNG AND CAUSING THE ALLEGED DAMAGE. WITHOUT
LIMITING THE FOREGOING, PURCHASER ASSUMES ALL RiSK AND LIABILITY FOR LOSS, DAMAGE OR INJURY TO
PURCHASERAND PURCHASER'S PROPERTY AND TO OTHERS AND THEIR PROPERTY ARISING OUT OF THE USE,
MISUSE OR iNABiLITY TO USE THiS PRODUCT SOLD BY SAMSUNG NOT CAUSED DIRECTLY BY THE NEGLIGENCE OF
SAMSUNG. THIS LIMITED WARRANTY SHALL NOT EXTEND TO ANYONE OTHER THAN THE ORIGINAL PURCHASER OF
THIS PRODUCT, IS NONTRANSFERABLE AND STATES YOUR EXCLUSIVE REMEDY.
Some states do not allow limitations on how long an implied warranty lasts, or the exclusion or limitation of incidental or
consequential damages, so the above limitations or exclusions may not apply to you. This warranty gives you specific legal
rights, and you may also have other rights which vary from state to state.
To obtain warranty hardware service, please contact SAMSUNG at:
Samsung Electronics America, inc.
105 Challenger Road Ridgefield Park, NJ 07660-0511
1-800-SAMSUNG (726-7864) and www.samsung.com/us
Contact SAMSUNGWORLD WIDE
you haveany questionsor cornrnentsrelatingto Samsungproducts,pleasecontactthe SAMSUNGcustomercarecenter.
CANADA
North America
Latin
America
Europe
1-800-SAMSUNG
01-800-SAMSUNG
(726-7864)
(726-7864)
(726-7864)
ARGENTINE
1-800-SAMSUNG
0800-333-3733
BRAZIL
0800-124-421,4004-0000
www.samsung.com/br
CHILE
www.samsung.com/d
NICARAGUA
HONDURAS
800-SAMSUNG
(726-7864)
00-1800-5077267
800-7919267
COSTA RICA
0-800-507-7267
www.samsung.com/tatin
ECUADOR
1-800-10-7267
www.samsung.com/tatin
EL SALVADOR
GUATEMALA
800-6225
1-800-299-0013
www.samsung.com/tatin
www.samsung.com/tatin
JAMAICA
PANAMA
1-800-234-7267
800-7267
www.samsung.com/tatin
www.samsung.com/tatin
PUERTO RICO
REP. DOMINICA
1-800-682-3180
1-800-751-2676
www.samsung.com/tatin
TRINIDAD & TOBAGO
VENEZUELA
1-800-SAMSUNG
0-800-100-5303
COLOMBIA
01-8000112112
BELGIUM
02 201 2418
CZECH REPUBLIC
DENMARK
800-SAMSUNG
FINLAND
30-6227
FRANCE
01 4863 0000
GERMANY
HUNGARY
01805-SAMSUNG
(726-7864
06-80-SAMSUNG
(726-7864)
ITALIA
800-SAMSUNG
02 261 03 710
MEXICO
U.S.A
LUXEMBURG
NETHERLANDS
NORWAY
POLAND
CIS
www.samsung.com/ar
www.samsung.com/tatin
www.samsung.com/tatin
www.samsung.com/tatin
www.samsung.com/tatin
www.samsung.com/tatin
(726-7864)
www.samsung.com.co
w\_,v.samsung.com/be (Dutch)
www.samsung.com/be fr (French)
(800-726786)
www.samsung.com/cz
www.samsung.com/dk
(7267864)
515
www.samsung.com/fi
www.samsung.com/fr
_ 0,14/Min)
(726-7864)
www.samsung.de
www.samsung.com/hu
www.samsung.com/it
www.samsung.com/tu
0900-SAMSUNG (0900-7267864)
3-SAMSUNG (7267864)
0 601 1SAMSUNG
(_ 0,10/Min)
(172676), 022-607-93-38
www.samsung.com/nl
www.samsung.com/no
www.samsung.com/pl
80820-SAMSUNG
OSOO-SAMSUNG
SPAIN
SWEDEN
9O2-1-SAMSUNG
(902 172 678)
0771 726 7864 (SAMSUNG)
U.K
EIRE
0845 SAMSUNG
0818 717 100
(7267864)
AUSTRIA
SWITZERLAND
(7267864,
(7267864,
RUSSIA
0810-SAMSUNG
0848-SAMSUNG
8-800-555-55-55
KAZAKHSTAN
UZBEKISTAN
8-10-800-500-55-500
8-10-800-500-55-500
KYRGYZSTAN
TADJIKISTAN
00-800-500-55-500
8-10-800-500-55-500
UKRAINE
8-800-502-0000
www.samsung.ua
BELARUS
MOLDOVA
810-800-500-55-500
00-800-500-55-500
www.samsung.com/tt
LITHUANIA
LATVIA
8-800-77777
8000-7267
www.samsung.com/tv
ESTONIA
AUSTRALIA
800-7267
1300 362 603
www.samsung.com/ee
www.samsung.com/au
NEW ZEALAND
CHINA
0800 SAMSUNG (0800 726 786)
400-810-5858,
010-6475 1880
3698-4698
www.samsung.com/nz
www.samsung.com/cn
KONG
(726-7864)
(726-7864)
www.samsung.com/pt
www.samsung.com/sk
g 0.07/rain)
CHF 0.OS/min)
JAPAN
MALAYSIA
0120-327-527
1800-88-9999
THAILAND
TAIWAN
VIETNAM
1 800 588 889
TURKEY
444 77 11
SOUTH AFRICA
0860-SAMSUNG
U.AE
800-SAMSUNG
www.samsung.com/at
www.samsung.com/ch
www.samsung.com/hk
www.samsung.com/in
www.samsung.com/id
www.samaung.oom/jp
www.samsung.com/my
1-890-10-SAMSUNG (726-7864), 1-800-3SAMSUNG (726-7864),
1-800-8-SAMSUNG (726-7864), 02-5805777
1800-SAMSUNG
(726-7864)
1800-29-3232,
0800-329-999
www.samsung.com/se
www.samsung.com/uk
www.samsung.com/ie
www.samsung.com/kzju
www.samsung.com/kzju
3030 8282, 1800 110011, 1800 3000 8282
0800-112-8888
SINGAPORE
www.samsung.com/es
www.samsung.ru
INDONESIA
PHILIPPINES
Middle
East &
Africa
www.samsung.com/mx
www.samsung.com/us
PORTUGAL
SLOVAKIA
HONG
INDIA
Asia Pacific
8-SAMSUNG
www.samsung.com/ca
02-689-3232
www.samsung.com/ph
www.samsung.com/sg
www.samsung.com/th
www.samsung.com/tw
www.samsung.com/vn
www.samsung.com/tr
(726-7864)
(726-7864),
www.samsung.com/za
8000-4726
www.samsung.com/ae
QUESTIONS OR COMMENTS?
,
COUNTRY
i
CALL
OR ViSiT US ONLINE
1-800-SAMSUNG
IN THE US
(7267864)
AT
WRITE
Samsung
www.samsung,com/us
Electronics
America,
105 Challenger
Road Ridgefield
NJ 07660-0511
Inc.
Park,
Code No. AH68-02268N