1
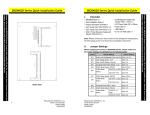
ETB9F000 Series ETX v4.01 SoM with Multiple I/O Features User’s Manual Disclaimers This manual has been carefully checked and believed to contain accurate information. AXIOMTEK Co., Ltd. assumes no responsibility for any infringements of patents or any third party’s rights, and any liability arising from such use. AXIOMTEK does not warrant or assume any legal liability or responsibility for the accuracy, completeness or usefulness of any information in this document. AXIOMTEK does not make any commitment to update the information in this manual. AXIOMTEK reserves the right to change or revise this document and/or product at any time without notice. No part of this document may be reproduced, stored in a retrieval system, or transmitted, in any form or by any means, electronic, mechanical, photocopying, recording, or otherwise, without the prior written permission of AXIOMTEK Co., Ltd. CAUTION If you replace wrong batteries, it causes the danger of explosion. It is recommended by the manufacturer that you follow the manufacturer’s instructions to only replace the same or equivalent type of battery, and dispose of used ones. Copyright 2009AXIOMTEK Co., Ltd. All Rights Reserved May 2009, Version A4 Printed in Taiwan ii ESD Precautions Computer boards have integrated circuits sensitive to static electricity. To prevent chipsets from electrostatic discharge damage, please take care of the following jobs with precautions: Do not remove boards or integrated circuits from their anti-static packaging until you are ready to install them. Before holding the board or integrated circuit, touch an unpainted portion of the system unit chassis for a few seconds. It discharges static electricity from your body. Wear a wrist-grounding strap, available from most electronic component stores, when handling boards and components. Trademarks Acknowledgments AXIOMTEK is a trademark of AXIOMTEK Co., Ltd. ® MS-DOS and Windows 95 are trademarks of Microsoft Corporation. Phoenix & AWARD are trademarks of Phoenix Technology Ltd. IBM, PC/AT, PS/2, VGA are trademarks of International Business Machines Corporation. VIA is a trademark of VIA Technologies, Inc. Winbond is a trademark of Winbond Electronics Corp. Other brand names and trademarks are the properties and registered brands of their respective owners. iii Table of Contents Disclaimers ................................................................................................ ii ESD Precautions ...................................................................................... iii Chapter 1 1.1 Introduction .......................................................1 Specifications ....................................................................................2 Chapter 2 Jumpers and Connectors ...................................4 2.1 2.2 2.3 2.3.1 2.3.2 2.3.3 2.3.4 2.3.5 2.3.6 2.3.7 2.3.8 2.3.9 2.3.10 2.4 2.4.1 2.4.2 2.4.3 2.4.4 2.4.5 2.4.6 2.4.7 2.4.8 2.4.9 2.4.10 2.4.11 2.4.12 2.4.13 2.4.14 2.4.15 2.4.16 2.4.17 2.4.18 2.4.19 2.4.20 2.4.21 2.4.22 iv Board Dimensions and Fixing Holes ...............................................4 Board Layout .....................................................................................5 Jumper Settings ................................................................................6 COM1 ~ COM2 Mode Select for Type Jumpers: JP7, JP8..............7 COM1 Mode Select Jumpers: JP4, JP5, JP6 ..................................9 LCD Voltage Selection Jumper: JP2 ...............................................9 CompactFlashTM Voltage Selection Jumper: JP10.......................10 CompactFlashTM IDE mode Selection Jumper: JP11 ...................10 Audio Line Out Mode Selection Jumper: JP1...............................10 LPT & FDD Selection Jumper: JP13..............................................11 Clear CMOS Setting Jumper: JP9 .................................................11 Debug Mode Selection Jumper: JP15...........................................11 Watchdog Trigger Mode Setting Jumper: JP14...........................12 Connectors and Switches...............................................................13 ETX Connector – X1: CN16 ............................................................14 ETX Connector – X2: CN17 ............................................................16 ETX Connector – X3: CN18 ............................................................18 ETX Connector – X4: CN19 ............................................................20 40-Pin LVDS Connector: LVDS1....................................................22 7-Pin Inverter Connector: CN4.......................................................22 Video Connector: CN22..................................................................23 TV Connector: CN5.........................................................................23 COM Port (Box-Header): CN20 ......................................................23 USB Connecotor (Box-Header): CN11 ...........................................23 Flat Panel Bezel Connecotor: CN15...............................................24 I2C Bus Connecotor: J2 .................................................................25 SM Bus Connecotor: J3 .................................................................25 3-Pin Fan Connecotors: FAN1/FAN2..............................................25 5.1 Channel Audio Bus Connecotor: FC1 .....................................25 Audio Connecotor: CN3...................................................................26 5.1 Channel Audio Connecotor: CN21...........................................26 44Pin TTL Flat Panel Connector: CN2 ............................................27 Keyboard & Mouse Connector: CN7...............................................27 Parallel Port Connector: CN12 ........................................................28 COM Port Connector: CN9 ..............................................................28 VGAConnector: CN8 ........................................................................29 2.4.23 2.4.24 2.4.25 2.4.25 2.4.26 USB Connectors: CN10 ..................................................................29 40 Pin IDE Interface Connector: IDE1............................................30 44 Pin IDE Interface Connector: IDE2............................................31 CF Socket: CN13 ..............................................................................32 Floppy Disk Connector: FDD1.........................................................33 A p p e n d i x Watchdog Timer ....................................................... 34 v ETB9F000 ETX v4.01 SoM User’s Manual Chapter 1 Introduction The ETB9F000 is a finest embedded ETX computer-on-module in the market, which makes a generic interface to connect the module to peripherals such as hard disk, mouse, and display. It is an all-in-one single module as computing engine with excellent Multiple I/O, LVDS LCD, one VGA port, TV-Out, Fast Ethernet and AC’97/HD digital Audio interface. It also provides one FDD/LPT port, four 32-bit/33MHz PCI Bus master and three Full ISA Bus supported for expansion purpose, PATA IDE, two COM ports, four USB 2.0 and Watchdog Timer. Therefore, the ETB9F000 module provides versatile functions to cater for various clients’ applications; moreover, its flexible modularity goes with appropriately designed baseboard to make the best solution for customization, and last a durable lifetime to cope with fast evolving technology. Introduction 1 ETB9F000 ETX v4.01 SoM User’s Manual 1.1 Specifications CPU: ETX module System Chipset: On the Module BIOS: On the module; optional socket on the baseboard System Memory On the module Onboard IDE One Parallel ATA-100 CompactFlash Socket TM One CompactFlash Type II Socket Onboard Multi I/O One LPT port with SPP/ECP/EPP compliant One Floppy port, shared with LPT One RS-232, one RS-232/422/485 One IrDA (Pin header) for wireless communication USB Interface TM Four USB ports with fuse protection and complies with USB Spec. Rev. 2.0 Watchdog Timer 0~255 seconds; up to 255 levels Expansion Slots Four 32-bit/33MHz PCI slots Three ISA slots Ethernet One from ETX SoM with trple deck RJ-45 connector with LED display over USB Wake On LAN (via ATX power supply) Audio 2 Line-in/Line-out/MIC-in/Surround/Center Bass with PC99 compliant on the rear I/O Introduction ETB9F000 ETX v4.01 SoM User’s Manual Power Management ACPI (Advanced Configuration and Power Interface) Form Factor: ETX form factor 304.8 mm x 190 mm NOTE: All specifications and images are subject to change without notice. Introduction 3 ETB9F000 ETX v4.01 SoM User’s Manual Chapter 2 Jumpers and Connectors 2.1 4 Board Dimensions and Fixing Holes Watchdog Timer ETB9F000 ETX v4.01 SoM User’s Manual 2.2 Board Layout Watchdog Timer 5 ETB9F000 ETX v4.01 SoM User’s Manual 2.3 Jumper Settings The ETB9F000 Series is configured to match the needs of your application with the proper jumper settings. The table below is a summary of all the jumpers and their corresponding functions onboard the ETB9F000 Series. The succeeding tables show the correct jumper settings for the onboard devices. Jumper JP1 JP2 JP4 JP5 JP6 JP7 JP8 JP9 JP10 JP11 JP13 JP14 JP15 6 Default Setting LINE OUT Mode Select: None Amplifier LCD Voltage select : 3.3V COM1 Mode Select: RS-232 COM1 Mode Select: RS-232 COM1 Mode Select: RS-232 COM1 Pin 1: COM1 Mode DCD Select COM1 Pin 9: RI COM2 Mode COM2 Pin 1: Select DCD COM2 Pin 8: RI Clear CMOS Setting : Normal Compact Flash Voltage select : 3.3V Compact Flash Select : Slave LPT/FDD Device Select : LPT Watchdog Timer : RESET Debug Mode Select : Port 80h Jumper Setting Short 1-3, 2-4 Short 1-2 Short 1-2 Short 3-5, 4-6 Short 3-5, 4-6 Short 3-5 Short 4-6 Short 3-5 Short 4-6 Short 1-2 Short 1-2 Short 1-2 Short 1-2 Short 2-3 Short 1-2 Watchdog Timer ETB9F000 ETX v4.01 SoM User’s Manual 2.3.1 COM1 ~ COM2 Mode Select for Type Jumpers: JP7, JP8 These jumpers select the COM1, COM2 ports’ DCD and RI mode. Description COM1 Watchdog Timer Function Jumper Setting Pin 1=5V JP7 Pin 1=DCD (Default) JP7 Pin 9=12V JP7 Pin 9=RI (Default) JP7 7 ETB9F000 ETX v4.01 SoM User’s Manual Description COM2 8 Function Jumper Setting Pin 1=5V JP8 Pin 1=DCD (Default) JP8 Pin 8=12V JP8 Pin 8=RI (Default) JP8 Watchdog Timer ETB9F000 ETX v4.01 SoM User’s Manual 2.3.2 COM1 Mode Select Jumpers: JP4, JP5, JP6 These jumpers select the COM1 port’s communication mode to operate RS-232 or RS-422/485. Description Function COM1 Mode RS-232 Select (Default) 2.3.3 Jumper Setting JP4 JP5 JP6 RS-422 JP4 JP5 JP6 RS-485 JP4 JP5 JP6 LCD Voltage Selection Jumper: JP2 This jumper is to select the voltage for LCD interface. Description LCD Voltage Selection Watchdog Timer Function Jumper Setting 3.3V (Default) JP2 5V JP2 9 ETB9F000 ETX v4.01 SoM User’s Manual 2.3.4 CompactFlashTM Voltage Selection Jumper: JP10 TM This jumper is to select the voltage for CompactFlash Description CompactFlash Voltage Selection 2.3.5 Function interface. Jumper Setting 3.3V (Default) JP10 5V JP10 CompactFlashTM IDE mode Selection Jumper: JP11 ETB9F000 CompactFlashTM IDE mode can be selected for Master/Slave by setting up jumper JP11. Description CompactFlash IDE Mode Selection 2.3.6 Jumper Setting Slave (Default) JP11 Master JP11 Audio Line Out Mode Selection Jumper: JP1 Description Audio Line Out Mode Selection 10 Function Function Jumper Setting Audio None Amplifier (Default) JP1 Audio Amplifier JP1 Watchdog Timer ETB9F000 ETX v4.01 SoM User’s Manual 2.3.7 LPT & FDD Selection Jumper: JP13 Description LPT & FDD Selection 2.3.8 Function Jumper Setting LPT (Default) JP13 FDD JP13 Clear CMOS Setting Jumper: JP9 You may need to use this jumper is to clear the CMOS memory if incorrect settings in the Setup Utility. Description Clear CMOS Setting 2.3.9 Function Jumper Setting Normal (Default) JP9 Clear CMOS JP9 Debug Mode Selection Jumper: JP15 Description Debug Mode Selection Watchdog Timer Function Jumper Setting 80h (Default) JP15 300h JP15 11 ETB9F000 ETX v4.01 SoM User’s Manual 2.3.10 Watchdog Trigger Mode Setting Jumper: JP14 ETB9F000 features a special watchdog timer that can perform the sensitive error detection and report function. When the CPU processing comes to a halt, the watchdog either generates a NMI or resets the CPU. Description Function Watchdog Trigger NMI Mode Setting Reset (Default) 12 Jumper Setting JP14 JP14 Watchdog Timer ETB9F000 ETX v4.01 SoM User’s Manual 2.4 Connectors and Switches Connectors RTC Battery LCD Connector (LVDS) FDD Connector Parallel IDE Connector (primary) Parallel IDE Connector(secondary) Label Connectors BAT1 Power Button LVDS1 Reset Button FDD1 FAN Connector Label SW1 SW2 FAN1 IDE1 FAN Connector FAN2 IDE2 Printer Port Connector CN12 TM TFT LCD Connector LCD Inverter Connector TV-OUT S-Video (TV-OUT) LAN1 Connector 6-PinMiniDim Keyboard/Mouse VGA Connector Serial Port1 Connector USB Port1 &Port2 Connector USB Port3 &Port4 Connector (Box Header) PCI Slot1 PCI Slot2 PCI Slot3 PCI Slot4 Audio Connector (support 5.1 Channel Audio) Watchdog Timer Compact Flash Connector Front Panel Bezel CN4 Connector CN5 ATX Power Connector CN22 ETX Connector-X1 CN25 ETX Connector-X2 CN2 CN13 CN14 CN15 CN16 CN17 CN7 ETX Connector-X3 CN18 CN8 CN9 ETX Connector-X4 Serial Port2 Connector CN19 CN20 CN10 ISA Slot1 ISA1 CN11 ISA Slot2 ISA2 PCI1 PCI2 PCI3 PCI4 ISA Slot3 IR Connector I2C BUS Connector SMBUS Connector ISA3 J1 J2 J3 CN3 5.1 Channel Audio BUS Connector FC1 13 ETB9F000 ETX v4.01 SoM User’s Manual 2.4.1 14 ETX Connector – X1: CN16 Pin Description Pin Description 1 GND 2 GND 3 PCICLK3 4 PCICLK4 5 GND 6 GND 7 PCICLK1 8 PCICLK2 9 PCI_REQ3# 10 PCI_GNT3# 11 PCI_GNT2# 12 VCC3 13 PCI_REQ2# 14 PCI_GNT1# 15 PCI_REQ1# 16 VCC3 17 PCI_GNT0# 18 N.C. 19 VCC 20 VCC 21 SERIRQ 22 PCI_REQ0# 23 PCI_AD0 24 VCC3 25 PCI_AD1 26 PCI_AD2 27 PCI_AD4 28 PCI_AD3 29 PCI_AD6 30 PCI_AD5 31 PCI_C/BE0# 32 PCI_AD7 33 PCI_AD8 34 PCI_AD9 35 GND 36 GND 37 PCI_AD10 38 LINE_IN_L 39 PCI_AD11 40 MIC_IN 41 PCI_AD12 42 LINE_IN_R 43 PCI_AD13 44 ASVCC 45 PCI_AD14 46 LINE_OUT_L 47 PCI_AD15 48 AUDIO_GND 49 PCI_C/BE1# 50 LINE_OUT_R 51 VCC 52 VCC 53 PCI_PAR 54 PCI_SERR# Watchdog Timer ETB9F000 ETX v4.01 SoM User’s Manual Pin Description Pin 55 PCI_PERR# 56 N.C. 57 PCI_PME# 58 USB2- 59 PCI_LOCK# 60 PCI_DEVSEL# 61 PCI_TRDY# 62 USB3- 63 PCI_IRDY# 64 PCI_STOP# 65 PCI_FRAME# 66 USB2+ 67 GND 68 GND 69 PCI_AD16 70 PCI_C/BE2# 71 PCI_AD17 72 USB3+ 73 PCI_AD19 74 PCI_AD18 75 PCI_AD20 76 USB0- 77 PCI_AD22 78 PCI_AD21 79 PCI_AD23 80 USB1- 81 PCI_AD24 82 PCI_C/BE3# 83 VCC 84 VCC 85 PCI_AD25 86 PCI_AD26 87 PCI_AD28 88 USB0+ 89 PCI_AD27 90 PCI_AD29 91 PCI_AD30 92 USB1+ 93 PCI_RST# 94 PCI_AD31 95 PCI_INTC# 96 PCI_INTD# 97 PCI_INTA# 98 PCI_INTB# 99 GND 100 GND Watchdog Timer Description 15 ETB9F000 ETX v4.01 SoM User’s Manual 2.4.2 16 ETX Connector – X2: CN17 Pin Description Pin Description 1 GND 2 GND 3 ISA_SD14 4 ISA_SD15 5 ISA_SD13 6 MASTER# 7 ISA_SD12 8 DREQ7 9 ISA_SD11 10 DACK7# 11 ISA_SD10 12 DREQ6 13 ISA_SD9 14 DACK6# 15 ISA_SD8 16 DREQ5 17 ISA_MEMW# 18 DACK5# 19 ISA_MEMR# 20 DREQ0 21 ISA_LA17 22 DACK0# 23 ISA_LA18 24 IRQ14 25 ISA_LA19 26 IRQ15 27 ISA_LA20 28 IRQ12 29 ISA_LA21 30 IRQ11 31 ISA_LA22 32 IRQ10 33 ISA_LA23 34 IOCS16# 35 GND 36 GND 37 SBHE# 38 MEMCS16# 39 ISA_SA0 40 ISA_OSC 41 ISA_SA1 42 BALE 43 ISA_SA2 44 TC 45 ISA_SA3 46 DACK2# 47 ISA_SA4 48 IRQ3 49 ISA_SA5 50 IRQ4 51 VCC 52 VCC 53 ISA_SA6 54 IRQ5 Watchdog Timer ETB9F000 ETX v4.01 SoM User’s Manual Pin Description Pin Description 55 ISA_SA7 56 IRQ6 57 ISA_SA8 58 IRQ7 59 ISA_SA9 60 SYSCLK 61 ISA_SA10 62 REFRESH# 63 ISA_SA11 64 DREQ1 65 ISA_SA12 66 DACK1# 67 GND 68 GND 69 ISA_SA13 70 DREQ3 71 ISA_SA14 72 DACK3# 73 ISA_SA15 74 IOR# 75 ISA_SA16 76 IOW# 77 ISA_SA18 78 ISA_SA17 79 ISA_SA19 80 SMEMR# 81 IOCHRDY 82 AEN 83 VCC 84 VCC 85 ISA_SD0 86 SMEMW# 87 ISA_SD2 88 ISA_SD1 89 ISA_SD3 90 N0WS# 91 DREQ2 92 ISA_SD4 93 ISA_SD5 94 IRQ9 95 ISA_SD6 96 ISA_SD7 97 IOCHK# 98 RSTDRV 99 GND 100 GND Watchdog Timer 17 ETB9F000 ETX v4.01 SoM User’s Manual 2.4.3 18 ETX Connector – X3: CN18 Pin Description Pin Description 1 GND 2 GND 3 RED 4 BLUE 5 HSYNC 6 GREEN 7 VSYNC 8 DDCK 9 TTL_B0 10 DDDA 11 LCD2CLK-/TTL_B6 12 LCD2DO3- 13 LCD2CLK+/TTL_B7 14 LCD2DO3+ 15 GND 16 GND 17 LCD2DO1+/TTL_B3 18 LCD2DO2+/TTL_B5 19 LCD2DO1-/TTL_B2 20 LCD2DO2-/TTL_B4 21 GND 22 GND 23 LCD1DO3-/TTL_G4 24 LCD2DO0+/TTL_G7 25 LCD1DO3+/TTL_G5 26 LCD2DO0-/TTL_G6 27 GND 28 GND 29 LCD1DO2-/TTL_R6 30 LCD1CLK+/TTL_G3 31 LCD1DO2+/TTL_R7 32 LCD1CLK-/TTL_G2 33 GND 34 GND 35 LCD1DO0+/TTL_R3 36 LCD1DO1+/TTL_R5 37 LCD1DO0-/TTL_R2 38 LCD1DO1-/TTL_R4 39 VCC 40 VCC 41 N.C. 42 N.C 43 N.C. 44 BLON# 45 BIASON/HSYNC 46 DIGON 47 COMP 48 Y 49 N.C 50 C 51 LPT/FLPY# 52 TTL_G0 53 VCC 54 GND Watchdog Timer ETB9F000 ETX v4.01 SoM User’s Manual Pin Description Pin Description 55 57 STB#/N.C. 56 AFD#/DENSEL TTL_R0 58 PD7/N.C 59 61 IRRX 60 ERR#/HDSEL# IRTX 62 PD6/N.C 63 RXD2 64 INIT#/DIR# 65 GND 66 GND 67 RTS2# 68 PD5/N.C 69 DTR2# 70 SLIN#/STEP# 71 DCD2# 72 PD4/DSKCHG# 73 DSR2# 74 PD3/RDATA# 75 CTS2# 76 PD2/WP# 77 TXD2# 78 PD1/TRK0# 79 RI2# 80 PD0/INDEX# 81 VCC 82 VCC 83 RXD1 84 ACK#/DRV 85 RTS1# 86 BUSY#/MOT 87 DTR1# 88 PE/WDATA# 89 DCD1# 90 SLCT#/WGATE# 91 DSR1# 92 MSCLK 93 CTS1# 94 MSDAT 95 TXD1# 96 KBCLK 97 RI1# 98 KBDAT 99 GND 100 GND Watchdog Timer 19 ETB9F000 ETX v4.01 SoM User’s Manual 2.4.4 ETX Connector – X4: CN19 Pin 20 Description Pin Description 1 GND 2 GND 3 5VSB 4 PWGIN 5 PS_ON 6 SPEAKER 7 PWRBTN# 8 RTC_BATTERY 9 N.C 10 LILED 11 RSMRST# 12 ACTLED 13 TTL_B1 14 SPEEDLED 15 TTL_R1 16 I2CLK 17 VCC 18 VCC 19 OVCR# 20 N.C 21 N.C 22 I2C_DAT 23 SMBCLK 24 SMBDAT 25 SIDE_CS3# 26 N.C 27 SIDE_CS1# 28 DASP_S 29 SIDE_A2 30 PIDE_CS3# 31 SIDE_A0 32 PIDE_CS1# 33 GND 34 GND 35 PDIAG_S 36 PIDE_A2# 37 SIDE_A1 38 PIDE_A0# 39 SIDE_INTRQ 40 PIDE_A1# 41 N.C 42 TTL_G1 43 SIDE_ACK# 44 PIDE_INTRQ 45 SIDE_RDY 46 PIDE_ACK# 47 SIDE_IOR# 48 PIDE_RDY 49 VCC 50 VCC 51 SIDE_IOW# 52 PIDE_IOR# 53 SIDE_DRQ 54 PIDE_IOW# Watchdog Timer ETB9F000 ETX v4.01 SoM User’s Manual Pin Description Pin Description 55 57 SIDE_D15 56 PIDE_DRQ SIDE_D0 58 PIDE_D15 59 SIDE_D14 60 PIDE_D0 61 SIDE_D1 62 PIDE_D14 63 SIDE_D13 64 PIDE_D1 65 GND 66 GND 67 SIDE_D2 68 PIDE_D13 69 SIDE_D12 70 PIDE_D2 71 SIDE_D3 72 PIDE_D12 73 SIDE_D11 74 PIDE_D3 75 SIDE_D4 76 PIDE_D11 77 SIDE_D10 78 PIDE_D4 79 SIDE_D5 80 PIDE_D10 81 VCC 82 VCC 83 SIDE_D9 84 PIDE_D5 85 SIDE_D6 86 PIDE_D9 87 SIDE_D8 88 PIDE_D6 89 GPE2# 90 CBLID_P# 91 LAN_RX- 92 PIDE_D8 93 LAN_RX+ 94 SIDE_D7 95 LAN_TX- 96 PIDE_D7 97 LAN_TX+ 98 HDRST# 99 GND 100 GND Watchdog Timer 21 ETB9F000 ETX v4.01 SoM User’s Manual 2.4.5 40-Pin LVDS Connector: LVDS1 The PIN 32/30 Channel A D3+/- signals and PIN 13/11 Channel B D3+/- signals are used for single or dual Channel 24-bit LCD panel. When LCD panel is single Channel 24-bit, it is using the PIN 32/30 Channel A D3+/- signals. Pin Deception Pin Deception 1 VCCM 2 VCCM 3 VCCM 4 VCCM 5 VCCM 6 VCCM 7 N.C. 8 N.C. 10 GND 12 Channel B D0- 14 Channel B D0+ 15 GND 16 GND 17 Channel B CLK- 18 Channel B D1- 19 Channel B CLK+ 20 Channel B D1+ 21 GND 22 GND 23 Channel A D0- 24 Channel B D2- 25 Channel A D0+ 26 Channel B D2+ 27 GND 28 GND 29 Channel A D1- 30 Channel A D3- 31 Channel A D1+ 32 Channel A D3+ 33 GND 34 GND 35 Channel A D2- 36 Channel A CLK- 37 Channel A D2+ 38 Channel A CLK+ 39 GND 40 GND 9 GND 11 Channel B D313 Channel B D3+ 2.4.6 Pin 1 40 39 7-Pin Inverter Connector: CN4 Description Pin Description 1 VCC12M1 2 VCC12M1 3 VCC 4 BLEN 5 GND 6 GND 7 GND 22 2 Watchdog Timer ETB9F000 ETX v4.01 SoM User’s Manual 2.4.7 Video Connector: CN22 Descriptio Pin Pin Description 1 GND 2 NC 3 CHROMA 4 LUMA 2.4.8 TV Connector: CN5 Pin Description Pin 1 COMPOSITE 2 Pin Description Description GND Pin Description 1 Data Carrier Detect 2 3 Receive Data (RXD) 4 Data Set Ready (DSR) Request to Send 5 Transmit Data (TXD) 7 Data Terminal Ready 6 Clear to Send (CTS) 8 Ring Indicator (RI) 9 Ground (GND) 10 No connector 2.4 .9 2.4.10 USB Connecotor (Box-Header): CN11 Pin Description Pin VCC USB1- 5 USB1+ 6 USB2+ 7 GND 8 GND 9 GND 10 GND Watchdog Timer 2 4 Description 1 3 VCC USB2- 23 COM Port (Box-Heade ETB9F000 ETX v4.01 SoM User’s Manual 2.4.11 Flat Panel Bezel Connecotor: CN15 2 4 6 8 10 12 14 1 3 5 7 9 11 13 Power LED This 3-pin connector named as Pin 1, 3 and 5 connects the system power LED indicator to such a switch on the case. Pin 1 is assigned as +, and Pin 5 as -. The Power LED lights up when the system is powered ON. External Speaker and Internal buzzer Connector Pin 2, 4, 6 and 8 can be connected to the case-mounted speaker unit or internal buzzer. While connecting the CPU card to an internal buzzer, you need to short pins 2-4; while connecting to an external speaker, set pins 2-4 to Open and connect the speaker cable to pin 8 (+) and pin 2 (-). ATX Power On/Off Button This 2-pin connector named as Pin 9 and 10 connects the front panel’s ATX power button to the CPU card, which allows users to control ATX power supply to be on/off. System Reset Switch Pin 11 and 12 can be connected to the case-mounted reset switch that reboots your computer instead of turning OFF the power switch. It is a better way to reboot your system for a longer life of the system’s power supply. HDD Activity LED This connection is linked to hard drive activity LED on the control panel. LED flashes when HDD is being accessed. Pin 13 and 14 connect the hard disk drive to the front panel HDD LED, Pin 13 assigned as -, and Pin 14 as +. 24 Watchdog Timer ETB9F000 ETX v4.01 SoM User’s Manual 2.4.12 I2C Bus Connecotor: J2 Pin Description 1 CLOCK 2 DATA 3 GND 2.4.13 SM Bus Connecotor: J3 Pin Description 1 GND 2 +12V 3 N.C 1 2 3 2.4.14 3-Pin Fan Connecotors: FAN1/FAN2 Pin Description 1 GND 2 +12V 3 N.C 1 2 3 2.4.15 5.1 Channel Audio Bus Connecotor: FC1 Pin Description Pin 1 SURR_OUT_R 2 3 SURR_OUT_L 4 GND USB2- 5 CEN_OUT 6 LFE-C Watchdog Timer Description GND VCC 25 ETB9F000 ETX v4.01 SoM User’s Manual 2.4.16 Audio Connecotor: CN3 Color Blue Green Red Description LINE_IN LINE_OUT MIC_IN 2.4.17 5.1 Channel Audio Connecotor: CN21 Color Orange 26 Description SURROUND Black CENTER BASS Gray N.C Watchdog Timer ETB9F000 ETX v4.01 SoM User’s Manual 2.4.18 44Pin TTL Flat Panel Connector: CN2 43 41 39 37 35 33 31 29 27 25 23 21 19 17 15 13 11 9 44 42 40 38 36 34 32 30 28 26 24 22 20 18 16 14 12 10 Pin 1 4 7 10 13 16 19 22 25 28 31 34 37 40 43 Description Pin -12V GND L_VDDEN B1 B4 B7 G2 G5 R0 R3 R6 GND M ENABKL VDDM 2 5 8 11 14 17 20 23 26 29 32 35 38 41 44 Description +12VM VDDM GND B2 B5 G0 G3 G6 R1 R4 R7 SHFCLK HSY GND VDDM 7 5 3 1 8 6 4 2 Pin Description 3 6 9 12 15 18 21 24 27 30 33 36 39 42 GND VDDM B0 B3 B6 G1 G4 G7 R2 R5 GND VSY GND -SHFCLK 2.4.19 Keyboard & Mouse Connector: CN7 Pin Description Pin Description 1 2 3 4 K/B Data NC GND VCC 7 8 9 10 M/S Data NC GND VCC 5 K/B CLK 11 M/S CLK 6 NC 12 NC Watchdog Timer 12 10 11 9 8 7 6 4 5 3 2 1 27 ETB9F000 ETX v4.01 SoM User’s Manual 2.4.20 Parallel Port Connector: CN12 Pin Description Pin Description 1 2 3 Strobe# Data 0 Data 1 14 15 16 4 Data 2 17 5 6 7 8 9 10 11 12 13 Data 3 Data 4 Data 5 Data 6 Data 7 Acknowledge# Busy Paper Empty# Printer Select 18 19 20 21 22 23 24 25 Auto Form Feed# Error# Initialize# Printer Select In# GND GND GND GND GND GND GND GND 2.4.21 COM Port Connector: CN9 Pin Description 1 Data Carrier Detect (DCD) Receive Data (RXD) Transmit Data (TXD) Data Terminal Ready (DTR) Ground (GND) Data Set Ready (DSR) Request to Send (RTS) Clear to Send (CTS) Ring Indicator (RI) 2 3 4 5 6 7 8 9 28 Watchdog Timer ETB9F000 ETX v4.01 SoM User’s Manual 2.4.22 VGAConnector: CN8 Pin Signal Pin Signal Pin Signal 1 Red 2 Green 3 Blue 4 N/A 5 GND 6 AGND 7 AGND 8 AGND 9 NC 10 13 GND Horizontal Sync 11 14 NC Vertical Sync 12 DDC DATA 15 DDC CLK 2.4.23 USB Connectors: CN10 Pin Signal Name 1,5 USB Vcc 2,6 USB - 3,7 USB + 4,8 USB GND Watchdog Timer 29 ETB9F000 ETX v4.01 SoM User’s Manual 2.4.24 40 Pin IDE Interface Connector: IDE1 Pin 1 4 7 10 13 16 19 22 25 28 31 34 37 40 30 Description Reset # Data 8 Data 5 Data 11 Data 2 Data 14 GND GND IOR # No connector Interrupt No connector HDC CS0 # GND Pin 2 5 8 11 14 17 20 23 26 29 32 35 38 Description GND Data 6 Data 10 Data 3 Data 13 Data 0 No connector IOW # GND No connector No connector SA0 HDC CSI # Pin 3 6 9 12 15 18 21 24 27 30 33 36 39 Description Data 7 Data 9 Data 4 Data 12 Data 1 Data 15 No connector GND IOCHRDY GND-Default SA1 SA2 HDD Active # Watchdog Timer ETB9F000 ETX v4.01 SoM User’s Manual 2.4.25 44 Pin IDE Interface Connector: IDE2 2.4.26 43 41 39 37 35 33 31 29 27 25 23 21 19 17 15 13 11 Pin 9 7 5 3 1 44 42 40 38 36 34 32 30 28 26 24 22 20 18 16 14 12 10 8 6 4 2 Description Pin Description Pin Description 1 Reset # 2 GND 3 Data 7 4 Data 8 5 Data 6 6 Data 9 7 Data 5 8 Data 10 9 Data 4 10 Data 11 11 Data 3 12 Data 12 13 Data 2 14 Data 13 15 Data 1 16 Data 14 17 Data 0 18 Data 15 19 GND 20 No connector 21 No connector 22 GND 23 IOW # 24 GND 25 IOR # 26 GND 27 IOCHRDY 28 No connector 29 No connector 30 GND-Default 31 Interrupt 32 No connector 33 SA1 34 No connector 35 SA0 36 SA2 37 HDC CS0 # 38 HDC CSI # 39 HDD Active # 40 GND 41 VCC 42 VCC 43 GND 44 N.C Watchdog Timer 31 ETB9F000 ETX v4.01 SoM User’s Manual 2.4.25 CF Socket: CN13 Pin 1 2 3 4 5 6 7 8 9 10 11 12 13 14 15 16 17 18 19 20 21 22 23 24 25 32 Description GND Data 3 Data 4 Data 5 Data 6 Data 7 CS0# Address 10 ATASEL Address 9 Address 8 Address 7 VCC Address 6 Address 5 Address 4 Address 3 Address 2 Address 1 Address 0 Data 0 Data 1 Data 2 IOCS16# CD2# Pin 26 27 28 29 30 31 32 33 34 35 36 37 38 39 40 41 42 43 44 45 46 47 48 49 50 Description CD1Data 11 Data 12 Data 13 Data 14 Data 15 CS1# VS1# IORD# IOW R# W E# INTR VCC CSEL# VS2# RESET# IORDY# DMAREQ DMAACKDASP# PDIAG# Data 8 Data 9 Data 10 GND Watchdog Timer ETB9F000 ETX v4.01 SoM User’s Manual 2.4.26 Floppy Disk Connector: FDD1 Pin Description Pin 1 GND 2 4 7 No connector GND 5 8 Description Reduce write current GND Index# Pin 3 GND 6 9 No connector GND Drive select B# GND Direction# GND Write gate# GND Read data# GND 10 Motor enable A# 11 GND 12 13 16 19 22 25 28 31 34 GND Motor enable B# GND Write data# GND Write protect# GND Disk change# Drive select A# GND STEP# GND Track 0 # GND Side 1 select# 15 18 21 24 27 30 33 Watchdog Timer 14 17 20 23 26 29 32 Description 33 ETB9F000 ETX v4.01 SoM User’s Manual Appendix Watchdog Timer Using the Watchdog Function The ETB9F000 ETX Evaluation Platform Base Board is using Watchdog Timer Version 2.0, which generates either a system reset or non-maskable interrupt (NMI), depending on the JP14 jumper settings. Enable and program the function as below: Start ↓ Un-Lock WDT ↓ Set multiple (1~4) ↓ Set base timer (0~F) ↓ WDT counting ↓ re-set timer ↓ IF No re-set timer ↓ IF to disable WDT 34 : OUT 120H 0AH ; enter WDT function OUT 120H 0BH ; enable WDT function : OUT 120 0NH ; N=1,2,3 or 4 : OUT 121 0MH ; M=0,1,2,…F : OUT 121 0MH ; M=0,1,2,…F : WDT time-out, generate RESET or NMI : OUT 120 00H ; Can be disable at any time Watchdog Timer ETB9F000 ETX v4.01 SoM User’s Manual M 0 1 2 3 4 5 6 7 8 9 A B C D E F Watchdog Timer 1 0.5 sec. 1 sec. 1.5 secs. 2 secs. 2.5 secs. 3 secs. 3.5 secs. 4 secs. 4.5 secs. 5 secs. 5.5 secs. 6 secs. 6.5 secs. 7 secs. 7.5 secs. 8 secs. N 2 5 secs. 10 secs. 15 secs. 20 secs. 25 secs. 30 secs. 35 secs. 40 secs. 45 secs. 50 secs. 55 secs. 60 secs. 65 secs. 70 secs. 75 secs. 80 secs. 3 50 secs. 100 secs. 150 secs. 200 secs. 250 secs. 300 secs. 350 secs. 400 secs. 450 secs. 500 secs. 550 secs. 600 secs. 650 secs. 700 secs. 750 secs. 800 secs. 4 100 secs. 200 secs. 300 secs. 400 secs. 500 secs. 600 secs. 700 secs. 800 secs. 900 secs. 1000 secs. 1100 secs. 1200 secs. 1300 secs. 1400 secs. 1500 secs. 1600 secs. 35