1
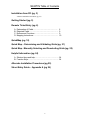
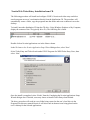
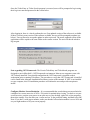
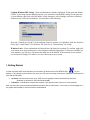
NEWTIN Remote Ticket Entry User’s Manual (Modified 6/12/07) Welcome to the JULIE NEWTIN Remote Ticket Entry user’s manual. This document will serve as an instructional manual and reference guide. It will give step-by-step information on how to use the ticket entry screen, as well as what information is required to process each locate request. JULIE’s NEWTIN Ticket Entry is designed to be user friendly. One particularly helpful feature is the data entry prompts. When your cursor is blinking in any field on the ticket, you can look at the bottom left-hand side of the screen and see a brief description of the information that should be entered into that field. NEWTIN Table of Contents Installation from CD (pg. 3) Alternate Installation Procedures (pg. 25) Getting Started (pg. 5) Remote Ticket Entry (pg. 6) A. B. C. D. Explanation of Fields………………………………..…. Required Fields……………………………….………… Buttons and Functions ……………………………...…. Mapping Instructions……………………………..…….. 6 9 9 10 QuickMap (pg. 10) Quick Map – Determining and Validating Grids (pg. 21) Quick Map - Manually Selecting and Deselecting Grids (pg. 22) Helpful Information (pg. 24) A. Shortcut keys and help………………………..…...…… 24 B. Function Keys……………………………………………. 24 Alternate Installation Procedures (pg 25) Street Entry Guide – Appendix A (pg 29) 2 Newtin Web Ticket Entry Installation from CD The following procedure will install and configure JULIE’s Newtin web ticket entry and ticket search programs on a user’s workstation directly from the distribution CD. The procedure will automatically create a folder, copy the programs into that folder and create a shortcut icon on the desktop. To install, insert the distribution CD into the CD drive. Using Windows Explorer or My Computer, display the contents of the CD (typically drive D:). The following file is listed. Double click on Newtin Applications.exe in the Name column. In the Welcome to the Newtin Application Setup Wizard dialogue box, select ‘Next’. Select Ticket Entry and Ticket Search under JULIE Programs for WEB Ticket Entry Users, then select ‘Next’. Once the install is completed, select ‘Finish’ from the Completing the Newtin Applications Setup Wizard dialogue box. If desired, users may choose to launch Ticket Entry when finished. The above procedure will result in a new folder being created on the user’s local drive in the Program Files directory named Newtin. It will also result in shortcut icons being placed on the user’s desktop for the selected applications. 3 Once the Ticket Entry or Ticket Search program is executed, users will be prompted to log in using their log in account and password in the screen below. After logging in, there is a check performed to see if an updated version of the software is available. If there is a more recent version of the software available, the user will be prompted to update (see below). Users will need to accept the update in order to proceed. The newer, updated version of the application will be copied to the same folder as the current version. The user will then be asked to log in again. Note regarding .NET Framework: The Newtin TicketEntry and TicketSearch programs are designed to run in MicroSoft’s .NET Framework environment. Most newer computers come with .NET already installed. Users should confirm that the .NET framework is installed on their workstation prior to running TicketEntry. The procedure to verify that .NET Framework is installed can be found in the Alternate Installation Procedures section of this manual. If .NET is not installed on your computer, this CD installation procedure will inform the user and provide an option to install. Configure Monitor Screen Resolution – It is recommended that your desktop screen resolution be configured to a screen area size of 1024 x 768 pixels for optimal map viewing. To check or set your screen area size, position your mouse to an open area on your desktop, right click, select properties, then select settings. You can slide your ‘screen area bar’ to the preferred setting, and then select OK. Note: If you have a wide aspect monitor, make sure that the left resolution number is set to 1024 and set your right number to fill your screen properly. 4 Confirm Windows DPI Setting – Most workstations are already configured for the preferred default 96 DPI. If your map does not display properly, you will need to confirm this setting. On an open area of your desktop, right click with your mouse, select Properties, select Settings, and select Advanced. In the new box, select the General tab. You will observe the following: Note: the “Normal size (96 dpi)” value under the Font Size window. For Windows 2000, the Font Size for 96 dpi is ‘Small Fonts”. For Windows XP, Font Size is “Normal Fonts” for 96 dpi. Windows Fonts – Most workstations will already have the fonts set to normal. To confirm, right click your mouse on an open desktop area, select Properties and then Appearance. If fonts are selectable on your machine, you will see a selection in the fonts box at the bottom. If the selection is not ‘normal’, you will need to change it in order to view the entire map on your screen. I. Getting Started In order to process utility locate requests, you will need to go double-click on the NEWTIN Icon on your desktop. A box will pop up this is where you enter your User name in the top line and your Password in the bottom line then click the OK button. • • Account: User accounts are set up by JULIE. Account typically is last name followed by first initial. (Example: an account for John Doe would be doej Password: A combination of letters and numbers. (The password lower case and is case sensitive.) After you enter your Account name and Password and then click the "OK" button, or hit “enter” you will be logged in to the system with the ability to use the functions outlined below. 5 II. Remote Ticket Entry A. Explanation of Fields: Following is a list of every field in the Ticket Entry screen. This is a brief explanation of each field for quick reference. Also, remember when your cursor is in each field, you can look at bottom left hand side of the screen and see what is required for that field. Phone – The excavator company’s main phone number, including the area code, but no dashes. Ext – Enter a phone number extension if applicable. P Button – Once the phone number has been entered you hit tab and it takes you to this button, hit enter and it will pull up a list of the people that have called in using that same phone number. Use your arrow keys to select the appropriate caller and then hit “enter”. (This will automatically populate all the other company fields) If the number doesn’t pull anything up then just tab to the Company field and proceed to get the rest of the company information. Company – The excavator company’s name. C Button – After the company name is entered hit tab and it takes you to this button, hit enter and it will pull up a list of the people that have the same company name, again use the arrow keys to select the appropriate caller and then hit “enter”. (If the company name is found it will populate all the other company fields.) Caller – First and last name of person calling in the request. Phone – Enter an alternate daytime phone number to contact the caller. MUCH – Indicates caller type as Municipal, Utility, Contractor, Homeowner or Other. CGR – Indicates whether this user is required to provide a grid ( ie Caller Grid Required). Address – The company’s mailing address. Zip – Zip code (in mailing address). State – State name (in mailing address). City – City that relates to zip code and mailing address. Fax – The caller’s company fax number, entered as 10 digits with no dashes or spaces. Note: For Remote Ticket Entry Users, all of the above fields will be automatically filled in with information stored with that user’s login account. If any of this information needs to be updated, contact the JULIE Data Department at 815-741-5011. Callback – Field to hold special requests related to required callback by utility companies to the excavator in the event that the utility company does not have any facilities at the excavation site. If contact is preferred at a different phone number that the one provided, enter the preferred phone number in this field. A phrase may be inserted into this field later based on the user response to the question related to waiving of the required callback. Site Contact – Name of person on site to contact, or someone familiar with the project. Phone – Enter the field contact’s phone number including the area code, but without dashes. Ext – If there is an extension number for the field contact, enter it; if not, leave it blank. 6 State – Automatically populated with IL for Illinois. County – The county where excavation will be done. This field has a drop down box with all of the county names, from which the county can be selected. Place – The incorporated city, village or town OR the unincorporated township name where the excavation will be done. This is a key field for determining which utility companies are notified. If your place is in an incorporated entity, your place entry here must be the name of the city, village or town followed by a ‘CIT’. Unincorporated areas are entered as just the township name. It is important to recognize that the CIT following place names differentiates townships from cities, villages and towns sharing the same name. Omitting the CIT when digging in a city may be a valid place entry, but the information on the ticket will be incorrect, resulting in improper utility notification which may subject the user to liability in the event of damage or injury. This field also has a drop down box with all of the valid place names in the county, from which the place name can be selected. Subdivision – Name of subdivision if digging in one. Address – Numerical component of the jobsite address if there is one. Enter just a single address in the field. No lot numbers or rural route box address should be entered here. Street – The street name of the jobsite address. Enter just a single street name, correctly spelled, with the correct suffix, adhering to the formatting standards for street entry. To assist with this entry, entering the first 2 or 3 letters of the main part of the street name, then clicking on the ST button to the right, will produce a list of streets beginning with those letters that are in the place entered. Selecting your street from this list will ensure proper spelling and format. Users are encouraged to use this feature. Nearest Cross-Street – The name of the street that intersects the jobsite street closest to the jobsite. This should be the closest intersecting street. Do not enter a parallel street or the biggest main street in the vicinity in this field unless it intersects closer than any other street. Again, enter just a single street name, correctly spelled, with the correct suffix, adhering to the formatting standards for street entry. To assist with this entry, entering the first 2 or 3 letters of the main part of the street name, then clicking on the NC button to the right, will produce a list of streets beginning with those letters that are in the place entered. Selecting your street from this list will ensure proper spelling and format. Users are encouraged to use this feature. ¼? – Enter either a “Y” (yes) or “N” (no) to the question “Does your cross-street intersect within one-quarter mile of your entire digsite?” Note that if you are working an extended project that covers a long stretch of area, your crossstreet may be with ¼ mile at the beginning, but farther away at the end. In this case, your entry would be “N”o. Lat - Latitude of excavation if applicable (north coordinate). Enter in degrees, minutes, seconds (ie 12.32.45). Long - Longitude of excavation if applicable (west coordinate). Enter in degrees, minutes, seconds (ie 12.32.45). CPG – Caller Provided Grid field. If entering just the section and quartersection, the entry must contain 2 digits for the section number followed by 2 digits for the quartersection. Example: Section 4 southwest quarter must be entered as 04SW. A grid including the tier and range can be entered as T23NR07W24NE. Such a grid entry must contain all 10 characters. Multiple grids may be entered by separating with a single space (ie 04NW 04SW). Grids Button – This button should be selected after entering street, cross-street and grid. This will result in a ‘grid lookup’ being performed, which will either determine the grid or validate a caller provided grid. Grids – Field that displays the grids that have either been returned by the system as a result of grid determination, provided by the caller, or selected while using the map. Additional Address or Direction to the Jobsite – Any additional address information, directions or instructions that can be used by a locator to drive to, find or identify a digsite. Information that typically is included in this field would include lot numbers, building or apartment numbers, descriptive directions, approximate distance and direction from the nearest city if unincorporated area. 7 Work Type – Statement regarding the type of excavation to be performed. Common work types can be selected from a drop down box. Boring? – Will there be any directional boring or horizontal drilling on this job? Enter “Y”es or “N”o. Depth > 7ft? – Will the depth of the excavation exceed 7 feet? Enter “Y”, “N”, or “U”nsure. Extent – Indicate where on the jobsite you propose to excavate, which indicates to the utility locators where on your jobsite they need to locate. Be sure that your entire excavation area is covered in your extend description. DoneFor - Who is the work being done for? Pre-Marked? – Has somebody from your company pre-marked the dig area using white paint, stakes or flags? Enter “Y”es or “N”o. Work Date – The digstart date and time that you intend to begin your excavation. Enter an “L” in this field if you need the jobsite marked at the end of the legal 48 hour/ 2 working day waiting period. To hand-enter a date and time, adhere to the format of 03/15/07 11:00 for 11AM on March 15th, 2007. Note that Illinois law requires 48 hour/2 working day advance notice for routine excavation and that excavations must start within 14 days of entering you locate request, including the day of the entry. Dig By Date – Displays the date by which the excavation must begin in order for the locate request to remain valid. Expires Date - Displays expiration date of the locate request. A call to JULIE prior to this date is required to extend a locate request. Meet – Used to indicate that a joint meeting is requested. This field is not valid for Remote Ticket Entry users. RR? – Is this jobsite within 100 feet of a railroad? “Y”es, “N”o or “U”nknown. Remarks – Any other useful information that does not have a defined field above. This field might be used to request utility locators to use paint and stakes, to warn about a hazardous condition, situations regarding gates or pets, or any other special information. Map Button – Go to the map. Click this button to enter the map, from which a jobsite can be identified, a jobsite polygon drawn to cover the dig site area and saved back to the entry screen upon map exit. These steps are explained in-depth elsewhere in this document. Note: An attempt should be made to find the jobsite on the map on each request that you create. The ticket will be sent to participating utility companies that have lines in the polygon area that you draw on the map. Drawing a polygon that is the correct size and in the correct location is crucial to ensure the correct utility companies receive the ticket. An incorrect polygon may result in some utilities not receiving the ticket, resulting in their lines not being marked in the field. Get Members Button – Determines which utility companies will be notified based on the geographical parameters entered on the ticket. The ticket will be sent to these utilities companies. Submit – Submit ticket for processing and delivery. If all required fields are populated, the ticket number will be displayed in the top left hand corner of the screen. Many users like to print a copy of a locate once completed. A printable version can be accessed by clicking on ‘Full Ticket’ at the top of the screen. Abort – This will abort the ticket. It will not be sent to any utilities and you will not be given a ticket number. 8 B. Required Fields: There are required fields that require input in order to be issued a dig number. Here is a list of them for quick reference: All Caller Information County and Place Work Type Boring Depth>7ft Extent Pre-Marked? Work Date Grids You can not submit a request without the appropriate information in these fields C. Buttons and Functions: The function buttons are listed across the top of the screen. You can choose to do any function by either clicking on that button or by pressing ALT and the underlined letter. To view the underlined letter press ALT once, then you can push the underlined letter. For example to do a new ticket, press ALT N, then this will pull up a box that asks if you want to clear the ticket. Then select the appropriate button: Yes (to clear everything) or No, but clear grids (keeps everything but the grids) or No, but keep grids (keeps everything including grids). The short cut is also listed next to each function below. Inquire (Alt I) - (Inquiry) Allows you to look at an existing ticket. Enter the ticket number, including the A or X, into the white box and then click on OK button, or hit enter. The ticket will then be displayed. New (Alt N) - Allows you to create a new ticket. Full Ticket (Alt F) – Will show a full view of the ticket and will allow you to print the ticket. Web (Alt W) – Web page allows you to search for tickets and generate reports. 9 D. Mapping Instructions: Quick_Map Move the mouse pointer over any field or button (without clicking) to view its description ‘Lookup’ area displays information from Ticket Entry used to generate a map 10 • • • • • • • State (Required) o Defaults to Illinois (cannot be changed) County (Required) o Displays currently enabled county (cannot be changed in Quick_Map) Place (Required) o City or town used to query the database (may be changed) Address (Optional) o Address number used to query the database (may be changed) Street (Required) o Primary street used to query the database (may be changed) Cross1 & Cross2 (Optional) o Cross streets Quick_Map uses to query the database (may be changed) Swap (Optional) o Switches ‘Street’ field with ‘Cross1’ field (or ‘Cross1’ with ‘Cross2’) Quick_Map comes with a set of tabs and associated buttons that may be utilized in finding an area and displaying it on a map 1 - ‘Find’ tab provides 7 buttons and 1 display area ‘Find’, ‘Street’ and ‘Cross1’ & ‘Cross2’ search for exact matches If an exact match is not found, a dialog box displays - Click ‘OK’ and Quick_Map will begin searching for similar matches - If similar matches are not found, Quick_Map displays a blank screen - If similar matches are found, they will be listed in the ‘Found Box’ - Click any result in the ‘Found Box’ to display that area on the map - Confirm that the street on the map is your dig area, select Seg to establish a jobsite polygon, then return to the entry screen by selecting the Save button. 11 2 - ‘Search’ tab provides 9 buttons and 2 display areas o Text can be manually entered into the ‘Search for Text’ field 12 ‘Copy from Street’ places text from the street field into the ‘Search for Text’ field. Doubleclick to copy only the root of the street name. ‘Copy from Cross1’ and ‘Copy from Cross2’ do the same thing for the cross street fields ‘Search’ queries information entered in ‘Search for Text’ field Results are listed in the results area below ‘Search for Text’ field Highlight a result to display street segments in ‘Found box’ Highlight street segments in the ‘Found box’, click ‘Copy to Street’ or ‘Copy to Cross’ and that information will copy to the corresponding field in Ticket Entry once ‘Save All’ is selected ‘Sndx’ will search using a “sounds like” index to find similar street names ‘HL1,’ will highlight the entire found road in the ‘Street’ field in red ‘HL2’ will highlight the entire found road in the ‘Cross1’ field in green ‘HL3’ will highlight the entire found road in the ‘Cross2’ field in blue ‘All HL’ combines the functions of the previous 3 buttons 13 3 - ‘Intersection’ tab provides 5 buttons and one display area o ‘Find’ looks for the exact intersection of ‘Street’ and ‘Cross1’ fields o ‘Search’ looks for similar intersections of the ‘Street’ and ‘Cross1’ fields o ‘Find2’ looks for an exact match of the section of ‘Street’ between ‘Cross1’ and ‘Cross2’ o ‘Search2’ looks for similar matches of the section of ‘Street’ between ‘Cross1’ and ‘Cross2’ o Matching results display in the ‘Found box’ o ‘Copy to Street/Cross’ copies the highlighted result from the ‘Found Box’ back to the corresponding fields in Ticket Entry once the ‘Save All’ button has been selected 4 - ‘Grid’ tab provides 6 buttons and 2 display areas The top half of the ‘Grid’ tab provides 3 buttons and 1 display area ‘Add’ opens a dialog box allowing a grid to be added by name 14 ‘Delete’ is used to de-select a chosen grid that is highlighted in the list ‘Clear’ de-selects all chosen grids The bottom half of the ‘Grid’ tab provides 3 buttons and 1 display area Grid names within the currently enabled county must be used ‘Find’ searches for exact match to grid listed in ‘Search for Text’ field Minimum 4 characters must be entered or dialog box displays ‘Search’ looks for similar matches to grid in ‘Search for Text’ field ‘Search’ allows for wild card characters ‘Add’ will add a highlighted grid to the list of selected grids above 5 – ‘Place’ tab has 4 main buttons, one display area, and 3 other buttons • The buttons are used to search for features on the map, such as landmark points, water features, etc. • The ‘Find’ and ‘Search’ buttons allow you to search the base map layers that are checked in the boxes at the bottom of the tab. o ‘Find’ looks for points that begin with text in ‘Search for Text’ field o ‘Search’ looks for points that contain text in ‘Search for Text’ field o Click on a result from the ‘Found box’ to jump to that point on the map o ‘Copy From Place’ copies the text from the ‘Place’ field to the ‘Search for Text’ field o ‘Copy To Place’ copies the text from the results window to the ‘Place’ field • The ‘Show Points’ button displays landmark points (see description below) on the map with red pushpins 15 • • The boxes at the bottom of the window allow you to check which layers of the base map to search. Hover the mouse (move the pointer over the box without clicking) to see a description of the layer. o Plc – Places – cities, towns, places o Dec – Landmark points – places, churches, schools, cemeteries, points of interest, etc o Lpy – Landmark polygons – military bases, large lakes, etc o Kgl – Key geographic locations – (this layer is not included) o RR – Railroad tracks o Wat – Water polygons – lakes, large rivers, etc o Hyd – Water lines – rivers, streams, canals, etc Click the buttons at the very bottom to check boxes that are similar. o The ‘Places’ button will check the Plc, Dec, Lpy, Kgl, and Add boxes o The ‘Water’ button will check the Wat and Hyd boxes o The ‘All’ button will check all boxes o The ‘Clear’ button will un-check all boxes 6 - ‘Lat/Long’ tab provides 4 buttons and 3 display areas o Click ‘Point’ to select a location on the map and save its Lat/Long coordinates. A red plus marker symbol will be placed on the map o Click ‘Clear’ to remove Lat/Long marker from map display o Click ‘Remove’ to clear Lat/Long marker from map display as well as remove the coordinate from the ‘Latitude’ and ‘Longitude’ fields in Ticket Entry 16 NOTE: Both Latitude and Longitude fields must hold information in order for a coordinate to be correctly found and properly displayed on the map. o o o o ‘Latitude’ field displays/holds North/South reading of GPS coordinate. ‘Longitude’ field displays/holds East/West reading of GPS coordinate. Once valid Lat/Long coordinates are entered, click ‘Jump to’ to display that area on the map Coordinates can be entered in 3 formats decimal degrees - example: latitude 41.123456, longitude 109.123456 degrees, minutes, and decimal seconds - example: : latitude 40 37 57.1234, longitude 111 57 21.1234 degrees and decimal minutes - example: latitude 40 37.1234, longitude -111 57.1234 1 degree = 60 minutes and 1 minute = 60 seconds Enter the coordinates in appropriate format, depending upon how they are provided by the GPS receiver. The other two formats will be automatically calculated. 7 - ‘Location’ tab provides 2 display areas o ‘Additional Address’ shows the information entered in the ‘Additional Address or Directions To Jobsite Info’ field from the text entry part of the ticket o ‘Extent’ shows the information entered in the ‘Extent’ field from the ticket o ‘Remarks’ shows the information entered in the ‘Remarks’ field from the ticket. 17 Note: The text in these fields can be modified from this tab. Modification made in these fields can be saved to the appropriate field in the text portion ticket entry by selecting the SAVE button in the lower right hand corner of the map area once map activities have been completed. 8 - ‘ORTHO’ tab provides access to the Orthophotography View and display controls. These views may be helpful to establish scale and content of an area. They are intended to be used for reference and should not be the sole basis for determining position of hand-drawn jobsite polygons. 18 Show – Will display the ortho image for the area in the map view window. Zoom level to display an ortho image must be set to 5 or less. Hide – Will remove the ortho image. Street Box – Checking this box will display the street layer on top of the ortho layer. Transparency Slide – Sliding this bar will cause the Ortho layer to become more or less transparent in the event that the user wants to see the underlying map layer. Color Slides – Accent certain color schemes on the ortho to accentuate various features. Quick_Map supplies many tools that may be utilized to navigate the map, inquire streets, draw ‘Dig Sites’ and select grids to name a few 19 o ‘Mov’ is a navigation button allowing the map to be re-centered and to zoom in and out o With the ‘Mov’ button activated, the following can be performed Click on an area in the current map view to have that point become the center of the map Hold down left click and drag the mouse to draw a box around an area in the map and zoom in, (Lower the altitude) Hold down right click and drag the mouse to draw a box around an area in the map and zoom out, (Raise the altitude) Hold down middle click and drag the mouse to pan/drag the map o ‘Grids’ toggles the tier, range, section, quartersection grid layer on and off Only works at map zoom level 5 or lower Must be activated in order to manually select grids from map (see below) Selected grids display in a gold tone color Unselected grids display hollow with a red outline o ‘Bulls’ is a distance tool used to determine the size of a radius Displays 100ft increment rings with outer red ring marking 1,000ft o ‘Near’ is an identify tool used to identify particular street segments Click on a street in the map display and ‘Near’ will mark it in red and display the address and name information at the lower left hand corner of the screen o ‘Place’ is an identify tool used to identify the place/city or town associated to the current map display. This may not match the PLACE names entered in the text area of the ticket. Not all areas are associated to a place/city or town o ‘Point’ Latitude/Longitude button used to manually mark a specific coordinate on the map The bottom of the map screen below the tools, displays the coordinates for the current mouse location on the map o ‘St’ highlights entire length of the street listed in ‘Street’ field o ‘C1’ highlights entire length of the street listed in ‘Cross’ field o ‘Streets’ lists all streets in current map view in the ‘Found box’ Must be a map zoom level 1 or 2 o ‘Ints’ displays intersections for nearest street with mouse click on map. o ‘Lat/Long’ toggles the Latitude/Longitude reference layer on and off o ‘Fade’ –Toggles map fading. o ‘Poly’ three phase button used to create polygons with mathematically precise extents or boundaries With ‘Poly’ button activated, the following may be performed Point mouse to a location on the map and double click to create a radius Point mouse to a location on the map, single click and drag the mouse in any direction. Double click to create a precise linear polygon Point mouse to a location on the map, single click and drag the mouse in any direction. Single click and continue to drag the mouse in another direction (continue as needed). Double click to create an area polygon with precise mathematical boundaries o ‘Line’ creates precise linear polygons with mathematical extents or boundaries 20 o o o o o o o o o o o o o o o Click ‘Line’, click on a start point on the map and drag the mouse in any direction. Single click to change direction and double click to create a linear polygon ‘Seg’ automatically covers a highlighted street segment with the buffer distance set in the ‘Buff’ field Only works if a street segment is chosen from the ‘Found box’ or is displayed in red on the map ‘Pdrw’ freehand drawing tool used to draw dig sites Click ‘Pdrw’, point mouse to a start point on the map and hold down left click. Drag mouse in any direction and a red line will appear tracing the path taken. When the end point is reached, release left click to create a polygon covering the selected area ‘Ldrw’ freehand drawing tool used to draw dig sites Click ‘Ldrw’, point mouse to a start point on the map and hold down left click. Drag the mouse in any direction and a red line will appear tracing the path taken. When the end point is reached, release left click to create a polygon covering the selected area with the prescribed buffer distance listed in the ‘Buff’ field ‘+’ used to add to existing polygon by drawing another. ‘Dist’ measuring tool used to determine distances between locations or objects on the map Measurements are displayed in feet at the bottom left hand corner of the map screen Click ‘Dist’ and point the mouse to a start point on the map. Click and drag the mouse in any direction. Single click to change direction and double click to exit the ‘Dist’ tool When directions are changed in the ‘Dist’ tool, the reading displays the length of the current segment as well as the total distance from the start point ‘Buff’ displays the current buffer (in feet) that will be applied to all drawn radian and linear polygons. This buffer value is set by JULIE and should not be changed by users. ‘C’ clears objects from the map display, such as bullseyes, distance lines, address ranges, etc (everything except grids & polygons) ‘Clear’ cannot be undone ‘Cl’ clears all objects, selected grids and drawn polygons from the map display ‘Clear’ cannot be undone ‘1’,’2’,’3’,’4’,’5’,’Z’ are preset map zoom levels, with 1 being the closest view and 5 displaying the most area. Z level displays the entire county. '+’ and ‘-‘ zoom in and out 1 step (also ‘ctrl +/-‘ do the same functions) ‘<’ returns to the previous map (also ‘alt Å’ does the same function) ‘A’ positions the map to a selected area ‘G’ positions the map to the area of selected grids. ‘Save’ returns to Ticket Entry saving polygonal and grid selections Save All’ returns to Ticket Entry saving polygonal and grid selections as well as any street name or address changes that may have been made while in the map o ‘Cancel’ returns to Ticket Entry without saving any selections or modifications made while in the map Quick Map – Determining and Validating Grids Once a jobsite area polygon has been identified in QuickMap, whether by finding a street segment automatically or by hand-drawing a point, line or area polygon, Newtin ticket entry will turn on the 21 section/quarter-section grids that contain parts of the jobsite polygon. Thee grids will typically be outlined in a gold or yellow color. If however, any of the grids containing a portion of the polygon are invalid for the PLACE entered in the PLACE field, the invalid grid will be shaded red. Saving these grids back to the ticket entry screen and completing your locate request will not be allowed when this condition exists. Following is an example of this condition. In the case above, the red-shaded grids to the west are not valid for Homer Glen Cit, meaning that according to our data, the boundaries of Homer Glen do not extend into thee quarter-sections. In order to complete the processing of a locate request with this condition, either of the following strategies may be taken. 1) Clear the existing blue jobsite polygon and redraw by hand so that it does not touch the invalid grids for your PLACE. It is important to remember that your entire dig area must be included in your jobsite polygon in order for the locate request to be valid. 2) Clear the jobsite polygon and turn on, by hand, the valid grid(s) that contain your jobsite. Note: Whichever strategy is used to continue processing of a locate in which invalid grids for a PLACE were identified, it is important to recognize that if your jobsite extends into multiple PLACES, a separate locate request is required for each PLACE. Failing to submit a locate request for each unique PLACE will likely result in the appropriate utility companies being unaware of your excavation and will subject the excavator to liabilities in the event of damage or injury. Quick Map - Manually Selecting and Deselecting Grids From Quick Map, grids can be manually selected and deselected. Grids should be selected when your jobsite falls in a grid that has not already been selected by any automated method. Grids shuld be 22 deselected when you know that your jobsite is not contained in a grid or grids that have been selected as a result of some automated calculation. To enable manual rid selection and deselection, click on the ‘Grid’ button below the map area. This will overlay the section and quarter-section grid layer on the map. Grids that are already selected will be shaded yellow. Unselected grids, will be hollow and outlined in red. Point and click on the grid to change it’s selected/deselected status. Note: Automatically deselecting a grid that is touching a jobsite polygon will result in the removal of the polygon. It is allowable to re-draw a jobsite polygon that had been erased by deselecting a grid, provided your entire digsite is contained in the new polygon. 23 IV. Helpful Information A. Short Cut Keys and Helps Alt-Tab: Use this to switch between open programs. Holding the alt key down and hitting the tab key will show you a list of all the programs that are currently open on your computer. It will allow you to go to another open program by hitting the tab key until the box selects the program you want. If you do not have more than one program open this will do nothing. You can use this to switch between the ticket entry screen and the map screen, as well as between all your other office programs. Using Auto-Complete in Internet Explorer: This allows you to recall information in a certain field in which you have previously submitted information. Set Up: In Internet Explorer, click Tools and select Internet Options. Under the Content Tab, click on the AutoComplete Button. Make sure there is a check next to Forms. If you want to delete all the existing data click on the Clear Forms button. In the ticket entry screen: There are 2 ways to access the information that is stored in the fields. 1. Hit the Down Arrow key. This will bring up the list of all the previous information that you've submitted in that field. 2. Start typing. If what you type matches anything that is stored, it will list all of the matches. Keep typing if you want to narrow the list down. If there are no entries that match what you want just ignore the drop down box. Once you've highlighted or selected the data that you want using the arrow keys hit the Tab or Enter key to move to the next field. Back Button: If you want to go to the previous page/view, hit the Back button on your Internet Browser program (Internet Explorer). Readjusting the display properties: Right-click on a blank part of the desktop and select Properties. Go to the Settings Tab. In the Screen Area section select the amount of pixels you want. The higher the number, the more you can see on the screen at one time. We suggest 1024 by 764 pixels in order to view the entire TE screen without scrolling from side to side. You can change it back and forth from your normal settings if you need/want to. You can also click on a box that allows you to have the desktop settings show up in your system tray, which makes it quick and easy to change these settings. F11 key: This automatically maximizes the window screen and allows more information to be displayed on the monitor at one time. If you press the F11 key again, it will take you back to normal view. 24 Alternate Methods of Installing or Executing Newtin Web Ticket Entry As an alternative to installing the Newtin Ticket Entry and Ticket Search applications from the a distribution CD, these applications are available for easy access from a webpage. These applications can be either downloaded from this webpage or executed directly from it. Following is a description of the procedure and setup considerations to install from the website or execute directly from it. In order to run Newtin Remote Ticket Entry from your computer, a few simple steps must be taken. They include: 1) Confirm that .NET framework is installed and if not, install the free download from MicroSoft. 2a) Go to the JULIE RTE website, login and download the TicketEntry program to your computer (Preferred method) OR 2b) Configure your Internet Explore by setting up trusted sites and configure the .NET Framework with the correct security settings. 3) Set up the screen resolution (size) on your monitor in order to see entire map. 4) Confirm monitor DPI setting. 1) Confirm that .NET framework is installed. The Newtin Remote Ticket Entry application requires the .NET framework v1.1. Most computers purchased within the past couple of years will already have the .NET framework installed. To determine if you already have .NET installed, the following steps can be performed. Click on your START button on your Windows desktop. Select Control Panel Double click on Add or Remove Programs When the window appears, scroll through the list of applications. If you see Microsoft.NET Framework 1.1 listed, the latest version is already installed. Exit If .NET framework is not installed, visit Microsoft’s website http://msdn2.microsoft.com/enus/netframework/aa569264.aspx for free download instructions. 2) Download the Ticket Entry program to your computer (Preferred). NOTE: Newtin RTE can either be [1] downloaded to and executed from your local machine which does not require any security settings to be set or [2] run directly from the web page. Downloading and executing requires less setup, is more efficient and preferred. Using Windows Explorer, create a new folder into which you will download the Ticket Entry Program. Recommend creating this folder on you “C” drive and give it an identifiable name such as “JULIE”. To do this, start Windows Explorer. From the list of ‘Folders’, select My Computer, then 25 Local Disk (C). Using your mouse point to an open area on the right, right click, select New, then Folder, after which you can name your newly created folder. Access the JULIE webpage by entering http://newtina.julie1call.com into your Internet Explore address line. Once there, you should be prompted for a username and password. You will need your login information from JULIE in order to proceed past this point. Once logged in, hold your mouse over the TicketEntry link, right click, then ‘Save Target As”. In the Save As dialogue box, you will need to add “.EXE’ to the end of the file name (see below). Also, make sure that the file will be saved in the new folder that you created previously in the ‘Save in:’ box. Select the ‘Save’ button. Using Windows Explorer, go to the new folder to confirm that the TicketEntry.exe file was saved. To execute, double click on the TicketEntry application. The first time you start the program, you will be prompted for the "Path to Application Server", enter http://newtina.julie1call.com/newtinweb. When prompted for "Port for application server", enter 80. You will then be prompted for your account and password and you can then proceed to log in and use the Newtin system. For future convenience, you can create a TicketEntry icon on your desktop by right-clicking on the TicketEntry.exe and select ‘Move to Desktop’. 26 2 (alternate) Running the TicketEntry application from the webpage (less preferred) In order to run the applications directly from the web page, this web site must be set as a trusted site in Internet Explorer and you must set up your .NET security settings. Setup Internet Explorer 1. Open Internet Explorer 2. Select "Internet Options" from the Tools menu. 3. Click the "Security" tab. 4. Click the "Trusted sites" Icon. 5. Find in the lower portion of the dialog the area for "Security level for this zone". 6. Verify that the level is set to "Low". If necessary, click the 'Custom Level' button and at the bottom of the dialog displayed, select "Low" and click the "Reset" button. 7. Click the "Sites" button to open the trusted sites list. 8. If checked, uncheck the "Require server verification (https:) for all sites in this zone" option. 9. In the "Add this Web site to this zone:" field, enter the host server: http://NewtinA.Julie1call.com Click the "Add" button to add the site to the Web sites list. 10. In the "Add this Web site to this zone:" field, enter the host server: http://NewtinX.Julie1call.com Click the "Add" button to add the site to the Web sites list. Also add http://12.32.137.34 and http://67.102.3.130 11. Click OK to dismiss the Trusted Sites dialog 12. Click OK to dismiss the Internet Options dialog Setup .NET Security Settings Microsoft's shortcut to the .NET Security Wizard application is not updated when installing the .NET 1.1 Framework after having installed the .NET v1.0 Framework. The best way to launch the .NET 1.1 Security Wizard application is to run it directly. 1. Find the Microsoft .NET Configuration Wizards Application. You must run the ConfigWizards.exe located in the .NET v1.1 Framework directory. To find, select Start on your desktop, Select Settings, Control Panel, Administratvie Tools. 2. You will see 3. Once you have launched this Wizards program, click the Adjust .NET Security icon. 4. Select "Make changes to this computer" . 5. Click the "Next" button to continue. 6. Click the "Trusted Sites" icon. 7. Move the slider to the top towards the label "Full Trust" Microsoft .NET Framework 1.1 Wizards.lnk 27 8. Click the "Next" button to continue. 9. Verify the settings summary and click the "Finish" button to finish. 10. Close the ConfigWizards.exe program 11. Close the ConfigWizards.exe program 3) Configure Monitor Screen Resolution – It is recommended that your desktop screen resolution be configured to a screen area size of 1024 x 768 pixels for optimal map viewing. To check or set your screen area size, position your mouse to an open area on your desktop, right click, select properties, then select settings. You can slide your ‘screen area bar’ to the preferred setting, then select OK. Note: If you have a wide aspect monitor, make sure that the left resolution number is set to 1024 and set your right number to fill your screen properly. 4) Confirm Windows DPI Setting – Most workstations are already configured for the preferred default 96 DPI. If your map does not display properly, you will need to confirm this setting. On an open area of your desktop, right click with your mouse, select Properties, select Settings, and select Advanced. In the new box, select the General tab. You will observe the following: Note the “Normal size (96 dpi)” value under the Font Size window. For Windows 2000, the Font Size for 96 dpi is ‘Small Fonts”. For Windows XP, Font Size is “Normal Fonts” for 96 dpi. Windows Fonts – Most workstations will already have the fonts set to normal. To confirm, right click your mouse on an open desktop area, select Properties and then Appearance. If fonts are selectable on your machine, you will see a selection in the fonts box at the bottom. If the selection is not ‘normal’, you will need to change it in order to view the entire map on your screen. 28 Appendix A - JULIE Web Ticket Street Entry Guide The following guide is intended to assist Web ticket entry users while entering street information in the street and cross-street fields. Following this guide is important to proper utility notification. Please review this guide and keep it available as a reference when entering locates. Primary Street Entry Rules - Enter a single street name, and just the street name, in each of the street and cross-street fields. - Spell each street correctly, observing proper spacing on compound word names. - Include a street suffix, using the proper abbreviation, on each entry. - Do not use punctuation (ie periods, dashes, apostrophes) in either of these fields. - Do not include rural route box addresses in street field. - Do not put lot numbers in either the address or street field. Lot #s go in the location field. Standard Abbreviations AVE - Avenue BLVD - Boulevard CIR - Circle CT - Court CRK - Creek DR - Drive LN - Lane 1ST - First LK - Lake PKWY- Parkway RD - Road ST - Street TER - Terrace TRL - Trail VW - View WAY - Way 2ND - Second N S E W - North - South - East - West RT - Route HWY - Highway CO RD - County Road 3RD - Third 4TH - Fourth …. Standard Spacing & Formats Valid Entries Invalid Entries W JEFFERSON ST W. JEFFERSON ST. (no punctuation needed) SMITH RD MITHRD (maintain proper spacing) LARKIN AVE LARKIN (include suffix information) 3RD ST THIRD ST (use numerals for numbered streets) THISTLE LN THISLE LN (spelling…very important) RT 24 E RT 24 or US RT 24 (no need for directional on RTs) HWY 6 US HWY 6 (no need to specify US or IL on HWY and RT) RIVER OAKS DR RIVEROAKS DR (properly spacing) CO RD 2075 E 2075 E RD (observe county road format & spacing) I80 I 80 (observe spacing) I55 FRONTAGE RD FRONTAGE RD (include specifics on frontage roads) SAINT ANNES CT ST ANNES CT (spell out SAINT and MOUNT) BIRCH LN BIRCH LN-LOT#17 (just street name, put lot# in location) OBRIANS CT O’BRIAN’S CT ( no punctuation needed) ELM ST INTERSECTION OF ELM AND 2ND (single name only) ACTUAL STREET NAME RT 5 BOX 130A ( put RR box info in location field) We need your help & cooperation. Please observe these guidelines when entering streets. 29