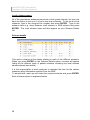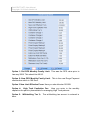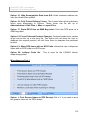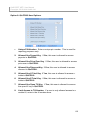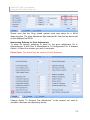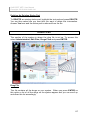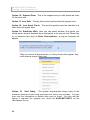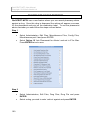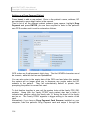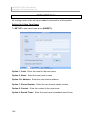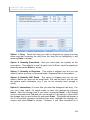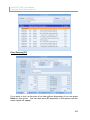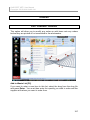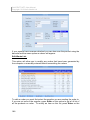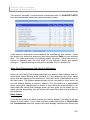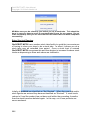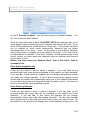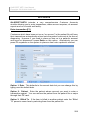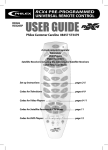
1
QicScript.net User Guide QicSCRIPT.NET User Manual Copyright 2010 Helix Health Ltd QicSCRIPT.NET® User Manual Contents COPYRIGHT - SOFTWARE ....................................................................... 11 COPYRIGHT - MANUAL ............................................................................ 12 SOFTWARE USE ....................................................................................... 12 SOFTWARE TRANSFER ........................................................................... 12 UPGRADES ............................................................................................... 12 BREACH..................................................................................................... 12 LIABILITY AND WARRANTIES .................................................................. 13 ADDRESS AND CONTACT NUMBERS ............................................... 13 INTRODUCTION ................................................................................... 14 STARTING YOUR MACHINE................................................................ 15 OPERATING INSTRUCTIONS .............................................................. 16 Entering Information ................................................................................... 16 Touchscreen Functionality: ......................................................................... 17 ERROR MESSAGES ............................................................................. 18 FATAL SYSTEM ERRORS ................................................................... 18 WHY THE NEED TO BACKUP ............................................................. 18 Very Important ............................................................................................ 19 Backup Procedure through Windows ......................................................... 19 DISCLAIMER......................................................................................... 20 CLIENT SUPPORT COMMUNICATOR ................................................ 21 2 2 nd GENERATION CLAIMS .................................................................. 24 nd What is 2 Generation Claims? .............................................................. 24 QicSCRIPT.NET User Manual Copyright 2010 Helix Health Ltd ADMINISTRATION ................................................................................ 26 Merge Duplicate Patients ........................................................................... 26 Purge Old Prescriptions.............................................................................. 26 Utility Procedures ....................................................................................... 26 Check for Live Updates .............................................................................. 26 LIVE UPDATE: ...................................................................................... 27 Manual Process ...................................................................................... 27 Automatic Process .................................................................................. 32 CONFIGURATION ................................................................................ 36 General Details........................................................................................... 37 Local scheme names ................................................................................. 38 Scheme details ........................................................................................... 38 Additional Pricing........................................................................................ 41 Vat Details .................................................................................................. 43 Ordering Options ........................................................................................ 44 Modem Details ........................................................................................... 48 Labelling Details ......................................................................................... 48 Accounts Options ....................................................................................... 50 Script Entry Options ................................................................................... 52 Interaction Options ..................................................................................... 56 Claims Transmission .................................................................................. 58 Miscellaneous Options ............................................................................... 60 Miscellaneous Part 2 .................................................................................. 63 Miscellaneous Part 3 .................................................................................. 65 Printer Details ............................................................................................. 66 Workstation Details .................................................................................... 66 Business Intelligence .................................................................................. 66 USER FILE ............................................................................................ 67 Searching For An Existing User ................................................................. 70 Modifying An Existing User......................................................................... 70 Deleting An Existing User ........................................................................... 70 Flexible Price Adjustment ................................................................... 71 Flexible Price Adjustment ........................................................................... 71 MedicalCard.ie web Link ..................................................................... 77 DOSAGE CODES ................................................................................... 79 Setting Up A New Dosage .......................................................................... 79 Searching For A Dosage ............................................................................ 80 Modifying An Existing Dosage .................................................................... 80 Deleting An Existing Dosage ...................................................................... 80 COST CENTRES................................................................................... 81 3 QicSCRIPT.NET User Manual Copyright 2010 Helix Health Ltd Setting Up A Cost Centre ........................................................................... 81 Searching For An Existing Cost Centre ...................................................... 81 Modifying An Existing Cost Centre ............................................................. 81 Deleting An Existing Cost Centre ............................................................... 81 SUPPLIER FILE .................................................................................... 82 Setting Up A New Supplier ......................................................................... 82 Searching For An Existing Supplier ............................................................ 84 Modifying An Existing Supplier ................................................................... 84 Deleting An Existing Supplier ..................................................................... 84 Eurodrug Tele-Ordering .............................................................................. 85 ORDER FILE ......................................................................................... 85 LAYOUT FILES ..................................................................................... 85 STOLEN PAD FILE ............................................................................... 86 Adding A Stolen Pad................................................................................... 86 Searching For An Existing Stolen Pad ........................................................ 86 Modifying An Existing Stolen Pad ............................................................... 86 Deleting An Existing Stolen Pad ................................................................. 87 DRUG FILES ......................................................................................... 87 Drug File ..................................................................................................... 87 Setting Up A New Drug............................................................................... 88 Modifying An Existing Drug ......................................................................... 99 Searching For An Existing Drug ................................................................. 99 Deleting An Existing Drug ........................................................................... 99 PHARMACIST ADVICE REMINDER .................................................. 100 Step 1 ....................................................................................................... 100 Step 2 ....................................................................................................... 100 STOCK MOVEMENTS ........................................................................ 103 BONUS DETAILS ................................................................................ 103 Setting Up A New Bonus Item .................................................................. 103 Searching For An Existing Bonus Item ..................................................... 104 Modifying An Existing Bonus Item ............................................................ 104 Deleting An Existing Bonus Item .............................................................. 104 WARNING CODES .............................................................................. 105 Adding A Warning ..................................................................................... 105 Searching For An Existing Warning .......................................................... 105 Modifying An Existing Warning ................................................................. 105 Deleting An Existing Warning ................................................................... 105 4 QicSCRIPT.NET User Manual Copyright 2010 Helix Health Ltd REMINDER CODES ............................................................................ 105 Adding A Reminder .................................................................................. 105 Searching For An Existing Reminder ....................................................... 105 Modifying An Existing Reminder............................................................... 106 Deleting An Existing Reminder ................................................................. 106 ADVICE CODES ................................................................................. 106 Adding an Advice Code ............................................................................ 106 Searching for an Advice Code .................................................................. 106 Modifying An Existing Advice Code .......................................................... 106 Deleting An Existing Advice Code ............................................................ 106 PATIENT FILES .................................................................................. 107 Patient file................................................................................................. 107 Setting Up A Patient ................................................................................. 107 Searching For An Existing Patient ............................................................ 113 Modifying An Existing Patient ................................................................... 113 Deleting An Existing Patient ..................................................................... 113 Setting up a GMS Patient ......................................................................... 113 Setting up a Drug Payment Patient .......................................................... 114 Setting up a Long Term Illness Patient ..................................................... 115 Setting up a High Tech Patient. ................................................................ 115 Setting up a Health Amendment Patient. ................................................. 116 Setting up a Doctor Stock Order ............................................................... 116 Setting up a Methadone Patient ............................................................... 117 Setting up a Veterinary Patient. ................................................................ 118 Dispensing a veterinary script ............................................................... 118 Setting up an EU National Patient ............................................................ 119 Setting up an EHB Psychiatric Patient ..................................................... 119 DRUG PAYMENT FILE ....................................................................... 119 Entering A Payment Record ..................................................................... 120 Modifying An Existing Payment Record.................................................... 121 Deleting an existing payment ................................................................... 121 ACCOUNTS FILE................................................................................ 121 PRESCRIPTION FILE ......................................................................... 121 Searching For A Prescription.................................................................... 122 DOCTOR FILE .................................................................................... 122 Searching For A Doctor ............................................................................ 122 Setting Up A Doctor .................................................................................. 122 Modifying An Existing Doctor.................................................................... 123 Deleting An Existing Doctor ...................................................................... 124 5 QicSCRIPT.NET User Manual Copyright 2010 Helix Health Ltd MDS SCRIPT FILE .............................................................................. 124 Setting Up A New MDS Script Item .......................................................... 124 Modifying An Existing MDS Script Item .................................................... 125 Deleting An Existing MDS Script Item....................................................... 125 CARE HOME FILE .............................................................................. 126 Setting Up A New Care Home .................................................................. 126 Option 10: ADM Code for these Round Times: Only used for robotic Dispensing. ............................................................................................... 127 Searching For A Care Home .................................................................... 127 Modifying An Existing Care Home ............................................................ 127 Deleting An Existing Care Home .............................................................. 127 INTERVENTION FILE ......................................................................... 127 Recording an intervention ......................................................................... 127 Searching For An Intervention .................................................................. 129 Modifying An Existing Intervention ............................................................ 129 Deleting An Intervention ........................................................................... 129 PATIENT CATEGORIES ..................................................................... 129 Setting Up A New Patient Category .......................................................... 129 Searching For A Patient Category ............................................................ 129 Modifying An Existing Patient Category .................................................... 129 Deleting An Existing Patient Category ...................................................... 130 PATIENT REGIONS ............................................................................ 130 Searching For A Patient Region ............................................................... 130 Modifying An Existing Patient Region ....................................................... 130 Deleting An Existing Patient Region ......................................................... 130 MAIN .................................................................................................... 131 Enter prescriptions ............................................................................ 131 To Set Up A Patient .................................................................................. 131 To Enter A Prescription............................................................................. 132 Other Dispensing Options......................................................................... 133 Private Or DPS Repeats ........................................................................... 137 GMS Repeats ........................................................................................... 137 ALT Functions .......................................................................................... 138 ALT+P: Phased Script. .......................................................................... 138 ALT+N: Not Dispensed. ........................................................................ 139 ALT+A: On Account. ............................................................................. 139 ALT+C: Change Reminders. ................................................................. 140 ALT+W: Change Warning. .................................................................... 140 ALT+E: Emergency Supply. .................................................................. 140 ALT+R: Rx Required. ............................................................................ 140 6 QicSCRIPT.NET User Manual Copyright 2010 Helix Health Ltd ALT+L: Print No Label. ......................................................................... 141 ALT+Q: Query This. .............................................................................. 141 ALT+S: Stock Order Details. ................................................................. 141 ALT+M: Miscellaneous Comments. ...................................................... 141 ALT+F: Edit in Full. ............................................................................... 141 ALT+V: Veterinary Info. ........................................................................ 141 ALT+X: Extemporaneous. ..................................................................... 141 ALT+B: Batch Details............................................................................ 142 Repeating Prescriptions from a Patient‟s History ..................................... 142 Dispensing a Loan Prescription ................................................................ 142 Marking A Loan Script As Received ......................................................... 142 Dispensing an Emergency Supply Prescription ........................................ 143 Dispensing a Prescription with an Owing. ................................................ 143 Dispensing the Remainder of an Owing ................................................... 143 Levy Payments when dispensing ............................................................. 143 Leo Pharmaceuticals Drug Substitution.................................................... 145 GMS Validation .................................................................................. 147 EDIT PATIENT DETAILS .................................................................... 153 To add a new family member ................................................................... 153 REPRINT A LABEL ............................................................................ 153 HEALTH CHECK ................................................................................ 154 Accessing Patient Assessments ............................................................... 154 Complete an Assessment......................................................................... 154 HANDY DISPENSING HINTS ............................................................. 158 UNFINISHED INTERVENTIONS ......................................................... 159 OUTSTANDING TO DO LIST ............................................................. 159 Modifying An Existing To Do Item ............................................................ 159 Deleting An Existing To Do Item ............................................................... 159 Printing Your To Do List ........................................................................... 160 VERIFY PRESCRIPTIONS ................................................................. 160 View Exception GM Scripts: ..................................................................... 160 View All GM Prescriptions ........................................................................ 161 Loan GM Prescriptions Only..................................................................... 162 Queried GM Prescriptions: ....................................................................... 162 TRANSMIT USING GMS CLAIMS1 .................................................... 162 TRANSMIT USING GMS CLAIMS 2 ................................................... 163 PCRS v2 Claims Transmission: ............................................................... 163 7 QicSCRIPT.NET User Manual Copyright 2010 Helix Health Ltd Downloading Exception Report: ............................................................... 165 Fixing Exception Errors:............................................................................ 168 Text Messaging Service: .......................................................................... 170 HOW TO USE MDS AND PRINT MDS FORMS.................................. 171 Setting up the Monitored Dose Systems to be used. ................................ 171 Setting up patient‟s on the monitored dose system. ................................. 172 DISPENSING USING MDS ................................................................. 173 Dispensing A Drug For The Monitored Dose System ............................... 174 PRINTING MAR FORMS AND LABELS ............................................. 175 Nomad System ......................................................................................... 176 Print Preprinted M.A.R Forms ............................................................... 176 Print Blank M.A.R forms ........................................................................ 176 Print Monthly M.A.R Forms ................................................................... 176 Print Preprinted Cassette Forms ........................................................... 176 Print Blank Cassette Forms .................................................................. 177 Print Patient Profile Labels .................................................................... 177 Print Carehome ID Labels ..................................................................... 177 Print Cassette Owner Labels ................................................................ 177 Print Insert Tray ID ................................................................................ 178 Print Patient List .................................................................................... 178 Venalink System ....................................................................................... 178 Print 7 Item M.A.R Forms ...................................................................... 178 Print Medication Labels ......................................................................... 178 Print Patient List .................................................................................... 179 Generic System ........................................................................................ 179 Print 6 Item M.A.R Forms ...................................................................... 179 Print Patient List: ................................................................................... 179 TEXT MESSAGING CENTRE ............................................................. 179 PRINT BATCH OF LABELS ............................................................... 185 PRINT MULTIPLE RECEIPTS ............................................................ 185 LIVE SUPPORT................................................................................... 185 LIVE CHAT .......................................................................................... 188 EXIT QicSCRIPT.NET® ...................................................................... 190 ENQUIRIES ......................................................................................... 190 View A Specific Label ............................................................................... 190 View A Patient‟s History............................................................................ 191 View A Specific Order ............................................................................... 191 8 QicSCRIPT.NET User Manual Copyright 2010 Helix Health Ltd View a Specific Return ............................................................................. 192 Account Enquiry [F1] ................................................................................ 192 Price Enquiry [F3] ..................................................................................... 193 Profit Enquiry ............................................................................................ 194 Profit Enquiry By Doctor: .......................................................................... 195 Here you can select your doctor to run ..................................................... 195 Calculate Product Usage .......................................................................... 195 Calculate Stock Value .............................................................................. 195 Product Locator ........................................................................................ 195 Drug Information [F4] ............................................................................... 196 Interaction Check Shift +[F4] .................................................................... 196 About This System ................................................................................... 196 ORDERS ............................................................................................. 197 EDIT CURRENT ORDERS .................................................................. 197 Add to Wants List [F2]........................................................................... 197 Edit Wants List. ........................................................................................ 198 Print Wants List ........................................................................................ 199 Transfer Suppliers .................................................................................... 199 PRINT AND TRANSMIT ORDERS ..................................................... 200 CHECK IN DELIVERIES ..................................................................... 200 Note: Pack Replacement and Check in Deliveries: .................................. 201 Back Orders ............................................................................................. 201 VIEW A SPECIFIC ORDER ................................................................ 202 VIEW A SPECIFIC RETURN .............................................................. 202 REPRINT/RETRANSMIT AN ORDER ................................................ 202 REPRINT A DELIVERY NOTE............................................................ 203 AD HOC DELIVERY OR RETURN ..................................................... 203 Ad Hoc Delivery........................................................................................ 203 Ad Hoc Return .......................................................................................... 203 INTER SHOP TRANSFERS ................................................................ 204 Transfer To Another Shop ........................................................................ 204 Transfer FROM Another Shop.................................................................. 204 STOCK MOVEMENTS ........................................................................ 204 Enter Stock Movements ........................................................................... 204 View Stock Movements: ........................................................................... 205 STOCK CONTROL ............................................................................. 205 9 QicSCRIPT.NET User Manual Copyright 2010 Helix Health Ltd Enter Stock at Random............................................................................. 206 Enter Stock Alphabetically ........................................................................ 207 Enter Stock by Barcode ............................................................................ 207 ACCOUNTS......................................................................................... 209 Enter transaction [F1] ............................................................................... 209 Edit transaction ......................................................................................... 210 Modify Transactions.................................................................................. 210 Deleting Transactions ............................................................................... 210 Account Enquiry ....................................................................................... 210 CALCULATE TOTAL CREDIT ............................................................ 211 MONTH END REPORTING ................................................................. 211 Change Reporting Period. ..................................................................... 213 MONTH END CLEARDOWN............................................................... 214 REPORTS ........................................................................................... 215 Administration Reports ............................................................................. 215 Daily Audit Report ................................................................................. 215 Veterinary Report .................................................................................. 216 Controlled Drugs Report ....................................................................... 216 Validation Report................................................................................... 217 Code Scripts Report .............................................................................. 217 Items Owed Report ............................................................................... 218 Loan Scripts Report .............................................................................. 218 Med1 Patient Report ............................................................................. 219 Financial Reports ...................................................................................... 219 Detailed Scheme Analysis Report ......................................................... 219 Financial Consolidation ......................................................................... 220 Vat analysis ........................................................................................... 220 Cost Centre Analysis............................................................................. 221 Itemised claims listing ........................................................................... 221 DPS Transaction Analysis ..................................................................... 222 HT Capitation Analysis .......................................................................... 222 Monthly HT Receipts ............................................................................. 223 Not Dispensed Scripts........................................................................... 223 Last Claim Details ................................................................................. 224 Stock Control Reports............................................................................... 224 Usage Analysis ..................................................................................... 224 Purchase Analysis Report ..................................................................... 225 Transfer Analysis Report....................................................................... 225 Stock Valuation Report ......................................................................... 226 Stock Movements.................................................................................. 226 10 QicSCRIPT.NET User Manual Copyright 2010 Helix Health Ltd Slow Moving Stock ............................................................................... 227 Print Wants List ..................................................................................... 227 Ideal Stock Levels ................................................................................. 228 Clinical Reports ........................................................................................ 229 Compliance Reporting .......................................................................... 229 Intervention Reports.............................................................................. 230 A.D.R Reporting .................................................................................... 231 Assessment Statistics ........................................................................... 231 Dispensed Drug Report ........................................................................ 232 Patient History Report ........................................................................... 232 Drug Usage By Doctor .......................................................................... 233 Drug By Condition By GP ..................................................................... 233 Drug By GP By Condition ..................................................................... 234 Miscellaneous Reports ............................................................................. 234 To Do List ............................................................................................. 234 Transaction Analysis ............................................................................. 235 Patient Status Report ............................................................................ 235 Uncollected Scripts ............................................................................... 236 Comment Report .................................................................................. 236 Scheme Report By Date ....................................................................... 237 DPS Patient Listing ............................................................................... 237 Full BNF Listing .................................................................................... 238 Full Notes Listing .................................................................................. 238 IMPORTANT NOTICE ANY ATTACHED UPGRADE IS SUPPLIED TO YOU UNDER THE TERMS LISTED BELOW. USING THE PRODUCT INDICATES YOUR ACCEPTANCE OF THESE TERMS AND CONDITIONS. IF THEY ARE NOT ACCEPTABLE YOU MUST RETURN THE UNUSED SOFTWARE TO THE PLACE OF PURCHASE AND YOUR MONEY WILL BE REFUNDED. COPYRIGHT - SOFTWARE This software upgrade is Copyright (C) 1987-2010, and all rights are reserved by Helix Health Limited or its affiliates. Helix Health grants a non-exclusive right to use the programs in accordance with the terms and conditions listed here to the purchaser of the programs or a transferee (in accordance with condition 4 below). All rights not specifically granted under these terms and conditions are reserved by helix health or its affiliates. 11 QicSCRIPT.NET User Manual Copyright 2010 Helix Health Ltd COPYRIGHT - MANUAL This manual is copyrighted (C) 1987-2010 and all rights are reserved by Helix Health. The document may not be copied, photocopied, reprinted, translated, reproduced or transmitted, in whole or in part, without prior consent, in writing, from Helix Health, except where the copy is to be used, by the purchaser or transferee, for the purpose of utilizing the software more efficiently. SOFTWARE USE Only one copy of this software may reside and be used on a single machine at any one time. Modification is expressly prohibited. The software may only be copied for the purpose of backup for archival purposes but may not be distributed or lent to a third party except under the terms of condition 4 below. The software cannot be lent, leased, rented or otherwise transferred to another user except under terms of condition 4 below. SOFTWARE TRANSFER The software may be transferred to a third party provided all copies and the originals are transferred in the process and that the third party is shown and accepts these conditions. Without such a transfer, the third party will not be authorised by Helix Health to use the software and will be in breach of the copyright of the software. In such a case, the purchaser will be held responsible for any loss or damage suffered in accordance with condition 6 below. UPGRADES You are only entitled to upgrades of the software if you are properly licensed to use the software and provided that you have a valid support contract with Helix Health, or its affiliates, or you have paid Helix Health an agreed licence fee for the upgrade. BREACH If the purchaser or transferee acts in breach of any of these terms and conditions the purchaser or transferee shall indemnify Helix Health against all loss suffered, including loss of profits, and the purchaser or transferee shall return to Helix Health all lawful and infringing copies of the software, including the dongle. 12 QicSCRIPT.NET User Manual Copyright 2010 Helix Health Ltd LIABILITY AND WARRANTIES The Software is supplied to you on an 'as is' basis and it is up to the purchaser or transferee to satisfy himself/herself that the software meets his/her requirements BEFORE it is used. Although the software is tested before release, no claim is made regarding its accuracy. Helix Health, its affiliates, directors or any of the software distributors do not assume liability for any loss or damage arising from the use of the software, inability of the purchaser to use the software correctly or failure of the software to function correctly. This includes loss of profits, business interruption, loss of business information, direct or indirect damages for personal injury or any other financial or other loss. While every effort will be made to correct software 'bugs' no guarantee is made that 'bugs' will be corrected. The Software Licence Agreement is governed by the laws of the Republic of Ireland. ADDRESS AND CONTACT NUMBERS Helix Health Limited, 52, Broomhill Road, Tallaght, Dublin 24. Ireland Phone: (353)-1-4633000 Fax: (353)-1-4633011 Home Page: www.helixhealth.com Email: [email protected] 13 QicSCRIPT.NET User Manual Copyright 2010 Helix Health Ltd INTRODUCTION QicSCRIPT.NET® is a computer system specifically designed for use in Irish Retail Pharmacies. It carries out the standard labelling, pricing, filing procedures and electronic claims transfer implemented by the majority of pharmacists. The main features of QicSCRIPT.NET® are: Cost effective solution to reduce paperwork within a Pharmacy and Provide an improved customer service. Easy to grasp system which carries out a variety of informational based tasks required by the pharmacist. Reliable software, designed in conjunction with leading pharmacists. Large storage capability on industry standard equipment with minimal outlay. The facilities provided by QicSCRIPT.NET® include: 14 Preparation and storage of scripts, including the printing of prescription and bag labels. Ability to design your own labels. Filing of every script, with NO limits. To hold more information simply add another hard disk or use a larger one. Provision of detailed reports on dispensed scripts, patient history, stock levels etc. Fully integrated Debtors Ledger with facilities to print out customer statements and calculate VAT. Quick and easy access to all information, with facilities to correct any error. All files are updated immediately when information is entered i.e. the system is totally online. This means that all information is up to the minute. QicSCRIPT.NET User Manual Copyright 2010 Helix Health Ltd Facility to electronically transmit claims. Ability to use your own formulary drug list. Ability to retrieve patient‟s information by scanning Drug Payment cards. Incorporates Reverse Print Labelling Patent (Ireland: S70906, UK 2314437) STARTING YOUR MACHINE Firstly, turn on the server (in most pharmacies this is likely to be the Main dispensing machine). Then switch on all other machines. After a few moments you will be asked to enter your User Name and Password. 15 QicSCRIPT.NET User Manual Copyright 2010 Helix Health Ltd OPERATING INSTRUCTIONS Entering Information When entering data, follow all on screen prompts. Data is input according to the following rules. 16 1. Cursor. The cursor (Flashing Line) signifies where the letters you type will appear. 2. Enter Key. Whenever you finish typing a response press the key marked ENTER. From now on (and in all on screen prompts) this operation will be signified by ENTER. 3. Delete. If you enter an incorrect letter press the Delete key or the Backspace key. This will delete the last letter entered. On some keyboards the Backspace is marked You may only enter a certain number of characters per field. Once you reach this point the machine will start to beep until you press Backspace or ENTER. 4. Date Input Errors. Any errors in the data you have typed will be explained on the last line of the screen. You will get an error if, for example, you try to enter the 32nd January 2008 as a date. Simply reenter the data in the correct format. 5. Date Entry. All dates must be entered in the format DDMMYYYY. For example, to enter the 4th May 2008 as a date, simply type 04052008. If you just type 04 then the computer will assume that the month and year are the current month and year. 6. Escape Key. Pressing ESCAPE will exit you from what you are doing, and go back to the previous screen – usually WITHOUT SAVING any changes. 7. Hot Keys. Hot Keys are keys which can be used anywhere in the system to carry out a particular task. F1 allows you to: Enter Transactions, Account Enquiry, Check DPS Balances and Record DPS Payments F2 allows you to: Order Drugs QicSCRIPT.NET User Manual Copyright 2010 Helix Health Ltd F3 allows you to: Price Enquiry F4 allows you to: Lookup Drug Information F5 allows you to: Record Interventions Shift + F4 allows you to: Check For Drug Interactions Touchscreen Functionality: The latest version of QicSCRIPT.NET® has touchscreen functionality. This enables the user to simply touch a field on the screen in order to enter information. It also allows the user to navigate through the software without the use of the mouse or keyboard. Below is a summary of the navigation buttons available: “New Record” – this is the same as hitting the INSERT key to insert a new record “Delete” – this is the same as hitting the DELETE key to delete a record Moves focus up / down one record – same as hitting Up Arrow / Down Arrow on the keyboard Moves focus up / down one page – same as hitting Page Up / Page Down on the keyboard Moves focus to start / end record – same as hitting Home / End keys on keyboard. Touching these arrows on screen is the same as using the left / right arrows on the keyboard. THESE PROCEDURES SHOULD BE ADHERED TO THROUGHOUT THE SYSTEM 17 QicSCRIPT.NET User Manual Copyright 2010 Helix Health Ltd ERROR MESSAGES During any data input you may get an error, if you enter the wrong reply to a question etc. an error message will appear at the bottom of the screen telling you what you have done wrong. For example, suppose you typed 'A' to a Yes/No type question (e.g. OK to delete record), the computer will respond by saying: "Entry must be Y or N". You must then re-enter either 'Y' or 'N' to the question. These messages are there for your convenience. Entering incorrect data will NOT cause any problems, as long as you re-enter it in the correct format. FATAL SYSTEM ERRORS Sometimes the system might stop in the middle of a program saying that a fatal error has occurred. This can be caused by a number of reasons, some more serious than others. If this ever happens: 1. Note the error number and file name displayed on the screen and any other relevant information, like what you were doing at the time. 2. Follow any instructions given to rectify the problem. Contact our Customer Care Team if there are no instructions given or if you don't understand them. WHY THE NEED TO BACKUP The data on your computer is stored on a plastic sheet coated in metallic particles inside the hard disk unit. It can become corrupt due to stray magnetic fields, high temperatures etc. It is therefore VITAL that you duplicate the information on the machine on a Daily Basis. An external hard disk is normally used for this purpose. It is in YOUR interest to use it. We must stress that while it is unusual for computer information to become corrupt, it CAN happen. It is up to you to prepare for it. A number of steps can be taken: 1. 18 If at all possible, don't move the system box. If you ever need to move it contact Helix Health in advance. QicSCRIPT.NET User Manual Copyright 2010 Helix Health Ltd 2. Clean the computer regularly to prevent a build up of dust. A damp cloth should be used. 3. Keep the system in a cool place with plenty of room for air to circulate around the computer box. 4. Keep your second external hard disk backup at home in their proper case. Do not store them in direct sunlight, near magnetic fields or anywhere where they may become damaged. 5. Keep magnetic and heat sources (electrical equipment, heaters etc.) away from the system box. 6. In general, treat the machine with care. 7. Always shut down using the correct procedure. Never just switch off the computer Very Important REMEMBER: IT IS UP TO YOU TO PROTECT YOUR INFORMATION You will only realise how valuable the information is if you lose it. We cannot accept any responsibility for information lost. Your only safeguard is to do a daily backup and verify that they have been done correctly. We strongly recommend that you back up information on a daily basis. It takes about 5 to 10 minutes and should be done at a quiet time during the day, or at close of business, as the software cannot be used while backup is in progress. You should keep a full backup for each year end, and a separate full backup for each month end. While you may consider this time consuming and expensive, you will find it well worthwhile in the event of losing your information. The process of backing up information is extremely simple. DO NOT SWITCH OFF POWER DURING A BACKUP Backup Procedure through Windows The following procedure is written for QicSCRIPT.NET® clients who use Microsoft Backup Utility program as set up by a Helix Health engineer or trainer on the date of installation. If you use a different third party backup utility 19 QicSCRIPT.NET User Manual Copyright 2010 Helix Health Ltd please contact the customer support desk of your program, Helix Health do not support third party backup programs. Before proceeding with a back up you must ensure that you have logged out of QicSCRIPT.NET® on all terminals before starting the back up. The system cannot be used while a back up is going through. 1. On the desktop click the backup icon. 2. When the Microsoft backup utility has loaded click on the Backup tab. 3. Click on Job and then Daily backup. On the left hand side of the screen you should see a folder called Qic with a tic mark beside it. 4. Click on the Start Backup button and your backup will begin. Once the backup has started do not use the system until the back up has completed. 5. When the backup has been completed your will be notified on screen. Click the Close button and then the Red X on the top left hand corner of the screen to close the program. 6. Once the backup is completed disconnect your external hard disk and store it off location. DISCLAIMER It is up to the Pharmacy itself to ensure all pricing information is up to date and correct. Helix Health Ltd are not responsible for updating the following: Vat Rates Mark-up % Drug files and drug prices Dispensing Fees High-tech capitation fees Any other fees 20 QicSCRIPT.NET User Manual Copyright 2010 Helix Health Ltd CLIENT SUPPORT COMMUNICATOR Client Support Communicator allows the Helix Health Customer Support team to push out RSS feeds to all customers with any urgent or forthcoming updates customers may/will need to be made aware of. The user will not have to make any changes to their software in order for this functionality to run. Any notifications pushed out from Helix Health will be displayed at the bottom of the screen as highlighted above. Each notification will scroll across the screen continuously until the user selects it as being „Read‟. To mark a particular item as read the user must click once on the scrolling yellow bar. The below screen will then be displayed to the user. 21 QicSCRIPT.NET User Manual Copyright 2010 Helix Health Ltd The user can either select „Dismiss (Flag as read)‟ or select the checkbox as checked beside „Message is Read‟. The message scroll will now no longer appear within the application. To view all messages the user can select/click the highlighted option on the below screen. 22 QicSCRIPT.NET User Manual Copyright 2010 Helix Health Ltd The above notifications screen displays all messages currently sent out by Helix Health (Note that these are test messages) All those items with tick marks beside them are indicated as being „Read‟ by the user therefore will not appear on the scroll bar. 23 QicSCRIPT.NET User Manual Copyright 2010 Helix Health Ltd nd 2 What is 2 nd GENERATION CLAIMS Generation Claims? nd 2 Generation Claims allows the pharmacy to transmit their claim file directly st to the PCRS. 1 Generation Claims are sent to servers in Helix Health Ltd nd first and then sent onto the PCRS. 2 Generation Claims also allows the PCRS to transmit a reject list within 24 hours of claims transmission. The pharmacy can then make changes to this reject list and re-transmit to PCRS. th They can do this up to the 8 working day. The claim can be sent via broadband or via dial-up modem as it was always st done with 1 generation claims. What scheme types can you transmit? nd 2 Generation claims allows you to transmit the 5 scheme previous accepted st through 1 Generation claims which are: 1. 2. 3. 4. 5. GM – GMS Single Scripts GR – GMS Repeat Scripts DP – DPS Scripts over the monthly limit as set by the HSE SO- Stock Order Scripts EM – Hospital Emergency Scripts It also allows you to transmit 3 additional scheme types which are: 1. 2. 3. LT – Long Term Illness (LTI) Scripts HT – High Tec Scripts HA – Health Amendment Act Scripts nd What are the benefits of 2 Generation Claims? 1. Rejects are sent back to the pharmacy within a 24 hour period for correction where errors have been made. 2. Once rejects are corrected they can be resent within the accepted time period for processing. 3. There have been three new schemes added. 4. Better Cash Flow for the pharmacy. 5. Direct communication to the HSE with the pharmacy claims rather than through a third party. st 6. 1 generation claims is being phased out gradually by HSE. 24 QicSCRIPT.NET User Manual Copyright 2010 Helix Health Ltd What needs to be done to the Pharmacy Systems? Helix Health Ltd will install the following on customer‟s machines: 1. The „Access Component‟ 2. The „Digital Certificate‟ nd 3. QicSCRIPT.NET® which will have 2 Generation claim functionality nd 4. Configure QicSCRIPT.NET® for 2 Generation claims. 5. Advise Pharmacy on benefits of text messaging service provided by PCRS that updates them on their claim file submission What is the „Access Component‟? The access component allows the pharmacy‟s PC talk to the PCRS‟s server for the purpose of transmitting claims, receiving reject lists and re-transmitting rejects. What is the „Digital Certificate‟? A „public key certificate‟ (or identity certificate) is an electronic document which incorporates a digital signature to bind together a public key with an identity – for information such as the name of a person or an organisation, their address and so forth. The certificate can be used to verify that a public key belongs to an individual. Helix Health Ltd are responsible for requesting certificates from PCRS on behalf of the pharmacy and installing them for the pharmacy also. nd When can I switch to 2 Generation Claims? nd You can switch to 2 Generation Claims at any point but the month‟s claim nd you wish to transmit must be open before you change to 2 Generation Claims. What is the Reject Report? 24hours after submitting the claim file the PCRS transmit a reject report to the pharmacy. 25 QicSCRIPT.NET User Manual Copyright 2010 Helix Health Ltd ADMINISTRATION In this section of the software you will find options that enable you to update the drug prices from a monthly price update, you can update doctors, drug information and coding information. This is usually done from a disk. Before running any of these options please refer to the notes supplied with the disk. Failure to do so can result in complications to your system. Remember always do a backup before you run any upgrades. Merge Duplicate Patients If patients have been entered more than once, this option facilitates for their demographics and patients histories to be merged. Purge Old Prescriptions This option will facilitate you in removing scripts prior to a specified date from your system. This removal is scheme specific. Backup before you run this option. Utility Procedures These options should only be accessed when instructed to do so by Helix Health. Check for Live Updates If you are set up for this, you can check online for updates (drug prices, drug info, doctor file etc) instead of running them from a disk 26 QicSCRIPT.NET User Manual Copyright 2010 Helix Health Ltd LIVE UPDATE: 1. QicSCRIPT.NET® Live Update will automatically download new upgrades of the application once the store has a Broadband connection. 2. QicSCRIPT.NET® Live Update will automatically download the latest DrugInfo updates once the store has a Broadband Connection. Manual Process To manually check for any updates the user must configure the settings to not automatically check for updates. This can be done through going into Administration and select Check for Live Updates. The below screen will appear once the above option has been selected. 27 QicSCRIPT.NET User Manual Copyright 2010 Helix Health Ltd To configure the live update options select the Configure option. The below screen will be displayed. For manual checking of updates to the QicSCRIPT application or Drug Information module, un-check both of the below options and select Save to save the changes made. 28 QicSCRIPT.NET User Manual Copyright 2010 Helix Health Ltd The user will now be responsible for checking for Live Updates through selecting „Check for Update‟s‟ displayed in the previous screen. At this stage any updates available for download will be displayed to the user. The user can choose to download all updates through clicking on the Download option. This will then begin the download process. 29 QicSCRIPT.NET User Manual Copyright 2010 Helix Health Ltd Note: The user can still use the current application while the updates are downloading as they are not currently installing The progress bar will appear as above, however this will be minimised so the user can work on the current QicSCRIPT application. If QicSCRIPT is closed it will halt the download process. When the download process has completed the user can click on Finish on the above screen. Note: The installation process will not begin until the user exits the QicSCRIPT application and re-starts it again. Upon starting the QicSCRIPT application the user will be prompted to update the QicSCRIPT software. The below screen will be displayed giving the user the option to update the software now or at a later time. 30 QicSCRIPT.NET User Manual Copyright 2010 Helix Health Ltd Through selecting „Yes‟ the user will be brought through the usual upgrade process. Selecting „No‟ means that the user will still be using the current version and will be prompted to upgrade upon each login. 31 QicSCRIPT.NET User Manual Copyright 2010 Helix Health Ltd Automatic Process To configure QicSCRIPT to automatically check for updates to the application or Drug Information the check boxes on the below screen must be checked. Once the above option has been checked, the application will check for upgrades every second day the application has been opened. So upon opening the application the user will be presented with the following screen. 32 QicSCRIPT.NET User Manual Copyright 2010 Helix Health Ltd The user can choose „Yes‟ to download or „No‟ to keep working on the current version. If „No‟ has been selected this pop up will be presented to the user upon every login to the QicSCRIPT application. Through selecting „Yes‟ the user will be displayed with the following screen. This will be minimised while downloading to allow the user work away on the current version. 33 QicSCRIPT.NET User Manual Copyright 2010 Helix Health Ltd When the download process has completed the user can click on Finish on the above screen. Note: The installation process will not begin until the user exits the QicSCRIPT application and re-starts it again. Upon starting the QicSCRIPT application the user will be prompted to update the QicSCRIPT software. The below screen will be displayed giving the user the option to update the software now or at a later time. 34 QicSCRIPT.NET User Manual Copyright 2010 Helix Health Ltd Through selecting „yes‟ the user will be brought through the usual upgrade process. Selecting „No‟ means that the user will still be using the current version and will be prompted to upgrade upon each login. 35 QicSCRIPT.NET User Manual Copyright 2010 Helix Health Ltd CONFIGURATION Before you start using QicSCRIPT.NET® there are a number of sections that need to be set up before you begin. You can find these set ups in Administration, Edit Files, Miscellaneous Files, Configuration File. Within the Configuration File there are 17 further options, explained below. To change any of these options, select the corresponding number and press ENTER this will allow you to make a change to this option. 36 QicSCRIPT.NET User Manual Copyright 2010 Helix Health Ltd General Details General Details contains options such as the Pharmacy name, Address, GMS Code, etc. Option 1: Pharmacy Name. This is where you enter your Pharmacy Name that will print out on all your labels and report headings. A member of Helix Health Ltd will set this up for you on installation. Option 2: Pharmacy Address. This is where you enter your Pharmacy Address that will print out on all script labels. A member of Helix Health Ltd will set this up for you on installation. Option 3: Pharmacy Vat No. Here is where you can enter your Vat. number. Option 4: Pharmacy GMS Code. Here is where you enter the GMS number of your pharmacy. Option 5: Store ID. If your pharmacy is part of a chain you can enter in the pharmacy number here. Option 6: Last Patient Number. The number of patients currently on your system is held here. Note: Do not modify this number. Option 7: Last Label Serial Number. Each label prints out with a reference number on it. The figure here is the number of labels you have generated so far. Note: This is not the SCRIPT NUMBER & do not modify this number. Option 8: Last Robotic Msg Number. This is part of robotic dispensing systems. Note: Do not change this number. 37 QicSCRIPT.NET User Manual Copyright 2010 Helix Health Ltd Local scheme names All of the government schemes are preset on the system already, but you now have the option to set up to 9 of your own local schemes. To set up any local schemes, type in the required line number and press ENTER. Type in the scheme name e.g. Army Scheme, staff scheme or ESB scheme and press ENTER. This local scheme name will then appear on your Scheme Details list. Scheme details This option contains all the details relating to each of the different schemes. When you press ENTER on the Scheme Details option a screen will appear listing all the different types of patient schemes including any local scheme names entered (see above). It is the responsibility of each customer to maintain the fees for the various schemes using information supplied from the GMS. To amend fees, mark ups etc select the required scheme and press ENTER. Each of these options is explained below. 38 QicSCRIPT.NET User Manual Copyright 2010 Helix Health Ltd Option 1: Last Form Number. As a script is issued for each scheme a counter keeps track of how many scripts you have dispensed for that scheme and stores the number. Note: Do not change any of these form numbers. Option 2: Print Script Receipt. If you want the Unified Claim Form to print out automatically for this scheme, set this option to Yes. If you leave this set at No a form will not automatically print. However you will be able to print one out at the dispensing stage if required, by selecting the reprint option. Option 3: Print Customer Copy. If you want the Unified Claim Form to print out a customer copy automatically for this scheme, set this option to Yes. If you leave this set at No a form will not automatically print. However you will be able to print one out at the dispensing stage if required, by selecting the reprint option. Option 4: Allow Patient Discount. If this option is set to Yes, any patient assigned to this scheme will receive a discount if this is set for the patient on the patient file. However if this is set to No, while a patient is assigned to this scheme they will not receive a discount, even if discount allowed is set up in the patient‟s file. Option 5: Track Repeat Scripts. If this option is set to Yes, then under this scheme the system will allow you to repeat a script any number of times until 39 QicSCRIPT.NET User Manual Copyright 2010 Helix Health Ltd the expiry date has been reached. This should only be set to Yes for DPS and Private scripts. Option 6: scheme. Dispensing Fee. This is the regular dispensing fee for this Option 7: Controlled Drugs Fee. This is the fee for dispensing controlled drugs under this scheme. Option 8: Late - Before Midnight. If you mark a prescription as late when it is being dispensed then the late dispensing fee, entered here, will be added to the normal dispensing fee for this scheme. The time on the script (at the first stage of entering) must be marked with the appropriate time to claim this fee. Option 9: Urgent - After Midnight. If you mark a prescription as urgent when it is being dispensed then the urgent dispensing fee, entered here, will be added to the normal dispensing fee for this scheme. As above, the script should be marked with the appropriate time. Option 10: Phased Fee (Parts 2+). If you mark a prescription as phased when it is being dispensed then the phased dispensing fee, entered here, will nd be added to the normal dispensing fee from the 2 part onwards. Option 11: Not Dispensed Fee. If you mark a prescription as not dispensed when in dispensing then this is the fee that will be claimed. Option 12: Extra Over 70‟s Fee. Details the fee that will be charged to all over patients over 70 where allowed on the scheme. Please note that you must enter the patient‟s date of birth for this fee to be applied. Option 13: Submit Electronically. This option allows you to control whether you send a claim electronically. Enter in Yes/No to set whether you will be submitting this scheme electronically or not. Option 14: Eligibility Checking. NB: This procedure must be done for every scheme type on your system. Option 15: Bill patient at FEMPI: Use this option to bill all patients on this sceme at the FEMPI pricing structure 40 QicSCRIPT.NET User Manual Copyright 2010 Helix Health Ltd Option 16: Claim PCRS at FEMPI: Use this option to send you claim using the Fempi pricing structure. Option 17: Mark-up % (Regular). The % mark-up for the scheme is entered here Option 18: Mark-up % (Dressing). The % mark-up for dressings under this scheme is entered here. Option 19: Mark-up % (Misc.) The % mark-up for miscellaneous items under this scheme is entered here. Option 20: Broken Bulk %. The % broken bulk for the scheme is entered here. Option 21: Charge for Container. You can enter Yes/No as to whether you will charge for a container for this scheme. Option 22: Government Item Levy. Use this option for schemes that you you want to apply the €0.50 Levy Charge Option 23: PLU (for Barcode). This option is for printing the barcode number on the bag label, for systems where the till software cannot scan in the barcode from QicSCRIPT.NET®. Additional Pricing This option contains further pricing details for your system. To amend any of these options select the corresponding number and then press ENTER this will allow you to modify this option. 41 QicSCRIPT.NET User Manual Copyright 2010 Helix Health Ltd Option 1: Old DPS Monthly Family Limit. This was the DPS value prior to January 2009. This should be 90.00. Option 2: New DPS Monthly Family Limit. This is the new Drugs Payment contribution which is 100 Euro. Option 3 New Limit Effective From: Here you should enter 012009 Option 4: High Tech Capitation Fee. Here you enter in the monthly capitation fee paid to pharmacists for managing High Tech patients. Option 5: Withholding Tax %. The withholding tax amount is entered in here. 42 QicSCRIPT.NET User Manual Copyright 2010 Helix Health Ltd Option 6-9: Container Charges. This is where you set up the charges for using containers; and there are 4 different container charges that you can set up. Option 10-13: Price Enquiry Mark-up. You can set up 4 different mark-ups here. When you do a price enquiry the system will give you the selling price using the 4 different mark-ups on the system. Option 14 – 15: Sliding Scale pricing. This is where you can set the pricing structure for the FEMPII Sliding Scale pricing. Option 16 – 17: Methadone Care Fees. Option 18: Maximum Levy per Family. This is where you can set the maximum amount a family will pay in Levy Fees per month. Vat Details It is under this option that all your Vat Rates are set up. To change any of these options select the corresponding number and then press ENTER. This will allow you to amend this option. 43 QicSCRIPT.NET User Manual Copyright 2010 Helix Health Ltd Ordering Options This section contains all information regarding ordering from QicSCRIPT.NET®. To amend any of these options select the corresponding number and then press ENTER this will allow you to amend this option. Option 1: Default Supplier. Enter your main supplier code in this field. This will ensure that any items with no supplier assigned to them will automatically appear for this supplier. Option 2: Force Orders to Default Supplier. This is the option to force the manual order (F2 option) to use the default supplier for the store, rather than the last supplier for the drug. Option 3: Ordering Method. This is the method by which the system will generate your wants list for your order. You have 4 options here: 1. 2. When Below Ideal: Every time a product is sold, the computer will recalculate the ideal stock level for that product. If the quantity in stock is below this level, then enough will be ordered to bring it back to the ideal level. Note: You must be keeping accurate stock for this option to work correctly. Manually (Using F2): The user will decide what they want to put on order using this option. To do this they press F2 (which is a hot key) and it allows you to call up a drug and place it on an order. The F2 key can be used anywhere in the system. Note: When you are using this option the system is doing no automatic ordering. 3. Each Time Dispensed: With this method of re-ordering, every time you dispense an item or part thereof, the system will automatically put this item back on order. 4. Pack Replacement: With this method of re-ordering, every time you dispense a full pack of a particular product, the system will put a new pack on order. Option 4: Auto Check in After Transmission. Here you can enter in Yes/No as to whether you want the system to automatically check in stock after the supplier has received your order. If you select Yes any items which the supplier has in stock will automatically be checked into your system. This check in method may be prone to errors in that the supplier‟s system may say 44 QicSCRIPT.NET User Manual Copyright 2010 Helix Health Ltd that they have stock of a certain item but when the goods arrive the item may not be in stock. If this option is set to No, you will need to check in orders manually - in Orders-> Check in Deliveries (explained in more detail later). Failure to do this may prevent stock being re-ordered automatically. Option 5: Show Message When Drug is Ordered. If this option is set to Yes, when you dispense an item and the system is putting it onto the wants list, a message will appear on the dispensing screen to tell you that the item has been put on order. Option 6: Delivery Docket Method. You have 4 different options for printing out delivery dockets. They are as follows: 1. Always Print Docket. When you have transmitted an order to the supplier and they have sent you back a message to say what they have in stock and what is not, the system will automatically print you off a delivery docket for this order. 2. Print If Different. When you have transmitted an order to the supplier, a delivery docket will only print off if they don‟t have all the items that you ordered. 3. Always Ask to Print. When you have transmitted an order to the supplier the system will ask you if you want a delivery docket to print off. 4. Never Print Docket. If you are set to this option, the system will never print you off a delivery docket. Option 7: Wholesaler Lead Time (Days). This option allows you to enter in the average number of days from when you place your order to when you expect to receive your wholesale orders (minimum 1). Option 8: Ideal Stock Level Method. In this option you specify what method the system will use to calculate what the ideal stock levels for the different products are. The Ideal Stock Levels are calculated automatically whether you are using Ideal Stock Levels or not. You have 6 options here: 1. Use Max Daily & Weekly Sales: QicSCRIPT.NET® keeps a list of the maximum daily/weekly sales of a product. If this option is selected the computer uses a combination of the maximum daily and weekly sales figures to ensure that enough is stocked to cope with 45 QicSCRIPT.NET User Manual Copyright 2010 Helix Health Ltd past maximum demands. The ideal level is skewed (2:1) in favour of the weekly figure as this results in a lower stock level. This is the preferred option. 2. Use Max Daily: As above but only maximum daily figures are used. This results in higher stock levels within the pharmacy, but will help avoid situations where you are out of stock of a product because of short-term demand. 3. Use Max Weekly Sales Only: As above but only maximum weekly figures. This results in lower stock levels within the pharmacy, but will not help to avoid situations where you are out of stock of a product because of short-term demand. 4. Use Current MTD & YTD Sales: QicSCRIPT.NET® keeps a list of the current month and year to date sales of a product. If this option is selected, the computer uses a combination of the current monthly & yearly sales figures to ensure that enough is stocked to cope with past maximum demands. This method will take into account seasonal variations, but may result in stock levels that are too low to cope with daily variations. 5. Use Current MTD Sales Only: As above but only the current month sales are used. 6. Use Current YTD Sales Only: As above but only the current year to date sales are used. Option 9: No orders after (Months). Set this option to the number of months after which a product will stop ordering if it is not sold. If this is set to 2 and a product has not been sold in the previous 2 months, then the product will no longer be ordered until such time as it is sold again. Setting to 0 switches the function off and forces ordering once the product drops below ideal level – irrespective of when it was last sold. Option 10: Change Usual Supplier. The default supplier Administration, Edit Files, Miscellaneous Files, Configuration and Ordering Details is set up on your system so that when you order an item it automatically appears on your default supplier‟s order. However if you are placing an item on order using the F2 key and you want to use a different supplier as opposed to your default the system gives you 3 options in the way you want this amendment recorded. 46 QicSCRIPT.NET User Manual Copyright 2010 Helix Health Ltd 1. Change Automatically. If you place an item on order for a different supplier from your default supplier the system will automatically change the supplier on this item permanently so that it is ordered from the new supplier from now on. 2. Ask Before Changing. If you place an item on order for a different supplier from your default supplier, the system will ask you if you want to change the supplier on this item permanently so that it is ordered from the new supplier from now on. 3. Never Change. If you place an item on order for a different supplier from your default supplier, the system will place the item on order with this supplier for this order only. The next time you order the item it will use your default supplier. Option 11: Back Order Method. This option allows you to set the back order method for shorts from your suppliers. Never Back Order. If this option is set, the system will never back order any products that are short. If you do have shorts and you want to reorder them, you will have to generate a separate order for them. Back Order During Check In. If this option is set, when you are checking in an order and you have been left short you have to amend the check in to record the shorts. These shorts are then put back on order to whomever they were ordered from in the first place. You have the option to transfer all these shorts onto another supplier on a once off basis if you require (See Transfer Supplier in the Orders menu) Back Order on Transmission. If option is set, the system will put any shorts on back order as soon as the teleorder transmission is complete. The shorts will automatically go on back order to the original supplier. At this point you will have the option to transfer the order onto a different supplier on a once off basis (see Transfer Supplier in the Orders menu). Option 12: Check Orders by Exception. If set to No then all delivery quantities are set to zero and you must enter each one. If set to Yes then the quantities to be checked in are set to the quantity ordered and you need only change the ones that are incorrect or short. 47 QicSCRIPT.NET User Manual Copyright 2010 Helix Health Ltd Option 13: Random Stock Check Interval. Enter in the interval before which a product will reappear on the Random Stock Take e.g. 6 months, the product will appear every six months. Option 14 Last Order Number. This is the number of the last order generated on the system. Note: Do not adjust this number. Option 15: Last Return Number. This is the number of the last return generated on the system. Note: Do not adjust this number. Option 16: Automatically Transfer to OS list: When a teleorder is transmitted and the supplier is out of stock of some items, you can choose to transfer these items to a general Out of Stock List. This list can then be transferred to another supplier. If this is your preferred choice enter Y. If you prefer to keep the Out of Stock Items on the same Suppliers list until you send the next order, enter N. Option 17: Auto Check Sort Dated Stock List: Allows you to check short dated stock prior to adding them to the wants list. Option 18: Show stock levels on Drug List: Allows you to view stock levels while in the drug file. Modem Details Helix Health will have this option set up on installation, please do not change this option unless you are instructed to by Helix Health. Labelling Details To change any of these options select the corresponding number and then press ENTER this will allow you to modify this option. 48 QicSCRIPT.NET User Manual Copyright 2010 Helix Health Ltd Option 1: Label Length. This is where you set up the label length, if you have a regular label and a strip label, this length should be set to 17. If you only have regular labels this length should be set to 12. Option 2: Label Width. This is where you set up the label width. This should be set to 42 for most standard labels. Option 3: Print Labels in Upper Case. This option allows you to enter in Yes/No as to whether you require the system to print labels in capital letters or not. Option 4: Print Labels in Groups. On a network (shared) printer, if spooling is set up correctly (i.e. long timeout), all labels for one patient should print together. On a single user PC, or one with a local printer, this setting has no effect. Option 5: Print Two Private Labels. If this option is set to Yes then when you print a private script two labels will print. This is used for customers who do not use the strip labels but print a second private label for their daily register. Option 6: Print Registration Label. When a new patient is set up on the system, and if this option is set to Yes, it will automatically print out a registration label with all their details and the pharmacy details on it. 49 QicSCRIPT.NET User Manual Copyright 2010 Helix Health Ltd Option 7: Print Name on Label. This option should be set to No if you are using labels with your name and address pre-printed. If this option is set to Yes, then the system will automatically print out your name and address onto the script labels. Option 8-9: Start Line/Length on Screen. option on installation. Helix Health will set up this Options 10-16: Barcode Labels. These are options for printing out sheets of barcode labels. The printing can be done in Main-> Print Barcode Labels. This is used for printing barcodes for drugs that may not have a barcode on their packaging. Accounts Options This option contains the defaults relating to the Accounts sections of the programs. To amend any of these options select the corresponding number and then press ENTER this will allow you to make any modifications. Option 1: Show Gross Margin on Price Enquiry. If this option is set to Yes when you do a price enquiry by pressing F3 the system will display the margin on the item. If set to No then no margin will appear. Option 2: Disable Accounts Functions. If this option is set to Yes the Hot Key F1 for placing items on account or account enquiries has been disabled. You will have to use Accounts on the main menu screen instead. 50 QicSCRIPT.NET User Manual Copyright 2010 Helix Health Ltd Option 3: Are Majority of Patients on Account. If this option is set to Yes, all patients set up on the system will default to on account Yes. If this option is set to No, then any new patients set up on the system will default to on account No. You can amend any of these options when you set up the patient. Option 4: Print Full Address On Statement. If this option is set to Yes, when a statement is printed the patient‟s full address will print. If this option is set to No only the patient name will print. Option 5: Print Statements in Small Print. If this option is set to Yes, the system will use a smaller font size to print out statements. Option 6: Print Statements with Zero Balance. If this option is set to Yes, statements for patients with zero balance will print. If this option is set to No, statements for patients with zero balances will not have a statement printed. Option 7: Display Warning On Overdue Amounts: If Y is entered QicSCRIPT.NET® will warn you that the patient has balances over one month in debit. Option 8: Ref. On Statements: You will be given three options to choose from. Print Reference Only. This will give a reference number relating to a transaction. Print Description and Reference. This will give you a reference number together with a description of the transaction. Print Description Only. Choose appropriately depending on the amount of information you require on the statements. Option 9: Statement Totals. Choose to have totals for Each Patient or No Patient Totals. Option 10: Statement Format. There are five options to choose from depending on the type of paper you wish to use when printing statements. 51 QicSCRIPT.NET User Manual Copyright 2010 Helix Health Ltd Script Entry Options To change any of these options select the corresponding number and then press ENTER this will allow you to make any modifications required to this option. Option 1: Size of each Script History Line. This option allows you display the patient history screen giving either 1 or 2 lines for each history. You have the choice of entering in 1 or 2 here, which will give either 1 or 2 lines for each medication. If you select 1 here the system shows more patient histories. If you select 2 the system will give each medication history 2 lines which means that the screen is less cluttered and easier to read. Option 2: Stop at “Prescribing G.P” Prompt. If this option is set to Yes, if you call up a patient for dispensing, the system will stop at “Prescribing G.P” and this forces the user to enter the doctor code to be recorded for that prescription. If this option is set to No, the system will not stop at “prescribing G.P” 52 QicSCRIPT.NET User Manual Copyright 2010 Helix Health Ltd Option 3: Stop at “Dispensed By”. If this option is set to Yes, when a prescription is being processed, the system will pause at the “Dispensed By” field to allow the current user enter their code. If this option is set to No, the system will not pause at this field. Option 4: Stop at “Repeat By” Prompt. If this option is set to Yes, if you are entering in a prescription the system will automatically stop at the “Repeat By” field so that you don‟t forget to enter repeats it if any. If this option is set to No, when entering a prescription the system will skip over the ”Repeat By” field and it is up to the dispenser to go back and enter in the repeats. It is recommended that you set this to Yes because entering in repeats correctly is essential. Option 5: Stop at “Repeat To”. If this option is set to Yes, when you are processing a prescription, the system will pause at the “Repeat To” field to enable the user enter a date. This will allow the script to be repeated until this date is reached. E.g. the user can enter 6M for a six monthly prescription. The expiry date will be calculated automatically, and the prescription can be repeated any time up until this date (at which point it will appear as “EXPIRED” on the PMR. Option 6: Stop at “Retain Rx” Prompt. If this option is set to Yes, when you are entering in a prescription the system will automatically stop at the “Retain Rx” field so that you don‟t forget to enter if you are keeping the prescription. If this option is set to No, when entering a prescription the system will skip over the ”Retain Rx” field and it is up to the dispenser to go back and enter if the Rx will be retained. When set to Y, the letter R appears beside the script on the PMR. Option 7: Stop at “Condition” Prompt. If this option is set to Yes, when you dispense an item the system will stop at the “Condition” field to allow the user enter a know medical condition for the patient. Option 8: Stop at “Date Written” Prompt. If this option is set to Yes, when you dispense an item the system will stop at the “Date Written” field to allow the user to enter Y/N whether they want to enter a different date to the dispensed date or not. Option 9: Remember Scheme and Repeat By. By setting this option to Yes, it means that when you are doing a prescription containing more than one item and you specify that the first item belongs to a specific scheme and has a certain number of repeats left, the system will now assign the same scheme to all items on the script and the same number of repeats. 53 QicSCRIPT.NET User Manual Copyright 2010 Helix Health Ltd Option 10. Show label Preview Before Printing. If this option is set to Yes, you will have the option to view a sample label on screen before printing the final label. This affords you an opportunity to make any amendments to dosage or warning details. Option 11. Print Label for Owed Medication. By setting this option to Yes, it means that when a script is being processed and there is insufficient stock of an item, the system will generate a label informing the customer of the name of the product owed to them and the quantity. There is also a blank line on the label where the user can manually insert a date for the customer to call back for the item owed. Option 12: Group Scripts By Form Number. If this option is set to Yes, when you are in a patient‟s history all the scripts with the same script number will appear grouped together. If this option is set to No, when you are in a patient‟s history all the scripts will appear in date order. Option 13: SafeSCAN code. SafeSCAN is a security feature used in dispensing. If you set up a user to use SafeSCAN when a product is dispensed the barcode for this product is then scanned ensuring that the correct product was selected from the drug file. If you are using the SafeSCAN facility (see User File) you can enter a code in here that will override the SafeSCAN. If this password is entered at dispensing stage you can override the SafeSCAN facility. Option 14: F10 Options. This option is used for deciding when you want the bag label to print. You have 3 options. 1. Private Bag Label Only. If you select this option, when you press F10 for a bag label it will only print out if the script is private. 2. Never Print Bag Label. If you select this option, the system will never print out a bag label. 3. Always-Print Bag Label. If you select this option when you press F10 the system will print a bag label for every type of script that is entered. Option 15: Default Dosage. This option allows a dosage code be entered so that if a script is being processed and a dosage is not specified, the system will insert the dosage that has been inserted in this field. E.g. MD can be inserted for “as directed”. 54 QicSCRIPT.NET User Manual Copyright 2010 Helix Health Ltd Option 16: Save Dosage. Here the choices are: Never Change Dosage: In the drug file it is possible to allocate a dosage code to individual drugs. This code is then used each time the drug is dispensed. Save When Dispensing: If using this option the system will save the next dosage used when processing a script and store it as the usual dosage. Save Only If Blank: This option will store and save the next used dosage if there is no existing dosage saved. Don‟t Use Usual Dosage: Using this option will allow you to ignore the usual dosage stored. Option 17: Dosage Format: Here the choices are: New Long Length Format. With this dosage format option you can set up dosage codes up to 10 characters long e.g.: T1TD – Take One Three Times Daily, as this is the usual way doctors write prescriptions. Old 2 Character Format. With this dosage format option, when you want to enter in a dosage code you use the standard 2-character format e.g.: MD – As Directed. Option 18: Class to Show: You can select which drug classification to show when dispensing. The options you have are: No Classification AMA Classification AHFS Classification BNF Classification Note: This option is only available if you have Drug Interactions module installed. 55 QicSCRIPT.NET User Manual Copyright 2010 Helix Health Ltd Option 19: Therapy Review: The options here are: Auto Drug Usage Review: By choosing this option, at the end of each prescription the system will automatically display a page containing details of interactions, compliance, notes, etc. No Drug Usage Review: By choosing this option, you will not automatically view the above options. Ask to Do A Drug Usage Review: This option will ask at the end of each script if the user wishes to view a “drug usage review”. The user can answer Y or N. Option 20: Save Conditions: Three options are available here: Never Save Conditions: This option will allow the condition field to be bypassed when dispensing. Save When Dispensing: This option will store the condition used whilst dispensing and store it for use in the pharmaceutical care subsection and reports. Save Only if Blank: Using this option will save a condition only if no condition is currently is saved. Interaction Options This section relates to the Drug Information module on the system and only users with Drug Information installed on their system can use this option. To amend any of these options, select the corresponding number and press ENTER this will allow you to amend the option chosen. 56 QicSCRIPT.NET User Manual Copyright 2010 Helix Health Ltd Option 1: Display Using Normal Colours. If this option is set to Yes, the system will use the Normal screen colours when an interaction occurs. If this option is set to No, the system will use different colours to the normal screen colours, making the interaction easier to view. Option 2: Check Alcohol Interactions. If this option is set to Yes, then every item dispensed will be checked for an interaction with alcohol. If this option is set to No, no alcohol/drug interactions will appear. Option 3: Months to use for Checks. Enter in the number of months the computer is to check back for interactions with current medication and previous medication on the patient‟s file. Option 4: Warn if Not Performing a Check. When new products come on the market and they have not been included in the Drug Interaction file yet, the system will warn you that there is no interaction check for this drug. The user can then contact Helix Health and let us know so that we can ensure that the Drug Interaction file is updated. If set to No, the system will not warn of any drug interaction check when there is no information available. Option 5: Ask to Record Interventions: If this option is set to Yes, when the system finds a drug interaction you will be offered the opportunity to record what action was followed and the final outcome. Interventions can be reported on. Option 6: Check Duplicate Therapy: In this option you will be given the choice of 9 types of information levels. Chose whichever is appropriate to your needs. Option 7: Show Interactions Above. All interactions that occur on the system are given a level of how potentially dangerous they are. You can select the level that you want to set your system at, so the less serious interactions do not appear and only the significant interactions are brought to your attention. The available levels are listed on screen. Option 8: Default Leaflet Message. There is a facility to print off Drug Information Leaflets for customers and you can then enter in your own message that you wish to appear on these leaflets. This is a free text option (it is explained later in the manual how to print off these leaflets). 57 QicSCRIPT.NET User Manual Copyright 2010 Helix Health Ltd Claims Transmission This section contains all the defaults for electronic claim transmission. If you want to start transmitting your claims electronically contact Helix Health Ltd to ensure that these details are set up correctly. To amend any of these options, select the corresponding number and press ENTER. This will allow you to amend the option. Option 1: Current Claim Period. This option stores the date of the current month‟s claims you are working. You cannot change this option without an access key that you need to contact Helix Health for. Option 2: Last Claim Transmitted. This option stores the date of your last transmission. You cannot amend this option without an access key that you need to contact Helix Health for. Option 3: Exception File Received. When using GMS 2, this field will be filled with Y if the Exception File has been received from the PCRS, and N if it has not. Option 4: Next Batch to Transmit. This refers to the re-transmission of your Reject Report. If no Exception Report has been received, this defaults to 0. If you have received it, this will be 1. If you have downloaded your exception report again, this will be 2, etc. Option 5: Pharmacy GMS Code. Enter the pharmacy GMS number here. 58 QicSCRIPT.NET User Manual Copyright 2010 Helix Health Ltd Option 6: GMS Transmission Type. Here you can enter 1 or 2 depending on whether you are using GMS 1 or GMS 2 (first and second generation claims). Option 7: Transmission Speed. Enter the modem speed here. Option 8: Primary Phone Number. This is the phone number that your modem will dial first when transmitting a claim if you are using a Dial-Up connection. Note: This number should not be changed Option 9: Secondary Phone Number. This is the phone number your modem will dial second if it has failed to get through on the first attempt. Note: This number should not be changed. Option 10: Pharmacy Password. Set up by Helix Health Ltd after your first transmission. Option 11: Encryption Key. This is the encryption key that encrypts your claim files whilst they are being transmitted. This has to be set up by the pharmacist and can be made up of letters A-F and numbers 0-9. Only the pharmacist and the GMS board need know this code. If this number is changed, the GMS board must be notified so they can decrypt information transmitted. Option 12: Ask if H/T N/Disp Patients Were Entered. This is an option for a pop-up warning when transmitting claims. When using GMS2 HT patients who you are eligible to claim for but have not received meds this month must be entered, and their drugs marked as Not Dispensed. This is so the PCRS can process these claims electronically. Option 13: Ask if Exceptions Were Checked First. This is another option for a pop-up warning when transmitting claims to ensure users have verified their scripts before transmitting. Note: Options 7-11 are irrelevant if using Broadband and GMS2 59 QicSCRIPT.NET User Manual Copyright 2010 Helix Health Ltd Miscellaneous Options To change any of these options select the corresponding number and press ENTER; this will allow you to amend the option. Option1: Pricing on Financial Reports. This option allows the user to reprice scripts on financial reports using the PCRS reimbursement price for DPS/LTI/GMS scripts. Option 2: Financial Year Starts: Enter the relevant month. Option3: Open on Sundays: Enter Y or N. This is so that the system can remind you when you are due to forward your monthly claims. It is also relevant to running reports on our Head Office system. Option 4: Patient Name Display Format: Here you have two options: Standard Format: This option will display the patient‟s first name first and then surname in alphabetical order. 60 Justified Format: This option displays surname first and then first name. It uses the address to display people with the same address together. QicSCRIPT.NET User Manual Copyright 2010 Helix Health Ltd Option 5: Patient Display Order: Two sub-options exist here: Sort by Address: This will group together people with similar addresses i.e. families are readily found together. Sort by Firstname: This method will use the patients‟ first names to form an alphabetical list. Option 6: Default Patient Region: This is for setting the default region for all Psychiatric Patients on record. Any psychiatric patient that does not have a region assigned to them will now be assigned to this region. Option 7: Monitored Dose System in Use: If you are dispensing to nursing homes, you can specify which system you are using: Nomad Venalink Generic Option 8: Days Supply For MDS Robot: This option is used for robotic dispensing only. Please contact Helix Health for further information. Option 9: List All Drugs in Stock Report: Enter Y to include all drugs on the stock report or N to include only those that are currently in stock. Option 10: Print Name in Scheme Analysis: If this option is set to Y, when you run any of the scheme reports it will include the patient‟s name. If it is set to N, then all details are supplied except the patient‟s name. Option 11: Daily Report Type. The system gives you 4 different styles of printing the Daily Audit Report found in Reports, Administration Reports, Daily Audit Report. 1. Summary (With Totals). This will give you an analysis of how much was dispensed to each different scheme type, and includes a grand total (including vat). 2. Detailed (With Totals). This will give you an analysis of how much was dispensed to each patient, and includes a grand total (including vat). 3. Summary (Without Totals). This will give you an analysis of how much was dispensed to each different scheme type, with no grand total (including vat). 61 QicSCRIPT.NET User Manual Copyright 2010 Helix Health Ltd 4. Detailed (Without Totals). This will give you an analysis of how much was dispensed to each patient with no grand total (including vat). Option 12: MDS Robot Type. This option can be used to select robotic dispensing. Option 13: Calendar Pack Robot Type. This option can be used to select robotic dispensing. Option 14: Enable Robotic Part Packs. Y/N – only used if a robot is in use in the pharmacy Option 15: Use P1-P3 to switch GM to GR. If this is set to Y, you can enter P1-P3 in the “Repeat By” field when dispensing to change a GM script to a GR script (Part 1, Part 2 or Part 3). Option 16: Suppress Counselling Reminders. If set to Y, counselling reminders attached to a drug will not pop-up when dispensing. Option 17: Default Lots for Phased Rx. Allows the user to specify the default number of lots for phased scripts. Option 18: Scheme List for Daily Report: When you access this option you will be given a list of all the schemes operated by the system. By hitting the space-bar it will place a tick beside the scheme and it will then be included in the daily audit report. By hitting the spacebar a second time it will remove the tick and the scheme will then be excluded from the daily report. Option 19: Codes For Drugs Used To Treat Erectile Dysfunction: This option list all GMS codes for products such as Viagra to insure that current GMS dispensing limit allowances are observed. If the limit is exceeded, the script will be changed to DR (private) as the pharmacy cannot claim for more than the allowed limit. 62 QicSCRIPT.NET User Manual Copyright 2010 Helix Health Ltd Miscellaneous Part 2 Option1: Only Update Prices From Disk. If this option is set to Yes, when a price update is run, only the prices will be used from the IPU disk. Details relating to drug names or pack sizes will not be changed. If the option is set to No, then all fields contained on the disk will be updated. Option 2: Use Warnings on Price Disk: If this option is set to Yes, when a price disk is run it will use the warnings as supplied by the IPU. By setting this option to No, then your existing warnings will remain unchanged. Option 3: Use Counselling Notes on Disk: If you have this option to Yes, when you run an IPU disk, it will update any counselling notes available or that have been changed by the IPU. If the option is set to No, then any existing notes remain unchanged. Option 4: Add Dispensed Drugs to Formulary. When dispensing, if you use a formulary and then access the full drug list and dispense an item from it, the item dispensed will now be on the formulary. 63 QicSCRIPT.NET User Manual Copyright 2010 Helix Health Ltd Option 5: Check Short Drug Lookup First. If this option is set to Yes, the system will search for drugs by these short look up codes first. If no codes exist, the system will bring up a list of nearest alphabetical matches. Option 6 Template Option in Add Patient. If set to Yes, this option will facilitate a faster way of registering families as it will transfer details of surname, address, doctor and scheme details. Option 7: Generate Patient References. If this option is set to Yes, then a unique number is inserted into the patient reference field for each patient. Otherwise, you can enter your own reference if required. Option 8: Request Card Expiry Dates: Choose Yes and then each time details of schemes are inserted, you will be asked to insert an expiry date. Option 9: Check that DPS Number is valid: Inserting Yes here will ensure that DPS numbers that are entered have the correct number of digits and are not clashing with someone else‟s number. Each DPS number is 10 alphanumeric digits in length with the last digit denoting the person‟s position in a family. Option 10: Mandatory Entry of Levy Payments: When a DPS or GMS script has been processed; the monetary details of the month‟s payments are displayed. If this option is set to Y, the user must enter the full amount of the payment due. If set to N, the user can ESCAPE without entering any payment. If set to L, the user can enter an amount less that the full amount due, and can now enter a zero value. Option 11: Months to Check for Levy Payments. Here a single digit number can be entered to indicate the number of months to check for payments relating to DPS or GMS Levy payments. Option 12: Ask Pharmacist for Advice. If set to Y, a text box will appear at the end of each script, allowing the pharmacist to enter patient advice. This will print on a separate label. Advice can be set up against drugs in the drug file. These will transfer into this text box automatically if these drugs are dispensed. Option 13: Print Emergency On Loan Report. Scripts marked as emergency will appear on the Loan Scripts Report Option 14: Send Repeat Compliance Message. This has to do with the compliance of patients and the regular dispensing of their medications. 64 QicSCRIPT.NET User Manual Copyright 2010 Helix Health Ltd Option 15: Hide Demographic Data from H/O. Hides customer address etc from the Head Office system. Option 16: Print Prison Delivery Forms. This is used when printing delivery forms upon dispensing to Prisons. These forms can be set up in Administration-> Edit Files -> Misc-> Layout Files. Option 17: Show DPS Price on GMS Bag Label. Prints the DPS price on a GMS bag label. Option 18: Force Preferred Product Changes. Preferred products for certain drugs can be set up in the drug file. This option will not allow the user to dispense the original product, but will force them to dispense the preferred product. Option 19: Allow DPS Items with no DPS Code. Allows the user to dispense items with no DPS code on a DPS script. Option 20: Lollipop Chute No. dispensing system. This is used for the CONSIS robotic Miscellaneous Part 3 Option 1: Print Generic Name on DPS Receipt: Set to Y if you wish to print the generic name on the DPS receipt. 65 QicSCRIPT.NET User Manual Copyright 2010 Helix Health Ltd Option 2: Print Generic Name on Drug Refund Receipt: Set to Y if you wish to print the generic name on the Drug Refund receipt. Option 3: Print Individual Drug Prices on DR Receipt: Set to Y if you wish to the individual drug prices on the DR Receipt. Option 4: Count DPS items below limit as FEMPI items: Set to Y if you wish to count DPS items below the limit as FEMPI items. Option 5: List any Owings on initial PMR display: When set to yes any outstanding owing‟s will be displayed to the user. Option 6: Months to look back when scanning for owing‟s: This setting will determine how far back the system will look for the owing‟s. Printer Details Helix Health will have this option set up on installation. Please do not change this unless you are told to by Helix Health. Workstation Details Helix Health will have this option set up on installation. Please do not change this unless you are told to by Helix Health QicSCRIPT.NET® contains a unique patented printing system for labels which helps reduce the common problem where labels get jammed in the printer. ReversaPrint, when switched on, will change your printer fonts so that labels are printed upside down. Because the pharmacy name/address are usually printed at the bottom of the label, by reversing the label, these details now print on top. As a result the labels don’t have to be fed as far forward, and this helps reduce label peel off. Further details are available from Helix Health. Business Intelligence This is concerning Business Intelligence reporting and Head Office functionality. If your store is set up for these, a Helix Health Engineer will set this option up on installation. Please to not change any details here unless instructed to do so by Helix Health. 66 QicSCRIPT.NET User Manual Copyright 2010 Helix Health Ltd USER FILE This is the section of the system where all the users of the system are set up. To access this file select Administration, Edit Files, Miscellaneous Files and press ENTER. To SET UP a new user on the system press INSERT. Option 1: User Code. Any number or letters (10 digits) can be entered into this field. This is the code that the user must enter into the system when logging into QicSCRIPT.NET®. It is also used throughout the system whenever you are requested to enter a user. Option 2: User Password. This is where you set up the user‟s password. It can be numeric, alphabetical or a combination of both. Option 3: Full Name. This is where the user‟s full name is entered. Option 4: Reference Number. Any number can be entered into this field. This number is unique and the system uses this for reporting purposes. It is not necessary to remember this number. Note: It is essential for the user to remember what they Log In as and their Password. Option 5: Staff Card Number. This number is automatically generated by QicSCRIPT.NET® but can be changed if need be. Option 6: Change Menu Structure: If you wish to limit access to areas of the system select 6. You can navigate through each option on the menu. By default, the user has access to all areas of the system. To limit access to particular areas of the system, hit the SPACE BAR on the options you wish to 67 QicSCRIPT.NET User Manual Copyright 2010 Helix Health Ltd limit. This will show the areas access is restricted. By hitting the SPACE BAR again you give the user back access. Hit the EXIT button once you have this set up. Option 7: Change QicSCRIPT.NET® User Options. 68 1. Ask for Password in Script Entry. If this option is set to Yes, when you are dispensing a script the system will stop at the “Issued By” option and force you to enter in your password if you wish to continue dispensing the script. 2. Default Drug List to Use. This option allows you to select which drug list you want this user to have access to. There are 3 different types of lists, All Drugs, Formulary Only and Ethical Only. This is useful if setting up a Locum. You can set the LOCUM user file to view Formulary Only, so they will only dispense drugs which you have previously dispensed (or they can switch lists if they cannot find the drug). 3. Allowed Switch Between Lists. If you have chosen a default drug list (above) you can also switch to one of the other drug lists when dispensing by entering Yes here. 4. Use SafeSCAN ® To Check Issues. If Yes, when in dispensing, after a user has entered a drug, the system will ask them to scan in the barcode of this product to ensure that they have entered the correct product. If No, the system will ignore this option. Note: You need to have a scanner connected to your keyboard to use this facility. QicSCRIPT.NET User Manual Copyright 2010 Helix Health Ltd Option 8: QicPOS® User Options. 1. Unique PIN Number. Enter a unique pin number. This is used for reporting purposes only. 2. Allowed Use Payout Key. If Yes, this user is allowed to access payouts in QicPOS®. 3. Allowed Use Price Over Key. If Yes, this user is allowed to access price over in QicPOS®. 4. Allowed Use Discount Key. If Yes, this user is allowed to access discount in QicPOS®. 5. Allowed Use X-Total Key. If Yes, this user is allowed to access xtotals in QicPOS®. 6. Allowed Use Z-Total Key. If Yes, this user is allowed to access ztotals in QicPOS®. 7. Allowed Use Open Till Key. If Yes, this user is allowed to access the open till key in QicPOS®. 8. Limit Access to Till Number. If a user is only allowed access to a certain till, enter in the till number here. 69 QicSCRIPT.NET User Manual Copyright 2010 Helix Health Ltd Searching For An Existing User To search for a user, press the SPACE BAR and the system will ask you for the name you want to search for. Enter the user name and press ENTER. The system will search for this user. Modifying An Existing User To MODIFY an existing user, highlight the user and then press ENTER. The same screen as above will appear. To amend any of these options select the corresponding number and then press ENTER this will allow you to amend this option. Deleting An Existing User Highlight the user and then press DELETE. You are then asked are you sure that you want to delete this user. Answer Yes to remove from the user file. Note: deleting a user from the file deletes them from any prescriptions it was assigned to causing “?” signs to appear instead of the user’s name. It will also cause errors if one of these scripts is repeated. 70 QicSCRIPT.NET User Manual Copyright 2010 Helix Health Ltd Flexible Price Adjustment Flexible Price Adjustment Flexible Price Adjustment gives the user the ability to pass on any discounts/increases they desire to specific schemes, drugs or patients. The system can be adjusted in the following way: Allow the user to specify patients that they would like to nominate for specific discounts / increases Allow the user to specify which scheme they would like to apply discounts / increases to Allow the user to specify which drugs they would like to nominate for specific discounts / increases This functionality would generally only be used for Private schemes. Nominating Patients for Price Adjustment To nominate a patient for discounts call up the patients file: 71 QicSCRIPT.NET User Manual Copyright 2010 Helix Health Ltd Go to Option 17 “Account Details” Set Option 7 to the amount you want to deduct or increase the patients Fee by. Above is set so that the patient has a reduction of €1 to each item the patient is dispensed. On dispensing to this patient you will notice that the fee for each item has deducted €1 from the dispensed items Fee field as below: 72 QicSCRIPT.NET User Manual Copyright 2010 Helix Health Ltd Please note that the Drug refund system used was setup for a €3.50 dispensing fee. The price Adjustment has deducted €1 from the fee above and is now displayed as €2.50. Nominating Scheme for Price Adjustment To allow for specific schemes to allow for the price adjustment Go to Administration Edit Files Miscellaneous Configuration File Scheme Details Select the scheme you wish to nominate. Please Note: This should only be used for Private Schemes. Change Option 13 “Scheme Fee Adjustment” to the amount you want to increase / decrease the dispensing fee by. 73 QicSCRIPT.NET User Manual Copyright 2010 Helix Health Ltd Now you must enable the drug for scheme fee adjustment. Go to Administration Edit Files Drug Files Drug File Call up the drug you wish to enable the scheme adjustment on. Go to Option 28 “Miscellaneous Details” Set Option 19 “Apply Scheme Fee Adjustment” to “Y” On dispensing this drug to patients under the nominated scheme, the fee of the dispensing will now increase / decrease depending on the value entered in on the scheme details screen. Nominating Drugs for Price Adjustment To nominate drugs to allow for price Adjustments go to Administration Edit files Drug Files Drug File Now select the drug you wish to nominate for a discount or an Increase. 74 QicSCRIPT.NET User Manual Copyright 2010 Helix Health Ltd Go to Option 28 “Miscellaneous Details” Change Option 10 “Drug Fee Adjustment” to the amount you wish to increase or decrease the dispensing fee for this drug. Now must set the scheme so that it allows Drug fee adjustments. 75 QicSCRIPT.NET User Manual Copyright 2010 Helix Health Ltd Go to administration Edit files Miscellaneous Configuration file Scheme details. Change Option 25 “Apply Drug fee adjustment” to “Y”. For dispensing‟s of this drug, the scheme adjustment will be applied. You will note that the Dispensing fee field in the dispensing screen has been decreased by €1.00 for the above drug. Please Note: If the user applies a Scheme Fee Adjustment & applies the Apply Scheme Fee Adjustment to „Y‟ while also applying a Drug Fee Adjustment and setting Apply Drug fee adjustment to „Y‟ then the two fees will be added to the dispensing fee. A hierarchy is not applied whereby one setting overrides the other. If only one fee is required the user must set the appropriate adjustment field to „N‟. 76 QicSCRIPT.NET User Manual Copyright 2010 Helix Health Ltd MedicalCard.ie web Link A link to the HSE‟s website has been added to the Main Menu of the QicScript Application. This link will direct you to www.medicalcard.ie 77 QicSCRIPT.NET User Manual Copyright 2010 Helix Health Ltd 78 QicSCRIPT.NET User Manual Copyright 2010 Helix Health Ltd DOSAGE CODES This is the section of the system where dosages are held. This file contains all the dosage codes you will use when dispensing drugs. Helix Health provides a comprehensive database of dosage codes with the system. Setting Up A New Dosage To SET UP a new dosage press INSERT. Option 1: Code. This is the code that you will use when in dispensing to retrieve the dosage you want to assign to the prescription. Option 2-6: Text. This is the dosage message that will appear when the label has printed out. You can have up to 5 lines of text. This is a free text option. 79 QicSCRIPT.NET User Manual Copyright 2010 Helix Health Ltd Searching For A Dosage To SEARCH for a dosage, hit the SPACE BAR and the system will ask you for the dosage you want to search for. Enter the dosage and press ENTER. The system will search for this dosage. E.g. if you want a list of all dosages containing the word “Spoon” – type in “spoon” here. Modifying An Existing Dosage To MODIFY an existing dosage highlight the message and press ENTER. To amend any of these options select the corresponding line number and then press ENTER. This will allow you to make any amendments. Deleting An Existing Dosage To DELETE an existing dosage, highlight the dosage and then press DELETE. You are then asked are you sure that you want to delete this dosage. Answer Yes here and the dosage is removed from the dosage file. Note: If a dosage is deleted from the file it is also deleted from any prescriptions it was assigned to causing “?” signs to appear instead of the dosage code. It will also cause errors if one of these scripts is repeated. A dosage table can be held and maintained in Head Office and distributed to all stores. 80 QicSCRIPT.NET User Manual Copyright 2010 Helix Health Ltd COST CENTRES In this section of the system you can set up the cost centres that you want to assign your patients to. Setting Up A Cost Centre To SET UP a new cost centre on the system press INSERT. Option 1: Code. This is where you set up the code for the cost centre that you will assign to the patient. Option 2: Value. This is where the cost centre description is entered and it is a free text option. Searching For An Existing Cost Centre To SEARCH for a cost centre, hit the SPACE BAR and the system will ask you for the cost centre you want to search for. Enter the cost centre and press ENTER. The system will search for this cost centre. Modifying An Existing Cost Centre To MODIFY an existing cost centre highlight the cost centre and press ENTER. To amend any of these options select the corresponding number and then press ENTER. This will allow you to make any amendments. Deleting An Existing Cost Centre To DELETE an existing cost centre, highlight the cost centre and press DELETE. You are then asked are you sure that you want to delete this cost centre. Answer Yes here and the cost centre is removed from the cost centre file. Note: If a cost centre is deleted from the file it is also deleted from any patients it was assigned to causing “?” signs to appear instead of the cost centre. 81 QicSCRIPT.NET User Manual Copyright 2010 Helix Health Ltd SUPPLIER FILE In this section of the system the supplier details are held. To access this select Administration, Edit Files, Miscellaneous Files, Supplier File and press ENTER. The following screen will appear. Setting Up A New Supplier To SET UP a new supplier press INSERT. Option 1: Code. This is the supplier code that you will use when placing items on order and also for setting up your default suppler. Option 2: Name. The full supplier name is entered here. 82 QicSCRIPT.NET User Manual Copyright 2010 Helix Health Ltd Option 3-6: Address. The full supplier address is entered here. Option 7: Phone. The supplier phone number is entered here. Option 8: Fax. The supplier fax number is entered here. Option 9: Contact. The usual supplier contact‟s name or rep is entered here. Option 10: Delisted. (Y/N) The user can mark a supplier as delisted here instead of deleting them from the supplier list. Option 11: Ordering Details. These are additional supplier details. Press ENTER to bring up the following screen. Option 1: Stop Automatic Ordering. If this option is set to Yes, the system will not generate any automatic orders for this supplier and you must do so manually by using the F2 key. If set to No, the system will automatically order for you. Option 2: Order Electronically. If this option is set to Yes, the system will allow you to transmit orders via modem to this supplier. If set to No, it will not allow you to transmit electronically to the supplier. 83 QicSCRIPT.NET User Manual Copyright 2010 Helix Health Ltd Option 3-9: Ordering Electronically details. Helix Health will have this option set up on installation. Please do not change unless you are instructed to by Helix Health. If you need to set up a new supplier it is recommended that you contact Helix Health to ensure the details are entered correctly. Option 10: Last Transmission Day. Customers transmitting to Aegis only use this option. You must set up your transmission day that Aegis provides you with here. It is this day that you must transmit on every week. Option 11: Last Transmission Time. Only customers transmitting to Aegis use this option. You must set up your transmission time provided to you by Aegis here. You will transmit your order every week at this time. Option 12: Next Reminder Date. A date will automatically generate here to remind you when to send your order to Aegis. Option 13: Usual Lead Times (Days). With most suppliers the lead-time from delivery of goods from receipt of an order is usually 1 day. However for customers transmitting to Aegis this is not the case and it could be anything from a few days to a week. The lead-time from your supplier must be entered in here. Searching For An Existing Supplier To SEARCH for a supplier, hit the SPACE BAR and the system will ask you for the supplier you want to search for. Enter the supplier and press ENTER. The system will search for this supplier. Modifying An Existing Supplier To MODIFY an existing supplier, highlight the supplier and press ENTER. To amend any of these options select the corresponding number and then press ENTER. This will allow you to amend this option. Deleting An Existing Supplier To DELETE an existing supplier, highlight the supplier and then press DELETE. You are then asked are you sure that you want to delete this supplier. Answer Yes here and the supplier is removed from the supplier file. Note: If a supplier is deleted from the file it is also deleted from any orders and deliveries that it was assigned to causing “?” signs to appear instead of the supplier. It is better to mark the supplier as Delisted. 84 QicSCRIPT.NET User Manual Copyright 2010 Helix Health Ltd Eurodrug Tele-Ordering Electronic ordering is now available from Eurodrug. In order to set these up as a new supplier an access code is needed. The customer can call the customer support team to set this up. ORDER FILE With this facility you can check what you currently have on order for a particular supplier, or from all suppliers, and you can also modify the order. To access this option, select Orders, Edit Current Orders, Edit Wants List and press ENTER. The system asks you to enter the supplier that you want to check. Enter the supplier code here. If you want to list everything on order to all suppliers press ENTER. To add, modify or delete an order please read the orders section of the manual. LAYOUT FILES Helix Health will have this option set up on installation. However if you require a change to any of the label layouts, please contact Helix Health for assistance. 85 QicSCRIPT.NET User Manual Copyright 2010 Helix Health Ltd STOLEN PAD FILE If a doctor has had a prescription pad stolen you can enter this into the system so that when you are dispensing, if you enter in the relevant doctor‟s name the system will notify you of all stolen pad numbers for that doctor. Adding A Stolen Pad To SET UP a stolen pad press INSERT. Option 1: Doctor GMS. Enter the doctor‟s GMS number here. Option 2: Date Notified. Enter the date that you were notified that the pad was stolen. Option 3: Pads Stolen. Enter any of the information that will allow you identify a stolen pad. Searching For An Existing Stolen Pad To SEARCH for a stolen pad, hit the SPACE BAR and system will ask you for the stolen pad you want to search for. Enter the stolen pad and press ENTER. The system will search for this stolen pad. Modifying An Existing Stolen Pad To MODIFY an existing stolen pad, highlight the text and press ENTER. To amend any of these options select the corresponding number and then press ENTER. This will allow you to make any amendments to this option. 86 QicSCRIPT.NET User Manual Copyright 2010 Helix Health Ltd Deleting An Existing Stolen Pad To DELETE an existing stolen pad, highlight the text pad and press DELETE. You are then asked are you sure that you want to delete this intervention. Answer Yes here and the stolen pad is removed from the file. DRUG FILES This section of the system is where the drug file is set up. To access this select Administration, Edit Files, Drugs Files and press ENTER. Drug File This file contains all the drugs on your system. When you press ENTER on this option a list of all the drugs on the system appear and you can scroll up and down this list accordingly. 87 QicSCRIPT.NET User Manual Copyright 2010 Helix Health Ltd Setting Up A New Drug To SET UP a new drug press INSERT. Option 1: Drug Code. The drug code is entered here. Option 2: Trade Name. The drug trade name is entered here. Option 3: Generic Name. The drug generic name is entered here. Option 4: Pack Size. The drug pack size is entered here. Option 5: Manufacturer. The drug manufacturer is entered here. This is a free text option. Option 6: Agent. The drug agent is entered here. This is a free text option. Option 7: Trade Price. The drug trade price is entered here. Option 8: FEMPI Cost Price. The FEMPI Price is entered here 88 QicSCRIPT.NET User Manual Copyright 2010 Helix Health Ltd Option 9: Priced Per. Smallest dispensable unit, e.g. if the drug comes in a box of 21 tablets and you dispense 1 tablet, the price per is 21. If you would only ever dispense a full box (21 tablets), the price per can be set to 1. Option 10: Pharmachem Price. The pharmachem drug price is entered here. When a drug is dispensed the system will use the pharmachem pricing to price the drug*. Note: This only applies if you are using the Veterinary module and this is a veterinary drug. Option 11: Contract Price. If you get a special price for an item from a supplier (as opposed to the latest price on your price update) you can enter the price here. The system will use this price to price items. Option 12: Contract Expires. This is where you can enter the date when the contract price with the supplier expires. Option 13: VAT Rate. The VAT rate of the drug is entered here. Option 14: Container. The container charge for the drug is entered here. Option 15: Charge for Broken Bulk. If you charge for Broken Bulk on this item set this to Y for Yes. If you do not charge Broken Bulk on this item set this option to N for No. Option 16: Mark-up Category. You have 3 options for the mark-up category: Regular Mark-up, Dressing Mark-up, Misc Mark-up. There is a percentage mark-up for each scheme for these categories in Scheme Details in the Configuration File. Option 17: Barcodes. Up to Five barcodes for each product can be entered here. Option 18: PA Number. The drug PA number is entered here. Option 19: Schedule. Enter in the legal classification of the drug here e.g. S1A, S1B, CD2, CD3 etc. Option 20: applicable). GMS Code. The GMS code for a drug is entered here (if Option 21: applicable). DPS Code. The DPS code for a drug is entered here (if 89 QicSCRIPT.NET User Manual Copyright 2010 Helix Health Ltd Option 22: High Tech Code. The High Tech code for a drug is entered here (if applicable). Option 23: DE Code. The Dental code for a drug is entered here (if applicable). Option 24: Short Code. You can make up short codes for drugs e.g. AMO25 – for Amoxil 250mg. If you type in the short code for a drug when you are dispensing, the system will select the drug with that code. Option 25: MDS Code. Used for robotic dispensing. Option 26: Warnings and Advice. Option 1-5: You have 5 lines of warnings that you can set up on a drug. Select the drug warnings from the warning file by typing in the warning code. Alternatively by pressing ENTER you can search the full warning list. Option 6: If this is set to N for No, no Warnings will be updated for this drug from you drug file updates. If this is set to Y for Yes the warnings for this drug will be updated automatically from the drug file updates. Option 7-10: You can enter in up to 4 lines of counselling details that will appear on screen once you dispense this drug. You can set up the counselling details by typing in the reminder code. Alternatively by pressing ENTER you can search the full counselling list. Option 11: If this is set to N for No, no Counselling Codes will be updated for this drug from you drug file updates. If this is set to Y for Yes the Reminder Codes for this drug will be updated automatically from the drug file updates. 90 QicSCRIPT.NET User Manual Copyright 2010 Helix Health Ltd Option 12: Advice: The user can enter advice for any patients taking this drug. Free-text can be entered or the user can pick from a list (set up in Admin, Edit Files, Drug Files, Advice Codes) Option 27: Counselling Notes: If there are any counselling notes available on the monthly price update they will appear here. Option 28: Miscellaneous Details. To enter details in this field, type in 26 and press ENTER. The following screen appears. Option 1: BNF Classification. This is the BNF Classification for this drug. The user can populate this themselves (from a picklist). 91 QicSCRIPT.NET User Manual Copyright 2010 Helix Health Ltd Option 2: ATC Code 1: Here will appear the ATC Classification reference. Option 3: ATC Code2: Here will appear the ATC Classification reference. Option 4: Limit to Schemes. The drug can be limited to certain schemes if necessary. E.g. Methadone only to be allowed on the ME (Methadone) Scheme. Option 5: Generic Product. Is the drug “generic” (Y/N) Option 6: Ethical Product: The ethical drug list is a smaller drug list which will include only items with Yes entered in this field. Option 7: Veterinary Product: If this is set to Yes, the system will flag this product as a veterinary item. Option 8: On Formulary: The formulary drug list is a shorter list than the drug file. It contains the items previously dispensed. Entering Yes here will place the item on the formulary list. Option 9: Exempt from Levy: If set to Y the drug will be exempt from the government levy. Option 10: Drug Adjustment Fee: Enter the amount you wish to increase or decrease the dispensing fee for this drug. Option 11: Usual Dosage. You can enter the usual dosage code for this drug here. If you do not enter in the usual dosage for the drug in here the system will use the default dosage from the Configuration File (if one is entered). Option 12: Usual Quantity. You can enter in the usual quantity of this drug that is dispensed. This can quicken the dispensing as the system will default to the usual quantity for a drug, if you press ENTER in the Quantity to Dispense field. Option 13: Date Discontinued. This field records the date on which the drug was discontinued. Option 14: Don‟t Monitor For Compliance: Enter Y if you wish to drug to be included when doing a compliance check in the pharmaceutical care subsection. 92 QicSCRIPT.NET User Manual Copyright 2010 Helix Health Ltd Option 15: Auto Print Patient Leaflet. If this option is set to Yes, drug information leaflets will automatically print for this drug when dispensed. Note: You must first ensure that you have your Drug Information Leaflet printer set up in the printer file. Ring Helix Health for instructions. Option 16: Remove from Transaction Report: Enter Y or N whether you require the specific drug to be included when running the transaction report. Option 17: Invoice Required When Claiming. Some drugs require the pharmacist to also post an invoice to the PCRS when claiming. This can be flagged here. Option 18: Can be stocked in robot: Enter Y if the product can be stocked in the robot. Option 19: Apply Scheme Fee Adjustment: Enter Y if you wish to apply the adjustment fee set at scheme level. Option 29: Pre-Pack Details Option 30: Ordering Details. All ordering and stock details for the drug are in this option. To enter details for this field type in 30 and press ENTER. The following screen appears: 93 QicSCRIPT.NET User Manual Copyright 2010 Helix Health Ltd Option 1: Default Supplier. The main supplier of this product is entered here. When this item is put on order it will automatically appear on this default supplier‟s list. Option 2: Location. The dispensary can be broken down into locations by a letter or number and you can then enter the location against the drug so that it is easy to find. This location appears when you dispense the drug or do a price enquiry. Option 3: Preferred Product. Is this a preferred product (Y/N) Option 4: Stocked in Robot. Used for robotic dispensing only. Option 5: Re-Order Method. There are 5 different methods of re-ordering individual products on the system apart from the general re-order method already. You can use any one of these re-order methods for specific drugs and this method will take precedence over the default re-order level for this drug. 94 1. Use Default Method. With this method whatever method of reordering you have already selected in Administration, Edit Files, Miscellaneous Files, Configuration and Ordering Options will be used. This is the method that will be assigned to all drugs unless you change them. 2. When Below Ideal. Every time a product is sold the computer will recalculate the ideal stock level. If the quantity in stock is below this level, then enough will be ordered to bring it back to the QicSCRIPT.NET User Manual Copyright 2010 Helix Health Ltd ideal level. A full account is taken of products waiting to be checked in etc. This is the preferred option. 3. Manually (Using F2). The user will decide what they want to put on order using this option. To do this they press F2 that is a hot key and it allows you to call up a drug and place this on order. The F2 key can be used anywhere in the system. 4. Each Time Dispensed. With this method of re-ordering, every time you dispense an item the system will automatically put this item back on order. 5. Pack Replacement. With this method of re-ordering, every time the system notices that you have sold a pack of a particular product it will place a full pack on order. Option 6: Quantity in Stock. This option is only for viewing purposes and gives you the quantity of stock you have of this product. Option 7: Ideal Stock Level Method. Here you setup your ideal stock level so that the system will always ensure that you have this level of the item in stock. Alternatively you can enter in A for Automatic here and the system will work out what your ideal stock level is based on your ideal stock level method. Administration, Edit Files, Miscellaneous Files, Configuration and Ordering Details. Option 8: Minimum Order Quantity. Here you can tell the system how many items to order based on the quantity in stock and the system will calculate this. Press ENTER and Auto will appear in this field. If you want to enter your own re-order stock quantities, type in the figure and the system will always re-order this amount. Option 9: Used in Pack. Used internally if the ordering method is pack replacement. Option 10: Have Short Dated Stock Available. Used internally in a chain of pharmacies. If set to Y, other pharmacies can see that you have short dated stock of this product available. Option 11: Last Ordered. The date of the last time this product was ordered will appear here. 95 QicSCRIPT.NET User Manual Copyright 2010 Helix Health Ltd Option 12: Ordered From. This is the supplier who you last placed an order for this item with. Option 13: Last Sold. The day this product was last sold will appear here. Option 14: Last Stock Check. The day this product was last checked in a stock take will appear here. Option 15: Substitute With. Here you can select another drug which you would prefer users to dispense as an alternative to the current one. When they try to dispense this drug (in Enter Prescriptions), a pop-up message will appear: They can choose to dispense this, or if they choose the original, they must select a reason from a list. Option 16: Sold Today. The system automatically keeps track of the maximum amount of each drug you have ever sold in any one-day. You can then use this information to decide how much to order. You can edit the figures if required but typically you would let QicSCRIPT.NET® do the calculations for you. 96 QicSCRIPT.NET User Manual Copyright 2010 Helix Health Ltd Option 17: Sold This Week. The system automatically keeps track of the maximum amount of each drug you have ever sold in any one-week. You can then use this information to decide how much to order. You can edit the figures if required but typically you would let QicSCRIPT.NET® do the calculations for you. Option 18: Sold This Month. The system automatically keeps track of the maximum amount of each drug you have ever sold in any one-month. You can then use this information to decide how much to order. You can edit the figures if required but typically you would let QicSCRIPT.NET® do the calculations for you. Option 19: Sold This Year. The system automatically keeps track of the maximum amount of each drug you have ever sold in any one-year. You can then use this information to decide how much to order. You can edit the figures if required but typically you would let QicSCRIPT.NET® do the calculations for you. Option 31: Drug MDS Details. This option is used for entering “tic-tac” information against a drug. To enter details at this field, type in 28 and press ENTER. The following screen appears: Option 1: Shape. The shape of the drug is entered here and there are 16 options to choose from. st st Option 2: 1 Colour. The 1 /Primary colour of the drug is entered here and there are 16 options to choose from. nd Option 3: 2 Colour. The 2 are 16 options to choose from. nd colour of the drug is entered here and there Option 4: Markings. If there are any significant markings on the drug you can enter them here. This is a free text option. 97 QicSCRIPT.NET User Manual Copyright 2010 Helix Health Ltd Option 5: Fits in Cassette/Tray. Here you are telling the system if the drug is small enough to fit into the tray. If not type No here so that the drug is not expected to be in the tray. Option 32: Extemporaneous Details. To set up an extemporaneous item you need to set up a new drug and name it (as explained previously in setting up a new product). You can then skip all the other fields until you come to field 23 Extemporaneous Details. Press ENTER and the following screen appears: Option 1: Trade Price. Enter the trade price for the extemporaneous drug you are about to make up. Option 2: Price Per. Smallest dispensable unit, e.g. if the drug comes in a box of 21 tablets and you dispense 1 tablet, the price per is 21. If you would only ever dispense a full box (21 tablets), the price per can be set to 1. Option 3: VAT Rate. Enter the VAT rate. Option 4: GMS Code. If this extemporaneous item is available on the GMS scheme enter the relevant GMS code that is provided. Option 5: DPS Code. If this extemporaneous item is available on the DPS scheme enter the relevant DPS code that is provided. 98 QicSCRIPT.NET User Manual Copyright 2010 Helix Health Ltd Option 6: Extemporaneous. This field has to be flagged as Yes when setting up an extemporaneous item. Option 7-16: Product. Here you select the individual drugs that will make up this extemporaneous item. Select the drug in question from the drug file and then enter in the amount that is to be used. The system will automatically calculate the cost price for the component. Option 17: Preparation Notes. This is a free text option where you can enter how the extemporaneous item was prepared. This note will pop up whenever the drug is dispensed. Modifying An Existing Drug To MODIFY an existing drug, highlight the drug then press ENTER. To amend any of these options select the corresponding number and press ENTER. This will allow you to make any amendments to this option. Searching For An Existing Drug To SEARCH for a drug, hit the SPACE BAR and the system will ask you for the drug you want to search for, enter the drug and press ENTER. The system will search for this drug. Deleting An Existing Drug To DELETE an existing drug, highlight the drug and press DELETE. You are then asked are you sure that you want to delete this drug. Answer Yes here and the drug is removed from the file. Note: If a drug is deleted from the file it is also deleted from any prescriptions that it was assigned to causing “?” signs to appear instead of the drug. Errors will also appear if you try to repeat this prescription. 99 QicSCRIPT.NET User Manual Copyright 2010 Helix Health Ltd PHARMACIST ADVICE REMINDER QicSCRIPT.NET® has a new feature where you can record pharmacy advice against a drug. Once this drug is dispensed the advice will appear on screen for the pharmacist and print on the medication label. To use the pharmacist advice reminder you need follow the steps outlined below. Step 1 Select Administration, Edit Files, Miscellaneous Files, Config Files, Miscellaneous part 2 and press ENTER. Select Option 12 „Ask Pharmacist for Advice‟ and set to Y for Yes. Press ENTER twice to save. Step 2 100 Select Administration, Edit Files, Drug Files, Drug File and press ENTER. Select a drug you wish to enter „advice‟ against and press ENTER. QicSCRIPT.NET User Manual Copyright 2010 Helix Health Ltd Select Option 26 Miscellaneous Details and press ENTER. following screen appears: Select Option 10 „Advice‟ and press ENTER. The following screen appears: The 101 QicSCRIPT.NET User Manual Copyright 2010 Helix Health Ltd 102 Press ENTER to accept entering a new record. Give the record a code and press ENTER. Now enter the advice you wish to appear on the pop-up reminder for the pharmacist and on the advice label. You have 4 lines of text to enter this advice in. Press ENTER twice when finished. If you have already created codes and advice, you can access and re-use them instead of creating a new one. Now dispense the drug and once you finish the script, the advice will pop-up on screen for the pharmacist. It can be changed if needs be at this point. This advice also prints on the advice label. Note: it is important that the Advice Label is set up correctly in Admin-> Edit Files-> Miscellaneous-> Layout Files-> Advice Label QicSCRIPT.NET User Manual Copyright 2010 Helix Health Ltd STOCK MOVEMENTS To discover how to add or view stock movements please read the orders section of the manual. BONUS DETAILS If there is bonus stock or discounts available for certain products you can set these up for the products so that the system counts for them when dispensing and ordering. Setting Up A New Bonus Item To SET UP a new item of bonus stock press INSERT. 103 QicSCRIPT.NET User Manual Copyright 2010 Helix Health Ltd Option 1: Drug. Enter the drug that there is bonus stock available for. Option 2: Supplier ID. Enter the supplier code for the wholesaler giving the bonus. Option 3: Start Date. Enter the date when bonus stock is available for this drug. Option 4: Finish Date. Enter in the date when the bonus stock is no longer available for this drug. Option 5: Type. Enter in the type of bonus stock here. There are 3 available options: X free with Y, Discount Percent and Text Message. Option 6: Details. Enter any extra details regarding the bonus stock. This is a free text option. Searching For An Existing Bonus Item To SEARCH for a bonus detail, hit the SPACE BAR and the system will ask you for the bonus you want to search for. Enter the bonus and press ENTER. The system will search for this bonus detail. Modifying An Existing Bonus Item To MODIFY an existing bonus detail, highlight the bonus then press ENTER. To amend any of these options select the corresponding number and press ENTER. This will allow you to make any amendments to this option. Deleting An Existing Bonus Item To DELETE an existing bonus detail, highlight the bonus and press DELETE. You are asked are you sure that you want to delete this bonus. Answer Yes here and the bonus is removed from the file. 104 QicSCRIPT.NET User Manual Copyright 2010 Helix Health Ltd WARNING CODES Your system will have a list of codes already installed. These codes are updated by the monthly price disk circulated by the IPU. The warning/reminder list can be printed by hitting F10. Adding A Warning To insert a new warning hit insert: Code: Enter a code for the new warning. 2-6 Text: Enter the detailed wording of the new warning and hit ENTER to save it. Searching For An Existing Warning To find a particular warning hit the space-bar and type a word or phrase. The system will then locate a warning or warning containing the entered text. Modifying An Existing Warning To modify an existing warning highlight the warning and hit ENTER. You can now make any changes to the text field. Once finished hit ENTER to save. Deleting An Existing Warning To delete a warning message highlight the warning and hit delete. Warning - Deleting a warning will cause question marks to appear on labels when dispensing. REMINDER CODES Adding A Reminder To enter a new reminder hit insert. Code: Enter a code for the new reminder. 2-5 Text: Enter the wording you wish to attach to the new reminder code. Searching For An Existing Reminder To find a particular reminder hit the space-bar and type a word or phrase. 105 QicSCRIPT.NET User Manual Copyright 2010 Helix Health Ltd Modifying An Existing Reminder To modify an existing reminder, highlight it and hit ENTER. You can now make any changes to the text field. Once finished hit ENTER to save. Deleting An Existing Reminder To delete a reminder message –highlight the reminder and hit delete. Warning - Deleting a reminder will cause question marks to appear when dispensing. ADVICE CODES Adding an Advice Code To enter a new Advice Code, hit Insert. Code: Enter a code for the new advice code. 2-5 Text: Enter the wording you wish to attach to the new advice code. Searching for an Advice Code To find an advice code, hit the space-bar and type a word / phrase. Modifying An Existing Advice Code To modify an existing advice code, highlight it and hit ENTER. You can now make any changes to the text field. Once finished hit ENTER to save. Deleting An Existing Advice Code To delete an advice code – highlight the advice code and hit delete. Warning - Deleting an advice code will cause question marks to appear when dispensing. 106 QicSCRIPT.NET User Manual Copyright 2010 Helix Health Ltd PATIENT FILES All files relating to patient details are stored in this section of the system. Patient file All patients on the system are held in this file and when you press ENTER on Patient File a list of all existing patients appears. Setting Up A Patient To SET UP a new patient press INSERT. 107 QicSCRIPT.NET User Manual Copyright 2010 Helix Health Ltd Option 1: Name. Enter the patient‟s name (surname,firstname,title). Option 2-5: Address. Enter the patient‟s address. Option 6: Comment: This is a free text field where some information relating to the patient can be entered. Option 7: G.P. Select the patients GP by typing in the doctor‟s surname and then selecting the GP from the GP file. Option 8: Scheme. Select the patient‟s scheme type from the scheme list. Option 9: Number. This is where the GMS or HT, LTI, or DPS numbers are entered. Option 10: Expires. scheme if entered. This field contains the expiry date of the relevant Option 11: D.O.B. Enter the patient‟s date of birth. Option 12: Sex. Enter the patient‟s sex. 108 QicSCRIPT.NET User Manual Copyright 2010 Helix Health Ltd Option 13: Cost Centre. You can assign patients to Cost Centres here, which can be used for reporting purposes. Option 14: Reference. This field displays the reference number relating to this patient. Only if the system is configured to generate patient references. (Check configuration – misc. options 2 and number 7) Option15: Scheme Codes. This field contains all the details of schemes and expiry dates of cards relating to the patient. Option 9:Patient is Exempt from Item Levy. Use this option if you do not want this patinent to receive and Levy Fees. Option 10: Head of family GM Code. Enter the code of the head of the patient family here, this is how you can link GM families together for Levy payments. Option16: Contact Details. You can enter patient‟s phone numbers and email addresses here. Option 17: Account Details. All information relating to this patient‟s account is stored here. 109 QicSCRIPT.NET User Manual Copyright 2010 Helix Health Ltd Option 1: All items on account. If this option is set to Yes, all items dispensed to the patient are put on their account. Option 2: Statement Type. You can decide what type of statement this patient may require and there are 3 choices: Regular Statement, VAT Statement and No Statement. Option 3: Charge All Items To. If the items on account are charged to the patient press ENTER here and SAME will appear here. However if the items on account are charged to another patient, type in the patient‟s name and select from the patient file. E.g. Children billed to a parent‟s account. Option 4: Company Account. If the items on account are charged to a company account, firstly the account must be set up as a patient (explained above). Then select the company from the patient file and enter here. Option 5: Reducing Balance. If the patient‟s medications are billed to a company account and the company pay the full amount on the account leave this option at 0.00. If however the company will pay a certain amount of the patient‟s bill and the balance they must pay themselves, you enter in the amount that the company is billed for here. Option 6: Discount %. If the pharmacy offers discount to a company account enter the discount here. Option 18: Monitored Dose Info. This option is used for dispensing to nursing homes module. 110 QicSCRIPT.NET User Manual Copyright 2010 Helix Health Ltd Option 1: Care Home. Firstly you need to have the nursing home set up as a patient (explained above) and then assign this nursing home to the patient. Normal Time of Rounds. The round times of this nursing home will appear here, having been previously been entered when the nursing home was set up in the Nursing Home File. Option 2: Use Normal Times. If you answer Yes, here the patient should be issued with medication at the normal hospital round times specified above. If No, the patient should be issued with medication at his or her own times specified below. Option 3: Time of Rounds for This Patient. Enter in the time of the patient‟s rounds here using the 24-hour clock Option 4: ADM Code for these Round Times: only used for robotic dispensing. 111 QicSCRIPT.NET User Manual Copyright 2010 Helix Health Ltd Option 5: Floor. Enter the floor of the nursing home the patient is on. Option 6: Room. Enter the patient‟s room here. Option 7: Profile. Enter in any comments you would like noted on the patient file. This is a free text option. Option 19: Miscellaneous Option 1: RSI Number. Enter the patient‟s RSI number – or insurance details. Option 2: Status. You have 4 different types of patient status: Regular, Deceased, Passing Trade and Visitor. Option 3: Patient Category. Here you can assign the patient to a specific category which can be used for reporting purposes. Option 4: Patient Region: Here you can assign a patient to a specific Region (for psychiatric patients). Option 5: OK to Send Mail: Enter Y if you wish this patient to be used when doing mail merges. Option 6: Interaction Check. If this option is set to Yes, when an interaction occurs on this patient‟s file the system will notify you. If No, the system will not notify you of any interactions for this patient. Note: You must be running the Drug Interaction module for this to work. 112 QicSCRIPT.NET User Manual Copyright 2010 Helix Health Ltd Option 20: Audit Trail. Any amendments which have been made to the patient file are recorded in the audit trail option, e.g. if a patient changes scheme type, it will record that a change was made to the scheme type, who it was changed by, the date and time. If you want to view any of the changes that have been made to a patient, highlight the change and press ENTER. Searching For An Existing Patient To SEARCH for a patient, hit the SPACE BAR and the system will ask you for the patient you want to search for. Enter the patient and press ENTER. The system will search for this patient. Modifying An Existing Patient To MODIFY an existing patient, highlight the patient and press ENTER. To amend any of these options select the corresponding number and then press ENTER this will allow you to make a change to this option. Deleting An Existing Patient To DELETE an existing patient, highlight the patient and press DELETE. You are then asked are you sure that you want to delete this patient. Answer Yes and the patient is removed from the file. Note: You cannot delete a patient if they have any scripts on their history or account details. These need removing first (see the Enter Prescriptions section of the manual for details) Setting up a GMS Patient Press Insert to add a new patient. Enter the patient‟s name, address, GP as explained in earlier in the manual. Then lists of different patient scheme types appear, highlight GMS and press ENTER. You are then required to enter the patient‟s GMS number into option 9 as follows: GMS codes are 8 characters long. All characters must be numeric except for the first (which is alphanumeric) and the last (which is alphabetical). You can also enter the expiry date for the GMS card and when this card expires the system will no longer allow you to dispense any scripts to the patient under the GMS scheme the patient will automatically default to private, thus prompting the patient to renew their card. 113 QicSCRIPT.NET User Manual Copyright 2010 Helix Health Ltd Setting up a Drug Payment Patient Press Insert to add a new patient. Enter in the patient‟s name, address, GP as explained in more detail earlier in the manual. Then a list of all the different patient scheme types appear, highlight Drug Payment and press ENTER, you are then required to enter in the patient‟s own PPS number and it must be entered as follows: DPS codes are 9 alphanumeric digits long. The first SEVEN characters must be numeric, while the last two are alphabetical. You can also enter in the expiry date of the DPS card and when this expires the system will no longer allow you to dispense any scripts under the DP scheme to the patient. They will automatically default to private, thus prompting the patient to renew their card. To link families together in one unit the system looks at the family PPS (DP) number. Along with the “family PPSN” each patient also has a letter in indicate their position within the family with “A” being the head of the family and so on. The “family PPSN” appears in bigger writing in the centre of the card. Alternatively if you have a Drug Payment Card Scanner installed on your computer, take the patient‟s Drug Payment card and swipe it through the 114 QicSCRIPT.NET User Manual Copyright 2010 Helix Health Ltd scanner, this will automatically set up the patient on your system with all the relevant PPSN details, expiry dates and family position. Setting up a Long Term Illness Patient Press Insert to add a new patient. Enter in the patient‟s name, address, GP. Then a list of the different patient scheme types appear, highlight Long Term Illness and press ENTER, you are then required to enter in the patient‟s own LTI number and it must be entered as follows: LTI codes are between 2 and 8 characters long. You can also enter in the expiry date of the LTI card and when this expires the system will no longer allow you to dispense any scripts under the LTI scheme to the patient. They will automatically default to Private, thus prompting the patient to renew their card. Setting up a High Tech Patient. A High Tech patient will usually either be also GMS or DPS. You can add in a patient as high-tec only (as seen above on LTI etc), or you can add in the high-tec scheme in option 15 – Scheme Details when in a patient record (see below): 115 QicSCRIPT.NET User Manual Copyright 2010 Helix Health Ltd You can also enter in the expiry date of the HT card. When this expires, the system will no longer allow you to dispense any scripts under the HT scheme to the patient, thus prompting the patient to renew their card. Setting up a Health Amendment Patient. Press Insert to add a new patient. Enter in the patient‟s name, address, GP. Then a list of the different patient scheme types appear, highlight Health Amendment and press ENTER, you are then required to enter in the patient‟s HA number. You can also enter in the expiry date of the HA card. When this expires the system will no longer allow you to dispense any scripts under the HA scheme to the patient. They will automatically default to private, thus prompting the patient to renew their card. Further information such as date of birth and sex are required, as explained earlier in the manual also. Setting up a Doctor Stock Order When setting up a doctor stock order the doctor you are dispensing to must be set up as a patient under the Doctor Stock Order Scheme. 116 QicSCRIPT.NET User Manual Copyright 2010 Helix Health Ltd A doctor should be set up with the Name of the doctor being the patient name and the prescribing GP being the GP you are setting up. Doctor codes are 5 characters long and all must be numeric. You can also enter the expiry date of the Stock Order card. When this expires the system will no longer allow you to dispense any scripts under the Stock Order scheme to the doctor. Setting up a Methadone Patient Press Insert to add a new patient. Enter the patient‟s name, address and GP. Then a list of all the different patient scheme types appear; highlight Methadone and press ENTER, you are then required to enter in the patient‟s Methadone number. 117 QicSCRIPT.NET User Manual Copyright 2010 Helix Health Ltd You can also enter in the expiry date of the Methadone card. When this expires the system will no longer allow you to dispense any scripts under the Methadone scheme to the patient. They will automatically default to Private, thus prompting the patient to renew their card. Setting up a Veterinary Patient. This option is only available if you have the veterinary module installed. Press Insert to set up a new patient. Enter the owner as the patient in this case and select the scheme type Veterinary and press ENTER. With this scheme you also have the option to use the Pharmachem pricing. The prices will load from the IPU monthly price update. When you have a patient set up as Veterinary scheme and dispense an item to them, it will use the Pharmachem price where available rather than the trade price. Dispensing a veterinary script When you are dispensing a Veterinary item the system will prompt you to enter the following details: 1. Animal Details 2. Dosing Details 3. Administration Site You can go back and view Veterinary scripts by pressing Tab for Histories and pressing F6 to view. Option 27 on the View Record screen will give you the Veterinary details. 118 QicSCRIPT.NET User Manual Copyright 2010 Helix Health Ltd Setting up an EU National Patient Press Insert to add a new patient. Enter in the patient‟s name, address and GP. Then lists of the different patient scheme types appear; highlight EU National and press ENTER. Setting up an EHB Psychiatric Patient Press Insert to add a new patient. Enter in the patient‟s name, address and GP. Then lists of the different patient scheme types appear; highlight EHB Psychiatric and press ENTER. DRUG PAYMENT FILE With this option you are able to enter payments for patients under the DPS scheme. Patient. Select the patient you wish to enter payments against. This does not have to be the person who received the script. E.g. Parent of a child who received a script. When you press Enter the following screen appears: 119 QicSCRIPT.NET User Manual Copyright 2010 Helix Health Ltd Entering A Payment Record Please note that you can also enter a drug payment by pressing F1 and selecting record DPS payment and press ENTER and then follow the steps below. To enter a new record press INSERT. Option 1: Date Paid. Enter the date the patient made the payment for the script. Option 2: Claim Period: Enter the month you wish to claim in. Option 3: Amount Paid. Enter the amount the patient paid. 120 QicSCRIPT.NET User Manual Copyright 2010 Helix Health Ltd Option 4: Form Number. Enter in the form number (printed on the claim form) of the Prescription here. Modifying An Existing Payment Record Highlight the payment you wish to modify and press Enter. Make your changes and press Enter to save. Deleting an existing payment Highlight the payment you wish to delete and press Delete. The delete amount will be placed back onto the patient‟s file as outstanding. ACCOUNTS FILE This option can be used to complete the same tasks as found under the Accounts Menu. Please refer to the Accounts Menu section of the manual for further details on completing these tasks. PRESCRIPTION FILE This file holds a list of all the prescriptions that have been dispensed on the system. 121 QicSCRIPT.NET User Manual Copyright 2010 Helix Health Ltd Searching For A Prescription To SEARCH for a prescription press the SPACE BAR and type in the prescription reference number and the system will bring you directly to this script. To MODIFY an existing prescription please refer to the Dispensing section of the manual. DOCTOR FILE This section of the system contains a list of all the doctors set up on the system. This database is supplied by the GMS Payments Board. Searching For A Doctor To search for a doctor press the Spacebar and type in their surname and press ENTER if the doctor is not located in this search of your local doctor file press Y to the message displayed and the full GMS doctor file will be searched. Setting Up A Doctor To SET UP a new doctor press INSERT. 122 QicSCRIPT.NET User Manual Copyright 2010 Helix Health Ltd Option 1: Doctor Code. Enter a doctor‟s code. This can then be used as a quick way of recalling the doctor when dispensing or assigning a doctor to a patient. Option 2: Title. Enter the doctor‟s title. Option 3: First Name. Enter the doctor‟s first name. Option 4: Surname. Enter the doctor‟s surname Option 5-8: Address. Enter the doctor‟s address. Option 9: Work Phone. Enter the doctor‟s work phone number. Option 10: Mobile Phone. Enter the doctor‟s mobile phone number. Option 11: Home Phone. Enter the doctor‟s home phone number. Option 12: Fax Number. Enter the doctor‟s fax number. Option 13: GMS code. Enter the doctor‟s GMS code. Modifying An Existing Doctor To MODIFY an existing doctor, highlight the doctor then press ENTER. To amend any of these options select the corresponding number and then press ENTER this will allow you to amend this option. 123 QicSCRIPT.NET User Manual Copyright 2010 Helix Health Ltd Deleting An Existing Doctor To DELETE an existing doctor, highlight the doctor and press Delete. You are then asked are you sure that you want to delete this doctor. Answer Yes here and the doctor is removed from the file. Note: If a doctor is deleted from the file it is also deleted from any prescriptions it was assigned to causing “?” signs to appear instead of the doctor’s name. It will also cause errors if one of these scripts is repeated. MDS SCRIPT FILE With this section of the system you can enter scripts/modify scripts for patients under the monitored dose system. Setting Up A New MDS Script Item To SET UP a new MDS script item press [INSERT]. Option 1: Start On. Enter the date that the patient is to start receiving their medication on. Option 2: Finish On. Enter the date that the patient is to finish receiving their medication on, or hit ENTER for “indefinite”. 124 QicSCRIPT.NET User Manual Copyright 2010 Helix Health Ltd Option 3: MAR Position. Enter where on the MAR sheet you want this patient‟s medication to start printing on. The range is from 1 to 20, where 1 = Top of Mar and 20 = Bottom. Option 4: Drug. Enter the drug from the drug file that is to be given to the patient. Option 5: Shape. Enter the shape of the drug if it does not already appear. Option 6: Colour 1. Enter the primary colour of the drug choosing from the list provided on screen. Option 7: Colour 2. Enter the second colour of the drug choosing from the list provided on screen, if none press ENTER. Option 8: Markings. Enter any distinguishing markings on the drug. This is a free text option. Option 9: In Cassette. If this option is set to Yes the drug is placed inside the cassette. If No the drug may be to big too be placed inside the cassette, and will be included separately. Option 10: Quantity. Enter the quantity the patient is receiving. Option 11: Dosage. Enter the dosage. Option 12: Times Given. Enter the quantity of this drug to be given to the patient at the round times. Modifying An Existing MDS Script Item To MODIFY an existing MDS script, highlight the script then press ENTER. To amend any of these options select the corresponding number and then press ENTER this will allow you to amend this option. Deleting An Existing MDS Script Item To DELETE an existing MDS script, highlight the script and press Delete. You are then asked are you sure that you want to delete this script. Answer Yes here and the script is removed from the file. 125 QicSCRIPT.NET User Manual Copyright 2010 Helix Health Ltd CARE HOME FILE All nursing homes to be set up are added in this section of the system. Setting Up A New Care Home To SET UP a new care home press [INSERT]. Option 1: Code. Enter the code for the care home. Option 2: Name. Enter the care home‟s name. Option 3-6: Address. Enter the care home‟s address. Option 7: Phone Number. Enter the care home‟s phone number. Option 8: Contact. Enter the contact in the care home. Option 9: Round Times. Enter the care home‟s standard round times. 126 QicSCRIPT.NET User Manual Copyright 2010 Helix Health Ltd Option 10: ADM Code for these Round Times: Only used for robotic Dispensing. Option 11: Automatically Claim Phased Fee. This allows the user to claim for any phases they enter against the patient‟s medications. This only applies to GMS patients. Searching For A Care Home To SEARCH for a care home, hit the SPACE BAR and the system will ask you for the care home you want to search for. Enter the care home and press ENTER. The system will search for this care home. Modifying An Existing Care Home To MODIFY an existing care home, highlight the care home then press ENTER. To amend any of these options select the corresponding number and then press ENTER this will allow you to amend this option. Deleting An Existing Care Home To delete an existing care home, highlight the care home and press Delete. You are then asked are you sure that you want to delete this care home. Answer Yes here and the care home is removed from the file. Note: If a care home is deleted from the file it is also deleted from any prescriptions it was assigned to causing “?” signs to appear instead of the care home’s name. It will also cause errors if one of these scripts is repeated. INTERVENTION FILE Recording an intervention To record an intervention, hit ENTER: if entering a prescription you can use the hot keys shift & F1 127 QicSCRIPT.NET User Manual Copyright 2010 Helix Health Ltd Option 1: Date at: When a new intervention is being recorded the system will default to the current date and time. This can be changed if necessary. Option 2: Patient: Enter the patients name in the format surname, firstname. Option 3: GP. Enter the code of the relevant GP. Option 4: Pharmacist: The system will default to the current person logged in to the system. Option 5: Drug: Here you enter the name of the drug from the drug file. Option 6: Condition: Enter the condition or hit tab to choose from a list of conditions. Option 7: Reason: Select a reason from the list displayed. Option 8: Action: Record the actions taken using the 5 lines of text available. Option 9: Outcomes: Record the outcomes using the 5 lines of text available. Option 10: Duration: Enter the time taken to sort intervention. Option 11: Finished: Indicate whether the intervention is now finished Y or N Option 12: Comments: Here you can enter any other details. 128 QicSCRIPT.NET User Manual Copyright 2010 Helix Health Ltd Searching For An Intervention To search for an intervention, hit the Spacebar and enter the date of the required intervention. The system will then go to the intervention of that date. Modifying An Existing Intervention To MODIFY an existing intervention hit ENTER on required intervention and you can makes changes to the various fields. Deleting An Intervention To DELETE an intervention, move the highlighter to the required intervention and then hit the DELETE key. PATIENT CATEGORIES Setting Up A New Patient Category To set up a new patient category hit INSERT. Code: Enter a two-digit code using numbers or letters. Value: This is a free text field where you can enter an explanation of the code. Searching For A Patient Category To search for a category hit the spacebar and type part of the text of the category required. The system will then go the required category. Modifying An Existing Patient Category To MODIFY an existing category hit ENTER on the required category and you can make any changes to the various fields. 129 QicSCRIPT.NET User Manual Copyright 2010 Helix Health Ltd Deleting An Existing Patient Category To DELETE a category, highlight the required category and then hit the DELETE key PATIENT REGIONS Here the user can set up patient regions for psychiatric patients. Patients can then be assigned to their appropriate region. This is very useful for reporting purposes. To set up a new patient region hit INSERT. Code: Enter a two-digit code using numbers or letters. Value: This is a free text field where you can enter an explanation of the code. Searching For A Patient Region To search for a region hit the spacebar and type part of the text of the region required. The system will then go the required region. Modifying An Existing Patient Region To MODIFY an existing region hit ENTER on the required region and you can make any changes to the various fields. Deleting An Existing Patient Region To DELETE a region, highlight the required region and then hit the DELETE key 130 QicSCRIPT.NET User Manual Copyright 2010 Helix Health Ltd MAIN The most commonly used functions of QicSCRIPT.NET® are listed under the heading “Main” for easier access. Enter prescriptions It is here in Enter Prescriptions that all the prescriptions are dispensed. This also holds all patient, patient‟s current medications and histories. From here you can repeat medication, print prescription labels and receipts. To Set Up A Patient Select Enter Prescriptions and press ENTER. Then press Insert to set up a new patient. Please refer to the Patient Files section of the manual for instructions on entering a new patient. 131 QicSCRIPT.NET User Manual Copyright 2010 Helix Health Ltd To Enter A Prescription. To dispense a script to a patient go to [Main, Enter Prescriptions]. The following screen will appear: Option 1: Patient Name. Select the patient from the patient file by typing in the first few letters of the patient‟s surname. A list of names with these letters will appear on screen. Highlight the patient that you are looking for and press ENTER. All the patient‟s details will automatically appear on the patient section of the Enter Prescription screen. Option 7: Prescribing GP. The system will then automatically bring you to the Prescribing G.P field (Option 7) and if you have already assigned a doctor to the patient when setting up the patient, that doctor‟s code will appear here and you can press ENTER to accept this. If you do not want to use this doctor for prescribing, enter in the doctor‟s code you do want to use and press ENTER to accept this. However, if you do not know this doctor‟s code you can enter the doctor‟s surname and the system will bring up all the regular doctors matching this name. If the doctor you are looking for is still not here you can press F10 to search the GMS Doctor File for the doctor. Likewise if the patient has no doctor assigned to his or her file, 132 QicSCRIPT.NET User Manual Copyright 2010 Helix Health Ltd when you call up the patient you can enter in the doctor‟s surname as explained above. Option 8: Prescription Pad: Here you can enter the doctor details listed on the prescription pad, leave as “As Above” unless the two differ (i.e. if one doctor is using another doctor‟s pad) Option 9: Dispensed By. The system brings you on to Dispensed By (Option 7). The last user who dispensed will automatically appear here and you can accept this by pressing ENTER. If you want to amend the dispenser, type in a new dispenser code. Alternatively press Tab and a list of all users will display, you can then highlight the user required and press ENTER to accept. Other Dispensing Options Option 2: Patient Notes. This is a free text option where you can enter any patient notes or references for the patient. To save the entry, click the Save button, or press Escape and the system will ask you if you want to save these changes, answer Yes here and these notes are saved. The option “Patient Notes” is then highlighted in Blue to notify the user that there are notes against this patient‟s file. Option 3: Levy Payments. You can view, edit or enter DPS payments against this patient here (same as F1 or Drug Payment File in Admin) Option 4: Med Management. booklet. This section is covered by a separate Option 5: Health Check Option 6: Text Messaging Option 10: Supervised By. Sometimes when a prescription is entered (e.g. by a technician) it may need to be checked by another pharmacist. To enter a Supervised By name, type in the user‟s code or press Tab and select the user from the user file by highlighting the user and pressing Enter to accept. Option 11: Date Dispensed. When a prescription is entered the system will automatically default to today‟s date and time. However if you need to enter a prescription for another date either for past or future dates you can do so by typing the date and pressing Enter to accept. 133 QicSCRIPT.NET User Manual Copyright 2010 Helix Health Ltd Option 12: Prescribing G.P Notes. This is a free text option where you can enter any G.P. notes or references for the G.P. To save the entry click on the save button or press Escape and the system will ask you if you want to save these changes, answer Yes here and these notes are saved. The option “Prescribing Notes” is then highlighted in Blue to notify you that there are notes against this patient‟s file. Option 13: Date Written. If the date the script was written differs from the dispensing date type the written date here. This is used for forward dating and back dating scripts. The claim month should also be changed if the month for this date is not the current month. Option 14: Claim Period. When a prescription is entered the claim period automatically defaults to the current month, telling the system that you will claim for this prescription this month. However if you have entered a prescription for a future date you will have to change the claim period also for this prescription. Enter the correct claim month here. Option 15: Late/Urgent Script. When a prescription is entered, this field will automatically default to N – Normal script. If however a prescription is late or urgent you can enter this into the system by changing this field to L – Late or U – Urgent the system will then add the relevant fee to the normal dispensing fee. The appropriate time should also be entered. Option 16: Emergency/Supply Loan. When a prescription is entered this field will automatically default to N – Normal. If however a prescription is an Emergency Supply, enter Type E or a Loan Prescription type L. st Once you have entered all the details on the 1 dispensing screen the following screen appears. To change any of these options select the corresponding number and then press Enter this will allow you to make changes to this option. Once you have selected the patient, the following Patient Medication Screen will appear. 134 QicSCRIPT.NET User Manual Copyright 2010 Helix Health Ltd Option 1: Drug. Select the drug you wish to dispense by typing the drug name and then selecting the drug from the drug file by highlighting it and pressing Enter to accept. Option 2: Quantity Prescribed. Next you must enter the quantity on the prescription. This defaults to one full pack if you hit Enter. Input the quantity to prescribe and press Enter to accept. Option 3: Quantity to Dispense. This option is skipped over but you can select it before you print out the script label. Explained later in the manual. Option 4: Quantity Still Owed. This option is skipped over but you can select it before you print out the script label. This can be filled if you still owe the patient some medication (e.g. if you do not currently have enough in stock). Option 5: Instructions. It is here that you enter the dosage for the drug. You can use 2 digit codes, full length codes or enter text dosages by pressing Insert. Enter the dosage code if you know it and press Enter. If the dosage code is unknown press Tab and you can search for it by typing in a word from the dosage that you are looking for and press Enter. The system will display a list of all possible dosages containing that word. Highlight the dosage you require and press Enter to accept. However if you have searched for a 135 QicSCRIPT.NET User Manual Copyright 2010 Helix Health Ltd dosage and it is not on the dosage file you can add your own dosages by pressing Insert, and typing in the dosage required for the drug. This is a sample list of some dosage codes. CODE 2 5 10 15 20 1D 1B 1T 1Q 1H 1M 1P 1S 1U T1 D1 F1 U1 DA BD TD QD MN NN NO 136 DESCRIPTION TAKE HALF A 5ML TAKE ONE 5ML SPOONFUL (5MLS) TAKE TWO 5ML SPOONFULS 10MLS) TAKE THREE 5ML SPOONFULS (15MLS) TAKE FOUR 5ML SPOONFULS (20MLS) ONE TO BE TAKEN DAILY (2DTWO, 3D-THREE ) ONE TO BE TAKEN TWICE DAILY ONE TO BE TAKEN THREE TIMES DAILY ONE TO BE TAKEN FOUR TIMES DAILY EVERY HOUR ONE IN THE MORNING ONE PUFF TO BE INHALED TAKE ONE TO START THEN ONE TO BE USED TAKE ONE (T2 - TWO, T3 - THREE etc) INSTILL ONE DROP (D2 - TWO, D3 - THREE etc) FOR ONE DAY (F2 - TWO, F0 - TEN etc) ONE TO BE USED (U2 - TWO, U3THREE etc) DAILY TWICE DAILY THREE TIMES DAILY FOUR TIMES DAILY MORNING AND NIGHT AT NOON AT NIGHT QicSCRIPT.NET User Manual Copyright 2010 Helix Health Ltd HT TS AC AM M HALF A TABLET TO BE TAKEN TEASPOONFULS HALF AN HOUR BEFORE FOOD AFTER MEALS BEFORE MEALS Option 6: Condition. This field allows you to enter the condition for which the medication is being prescribed. This can be used in the reports section. Option 7: Scheme. This option is skipped over but you can select it before you print out the script label. Explained later in the manual. Option 8: Repeat. If there are any repeats for this prescription, type the repeat times here and press Enter to accept. If it is a GM script, it can be changed to a GR script here by typing P1, P2 or P3 for the appropriate repeat part of the script. Private Or DPS Repeats To enter Repeats for Private prescriptions enter the number of repeats left, so if the prescription is repeated by 2 enter in 2 here denoting that there are only 2 repeats left on this prescription. The system will display on the patient‟s history that there are 2 repeats left. GMS Repeats To enter Repeats for GMS prescriptions (not GR scripts) input the number of repeats left, so if the prescription has 2 repeats left, enter in 2 here denoting that there are only 2 repeats left on this prescription. The system will display on the patient‟s history that there are 2 repeats left. Once all this information has been input, press ENTER for the prescription to store on the system and appear on the patient‟s history. However there are further options you may require to use when entering scripts. Option 9: Repeat To. If you have entered a repeat prescription the system also assigns a 6-month expiry date against the prescription. If you need to change the expiry date, type in the required number of months followed by the letter M e.g. 8M (8 months) the system will then calculate the expiry date of this prescription and enter it here. This script will appear as EXPIRED on the PMR once this date has been reached. 137 QicSCRIPT.NET User Manual Copyright 2010 Helix Health Ltd Option 10: Retain Rx: This allows you to record whether you kept the script or returned it to the patient. Ref. This displays the patient reference number (if your system has been configured to generate patient reference number). This is set to Y by default, and this is the reason R appears beside most drugs in the PMR. Option 11: Cost. The cost price of the drug is displayed here. If you want to modify this price type in the new cost price (including decimal point) and press Enter to accept. Option 12: Fees. The fee for this drug is displayed here, but if this needs to be changed for any reason simply type in the new fee (including decimal point) and press Enter to accept. Option 13: Markup. This option displays the markup. You cannot amend this option. Option 14: V.A.T. The VAT value of this drug is displayed here. If this needs to be changed for any reason simply type the new amount (including decimal point). Option 15: Price: Here you will find the total cost of the drug to be dispensed. ALT Functions When you have finished entering the detail for the Script the following screen will appear giving you a list of further options. You can press ENTER at this point to accept the script as entered or press ALT and the relevant key to record the script in a different way. The Alt options are as follows:- ALT+P: Phased Script. By holding down the ALT + P keys together, the system allows this prescription to be phased. The system will require the following information: 138 QicSCRIPT.NET User Manual Copyright 2010 Helix Health Ltd 1. Number to Lots to Dispense As 2. Reason for Phased Dispensing 3. Supervise Administration (Yes or No) 4. Day of Administration (if being Supervised) You are then required to enter the quantity that you are dispensing to the patient now. The system will display the balance in the quantity owed field. To issue the next phase press Tab to repeat the prescription. The system will ask if you want to dispense some of the balance. The balance will default to the next quantity to be phased and you can amend it accordingly. If you want to view a detailed breakdown of when each part of the prescription was dispensed press Tab for Histories and press F6 to view the highlighted script. Select the Dispensed to Date field. An exact breakdown will appear of the dates and quantities dispensed. ALT+N: Not Dispensed. If you want to claim a fee for a Not Dispensed item press ALT+N. The system will ask you to enter a reason why you are not dispensing this item. The system will mark this item as Not Dispensed. It is important if using Claims 2 to put through HT patients drugs as Not Dispensed if you are claiming the HT fee for a month where they do not receive any drugs. ALT+A: On Account. This key is used for patients whom you have not set up as on account on the patient file but whom you want to add this item only on account. Press ALT+A 139 QicSCRIPT.NET User Manual Copyright 2010 Helix Health Ltd and this item will go on account for this prescription only. Any further prescriptions dispensed will not go on account unless you press Alt+A again. ALT+C: Change Reminders. As explained earlier in the manual you can set up reminder codes against drugs so when the drug is dispensed to a patient the reminder note will appear on screen prompting the pharmacist to counsel the patient on the drug. If you would like to change the reminder note on a drug press ALT+C and you can change or add in new reminder notes. ALT+W: Change Warning. All drugs have warnings set up against them, but if you need to change or add to the warning that is already assigned to a drug, press ALT+W and the system will allow you to amend warnings when dispensing. ALT+E: Emergency Supply. If you need to dispense a prescription as an Emergency Supply press ALT+E. The system will ask you for a reason as to why you are dispensing without a script. Once you have entered the reason the script is recorded as normal but on the patient‟s history you will note an “E” has appeared reminding you that this script was dispensed as an emergency supply. ALT+R: Rx Required. If a patient has no prescription with them but needs the medication and will return at a later date with the prescription press ALT+R. You are then required to enter a reason why you are dispensing without a script. Once you have entered the reason the script is recorded as normal but on the patient‟s history where the script number usually appears, Need Rx is now displayed, reminding you to ask for the prescription from this patient. When the patient returns with the prescription, you can enter this into the system. Call up the patient‟s history and press Tab. This will list all the previous medication received by the patient. Highlight the drug that requires a prescription and press Enter. Then press Escape and the system will bring up the following message: “This prescription was on loan to the patient. Has the patient presented with a valid prescription”, answer Yes here and the system asks what quantity you wish to dispense now. The amount given out on loan already will be displayed; you can increase this if the prescription has been written with a larger quantity and press Enter. The prescription is then recorded as normal. 140 QicSCRIPT.NET User Manual Copyright 2010 Helix Health Ltd ALT+L: Print No Label. If you do not want a prescription label to print out when a drug is dispensed (maybe because this is an OTC drug) press ALT+L here and the script will record as normal but no label prints. ALT+Q: Query This. This option is mainly used for schemes that are transmitted electronically. If you have entered a prescription and need to check this before transmitting, mark it as Queried by pressing ALT+Q. When it comes to transmitting, all the scripts marked as Queried will be kept separate allowing you to check them before verifying as OK and transmitting. ALT+S: Stock Order Details. When you set up a doctor with the scheme type Doctor Stock Order you are required to enter some details such as stock order type and stock order reference. If you want to change any of these details when dispensing, press ALT+S and it will allow you to do so. ALT+M: Miscellaneous Comments. If you want to enter any script comments press ALT+M and enter the comments. The script then enters as normal and the script comment appears on the patient‟s history. This will display the letter C beside this drug in the PMR. ALT+F: Edit in Full. If you have entered a prescription and then need to change some details, press ALT+F and the system allows you make as many changes to the script as required before saving it on the patient‟s history and printing a label. ALT+V: Veterinary Info. If you have a patient‟s scheme set up as veterinary, when you dispense an item under this scheme you are required to enter in additional information such as Animal Details, Dosing Details and Admin Site. If you need to amend any of these details before printing, press ALT+V and make the relevant changes. ALT+X: Extemporaneous. Extemporaneous items are set up on the drug file. To do this, insert a new drug and complete the required detail for it. Select Option 26, Extemporaneous Details; it is here that all the pricing, components and 141 QicSCRIPT.NET User Manual Copyright 2010 Helix Health Ltd preparation notes are stored for the extemporaneous item. The item is not saved on a drug file. To dispense this item to a patient, call up the drug that you have just setup from the drug file and dispense as normal. When dispensing an extemporaneous item and you need to change any of the extemporaneous details such as the components, press ALT+X and the system will allow you to do so. Press Enter and the script are recorded as normal. ALT+B: Batch Details. If you keep batch details, when you enter the prescription press ALT+B to enter these details. You are required to enter in the Batch Number and Expiry Date. The prescription then records as normal. Repeating Prescriptions from a Patient‟s History If you want to repeat a prescription that has already been entered on the patient‟s history, press the Tab key. The system will bring up another screen with a list of all the patients‟ previous medications. Highlight the script you want to repeat and press Enter this will tag this item to repeat (you can do this with as many items as required). Alternatively, press the letter associated with the line, i.e. to repeat the first 3 lines, type ABC. Press Escape and the system will repeat all the tagged medication. Dispensing a Loan Prescription Select the patient and enter the prescription as explained above. Press Alt + R and enter the reason for the loan into the Reason For Emergency Supply screen and press Enter. Finish the script as normal and the script will appear on the patient‟s history denoted by Need Rx. Marking A Loan Script As Received Select the patient and press Tab to enter their history. Select the loan script and press Enter and then Escape. A message will be displayed asking you if the patient has presented a valid prescription press Y. Enter in the full amount of the item to be dispensed including the amount dispensed previously on loan and press Enter(e.g. if you dispensed 7 tablets to the patient on loan and the script states that they are to be dispensed 28 enter this amount). The system will automatically print out a label for the outstanding amount. You will then be asked if there are any additional items to be dispensed on this prescription, press Y if so and enter the items and finish the script as normal. 142 QicSCRIPT.NET User Manual Copyright 2010 Helix Health Ltd Dispensing an Emergency Supply Prescription Select the patient and enter the item as normal. Before finishing the prescription press Alt + E and enter the reason for the emergency supply into the Reason For Emergency Supply screen and press Enter, (please note that all reasons are transmitted electronically to the GMS Payments Board with your claims). Finish the script as normal. Dispensing a Prescription with an Owing. Select the patient and enter the script as normal. Select option 4 and enter in the amount owed to the patient and finish the prescription. The system will print a label for the amount being dispensed and then print an owing label for the amount owed to the patient. (please note that QicSCRIPT.NET® must be setup to print owing labels please refer to the configuration section of the manual for details on this setting) Dispensing the Remainder of an Owing Select the patient and press Tab to enter their history. Select the owing and press Enter then Escape. You will be asked to enter the amount you are giving to the patient with the amount owed displayed by default. If you are dispensing the amount owed to the patient press Enter and the system will print off a label for the amount. If you still do not have enough stock to fulfil the prescription enter the amount you are dispensing to the patent and press Enter. The system will print a label for the amount being dispensed and also a owing label for the amount outstanding. Levy Payments when dispensing On dispensing to Levy Applicable Patients the user will be prompted to enter in a payment of €0.50c per item on the script. 143 QicSCRIPT.NET User Manual Copyright 2010 Helix Health Ltd These Payments will be stored against the Patient on the Levy Payments Screen, Previously known as DPS Payments screen (Prior to FEMPI II Release). This can be viewed in the Enter prescriptions screen. A record of each payment along with the Date is visible through this menu. 144 QicSCRIPT.NET User Manual Copyright 2010 Helix Health Ltd Leo Pharmaceuticals Drug Substitution Leo Pharmaceuticals have included a prompt when dispensing and ordering. When a user selects Xamiol Gel 60g the system automatically suggests the substitute product Dovobet Gel (which contains the same active ingredients, form and strength). When a user selects Xamiol Gel 60g to dispense the following pop up will be displayed The prompt will default to „Yes‟, therefore once the user has pressed ENTER Xamiol Gel 60g will be replaced by Dovobet Gel. If the user selects „No‟ then Xamiol Gel 60g will be dispensed. The same process applies with ordering. When a user adds Xamiol Gel 60g to the wants list the following pop up will be displayed. 145 QicSCRIPT.NET User Manual Copyright 2010 Helix Health Ltd The prompt will default to „Yes‟ so once the user presses ENTER Xamio Gel 60g will be replaced by Dovobet Gel. If the user selects „No‟ then Xamiol Gel 60g will is placed on the wants list. 146 QicSCRIPT.NET User Manual Copyright 2010 Helix Health Ltd GMS Validation The ability to check the validity of a patient‟s code has now been added to the system. QicScript.Net will now connect to the HSE‟s web service and send the code across to check for validity. If the code is valid, the system will tell the pharmacist that it is valid and return patient details such as: Date of birth Patient code Doctor code Valid to and From dates Scheme type Is High Tech (Y/N) To enable GMS validation there is one configuration change that you will need to make. Go to Administration Edit files Miscellaneous Configuration File Scheme Details Select the scheme for which you want to enable validation against. 147 QicSCRIPT.NET User Manual Copyright 2010 Helix Health Ltd Select Option 14 – the user will be presented with 3 options. Active – If active checking is turned on and the patients‟ code is invalid, a pop up will appear to the user informing them that the patient does not have a valid code. Passive – If passive checking is turned on and the patients‟ code is invalid, a message is displayed at the bottom of the screen to say that the patient does not have a valid code. None – No checking is done On entering the Dispensing screen a call is made from QicScript to the HSE‟s web service to check if the patient has a valid GMS card. A message is then displayed to the user at the bottom of the screen to say if the patient has a valid code or an expired code. Below is an example of a patient that does not have a valid code when Passive Checking is turned on. 148 QicSCRIPT.NET User Manual Copyright 2010 Helix Health Ltd This is a zoomed in display of the message. On Clicking the Dismiss button as displayed above, the message will be removed. If dismiss is not pressed, the system will close the message once the user escapes out of the dispensing screen or finishes off the prescription. Below is an example of a patient that does not have a valid code when active checking is turned on. On entering the dispensing the screen, a pop up will appear as displayed below. 149 QicSCRIPT.NET User Manual Copyright 2010 Helix Health Ltd Once you click ok on the message above, the message will be removed from the screen. Below is an example of a patient that has an expired code – 150 QicSCRIPT.NET User Manual Copyright 2010 Helix Health Ltd Note: If the patients‟ code is invalid or expired and the user is displayed with either of the above messages, the system will NOT stop the user from dispensing to that patient, it is up to the pharmacist to decide whether or not to continue with the dispensing to that patient. Below is an example of Patient that has a valid code – This is a zoomed in display of the message 151 QicSCRIPT.NET User Manual Copyright 2010 Helix Health Ltd On Clicking the Dismiss button as displayed above, the message will be removed. If dismiss is not pressed, the system will close the message once the user escapes out of the dispensing screen or finishes off the prescription. You can also click on the green message and it will display a pop up with the patient information. Below is an example of this message – Once the user clicks ok on this message, the message will be removed and the user can then continue with the dispensing. Note: Patient name and code have been blanked out due to Data protection legal obligations. 152 QicSCRIPT.NET User Manual Copyright 2010 Helix Health Ltd EDIT PATIENT DETAILS Enter the name of the patient, as normal in the “Enter Prescriptions” screen. When you have selected the patient you want to change you can amend their details by going as far as the “Select number to amend option” on the bottom of the Enter Prescriptions screen and change line number 1. A box will appear with the follow options. At this stage enter the number of the line you want to amend. If you wish to change the person‟s address, enter 2 and type in a new address. Pressing Enter at the Select Number to Amend prompt saves the new information to the patient file. Pressing Escape cancels this. To add a new family member Select one of the existing family members from your patient file in Enter Prescriptions; highlight this family member and press Insert. The system will ask you if you want to use this patient‟s details as the template. REPRINT A LABEL Select the patient you wish to reprint a prescription label for and when you are at the patient‟s history press F8 to reprint the label for the last script they received. 153 QicSCRIPT.NET User Manual Copyright 2010 Helix Health Ltd HEALTH CHECK Accessing Patient Assessments To access patient assessments, go to Enter Prescriptions in the Main Menu. Enter the patient‟s name and press enter. Choose Option 5 here to open the VitaLife application. Note: Only QicScript.NET Users that have dispensed a prescription in the past will be able to access this section. If you have set up a new user (Username and Password) and you need to access patient assessments please contact support to be granted access. Complete an Assessment To carry out an assessment on the patient click the assessment button at the bottom right of the screen. The default assessment that will show here is the 154 QicSCRIPT.NET User Manual Copyright 2010 Helix Health Ltd Blood Pressure Test. To choose a different assessment, click the drop down menu to the right of this button. Once you have chosen the required assessment, a form will open with a number of questions/ tests. Complete this form as needed. 155 QicSCRIPT.NET User Manual Copyright 2010 Helix Health Ltd Once you have completed the test, you have a number of options: Referral Letter – Click this button to open a new referral letter. When you select this option a pop-up will appear asking whether to mark this patient as referred. If you select Yes here on the patient assessment list, a tick will appear beside this option to show the patient was referred. The letter will then open: 156 QicSCRIPT.NET User Manual Copyright 2010 Helix Health Ltd This letter is a standard letter template, it cannot be edited, the relevant patient details and test information will automatically appear on the letter. You can print this by clicking the print button at the top of the screen. Print – Clicking the print option at the end of the assessment will print out a copy of the assessment. Close – Clicking the Close button will close the assessment and save all the details entered. Cancel – Click cancel to close the assessment without saving it. Once the assessment is saved it will appear on the main screen. You can complete an unlimited number of tests on any patient following the same process as above. To Edit or view the assessment after it is completed, click the View button. You can make any required changes and save the assessment again. You can minimise/Hide the VitaLife program at any stage to return to QicScript.NET by clicking the minimise button at the top of the screen. 157 QicSCRIPT.NET User Manual Copyright 2010 Helix Health Ltd To exit the application, click the Close button at the top of the screen. HANDY DISPENSING HINTS This section summarises the most commonly asked questions we receive from customers. 158 1. To perform any task to a previously dispensed script, call up the patient and press Tab for histories. All options including editing, viewing and reprinting scripts are performed here. 2. To delete a script from a patient‟s history you call up a patient‟s file, press Tab for histories and highlight the script you want to delete. Then press Delete on that script. The system will ask you if you are sure you want to delete this item. Press Y for Yes and N for No. 3. You can now scroll up and down through your patient files, drug files, patient history etc using the arrow keys and the page up and page down keys, or the equivalent touchscreen buttons if you are using a touchscreen. 4. You can now select which schemes you want to print a bag label for by going to [Administration, Edit Files, Miscellaneous Files, Configuration File, Script Entry Options] and select option 13, F10 Options. You have the choice to print a private bag label only, never print a bag label or always print a bag label. 5. To edit a script call up a patient‟s file, press Tab for histories and highlight the script you want to edit. Then press [F9] on that script. The system will allow you to amend the script details. 6. To reprint a receipt, bag label or script label call up a patient‟s file, press Tab for histories and highlight the script you want to reprint and press [F8]. The system will give you the option to reprint drug labels, bag labels or UFC receipt. QicSCRIPT.NET User Manual Copyright 2010 Helix Health Ltd UNFINISHED INTERVENTIONS If in the course of dispensing or checking drug interactions, you have entered intervention, this section allows you to view, update or delete. To view an intervention, move the highlighter to the relevant entry and hit ENTER. This will display all details relating to the intervention and make any changes to them. To delete an intervention, move the cursor to the relevant intervention and hit the DELETE key to remove it. YOU CANNOT RECORD AN INTERVENTION IN THIS SECTION OUTSTANDING TO DO LIST This allows you to keep list of outstanding things to do. To setup a new TO DO, hit INSERT. 1. 2. Patient. Enter the name of the patient the “to do” relates to. Pharmacist. Enter the name of the pharmacist the “to do” relates to. 3. Date. Enter the date required. By hitting “TAB” you can access a calendar. 4. Description. This is a free text field to allow you enter a description of the “to do”. 5. Comments. You now have five lines to outline details of the “to do”. 6. On PCP list. Enter Y or N. 7. Completed. Enter Y or N to reflect whether the “to do” has been completed. This also removes it from the “outstanding” list. Modifying An Existing To Do Item Move the cursor to the required “to do” and hit the ENTER key. You can now make any changes to the “to do”. Deleting An Existing To Do Item Move the cursor to the required “to do” and then hit the DELETE key. 159 QicSCRIPT.NET User Manual Copyright 2010 Helix Health Ltd Printing Your To Do List To print a list of “to do‟s” hit F10 and the system will ask you the number of days you wish to print. VERIFY PRESCRIPTIONS This section of the program is used to check prescriptions that have been entered have been done so correctly. Customers who want to check the information that they have entered into the system before transmitting electronically at the end of the month mainly use it. When you first enter on Verify Prescriptions on the main menu you are asked to select a period to verify. This is done by month so select the month required by typing for example: 102009 for October 2009. You then have the option to view all form types or just a specific scheme. You can view all scripts, or select a specific scheme from the list. If you choose View All Form Types – only the ones that are submitted electronically will be displayed. Then you have the following options: View Exception GM Scripts: These are the prescriptions that the software think may be rejected for some reason (e.g. patient code is invalid or incorrect). This option takes some time 160 QicSCRIPT.NET User Manual Copyright 2010 Helix Health Ltd to run, but is very useful for checking before transmitting your claims, as it can minimize your rejects received from the PCRS. QicSCRIPT.NET® will validate all scripts against the GMS business rules when going into verifications and generate its own exception file where users can fix any script errors before transmitting their claim to reduce the amount of rejections sent back on claims transmission. A caution sign is displayed next to the script in verification to indicate to the user that there is a problem with the script. This only flags scripts that are due for electronic submission. If LTI or HA scheme is set to Submit electronically then a new check is made that either the Drug GMS code contains a value or the Drug DPS Code begins with 777. This check is done in Script Entry and when viewing Exceptions in Verify Scripts. View All GM Prescriptions All the GMS prescriptions that have been entered for the period of time selected display on screen here. 161 QicSCRIPT.NET User Manual Copyright 2010 Helix Health Ltd To amend any of these prescriptions, highlight the prescription and press Enter. You can change any of the prescription details, add more items on or delete off any items, you can also reprint a claim form (customer or pharmacy copy) by pressing F7. To mark the prescriptions as verified press F9 on each prescription and a tick will appear beside the script marking it as checked. If you scroll down a list of prescriptions and want to say that each one is ok, rather than pressing F9 on each script press F10 and press Y to the message and it will tick everything up to that point. Loan GM Prescriptions Only The system separates all the Loan prescriptions from the rest so it is clear exactly what scripts are required before the claim file is sent. If you do not have the prescriptions for these loan scripts, you cannot claim for them so the system will allow you to push them forward to next month giving the patient more time to return with the prescription. It keeps doing this until the prescription has been received. Queried GM Prescriptions: Any prescriptions that were marked as queried when dispensing will appear here. Once you have checked the prescription and are happy to claim for it press [F8] to take the query marking off the script and it will then be included with the regular GM prescriptions. Note: The same procedure can be carried with any of the schemes that you have set up to transmit electronically. TRANSMIT USING GMS CLAIMS1 All claims that are transmitted are encrypted and can only be read by the GMS (P) Board (see section on encryption of claims). While all these claims go through the Helix Health network, they cannot be read by Helix Health and therefore the confidentiality of the patient is protected At the end of the month once you are happy that all the prescriptions that you have entered are correct, it is time to transmit them electronically. To do this select the option PCRS Claims Transmission and press Enter. You are then required to select a claim period you wish to claim for e.g. 052009 for May 2009. If the system comes across any loan items for the month that you are transmitting it will ask you do you want to move them into the current claim month; this allows you get the prescription from the patient and enter it in as a 162 QicSCRIPT.NET User Manual Copyright 2010 Helix Health Ltd valid script before transmitting. Answer Yes here if you have the prescription, otherwise it will not be transmitted. The system then extracts the relevant prescriptions for claiming and transmits them to the PCRS. The claim file transmits the same way as a teleorder, however it may take longer to go through on older modems. TRANSMIT USING GMS CLAIMS 2 The benefits of using GMS Claims 2 are discussed earlier in this manual. The following is a step by step guide on how to transmit using GMS Claims2: PCRS v2 Claims Transmission: After verifying your scripts to be sent electronically, you can click “Transmit rd Claims to PCRS”. This must be done before midnight of the 3 working day of the month. 163 QicSCRIPT.NET User Manual Copyright 2010 Helix Health Ltd If you have broadband, this should go through straight away, but if you are using a Dial-Up connection, you must first connect to GMS, then transmit (then disconnect once it has gone through). After selecting which month to transmit, you will get the following warnings: Any HT patient that did not receive medications in the previous month, and who the pharmacy can claim the HT fee for should have their medications put through as Not Dispensed in order to receive the HT fee. This is a reminder to that effect. This is a pop-up to remind the user to check for EXCEPTIONS in verify prescriptions before transmitting their claims (see earlier). This brings up a list of all scripts that the software believes will be rejected by the PCRS, and is useful on cutting down the amount of rejects received in the exception report. Next, a summary screen will appear of a breakdown of all scripts to be transmitted. Hit Y to transmit. 164 QicSCRIPT.NET User Manual Copyright 2010 Helix Health Ltd Downloading Exception Report: 24 hours after transmission, the Exception Report should be ready to be downloaded. Again, if using a dial-up, you will need to connect to the GMS again before trying to download this (and disconnect once you have the report). 165 QicSCRIPT.NET User Manual Copyright 2010 Helix Health Ltd If the Exception Report is not ready, but everything else went through okay, you should see “Error 212”. This simply means “try again later” as the PCRS just don‟t have the report ready for you yet. Otherwise, you should see this: This is a summary of the exception report – the claim period, total scripts, total rejects etc is viewable here. Exceptions are broken down into the following 3 categories: 166 Different – these are scripts where you are getting paid a different amount to what you may be expecting (same as price differences in the old printed exception report). This may be because a drug has changed price, or because your fees are not up to date on the system. Deleted – these are your rejected scripts that you are NOT getting paid for. These can be fixed and resubmitted using “Fix Exception Errors” Warnings – these have been rejected for similar reasons to the Different scripts. However, the PCRS will pay for these in full. You may want to view the reason for these rejections in “View Exception Report”. QicSCRIPT.NET User Manual Copyright 2010 Helix Health Ltd Nothing can be changed in this option, it is simply a detailed list of all your rejects, and can be saved to a file, or printed as you want. These reports are saved on the system, and you can view old ones by clicking on “Historical Reports” 167 QicSCRIPT.NET User Manual Copyright 2010 Helix Health Ltd Fixing Exception Errors: The last option is to “Fix Exception Errors”. This brings a list of all your rejects that can then be fixed and retransmitted. 168 QicSCRIPT.NET User Manual Copyright 2010 Helix Health Ltd Depending on the reason for the script being rejected (see right hand side) you have 3 options: Edit Script – F6 Edit Patient – F7 Edit Doctor – F8 When editing a script, it is much like verifying – the drug that is causing the problem is flagged: Simply arrow down to this drug, and hit ENTER to modify: 169 QicSCRIPT.NET User Manual Copyright 2010 Helix Health Ltd Here the problem is a withdrawn drug code, so the drug must be changed to solve this reject. Once all rejects have been fixed, you can retransmit your exceptions to the PCRS. Only exceptions that have been fixed will be retransmitted. Finally, 24 hours later, you can download your exception file again. If there are any further exceptions, these can be fixed and retransmitted again – any day th up to midnight on the 8 working day of the month. Your final exception report will contain final result of paid, unpaid and difference in items. Text Messaging Service: It is also possible to sign up for a text messaging service from the PCRS. This is to receive text messages to remind you to send your claims, to inform you when your exception report is ready for download, and to inform you of any problems with the PCRS servers that deal with receiving your claims. For further information please contact the HSE. 170 QicSCRIPT.NET User Manual Copyright 2010 Helix Health Ltd HOW TO USE MDS AND PRINT MDS FORMS Before you can print off any of the nursing home forms, you must make sure that you have some set ups done first Setting up the Monitored Dose Systems to be used. Firstly you need to decide what monitored dose system you will be using (Nomad, Venalink or Generic) and then set this up in the system. To do this select [Administration, Edit Files, Miscellaneous Files, Configuration, Miscellaneous Details and Field Number 6: Monitored Dose System in Use]. You have 3 options: Nomad, Venalink or Generic. The next step is to set up the Nursing Home. Please refer to Setting Up A Nursing Home section of the manual 171 QicSCRIPT.NET User Manual Copyright 2010 Helix Health Ltd Setting up patient‟s on the monitored dose system. The next step is to set up the patients on the Monitored Dosage System. To do this select [Administration, Edit Files, Patient Files and Patient File]. Highlight the patient you wish to set up on the Monitored Dose System and press Enter. The Monitored Dose Information is entered under option 18. Option 1: Care Home. You need to set the nursing home up as a patient (explained above) and then assign this nursing home to the patient. Normal Time of Rounds. The round times of this nursing will appear here, having been previously been set up when the nursing home was set up. Option 2: Use Normal Times. If this option is set to Yes, the patient will use the normal nursing home round times specified above. If No the patients will use their own round times specified below. Option 3: Time of Rounds for This Patient. Enter the time of the patient‟s rounds here using the 24-hour clock. Option 4: ADM Code for these Round Times. Only used in robotic dispensing 172 QicSCRIPT.NET User Manual Copyright 2010 Helix Health Ltd Option 5: Floor. Enter the floor of the nursing home the patient is on. Option 6: Room. Enter the patient‟s room here. Option 7: Profile Note. Enter profile notes on the patient. Free text option. DISPENSING USING MDS The next step is to set up the current medications for the patients and to dispense the medication. To do this go select [Main, Enter Prescriptions], and call up the patient you are dispensing to. When you are in the patient‟s dispensing history press F7 for MDS dispensing. To set up a new drug for a MDS patient press Insert. You are then required to enter the following information. Option 1: Start on. Enter the date as to when the patient is to start receiving this medication. Option 2: Finish On. Enter the date as to when the patient is to finish receiving this medication, or hit enter to leave as “Indefinite”. 173 QicSCRIPT.NET User Manual Copyright 2010 Helix Health Ltd Option 3: Mar Position. This is the position on the Mar where this patient‟s medication will print. The range is from 1 to 20 with 1 = Top of Mar sheet and 20 = Bottom of Mar sheet. Option 4: Drug. Select the drug to dispense, type in a couple of letters of the drug name and then select the drug from the drug file by highlighting the drug and pressing Enter. Option 5: Shape. Enter the drug shape. There are 16 different options. Select the correct option. Option 6: Colour 1. Enter the primary drug colour. There are 16 different options. Option 7: Colour 2. Enter the secondary drug colour. There are 16 to different options. You will only be asked for a second colour if the drug is a capsule. Option 8: Markings. Enter any specific drug markings so that they can be easily identified. Option 9: In Blister. If the drug fits into the blister pack answer Yes here. If it does not, answer No. Option 10: Quantity. Enter the quantity to dispense. Option 11: Dosage. Enter the drug dose. Option 12: Times Given. Here the different round times will appear and the quantities given at each round time are to be entered in here. Rounds can be skipped. When you have finished entering in the detail of this drug, press Enter. If you need to enter any more drugs, press Insert and follow the above instructions. Once the above procedure is completed the prescription has been set up for the patient and is ready to be dispensed. Dispensing A Drug For The Monitored Dose System To do this, select [Main, Enter Prescriptions] and call up the patient to whom you are dispensing. When you are at the patient‟s history screen press F7 for MDS dispensing. 174 QicSCRIPT.NET User Manual Copyright 2010 Helix Health Ltd The medications that have been dispensed previously through MDS will be displayed on screen. To dispense any of these items highlight each of them in turn and press Enter, indicating that you want to tag these items for dispensing. If you want to dispense all current medication press F10 and the system will tag them all. Pressing F9 allows you to modify any of the drugs you have entered already and pressing Delete will delete off the drug. Note: It is important that the medication information in this screen is kept up to date as all M.A.R forms and charts will print based on the information contained here. Press Escape when you have finished tagging all the items for dispensing, and at this point each item on the prescription will appear on the usual dispensing screen with the quantity and dosage appearing. To dispense the item press Enter, and the next drug will appear. To make any changes, type in the line number containing the information you want to change and press Enter. When you have finished making the required changes press Enter to dispense. Once you have finished, press Escape and you can then enter in a new patient. Your are now also ready to print out the M.A.R Forms. PRINTING MAR FORMS AND LABELS In MDS, there is the facility to print out M.A.R forms and the relevant labels for Nomad, Venalink and generic systems. These options can be found by selecting [Main, Print Nomad/Venalink/MDS Forms]. 175 QicSCRIPT.NET User Manual Copyright 2010 Helix Health Ltd Nomad System If you are using the Nomad Monitored Dosage System the following are the list of forms and labels available to you. Print Preprinted M.A.R Forms Using this option the system will insert the medication information for each patient on to the Preprinted M.A.R forms. When you select this choice you have the option to print for all patients in the Nursing Home or for specific patients. If you select to print for a specific patient the system will require you to call up the required patient. The next screen will ask you confirm the week that the labels will commence printing for. Press Enter to select the default or type over this date with the correct date if required. The system will then ask how many weeks you want to print for. This option defaults to 4. If you want to change this, type over it with the correct number of weeks. The M.A.R forms are then given to the nursing home staff to show them what medication is required by which patients and at what time. The nurse can then mark onto these sheets whether the patient received the medication or not. Print Blank M.A.R forms Using this option the system will print out the M.A.R form onto plain white paper and print the medication information onto these sheets for each patient. When you select this field option you have the choice to print for all patients in the Nursing Home or for specific patients. If you select to print for a specific patient the system will require you to call up the required patient. If you select all patients the system will ask you to select the nursing home you want to print for. The next screen will ask you confirm the week that the labels will commence printing for. Press Enter to select the default or type over this date with the correct date if required. The system will then ask how many weeks you want to print for. This option defaults to 4. If you want to change this, type over it with the correct number of weeks. The M.A.R forms are then given to the nursing home staff to show them what medication is required by which patients and at what time. The nurse can then mark onto these sheets whether the patient received the medication or not. Print Monthly M.A.R Forms This will print the M.A.R sheet for 1 month. Follow the instructions as above. Print Preprinted Cassette Forms Using this option the system will print off the medication onto the cassette form that is to be inserted in the back of the Nomad box. When you select this field you have the option to print for all patients in the Nursing Home or for specific 176 QicSCRIPT.NET User Manual Copyright 2010 Helix Health Ltd patients. If you select to print for a specific patient the system will ask you to call up the required patient. If you select all patients the system will ask you to select the nursing home you want to print for. The next screen will ask you confirm the week that the labels will commence printing for. Press Enter to select the default date or type over this date with the required date. The system will then ask how many weeks you want to print for. This option defaults to 4. If you want to change this, type over it with the correct number of weeks. A star will appear next to the drugs that are not kept in the box, to remind the nurse to administer these drugs as well. Print Blank Cassette Forms Using this option the system will print the cassette form onto plain Nomad paper as well as insert the medication information, to be inserted in the back of the Nomad box. When you select this field you have the option to print for all patients in the Nursing Home or for specific patients. If you select to print for a specific patient the system will ask you to call up the required patient. The next screen will ask you confirm the week that the labels will commence printing for. Press Enter to select the default date or type over this date with the correct date if required. The system will then ask how many weeks you want to print for. This option defaults to 4. If you want to change this, type over it with the correct number of weeks. A star will appear next to the drugs that are not kept in the box to remind the nurse to administer these drugs as well. Print Patient Profile Labels This option will print out the patient profile information onto the patient profile label. When you select this field you have the option to print for all patients in the Nursing Home or for specific patients. If you select to print for a specific patient the system will ask you to call up the required patient. The system will then ask you to enter the number of labels you want to print. The system will default to 5 labels. If you want to amend this number, type over it with the correct number. The label will print out the name of the patient, date of birth, floor, doctor, room, telephone number and the profile note for the patient. This label is then stuck to the side of the Nomad box. Print Carehome ID Labels This option will print out the care home ID label with the name of the Nursing Home on it, to be attached to the Nomad box. The system will then ask you to enter the number of labels you want to print. The system will default to 1 label. If you want to amend this number, type over it with the correct number. Print Cassette Owner Labels This option prints out the pharmacy name onto the cassette owner label. The system will then ask you to enter the Pharmacy. When you have done this press Enter and the system will ask you for the number of labels you want to 177 QicSCRIPT.NET User Manual Copyright 2010 Helix Health Ltd print. The system will default to 5 labels. If you want to amend this number, type over it with the correct number. This label should be stuck to the back of the Nomad box to identify which pharmacy the box came from. Print Insert Tray ID This option will print the name, address and registration number of the patient. When you select this option you can print for all patients in the Nursing Home or for specific patients. If you select to print for a specific patient the system will require you to call up the required patient. The system will then ask you to enter the number of labels you want to print. The system will default to 5 labels as this would be the normal number of boxes per patient. If you want to amend this number, type over it with the correct number. This label should be stuck to the back of the insert tray containing the patient‟s medication. Print Patient List This option will print out a list of patients who are in a particular Nursing Home. When you select this option the system will ask you to select the Nursing home you want to print the list for. Type in the first few letters of the nursing home and press Enter. Highlight nursing home you want and press Enter. Venalink System If you are using the Venalink Monitored Dosage System the following are the list of forms and labels available to you. Print 7 Item M.A.R Forms Using this option the system will insert the medication information for each patient on to the Preprinted M.A.R forms. When you select this field you have the option to print for all patients in the Nursing Home or for specific patients. If you select to print for a specific patient the system will require you to call up the required patient. If you select all patients the system will ask you to select the nursing home you want to print for. The next screen will ask you confirm the week that the labels will commence printing for. Press Enter to select the default date or type over this date with the correct date if required. The M.A.R forms are given to the nursing home staff to indicate what medication is required by which patients and at which time. The nurse can then mark onto these sheets whether the patient received the medication on not. Print Medication Labels This option prints out the medication labels that are to be stuck to the Venalink blister packs. When you select on this field you have the option to print for all patients in the Nursing Home or for specific patients. If you select to print for a specific patient the system will require you to call up the required patient. The 178 QicSCRIPT.NET User Manual Copyright 2010 Helix Health Ltd next screen will ask you confirm the week that the labels will commence printing for. Press Enter to select the default date or type over this date with the correct date if required. Print Patient List This option will print out a list of patients who are in a particular Nursing Home. When you select this option the system will ask you to select the Nursing home you want to print the list for. Select the Nursing Home by typing in the relevant line number and pressing Enter. Generic System Print 6 Item M.A.R Forms Using this option the system will insert the medication information for each patient on to the Preprinted M.A.R forms. When you select this field you have the option to print for all patients in the Nursing Home or for specific patients. If you select to print for a specific patient the system will require you to call up the required patient. If you select all patients the system will ask you to select the nursing home you want to print for. The next screen will ask you confirm the week that the labels will commence printing for. Press Enter to select the default date or type over this date with the correct date if required. The M.A.R forms are given to the nursing home staff to indicate what medication is required by which patients and at which time. The nurse can then mark onto these sheets whether the patient received the medication on not. Print Patient List: This option will print out a list of patients who are in a particular Nursing Home. When you select this option the system will ask you to select the Nursing home you want to print the list for. Select the Nursing Home by typing in the relevant line number and pressing Enter. TEXT MESSAGING CENTRE This section will allow you to send text messages to your patients. You can send texts to individuals or groups of patients. The texts can be templates or free texted. Before sending any text messages you need to sign up for the text messaging Service. Go to Administration, Edit Files, Miscellaneous, Configuration Files, SMS Text Messaging. 179 QicSCRIPT.NET User Manual Copyright 2010 Helix Health Ltd Options 1 – 4 will be set up with your user details. Options 5 – 9 are where you can create text message templates. These are messages that will be used regularly to send to groups of patients. To enter these, type the number (e.g. 5) and press ENTER. Then type in the message and press ENTER again. There is a limit of 100 characters for each message. You can include the patients name in the message. To include the patient‟s first name, type %F. To include the patients full name, type %N. 180 QicSCRIPT.NET User Manual Copyright 2010 Helix Health Ltd Options 10 – 14 are where you can specify names of different groups. Patients can be assigned to a particular group for group texting. To assign a patient to a group, and set up their text message settings, open the patient‟s details in Main, Prescriptions Entry. Change option 1 Edit Patient Details. Here, select to change option 16 Contact Details. In order to receive text messages from the pharmacy, the patient must have a valid mobile number entered in option 5, and must have consented to receive text messages in option 6. Option 7: If this option is set to Y, the patient will be texted when the pharmacist completes a prescription. Option 8: If this option is set to Y, the patient will receive a text message after the next prescription is completed only. Option 9 – 13: You can assign the patient to any of these groups. Once the above details have been entered you can then text the patient. 1. From Prescription Entry Screen 181 QicSCRIPT.NET User Manual Copyright 2010 Helix Health Ltd Choose option 6 to send a text to a single patient. Choose Send a Text Message Now to send a text to the patient. 182 QicSCRIPT.NET User Manual Copyright 2010 Helix Health Ltd Choose one of your template text messages from the list, or choose the first option to Type in a Message to send, this option will allow you to free type in your own message. You can also send messages from the main menu, Go to Main, Text Messaging Centre and choose from the following options: Send to Individuals: This option allows you to choose a message to send to one particular patient. Send to Groups: This option allows you to choose a particular Group to send messages to. Check Available Credit: This option will allow you to check the status of your remaining credits. 183 QicSCRIPT.NET User Manual Copyright 2010 Helix Health Ltd If you try to send a text message but you do not have enough credits on your account, the following message will appear: You can contact Helix Health Sales department to purchase more credits. Print Group Members: This option will allow you to print out a list of all the members in any of your groups. 184 QicSCRIPT.NET User Manual Copyright 2010 Helix Health Ltd PRINT BATCH OF LABELS This option allows you to print multiple free text labels. Press Enter on Print Batch of Labels. Enter a short name that you can use at a later date to recall the label, or press Tab to get a list of previously stored labels. You will be presented with details from the previously stored label, or alternatively a blank label. You can then type on the screen any information that you want to print on the label. By pressing Tab a list of different settings such as Bold, Underline and Centre appear. To select any of these options highlight it and then press Enter. To print out this label press F10. When you escape from this option the system will ask you if you want to save this label. Answer Yes here if you wish to use this label. To print out an existing label that you have already saved, press Tab and a list of all the existing labels you have saved will appear. Highlight the one you wish to use and press Enter, this label will then appear on screen. Pressing F10 will print out the label. PRINT MULTIPLE RECEIPTS You can select a patient and a date range and the system will alphabetically print all receipts for the patient between these dates. LIVE SUPPORT A new Live Support option has been provided within this release to allow user‟s contact our support team via a website within the QicSCRIPT application rather than opening the website external to the application. The option will be provided in the Main Menu as well as the Favourites section as displayed below: 185 QicSCRIPT.NET User Manual Copyright 2010 Helix Health Ltd Through selecting either of these options the user will be directed to the Helix Health Live Support web page whereby the customer support representative they are in contact with will provide a 6 digit support code. 186 QicSCRIPT.NET User Manual Copyright 2010 Helix Health Ltd Once the 6 digit code has been entered the user can select „Connect to Technician‟ which will in turn give the support representative access to the user/customer‟s computer. Note: If the Close option has been selected it will not close the remote connection. 187 QicSCRIPT.NET User Manual Copyright 2010 Helix Health Ltd LIVE CHAT A Live Chat facility has also been implemented in order to give our customer‟s the chance to text chat with our customer support team. Through selecting the highlighted „Live Chat‟ option above, the user will be redirected to a website that will enable them to chat online with one of our support representatives. 188 QicSCRIPT.NET User Manual Copyright 2010 Helix Health Ltd The customer can type in the text box above. Pressing enter will send the message to the support representative. The support representative will be responsible for disconnecting once the conversation has completed. 189 QicSCRIPT.NET User Manual Copyright 2010 Helix Health Ltd EXIT QicSCRIPT.NET® Clicking on this button (or pressing Enter on it) will exit you from QicSCRIPT.NET® ENQUIRIES View A Specific Label All labels are now printed with a label reference number (this is not the prescription number). All labels are stored numerically in this option. If you want to look at a particular label press Enter on View a Specific Label. Press Spacebar and the system will allow you type in the reference number of the 190 QicSCRIPT.NET User Manual Copyright 2010 Helix Health Ltd label you want to view. When you press Enter the system will bring you automatically to this label. If you don‟t know the reference number for the label you can scroll down the list until you find the label you are looking for. To view any information on this label press Enter. View A Patient‟s History If you want to look at patient‟s history you can Enter on this option rather than calling up the patient‟s file in Enter Prescriptions. The system requires you to enter in the patient‟s name by calling them up from the patient file. Alternatively you can use the swipe card to call up the patient if you have a swipe card reader attached to your system. Once you have the selected the patient their entire history appears on the screen. To view any prescription in detail, highlight the prescription and press Enter. View A Specific Order With this option you can look up orders, there are 3 options here: 191 QicSCRIPT.NET User Manual Copyright 2010 Helix Health Ltd 1. Unchecked Orders: These are orders that have been received but not checked into stock yet. Press Enter on this option and highlight the order you want to view. Press Enter on it to view the order. 2. Checked in Orders: These are orders that have been received and checked into stock. Press Enter on this option, then highlight the order you want to view and press Enter here. 3. By Invoice Number: This will bring up all the orders that have been received and checked into stock by their invoice number (if entered). Press Enter on this option, then highlight the order you want to view and press Enter here. View a Specific Return With this option you can look up any returns to suppliers. Press Enter on this option and a list of all the returns will be displayed. To look up the details on a specific return, highlight the return and press Enter. Account Enquiry [F1] If you want to look up a patient‟s account, to view transactions for the month or balance press Enter on this option. Alternatively you can press F1 anywhere in the system and the system will bring up the same option. You can call up the patient from the patient file by typing their name here. Also if the patient has their DP card you can swipe through their card and the patient will appear on screen (a swipe card reader required). Once you have the patient on screen the system gives you their current balance along with all their transactions. 192 QicSCRIPT.NET User Manual Copyright 2010 Helix Health Ltd Price Enquiry [F3] If you want to look up the price of an item without dispensing it you can press Enter on this option. You can also press F3 anywhere in the system and the same option will appear. 193 QicSCRIPT.NET User Manual Copyright 2010 Helix Health Ltd If you have a scanner you can scan in the barcode on the item you want to look up a price for then enter in the quantity that you would like to price and press Enter. The system will then give you pricing details such as cost, unit cost, broken bulk, % markup and margin. To price a drug you can also call the drug up from the drug file and press Enter. The same information as above appears. To price more than one drug press Insert and type in the next drug and press Insert again and the cost of the two drugs will be added together. Repeat as often as required. Profit Enquiry This option allows you to view your profit figure for any given period of time. Press Enter on this option. The system will ask you for a range of dates to calculate the profit for. Enter the dates and the system then displays the number of items, cost, fees, markup, VAT, total and profit for every scheme type less any discount given to the patients. There are two options on the bottom: OK – this will exit from the report and ask if you want to print it Copy – copies the text to the clipboard so it can be pasted into another program (e.g. Word or Notepad). This is useful for saving your reports. 194 QicSCRIPT.NET User Manual Copyright 2010 Helix Health Ltd Profit Enquiry By Doctor: Here you can select your doctor to run Calculate Product Usage Here you can enter a drug and find out the quantities you have used Calculate Stock Value Here the systems scans through the drug file to give a total valuation of the current stock in hand. Product Locator This option is used to locate products by particular details such as manufacturer or BNF classification. Press Enter on this option and the following screen appears: To search for a product using any of the fields displayed above, select the corresponding number and press Enter, and then type what you want to search for, e.g. the name of a particular manufacturer. The system will then generate a list of the products provided/supplied by this manufacturer. 195 QicSCRIPT.NET User Manual Copyright 2010 Helix Health Ltd Drug Information [F4] This option is only available for customers who have the Drug Interaction module installed onto QicSCRIPT.NET®. It is used to look up any drug information that is available for a particular drug. The system then lists the patient counselling, side effects, food/nutrient interactions, chemical list, product summary and minimum/maximum dosage of this drug. These can be printed if required. Pressing the F4 key anywhere in the system also takes you in to the same option. Interaction Check Shift +[F4] This option is used for checking interactions between various drugs. You can enter up to 10 drugs to check interactions by selecting them from the drug file and pressing Enter. If any interactions occur between these drugs the system will list them and you can view the interaction level. Pressing the F5 key anywhere in the system will bring up the same option. About This System This section contains information relating to your computer system and its configuration. Occasionally you may to asked to check a detail contained in this section by Helix Health. 196 QicSCRIPT.NET User Manual Copyright 2010 Helix Health Ltd ORDERS EDIT CURRENT ORDERS This option will allow you to modify any orders or add items onto any orders before they are printed off or transmitted to the wholesalers. Add to Wants List [F2] If you want to enter a new item to this list, select the drug from the drug file and press Enter. You must then enter the quantity you wish to order and the supplier with whom you want to order from. 197 QicSCRIPT.NET User Manual Copyright 2010 Helix Health Ltd If your system has a scanner attached you can also scan the product using the barcode and the same option as above will appear. Edit Wants List. This option will allow you to modify any orders that have been generated by the computer or manually entered before transmitting the orders. To edit an order you must first select the supplier you are sending the order to. If you are not sure of the supplier, press Enter on this option to get a full list of all the products on order. To modify an item on this list, press Enter on the 198 QicSCRIPT.NET User Manual Copyright 2010 Helix Health Ltd required item. You can change any of the order details by typing in the line number containing the information and pressing Enter. If you have a default supplier set in Configuration, any product with no supplier against it will automatically be ordered from the default supplier. If you change the supplier for this product, depending on how you are set up in Configuration, the supplier will be changed permanently. If you hit F6 on this screen, you can see the quantity that you have in stock and the Ideal Stock Level for each product. You may Add, Modify or Delete any items from the selected order list. If you want to enter a new item to this list press Insert. If there are no items on order you will be asked if you wish to insert a new record, answer Yes. Simply enter the product you want to order, the supplier you want to order from, and the quantity you want to order. If you want to modify an item highlight the item and press Enter and the system will allow you to modify the ordering details. Please note that the maximum number of items per order is 350. If you want to order 500 items you will have to put the first 350 on one order and 150 on another. If you want to delete an item highlight the item and press Delete and the system will allow you to delete the item. Print Wants List Select the required supplier, or press Enter for all items on order. Then select the printer you wish to print to. All products will be listed, showing pack size, quantity on order, value, ordering code and supplier. Transfer Suppliers This option allows you to transfer all items on order from one supplier to another on a once off basis. Select the supplier you wish to transfer from, and then select the new supplier and press Enter. A note will appear on screen to tell you the transfer has been completed successfully. This is useful when transferring items that one supplier did not have (on OUT OF STOCK) to another supplier. 199 QicSCRIPT.NET User Manual Copyright 2010 Helix Health Ltd PRINT AND TRANSMIT ORDERS Select the required supplier, or press Enter for all suppliers. Press Enter on the supplier whose order you wish to print or transmit. If you want to teleorder to this supplier the EDI information must be set up in the Supplier File. The order will then print or transmit. When transmitting an order you may enter any comments you wish to be sent with the order. If the transmission is interrupted or not successful, you will be asked if you wish to re- transmit the order (this option will be explained further down the list). If you answer No, you will be given the option of printing the order. Regardless of whether you print or transmit the order, stock figures will not be updated until you check in the delivery. Once you have printed or transferred an order it will automatically move to the Check in Deliveries section or automatically check in the delivery if this is set in Ordering Details in the Configuration File (see Configuration Section). CHECK IN DELIVERIES If you wish to keep full stock control you must check in all orders as you receive them. A list of all supplier orders sent will appear when you press Enter on this option. Select the supplier whose delivery you wish to check in. All items on the selected order will appear in list format, showing the amount ordered and the amount received. 200 QicSCRIPT.NET User Manual Copyright 2010 Helix Health Ltd The amount received is electronically transmitted back to QicSCRIPT.NET® from the wholesalers once they have received an order. If the amount received or price needs to be modified for any product, select the product by using the arrow key and then pressing Enter on the required item. You may now modify the quantity and/or the price. If the cost price on screen is different from the cost price on the supplier invoice you should change it. This will keep your cost prices updated on your product file. Note: Pack Replacement and Check in Deliveries: When you are using Pack Replacement as your default order method, and you have some orders waiting to be checked in; If you dispense any of the same drugs that are waiting to be checked in, they will not be automatically put on the next order. The system assumes that you do not want to order more, as you are already waiting on more to come in. For this reason it is appropriate when using pack replacement to check in your deliveries automatically, or at least have the setting that displays when an item goes on the wants list, so when you are dispensing, you will notice that some items may not be added to the wants list. Back Orders If you do not receive all items ordered, you will be asked if you wish to put the shorts on back order. If you have the back order method set to Back Order on Transmission then the system will have already identified the shorts and 201 QicSCRIPT.NET User Manual Copyright 2010 Helix Health Ltd they are automatically back in the Edit items on Order section. If you answer No, or have set the Back Order method to Never Back Order, the short stock items will be removed from your order list. To complete the check-in process, press F10 to confirm the order. You may enter the supplier's invoice number for reference; Order Checked By will default to the current user. VIEW A SPECIFIC ORDER You may view both unchecked and checked-in orders. Select the required option and hit the Tab key or Space Bar to search for a particular date. Press Enter on the required supplier. All order details will appear on screen. Note: Orders cannot be modified here. VIEW A SPECIFIC RETURN To view a specific return hit the Tab key or Space Bar to search for a particular date. Press Enter on the required supplier. All order return details will appear on screen. Note: Returns cannot be modified here. REPRINT/RETRANSMIT AN ORDER This facility allows you to Reprint or Re-transmit any orders that unsuccessfully printed or transmitted or successfully printed or transmitted the first time. To search for a particular order either press the Tab key or Space Bar. Press Enter on the required order. The order will then be printed or transmitted in the same way as before. 202 QicSCRIPT.NET User Manual Copyright 2010 Helix Health Ltd REPRINT A DELIVERY NOTE This facility allows you to re-print a delivery note for any order. To search for a particular delivery either press Tab or Space Bar. Press Enter on the required delivery. The delivery note is not marked as “Reprinted”. AD HOC DELIVERY OR RETURN Ad Hoc Delivery This facility is used to enter delivery for goods that you have not generated an order for e.g. if a rep comes into your shop and you order and receive the goods at the same time, or if you phone an order in and do not enter it into QicSCRIPT.NET® Select the required supplier; the date will default to today. Press Enter to confirm supplier and date. You will be asked if you wish to enter a new record, answer Yes. Scan in or type in the product required. Enter the number of items being delivered to you. You may add bonus stock by entering the ordered amount (3) plus the bonus stock (1) e.g. 3+1. Enter on the order value or put in the new value. Press F10 and Yes to confirm the delivery. Your stock has now been updated. Ad Hoc Return Note: This facility is used for all returns to suppliers. Select the required supplier; the date will default to today. Press Enter to confirm the supplier and date. You will be asked if you wish to enter a new record, answer Yes. Scan in or type in the product required. Enter the number of items being returned. Enter on the order value or put in the new value. Press F10 and Yes to confirm the return. Your stock has now been updated (i.e. reduced). 203 QicSCRIPT.NET User Manual Copyright 2010 Helix Health Ltd INTER SHOP TRANSFERS This option allows you to account for stock being moved from one shop to another and increases or decreases stock accordingly. Transfer To Another Shop This option allows you to account for stock being moved from your shop. A box will appear requiring you to enter the name of the shop that the stock is going to and the date will default to today‟s date. To enter a new transfer press Insert, A box will appear requiring the name of the product being transferred and the quantity. The system will automatically calculate the value of the stock. The stock in your shop will automatically be reduced by the quantity entered. Press F10 and select your report printer to print out the transfer docket. The system will build up a list of transfers that can be viewed and reprinted in [Enquiries, Order Enquiry, Checked Orders]. Transfer FROM Another Shop Follow the same instructions as for above except the stock will be increased instead of reduced. STOCK MOVEMENTS Enter Stock Movements You should enter all stock movements into and out of the pharmacy e.g. if a bottle of medicine is broken, it should be moved out of stock. 204 QicSCRIPT.NET User Manual Copyright 2010 Helix Health Ltd Option 1: Date. The date of the movement will default to today and cannot be changed. Option 2: Time. This will automatically default to the current time and cannot be changed. Option 3: Entered By. This will automatically default to the logged on users name and cannot be changed. Option 4: Drug. Select the product you are moving by either scanning it in or typing in the first few letters of the drug name and selecting from the drug file. Option 5: Movement Type. Enter I if you are moving the product into stock or 0 if you are moving the product out of stock. Option 6: Quantity. Enter the quantity of this product being moved. You can enter packs or individual tablets – e.g. 2P 5 for 2 packets and 5 tablets. Option 7: Reason. Enter a reason for the movement. Press Enter to save the above details. View Stock Movements: Select the product you wish to view. All movements in and out of the pharmacy for this product will appear on screen. Press Enter on the movement to see it in more detail. STOCK CONTROL QicSCRIPT.NET® has a rolling stock take, which means that you can use the dispensing and ordering facilities, while the stock take is in progress. QicSCRIPT.NET® will automatically compensate as it goes along. There are three methods of doing a stock take. You can do a Random Stock Take, Stock Take Alphabetically or a Stock Take by Barcode. 205 QicSCRIPT.NET User Manual Copyright 2010 Helix Health Ltd NB Make sure you do a backup just before you do a stock take. This should be done in case you have to revert to pre-stock take figures for any reason. Do not erase the backup until you are sure that the new stock take has been completed successfully. Enter Stock at Random QicSCRIPT.NET® has a random stock take facility to avoid the inconvenience of having to close your shop to do a stock take. In effect, it allows you do a stock take over an extended time period. Once a stock level is entered QicSCRIPT.NET® recognises this and then begins to increase & reduce stock levels as dispensing is done and orders are checked in. Initially all products are identified as “Not Stocked”. When they are sold and/or stock figures are entered they become identified as “Stocked”. If stock levels reduce to 0 and the product has not been sold within the preceding 4 months then the stock becomes delisted again. In this way, out of use products are never reordered. 206 QicSCRIPT.NET User Manual Copyright 2010 Helix Health Ltd In field 7 Quantity In Stock - you can enter packs or individual tablets – e.g. 2P 5 for 2 packets and 5 tablets. Once an initial stock take is done, QicSCRIPT.NET® will randomly ask you to verify specific items of stock per day to complete one recheck per year. If you stock 3,000 products this would be about 10 per day. This process will allow you to validate all stock levels continuously, ensuring that no further stocktakes have to be done – ever!! At any point in time a Stock Valuation report will provide a complete list of the stock in the shop. A full audit trail of all adjustments is available. This daily validation should become part of the shop‟s routine, as stock levels are important from an ordering and financial control point of view. Before you start using the Random Stock Take a Full Stock Take is necessary first. Enter Stock Alphabetically Firstly you are asked if want to select a supplier. If you say Yes, all the products which you stock take are assigned to the supplier you have selected. If you say No, to this option the supplier will not change automatically unless you make the change manually. A list of all the products will appear on the screen and the system will automatically bring you to the Quantity field where you can enter the amount of this product that you have in stock. Continue on until you have all the stock quantities entered. Enter Stock by Barcode Firstly you are asked if want to select a supplier; if you say Yes, all the products which you stock take will be assigned to the supplier you have selected. If you say No, to this option the supplier will not change automatically unless you make the change manually. You are then brought into a screen and it is here that you scan in the product you want to enter. All the details for the product will appear and it automatically brings you to the 207 QicSCRIPT.NET User Manual Copyright 2010 Helix Health Ltd Quantity field where you can enter the amount of this product that you have in stock. Continue on until you have all the stock quantities entered. As you enter figures in both stock take alphabetically and by barcode they become live on the system. 208 QicSCRIPT.NET User Manual Copyright 2010 Helix Health Ltd ACCOUNTS QicSCRIPT.NET® includes a very comprehensive Customer Accounts module allowing you to enter transactions, make account enquires, do account reports and run a month end facility. Enter transaction [F1] Customers which have been set up as “on account” in the patient file will have their transactions automatically moved onto the patient‟s account at the time of dispensing. However if you need to place an item on to a patient‟s account and have not dispensed it press Enter on this option. Alternatively you can press F1 anywhere on the system to place an item onto a patient‟s account. Option 1: Date. This defaults to the current date but you can change this by typing over the default date. Option 2: Patient. Enter the patient whose account you want to enter a transaction against. You can retrieve the patient from the patient file or swipe through their DP card. Option 3: Billed To. If the item is billed to another patient enter the “Billed To” person‟s name here by selecting them from the patient file. 209 QicSCRIPT.NET User Manual Copyright 2010 Helix Health Ltd Option 4: Type. There are 4 transaction options: Invoice, Cash Payment, Discount and Credit Note. Option 5: Description. This is a free text option where you enter the item the patient is receiving. Option 6: Reference. Enter a reference such as a till receipt number. Option 7: Amount. Enter the amount of the transaction. Option 8: VAT Rate. Enter the VAT rate of the transaction. Option 9: VAT. Enter the VAT amount here. Then press Enter to save the transaction. Edit transaction If a transaction has gone on a patient‟s account and you then want to edit the transaction press Enter on this option. The system will ask you to select a patient, do so by retrieving the patient from the patient file or by swiping through their DP card if you are using a swipe card reader. Modify Transactions To modify a transaction highlight the transaction on the patient‟s list and press Enter. You can then change any of the fields such as the date, transaction type, description etc. You can also add new transaction in this option by pressing Insert. The same screen appears as in Enter Transaction explained above. Deleting Transactions To delete off a transaction, highlight the transaction and press Delete on it and the system will then delete this off. Account Enquiry If you want to look up a patient‟s account details, to view transactions for the month or balance press Enter on this option. Alternatively you can press F1 anywhere in the system and the system will bring up the same option. 210 QicSCRIPT.NET User Manual Copyright 2010 Helix Health Ltd You can retrieve the patient from the patient file by typing their name here. Also if the patient has their DP card you can swipe their card and the patient details will appear on screen. Once you have the patient on screen the system gives you their current balance along with all their transactions. CALCULATE TOTAL CREDIT If you press Enter on this option the system will give you the total debtors amount outstanding as of now. The message reads as “There is currently 0.00 Euro outstanding, of which 0.00 Euro (0%) was billed on previous statements. MONTH END REPORTING There are 3 different reports available for the accounts module. 211 QicSCRIPT.NET User Manual Copyright 2010 Helix Health Ltd 212 1. Print Outstanding Balances Press Enter on this option and the system will ask you if you want to print out all customers owing money or only customers over a certain amount. If you want all customers press Enter here. If you only want customers with a certain balance press Enter and the system will ask you for the cut off amount. Enter the figure. The system then asks if you want to include this month‟s transactions. The system then asks what printer you want to print to. Select the printer and press Enter and the report will print off. 2. Print Transaction List When you Enter on this option the system prints off the transactions for the current month. 3. Print Monthly Statements Press Enter on this option to print off your statements at the end of the month. You are given 4 options: QicSCRIPT.NET User Manual Copyright 2010 Helix Health Ltd All Customers: This prints statements off for all customers on the system. From a Specific Customer On: If you only want to print statements for all the customers beginning with “M” specify this and the system will print out all customers on the system starting from “M”. Print Specific Customer Only: If you want a statement for just one customer select the customer and it will print a statement off for this one customer only. Print In Cost Centre Sequence: The statements will print by cost centre in alphabetical order. Change Reporting Period. If you need to print off reports for a previous month, press Enter on this option. Then highlight the month you need to re-print reports for and press Enter. The system then allows you to print off the account reports for this month. Print Transaction List will list all drugs for that period, whereas Monthly Statement will only print “from last statement” (once a cleardown has been run). 213 QicSCRIPT.NET User Manual Copyright 2010 Helix Health Ltd MONTH END CLEARDOWN Finally, when you have printed off your transaction list and the statements, the final option is the Month End Clear down. Press Enter on this option to select. The following message appears: This program clears down the current month’s accounts and just brings a balance forward for the next month. Do not proceed unless you are sure you know what you are doing and you have printed the Monthly Transaction List and Monthly Statements. Press [ESCAPE] if you wish to abort. This procedure will only take 3 minutes, but nobody will be able to use the accounts while you are doing it. Do you wish to proceed with Month End Clear Down, answer Yes or No here. 214 QicSCRIPT.NET User Manual Copyright 2010 Helix Health Ltd REPORTS All information entered into QicSCRIPT.NET® through Dispensing, Ordering and Accounts can be given back to you for analysis purposes in the reports section. There are 5 different report types each explained below. 1. Administration Reports 2. Financial Reports 3. Stock Control Reports 4. Clinical Reports 5. Miscellaneous Reports Administration Reports Daily Audit Report Description This report forms a register of issues dispensed to each patient. Use Forms a hard copy of issues from the pharmacy and removes the need to record the issues in a register. Parameters The script types included in the report are determined by the scripts marked in Administration, Edit Files, Miscellaneous, Configuration File, Miscellaneous Part 1, Option 11. Columns Patient Details, Script Label, Drug Name, Quantity, Dosage, Price. Sorted by Chronological Order. Totals Depends on the option selected in the configuration file. 215 QicSCRIPT.NET User Manual Copyright 2010 Helix Health Ltd Veterinary Report Description This report forms a register of all veterinary issues dispensed to each patient. Use Forms a hard copy of veterinary issues from the pharmacy in relation to LM33 regulations. Parameters Date range. Columns Patient Details, Label Number, Drug Name, Quantity, Dosage, Price. Sorted by Chronological Order. Totals None. Controlled Drugs Report Description This report forms a register of all controlled drug issues dispensed to each patient. Use Forms a hard copy of all controlled drug issues from the pharmacy in relation to the controlled drugs dispensing regulations. Parameters Date range. Columns Patient Details, Label Number, Drug Name, Quantity, Dosage, Price. Sorted by Chronological Order. Totals None 216 QicSCRIPT.NET User Manual Copyright 2010 Helix Health Ltd Validation Report Description This report forms a list of all issues dispensed within the pharmacy within one claim period. Use Used to validate prescriptions before sending them to the GMS payments board. Parameters Scheme name, month and script number. Columns Form, Date, Patient Details, Doctor Details, Drug Details, Quantity. Sorted by Chronological Order. Totals None. Code Scripts Report Description This report forms a list of all issues dispensed within the pharmacy within one claim period. Use Used to code each prescription item before sending the prescriptions to the GMS payments board. Parameters Date range, Scheme name. Columns Date, Patient Details, Drug Details, Quantity, Cost, Total. Sorted by Chronological Order. Totals None. 217 QicSCRIPT.NET User Manual Copyright 2010 Helix Health Ltd Items Owed Report Description This report forms a list of all items owed to patients of the pharmacy. Use Used to list all owed items owed to patients by the pharmacy. Parameters Date range. Columns Date, Patient Name, Label Number, Drug Name, Owed. Sorted by Chronological Order. Totals None. Loan Scripts Report Description This report forms a list of all issues dispensed within the pharmacy where a prescription has not been received from the patient. Use Used to provide the pharmacy with all loan scripts dispensed by a pharmacy in order to receive the script and payment from the GMS payments board. Parameters Date range, Nursing home, Doctor. Columns Patient name, Patient Address, Date, Drug Name, Quantity, Cost. Sorted by By Date or By Patient. Totals Total cost of all loan scripts. 218 QicSCRIPT.NET User Manual Copyright 2010 Helix Health Ltd Med1 Patient Report Description This report forms a list of all Drug Refund and/or Drug Payment issues dispensed within the pharmacy for a patient and their family members. Use Used to provide a patient with a list of all prescriptions they have paid for within the pharmacy in order to claim back their costs against tax. Parameters Patient name(s), Date range. Columns Script number, Date, Total price, Patient. Sorted by Chronological Order. Totals Total value of all prescriptions. Financial Reports Detailed Scheme Analysis Report Description This report forms a list of all issues dispensed within the pharmacy within one claim period. Use Used to discover the total number of scripts dispensed in one claim period along with the total profit for dispensing on each scheme. Parameters Month/Year. Columns Script number, Date, Patient Details, Drug Details, Quantity, Cost price, Mark-up, Fee, VAT, Total price. Sorted by Chronological Order. Totals Each column from Cost price to Total price is totalled. 219 QicSCRIPT.NET User Manual Copyright 2010 Helix Health Ltd The psychiatric scheme report separates out patients in Non Medical Card Holders ( Mark up applied) and Non Medical Card Financial Consolidation Description This report forms a list of all issues dispensed within the pharmacy within one claim period. Use Used to discover a detailed breakdown of the total number of scripts dispensed for scheme in one claim period along with the total value of dispensing to each scheme. Parameters Month/Year. Columns Scheme name, Number of items, Cost, Mark-up, Fee, Container, Broken bulk, VAT, Total. Sorted by Scheme name. Totals None. Vat analysis Description This report details the vat payable for each scheme based on dispensings in one claim period. Use For compiling VAT returns. Parameters Month/Year. Columns Description, 0%, 21%, 13.5%, Others, Total. Sorted by Scheme name. Totals A total for each VAT rate is shown on the bottom on the report. 220 QicSCRIPT.NET User Manual Copyright 2010 Helix Health Ltd Cost Centre Analysis Description This report displays the total monetary value of the all dispensings to each cost centre within the pharmacy for one claim period. Use Used to discover the total value of dispensing to each cost centre within the pharmacy Parameters Month/Year. Columns Description, 0%, 21%, 13.5%, Others, Total. Sorted by Cost Centre Totals Each VAT rate and the total columns are totalled on the bottom of the report. Itemised claims listing Description This report forms a list of all issues dispensed within the pharmacy within one claim period. Use Used to try and replicate the payments report you receive from the GMS payments board. Parameters Month/Year Scheme. Columns Form number, Claim date, Item number, DMS Code, Quantity, Ingredient cost, Fees, VAT, Item total. Sorted by Chronological Order. Totals Each column from Ingredient cost to Item total is totalled. 221 QicSCRIPT.NET User Manual Copyright 2010 Helix Health Ltd DPS Transaction Analysis Description This report forms a list of all DPS issues dispensed within the pharmacy within one claim period. Use Used to discover which patients / families have / haven‟t breeched the DPS monthly limit. Parameters Month/Year Families Above Limit, Families Below Limit List All Prescriptions, Print By Surname, Print By DP Code. Columns Family details, Script, Patient details, Value, Payment, Still due. Sorted by Chronological Order. Totals The families, value, payment and still due columns are totalled HT Capitation Analysis Description This report forms a list of all HT patients on the system. Use Used to lit all HT patients on the system and to determine which patients the pharmacy are to receive HT capitation fees for in a given claim period. Parameters Month/Year. Columns Patient number, Patient number, HT items this month, DP items this month, Capitation fees. Sorted by Chronological Order. Totals The capitation fees column is totalled. 222 QicSCRIPT.NET User Manual Copyright 2010 Helix Health Ltd Monthly HT Receipts Description This report prints a HT claim form for all HT patients on the system who have not received HT items in a claim period. Use Used to claim HT capitation fees for a given claim period. Parameters N/A Columns N/A Sorted by N/A Totals N/A Not Dispensed Scripts Description This report prints a list of all items marked not dispensed by the pharmacist while dispensing. Use Used to claim not dispensed fees for a given claim period. Parameters Date range Columns Patient details, Label number, Drug name, Quantity, Scheme, Cost. Sorted by Chronological order Totals The cost column‟s values are totalled 223 QicSCRIPT.NET User Manual Copyright 2010 Helix Health Ltd Last Claim Details Description This report prints details of the last claim submitted electronically to the GMS payments board similar to the details shown on screen when your claim is transmitted. Use Used to provide a summary of the last claim details transmitted to the GMS payments board and what you can expect to be paid for your claim. Parameters N/A Columns N/A Sorted by N/A Totals N/A Stock Control Reports Usage Analysis Description This report prints a list of all drugs dispensed by a pharmacy within a given date range. Use Generating orders, discovery of drug usage in the pharmacy. Parameters By drug, By manufacturer, By agent, By BNF class, By Doctor, By cost centre, By month, BNF by cost centre, Date range. Columns Each variant has its own individual columns. Sorted by Each variant has its own sorting order for example By highest or By lowest usage. Totals Each variant has its own totals. 224 QicSCRIPT.NET User Manual Copyright 2010 Helix Health Ltd Purchase Analysis Report Description This report prints a list of all drugs purchased by a pharmacy within a given date range. Use Discovery of the total cost of orders placed within a given date period. Parameters By drug, By manufacturer, By agent, By BNF class, Date range. Columns Each variant has its own individual columns. Sorted by Each variant has its own sorting order for example By highest or By lowest usage. Totals Each variant has its own totals. Transfer Analysis Report Description This report prints a list of all drugs transferred between shops by a pharmacy within a given date range. Use Discovery of all drugs transferred between shops (If list all drugs is selected ) and the value of the transfers. Parameters Transfer to another shop, Transfers from another shop, Date range, List all drugs. Columns Shop/Drug details, Quantity, Value, VAT, and Total. Sorted by Alphabetically, By sales value. Totals The value, VAT and total columns are all totalled. 225 QicSCRIPT.NET User Manual Copyright 2010 Helix Health Ltd Stock Valuation Report Description This report prints a list of all drugs held in stock by the pharmacy. Use Discovery of the total value of all stock. Discovery of the current stock levels of each item held in stock and their value. Discovery of all issues and receipts of all drugs since the last stock take. Parameters For real, Starting and Ending drug. Columns Drug name, Size, Manufacturer, Latest cost, Opening stock, Total issues, Total receipts, Closing stock and Value. Sorted by Chorological order. Totals The value column is totalled. Stock Movements Description This report prints a list of all stock movements carried out in the pharmacy. Use Discovery of the movements into and out of stock of each item in the pharmacy and the value of all movements. Discovery of why the movement was carried out. Parameters Date range, List all movements in detail. Columns Sorted by Drug name, Size, Date, Type, Quantity and Reason if List all movements in detail is selected. If not selected then the columns are Drug name, Size, Quantity in and Quantity out. Chorological order. Totals None. 226 QicSCRIPT.NET User Manual Copyright 2010 Helix Health Ltd Slow Moving Stock Description This report prints a list of all drugs not dispensed in the previous six months plus but have been dispensed in the past. Use Discovery of all drugs not dispensed in the past that are still in stock and costing money and tying up space within the pharmacy. Parameters Last selling date. Columns Drug name, Size, Manufacturer, Latest cost, Opening stock, Total issues, Total receipts, Closing stock, Value and Last sold. Sorted by Chorological order Totals The value column is totalled Print Wants List Description This report prints a list of all drugs held on the wants lists of each supplier. Use Order generation. Parameters Supplier name, All suppliers. Columns Drug, Pack size, Order quantity, Value, Order code, Supplier. Sorted by Chorological order Totals None. 227 QicSCRIPT.NET User Manual Copyright 2010 Helix Health Ltd Ideal Stock Levels Description This report prints a list of all drugs held in stock by the pharmacy and their ideal stock levels. (Please note that you must be using the When Below Ideal ordering method for this report to generate) Use Discovery of all drugs not dispensed in the past that are still in stock and costing money and tying up space within the pharmacy. Parameters None. Columns Drug name, Size, Manufacturer, Latest cost, Current stock, Ideal level and Packs. Sorted by Chorological order Totals None. 228 QicSCRIPT.NET User Manual Copyright 2010 Helix Health Ltd Clinical Reports Please note you must have Drug Information installed on your system for some of these report to generate information. Compliance Reporting Description This report prints a list of all intervals between dispensings and missing combination therapy details. Use The sub reports can both be used to generate business for the pharmacy and help ensure that the patients are taking their medication correctly. Parameters Intervals between dispensings, Missing combination therapy, BNF class, Drug and Date range. Columns Intervals Between Dispensings: Patient details, Drug details, Date issued, Next issued, Number of days, Issue quantity, Daily average and Dosage. Missing Combination Therapy: Patient details, Drug name, Last issued, Quantity and Dosage Sorted by Chorological order Totals None. 229 QicSCRIPT.NET User Manual Copyright 2010 Helix Health Ltd Intervention Reports Description This report prints a list of all intervention statistics and a detailed list of `all interventions. Use The sub reports can both be used to generate lists of the most common interventions and their outcomes, along with who recorded the intervention and why it was recorded. Parameters Intervention Statistics: Overall statistics, By pharmacist, By doctor, By condition, Date range and All actions taken. Detailed Intervention List: Date range, All actions taken and List patients Columns Intervention Statistics: For each variant of the report the columns are Intervention reason, Intervention action, Intervention outcome, Times and %. Detailed Intervention List: Doctor, Intervention reason, Intervention action and Times Sorted by Chorological order Totals The number of times an intervention was recorded is totalled for each variant of the sub reports. 230 QicSCRIPT.NET User Manual Copyright 2010 Helix Health Ltd A.D.R Reporting Description This report prints a list of all adverse drug reactions recorded by the pharmacy. Use Insuring that all patients are not dispensed drugs to which they are allergic or have an adverse reaction to. Parameters By Drug, By allergy, By BNF, By severity, By symptom and Date range. Columns Date, Patient name, Detail and severity Sorted by Chorological order Totals None. Assessment Statistics Description This report prints a list of all patient assessments recorded by the pharmacy. Use Provides the pharmacist with a list of all patient assessments recorded within a given date range. Parameters Date range. Columns Assessment protocol and Times done. Sorted by Chorological order Totals The number of times an assessment was recorded is totalled. 231 QicSCRIPT.NET User Manual Copyright 2010 Helix Health Ltd Dispensed Drug Report Description This report prints a list of all patients who were dispensed a particular drug within a given date range. Use If a drug has been recalled the pharmacist can produce a list of all patients the drug has been dispensed to in order to inform them of the recall. Parameters Drug X 6 if required and Date range. Columns Date, Patient name, Label number, Drug name, Quantity and Value Sorted by Chorological order Totals The quantity column is totalled. Patient History Report Description This report prints a patents dispensing history within the pharmacy. Use Can be used in place of a Med1 report. Parameters Patient name, Date range, List chargeable prescriptions only and Price drug refund prescriptions only. Columns Date Label number, Drug name, Quantity, Value, Scheme and Dosage details. Sorted by Chorological order Totals The value column is totalled. 232 QicSCRIPT.NET User Manual Copyright 2010 Helix Health Ltd Drug Usage By Doctor Description This report list all drugs dispensed within a given date range by the doctor who wrote the script. Use Can be used in to discover which doctor is writing the most expensive prescriptions and the number of items each doctor has ordered dispensed. Parameters Date range, List all drugs. Columns Doctor / Drug details, items, Sales including VAT, Sales excluding VAT, Cost, Profit and Average mark-up. Sorted by Alphabetically or By sales value. Totals The Sales including VAT to Average mark-up columns are totalled. Drug By Condition By GP Description This report list all drugs dispensed within a given date range for all medical conditions by the doctor who wrote the script. Use Can be used in to discover what the most common medical conditions are and the total value of dispensing for each medical condition. Also you can discover which doctor is writing the most expensive prescriptions Parameters Date range, List all drugs, Print profit levels and Doctor. Columns Doctor / Drug details, items, Sales including VAT, Sales excluding VAT, Cost, Profit and Average mark-up. Sorted by ICPC2e code or By sales value. Totals The Sales including VAT to Average mark-up columns are broken into totals for both the medical condition and the doctor. 233 QicSCRIPT.NET User Manual Copyright 2010 Helix Health Ltd Drug By GP By Condition Description Provides the same information as Drug By Condition By GP. Use As above Parameters Date range, List all drugs, Print profit levels and Condition. Columns Doctor / Drug details, Quantity, Sales including VAT, Sales excluding VAT, Cost, Profit and Average mark-up. Sorted by Alphabetically or By sales value. Totals The Sales including VAT to Average mark-up columns are broken into totals for both the medical condition and the doctor. Miscellaneous Reports To Do List Description Prints all outstanding To Do items for the pharmacy. Use The pharmacist can discover which patients are due for assessment protocol reassessments and contact the patients to see if they are still attending the pharmacy on their given date. Parameters How many days you want to print. Columns Date, Patient and Details. Sorted by Chorological Order. Totals None. 234 QicSCRIPT.NET User Manual Copyright 2010 Helix Health Ltd Transaction Analysis Description Prints all non GMS and DPS transactions dispensed by the pharmacy. Use The pharmacist can discover the total number and value of all non GMS and DPS prescriptions dispensed to each family within a given date range. Parameters Date range, Full analysis, Detailed analysis only and Summary analysis only. Columns None Sorted by Chorological Order. Totals Each family unit‟s transactions, number of patients and amounts are totalled. Patient Status Report Description Prints all patients within the pharmacy that have a pharmacy reference number assigned to them. Use A pharmacist can discover the patient‟s status and cost centre. Parameters None. Columns Patient ref, Patient name, Patient address, Status and area. Sorted by Chorological Order. Totals Each family unit‟s transactions, number of patients and amounts are totalled. 235 QicSCRIPT.NET User Manual Copyright 2010 Helix Health Ltd Uncollected Scripts Description Prints all prescriptions that have been dispensed but not collected by the patients. Use A pharmacist can discover which prescriptions have yet to be collected by the patients and contact them to inform them that their prescription is ready. Parameters Month Year. Columns Date, Patient name, Form number, Drug name, Quantity and area. Sorted by Chorological Order. Totals None. Comment Report Description Prints a list of all patients who had comments entered against prescription items. Use A pharmacist can discover what comments were entered against all prescriptions within a given date range. Parameters Comment to find and Date range Columns Date, Patient details, Label number, Drug name, Quantity and Value. Sorted by Chorological Order. Totals None. 236 QicSCRIPT.NET User Manual Copyright 2010 Helix Health Ltd Scheme Report By Date Description Prints all prescriptions that have been dispensed within a given scheme for a given date range. Use A pharmacist can discover the total value and profit of all prescriptions dispensed to each patient within a scheme during a given date range.(please note the patients reference number not their name will be printed) Parameters Date range and scheme. Columns Script number, Date, Patient details, Drug details, Quantity, Cost price, Mark-up, Fee, VAT and Total price. Sorted by Chorological Order. Totals Each off the column from the Cost price to Total price column are totalled. DPS Patient Listing Description Prints a list of all DPS patients registered with the pharmacy. Use A pharmacist can discover if all DPS family numbers have been entered into the system correctly. Parameters None. Columns DPS number, Patient name, and Patient address. Sorted by Chorological Order. Totals The total number of patients and families are displayed at the end of the report. 237 QicSCRIPT.NET User Manual Copyright 2010 Helix Health Ltd Full BNF Listing Description Prints a list of all drugs on the drug file sorted by their BNF classification. Use Parameters None. Columns Drug name, Size, Manufacturer, ATC1, ATC2 and IPU code. Sorted by BNF classification then alphabetically. Totals The total number of patients and families are displayed at the end of the report. Full Notes Listing Description Prints a list of all drugs on the drug file sorted by their counselling notes. Use Parameters None. Columns Drug name, Size, Manufacturer, ATC1, ATC2 and IPU code. Sorted by BNF classification then alphabetically. Totals The total number of patients and families are displayed at the end of the report. 238 QicSCRIPT.NET User Manual Copyright 2010 Helix Health Ltd QicScript.net User Guide 239