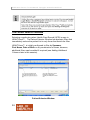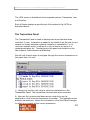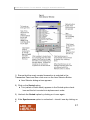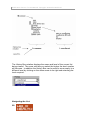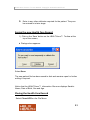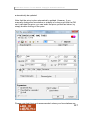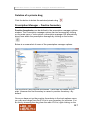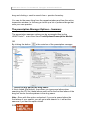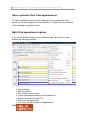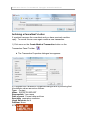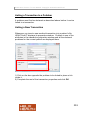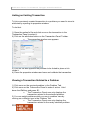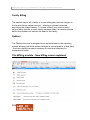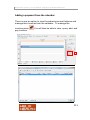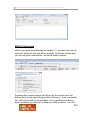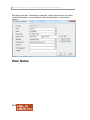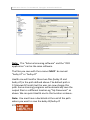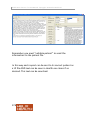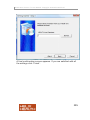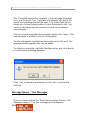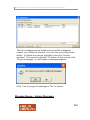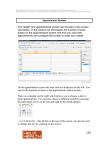
1
Health One Version 7.1 User Manual. Copyright 2011Helix Health Ltd HEALTHone User Manual Version 7.1 1 Health One Version 7.1 User Manual. Copyright 2011Helix Health Ltd Table of Contents TERMS AND CONDITIONS .....................................................4 Introducing HEALTHone™ .....................................................7 Getting Around ....................................................................21 The Health Care Record Window ........................................36 Transactions & Items ..........................................................50 Creating A New Patient Health Care Record .......................78 Adding Basic Medical Information ......................................85 Analysing Patient Information ............................................97 Prescription Manager....................................................... 116 Appointments Module ..................................................... 153 Messaging Feature ........................................................... 168 Correspondence................................................................ 170 General Scanning in HEALTHone™ ................................... 180 Laboratory Data Messaging ............................................ 183 Network Configuration Sharing ....................................... 191 Synchronizing Sources ...................................................... 193 Problem Orientated Medical Records .............................. 197 Billing ................................................................................ 205 Deleting Patient Files ....................................................... 220 Vaccination....................................................................... 222 Plan of Action ................................................................... 239 2 Health One Version 7.1 User Manual. Copyright 2011Helix Health Ltd The Alerts.......................................................................... 242 Queries: Extraction of Data .............................................. 247 Mail Merging in HEALTHone™ ......................................... 254 GMS Number validation ................................................... 263 Miscellaneous features..................................................... 264 Advanced Scanning in Health One ................................... 267 Text Messaging ................................................................ 281 3 Health One Version 7.1 User Manual. Copyright 2011Helix Health Ltd TERMS AND CONDITIONS IMPORTANT NOTICE THE ATTACHED UPGRADE IS SUPPLIED TO YOU UNDER THE TERMS LISTED BELOW. USING THE PRODUCT INDICATES YOUR ACCEPTANCE OF THESE TERMS AND CONDITIONS. IF THEY ARE NOT ACCEPTABLE YOU MUST RETURN THE UNUSED SOFTWARE TO THE PLACE OF PURCHASE AND YOUR MONEY WILL BE REFUNDED. COPYRIGHT - SOFTWARE This software upgrade is Copyright (C) 1987-2011, and all rights are reserved by Helix Health Limited (SSSL) or its affiliates. SSSL grants a non-exclusive right to use the programs in accordance with the terms and conditions listed here to the purchaser of the programs or a transferee (in accordance with condition 4 below). All rights not specifically granted under these terms and conditions are reserved by SSSL or its affiliates. COPYRIGHT - MANUAL This manual is copyrighted (C) 1987-2011 and all rights are reserved by SSSL. The document may not be copied, photocopied, reprinted, translated, reproduced or transmitted, in whole or in part, without prior consent, in writing, from SSSL, except where the copy is to be used, by the purchaser or transferee, for the purpose of utilising the software more efficiently. SOFTWARE USE Only one copy of this software may reside and be used on a single machine at any one time. Modification is expressly prohibited. The software may only be copied for the purpose of backup for archival purposes but may not be distributed or lent to a third party except under the terms of condition 4 below. The software cannot be lent, leased, rented or otherwise transferred to another user except under terms of condition 4 below. 4 Health One Version 7.1 User Manual. Copyright 2011Helix Health Ltd SOFTWARE TRANSFER The software may be transferred to a third party provided all copies and the originals are transferred in the process and that the third party is shown and accepts these conditions. Without such a transfer, the third party will not be authorised by SSSL to use the software and will be in breach of the copyright of the software. In such a case, the purchaser will be held responsible for any loss or damage suffered in accordance with condition 6 below. UPGRADES You are only entitled to upgrades of the software if you are properly licensed to use the software and provided that you have a valid support contract with SSSL, or its affiliates, or you have paid SSSL an agreed license fee for the upgrade. BREACH If the purchaser or transferee acts in breach of any of these terms and conditions the purchaser or transferee shall indemnify SSSL against all loss suffered, including loss of profits, and the purchaser or transferee shall return to SSSL all lawful and infringing copies of the software, including the dongle. LIABILITY AND WARRANTIES The Software is supplied to you on an 'as is' basis and it is up to the purchaser or transferee to satisfy himself/herself that the software meets his/her requirements BEFORE it is used. Although the software is tested before release, no claim is made regarding its accuracy. SSSL, its affiliates, directors or any of the software distributors do not assume liability for any loss or damage arising from the use of the software, inability of the purchaser to use the software correctly or failure of the software to function correctly. This includes loss of profits, business interruption, loss of business information, direct or indirect damages for personal injury or any other financial or other loss. While every effort will be made to correct software 'bugs' no guarantee is made that 'bugs' will be corrected. 5 Health One Version 7.1 User Manual. Copyright 2011Helix Health Ltd The Software License Agreement is governed by the laws of the Republic of Ireland. ADDRESS AND CONTACT NUMBERS Helix Health Limited, 52, Broomhill Road, Tallaght, Dublin 24. Ireland Phone: (353)-1-4633000 Fax: (353)-1-4633011 Home Page: www.helixhealth.com Email: [email protected] 6 Health One Version 7.1 User Manual. Copyright 2011Helix Health Ltd Introducing HEALTHone™ Concepts & Structure HEALTHone™ is structured around the Health Care Record and the various elements which form it. Being familiar with this and the terminology that is used will make using the product easier and the HEALTHone™ documentation straightforward to understand. Spending a few moments in this section before proceeding will be very worthwhile. This session is primarily intended to introduce the basic structure and terminology used in HEALTHone™. The question how is addressed in the sessions that follow. Health Care Record (HCR) This is equivalent to a patient‟s folder in your manual records; in fact it is structured in a similar manner. Below is drawn a patients folder which we will compare to the HEALTHone™Health Care Record (HCR) on the next page 7 Health One Version 7.1 User Manual. Copyright 2011Helix Health Ltd Patient’s Folder Typical Structure Front Cover Basic Administration Information First Name Surname Name Address Sex D.O.B Occupation …etc Inside Front Cover Basic Medical Information, i.e. Medical History Surgical History Tobacco Alcohol Consumption Blood Group Allergies …etc Inserts Consultation Records e.g. S. O. A. P. 8 Health One Version 7.1 User Manual. Copyright 2011Helix Health Ltd Health Care Record Structure The HEALTHone™ Health Care Record is divided into 2 chapters, Administrative and Medical, which contain one or more pages of information. Each chapter and page has an icon (small picture) that represents it on the HEALTHone™ screen. These icons are shown opposite the parts of the HCR they represent below: Administrative Chapter The first page of the Administrative Chapter contains the basic administration information needed to create the patients file, Name. Date of Birth, Sex, Address, Occupation etc. Similar to the front page of a patient‟s folder. Medical Chapter The first page in the Medical Chapter contains the Basic Medical Information, i.e. medical history, surgical history, allergies, blood group etc. This information is similar to the Inside Front Cover of a patient‟s folder. Page Two onwards details each consultation/contact with the patient. It is worth noting that HEALTHone™ will enter a new page in this chapter for any reason to update the patient‟s record, i.e. a repeat script, a consultant‟s report, a call out to the patient at home etc, not just for a consultation where the patient visits the surgery. These are similar to the inserts used to record a patient‟s visit in your manual folder – the main difference being that HEALTHone™ uses a page per contact, whereas your folder inserts could record several contacts with the patient. The HCR screen is divided into 3 principal areas called panels. These are the Problem, Transaction and Item Panels. We need concern ourselves only with the Transaction Panel, where the chapters and pages are displayed, and the Item Panel where the content of the page 9 Health One Version 7.1 User Manual. Copyright 2011Helix Health Ltd Selected in the Transaction Panel is displayed. The Item Panel on the right will display the contents of any page that is currently selected in the Transaction Panel. We will explain later how to do this, but for now look at the next three figures. Each displays a different page in the Transaction panel (note the current page is shown highlighted) and its content in the Item Panel. 10 Health One Version 7.1 User Manual. Copyright 2011Helix Health Ltd Administration Page 11 Health One Version 7.1 User Manual. Copyright 2011Helix Health Ltd Medical Chapter - Basic Medical Information Medical Chapter - A Consultation 12 Health One Version 7.1 User Manual. Copyright 2011Helix Health Ltd The Transaction This is simply the general name given to any page in the Health Care Record. Whenever a new page is required in the patient‟s HCR, we simply insert a new transaction. When a new medical transaction is created it will appear in the Transaction Panel underneath any existing medical transactions (these are listed in date order). Look at the next illustration. Our patient visited once again and we recorded this in his/her HCR by the addition of a medical transaction. The technique of inserting a new transaction is explained in a future session. The new transaction appears as a new page in the medical chapter: Medical Chapter - A Further Consultation 13 Health One Version 7.1 User Manual. Copyright 2011Helix Health Ltd The Item This is the name we use to describe the various types of information recorded in any transaction. The contents of the selected transaction (Medical Chapter - A Consultation) appears in the Item Panel on the right and is comprised of 4 separate Items: subjective symptoms:, objective findings:, assessment: and plan of action:. Items are easy to recognise by their distinctive icon. Each type of item has a unique name followed by a colon (:). You can think of an Item as being a container or box. The writing that appears to the right of the Item Name, i.e. after the colon (:), is its contents. The Item Selector HEALTHone™ has a dictionary of different Item Names. When you are entering information into a Transaction (page) in a patient‟s file you can add an item by selecting it from the dictionary. The Item Selector displays the dictionary contents and allows you to easily locate the Item you require. The icon on the left will be displayed on your computer screen (exactly where it is displayed on the screen is not important at the moment) and by simply clicking on it with your mouse the Item Dictionary will be displayed: 14 Health One Version 7.1 User Manual. Copyright 2011Helix Health Ltd The Item Selector Window The Sequence A sequence is a predetermined set of Items that have been grouped together to suit a particular task. With the exception of the Administration page all other transactions are blank when first created. That is they contain no Items at all. This allows for great flexibility, for example, when a pregnant female patient visits, you would create a new transaction in her file that adds a page in her Medical Chapter. Next you select the Sequence, which best suits the reason for her visit – this is done using the Sequence Selector. The Sequence Selector The Sequence Selector displays all the names of Sequences relevant to what you are currently doing, i.e. the list displayed will be dependent upon whether you are working on a page in the Administrative or Medical 15 Health One Version 7.1 User Manual. Copyright 2011Helix Health Ltd Chapters. Below is the list that will be displayed by the Sequence Selector for a medical transaction. In our example, the female patient is visiting for an antenatal check up and the „Antenatal Care‟ Sequence is shown selected: Sequence Selector Window The Aggregate Item We mentioned earlier that an Item could be considered as a box or container. The aggregate Item is no more that an Item that has more 16 Health One Version 7.1 User Manual. Copyright 2011Helix Health Ltd than one container. These are useful when recording natural groups of information. Take Blood Pressure as an example, we know we need two values to record this: Systolic and Diastolic pressures To record this we don‟t have to use two separate items, one for each pressure, we can simply use an Aggregate Item. The Aggregate Item Selector In a manner similar to the Item and the Sequence encountered earlier, the Aggregate Item also has a selector. By clicking on its icon (illustrated opposite) the selector window will be displayed: 17 Health One Version 7.1 User Manual. Copyright 2011Helix Health Ltd Summary Guide The basic building block for HEALTHone™ is the Health Care Record. 18 Health One Version 7.1 User Manual. Copyright 2011Helix Health Ltd This can be considered as the equivalent of the patient‟s folder in the manual filing system. The Health Care Record is divided into 2 Chapters: The Administrative Chapter The Medical Chapter Transactions (pages) are created in these Chapters. The transaction in the Administrative Chapter contains the basic patient information needed to create the Health Care Record: Patients First Name Patients Surname Patients Sex Patients Date of Birth as well as additional administration information such as occupation, name of spouse, GMS number etc. The first transaction in the Medical Chapter contains the patient‟s basic medical information, like: Medical History, Surgical History, Allergies, Blood Group etc. Transactions two onward in the Medical Chapter each record a contact with the patient. This contact can be for any reason, not simply a visit to the surgery. The Transaction is just a term used by HEALTHone™ to mean „page‟. Whenever a new page has to be inserted into the HCR we instruct HEALTHone™ to create a New Transaction. Transactions contain Items. An Item can be considered as a container or box. Each type of Item has its own unique name followed by a colon (:). We place information into Items. For example, the Date of Birth: Item will contain a date. 19 Health One Version 7.1 User Manual. Copyright 2011Helix Health Ltd A Sequence is a predetermined set of Items, grouped together to suit a specific task. There is no fixed number of Items grouped together in a Sequence, as many or few as are required to suit the task. An Aggregate Item is an item that will hold more than one piece of information. An example is Blood Pressure where both systolic and diastolic pressures need to be recorded. These then are the basic structural points around which HEALTHone™ has been designed. In the sessions that follow all of these points will be repeated. Own Notes 20 Health One Version 7.1 User Manual. Copyright 2011Helix Health Ltd Getting Around 21 Health One Version 7.1 User Manual. Copyright 2011Helix Health Ltd Session One introduced the Health Care Record and terminology used in HEALTHone™ . In this session we will introduce you to one of our patients: John Test, and learn the techniques and methods required to use HEALTHone™ and find your way around the program. Starting The Program Double click it to start HEALTHone™ – HEALTHone™has a built in security system that requires the user to identify themselves by name and password to gain access to the program. This information is entered in the LOGIN window illustrated opposite. 22 Health One Version 7.1 User Manual. Copyright 2011Helix Health Ltd Note: HEALTHone™ is case sensitive when letters are used in a password. See the Specific Tasks subjects in the Practice Management Section to find out how to change your password. Click on the Login button. If the Name and Password you entered were correct HEALTHone™ allows access and the Patient Selector Window appears next. 23 Health One Version 7.1 User Manual. Copyright 2011Helix Health Ltd The Patient Selector Window Selecting a particular patient Health Care Record (HCR) is easy in HEALTHone™ . The Patient Selector Window has dynamic filters that immediately reduce the patient list to only those that match the filter. HEALTHone™ is initially configured to filter by Surname, First Name, Date of Birth or any combination of these, however; additional filters can be added if required (see Adding Additional Columns later in this session) Patient Selector Window 24 Health One Version 7.1 User Manual. Copyright 2011Helix Health Ltd Sorting the Patient List Each column of information in the patient selector can be used as the basis for sorting the patient list. Clicking on a column name will cause HEALTHone™ to sort on its content. Each column can have one of three states – marked by an arrow or its absence. 1) Experiment by clicking on the Surname column heading If initially unsorted the patient list now sorts into ascending surname order 2) Repeat click on the Surname column heading Patient list sorts into descending Surname order 3) Repeat click on the Surname column heading Patient list returns to unsorted state. 25 Health One Version 7.1 User Manual. Copyright 2011Helix Health Ltd Adding Additional Columns Adjusting Column Widths There should now be two additional columns of patient information – however; these are not spaced correctly. Some columns are too wide for the information they display and others are too narrow. The width of each column can be altered by dragging the adjuster bar to the left of its heading. 26 Health One Version 7.1 User Manual. Copyright 2011Helix Health Ltd Selecting an Existing Patient 1) If the Surname filter is not currently selected (insert cursor flashing) click once in the white box above the column name. Surname filter is now selected 2) Type a T The list of patients reduces to display only those whose surname begins with „T‟ 3) Type an e The list of patients further reduces to display only those whose surname begins with „Te‟ Select John Test in the patient list. Click on the Select button. The Health Care Record (HCR) for John Test opens. 27 Health One Version 7.1 User Manual. Copyright 2011Helix Health Ltd The HEALTHone™ Screen This is the HEALTHone™ screen when a patient‟s HCR is open. The three panels mentioned in session one, problem, transaction and item, can be clearly identified. Major Areas of the Screen The HEALTHone™ Screen - Screen Panels 28 Health One Version 7.1 User Manual. Copyright 2011Helix Health Ltd The HCR screen is divided into three separate panels: Transaction, Item and Problem. Each of these displays a specific part of the patient‟s file (HCR) as described below. The Transaction Panel The Transaction Panel is used to display each event that has been recorded. A new transaction is added to the Health Care Record for any reason not simply because a patient visited for a consultation, i.e. to record an experts report, a lab result, a visit at home, an issue of a repeat prescription etc. Transactions in this panel are divided into the two chapters: Administrative and Medical. We will look at quick ways to navigate through the various transactions in this panel later, for now: 1) Using your mouse, click once to select any transaction in the Transaction Panel. The transaction becomes blue when selected. 2) Now use the up arrow and down arrow cursor keys on the keyboard to move from one transaction to another. The highlight moves between transactions. Notice the information in the Item Panel changes to reflect the contents of the current transaction. 29 Health One Version 7.1 User Manual. Copyright 2011Helix Health Ltd 3) Now repeat press the up arrow until the Administrative Chapter comes into view. You can now see that the Administrative Chapter has just one transaction and the Medical Chapter starts with the Basic Medical Information transaction. The Item Panel The Item Panel is used to display the contents of the selected transaction. Each transaction can contain one or more items. Remember the discussion on this in the Introduction section. Note: By default when you open a patient’s record, the last transaction displays. It is possible to set it to open automatically in either the Administrative or Basic Medical Information transaction if preferred. To do this click on the menu item « tools – options » and choose from the drop down list «Open the HCR on». The Problem Panel The Problem Panel is used to display the patient‟s principal active or inactive medical problems. This feature can also extend to linking the relevant transactions to the condition they relate too. We will show you how this is done later. It is possible to hide this panel if you are not using it: Click on the View menu and select the option Problems Problem panel disappears. Click on the View menu and select the option Problems once again. Problem panel re-appears. The HEALTHone™ Screen - Using Menus 30 Health One Version 7.1 User Manual. Copyright 2011Helix Health Ltd HEALTHone™ menus act exactly like any other Windows application, simply click, point, click. 1) Click once on the File menu at the top of the screen 2) Move the mouse to point to Open Sub menu appears 3) Move the mouse to point to HCR 31 Health One Version 7.1 User Manual. Copyright 2011Helix Health Ltd 4) Search for John Test then click on a patient to select. The first transaction in John Test‟s HCR is selected in the Transaction Panel and his administration information appears in the Item Panel. Menu States Menus and their various options are dynamic in that they have two states, active or inactive. A menu will become inactive, and therefore unselectable, if the task they perform is not relevant to what you are currently doing. Inactive menu options appear light grey in colour and active menu options appear black. In some instances the menu will not be present at all. The HCR menu, for example, will not be present on the menu bar unless a patient‟s HCR is open. 32 Health One Version 7.1 User Manual. Copyright 2011Helix Health Ltd Selecting a menu option Short Cuts 33 Health One Version 7.1 User Manual. Copyright 2011Helix Health Ltd The HEALTHone™ Screen - Toolbars A toolbar is a strip of buttons and possibly other objects that achieve various tasks i.e. open the Patient Selector Window; create a new patient file etc. etc. The HEALTHone™ Window has two toolbars: Standard and Analysis. If an icon is greyed out it is not relevant to the area that you are currently using. The Standard Toolbar The Analysis Toolbar To find out what a particular button does you simply place the mouse cursor on it and an explanation of its function appears in the prompt area at the bottom of the HEALTHone™ Window. Wait a few seconds and its name will appear underneath your mouse cursor. 1) Point your mouse at different buttons on the toolbars and observe the prompt area at the bottom of the screen. Note:The toolbars can be locked by default – so they can’t be dragged into awkward positions. . To do this click on the menu item « tools – options » and tick «Lock the toolbars». 34 Health One Version 7.1 User Manual. Copyright 2011Helix Health Ltd The Transaction and Item panels also have own toolbars: Transaction Panel Tool Bar Item Panel Tool Bar We have indicated the function of some of the more commonly used buttons, however, the prompt area at the bottom of the screen will display a description of each button when you point to it with the mouse and they are also described on the reference sheet. The Item, Sequence and Aggregate Selector buttons were mentioned in the Introduction Session and this is where they are displayed on your screen. The function of each button will be explained as they are encountered in the book. In many instances the action of a button is also available as an option on a menu, you can choose whatever method you prefer to select a particular function. 35 Health One Version 7.1 User Manual. Copyright 2011Helix Health Ltd The Health Care Record Window Navigating the Transaction Panel Using Menus 1) Click once on the HCR menu at the top of the screen 2) Move the mouse to point to Go to Sub menu appears 3) Move the mouse to point to End HCR 4) Click once to select. John Test‟s last transaction is selected. 5) Repeat Steps 1) – 4) and select other menu options. Observe the effect of each menu option. 6) Repeat steps 1) – 4) this time selecting Begin HCR. Scrolling A scroll bar will appear to the right of the Transaction Panel if it is not possible to display all of the patient‟s transactions at one time. John Test‟s file is a good example. He has a long medical history and has had many contacts with his doctor. HEALTHone™ scroll bars act exactly like any other Window‟s application. You have three sets of controls: Arrows Up/Down: Scroll display by one transaction up or down. Scroll Bar: Displays information relative to its position on the scroll track. Top, equals the beginning of the patients HCR, Bottom, the end of the patient‟s file, etc. This is dragged to its new location. Scroll Track: The quantity of information that can be displayed in the Transaction Panel is moved each time the track is clicked. Clicking the track beneath the Scroll bar will scroll downwards and above the Scroll Bar will scroll upwards. 36 Health One Version 7.1 User Manual. Copyright 2011Helix Health Ltd Practical Exercise: 1) Select the menu HCR/Go to and select Begin HCR. As you can see, the Administrative Chapter icon is not visible in the Transaction panel. To display this: 2) Click once on the Up Scroll Arrow. Administrative Chapter Icon comes into view 3) Experiment with the various scroll bar controls 4) Repeatedly click on the Up Scroll Arrow until the Administrative Chapter Icon is once again visible, 37 Health One Version 7.1 User Manual. Copyright 2011Helix Health Ltd Transaction Panel Filter Transactions are listed in the Transaction Panel in chronological order. However, HEALTHone™ has a special filter function that quickly locates transactions of a particular type for you. This is handy if, for example, you wish to view just lab results, or expert‟s reports or transactions relating to a particular problem. To activate the filter you click once with the Right mouse key anywhere in the Transaction Panel or click on the filter menu at the top of the transaction panel. A menu appears and you select the Filters option, then the required type of filter, i.e. Lab Result. Selecting full contents will return to normal chronological view of all transactions. Transaction Filter Menu 38 Health One Version 7.1 User Manual. Copyright 2011Helix Health Ltd 1) Right mouse click anywhere in the Transaction Panel or click on the Filters menuMenu Appears 2) Select the Filters option in the menu. Select Lab Results Just Lab Result type transactions are displayed 3) Repeat steps 1) and 2) and experiment with different selections of the Transaction panel filter. 4) Set back to Full contents Filtering Transactions by Problem John Test‟s file has been set up to illustrate this point 1) Right mouse click anywhere in the Transaction Panel Menu Appears 2) Select the Filtered on problems option in the menu. 3) Now select a problem in the Problem Panel Only those transactions that relate to the problem are displayed 4) Repeat step 3) for the other problems 5) Right mouse click anywhere in the Transaction Panel. Menu Appears 6) Select the Filtered on problems option in the menu. Display returns to all transactions. 39 Health One Version 7.1 User Manual. Copyright 2011Helix Health Ltd Adjusting the Display of the Transaction Panel Adjusting Display Width This is identical to the technique encountered earlier to adjust the Patient Selector window. When you point your mouse at the adjuster bars the cursor will change from an arrow to one of the adjustment cursors, dependent upon which bar you are pointing at. When either of these cursors are displayed you hold down the mouse key and drag to adjust the display width, when the new desired width is reached you release the mouse key. 1) Experiment with dragging the Panel Width Adjuster Bar. The width of the Transaction Panel varies 2) Drag the Column Adjuster Bars to display all the information available for each transaction. 40 Health One Version 7.1 User Manual. Copyright 2011Helix Health Ltd Transaction Properties Whenever a new transaction is created its properties box appears. This is where you can assign a person to be responsible for it and link it to a problem if you wish – amongst other things. It is automatically assigned the current date and time, the rest you complete yourself. More in the next session. The Transaction Information Area The principal information regarding a transaction is displayed at the bottom of the Item Panel in the Transaction Information Area. This information is dynamic in that it changes according to which transaction is currently selected. When information in this area is in RED it means you do not have the authority to change it – When displayed in BLACK you do. 41 Health One Version 7.1 User Manual. Copyright 2011Helix Health Ltd Viewing Transaction Attributes 1) Select any transaction 2) Click on the Attributes Button Selected transaction‟s attributes displayed in the Transaction Properties dialogue box. 3) Click the Cancel button to close the dialogue box. 42 Health One Version 7.1 User Manual. Copyright 2011Helix Health Ltd The Health Care Record Window The Item Panel As you now know, transactions form the pages in the patient‟s file. Items are effectively the writing on each page. These are displayed in the Item Panel on your screen. Once again, only the items that belong to the currently selected transaction will be displayed. Normal Items In the Introduction session Items were described as being containers and this is evident when you look at some of John Test‟s transactions: 1) Select the General Practice transaction that occurred on the 19th of January 1994. 2) Observe the item liver function tests:. This item contains the result normal. 3) Normally, you can open the container by clicking on it once to select it and pressing the Return key. Alternatively you can click on it twice with the mouse. Try it. If you have permission to edit this item it will open – otherwise a warning box appears! 4) Click on OK to close the Item window or warning box. Aggregate Items These are items that have more than one container. To see an example 43 Health One Version 7.1 User Manual. Copyright 2011Helix Health Ltd of these : 5) Select the consultation transaction that occurred on the 23rd of February 1997. 6) Observe the aggregate item blood pressure:. This item contains multiple results, systolic blood, diastolic blood. Adjusting the Item Panel Display Notice that the Item Panel also has Column Adjuster bars : 1) Point your mouse at the item column adjuster bars and drag to resize. Item information is hidden when the column width is made too small. 2) Drag the item column adjuster bars back to approximately where they were. That concludes our look at the HCR window. Lastly we will look at the last line of the screen. This is part of the HEALTHone™ screen and contains the Prompt Area – you have observed this earlier – and the Session Information Area. Session Information Area This area of the screen displays information about the current source reminds you how you logged on : 44 Health One Version 7.1 User Manual. Copyright 2011Helix Health Ltd Closing a Patients File To close a patient‟s file you select CLOSE HCR from the File Menu. If you had made any changes that had not been saved HEALTHone™ would prompt you to do so now. We have not, or least should not have, made any changes to his file. Select CloseHCR from the File Menu John Test‟s file is closed. To close the HEALTHone™ program you simply select Exit from the File Menu. 1) Select Exit on the File menu Close dialogue box appears. 2) Click on the Yes button or simply press the RETURN key. HEALTHone™ program closes and you are returned to the desktop. 45 Health One Version 7.1 User Manual. Copyright 2011Helix Health Ltd Summary Guide Start HEALTHone™ Double click this icon on your desktop : or select the menu sequence : Start / Programs / HEALTHone™ / HEALTHone™ for Windows Open the patient selector window Click on the „open‟ button on the HEALTHone™ Toolbar and select HCR. Note : The patient selector is normally open at all times. Select a patient in the patient selector window Click once on the filter above the column to be searched to activate it. Type the text to be matched Click twice quickly on the name of the patient in the patient list. To add/remove a column to/from the patient selector Click once on the Configure button at the bottom of the selector window. Click on the column select box required to add/remove the tick mark. To sort the patient selector window Click on the column heading to be sorted – ascending sort will occur. Click again for descending sort. Click again to cancel sorting. To adjust the patient selector column widths Place the mouse cursor on the column adjuster bar required and drag to adjust. To minimise / maximise patient HCR display Use the left most button of the HCR window controls to minimise the display and the centre button to maximise. To select a menu option Point to the menu required, click once, point to the menu option, click once again To quickly navigate through transactions in a patients file. Select any transaction in the Transaction Panel. Now use these short cut keys : To go to the first Admin page – Ctrl + Home To go to the Last Transaction – Ctrl + End To change chapters Ctrl + Page Up, Ctrl + Page Down 46 Health One Version 7.1 User Manual. Copyright 2011Helix Health Ltd To go to the next transaction – Ctrl + Down Arrow To go to the previous transaction – Ctrl + Up Arrow To go to the first transaction in a chapter – Ctrl + B To select which information is displayed in the transaction panel Right click anywhere in the transaction panel; select the filters option then select the display option required. To display only those transactions relating to a problem In the Problem Panel select the problem to be filtered on. Click anywhere in the Transaction Panel to activate it and press Ctrl + E To adjust the width of the Transaction Panel Drag the panel width adjuster bar. To view the attributes of a transaction Select the transaction required. Now click on the transaction Attributes button on the Transaction Panel toolbar. To close a patients file Select the menu option File / Close HCR To close HEALTHone™ Select the menu option File / Exit 47 Health One Version 7.1 User Manual. Copyright 2011Helix Health Ltd Own Notes 48 Health One Version 7.1 User Manual. Copyright 2011Helix Health Ltd 49 Health One Version 7.1 User Manual. Copyright 2011Helix Health Ltd Transactions & Items In this session we apply some of the techniques learnt so far. Our patient, John Test, has visited the surgery complaining of a painful lump on his neck. We assume that he is the first patient of the day and you have not yet started the HEALTHone™ program. Starting the Program and Logging In Start the HEALTHone™program and login. HEALTHone™ opens and the Patient selector window appears. If you are unsure about starting HEALTHone™and logging in refer back to the beginning of the previous session. Opening John Test’s Health Care Record We practiced this in the previous session: 1) If the Surname filter is not currently selected (cursor flashing) click once in the white box above the Surname column heading. Surname filter is now selected 2) Type Te The list of patients reduces to display only those whose surname begins with „Te‟‟ 3) Select John Test in the patient list. 4) Click on the Select button. 50 The Health Care Record (HCR) for John Test opens. Health One Version 7.1 User Manual. Copyright 2011Helix Health Ltd Creating a New Transaction To record the visit of John Test we need to add a page to the medical chapter of his HCR. To do this we simply create a new Medical Chapter Transaction. The new transaction will be added to the end of his file. 1) Click once on the Create Medical Transaction button on the Transaction Panel Toolbar. (See reference sheet). The Transaction Properties dialogue box appears – see Fig.3.1 Transaction Attributes In the previous session we mentioned that each transaction has a set of 51 Health One Version 7.1 User Manual. Copyright 2011Helix Health Ltd attributes. Some of those are specified at creation time in the Transaction Properties dialogue box above. Responsible: Specifies the name of the person responsible for creating or maintaining this transaction. This list shows the name of the person logged on and the names of any other people that have delegated their right to create transactions to the logged on user. Note: There is also an attribute called Author (not displayed on the Transaction Properties dialogue box) which is automatically set to be the name of the person who validates the transaction – see Transaction Status later in this session. Date of event: Automatically set to the current date and time. Note: You can change this if, for example, you are updating a patient‟s HCR at a later point in time. Speciality: This is another drop down list that specifies the medical speciality being recorded. In general practice this is useful when a consultants report pertaining to a speciality is being recorded, or, for example, a patient is being admitted to hospital. In most cases the speciality would be „General Practice‟. Legal Structure: HEALTHone™ can define a person as performing one 52 Health One Version 7.1 User Manual. Copyright 2011Helix Health Ltd or more roles in a practice. If this were the case you would select the current role here. Usually, a person only performs one role, i.e. Physician, and this box can be ignored. Comment: This new box gives the user additional flexibility in tagging transactions. You can insert any free text you like here. Alternatively you can use an associated list of preferred terms that can be defines using the configuration tool. Problem: The concept of problems was mentioned in the previous session. This is where a transaction is declared as being related to an existing problem. Note: This can be completed later when the reason for the visit is known. 2) Complete the Transaction Properties dialogue box by observing the lists for the attributes and then setting their values as follows: Type Contact Name Consultation Responsible Your name Date of event Current date and time Speciality general practice Legal Structure Physician/general practice Problem None 3) Click on the OK button. New transaction is completed and appears at the end of John Test‟s medical chapter. See Fig.3.2. It is printed in Bold and Italic (see the Transaction Status information box below) 53 Health One Version 7.1 User Manual. Copyright 2011Helix Health Ltd Shortcut to Creating a New Transaction It is possible to create new transactions directly from the patient selector. Below is a screen shot of the patient selector: 54 Health One Version 7.1 User Manual. Copyright 2011Helix Health Ltd Shortcut to Creating a New Transaction The three consultation types available are the first three transaction names that have been defined in the configuration tool. You can change the consultation types, and the icons associated with each, by opening the configuration tool. The first three consultation types in the list are those available in the patient selector of HEALTHone™. You can move a name on this list up or down by clicking on the name and dragging it to your preferred position in the list. 55 Health One Version 7.1 User Manual. Copyright 2011Helix Health Ltd The Item Selector HEALTHone™ items are accessed via the Item Selector window –this displays a dictionary of all the items in HEALTHone™. Clicking on the Item Selector Button on the Item Panel Toolbar, illustrated below, will display the selector window (see fig 3.3). Inserting Items 56 Health One Version 7.1 User Manual. Copyright 2011Helix Health Ltd 1) Ensure that the newly created transaction is selected in the Transaction Panel and then click once on the Item Selector Button. Item Selector dialogue box appears. 2) Click on the Sorted option. Tick (called a Check Mark) appears in the Sorted option check box and the list is sorted into alphanumeric order. 3) Uncheck the Sorted option by clicking on it once again. 4) If the Synchronous option is unchecked – check it now by clicking on it. 57 Health One Version 7.1 User Manual. Copyright 2011Helix Health Ltd 5) If the Leading option is unchecked –check it now. Type: as Only Items that begin with „as‟ are displayed 6) Uncheck the Leading option. All Items that contain the letters „as‟ together anywhere in their name are displayed. 7) Delete the as in the Find box. Full list of items appears once more 8) Uncheck the Synchronous option. 9) Refresh button activates Type in capitals: IC Nothing happens 10) Click once on the Refresh button. All Items that contain the letters „IC‟ together anywhere in their name are displayed. 11) Check the Synchronous option. Refresh Button de-activates – screen stays the same because Synchronous is active and filtering on „IC‟. 12) Check the Match Case option. Only Items that have upper case (capital) IC anywhere in their name are displayed. 13) Uncheck the Match Case option. Now we will locate the first item needed to record this visit of John Test. Firstly, set the Item Selector options as follows: 58 Health One Version 7.1 User Manual. Copyright 2011Helix Health Ltd Match Case Leading Sorted Synchronous = Unchecked. = Checked = Unchecked = Checked. We need to locate the Item: subjective symptoms 1) Delete the IC in the Find box and type su All items beginning with „su‟ are now displayed. 2) The Item subjective symptoms should already be selected, if not, select it now by clicking on it once. 3) Click on the OK button The Item Selector box closes and the Item „subjective symptoms‟ is added to the transaction detail panel and its associated list appears. We will look at the Associated List in more detail later. To continue: 4) Click once on the Associated List Close button. Associated List box closes and Subjective Symptoms dialogue box is active. Showing/Hiding the Item Attributes Panel 1) To show or hide the Item Attributes panel click on the illustrated button once. Click again to close. The Item box should now appear as in Fig.3.4 59 Health One Version 7.1 User Manual. Copyright 2011Helix Health Ltd Typing and Editing Text Typing and editing follows the usual text editing techniques: 1) Type the following: This is a line of text typed by your name 2) Press the Backspace key repeatedly to delete your name and the text „typed by‟ Text now reads „This is a line of text‟ 3) Use the Left Cursor key to move the flashing insert cursor to before the l of line. Type: new Text now reads „This is a new line of text‟ 4) Drag across the words a new to select them and type: an old 5) Text now reads „This is an old line of text. Drag and select the entire line of text. Press the Backspace key. 60 Text deleted. Health One Version 7.1 User Manual. Copyright 2011Helix Health Ltd The Item Dialogue Box Term Lists HEALTHone™ is designed to keep the amount of typing necessary to maintain a patient‟s record to a minimum. This is achieved by selecting terms from various sources and supplementing these with typing if necessary. The three most common sources of terms are: The Term Dictionary A complete list of terms known to HEALTHone™ The Associated List A list of terms related to the current Item. The Permanent List A list not related to a specific item that expresses degree, intensity, size etc as opposed to a particular complaint. To display a list you click on its illustrated button on the Item dialogue box toolbar. There are a number of good reasons to use lists as opposed to typing: Firstly It saves you time because it is quicker to choose a response from a list than type it yourself. Secondly It‟s easier, there is no need to remember the spelling of complicated medical terminology. 61 Health One Version 7.1 User Manual. Copyright 2011Helix Health Ltd Thirdly It is more consistent, you are more likely to express a condition in a similar manner using terms from a list as opposed to typing a response. This can become very important when analysing your patients later and locating occurrences of a particular illness or condition. Using the lists takes a little effort at the beginning but very quickly becomes far more efficient than typing. In short, we encourage you to use the lists wherever possible. The Term Dictionary OK, now to continue with John Test: 1) Click once on the Term Dictionary Button Term Selector Window appears 2) Ensure that only the Leading and Synchronous options are checked. 3) Type: nec List reduces to only terms beginning with „nec‟ 4) Select the term: neck pain 5) Click on the OK button. „Neck pain‟ inserted as a response and the selector window closes. The Permanent List John Test describes the pain as acute. To record this we use the Permanent List: 1) Click once on the Permanent List Button. Permanent List appears. 2) Select the term: acute, press the RETURN key Acute sub-list appears 3) Ensure that acute is still selected and click on the Insert button. 62 Item response now reads „neck pain acute‟ Health One Version 7.1 User Manual. Copyright 2011Helix Health Ltd Selecting / Deleting a Term A term selected from one of the lists is treated by HEALTHone™ as a complete unit, i.e. the term acute can only be deleted entirely not as individual letters a c u t e. 1) Press the Backspace key until the term acute is deleted The ENTIRE term „acute‟ is deleted. 2) Click once anywhere in the neck pain The entire phrase „neck pain‟ becomes highlighted to indicate that it is selected To cancel a selection: 3) Press the Right Cursor key to move the Insert Cursor away from the selected term. „neck pain‟ is no longer selected. Associated Lists Many Items have a list of common terms associated with them which is displayed in the Associated List Selector dialogue box. 1) Click once on the Associated List Button. Associated List dialogue box appears. 63 Health One Version 7.1 User Manual. Copyright 2011Helix Health Ltd List Options These are identical in meaning to the Item Selector dialogue box and the only new objects are the List Type selector and History Box. The list type selector provides an alternative way to display the Permanent List we used a moment ago. 64 Health One Version 7.1 User Manual. Copyright 2011Helix Health Ltd The History Option Box To use the History box you need to understand how the list is structured. List Structure This particular item, subjective symptoms, has terms associated with it which themselves have a list associated with them. You will know when a term has a list of its own because the icon illustrated will appear to the left of it. As an example, take the term „common‟ and the further selection of one its terms „sore throat‟. 65 Health One Version 7.1 User Manual. Copyright 2011Helix Health Ltd The History Box notation displays the name and level of the current list being viewed. The more sub-lists you select the higher the level number will become. In addition the History Box can be used to move easily to a different level by clicking on the down arrow to its right and selecting the level required. Navigating the List: 66 Health One Version 7.1 User Manual. Copyright 2011Helix Health Ltd 1) Click once on the term: common to select it and then press the Right Cursor Key once. Sub-List for „common‟ term appears and History Box displays „0:common‟ 2) Use the Down Cursor key to select the term sore throat, now press the Right Cursor key once again. Sub-List for „sore throat‟ term appears and History Box displays „1:sore throat‟ 3) Press the Left Cursor key once to return to the list 0:common. 4) Press the Left Cursor key again to return to the full list of associated terms. 5) Spend a little time experimenting with the Up, Down, Left and Right cursor keys to see their effect. 6) Click once on the Close button Associated List dialogue box closes 7) Click once again on the Associated List Button to re-open the dialogue box. 67 Health One Version 7.1 User Manual. Copyright 2011Helix Health Ltd Using a Term as a Response The cursor keys are used to navigate the various terms and lists, however, to use a term as a response simply select it press the RETURN key. If the term has a sub-list this will be displayed as well as the selected term being placed into the Item dialogue box. If the selected term does not have a sub-list pressing the RETURN key will use the term as a response and the Associated List dialogue box will automatically close. 1) Ensure that the term common is still selected, press the Right Cursor Key once to display the sub list. 2) Use the Down Cursor key to select the term lump, and press the Return key. The Item dialogue box now reads „neck pain lump‟ and the associated list box has closed. 3) Click the OK Button. Item dialogue box closes and the Transaction Detail Panel appears as shown: Note : If you do not wish to use Associated lists it is possible to disable them. To do this click on the menu item « tools – options ». They can be restored at any time. 68 Health One Version 7.1 User Manual. Copyright 2011Helix Health Ltd Automatic Item Selector Display The Subjective Symptom Item is now complete. Next, we will record the Objective Findings. To place another Item into this transaction for John Test we would normally click on the Item Selector Button on the Item Panel Toolbar, however, HEALTHone™ will automatically assume you are searching for an item as soon as you type! It will also display the dialogue box with the list filtered on what was typed. 1) Type an: o The Item Selector dialogue box appears with the items beginning with „o‟ already displayed. When you are familiar with HEALTHone™ you will realise that this is an advantage because it saves you time, however, at first it can be confusing. 2) Click once on the Cancel button. The Item Selector dialogue box closes. More Items Inserting the Objective Findings Item 1) Click once on the Item Selector Button on the Item Panel Toolbar. 2) Type: ob in the Find Box Item list reduces to those beginning with „ob‟ 3) Ensure that the Item objective findings is selected and click once on the OK button. The Item „objective findings‟ is placed into the transaction detail panel and its associated list box opens automatically. The term we require is not in the Associated List but in the Term Dictionary: 69 Health One Version 7.1 User Manual. Copyright 2011Helix Health Ltd 4) Click on the Close button to close the Associated List dialogue box. (or press „Esc‟). 5) Click once on the Term Dictionary Button. Term dictionary now appears 6) Type: seb in the Find box and select the term sebaceous cyst, click on OK Term „sebaceous cyst‟ entered as a response and the dictionary closes. We will now supplement this term with additional text: 7) Type: 2 x 2 cm Response now reads „sebaceous cyst 2 x 2 cm‟ 8) Click on the OK Button to complete this Item. Transaction detail Panel now has two items entered. Inserting the Assessment Item 1) Click once on the Item Selector Button on the Item Panel Toolbar. 2) Type: as in the Find Box Item list reduces to those beginning with „as‟ 3) Ensure that the Item assessment is selected and click once on the OK button. The Item „assessment‟ is placed into the transaction detail. The Assessment Item does not have an associated list. 70 Health One Version 7.1 User Manual. Copyright 2011Helix Health Ltd 4) Use the Item Dictionary to enter the term sebaceous cyst as a response. 5) Type: back of 6) Use the Item Dictionary to enter the term neck as a response. Response now reads „ sebaceous cyst back of neck‟ 7) Click once on the OK button. More Items The Assessment Item is now completed and your screen should appear as in Fig.3.5 below: Lastly, we will complete this session by inserting the Plan of Action Item: Inserting the Plan of Action Item 1) Click once on the Item Selector Button on the Item Panel Toolbar. 2) Type: pl in the Find Box Item list reduces to those beginning with „pl‟ 71 Health One Version 7.1 User Manual. Copyright 2011Helix Health Ltd 3) Select the Item plan of action and click once on the OK button. The Item „plan of action‟ is placed into the transaction detail panel and its associated list box opens automatically. Skipping a Term as a Response This time we wish to use a term from a sub-list but omit the term the list belongs to: 4) In the Find Box type: pr . Ensure the term procedure is selected and press the Right Cursor key once. The sub-list for „procedure‟ is displayed but the term is not placed in the Item dialogue as a response. 5) In the Find Box type: ex , and ensure that the term excision is selected. Press the Return key. The sub-list term „excision‟ appears as a response and the associated list box closes. 6) Type: shelled out successfully Click on the OK button. Inserting a Repeat Item Sometimes, for presentation purposes or because there is a great deal of typing required as a response or because there is more than one condition to be recorded, it may be necessary to use more that one item of the same name. You can use as many items of the same name as you require in a transaction. HEALTHone™ has a quick procedure to do this; simply select the item to be repeated and type an =. 1) Ensure that the newly created plan of action: item is selected in the transaction detail panel. Press: = (equals key) A new „plan of action‟ item is created and its associated list appears. 2) The first term follow up is the one we require. Press the Return key. 72 The term „follow up‟ is used as a response and its sub list Health One Version 7.1 User Manual. Copyright 2011Helix Health Ltd appears. 3) Select the term 1 week in the sub-list and press Return. 4) Click OK to close the plan of action dialogue box. Your completed transaction should now appear as in Fig. 3.6. Saving a Patients File Whenever you have created a new transaction or made changes to a patients file you should save the file. HEALTHone™ transactions can be Saved or Validated or Saved and Validated at the same time. 73 Health One Version 7.1 User Manual. Copyright 2011Helix Health Ltd A Saved transaction is one that has been written to the patients file and will be available the next time the file is opened, however; it will not become part of the HEALTHone™ audit trail until it has been validated. To save a patients file you select Save from the File Menu. 1) Select Save from the File Menu - Validation prompt appears. 2) Click the Validate Button. 3) Select Close HCR from the File menu. File closes and the Patient Selector window is once more in view. Note: By option you can skip the confirmation dialogue when saving a transaction – the transaction will be validated automatically. To do this click on the menu item « tools – options » and tick the option «CTRL+S validates transactions without confirmation». Then press CTRL+S to save and validate when in a patients file. Closing the HEALTHone™ Program To close the HEALTHone™ program you simply select Exit from the File Menu. 74 Health One Version 7.1 User Manual. Copyright 2011Helix Health Ltd 1) Select Exit on the File menu Close dialogue box appears. 2) Click on the Yes button or simply press the RETURN key. HEALTHone™ program closes and you are returned to the desktop. 75 Health One Version 7.1 User Manual. Copyright 2011Helix Health Ltd Summary Guide Create a new Medical Transaction Click on the New Medical Transaction button on the TRANSACTION PANEL Toolbar. Complete the transaction properties box. Insert a new Item If you know the name of the item you require simply type its name when the transaction detail panel is active. Otherwise, click on the Item Selector button on the ITEM PANEL Toolbar and select the required item from the list. Display / Change the attributes of an item. First ensure that the item is open for editing by selecting it and pressing the RETURN key. Now click on the attributes panel button to display these. Click once again on the same button to hide these. To display the term dictionary when editing an item. Click once on the blue book on the item dialogue box toolbar or type Ctrl + T To re-display the associated list when editing an item If an item has an associated list it will automatically open when the item is opened for editing. To re-display it once closed click once on the associated list button on the item dialogue box toolbar or type Ctrl + A To display the permanent dictionary when editing an item. Click once on the permanent list button on the item dialogue box toolbar or type Ctrl + P To navigate an associated list 76 Health One Version 7.1 User Manual. Copyright 2011Helix Health Ltd If the term required has no sub list of its own simply press RETURN to include it as a response. If the term has a sub list of its own, you can: Press RETURN – include term and display sub list. Press right arrow to exclude term and display sub list. Click on the term with the Right mouse key to display a menu. Now click on SELECT to include the term without displaying the sub list. Press left arrow to return to the term from a sub list. Repeat an Item Select it and press the equals key. Save a patients file Select the menu sequence File / Save Own Notes 77 Health One Version 7.1 User Manual. Copyright 2011Helix Health Ltd Creating A New Patient Health Care Record In this session all the techniques needed to create a file for a new patient will be discussed. We assume that you have not yet started HEALTHone™ for this session, if you have go straight onto Creating A New Health Care Record below. Starting the Program and Logging In Start the HEALTHone™ program and login. HEALTHone™ opens and the Patient selector window appears. If you are unsure about starting HEALTHone™ and logging in refer back to the beginning of the Getting Around session. Creating a new Health Care Record This can be done directly from the Patient Selector Window: 1) Click once on the New icon at the bottom of the window. 78 You are about to create the first transaction in this patient‟s file, this is always the “Patient Identification” transaction. New Patient HCR created and the Patient Identification Items, surname:, first name:, sex: and date of birth: automatically appear in the Item Panel. Health One Version 7.1 User Manual. Copyright 2011Helix Health Ltd Minimum Administration Items The patient attributes list appears in the first transaction of the administration section. The four items surname:, first name:, sex: and date of birth: are the minimum needed to create a new patient file. 1. Ensure that the surname: item is highlighted. Press the Return key. The „surname:‟ item opens ready for editing. 2. Type: Tennant; Press the Return key. The „surname:‟ item only requires a single line of text and automatically closes when the RETURN key is pressed. The highlight automatically moves on to the next item in the list. 3. Press Return to open the first name: item. Type: Sarah 79 Health One Version 7.1 User Manual. Copyright 2011Helix Health Ltd 4. Press the Return key. Press Return again to open the sex: item. Restricted Response List The possible responses to the sex: item are limited. For items like this HEALTHone™ will often present a list of possible terms. To complete this item, you can: Use the cursor keys. Type the first letter of the response, i.e. M male or F female Click on the down arrow to the right of the response box to display the list and select you answer by clicking on it with the mouse. Experiment with all of the above techniques. Select the response female. Press Return the „sex:‟ item closes and highlight moves onto the next item. Press Return. Type carefully: 12071972 for the date of birth. 5. Press the Backspace key ( ) to delete the 2 of 1972 and type a 0 Press Return to complete the item. The minimum items are now completed. Date Problem ? See the information box on the next page 80 Health One Version 7.1 User Manual. Copyright 2011Helix Health Ltd 6. Enter in any other attributes required for the patient. They can be entered at a later stage. Saving the new Health Care Record 1) Click on the „Save‟ button on the HEALTHone™ Toolbar at the top of the screen, Dialogue box appears: Select Save. The new patient file has been saved to disk and remains open for further editing if required. Notice that the HEALTHone™ information Bar now displays Sarah‟s Name, Date of Birth, Sex and Age. Closing the Health Care Record Select Close HCR on the File Menu. 81 Health One Version 7.1 User Manual. Copyright 2011Helix Health Ltd Sarah‟s file now closes Exiting HEALTHone™ Select Exit on the File Menu. Answer Yes when prompted. 82 HEALTHone™ closes and the desktop reappears. Health One Version 7.1 User Manual. Copyright 2011Helix Health Ltd Summary Guide 1. Create a new patient HCR in the patient selector window When the patient selector window is open click on the NEW button. 2. Create a new patient from the main menu. Select the menu sequence: File / New / HCR or click on the NEW button on the HEALTHone™ toolbar and select HCR or press: Ctrl + N 3. Save a patient file Select menu sequence: File / Save or click on the SAVE tool on the HEALTHone™ toolbar or press: Ctrl + S 4. To delete an item -Select the item to be deleted and press the DEL key. Answer YES when prompted. 5. To delete a transaction - If the transaction has not been validated simply select it and press the DEL key. Answer YES when prompted. If the transaction has been validated the technique is the same except the transaction will be marked as deleted and hidden within transaction list but NOT physically removed from the patient‟s file. 6. To delete a patient‟s file Open the patient selector window and select the patient concerned. Now click on the DELETE button. Answer YES when prompted. 83 Health One Version 7.1 User Manual. Copyright 2011Helix Health Ltd Own Notes 84 Health One Version 7.1 User Manual. Copyright 2011Helix Health Ltd Adding Basic Medical Information The Basic Medical Information is a transaction that records data such as allergies, past medical and surgical history, etc. It effectively acts like a summary chart in your manual notes. This is usually the first page in the Medical Chapter and has a unique icon to represent it. Illustrated on the left, Starting the Program 1) Start HEALTHone™ and Login. Patient selector window is now open. Opening a Health Care Record To open an existing patients HCR: 2) Type: Te in the surname filter 3) Select Sarah Tennant in the patient list. 4) Click on the Select button. The Health Care Record for Sarah Tennant opens. Creating a new Basic Information Transaction We are now going to record the Basic Medical Information in Sarah Tennant‟s HCR. Use the icon to quickly create a basic medical transaction 85 Health One Version 7.1 User Manual. Copyright 2011Helix Health Ltd As you can see from above the basic medical information sequence is added, next we select the sequence items we require. Managing Items In this instance we are going to skip over the first item because we wish to leave it in the file merely as a descriptive title. 1) Ensure the basic medical information Item is selected. Press the Down Cursor key once. „medical history:‟ item is now highlighted 2) Press the Return key to edit the medical history: item. In the associated list Find box type: h only terms beginning with „h‟ remain in the list. Quick Clicks 3) Select the term 86 hypertension in the list by clicking on it twice Health One Version 7.1 User Manual. Copyright 2011Helix Health Ltd quickly (keep the mouse perfectly still between clicks). „hypertension‟ added to the medical history item. 4) Click OK to close the medical history: item. Repeating an Item We wish to record more medical history information for Sarah and to do this another medical history item is required. There is a quick way to do this if an item of the same type already exists in the transaction you are editing. Simply select (not edit) the item which is the same type and press the (=) equals key. 5) The highlight is now on the surgical history: item. Press the Up Cursor key once to re-select the medical history: item ( or simply click on it once with your mouse) „medical history:‟ item now highlighted once more. 6) Press the equals key = once A new „medical history:‟ item is inserted and opens for editing. 7) Double Click on pneumonia in the associated term list. „pneumonia‟ added as a response for this item. 8) Do not close this item yet 87 Health One Version 7.1 User Manual. Copyright 2011Helix Health Ltd Setting Item Attributes Each item has a series of settings called attributes, which are in addition to any contents that may have been entered. These perform various functions including how the item and its contents appear on screen, how severe the condition being recorded is – via a gravity index, moment of occurrence, person responsible and various other information. These are displayed by clicking on the button illustrated when the item is open for editing. 1) The medical history item that contains the term pneumonia should still be open. If not, open it now for editing and close the associated list box when it appears by clicking on its Close button. „pneumonia‟ text displayed. 2) Click once on the button to display the items attributes. 3) Set the attributes the same way as illustrated in Fig.3: Medical History Item Attributes 4) When completed click on the OK button. 88 Health One Version 7.1 User Manual. Copyright 2011Helix Health Ltd Item closes and appears in red. Setting Item Display Mode You may have noticed above the Display Mode box – which we left on its default setting of Normal. Normal display mode shows the Item Name followed by its contents. There are several other ways to display item information – you can select these by either right clicking with your mouse on the item and selecting Display Mode, then select the mode required from the menu, or, click once on the item to select it and then use the short cut keys. 1) Right Click with the mouse on the medical history: item for pneumonia just created. Menu appears Select the Display Mode option – then select the Right option from the next menu. The item contents „pneumonia‟ stays in view but the item name „medical history‟ has disappeared. 3) Experiment with other display settings for the same item. 4) Ensure that the item is still selected and press Ctrl + 3 Item display returns to „Right‟ mode. 89 Health One Version 7.1 User Manual. Copyright 2011Helix Health Ltd Viewing Item Attributes You do not need to open an item for editing to view its attributes. This is only necessary if you wish to change their settings. To view, simply select the item by clicking on it once with the mouse and then click on the Attributes button on the Item Panel Toolbar – illustrated on the left. 1) Click once on the pneumonia medical history: item to select it. Click once on the Item Panel Toolbar Attributes button. 90 Attributes for the selected item appear. Health One Version 7.1 User Manual. Copyright 2011Helix Health Ltd 2) Close the Attributes window by clicking once on the button. Windows closes Completing the Basic Medical Information Surgical History: 3) Open the Surgical history: item for editing. Select appendicectomy from the associated list. Do not close the item yet. 4) Set the Date of Event attribute to: 01/07/1992 5) Click on OK to close the item. Family History: 6) There is a history of Heart Disease in the family. Open the family history: item and record this by selecting the appropriate term from the associated list and close the item. Completing the Basic Medical Information Tobacco: 91 Health One Version 7.1 User Manual. Copyright 2011Helix Health Ltd 7) Open the tobacco: item for editing. Select cigarettes from the associated list. Then type: 20 p/day. 8) Click on OK to close the item. Alcohol Consumption: 9) Open the alcohol consumption: item for editing. Select social from the associated list. Then type: 8 units/week. 10) Click on OK to close the item. Blood Group: 11) Open the blood group: item for editing. Select A neg from the associated list. 12) Click on OK to close the item. Recording & Displaying a Problem Sarah has hypertension and it would be nice to see this instantly when the patient file is opened – to facilitate this we use the Problem Panel. HEALTHone™ copies the contents of the item(s) problem: and places it into the Active window of the Problem Panel. Each problem is assigned a START date and - when inactive - an END date. Items that have been given an end date are moved from the Active to Inactive window of the Problem Panel. 92 Health One Version 7.1 User Manual. Copyright 2011Helix Health Ltd 1) Ensure the Item problem: is highlighted. Press Return to open. 2) Close the associated list and click once on the Term Dictionary (Blue Book) Term Dictionary window appears. 3) Type: Hypert and then select the term Hypertension in the list. Click OK The term „Hypertension‟ is now in the Problem dialogue box. 4) If the Item attributes are not on view click once on the button to reveal them. 5) Click on the START date to activate it and type: 28091978. Now click on OK to close the problem item window. The problem item closes but the contents „Hypertension‟ does not appear in the Problem Panel – it must first be validated. 6) Click once on the Save button on the Standard Tool Bar and select 93 Health One Version 7.1 User Manual. Copyright 2011Helix Health Ltd Yes when prompted to validate the transaction. „Hypertension Now Appears in the active Problem Panel. Recording Non Medication Related Allergies To record allergies which are not related to medication, such as Gluten, Cat Hair etc. we use the item allergies: Allergic reactions to medication are recorded by using the Drug Module. The technique is fully described in the Prescription Manager chapter. Inserting a new Item 1) Ensure that the item problem: is still selected. Now click once on the Item Selector button on the Item Panel Toolbar. Item selector window opens 2) In the Find box type: all All items names beginning with „all‟ are listed. 3) Select the Item allergies: in the list. Click OK Item „allergies:‟ is inserted and automatically opens the associated list‟ 4) Select cat hair from the associated list 5) Click on OK to close the item. 6) Ensure the allergies: item is still highlighted and press the equals key = once New „allergies:‟ item created. 7) Select dog hair from the associated list. 8) Set the Display mode attribute to: Content Right 9) Click on OK to close the item. 10) Ensure the new allergies: item is still highlighted and press the equals key = once more. A third „allergies:‟ item created. Using the Term Dictionary The Term Dictionary was mentioned in session three. We use it 94 Health One Version 7.1 User Manual. Copyright 2011Helix Health Ltd whenever the associated list does not have the term we require. Sarah has a gluten allergy. Gluten is not included in the allergy associated list. 11) Close the associated list box. 12) Click once on the Term Dictionary Button (blue book) Term Dictionary windows opens. 13) Type: glut in the Find box. Select the term gluten in the list and then click on the OK button. „Gluten‟ term is inserted as a response. 14) Set the Display mode attribute to: Content Right That completes the Sarah‟s medical information. Saving a Patient File Select Save on the File Menu and select Yes when prompted to validate the transaction. Select Close HCR from the File Menu. Sarah‟s file closes and the patient selector window reappears. Quitting HEALTHone™ Select Exit on the File Menu. Answer Yes when prompted. HEALTHone™ closes and the desktop reappears. 95 Health One Version 7.1 User Manual. Copyright 2011Helix Health Ltd Summary Guide To repeat an item - Select the item to be repeated and press the equals = key. To set item attributes - First ensure that the item is open for editing by selecting it and pressing the RETURN key. Now click on the attributes panel button to display these. Click once again on the same button to hide these. To change the item display mode - Right click on the item to be changed and select the option Display Mode from the menu. Now select the display mode required from the sub-menu‟ To view the attributes on an item - Select the item required and click once on the attributes button on the HCR Toolbar. To use a term from the Term Dictionary as a response to an item. - Click once on the blue book on the item dialogue box toolbar or type Ctrl + T. Now select the term required in the list. Own Notes 96 Health One Version 7.1 User Manual. Copyright 2011Helix Health Ltd Analysing Patient Information One of the strengths of HEALTHone™ is its ability to analyse patient information. There are two categories of analyses: Individual Patient and Population. Below are listed the types of analyses available in each category: Individual Patient Analyses Item Analysis o o Active Item in a patient‟s file Any Item in a patient‟s file HCR Analysis - Multiple items in a patient‟s file. Prescription Analysis - Drugs prescribed for a patient. Grid Analysis - Numerical data, table/graphic representation, i.e. audiometry charts, percentile charts etc. Population Analyses Template - Produce a document that can be viewed, printed/saved. Database - Produce results that can be viewed, printed and/or exported. These analyses all use pre-set analysis definitions. It is also possible for you to create your own definitions to add to the existing lists, however; it is beyond the scope of this manual to describe how this is done. In this session we will be using the standard definitions as supplied with the product. The various analyses are selected via the HEALTHone™ Analysis Toolbar. In the case of individual patient analysis the patient‟s HCR must be opened before selecting the analysis. Population analysis does not require a patient‟s HCR to be open. 97 Health One Version 7.1 User Manual. Copyright 2011Helix Health Ltd The patient John Test has a very mixed history. Ideal for analysis: Getting Started 1) Start HEALTHone™ and Login. Patient selector window is now open. Opening a Health Care Record To open an existing patient‟s HCR: 2) Type: Te in the surname filter 3) Select John Test in the patient list. 4) Click on the Select button. 98 The Health Care Record for John Test opens. Health One Version 7.1 User Manual. Copyright 2011Helix Health Ltd Item Analysis Item analysis has two forms, Active Item or Any Item. Each has its own button on the HEALTHone™ Analysis Toolbar. Active Item Analysis button. Technique: click once on any item you would like analysed. Next, click on the button. An analyse window opens and displays the value of each occurrence in the patients HCR.. Any Item Analysis button. Technique: click once on the button and select the item to be analysed from the item list. An analysis window opens and displays the value of each occurrence in the patients HCR.. Active Item Analysis For this we will use the aggregate item Blood Pressure. This is very handy when you would like to see at a glance previous pressures. 1) Select the consultation of the 24/10/1994 by clicking on it once in the transaction overview panel. 2) In the HCR Transaction Detail panel click once on the bold print item: blood pressure 3) Now click on the Active Item Analyse Button. The Active Item analysis window opens and shows all blood pressures recorded in the file 4) Experiment with selecting different options in the display filter. 5) Close the analysis window by clicking once on the cross in its top 99 Health One Version 7.1 User Manual. Copyright 2011Helix Health Ltd right hand corner. Any Item Analysis This analysis does not require the item that is to be analysed to be preselected. 1) Click on the Any Item AnalyseButton 2) Type: wei in the Item find box. Select the item: weight. 3) Click OK Item Analysis: weight‟ window opens and displays results. HCR Analysis This is a more complex analysis of the Health Care Record. Clicking on the Analysis button, will cause a list to be displayed. This list contains pre-set analysis definitions. Select the one you require and then click on the Execute button. The result is displayed in an analysis window 100 Health One Version 7.1 User Manual. Copyright 2011Helix Health Ltd 1) Click on the HCR Analysis Button. 2) Select Liver Profile from the list. 3) Click on the Execute button. Liver function analysis is performed and displayed in a HCR Analysis window. Some of the HCR analysis definitions prompt you for a response, i.e. for a start/end date. 4) Close the HCR Analysis window and then click on the HCR Analysis button once again. 5) This time select the Between date x and date y analysis. Click on 101 Health One Version 7.1 User Manual. Copyright 2011Helix Health Ltd the Execute button. The analysis runs and prompts for a start date. 6) Enter 01101997 as a start date. Click on the TICK to incorporate the date into the analysis scenario. The analysis now prompts for an end date. 7) Enter 01101998 and once again click on the TICK. The OK button should now be active. Click on the OK button. Detail of items between the specified dates are displayed. 8) Close the Analysis Window. Prescription Analysis Like the HCR Analysis in the previous example, the Prescription Analysis also uses pre-set analysis definitions. Clicking on the Prescription Analysis button, , will cause the analysis list to be displayed. Select the analysis you require and then click on the Execute button. The result is displayed in an analysis window 1) Click on the Drug Analysis Button. 2) Select Active therapy from the list. 3) Click on the Execute button. Active therapy analysis is performed and displayed in a Prescription Analysis window. 4) Close the Analysis Window. Select File / Close to close John Test‟s file. 102 Health One Version 7.1 User Manual. Copyright 2011Helix Health Ltd Population Analysis The population analysis also uses pre-set analysis definitions. There are two different categories: Template and Database. The Template analysis examines every patient‟s HCR, and as a consequence may take time to complete dependant upon the size of your practice. The Database analyses are much faster because they use a different method to access the patient data. The population analysis window is displayed by clicking on the population button . Unlike the other analyses, population analysis does not require a patient‟s file to be open. Display all the patient data in chronological order This is an extremely useful new function which allows you to view the patient‟s file in one « page » that you can scroll through. You can easily search all the data for any text you like. You can access this feature by clicking on the icon « display all data in chronological order » on the toolbar When you click on this icon you are presented with the following screen : 103 Health One Version 7.1 User Manual. Copyright 2011Helix Health Ltd You can now search all the data in the patient record simply by typing some text in the search box : You will see all the instances of the searched for text including the dates involved. This can be extremely useful for finding any information you wish in the patient‟s file. Database Analysis (Data Ware House – DWH – Built in Analysis) There are a number of pre-set database analysis all of which display their results on screen and many additionally allow the results to be printed as a report. HEALTHone™ provides an additional tool – called Query Tool which can be used to create your own reports. Example of Database Analysis with a Screen Display Result Only: 1) Click on the Population Analysis Button on the toolbar 2) Double click the Cube Analysis entry in the list. 104 Cube Analysis expands and reveals the „Patients Cube analysis. Health One Version 7.1 User Manual. Copyright 2011Helix Health Ltd 3) Click on the PatientsCube (Sex, Age Class, Private/GMS) analysis to select it and then click on the EXECUTE button. Cube analysis activates and displays the results in a window. This particular analysis is purely visual and you are not able to produce in report form. Other types of analysis are displayed and can also be reported and/or exported to other products. We will now close the current analysis and open a new one. 1) Close the current analysis by clicking once on the Red X in the top left hand corner of the window. 2) Double click the Patients seen entry in the list. Patients seen Analysis expands. 3) Click on the Patients with an actual encounter analysis and then click on the EXECUTE button. Patients seen analysis opens. This particular analysis requires additional information before it can be executed. You can select patients by a specific date range or by count of last days: 4) Select the Last Days option and enter a value for the Day count. 5) Now execute the analysis by clicking on the green right facing button on the tool bar. (see illustration). 105 Health One Version 7.1 User Manual. Copyright 2011Helix Health Ltd 6) Experiment with these values and date ranges until you obtain a result. Remember to reselect the execute button to reanalyse each time the values are changed. Analysis produces a results grid Once you have produced a result from a database analysis you can: Simply view it on screen Produce a report of the results Export the results to another product Viewing Results You can control the grid display in the following ways: Viewing Results – Maximise The Window - Click on the centre button of the window control in the top left hand corner of the window. 106 Health One Version 7.1 User Manual. Copyright 2011Helix Health Ltd You can also change the column widths by placing the cursor in the middle of the columns until you get a double arrow icon, then hold down the left mouse button and drag to column to the width you require. Produce a Report Of The Results To produce a report of the analysis result you simply click on the preview button. Some reports have a pre-set format regardless of the settings of the grid; others will reflect any changes made to the grid. Once previewed clicking on the print button in the preview window will print the report. 1. Click on the Preview button at the top of the screen 2) If you wish print the report by clicking on the Print button. 4) Close the preview window. Close the analysis window. Close the Population Analysis Window. 107 Health One Version 7.1 User Manual. Copyright 2011Helix Health Ltd Patient selector window should now be back in view. Exporting the results To export the results click on the export button in the analysis window to Save it to the location of your choice as a delimited text file or press the export to excel button to export the report to MS excel. Grid Analysis This form of analysis is specifically suited (although not exclusive) to analysing and displaying numeric information. The analysis is performed on a patient rather than population basis. Once extracted the analysed information can be displayed in a table or as a graph. Grid analyses are based on one of three sources: Predefined Grid Analyses Any Sequence of Items Any Aggregate Item When you are more experienced with using HEALTHone™ you will be able to create your own Grid Analyses, Sequences of Items and Aggregate Items. For now, we will use those supplied as standard with the product. 108 Health One Version 7.1 User Manual. Copyright 2011Helix Health Ltd In addition there are two predefined analyses: Growth Analysis Audiometric Analysis These each have their own button in the Grid Analysis window (see below) and require no further action other than clicking on them. Technique Open the patient file to be analysed. Activate the grid analysis (by clicking on the Grid Analysis Button on the HCR Analysis Toolbar The Grid Analysis Window opens: Select the source required, Grid, Sequence or Aggregate Item by clicking on the Grid Analysis Source Selection Button. Then press OK to see the analysis 109 Health One Version 7.1 User Manual. Copyright 2011Helix Health Ltd The results are initially displayed in tabular form in the Grid Analysis window. You can now: Filter the results Choose which results are displayed. Choose how to display the results – Grid or Table. John Test‟s HCR should still be open. If you have closed it in the meanwhile open it again now. Example: Activating the Grid Analysis 1) Click once on the Grid Analysis Button on the HCR Toolbar. 110 Health One Version 7.1 User Manual. Copyright 2011Helix Health Ltd Grid Analysis Window opens. 2) Click on the Grid Source Selector Button. Grid Selector Window opens. 3) Ensure that Grid is the selected source. 4) Select BLOOD PROFILE as the analysis in the group box. 5) Click on the Select Period box to tick it. 6) Click on OK to begin the analysis. Because the Select Period box was checked you are now prompted to enter a date range. 7) There is no need to type the forward slash marks in the date. Select the from date and type 01 01 1994 Select the to date and type 31 12 1995 Analysis on John Test blood results appears in tabular form in the Grid Analysis Window. Choosing a Table or Graph 111 Health One Version 7.1 User Manual. Copyright 2011Helix Health Ltd 8) Click on either display modem button to switch between Table and Graph displays. 9) Select Graph display – from there you can then choose if it is stacked or overlapping axis via buttons once again: 10) Choose each graph type in turn 11) Reselect the Table display once more. Printing Grid Analysis When the Grid Analysis Window is open you can print whatever is displayed by selecting the menu sequence: 112 Health One Version 7.1 User Manual. Copyright 2011Helix Health Ltd 7) File/Print Closing the Grid Analysis Window This can be done by clicking on the cross it the top right hand corner of the window or by selecting the menu sequence: 8) File/Close Grid Analysis. Summary Guide 1. To analyse a selected item Short Cut = Ctrl + I Open the file of the patient to be analysed. Select the item to be analysed and click once on the „Analyse Active Item‟ button on the HEALTHone™ Toolbar. 113 Health One Version 7.1 User Manual. Copyright 2011Helix Health Ltd 2. To analyse any item Short Cut = Ctrl + M. Open the file of the patient to be analysed. Click once on the „Analyse Any Item‟ button on the HEALTHone™ Toolbar. Select the item required to be analysed from the list. 3. To analyse the complete Health Care Record for a patient. Open the file of the patient to be analysed. Click once on the „Analyse HCR‟ button on the HEALTHone™ Toolbar. Select the analysis required from the list and click the Execute button. 4. To analyse the drugs prescribed to a patient Open the file of the patient to be analysed. Click once on the „Analyse Drugs Prescribed‟ button on the HEALTHone™ Toolbar. Select the analysis required from the list and click the Execute button. 5. To analyse the entire patient register. Short Cut = Shift + F7. Click once on the Analyse Population‟ button on the HEALTHone™ Toolbar. Select the analysis type: Now select the analysis required from the list displayed and click the Execute button 6. To create a grid analysis Open the file of the patient to be analysed. Activate the grid analysis window by clicking on the „Display as Grid‟ button on the HEALTHone™ Toolbar. Now, decide on the type of grid analysis required and click on the appropriate button in the grid analysis window: Growth Analysis, Audiometric Analysis, Grid Analysis If you select a grid analysis the grid selector window will open. Now select the grid analysis source: Grid Aggregate Sequence Select the analysis required from the list. Click OK. 114 Health One Version 7.1 User Manual. Copyright 2011Helix Health Ltd Own Notes 115 Health One Version 7.1 User Manual. Copyright 2011Helix Health Ltd Prescription Manager The Prescription Manager (PM) is used for the prescribing of two types of prescriptions: repeat prescriptions and acute prescriptions The first part of this chapter will deal with editing and printing of a simple drug prescription In the second part, we shall discus the management of the prescription. We will look at the more complex aspects such as repeat prescription management, the price of the prescriptions and the renewal of prescriptions. Opening the Prescription Manager In the majority of cases a prescription will be issued during the course of a consultation. However, in some cases the prescription may be the only reason for the contact. In either case, it is necessary to create a new HEALTHone™ transaction. A sequence, for example the medical sequence SOAP. May contain the item « drug prescription » . Never the less, if you create your own transaction, you may directly enter the item « drug prescription » When a patient file is open and a medical transaction has been created, the prescription Manager (PM) may be opened in several ways. Simply click the icon « prescribe a drug » from the tool bar at the top of the patient display window. Double click on the icon or press the Enter key when the « drug prescription » item is highlighted, if this item already exists in the transaction. 116 Press the combination hot keys Alt+F2. Health One Version 7.1 User Manual. Copyright 2011Helix Health Ltd Select the menu « insert » - « drug prescription ». Main Drug prescription screen The Prescription Manager contains four main panels 1. Drug Selection Panel = Drug list panel – Top left 2. Allergy/Adverse reaction Panel – Bottom left 3. Repeat Prescription panel = Repeats panel – Top right 4. Current Prescription Panel = Active prescription – bottom right Drug Selection Panel = Drug List panel. This panel is used for selection the desired drug. You can choose your drug from a list of brand names or from a list of generic names or from the private database. You can also choose a drug from any list of drugs already prescribed for this patient as per the screenshot below. By default, the IPU database containing the entire list of brand names is displayed. 117 Health One Version 7.1 User Manual. Copyright 2011Helix Health Ltd When you type some letters contained in any part of the drug name, the list will be filtered accordingly. The contents of the search panel is as below : The search zone allows you to see directly the drug as you will prescribe it, including the dosage. The presentation is included in the drug name. The drug search window also allows you to directly choose a dosage for a drug that may have several dosages predefined by the user. We will see later how to associate dosages with drugs. Click the button to show the list of predefined dosages. Select the appropriate dosage for this patient. From the search zone, you can also use the « Ctrl+Up_arrow » or « Ctrl+Down_Arrow » to switch between dosages. 118 Health One Version 7.1 User Manual. Copyright 2011Helix Health Ltd Selection from generic list : To select from the generic list, Open the menu and select « Irish Specialty (IPU – Generic) » or use the Hot keys Ctrl+G Type in a few letters for the required drug 119 Health One Version 7.1 User Manual. Copyright 2011Helix Health Ltd Selection of a list from drugs already prescribed to this patient: Open the menu item below. Select the view you require : Repeat Prescriptions, History, Active Therapy or last prescription. You can use the following Hot keys to achieve the view you desire : o CTRL+K for repeats o CTRL+U for Active Therapy o CTRL+H for History o CTRL+L for last prescription Note: 3.7 users. This view is now available on the left hand panel as well as the top right hand panel as you were used to. Repeat Prescription view displays the pack size and the drug name. The History and last prescription views also contain the date the drug was last prescribed. For all these views, typing some letters will reduce the list as with the main product filter. REPEATS PANEL The right hand top panel – contains the prescriptions from the patient file (repeats, history, ….) This panel allow you to view, exactly as in the product search panel, the drugs that are contained in the patient file. These views are optional and were included so that you can see the repeats at all times. This is the default view. 120 Quantity = number of tablets prescribed for the repeat period Health One Version 7.1 User Manual. Copyright 2011Helix Health Ltd Prescription = name of the drug Dosage = dose to be taken daily.. Remaining repeats = Total allowed repeats less the number of times prescribed so far (before required review, for example) Repeat by = number of repeats given in one shot e.g. 1 month 3 months 6 months etc Last prescribed = the date the drug was last repeated Generic name of the drug To change the view, simply click on the menu and choose the view you require. You may also use the Hot Keys as follows : o SHIFT+CTRL+K for Repeats o SHIFT+CTRL+U for Active therapy o SHIFT+CTRL+H for History o SHIFT+CTRL+L for the last prescription Note: The repeat prescriptions are saved to the Basic medical Information transaction and are visible at all times from within the patient file from the « view » tabs Allergies and Adverse reaction to Medication Panel 121 Health One Version 7.1 User Manual. Copyright 2011Helix Health Ltd This panel displays any adverse reactions to medications and allergies: Normally HEALTHone™ stores all drug allergies in the item « Adverse reaction to medication » and stores this item in the basic medical administration transaction. By convention we use the « allergy » item to store non drug items such as house dust mite etc. We will describe how to insert adverse reactions later. 122 Health One Version 7.1 User Manual. Copyright 2011Helix Health Ltd Current Prescription Panel This panel displays all the drugs prescribed in this session or, if you open an existing transaction, any drugs prescribed in that transaction. The toolbar at the top of this screen shows the following: 1. Number of drugs prescribed in this prescription set. 2. The Date of the prescription 3. The total price of all drugs in this set 4. Drug take – this is the schedule for the patient and can be printed here 5. Next prescription set in the transaction. 123 Health One Version 7.1 User Manual. Copyright 2011Helix Health Ltd Prescription Technique Prescribing and printing an acute Drug The acute prescription is selected from the standard drug list on the left. Once selected the drug will appear in the active prescription panel. It is then ready for printing Technique – Prescribing Drugs In this example, we will prescribe a drug from the list of branded drugs. We can describe prescribing from the other lists later. Open the patient file and create a new consultation 1) Open the prescription Manager (PM) by hitting the Hot Key combination ALT+F2. The PM opens. If this doesn‟t happen then use the menu item « Insert – drug prescription ». 2) Make sure you have selected the « Irish Specialty – (IPU) from the list in the top left pane. Select the Drugs 1) In the filter box type a few letters : « TENOR » 124 All the drugs that have the letters TENOR will appear in the list, sorted alphabetically. Health One Version 7.1 User Manual. Copyright 2011Helix Health Ltd 2) Press the ENTER key or Ctrl+N or drag the item to the current prescription panel using the mouse, to begin a new acute prescription, The drug edit window is displayed. 125 Health One Version 7.1 User Manual. Copyright 2011Helix Health Ltd In this example we will prescribe one tablet once a day for 28 days. The quantity will be calculated automatically, based on the duration. 3) You may also insert patient instructions, which may be printed later. A detailed description of the drug edit screen follows. 4) Click OK. The drug is prescribed and now visible in the active prescription window. 126 Health One Version 7.1 User Manual. Copyright 2011Helix Health Ltd 5) Repeat the operation for other drugs 6) Click the print icon on the tool bar at the top of the HEALTHone™ screen or use the Hot Key combination CTRL+P 7) You may also view a print preview of the prescription before it goes to the printer. Management of Repeat prescriptions Creating a repeat prescription There are several ways to create a repeat prescription from the drug list. First of all you should select a drug from the drug list on the left. 1. You can use the mouse to « Drag & Drop » your selected drug from the drug list to the repeats panel. 2. You can use the Hot Key Combination Alt+right arrow (open editor first) or CTRL+Alt+Right arrow (by pass edit screen if dosage already defined) 3. You can press the edit button, and tick the « Repeat » on the top right hand side of the edit window This box can be ticked by hitting the combination keys Alt+R 4. You can also « Drag & Drop » your selected drug from the current (acute) prescription panel to the repeats panel. 5. You can edit the acute prescription in the acute prescription panel and tick the Repeats box 6. Finally it is possible to send a drug from the list of drugs on the left hand panel to the repeats after hitting Enter on it by ticking the Repeats box and un-ticking the prescribe box (bottom left of edit screen) The repeat prescriptions are saved to the top right hand panel of the PM. By default this panel shows the repeats but it can also be changed to show other prescription sets from the patient file. 127 Health One Version 7.1 User Manual. Copyright 2011Helix Health Ltd The repeat prescriptions are saved to the basic medical Information transaction. These drugs are also automatically visible from the patient file with the PM closed. They are included in the « views » tabs on the top left hand side of the patient record. This view can be made the « default » view for these tabs by using the menu item tools/options/general and changing the default analysis tab setting on the right hand side Prescribing from Repeat Prescription List Here is a typical list of repeat drugs in the repeats panel. Managing the list of repeats: 1. You can select one or several or all drugs in the list as follows : Select a drug with the mouse. Hold the CTRL key down and then click several drugs to make a multiple selection Select all by clicking on the little square box on the top left of the PM screen or hit the Combination Keys CTRL+A to select all drugs in the list 2. You can define the « repeat by » quantity by selecting the drugs you require and then simply typing a number such as 3 or 6 for 3 monthly or 6 monthly scripts. You do this also by selecting your drugs and clicking on the repeat by icon on the tool bar 3. You can define that a drug or selection of drugs is being dispensed by the doctor directly. 4. Once you have made your selection and decided how many months repeats you want to give the patient you are ready to prescribe the repeats to the « Current prescription » panel, ready for printing. There 128 Health One Version 7.1 User Manual. Copyright 2011Helix Health Ltd are several methods of doing this. Click the icon « prescribe all » will automatically select all the repeats and prescribe them to the current prescription panel Note: hitting the F8 key will do the same thing Drag your selection with the mouse from the repeats panel to the current prescription panel If you are selecting more than one drug, hit the Enter key or CTRL+Enter and they will be prescribed directly Stopping repeat Prescriptions To stop a repeat and record the fact that you stopped it in the patient file you can click on the « stop » button You can also indicate the date and the reason for stopping : Deleting a Repeat prescription To delete a repeat prescription with no record of the deletion saved, select the drug in the repeats panel and click on the delete button. Multiple prescriptions in the same session: The PM allows you to create more than one prescription in the same transaction. This may be necessary, for example, when a patient returns, having received a prescription, because they forgot something or if you want to 129 Health One Version 7.1 User Manual. Copyright 2011Helix Health Ltd print some drugs on different forms for a single transaction. To create a new prescription, simply click on the button situated on the tool bar above the « Current Prescription » panel, and then prescribe new drugs. The counter to the right of the icon indicates how many prescriptions there are in the transaction and the number of the prescription being currently displayed In the patient file each prescription is contained in a separate «aggregate » of the item « drug prescription » Regarding the printing, the different instances may be printed separately or on the same form. More Details on prescribing Searching for a drug You may search for drugs using various options : 130 Health One Version 7.1 User Manual. Copyright 2011Helix Health Ltd By default, the PM searches for the characters entered in any part of the drug name Thus, if you are looking for « colostomy bags » and you enter the text « colostomy » you will get what you want, even though the item name does not start with the characters entered. Note: it is also possible, for example, to search by number. In this case it is necessary to precede the text by a « star » : * Example : Search for clonamox 250mg It‟s possible to change the search options by changing them in the menu item Options/drug Module. Search on any part of the drug name. If this option is not ticked, the search is made on the first letters of the drug name only. If this option is ticked, you can search for a drug by typing in letters from any part of the drug name. Search on an empty value : If this option is ticked, all drugs in the database will be displayed immediately you open the PM, when you have not typed in any search criteria. If it is not ticked, no drugs will be displayed until you start typing your search criteria. Use the unchecked option if you need the PM to open faster. Note: Some advice : If your search is made on the start of the drug name, you can put a space in first and then you will be searching the following text in any part of the drug name. Searching for drugs based on the « Equivalents » It is possible to filter a list based on the equivalents of a given drug. Click on the button on the tool bar. 131 Health One Version 7.1 User Manual. Copyright 2011Helix Health Ltd If we choose the first option above « active substance », having first typed “tenormin” it will displays all drugs containing « atenolol» in all its forms. If you choose « chemical subgroup » as my filter after choosing tenormin you get all drugs that are selective beta blockers. And so on… Pharmacological class = list of all beta blockers Anatomic level = cardiovascular drugs The filtering of these equivalent classes is based solely on information provided by the database distributor Filtering a drug by “Alternates” This is commonly used to find the cheapest alternative to a given drug. Let‟s take the tenormin example again: Choose tenormin 100mg tabs Now press the alternates button You can achieve this also by hitting the Hot Keys combination <Alt+A> Now you will see displayed, a list of all drugs containing atenolol 100mg 132 Health One Version 7.1 User Manual. Copyright 2011Helix Health Ltd tabs. This list is automatically sorted from cheapest to most expensive You may now prescribe directly from this list. Note: You can also prescribe the chosen drug by its generic name using this right click menu. You can also create an allergy for this drug from here (see later) Prescribing a drug to the active prescription panel There are several ways to prescribe a chosen drug from the drug list to the active prescription panel. 1) Prescribe directly without opening the drug prescription editor : Use the prescribe button or hit the Hot Keys CTRL +N (N for New prescription) 2) Edit the prescription before prescribing: Use the button « Edit » or hit the Hot Keys CTRL + E (E for Edit) 3) Use the mouse to select the drug and drag it to the active prescription panel 4) Simply hit the Enter key. What happens when you hit the Enter key can be defined in the Options. It may be set to direct prescribe or open the edit screen first. Note: If you select the tools/option of « edit before prescribing » and at the same time « prescribe directly from repeats.. » is ticked, hitting the Enter key will open the editor for drugs selected from the database but not when you select drugs from the top right panel (repeats, history..) Prescription Editor The Drug editor dialogue allows you to do the following : 133 Health One Version 7.1 User Manual. Copyright 2011Helix Health Ltd To prescribe a drug as a repeat OR as an acute prescription, or both To define and save several dosages for each drug. The start and end dates for a prescription, if required. To define a dosage schedule which can be given to the patient To define a series of other options If you wish to send a drug to the repeat panel simple tick the <Repeat> check box. The dosages The list of formulations available is now reduced to a manageable number of realistic possibilities. As well as this you can simply enter you own free text formulation. All calculations based on a free text formulation, however, will be the responsibility of the user. The editor allows you to format the dosage and formulations easily. In the numbers boxes, you can enter not only numbers but also special characters to allow for further flexibility For example, for the dosage you can enter the following: 1/2 Tablet, 2-3 tablets (2 or 3), 1 – 1/2 tabs etc. The automatic calculations will be correct if the PM understands what you have entered. For the price you can always insert this manually but you are then responsible for any further calculations made there on. The dose edition zone displays all the dosages that were saved by the user, with the default dosage indicated in bold type. . When you first open the module the default dosage for all drugs will be 1 daily for 28 days. The user can change this, save it and it will be remembered for this drug thereafter. 134 Health One Version 7.1 User Manual. Copyright 2011Helix Health Ltd The PM will calculate the quantity of a drug based on the dosage and the duration of treatment. However, if you modify the quantity manually the PM stops calculating. If the PM cannot ascertain what the formulation should be, it leaves it blank and coloured in pink. The user can then enter his own formulations as follows : 135 Health One Version 7.1 User Manual. Copyright 2011Helix Health Ltd Note the quantity is in pink. This indicates that the user has manually entered the quantity Let us take an example of Prednisolone as a prescription. The PM automatically calculates the quantity based on the duration as input by the user. If you want to change the Duration, say to 7 days, the quantity will 136 Health One Version 7.1 User Manual. Copyright 2011Helix Health Ltd automatically be updated. Note that the price is also automatically updated. However, if you manually change the formulation or quantity of a drug such that the PM can‟t calculate the price, you can insert the price yourself as below, by simply double clicking on the price. Please note that this is not recommended unless your formulations are 137 Health One Version 7.1 User Manual. Copyright 2011Helix Health Ltd completely unknown to HEALTHone™ . You are responsible thereafter for the accuracy of this price. You may also insert a free text dosage by clicking on the button or Hit the Hot Keys CTRL+T Enter any free text you like or choose from the list of common terms offered (use the Hot keys CTRL+ENTER to create a new line) As regards the list of dosages, each time you prescribe a drug and enter a dosage for the first time, this dosage is saved to the list of dosages. Every time you prescribe that drug, for any patient, from now on, this dosage is presented as your first option. The following commands allow you to manipulate the list of dosages : 138 Insert the currently displayed dosage to the list of saved dosages (Ins) Update the selected dosage to that of the displayed dosage (CTRL + S) Delete the highlighted dosage (CTRL + Del) Select the previous dosage (CTRL + Arrow Up) Select the next dosage (CTRL + Arrow Down) Make the highlighted dosage the default dosage (CTRL + M) Health One Version 7.1 User Manual. Copyright 2011Helix Health Ltd The dosage schedule = drug take during the day You enter the schedule directly as above individualised for each patient, with a comment if required. You can enter the actual number of tabs to be taken You can use, for example, an X to indicate when the medication is to be taken. You can use fractions or brackets to indicate, for example, an optional dose Drug Information There are several ways to view information on any drug as supplied by the manufacturer: 1. Click on the information icon on the top bar of the PM 2. Hit the combination keys ALT + Enter 3. Right click on the drug and choose the option « product information » 4. Click the Pill icon on the top right of the drug edit screen 139 Health One Version 7.1 User Manual. Copyright 2011Helix Health Ltd Prescription Manager – prescribe by disease – sets In the drug pick list window we can search for drugs « by disease » The principle here is that you define a prescription set for a particular condition and then you can prescribe the entire set of drugs in one shot to the active transaction. Search for a drug, right click on the drug, then select create new disease set, enter the disease. Once you have created your own new « disease » label, you can add any number of drugs to this disease set for later prescribing the entire set in one shot. 140 Health One Version 7.1 User Manual. Copyright 2011Helix Health Ltd Now you can choose the « drugs by disease » list in the same way as you choose brand/generics etc, and prescribe from there. Note that if you have defined a default item for drug sets in tool/options, and if you enter a content into this item, in HEALTHone™ that has a corresponding disease set in the PM, this drug set will be automatically proposed when you open the PM – as opposite. Now you can prescribe this «drug set » to the active transaction and all the drugs will be prescribed. Note : the edit screen will open for each drug if you simply drag the disease. If you hold the CTRL key down while dragging, the drugs will be prescribed directly if a dosage has already been assigned. This behaviour is exactly the same for normal prescribing. Ctrl_Enter or Ctrl_drag = prescribe directly if dosage defined. Management of allergies/adverse reactions to medications The prescription Manager allows you to define both « allergies » and « adverse reactions to medication ». If you define either of these from the drug list, then HEALTHone™ will display an alert if you try to prescribe them. By convention, the Irish users have adopted the use of the item « Adverse reaction to medication » as the way to declare a drug allergy. We use the item « allergy » to define an allergy against a non drug item such as « cat hair » « house dust mite » etc. However, using either of these methods in the PM will give an alert if used for a drug. For the purposes of this discussion we will use the term « allergy » to mean « adverse reaction to medication » only. The adverse reaction may be declared by different methods in the PM. Direct from the allergy section (lower left panel of the PM) During the prescription of a drug When you « stop » a drug, you can give an allergy as a reason for stopping it. 141 Health One Version 7.1 User Manual. Copyright 2011Helix Health Ltd The allergy is normally declared in the allergy panel at the bottom left hand side of the PM. Note : this panel can be hidden by option The same display is available directly in the patient file – top left views « allergies » 142 Health One Version 7.1 User Manual. Copyright 2011Helix Health Ltd Adding an allergy from the allergy panel Click the button or hit the combination keys Shift+Ctrl+A Adverse drug reactions use the « allergen group » as the default drug filter type. Thus you decide a patient is allergic to penicillin, meaning all penicillins. This is the commonest way of creating an allergy. However, you can also declare an allergy using other drug ingredients as seen in the drop down list. 143 Health One Version 7.1 User Manual. Copyright 2011Helix Health Ltd You can click on the down arrow next to the « allergen group » icon to see this list. Alternatively you can use the Hot Keys combinations Ctrl Right arrow and Ctrl Left arrow to move from one list to the next. ATC Code: (Anatomic Therapeutic Chemical Classification) Filters the drugs by their therapeutic actions e.g. antihypertensives etc .Type in the first few letters and the list will be reduced. You can also click the button to choose from a hierarchical list. Ingredients :Filters the drugs by their ingredients e.g. potassium, iodine etc. This may not be very useful for most users Free text: You can also use free text descriptions to enter your own drug names, perhaps if they don‟t exist in the other lists. Note that the entries to the free text list will not trigger an alert in the PM when you prescribe them. They will, however, be visible in the allergies panel You can give an adverse reaction a « severity index » from 1 – 7 Defining an adverse reaction directly from a selected drug After selecting a drug (from the drug list or from the repeats panel), you can declare an adverse reaction to this drug by right clicking on the drug and choosing the command: « Create an allergy or adverse reaction» or by hitting the Hot Key combination Ctrl+Alt+A. When an adverse reaction is created using this method, the coding possibilities are different 144 Health One Version 7.1 User Manual. Copyright 2011Helix Health Ltd Defining an allergy as a cause for stopping a drug When you stop a drug, say a repeat, you are asked the reason for stopping. One of the reasons is an allergy/adverse reaction You can also edit an existing adverse reaction ( edit the reaction or gravity only) . Management of the private drug database To select a drug from your own private list of drugs click on the drug database selection button on the top left hand panel. You will see a drop down list. You can also use the Hot Key combination Shift+Ctrl+B. The tool bar at the top of the PM allows you to : Create a new private drug Edit the selected private drug Delete the selected private drug Create a new private drug Click the button to add a new drug to the private database. You should fill in the boxes as in the dialogue below 145 Health One Version 7.1 User Manual. Copyright 2011Helix Health Ltd Enter the drug name. The drug name should include the strength and the strength unit. The rest of the form is optional. In the case of liquids or topical medications you should also fill in the « pack size units » boxes. Click the button to edit the selected private drug. The same edit dialogue box is opened and you can change any of the information 146 Health One Version 7.1 User Manual. Copyright 2011Helix Health Ltd Deletion of a private drug Click the button to delete the selected private drug Prescription Manager – Practice Formulary Practice formularies can be defined in the prescription manager options window. The Prescription manager options can be accessed by clicking on the main menu « tools options prescription manager OR alternatively direct from within the prescription manager by clicking on the button : Below is a screenshot of some of the prescription manager options: We have three user-defined formularies. These can be named as you wish. However the first formulary is named « practice formulary » by default. Once you have set up the practice formularies in the tools options menu, you can send drugs from the IPU list to your formulary for inclusion. You do this by choosing the drug from the main IPU list, right clicking on the 147 Health One Version 7.1 User Manual. Copyright 2011Helix Health Ltd drug and clicking « send to search form » practice formulary You can do the same thing from the repeats window and from the active transaction window. In this way you build up a list of preferred drugs that suits your own practice. The prescription Manager Options – Summary The prescription manager options can be accessed either by the HEALTHone™ main menu item Tools/Options/Prescription Module. OR By clicking the button in the main bar of the prescription manager. 1. Search on any part of the drug name: If this is ticked (the default), then when you type some letters when searching the IPU list, these letters need not be the first few letters of the drug but can be found anywhere in the drug name. Note : Even with this option unchecked, if you put a space before the first letters of your search, you will get a wide search i.e. it will act the same as if you had the option ticked. 148 Health One Version 7.1 User Manual. Copyright 2011Helix Health Ltd 2. Search on empty value: If this is ticked, the IPU list is loaded when you open the PM. Thus you will see some of the first drugs in the list before you type anything. If this is unchecked, the list remains empty until you type something. This should make for quicker opening of the PM because the list does not have to be loaded until you start typing. 3. Stay active for (28) days: Normally when you prescribe a drug, it remains active for the duration specified in the dosage. Sometimes this is not appropriate. For example, if you prescribe GTN spray 1 dose once a day, it will remain active for over 100 days. By using this options you control how long HEALTHone™ will consider the drug « active ». Note that all repeat prescriptions are considered « active » until they are removed from the repeats. 4. Insert the prescription at the end of the transaction: If not ticked, the prescription will be entered at the highlighted item in the transaction 5. Default repeat number: When this number of repeats have been issued, HEALTHone™ will grey out that drug in the repeats so that it will have to be « re-activated » before it can be prescribed again. If this number is changed (to 12 say), then for all future prescriptions the default repeat number before checking will be 12. 6. Apply to all drugs : This relates to 5 above. If this is ticked, then when you change the default repeat number, all existing repeats will revert to a default of 12. 7. Display overdue repeats in red: If the month is up, for a single month‟s prescription, the drug will appear in red. 8. Default duration for prescriptions : The default duration for repeat drugs is 28 days. You can change this default here to, say 30 or 31. 9. Drug set: If this is ticked, then if you have a drug set by disease matching this term, 149 Health One Version 7.1 User Manual. Copyright 2011Helix Health Ltd that drug set will be automatically proposed when you open the PM. 10. Layout: This is self explanatory. It is here that you can decide the default views for the left and right upper panels of the PM. 11. ENTER KEY These options determine what happens when you hit the ENTER key after selecting a drug. By default hitting the enter key will open the drug edit window. In this case you can skip the edit screen if you hit CTRL+Enter Even if you have the Enter key = open the drug edit screen, you can make it prescribe directly from the repeats. In all cases, if the drug has no dosage defined, the edit screen will always open Remember that you can easily see if a drug has a dosage defined, without opening the edit screen by looking at the middle panel of the left hand side of the PM. 12. Interactions: here you can decide what level of interactions you want the PM to warn you about. The interactions alert can also be turned off for drugs prescribed from repeats. 13. Print options: show print dialogue - This determines whether you print directly or show the printer list before printing when you hit the print button in the PM. This option is also available in the print screen itself Conversion of Repeat prescriptions from 3.7 version ofHEALTHone™ Because we are using an entirely new drug database, the IPU database, as our pick list in version 5.0,and above we have to “convert” our 3.7 drugs, which were entered using a different database, the IDDF database. There is no link between the two databases which would allow a direct “translation” of the IDDF drugs to the new IPU drug list. 150 Health One Version 7.1 User Manual. Copyright 2011Helix Health Ltd However HEALTHone™ does have a list of all the drugs in each patients record and it can directly enter these drugs into the repeats window of the version 5.0. You can continue to prescribe these drugs from the repeats as you have always done with no effort on your part. However, these prescriptions will have no link to the new drug list and this will lead to some restrictions, namely there can be no allergy/interaction checking; nor can HEALTHone™ update the prices or other drug information, for these drugs. We therefore strongly recommend that you use the “convert repeats” button on the repeats panel of the PM so that HEALTHone™ can attempt to pick a drug from the IPU list which is the same as that you have already prescribed. These drugs are coloured orange in the new PM until they are converted. Note: the private drugs are NOT converted, they can‟t be! As most of the drugs you previously had in your private database are not contained in the IPU database, we suggest you replace these drugs with those from the IPU drug list. You can, if you wish convert your own private database to a new private drug database. This will be described later. Conversion of 3.7 private drug database to a 5.0 or above private database It has already been noted that most of the drugs you used from your private drug database in 3.7, are available now in the new IPU drug list. If you replace these drugs with those from the new drug list you will have the following advantages : The names of the drugs/appliances will be correct as in the MIMS. The drugs will have all the attributes of any other drugs from the IPU, namely, a, interaction, pricing information, drug information, all of which were not available with drugs from the private list. With the Prescription Manager (PM) open, click on the HEALTHone™ main menu item « Prescriptions » : From here you can import all your old private drugs to the new private drug database. 151 Health One Version 7.1 User Manual. Copyright 2011Helix Health Ltd NOTE: Drugs prescribed from the 5.0 or above private database will have the same “properties” as those in the 3.7 private drug database: they will be entirely user controlled and will not have any relationship to the IPU list. 152 Health One Version 7.1 User Manual. Copyright 2011Helix Health Ltd Appointments Module The Health One appointments screen can be seen in the screen shot below. In this section we will explain the function of each button on the appointments screen and how you can book appointments and configure the screen to meet your needs. On the appointments screen the time slots are displayed on the left. You can set the duration of these in the appointments option section. There is a calendar on the right which allows you to choose a date to book appointments. You can also choose a different month by pressing the little black arrows to the left and right of the month display. - this facility at the top of the screen can also be used to change the day by clicking on the arrows 153 Health One Version 7.1 User Manual. Copyright 2011Helix Health Ltd Today’s date is highlighted in red. You can press the today button to bring you back to today at any stage. . View Selector Use this selector to choose: A one day view A 5 day week view A full week view A month view A list Or see who is in the waiting room. Resource Selector The resource selector can be used to add or remove users from the appointments screen – simply press the check box beside the users name to add or remove them from the screen User Priority on appointments screen To reorder the users priority on the appointment screen press the following button 154 Health One Version 7.1 User Manual. Copyright 2011Helix Health Ltd The following screen will be displayed allowing you to drag the users to the top using the mouse or Shift and arrows. The user at the top will be displayed on the left hand side of the appointments screen. - This button on the resource panel can be used to change the order of the date / resource on the top of the appointments screen. The buttons in the image below will allow you save the views you have require for example you could have different views for each day of the week. - this will allow you to select a view using the black dropdown arrow. - these buttons allow you to move through your saved views. - this button will allow you save & edit your views. You can also set your default view using this feature. 155 Health One Version 7.1 User Manual. Copyright 2011Helix Health Ltd Appointment Search By pressing this button at the top of the appointment screen you can search for a patients appointments or search for an available appointment Search appointments Enter the patients name on the text to search box – you can then search by date range, time, appointment type, User by pressing the search button. Search for a free period. Enter the search criteria from date, times, appointment types users, duration and press search. You can then select one of 156 Health One Version 7.1 User Manual. Copyright 2011Helix Health Ltd the times returned to book an appointment. - this button will display the invoices for the selected patient allowing you to make changes to patient billing. - This button lists all the appointments for the selected patient or pressing F12 refreshes the screen 157 Health One Version 7.1 User Manual. Copyright 2011Helix Health Ltd Change appointment status When you have booked an appointment you can use the above buttons to change the status of a selected appointment to Booked Present In Appointment – this will add the patient to the waiting room. Completed Did not attend Canceled Too late Whiteboard You can enter notes on the whiteboard which can be seen by any user on a shared configuration. 158 Health One Version 7.1 User Manual. Copyright 2011Helix Health Ltd Appointment Options Pressing the appointment options button will open up the options screen on the appointments module options From here you can choose to: Auto select patients if match criteria – this will allow you to enter a patients name directly into the calendar and if you have a direct match to a patient in your database you will not have to search for a patient – it will be added directly to the calendar. Edit the appointment after creation – this will display the edit appointment screen when you create an appointment allowing you to change the appointment type etc. You can also get the appointment edit screen by right clicking with the mouse on the appointment Set the default time shown in the calendar Show the appointment time Limit the calendar to only show the working hours Display the appointments using the status color instead of icons You allow have a number of other display and presence options to 159 Health One Version 7.1 User Manual. Copyright 2011Helix Health Ltd chose from which you can select to meet your needs. From this options screen you can also update the patient details displayed on the patient details panel of the calendar To update the details drag the fields from the panel on the right to the panel on the left using the mouse and press OK to save. This will update the details seen for the selected patient in details panel in the calendar. 160 Health One Version 7.1 User Manual. Copyright 2011Helix Health Ltd Appointment configurations To configure the appointments you can press the following button on the calendar The following screen will then be displayed From this screen you can configure your : Appointment types – add, edit delete appointment types Setup working hours, time blocks and appointment types for users & availability of rooms To add an appointment type press the The following screen will be displayed button. 161 Health One Version 7.1 User Manual. Copyright 2011Helix Health Ltd Enter in a Title for your new appointment type, a default duration and a display colour and indicate if the user will be free or not for this appointment (e.g. if it is a clinic when they will see people) – Press OK to save. You can edit the appointment types by pressing by pressing and delete a type . Time Blocks To add time blocks press the users tab – select the time slots your require the block for and right click on the mouse. 162 Health One Version 7.1 User Manual. Copyright 2011Helix Health Ltd The following screen will be displayed. 163 Health One Version 7.1 User Manual. Copyright 2011Helix Health Ltd Select the day of the week , then the start time and end time. Enter the appointment type of the time block – e.g. Lunch. You can then set when the time block will occur, by choosing the days or selecting first week of month, last week of month, Odd weeks, Even weeks. Then press OK to save. To Book an appointment 1. Select the times slot you require. 2. You can then either type the patients name directly into the slot if a patient matches an appointment will be booked for them. If not the patient search screen will be displayed allowing you to search for your patient. Press enter / ok to book the appointment 3. If you have the edit after creation options selected in the appointment options the following screen will be displayed otherwise the appointment will be added to the calendar. (you can then select the appointment and right click to see the edit screen. 164 Health One Version 7.1 User Manual. Copyright 2011Helix Health Ltd Using the edit appointment screen you can set the type of appointment, the resource the appointment is scheduled with, enter a to do status avatar to allow a user to easily see what a patient is coming in for and enter any comments on the appointment. Pressing F3 when you have an appointment selected will also allow you to add appointment comments. 165 Health One Version 7.1 User Manual. Copyright 2011Helix Health Ltd Open a patients Chart from appointments To open a patients chart from the calendar you can press the enter button on a selected patient in the calendar, or double click on a patient in the calendar using the mouse. Right Click appointment options If you select an appointment in the calendar and right click you can access the following options 166 Open Patient Edit the patient Edit / set a reoccurrence Insert a new appointment into the same slot. Add a comment (or press F3) Enter a to do status icon Cut, copy, paste & delete an appointment Health One Version 7.1 User Manual. Copyright 2011Helix Health Ltd Print the appointment Show all the appointments for the currently selected patient Show the history for the appointment Send a text message if you have enabled the text feature Display the prescription module for the patient to issue repeats. Open the billing module for the patient to see their invoices. 167 Health One Version 7.1 User Manual. Copyright 2011Helix Health Ltd Messaging Feature To Send a Message to Another User press the message button on the main toolbar 1) Click on the new message button 2) Select the recipient from by pressing the „to‟ button. 3) Type Message 4) If you wish to relate the message to a particular patient file, click select patient. This will allow you to choose the patient from the patient selector. 168 Health One Version 7.1 User Manual. Copyright 2011Helix Health Ltd 5) To send a carbon copy or blind carbon copy to another user, click CC button and then add cc or add bcc as required. 6) Click Send to forward the message to the recipients. To View Received Messages 1) Click on the message icon to see your inbox. Any messages which have been sent to you will be listed in here and you can view then by double clicking. 2) If the message is relating to a patient you can click view patient to open the patient‟s file. 4) There are options to reply, forward or delete the message at the top of the message inbox screen. 169 Health One Version 7.1 User Manual. Copyright 2011Helix Health Ltd Correspondence HEALTHone™ has its own text editor which can be used to quickly write letters to consultants and archive their replies directly into the patient‟s file. In its simplest form the text editor can be used to write free format letters, like any other word processor, and print/save these. However; there is a more powerful aspect to the text editor in that it has a number of pre-set documents, called templates which are used to automatically extract information from a patient‟s file and merge this into the new document. HEALTHone™ has a number of templates which are supplied as standard. In time you will be able to create new templates of your own. This document will introduce you only to how they are used. See also the chapter on Mail Merge to see how these templates can be further enhanced Free Format Letter To use the text editor to write a free format letter you do not need to have a patient‟s HCR open. Creating a New Letter 1) Select the menu sequence: File / New / Document The text editor window opens with a new blank document. - You can also press the new button to add a new document 170 Health One Version 7.1 User Manual. Copyright 2011Helix Health Ltd You can then type a letter and use the toolbars for the normal word processor formatting such as bold, underline, italic, justification, bullets, numbering & paragraph options. The toolbars are explained below. To save your document press the archive button which will allow you to save the document in the patients file as text, a word object or as an external document on the computers disk drive. Text Editor Toolbars In general, if you wish to know what a toolbar button does simply place your mouse on to it – exactly like you would with the – and a description of each will appear beneath the mouse cursor. 171 Health One Version 7.1 User Manual. Copyright 2011Helix Health Ltd Speed Toolbar This toolbar contains buttons which perform common functions and save you time. Formatting Toolbar - The Format toolbar is used to change the appearance of text. The controls affect two distinct type of text: The Character Any letter or letters that are currently selected. See next page for text selection techniques. The Paragraph Any amount of text ending in a RETURN character. (i.e. inserted by pressing the RETURN key). To Undo mistakes – This is where something has happened, possibly unexpectedly. Select the menu sequence Edit / Undo. The text editor remembers your last action and reverses it, but be careful, only the last action is remembered, so you must correct the mistake before doing anything else ! Editing A Character: Place the mouse cursor to the left of the character to be selected, hold down the mouse key and drag the mouse cursor over the character required. Now release the mouse key. A Word Place the mouse cursor over the middle of the word required and click twice quickly. Alternatively, drag the mouse cursor over the entire word as described for character selection. A Line Move your mouse cursor to the left of the line required until it becomes a right facing arrow. Now drag downwards for one line. A Paragraph Same as for the line but keep dragging down until the paragraph is selected. 172 Health One Version 7.1 User Manual. Copyright 2011Helix Health Ltd Any Amount Click once to place the insert cursor at the beginning of the selection. Use the scroll bar if necessary to view the end point of the selection. Hold down SHIFT and click once on the end point. All Text Select the menu sequence: Edit / Select All Changing the Appearance of Text. The Character: First select the character(s) to be altered, as described on the previous page. Now select the button required on the Formatting Toolbar. Alternatively: Select the menu sequence: Format / Font and change the settings as required. The Paragraph Position the insert cursor anywhere inside the paragraph to altered. Now select the change required on the Formatting Toolbar or, alternatively select the menu sequence: Format / Paragraph. To practice these techniques: 1) Select a paragraph in this book and type it. Do not press the Return key (even at the end of a line) until the entire paragraph has been entered. 2) Practice selecting Characters, Words, Line, Paragraphs and entire text. 3) Select a word and experiment with the settings in the: Format / Fontmenu. 4) Make sure your insert cursor is positioned inside the paragraph just typed and experiment with the Format / Paragraph menu. Page and Document Settings In addition to be able to type, edit and change the appearance of text you will also need to control document and page settings. Set Paper Size: Select the menu sequence Format / Document and 173 Health One Version 7.1 User Manual. Copyright 2011Helix Health Ltd set paper width and height size in the boxes provided. Set Margins Select the menu sequence Format / Document and set top, bottom, left and right margins in the boxes provided. Insert a Page Break Position the insert cursor where the break is required and select the menu sequence Insert / Page Break. To remove a Page Break Position the insert cursor underneath the page break and press the Backspace key once. Printing Your Document 1. Press the button on the main toolbar or select the menu sequence file print. 2. To preview before printing, select the menu sequence: File / Print Preview Saving and Archiving Your Document. There is a difference between saving and archiving. Saving means to save your work as an individual file on to your computer; Archiving means to attach the document to an Item in the current transaction of the patient‟s HCR. So, to archive a document the patient‟s file must be open and a new transaction created. HEALTHone™ will prompt you for the name of the item in which the document is to be archived, normally this would be the item archived document: See „Archiving a Consultant‟s Letter‟ later in this session for an example of archiving. For now we will simply SAVE this document: 1) Select the menu sequence: File / Save 2) Type in a name for the document 3) Click on the Save button. 174 Health One Version 7.1 User Manual. Copyright 2011Helix Health Ltd Closing a Document (and the Text Editor) Now that you have saved the document we can close it. If you choose to close the document and you haven‟t saved any changes HEALTHone™ will prompt you to do so. 4) Select the menu File / Close If you have already saved the document it will now close and the text editor will automatically close as well. If you have not saved the document HEALTHone™ prompts you to do so: 5) Select Yes or No. Cancel brings you back to the document to continue editing. If the document had never been saved before you would now be prompted for a file name and destination directory in which to save it. Upon completion the document will close and the text editor will automatically close as well. Using Templates If you find you are writing the same details into letters constantly you can build a template which will populate details from the patients chart into a letter for you along with items such as your name and address, practice details, patient details, politeness such as yours sincerely etc. Basically templates are designed to be used in conjunction with patient data. They provide a quick method of writing everyday letters in the practice. Once a letter has been created using a template in can be edited and enhanced by using the same techniques employed in writing a free format letter described earlier. 175 Health One Version 7.1 User Manual. Copyright 2011Helix Health Ltd There are a number of templates supplied with HealthOne which can be accessed by choosing the following sequence: File, Open, Template. Or by pressing on the main toolbar and choosing template. The following screen will be displayed, allowing you to choose a template. When you press open the template will open and the details of the current patient will be populated into the letter. You can amend the letter as you see fit, without affecting the template itself and print it off as you see fit. (i.e. any changes you make to the template will be for that one instance only, so you do not need to worry about damaging the template itself through your changes.) To create a new template Select the menu sequence File, New, Template or press the new button on the main tool bar and choose template. The template screen will be displayed. You can type in practice headers, politeness etc directly onto the template. 176 Health One Version 7.1 User Manual. Copyright 2011Helix Health Ltd You can then use this button to import HealthOne items into your template such as patient demographics. This button can be used to import analysis items such as repeat medications or problems. This button can be used to import grids. There are many other formatting buttons on the screen which will give you a tool tip when you hover over them with the mouse, however the buttons mentioned above are the main ones used. Press the save button on the main toolbar to save your template. Then enter a file name for your template and press save. 177 Health One Version 7.1 User Manual. Copyright 2011Helix Health Ltd Archiving a Consultant’s Letter If a patient has seen the consultant and you have received a written reply. To record this we once again create a new transaction: 1) Click once on the Create Medical Transaction button on the Transaction Panel Toolbar. The Transaction Properties dialogue box appears. 2) Complete the Transaction Properties dialogue box by ensuring that the attribute values are set as follows: Type Contact Name EXPERTS REPORT Responsible Your name Date of event Current date and time Speciality respiratory medicine Legal Structure As is Problem None 178 Health One Version 7.1 User Manual. Copyright 2011Helix Health Ltd 3) Click on the OK button. New transaction is completed and appears at the end of the patients medical chapter. Create a New Document 1) Select the menu sequence: File / New / Document A new document opens 2) Type the details of the letter received into your document and press save. You could also scan a document into a patients chart as an experts report. 179 Health One Version 7.1 User Manual. Copyright 2011Helix Health Ltd General Scanning in HEALTHone™ To scan within HEALTHone™ we use a program called Irfanview. This is available on the HEALTHone™ installation CD. To Install Irfanview: Insert HEALTHone™ installation CD. It will open an installation screen automatically. Click on Cancel. Open My Computer. Right click on the CDROM drive and left click on explore. Open the directory called Irfanview. Double-click on iview392.exe to install. After Installation of Irfanview you should double Click on the file called Irfan_ini.exe, also found in the Irfanview directory on the CD. After installing Irfanview, you must link Irfanview to your scanner driver. To do this, open Irfanview, click on file - "select twain source" and choose from the proposed list. (If there is nothing to select, you scanner driver is not installed and you should contact the providers of the scanner). Then go in to HEALTHone™ . 1. Go to Tools –options – scanning. 2. External scanning software should point to "c:\Program Files\IrfanView\i_view32.exe" 3. Item used to store scanned images = “archived document” or “report” or whatever you wish. Now HEALTHone™ is set up to scan pictures. 180 Health One Version 7.1 User Manual. Copyright 2011Helix Health Ltd To scan a single page 1. In HEALTHone™ the button for “insert multimedia object” (camera), has a down arrow next to it containing four options. Choose the option Picture from scanner. 3. Irfanview will open automatically. Click on File - Batch scanning. 3. Don't change any options in here. Just click OK. 4. Your picture should now scan. When it is completed it will show in Irfanview. 5. Close Irfanview. The picture will have saved into HEALTHone™ . 6. To add a comment, go to Insert item, choose comment and type in your comment. 7. Save and validate the transaction. To scan multiple pages A. Repeat steps 1 – 4 as above. B. Instead of closing Irfanview, click on File - Batch scanning again. C. Click OK. D. Repeat for each page you want to scan E. When completed close Irfanview. F. The pages will have saved into HEALTHone™ as one file. 181 Health One Version 7.1 User Manual. Copyright 2011Helix Health Ltd G. To add a comment, go to Insert item, choose comment and type in your comment. H. Save and validate the transaction. There is a separate section on scanning in this manual which goes into more detail on scanning. Own Notes 182 Health One Version 7.1 User Manual. Copyright 2011Helix Health Ltd Laboratory Data Messaging Laboratory results are recorded in the patient's file by: Manually entering the data Automatically receiving the data via the Data Exchange Module Manually Entering Laboratory Results 1) Create a new medical transaction. Leave the transaction Type as contact but change the Name to Lab. 2) Click on OK to create the transaction. 3) Insert the sequence haemoglobin or biochemistry as required and record the results. Automatically via the Data Exchange Module This is done in 3 phases 1. Download the lab results to a folder 2. Import the lab results into HealthOne 3. View and integrate them into the patients chart. 1. Download the lab results from the lab to a folder on your PC – e.g. C: labs. This will be a different method depending on which labs you work with. Your local healthboard or Healthlink will give you instructions on this. 2. To import the lab results to HealthOne Press the following button on the main tool bar. The following screen will be displayed 183 Health One Version 7.1 User Manual. Copyright 2011Helix Health Ltd The first time you set this up you will need to point Health One to the folder which you download your labs to. To do this you should select the Health Board for your area and press the edit button. The following screen will be displayed. The path to your folder which you down loaded your labs to and press next. Select the integration and filing options for the results on the next screen, to suit your practice and press next 184 Health One Version 7.1 User Manual. Copyright 2011Helix Health Ltd again. Then press finish. Once you have the correct path set to the folder which contains your downloaded lab results you can press the execute button. This will import the results to Health One. Automatic Merging If the laboratory definition file had been configured to automatically merge results into the patient files this would have occurred and only errors would be left to be resolved. Managing errors are described later, for now, assume all went well and the data has been successfully merged. Manual Merging Many practices would validate the results before merging them, in which case all results would now be waiting to be validated in the Data Exchange Module Inbox. Press this button on the main toolbar to access the Exchange module inbox The data exchange module screen will be displayed where you can see the list of imported lab results. 185 Health One Version 7.1 User Manual. Copyright 2011Helix Health Ltd Double click on any line to view the message. Any results which have been viewed will have an eye icon beside them Pressing will indicate that the result has been viewed and has been given permission to integrate. You can also print the result, send a text message to the patient from this screen. To integrate a result - select the results from the list on the data exchange module screen and press the integrate selected items button If the patient is matched to a patient in your database on name, surname, sex DOB, the result will be imported to their chart. If the patient is not in your database you will be given the option to add the patient or set as not found. 186 Health One Version 7.1 User Manual. Copyright 2011Helix Health Ltd Managing DXM Errors If a patient file cannot be located for an imported transaction the DXM module can be set to manage this in one of two ways: Automatically create a new file for the patient Set the transaction status to 'Not Found' and await user intervention to resolve the problem The choice of action is controlled via the lab Definition file. See Creating a Definition File later in this section. Note: If the definition file had been set to always validate transactions then all transactions, including the not found, are set to an initial status of waiting. Only when an attempt is made to integrate the transaction will a dialogue box appear requesting your choice of action: 187 Health One Version 7.1 User Manual. Copyright 2011Helix Health Ltd Automatically Create a New Patient File Initially this may seem the most sensible thing to do, however, labs do make mistakes, and the problem could be that the patient's name has simply been spelt incorrectly. Mark the Transaction as 'Not Found' With this setting the transaction will appear in the DXM INBOX as 'Not Found'. Now there are two possibilities: The patient genuinely does not exist The patient does exist but their name has been spelt in-correctly In all cases 1) Select the transaction and then click on the Correct DXM menu button The DXM Correct Identifiers window appears. In it is listed all patient's that nearly match the not found one: If the Patient Does Not Exist 2) Click on the Correct Identifiers window new button. The patient file is created. 3) A prompt appears to confirm creation. If the Patient Does Exist 1) In the Correct Identifiers window click on the patient file that the transaction is to be integrated into and click the Select button. 2) A prompt appears to confirm integration. Click OK 188 Health One Version 7.1 User Manual. Copyright 2011Helix Health Ltd 3) A notice appears to inform you it has been done. Click OK Not found patient. If the Patient does exist ..continued. 4) Two things now occur: The transaction is integrated into the selected patient's file. The name error is remembered for this lab and will be automatically corrected next time if set to do so in the definition file advanced options. (See HCR Identifiers below) 6) Click the Correct Identifiers window Cancel button. Window closes and DXM window back in view. 7) If you are ready to quit the DXM module click on the cross in the upper right hand corner of the DXM window. 189 Health One Version 7.1 User Manual. Copyright 2011Helix Health Ltd Tidying the INBOX All transactions imported into HEALTHone™ arrive in the DXM INBOX. From time to time it will be necessary to locate specific transactions and perform housekeeping on the INBOX. Locate Specific Transactions 1) Open the DXM module DXM window opens. 2) Use any of the techniques above to locate the transaction(s) required. Selecting Transactions 1) Once the transaction(s) required have been located they can be selected individually by clicking once on the transaction selector column to the left of the transaction. 2) Hold down Ctrl and Click the selector column to select multiple transactions. 3) Drag select the selector column to select contiguous transactions. Delete Transactions 1) Select the transactions to be deleted 2) Click on the Delete DXM menu button illustrated opposite. 3) Tick the box to permanently delete the transaction, or leave unticked to only mark as deleted - later re-restorable if required. Click OK 190 Health One Version 7.1 User Manual. Copyright 2011Helix Health Ltd Network Configuration Sharing Introduction A configuration is a collection of data such as sequences, aggregates, templates and general user settings. Each installation of HEALTHone™ has its own configuration set, which equates therefore on a network to each user having their own set. While this allows for individual preferences many users would like ONE common configuration set for all users. There are two ways in which HEALTHone™ allows this common network set to be managed: When logging into HEALTHone™ the network configuration set is selected. Note: Once a configuration set has been selected it will remain the active set for future logons until changed. Each user has their own set and synchronises with the network set when required. Typically all changes are made to the network configuration set and all users synchronise to this when required. Normally one or other of the above methods is chosen but not both. Selecting a Configuration Set at Logon Technique 1) Start HEALTHone™ and when the logon screen opens click on the Advanced tick box. A configuration tab appears. 191 Health One Version 7.1 User Manual. Copyright 2011Helix Health Ltd 2) Click on the Configuration tab to bring it forward. The configuration tab displays the location of the local configuration set. 3) Click on the Add button. 4) In the Browse for Folder window locate the network configuration set (usually on the server …\Honewin\Config). Click OK. The server configuration location is added to the configuration tab. 5) Select the server configuration and click on Select. Click on the Sources tab and logon in the usual way. Note: The Configuration tab will now remain as a feature of the logon screen. In the event of the network failing, or a laptop not connected to the network, the LOCAL configuration can be selected when required in the same manner. 192 Health One Version 7.1 User Manual. Copyright 2011Helix Health Ltd Synchronizing Sources Introduction A source contains a complete set of information regarding a practice, including patient files, billing information, appointment information and user information. Many practices will have secondary sources such as a laptop source, RIP Source and possibly a backup source somewhere on the network. These secondary sources need to be kept in-sync with the master source on the server. How a source is created is documented in the Installation Guide and is normally performed at installation time. There are two types of source: Master and Slave and dependent upon the type(s) being synchronised various options will/will not be available. Regardless of source type the procedure is quite straightforward. Synchronisation Technique 1) Start HEALTHone™ and login to ONE OF THE SOURCES TO BE SYNCRONISED. 2) Click on the Synchronise Sources button on the Standard Toolbar. Illustrated opposite. The Synchronisation Wizard start. There now follows a series of screens the first of which is just an opening screen and can be by-passed in the future by ticking the Do not display…box 193 Health One Version 7.1 User Manual. Copyright 2011Helix Health Ltd 3). Click Next – choose the direction of synchronization and press next. 4).Click next – choose the data you would like to synchronise. – Click next. 194 Health One Version 7.1 User Manual. Copyright 2011Helix Health Ltd 5) Click Next and Finish – to start the synchronisation. 195 Health One Version 7.1 User Manual. Copyright 2011Helix Health Ltd Typically in the case of a laptop the direction of synchronisation when leaving the practice would be Server to Laptop and when returning Laptop to Server. There is also an option to synchronise in both directions – , naturally, this would take longer to perform. Options a) Synchronise HCR’s Patient Files b) Don’t /Do synchronise deleted.. Patient‟s deleted in one source can optionally be deleted in the destination source. c) Advanced (Archive..) This option is for archiving files, for example if deceased patient‟s are being synchronised to an RIP source. Options control what will happen to the files in the original once synchronised to the destination. Don’t delete…Files left intact. Delete HCR…Moves patient files to the deleted patient selector screen. Delete permanently…Permanently delete the files in the original source. d) Audit trail Only applicable for Slave/Master synchronisations – synchronises the audit log. e) User information Only applicable for Slave/Master synchronisations –Changes in Master Source users – i.e. new users, password changes, rights changes etc. f) Billing Billing information. g) Appointments Appointment information. 196 Health One Version 7.1 User Manual. Copyright 2011Helix Health Ltd Problem Orientated Medical Records HEALTHone™ has a feature called Problem Orientated Medical Records(POMR) which provides the ability to link transactions to a problem. Once linked in this way the physician can firstly, see at a glance what the patient‟s primary problems are, and additionally elect to view only those transactions that relate to a particular problem. Problems appear in the Problems Tab of the Patient Information Panel. This tab has two buttons – one to display the active problems and the other to display the historical ones. POMR is an extension to the transaction filtering method mentioned in the Getting Startedsection. There it was described how to filter the Transaction Panel to view just lab results, experts reports etc. Once POMR is implemented, it is possible to view lab results that just relate to a particular problem. The process of using the POMR feature is as follows: Declare a problem Link transactions to a problem View transactions relating to a specific problem Change the status of a problem between active and inactive Displaying / Hiding the Problem Tab The Problem Tab is displayed or hidden in the Patient Information Panel by selecting the menu option View / Problem 197 Health One Version 7.1 User Manual. Copyright 2011Helix Health Ltd Declaring a Problem Problems are declared by inserting the item problem: into the patient‟s file. This could be inserted into any transaction, however; we suggest that it be inserted into the Basic Medical Information page – i.e. the first page in the medical chapter. The reason for this is that it provides a consistent method/location for recording problems and will make them easier to locate when updating is required. The standard process of creating a new patients file is to create a Basic Medical Information transaction as the first transaction in the Medical Chapter – this is done using the Sequence Basic medical information – this sequence includes the item problem:. Technique 1) Open the patient‟s file and select the Basic Medical Information transaction – first one in the medical chapter. 2) If the item problem: exists already select it and press Return. Go to step 6) Create the item problem: 3) Select the last item (do not open it) – this is done to ensure that the problem: item that is about to be inserted appears underneath the current items. 4) Click on the Insert Item button on the Item Panel Toolbar – illustrated opposite. 198 The Item Selector opens Health One Version 7.1 User Manual. Copyright 2011Helix Health Ltd 5) Type: prob into the Find box and select the item problem in the list. Click OK he problem item is inserted into the Basic Medical Information page and automatically opens; displaying it‟s associated list. 6) Select the problem required in the associated list, or alternatively close the list and type the problem yourself – we would recommend that the terms dictionary (blue book button) is used to ensure that the problem is correctly entered – rather than just type it. 199 Health One Version 7.1 User Manual. Copyright 2011Helix Health Ltd 7) If you are declaring a new problem enter the problem Start date no need to type the // marks. Do not confuse the Date of event date with the Start date. The Date of eventdate is the date on which the problem: item was inserted into the file (usually today‟s date) and the Start date is the date the problem started – this could be some years earlier. 9) Press Ok, Save and validate the Basic Medical Information transaction. 200 The problem now appears in the active problem window of the Problem Panel. Health One Version 7.1 User Manual. Copyright 2011Helix Health Ltd Linking a Transaction to a Problem A problem must first be declared as described above before it can be linked to a transaction. Linking a New Transaction Whenever you insert a new medical transaction into a patient‟s file HEALTHone™ displays its properties window. Problem is one of the attributes in the transaction properties window and all the declared problems for the current patient are displayed there. 1) Click on the box opposite the problem to be linked to place a tick inside it. 2) Complete the rest of the transaction properties and click OK. 201 Health One Version 7.1 User Manual. Copyright 2011Helix Health Ltd Linking an Existing Transaction To link a previously created transaction to a problem you need to view its attributes by opening its properties window. To do that: 1) Open the patient‟s file and click once on the transaction in the Transaction Panel to select it. 2) Click on the attributes button on the Transaction Panel Toolbar. The properties window now appears 3) Click on the box opposite the problem to be linked to place a tick inside it. 4) Close the properties window and save and validate the transaction. Viewing a Transaction Related to a Problem 1) Click once on the required problem in the Problem Tab. 2) Click once on the Transaction Panel to make it active. Hold down the Ctrl key and press E. The Transaction Panel now only displays the transaction related to the selected problem. 3) You can switch problems while you are in problem view by clicking on a different one in the Problem Tab. The Transaction Panel now only displays the transaction related to the newly selected problem. 202 Health One Version 7.1 User Manual. Copyright 2011Helix Health Ltd 4) To return to normal view Hold down the Ctrl key and press E again. There is an alternative way to switch between problem view and normal view: 1) Click once on the required problem in the Problem Tab. 2) Right click the mouse anywhere in the Transaction Panel and select Filtered on problems in the pop up menu that appears. The Transaction Panel now only displays the transaction related to the selected problem. 3) To return to normal view repeat step 2) above. Changing the Status of a Problem A problem can have one of two states: Active or Inactive. This is controlled by the End date check box in the problem: items attributes. To Make a Problem Inactive 1) Open the patient‟s file and click once on the transaction that contains the problem: item. If you took our advice this will be the Basic Medical Information transaction. 2) Click once to select the problem: item. Press Return to open the item. 3) Now check the End date check box and complete the end date. 4) Click OK to close the item window. Save and validate the transaction. Problem now appears in the History view of the Problem Tab. To Make an Inactive Problem Active 1) Follow steps 1) and 2) above, now uncheck the End date, follow step 4) 203 Health One Version 7.1 User Manual. Copyright 2011Helix Health Ltd Own Notes 204 Health One Version 7.1 User Manual. Copyright 2011Helix Health Ltd Billing The Billing feature of HEALTHone™ allows charges for services/products in the practice to levied against patients and payments recorded. Patient Invoices and receipts can be printed along with reports which reflect the current state of the practice accounts. Billing Items HEALTHone™ considers each individual charge in a practice as a billing item. When a patient receives medical services and/or products these are charged by inserting the relevant billing item, with a record of its cost, payment and receipt status, into the patients file. Reports There is a new billing queries module which will allow you to access all of your accounts data. You can easily see your daily accounts and general accounts and there is also a facility to do cube analysis for doing various comparisons. The queries module is discussed in more detail below. The population analysis has a number of reports under the billing heading, however these reports will now only work on the old billing data. They will not work with version 7.1 billing. These produce figures in detailed and summary form on a patient, doctor or debtor basis. 205 Health One Version 7.1 User Manual. Copyright 2011Helix Health Ltd Family Billing The easiest way to bill a family is to post sibling and spouse charges to the head of family patient account - entering a relevant comment describing the charge reason. To create a family you need to add a unique family number to each family members chart, an asterisk placed before the number will indicate the head of the family. Debtors The Debtors function is designed as an enhancement to the reporting system allowing individual patient charges to be assigned to a third party - such as a health insurance company or individual company for occupational health. The Billing module - New billing screen explained. 206 Health One Version 7.1 User Manual. Copyright 2011Helix Health Ltd Adding Billing Items Before you can bill a patient you must add the services you provide or billing items. To do this press the Add new cost button The following screen will be displayed Press the + button to add a new billing items Enter a code, description and amount and click off the line to save it as seen in the example below – code 04, Experts report, 60 Repeat the process until you have a cost entered for each of the services you provide in your practice. To set a default billing item, select the item and press . 207 Health One Version 7.1 User Manual. Copyright 2011Helix Health Ltd Add an invoice (hotkey Shift F9) To add an invoice press the add invoice button The following screen will be displayed. The date will default to today, but can be changed using the dropdown box at the top of the invoice screen. The person who is responsible for generating the invoice will default to the Dr the appointment was booked for but can be changed if a different user carried out the consultation. Using the drop down arrows in the invoiced section of the above screen, select the billing items to bill the patient for, you can select the billing items by code or description. You can have up to 3 items per invoice. You can set whether the focus will be on the code or description in your configurations. 208 Health One Version 7.1 User Manual. Copyright 2011Helix Health Ltd The total amount due on the invoice will increase with each billing item added. You can then choose whether the patient themselves will be paying the bill, or a search for a family member (patient search) or company who will be paying in the debtors section of the invoice screen. You can add comments to the invoice which can be on the print out. In the payments section of the invoice screen you can select a method of payment to clear the balance on the invoice. The payment methods include - cash (F4) Cheque (F5) or Credit card (F6) You can edit the amount paid for cases of partial payment. The status on the invoice screen will indicate whether the invoice is open, closed (paid) or canceled Then choose to save the invoice in a separate transaction which will save the invoice in an invoice transaction, this will result in extra transactions on your patients HCR. Or save it to the current transaction, which will save the invoice into the consultation transaction if it has been validated. Press OK to save. 209 Health One Version 7.1 User Manual. Copyright 2011Helix Health Ltd Add a receipt at a later time. You can add a receipt to pay off an invoice at a later stage by selecting the unpaid invoice from the list and pressing the payment button on the main billing tab will be displayed: . The following screen From the above screen you can change the amount which will default to the billing amount, you can also change the payment date which will default to today. You can select the payment type, record comments. When you select the options you require press OK to make the payment. If you enter in an amount, for example €200 as a payment. Health One will clear the most recent invoices first rather than the old invoices. 210 Health One Version 7.1 User Manual. Copyright 2011Helix Health Ltd Adding a payment from the calendar: There is now an option to view the patients account balance and manage their invoices from the calendar. To manage the invoices press pay invoices. . You will then be able to view, query, add, and 211 Health One Version 7.1 User Manual. Copyright 2011Helix Health Ltd Billing Queries To query your billing you can press the following button which, can be found on the main toolbar or on the billing tab of a patient or the analysis menu. The following screen will be displayed, where you will automatically see today‟s bills. From the billing queries screen you can: Query invoices by period (pressing the period label will give you options, person responsible, status, or by debtor. This can be done on a pivot table to do cube analysis. You can select the invoices and with a right click of the mouse you can edit their status all at once – for example to set all old invoices which are unlikely to be paid to a cancelled status. You can view total amount invoiced and paid. You can select from the 4 daily analysis options (expand this section) o Today‟s bills, - this will show you total invoices, receipts outstanding for the day by patient. 212 Health One Version 7.1 User Manual. Copyright 2011Helix Health Ltd o Today statistics – you can do statistics for the day such as % paid by dragging the column headers to the report. See screen shot below o o You can get a breakdown by payment type. There are also 2 general analysis options. Allowing you to query, all open bills or invoices with outstanding balances. You can also print, carry out a mail merge to send invoices / outstanding balance letters to patients, or export the list to excel. Pressing F8 will allow you to look at old billing module for a selected patient in the billing queries module. 213 Health One Version 7.1 User Manual. Copyright 2011Helix Health Ltd Billing reports To access the billing reports press the population analysis button on the main tool bar. These will only work with old billing data, they will not work on new billing module. The population analysis screen will be displayed allowing you to chose any of the reports listed in the billing section, which you can then press execute to view, by date range or last number of days. You then press this button to run the report. (see screen shots below) From this screen you can run the report on your old billing data by date range / last x number of days, output the report to excel, or print the report. 214 Health One Version 7.1 User Manual. Copyright 2011Helix Health Ltd Billing Conversion When you open the billing tab on version 7.1 you will now see an option to switch to the new billing module. Press this button and you will be given information, convert & switch options. Pressing the convert button will allow you to convert your old billing items to the new billing module. Warning – once converted you will not be able to convert back, it is a good idea to take a back up before you convert in case you wish to revert. You will 215 Health One Version 7.1 User Manual. Copyright 2011Helix Health Ltd not be able to convert any invoices created on the new version back to the old version. When you press the convert button you will be given 3 options: Option 1 - Conversion in a unique invoice transaction will convert your invoiced to the new billing module an place all the old invoices in a single invoice transaction. – Your new reports will work on the old data as it has been converted Option 2 – Convert each bill in a separate invoice transaction will place each old invoice in a separate invoice transaction. Option 3 – will convert the invoices into the most appropriate transaction. i.e. if there was a consultation it will put the invoice in there, if not it will create a new transaction. This method will increase the conversion time dramatically. The conversion should only be done once. Approximate conversion speed on a standalone non-networked machine: 216 Health One Version 7.1 User Manual. Copyright 2011Helix Health Ltd Option 1 10000 records = 3 mins, Option 2 10000 records = 15 mins Option 3 10,000 records = 1 hour Scenarios There are 3 scenarios for billing 1. The Dr generated the invoice and validates the transaction– this is the best method, as the receptionist will be able to save the invoice transaction into the consultation transaction.l 2. The Dr validates the consultation without doing creating an invoice – this is ok too as the receptionist will have a consultation transaction to place the invoice into. 3. The Dr does not validate the consultation. In this case the receptionist can record the invoice as a separate transaction or wait until the Dr validates the transaction before adding the billing items. Excluding Users from creating own bills This will prevent a scenario whereby at the end of the year the secretary has a number of bills / receipts assigned to her as the responsible person. To do this go to user editor, select user, and put a 1 in the billing denied grid. 217 Health One Version 7.1 User Manual. Copyright 2011Helix Health Ltd Billing to families To bill the amount to another patient – press the search button in the invoice screen and choose a patient who will pay the bill from the database. To create a family, place the same family number into the demographics / administrative chapter of each family member. Putting an * after the family number indicates the head of family. All patients under 18 will default to family. Billing to debtors You can use the debtors search to add the invoice to a 3 party such as an insurance company 218 rd Health One Version 7.1 User Manual. Copyright 2011Helix Health Ltd Own Notes 219 Health One Version 7.1 User Manual. Copyright 2011Helix Health Ltd Deleting Patient Files HEALTHone™ moves files in the Patient Selector window to the Deleted Patient Selector window. The deleted patient files can be viewed in the Deleted Patient Selector. If files are subsequently deleted from the Deleted Patient Selector window they will be deleted permanently Deleted patients can be restored from the Deleted Patient Selector back to the Patient Selector in cases where they have been deleted in error. Deleting A Patient File Locate the patient in the Patient Selector Select the patient (do not open the file) by clicking once on the patients name. Press the Delete key. Answer OK when prompted. Alternatively, select the Delete Patient Selector button at the bottom of the screen. Patient removed from the Patient Selector window. Viewing Deleted Patient Files Right click anywhere in the Patient Selector and select Show deleted patients from the menu. Deleted Patient Selector appears. Deleted patient files cannot be opened - if this is necessary, restore the file to the active Patient Selector. See next topic. 220 Health One Version 7.1 User Manual. Copyright 2011Helix Health Ltd Re-Viewing Active Patient Files Right click anywhere in the Deleted Patient Selector and select Show active patients from the menu. Active Patient Selector re-appears. Restoring Deleted Patient Files Select the patient file in the Deleted Patient Selector Click on the Restore Patient Selector button at the bottom of the screen. Answer OK when prompted. Permanently Deleting a Patient File Select the patient in the Deleted Patient Selector Click on the Delete Patient Selector button at the bottom of the screen. Answer Yes when prompted. 221 Health One Version 7.1 User Manual. Copyright 2011Helix Health Ltd Vaccination HEALTHone™ has a number of features which aid the recording and reporting of vaccinations, these include: A built in database of vaccines that the user can easily maintain. Allowing batch numbers and expiry dates to be edited as well as new vaccines to be added. The Pneumococcus schedule for childhood vaccinations that HEALTHone™ automatically tracks for due dates and received vaccinations from the date of birth. Population analysis reports specifically designed to analyse the childhood vaccinations schedule. The Patient Information Panel has a tab dedicated to vaccinations. Overdue vaccinations are highlighted and automatically activate this tab causing it to appear in front of the others. Due dates are automatically calculated from the child‟s date of birth. 222 Health One Version 7.1 User Manual. Copyright 2011Helix Health Ltd Recording Non Scheduled Vaccinations The following method is used to record all vaccinations unless a childhood vaccination schedule is being used. In cases where a schedule is being used for childhood vaccinations the method Childhood Vaccination Schedules, documented later, should be employed. Technique – Recording a Vaccination 1) Open the patient‟s file and add (click on the stethoscope icon) a new medical transaction with a Type equal to Contact and the Name set to vaccination. A new medical transaction is inserted into the patients file. 2) Insert the sequence (Shift + F4 or ) Vaccine into the new transaction. 3) Ensure the item vaccine: is selected and press Return 4) Item Vaccine: now opens and also its associated list. Close the Associated List box. 5) Click on the Vaccine Button to open the vaccination database. 223 Health One Version 7.1 User Manual. Copyright 2011Helix Health Ltd Alternatively use the short cut Ctrl + Alt + V The vaccination database window opens 6) Enter text into a filter box. 7) Locate the vaccine and select it. Click OK The Vaccine details are entered into the item vaccine PLUS the item attributes are also set to their correct values. Note: The item vaccine: values for Dose, Site, Manufacturer, Batch number and Expiry date are extracted from the vaccine database. They can be adjusted to correct any changes for this particular vaccination. If the Batch Number is amended a prompt will appear to request if the vaccine database should also be updated. By preference the Batch Number and Expiry Date should be changed by configuring the vaccination database. See the heading Maintaining the Vaccination Database later in this section. Vaccine Item – Attributes automatically set the values of the selected vaccine. 8) Correct the item attribute values if required. Click OK to close the item. 224 The vaccination details are recorded in the current transaction and also appear on the Vaccine tab of the Patient Information Panel. Health One Version 7.1 User Manual. Copyright 2011Helix Health Ltd Specifying Recall Dates If childhood schedules are not being used the method of specifying a recall date utilises the item Plan of action: If schedules are being used this procedure is NOT required. The Vaccine sequence includes the item Plan of action: and this will also be present in the current transaction. 1) If the item plan of action: is not present in the current transaction insert it now, by clicking on the Insert Item Button on the item panel toolbar. 2) Ensure that plan of action: item is selected and press Return to activate it. 3) Select vaccine from the associated list. Note: The object here is to place the word vaccine into the plan of action: item – not to re-state the type of vaccine – that has already been done in the item vaccine: 4) Cancel the associated list box. 5) In the plan of action: item details check the Date of event box and enter the RECALL date required. 6) Click OKto close the plane of action: item. The recall date has now been specified. This child will now be detected by the population analysis reports designed for childhood vaccination reporting. Alternatively you can select the item and right click with the mouse to plan the action and set action plan dates. 225 Health One Version 7.1 User Manual. Copyright 2011Helix Health Ltd Childhood Vaccination Schedules HEALTHone™ has a scheduling feature designed to manage childhood vaccinations. There are two phases involved: Assignment This phase is repeated once for each child. It places the aggregate item vaccination schedule: into the child‟s file and links the timing schedule to it. Recording This phase is repeated for each vaccination – its details: date, vaccination name, batch number, expiry date etc. Assignment Phase – Insert the Schedule into the Child’s File A child being presented for vaccination is assigned a Schedule by inserting the aggregate item vaccination schedule: into the Basic Medical Information transaction. Once inserted the timing is activated by linking the schedule to a timing set of rules and selecting the child‟s date of birth. Technique – Insert the Schedule into the Child’s File 1) Open the child‟s patient file. 2) Select the Basic Medical Information transaction. 3) Open the aggregate item selector by using the short cut Shift + F5. Or press 4) Select the aggregate group Pneumococcus Vaccination schedule and click OK 226 Health One Version 7.1 User Manual. Copyright 2011Helix Health Ltd The schedule is inserted into the Basic Medical Information transaction. Technique – Activate the Schedule Timing 5) Right Click on the Vaccination Schedule: item and select Apply vaccination schedule: Vaccinations from the popup menu. A prompt appears with the child‟s date of birth 6) Click yes when the prompt appears. The schedule is activated appears in the Vaccine tab of the Patient panel. Recording Phase – Recording Vaccinations using the Schedule This process is repeated for each vaccination a child receives. The vaccine schedule appears in the Vaccine tab of the Patient Information Panel. The vaccination schedule lists the type of vaccination required at a given 227 Health One Version 7.1 User Manual. Copyright 2011Helix Health Ltd due date based on the child‟s date of birth. Each vaccination type is linked to a particular vaccine or vaccines in the vaccination database. 1) Create a new medical transaction Type = Contact and Name = vaccination 2) Click on the Vaccine tab of the Patient Information Panel to bring it into view. 3) Click ONCE on the vaccination that is being received this time to select it. 4) Click on the injection needle icon on the Vaccine tab toolbar or use the short cut Ctrl + Alt + V What happens next is dependent upon how many vaccines are in the Vaccine Database for the selected vaccination type. If only one vaccine exists this will be issued immediately with its name, today‟s date, batch number, expiry date etc – Go straight to step 6). If more than one vaccine exists the vaccine database window will open, displaying all matching vaccines – Go to step 5). 5) When the Vaccine Database window opens – choose the vaccine being administered this time. Click OK A new item vaccine: appears in the current transaction displaying the vaccination details. 6) Check the vaccination details. If necessary amend the details by highlighting the item vaccine: and pressing return. Click OK to close the details. Note: The item vaccine: values for Dose, Site, Manufacturer, Batch number and Expiry date are extracted from the vaccine database. They can be adjusted to correct any changes for this particular vaccination. If the Batch Number is amended a prompt will appear to request if the vaccine database should also be updated. 228 Health One Version 7.1 User Manual. Copyright 2011Helix Health Ltd By preference the Batch Number and Expiry Date should be changed by configuring the vaccination database. See the heading Maintaining the Vaccination Database later in this section. The date completed details in the Vaccine tab of the Patient Information Panel is also updated. 7) Repeat actions 2) – 6) for any other vaccinations being administered at this time. Manufacturer Dose Site Batch No. Expiry Date Count Changing the Scheduled Due Date of a Vaccination for a Child There may be instances where it is known that a due date for a vaccination will be missed, i.e. due to a holiday etc. To prevent HEALTHone™ reporting this as overdue the due date can be altered: Technique 1) Locate the vaccination concerned in the Vaccine tab of the Patient Information Panel. Double Click the vaccination. The transaction that contains the schedule opens and the selected vaccination is shown in a dotted box. 2) Right Click the vaccination in the dotted box and select Shift Vaccination due date from the pop-up menu. 229 Health One Version 7.1 User Manual. Copyright 2011Helix Health Ltd A prompt box appears to request information about the new due date. 3) Complete the prompt box by typing a number and selecting the Day, Week, Month etc from the drop down selection box. Due date changes for the selected vaccination. Note: If a number of vaccinations are to be moved select them all before right clicking. All selected vaccinations will have their due date altered in the one operation. Managing Vaccination Refusals The method of recording a vaccine refusal depends upon how the vaccination is being recorded. 230 Former method Not using a vaccination schedule and specifying Health One Version 7.1 User Manual. Copyright 2011Helix Health Ltd the refusal directly in the vaccine: item. New method Using the Childhood vaccination schedule. Former Method If childhood vaccinations are being individually recorded the technique is: 1) Open the patient‟s file and add a new medical transaction with a Type equal to Contact and the Name set to vaccination. 2) Insert the sequence (Shift + F4) Vaccine into the new transaction. 3) Ensure the item vaccine: is selected and press Return Item Vaccine: now opens and also its associated list. 4) Locate the tern refusal in the Associated List box. Click on the Insert button. The term refusal now appears in the vaccine content box. Note: DO NOT type anything else in the item content box (i.e. the name of the refused vaccination) because HEALTHone™ only reports those items with a sole content of the word refusal as being refused. The vaccination name is entered in the item comments box. 5) If necessary click the expand button to view the item attributes. Check the Date of event box and type the name of the vaccination refused in the comment box. Click OK to save item. 6) Right click on the item and select Display / Comments from the pop up menu. New Method If a childhood vaccination schedule is being used: 1) Select the refused vaccination in the Vaccine tab of the Patient Information Panel. 231 Health One Version 7.1 User Manual. Copyright 2011Helix Health Ltd 2) Click on the Refusal button on the Vaccine Tab toolbar Refusal Reporting See next heading Childhood Vaccination – Recalling/Reporting. Childhood Vaccination – Recalling/Reporting The population analysis reporting is used to produce reports regarding childhood vaccinations. The choice of report depends on the method used: Former method Not using a vaccination schedule and specifying the recall date in the plan of action: item. New method Using the Childhood vaccination schedule. Technique 1) Close and save any open patient files 2) Select the menu Analysis / Population analysis. Shift+F7) 3) Click on the DatabaseAnalysis tab. 4) Expand the Vaccines section. 5) Select and Execute reports as required 232 (Short cut Health One Version 7.1 User Manual. Copyright 2011Helix Health Ltd Reports for the Former method If you are using the former method of recording childhood vaccines use the following report to list those patients who have an overdue vaccination: Planned Vaccines (Plan of Action) Reports for the New method If you are using the new schedule method of recording childhood vaccines use the following report to list those patients who have an overdue vaccination: Planned Vaccines (Due Dates) Overdue vaccine Reports for the Either Method Regardless of what method is being used the following reports are 233 Health One Version 7.1 User Manual. Copyright 2011Helix Health Ltd applicable: Patient’s with a vaccine between two dates Vaccines Monthly – All together Vaccines Monthly – All together (Per child) Vaccines Monthly – History per child Vaccines No Record Vaccines Refusals Maintaining the Vaccine Database The vaccination database will need to be updated whenever a new batch of vaccines is received or a vaccine is released on to the market. Opening the Vaccine Database 1) Click on the Vaccine tab of the Patient Information Panel for any patient. 2) Click on the Configure button on the tool bar Changing Batch and Expiry Dates 1) Locate the vaccine to be edited by typing its name in the 234 Health One Version 7.1 User Manual. Copyright 2011Helix Health Ltd VaccineNamefilter box, or if known, type the old batch number in the Batch Number filter box. 2) Once the vaccine has been located edit the old data. i.e. batch number details, expiry date etc. 3) Click the tick box to save your changes. 4) Click the Close button to close the vaccine database window. Adding a New Vaccine 1) Open the Vaccine database as outlined above 2) Click on the Plus button A new blank line appears at the end of the database. 3) Select the vaccine type from the HEALTHone™ term drop down box that this vaccine belongs to (i.e. Influenza [V]). 4) HEALTHone™ automatically offers the type as the name for the vaccine, simply select this and type the actual name. Complete the other details. 5) Click the tick box to save your changes. 6) Click the Close button to close the vaccine database window. Techniques for Upgrading Users Create the aggregate item Vaccination Schedule and Timing Schedule This action is performed only once and creates the aggregate item vaccination schedule:containing the current list of childhood vaccinations. In conjunction with this a timing schedule (set of rules) is declared that states when the vaccinations should occur with respect to the child‟s date of birth. 235 Health One Version 7.1 User Manual. Copyright 2011Helix Health Ltd Technique – Create the Vaccination Schedule Item 1) Click on the configuration tool icon 2) Select the menu File / Open / Aggregate or use the short cut Shift + F5 The aggregate item screen appears. This has its own toolbar. 3) Click on the last button on the right of the aggregate tool bar and select the vaccination_pneumo as seen in the screen shot below. The aggregate item is now created and also its timing schedule. 4) Select the menu File / Exit and click yes to save changes when prompted. 236 Health One Version 7.1 User Manual. Copyright 2011Helix Health Ltd The Configuration Tool closes. Linking Existing Vaccinations to a Schedule Upgrading users will have a number of child patients that have already received some childhood vaccinations at the time of the upgrade. These vaccinations will appear as independent entries in the Vaccine tab of the Patient Information Panel. If the child is under a year old we recommend that a vaccination schedule is also included, those vaccines already administered will appear as overdue as far as the schedule is concerned – because their entry in the schedule will be blank. This problem is overcome by linking the existing vaccinations received to their corresponding entries in the vaccination schedule. Technique 1) Insert a schedule as detailed in the procedure Assignment Phase – Insert the Schedule into the Child’s File above and activate the timing schedule. The Schedule now appears in the Vaccine tab with a number of vaccinations in RED indicating that they are overdue. 2) Click on the EXISTING vaccination to be linked to the schedule. 3) Ensure the EXISTING vaccination is still selected if not click on it once to select it. Now click on the schedule vaccination, in the Vaccine tab, that it is to be linked to. The link icon on the Vaccine tab will activate. 4) Click on the link icon 237 Health One Version 7.1 User Manual. Copyright 2011Helix Health Ltd The link occurs and the scheduled vaccination is marked as completed and turns black in colour. 5) Repeat for other vaccinations that require linking 238 Health One Version 7.1 User Manual. Copyright 2011Helix Health Ltd Plan of Action The « plan of action » concept allows you to plan an action or a series of actions for a patient. In this way your patient can benefit from a prevention schema which helps you with the follow up of the patient. To create a plan of action open a patients chart select the item you wish to plan for – right click on the item and press plan the action. Enter the details as seen in the screen shot below. When you press OK the action plan will be added to the action plan tab in the patients chart and the patient selector screen. 1. Planned date for the action : Here you can enter either the exact date you want the action to be done or a time interval when it should be done, say in 3 years time. 2. The frequency of the action to be carried out there after. You use this only if you wish to repeat the action at a given time interval into the future. You can also say here how many times you want to repeat the action into the future. HEALTHone™ will then automatically ask you do you want to carry on with the plan when the number is up. 239 Health One Version 7.1 User Manual. Copyright 2011Helix Health Ltd 3. Whether you require a reminder to appear in the patient file when you open the record 4. Who is responsible for carrying out the plan 5. What item name you would like to use when you declare the action as being done. These are all configurable Now when you open the patient file all her planned actions are visible in a new tab next to the billing tab in the medical section of the file When a planned action is done ? Now you have a list of planned actions in the action plan tab for the entire population and also, possibly, a list of planned actions in each patients file, visible when you click the action plan tab. When you actually carry out these plans, how do you manage the plan. There are several ways of doing this. However, in Ireland we advise you to stick with the following protocol. 1. Individual patients : If an action is planned, there will appear in the patient record, an additional tab called « action plan ». This tab contains a list of all the planned actions. You can click on one of the buttons at the top of the action plan tab, or right click on the action plan to get a list of possible actions. One of these is to « set the action as done » Setting the plan as « done » will remove the plan from the list in the patient file and also from the population list. An item will be inserted in the medical section to say the action is done. What item you use will depend on the options you set in the tools\options\action plan\ 240 Health One Version 7.1 User Manual. Copyright 2011Helix Health Ltd menu. By default the item name will be « done » and the content will be the name of the action : You will also, of course, have to enter the result in the normal manner. For example, if a smear comes back, you will enter the item « cervical smear » with the result as the content. In the case of a lab test you will enter the item name and the result, unless the result is imported electronically when it will be added in the same way - haemoglobin A1 --- 7.8 NOTE : If you do not set the plan as done it will continue to appear in the list of planned actions and will soon make the list worthless. You can also indicate if an action plan will never be done Or Delete an action plan 241 Health One Version 7.1 User Manual. Copyright 2011Helix Health Ltd The Alerts An Alert is a notification in the patient file which is triggered by defining certain criteria. The alerts are configured by the user and consist of a message which is displayed when an automatically launched analysis produces a result (or by option does not produce a result). The alerts are defined in the configuration tool as follows : Open the HEALTHone™ configuration tool. Click the button to display a list of the alerts. (You may also use the menu item file\open\alerts). The list on the left shows the details of the alert. The list on the right shows the list of protocol templates which may be linked to a specific alert on the left. The alerts that are invalid (for example the analysis corresponding to the alert does not exist) are displayed in red. Only the valid alerts can be triggered. Defining an Alert You can add, edit or delete an alert with the appropriate buttons at the bottom of the list of alerts (see previous screen shot. « + », « - » and . You can also use the Combination Keys : Ins, Ctrl+D et Crtl+E. Click on the icon to create a new alert. Click the « enabled » box to enable the alert. 242 Health One Version 7.1 User Manual. Copyright 2011Helix Health Ltd Give a name to the alert. This will be displayed in the notification. Choose an analysis from the list. The analyses that are available are those created in HEALTHone™: They are taken from those analyses available from the main HEALTHone™menu Analysis-formulas-extraction formulas Some « System » analyses are included in the list as well as the extraction analyses. For example, « patients birthday ». The system analysis are placed at the end of the list. Tick the « result » box if the alert should be triggered when the analysis gives a result. Un-tick the « result » box if the alert should be triggered when the analysis gives no result. Triggers : These options allow you to decide under what circumstances the alerts should be triggered. Manually by the user : The analysis is not executed until you click on the menu item tools During the Update of the HCR : With each modification of the HCR, the analysis will be executed. On opening the patient file: The analysis will be executed when the file is opened On closing the patient file: The analysis will not be executed until the file is closed. 243 Health One Version 7.1 User Manual. Copyright 2011Helix Health Ltd Options The Plan of Action functions may be customised in the options menu – main HEALTHone™ menu tools\Options\Action Plan Default values : 244 Default Frequency: The frequency with which the actions are repeated Default realisation item : The item name used to indicate that an action is done Health One Version 7.1 User Manual. Copyright 2011Helix Health Ltd Use the plan of Action item as the realisation item: Use the same item name to indicate that an action is done as is used for the planning. Exclude week-end in date calculation : Avoid a due date being a week-end Display: Display vaccines in the plans of action : If you tick this box the vaccines in the vaccination schedules appear in the action plan tab in the patient file – but not in the action plan tab of the selector. Display non read transactions in the list of action plans : Tick this and you can display all un read transaction in the action plan tab. Ask to create an action plan in not today‟s transaction : If you make an action « done » in an older transaction you will receive a confirmation dialogue. Display a dialogue when an action is done : Display a confirmation dialogue when you declare an action as done. Automatically select today‟s transaction for the action plan : If this is ticked, the action plan is automatically put into today‟s transaction, if it exists. Initialise the « Un read » status (for the following items): Import of lab results: After lab results are integrated, they receive an « un-read » status Import of HEALTHone™ HCR‟s : If you import a patient file, all its transactions will be tagged as « un-read » Synchronised transactions : Appear as un-read if ticked. 245 Health One Version 7.1 User Manual. Copyright 2011Helix Health Ltd Reminders Enable a default reminder to: How much time before an action is due do you want the reminder to be triggered If a reminder should be displayed: If you tick the option « Select the action plan tab » - « whenever a reminder is to be displayed », then when you open HEALTHone™ the action plan tab is automatically displayed, instead of the medical section tab. Analysis Filter the action plan for the current user (population analysis): Only the action plans for the logged on user are displayed in the action plan tab of the selector by default. Exclude action plans from item analysis: Planned actions are not taken care of when you do an item analysis (Ctrl_I or Ctrl_M) Own Notes 246 Health One Version 7.1 User Manual. Copyright 2011Helix Health Ltd Queries: Extraction of Data The Query Plus module The Query Plus module provides a simple yet powerful method to extract data from a population of patients based on user specified criteria. Furthermore, the query results can be combined with one another to provide added flexibility. Query Plus is based on the same concepts as the medical record. There are three levels: Patient, transaction and items. You can specify criteria at each level. For example provide a list of all females, older than 60 years (Patient, Sex=female, Age>=60), that were seen in the last 12 months that have received a flu vaccination. With Query Plus, you can select multiple items. You can also exclude patients that have an item containing a particular (or any) content. 1) Open the module database Analysis. Select the Query plus menu button to Perform a database analysis. (Alt F7) 247 Health One Version 7.1 User Manual. Copyright 2011Helix Health Ltd 2) Click on “New” and the following window appears. 248 Health One Version 7.1 User Manual. Copyright 2011Helix Health Ltd 1) Enter a description for the query in the “Analysis name” box and a description for the category group in the “Group” box. 2) The various options to create your query are divided into sections: Patient Criteria Transaction criteria Item Inclusion criteria Item Exclusion Criteria Restrict to another analysis 3) Each of the sections has tick boxes to the left of the criteria. These determine whether the indicated field will be displayed in the result or not. 4) Now we will deal with each of these sections in detail Patient Criteria From this section, we can choose to search from any or all of the three criteria Age, Sex, and Display 1) Age – We can choose patient of a given age, an age between X and Y, Greater than (>) X or Less than (<) Y. We can choose here whether to display the age in the final result or not by ticking the box. 2) Sex – Choose either all, male or female. 3) Display – Here we decide what fields we want to display in the result. The choices made here will always display as well as those fields you may tick in relation to specific fields that you otherwise choose in your analysis. The Possible fields that you can display here are those available in the patient selector. In this particular analysis, we are making no choices from the patient criteria. Therefore we are choosing all our patients as a base for the extracting our information 249 Health One Version 7.1 User Manual. Copyright 2011Helix Health Ltd Transaction Criteria 1) Chapter: - Here we can choose between Administrative Chapter and Medical Chapter. This criterion is rarely necessary and should generally be ignored! 2) Date: - here we can choose between all transactions, transactions done after a particular date (greater than), transactions done before a particular date (Less than) or transactions between two dates. You specify the dates in the columns to the right of the screen 3) Type: - Here we can choose the name of the transaction as displayed when creating a new transaction in HEALTHone™ In our current analysis, we will leave all these fields empty. Thus, we want to include all transactions in the patient files, no matter when they were done or what name we gave them Item Inclusion Criteria In this section, we have the opportunity to include up to four items in the search. Thus, each row in this section corresponds to one item. Each column represents the possible options with each item 1. The tick box column is used to decide if the item name and content will be displayed in the result or not. Tick the box to display the item and its content. 2. The item name is entered in the second column. You can choose here from any HEALTHone™ item 3. The Item Content column. Here you can choose from several attributes of the item, namely the main content, sub contact, or item codes. Normally you will use only the main content here. 4. The fourth, “Contains” column, is used to declare several possibilities in regards to the content. These include whether the item contains, is equal to, is greater than, is less than etc, or even if the content exists at all. Open the options with the drop down list to see for yourself what the possibilities are. 5. In the fifth “Contents” column, you should say what content it is that you are looking for. If you are looking for several contents of the same 250 Health One Version 7.1 User Manual. Copyright 2011Helix Health Ltd item, you can enter all the required contents to the one “contents” box. Each content should be separated from the other by a semi-colon (;). Other mathematical operators that can be used are as follows: Replace the item name with a star (*), if you are looking for a content of an unknown item. Use the hash sign (#), to search for a numerical or date value 6. The “AND” and the “OR” boxes at the top of the screen are used to declare whether each row is taken. Thus if we use the “OR” box we are saying that the search will give a result if either of the search conditions listed in the first two rows (above) are true. If we say “AND” then both criteria must be true to give a result. Item Exclusion Criteria This section is based on exactly the same principles as the previous section “Item Inclusion Criteria”. You use the same methods for entering, item name, contents, content parameters and actual item content. However, any information included in this section will be excluded from the search. Thus, we might ask the question: Give me a list of all diabetes patients in the practice who have never had their weight recorded. In this instance, the item content “diabetes” would be included in the “Item Inclusion” section, but the item name “weight” would be included in the “Item exclusion” criteria. Therefore, everyone who is a diabetic is included and then everyone in this list who has a weight recorded would be excluded. Restrict to Another analysis This section is an additional tool, which adds power to the original analysis. With this section, you can make one analysis dependant on the result of another, second, analysis. ! However, this section is most often useful when we use the “include” criterion. 251 Health One Version 7.1 User Manual. Copyright 2011Helix Health Ltd Here are two examples of how it is best used: a) You create one analysis to include many items: You create a second analysis that excludes many things. You add the second analysis in the “Restrict to another analysis” section of the first analysis. b) You might want to use the second analysis to simplify the query. Let us say you want to create an analysis to find all diabetic patients who have a BMI >30: Create a first analysis to find all your diabetic patients; create a second analysis to find all patients with a BMI > 30. You can restrict the first analysis to the second. You might use this method when the two analyses are useful in their own right. It will save duplication. THE ANALYSIS RESULT 1) You can execute this analysis directly from this screen by clicking on “execute”. Alternatively, you can save this analysis by clicking OK. Click OK 2) You are presented with the list of all the user-defined analysis with your newly created analysis included in this list. 3) Within this screen, you have the options as displayed. Execute the analysis (Alt+X) Edit the highlighted analysis (Alt+E) Create a New analysis (Alt+N) Delete the highlighted analysis (Alt+D) 4) Click on “execute” What can we now do with the result of this analysis? HEALTHone™ ‟s) “Query Plus” is a very powerful tool that allows the user to easily develop a range of analyses to suit his or her own needs. These analyses should be used as an adjunct to the “Built in” DWH analyses which have been pre-programmed by HEALTHone™ and contain most of the common, day to day analyses needed by the busy professional. With the result of the “Query Plus” analysis we have a new range of options. 252 Health One Version 7.1 User Manual. Copyright 2011Helix Health Ltd 1) We can simply Print the result – Click on the print Icon 2) We can export to excel 3) We can insert a “Plan of Action” into each of the patient files included in the result. This is indeed very powerful. We can then see at a glance from the patient selector all these patients. We can initiate an “alert” when we open the patient file which will remind us of the situation. Details of the “Plan of action” function are described elsewhere. 4) We can use a mail merge to send a personalised letter to each of the patient in the result, asking them, for example, to contact the doctor for an alternative treatment. This function is described elsewhere but essentially involves creating a document template, within HEALTHone™ , with the require message for the patients and including some “mail Merge” fields which would personalise the letter for each of the recipients. This template might also contain an internal “HCR analysis” that will extract specific patient information for the letter. In this case, HEALTHone™ will first load all the patients found by the population analysis and then perform the HCR analysis before finally displaying all the letters on screen, for printing. 253 Health One Version 7.1 User Manual. Copyright 2011Helix Health Ltd Mail Merging in HEALTHone™ HEALTHone™ document templates normally extract various bits of information from the patient file. We often extract single administrative items such as the patient‟s first name, surname etc, or we can extract other data such as the medical history/surgical history, last consultation etc, by means of “HCR analyses” This type of data is extracted when we create a letter from an individual patients file and is described elsewhere. Examples of such templates are “quicklet” or maternity claim templates. Mail Merging – what is it? Mail Merge gives us the ability to achieve three different things: 1) Using Database files (DBF or Access) to enter consultants names to standard templates Include the name and/or address of the consultant that we are referring to at the top of the letter, say the quicklet. We are including this function here because it is a prerequisite for the second function. However this function does not in fact use the specialized “Mail Merge” fields included in the HEALTHone™ text editor 2) Send a personalised letter, generated by HEALTHone™ for an individual patient, to several recipients or destinations. Thus we might want to send a quicklet for John Test to two consultants who are dealing with the patient. 3) Send a personalised letter to several patients about the same thing. For example we may want to find all males over the age of 50 and if they have not had a cholesterol check, we might want to send a letter to each of these patients. Each letter can be personalised so that we use the correct “mode of address” for example. Dear Mr. Test, Dear Ms. Burke etc. 254 Health One Version 7.1 User Manual. Copyright 2011Helix Health Ltd The first two of these functions require the use of an external database containing a list of, say consultants names and addresses. This information should be stored in a database file, either a “DBF” file or an “Access” database file. These files should be stored in the Honewin\DBF directory. As these databases are localised they are not distributed with HEALTHone™. It is possible to create a database by following the steps below. Creating Database files (DBF files) 1) Click on the button « manage associated databases » on the main toolbar in HEALTHone™ 2) Click on the button « new table » on the right of the « database query » window Using Database files (DBF) to enter Consultant’s names to letters In most normal situations when you are sending a letter to a specialist, you will not, in fact need to use the Mail merge facility. This would only be used if sending the same letter to several destinations. However, you would often want to insert the name of the specialist into the executed document. HEALTHone™ gives you this facility. First of all you need to have a database containing the details of all the consultants in your area. These do not come as standard with HEALTHone™! However, some users have already created these databases in particular localities – enquire from the user group. It is relatively easy to create DBF 111 file from an excel spreadsheet. Many people will keep a list of their local hospitals/consultants in this format. We cannot describe this process here. 255 Health One Version 7.1 User Manual. Copyright 2011Helix Health Ltd Once you have a dbf (or access) file with the names and details of the consultants you refer your patients to, you should save them to the directory honewin\dbf of your current HEALTHone™ configuration. The following procedure assumes you have a dbf file in the honewin\dbf directory : 1) Click on the main HEALTHone™ menu File\Open\Template 2) Choose an existing template as an example, say Quicklet.cvs 3) We will now enter a DBF field in the location indicated in the screen shot 4) Click on the button « insert text blocks {field} » -The following window appears 5) Choose the DBF file that you require, containing the list of all the consultants in your area. Then Click on the « choose fields » tab. This window allows you to choose the fields that will automatically be inserted to the final document when you execute it and choose your consultant. 6) You choose the field name and then click the +key to copy it into the top window. You can add free text e.g. a space between fields using the « insert text » box. In this example we are going to add the consultants title, first name and surname to the executed document in the place indicated above. 7) Click OK 8) Now click file\save as and name the template = « Quicklet_DBF.cvs » 9) Now open a patient file, if not already open. Press Shift+F2 execute the template « Quicklet_DBF.cvs » 10) You are immediately presented with a window containing the list of the consultants. You only job now is to choose a consultant and click apply. 11) The Title, first name and surname of the consultant will appear in the letter. 256 Health One Version 7.1 User Manual. Copyright 2011Helix Health Ltd 12) Note that you can always at the final stage choose your own fields to be entered in the final document by manually selecting the fields in the above screen shot and clicking « inset » to insert each field. This was the only way to do things in previous version of HEALTHone™ but it is cumbersome. Creation of a template and send it to several destinations Insertion of the mail shot fields To create a template that you want to send to several places follow the procedure described below : 1) From the main HEALTHone™ file menu, choose File\New\Template 2) Arrange the text and place the cursor where you want to insert a field 3) Click the button to insert a mail merge field or use the HotKey Combination Shift + Ctrl + Q. This button is the third button from the right in the toolbar of the canvas editor. 4) Choose external database as the source. The external databases should be located in the directory honewin\dbf. If you want to use an MS access database you should also choose the table that contains the fields you require, 5) The dialogue displays the available fields in the selected database. Simply select the field you require and press the OK button. If you require more than one field press « insert ». The Mail Merge fields are entered to the template as - {MailMerge : 6) Repeat the operation to add more fields. Only one external file is used, you can‟t change the database file to insert a second field. 257 Health One Version 7.1 User Manual. Copyright 2011Helix Health Ltd Inserting the field « Carbon Copy » When sending a letter to several people, it might be good practice to include all the recipients as « CC ». This can be done easily. Click on the down arrow next to the Mail Merge icon and choose « Insert carbon Copy field. Double click on the fields you want to include in the carbon copy field. You can also add free text here. Click OK. Insertion of destination field to the patient file HEALTHone™ can remember the names of the people that the letter was sent to and save this information into the patient file To do this you must add a « destinator » field, available in the same drop down menu. As with the CC field, you add the fields you require into the « destinator » field and click OK. Note: The destinator fields are used only when saving the letter to the patient file. They are deleted from the document during the merge. 258 Health One Version 7.1 User Manual. Copyright 2011Helix Health Ltd Inserting analysis fields This is exactly the same as inserting an analysis in any document template. It allows you to extract some data from the patient file for the document. Saving your work Your template is now ready, save it. Here is an example of a template, including the mail merge fields, and analysis extractions from the patient file. 259 Health One Version 7.1 User Manual. Copyright 2011Helix Health Ltd Sending a letter to several destinations 1) Open the patient file 2) Click on the template execution button (Shift + F2) 3) Select a Mail Merge template that you want to use. On opening the template all the HCR analyses will be executed with the exception of the Mail Merge analyses. 4) Select the Mail Merge button in the top tool bar of the template editor. This is the second last button on the top toolbar of the template editor. 5) The database that you choose when entering the Mail Merge fields is opened. You choose, from this list the addresses you want to send the letter to. You can double click on the name in the bottom panel to send it to the top (selected) panel. In this list you can select the name of the destination from the bottom grid « All records ». Press Enter or double click on the name to select. The selected destinations appear in the top grid. You can remove a selected name by using the right mouse click. 6) Click OK to execute the template, one for each destination.. 7) To Archive the document in the current transaction of the patient file click and select « in HCR as multimedia object » You get the same dialogue if you close the executed document directly by using the top right hand X of the text editor or by using the Combination keys Ctrl+F4 8) Select the item name with which you want to save the document Note : You can set a default item name to store archived documents, by using the main menu tools\Options\Template 260 Health One Version 7.1 User Manual. Copyright 2011Helix Health Ltd 9) You can change the name of the document, add a comment, add a severity index so it appears in red in the file or make it « display protected » so that nobody except the person who created the document can view the document. The document is saved in the patient file. To open it from there you should double click it. If the template contained the field « destinator » these names will be saved to the patient file also under the item « document sent to » Note: Please remember that when you execute a mail merge template the « Mail Merge » fields will not be immediately executed. You have to click on the « merge » button after executing the template. Sending a mailing to a selection of patients You can choose the recipients for your letter from several lists within HEALTHone™ The Patient selector The « Action Plan » tab in the patient selector The result window of a DWH analysis The relevant billing summaries Select the patients you want to receive the mail merge and click on the Mail Merge Button, select the mail merge template you wish to send HealthOne will generate the letters which you can print off and save to the patients files in the normal manner. 261 Health One Version 7.1 User Manual. Copyright 2011Helix Health Ltd Options In the main menu bar of HEALTHone™ select Tools\Options and then select the « template » tab. It is here that we can define various options relating to templates and Mail Merging. Template Selection You can select here where your templates are situated. This is important in a network environment where, if a someone makes a change to a template, or creates anew template, it will not be available to others unless they all have the same path entered here. Archived Document Here you can name the item that is used automatically when archiving a document to the patient file. Use this option in order to avoid being asked for a name every time you archive a document Tick the check box « close the editor after archiving.. » to automatically close the editor after archiving. Mail Merge You can define the number of copies of the first page to be printed. Printer Configuration Here you can choose the printer that should always be used to print your document templates. This setting will over rule the windows default settings. 262 Health One Version 7.1 User Manual. Copyright 2011Helix Health Ltd GMS Number validation If you create a new patient and enter the item « GMS number », you will be presented with the following screen. You can select the patient category from the drop down box and enter a GMS number. You can use the HSE button to validate the GMS number with the HSE. The number will be validated automatically when you book an appointment for the patient 263 Health One Version 7.1 User Manual. Copyright 2011Helix Health Ltd Miscellaneous features Display all the patient data in chronological order This is an extremely useful new function in HEALTHone™ It allows you to view the patient‟s entire file in one « page » that you can scroll through. You can easily search all the data for any text you like. You can access this feature by clicking on the icon « display all data in chronological order » which is on the main HEALTHone™ toolbar: When you click on this icon you are presented with the following screen: You can now search all the data in the patient record simply by typing some text in the search box: 264 Health One Version 7.1 User Manual. Copyright 2011Helix Health Ltd Transaction Naming HEALTHone™ has always used an associated list with the « transaction name » to distinguish between different types of transaction. For example, consultation, visit at home, drug prescription, obstetrics, lab… This list is created in the configuration tool. Open the configuration tool. Click on <file – open – transaction name> or use the Hot Key combination « Ctrl+T » The screen below is displayed You can drag the transactions you wish to use from the panel on the left to the panel on the right Transaction Comment Furthermore, we now have a new transaction attribute that we can use to extend the naming of transactions. Every transaction now has a new attribute called « transaction comment ». This attribute allows flexibility if you want to have additional methods of filtering the list of transactions in the left hand panel of the patient record. 265 Health One Version 7.1 User Manual. Copyright 2011Helix Health Ltd We might use the « transaction comment » field if we want to use other clinical information, not available in the list attached to « transaction name » Own Notes 266 Health One Version 7.1 User Manual. Copyright 2011Helix Health Ltd Advanced Scanning in Health One In this version of Health one we have made the scanning of reports into patient’s files much easier. Below is a summary of all the scanning functions in Health one. Scanning From Within a patient file a) As before, we can scan an image into a transaction. This image is a true “photo” of the original b) As before, We can scan a text document into a patient transaction. This document can be edited with any word processor eg Microsoft Word With both of these options you should use your favorite scanning software and your favorite “OCR”software. There are many cheap image scanner software programs on the market. “Irfanview” is a freeware program which is distributed with Health one. 267 Health One Version 7.1 User Manual. Copyright 2011Helix Health Ltd OCR software is more expensive and examples include “Omnipage” and “ReadIris” I have used “ReadIris” when testing the OCR function in Health one. With the OCR option, Health one now expects the user to save BOTH an image (tif) file AND a text (rtf) file. Health one now allows the user to easily copy some text from the text document to Health one items. Health one will normally save this text AND the original image in tif format. Scanning From the Patient selector We can now scan multiple pages of reports from many patients without opening each patient file. This is done by clicking the Tools menu in the main Health one toolbar We have the three options above. a) Scanner – image (tif) - scan multiple pages of reports to one TIF (image) file and then use Health one scanner interface to distribute each report to its correct patient file b) Scanner – Text (OCR) - scan multiple pages of reports to one RTF (text) file and then use Health one scanner interface to distribute each report to its correct patient file 268 Health One Version 7.1 User Manual. Copyright 2011Helix Health Ltd c) Scanner – import from file – Health one imports from pre existing tif/rtf files in specified location. These files might have been scanned outside Health one. In order to scan efficiently there are certain prerequisites as follows: 1. Install a good image scanner as above – these are cheap/free 2. Install a good OCR software – may cost several hundred Euro – I recommend ReadIris If you use OCR software, this will normally allow you to scan the image file as well as the text file 3. The software used for both image and text scanning must be defined in Health one Tools/options/scanning. We have added some new options here. You can now define here the path to the resulting tif/rtf files that will be imported by Health one Screenshot of Health one scanner options 269 Health One Version 7.1 User Manual. Copyright 2011Helix Health Ltd Note: The “External scanning software” and the “OCR application” can be the same software The files you save with the scanner MUST be named “bulky.tif” or “bulky.rtf” Health one will look for these two files (bulky.tif and bulky.rtf) in the path defined above. The default path is C:\Honewin\Private\ but the user can now change this path. Some scanning programs will automatically save the output files to a different location eg “My Document” as above. We can point Health one to this location as above. Note: You must have a backslash at the end of the path where you want to save the bulky.tif/bulky.rtf 270 Health One Version 7.1 User Manual. Copyright 2011Helix Health Ltd “Edit the items before inserting the rtf file” - This option is ticked by default. It means that Health one will open its new scanner interface when you exit the scanner program. This interface allows you to assign text to Health one items and also allows you to assign one or multiple pages of a tif file to one or more patients. Scanning from within the patient file You can continue to scan either tif files or text (OCR) files from within the patients file Create a new transaction called “experts report” – “Cardiology” – for example Click on the camera and choose the option that suits you, either Image or text (OCR) If you use the option “scanner –image (tif) then the scanning software defined in Tools/Options/scanning, will be opened by Health one - in this case irfanview 271 Health One Version 7.1 User Manual. Copyright 2011Helix Health Ltd In the scanning software click on scan or in the case of our example Irfanview, you would click on file – batch scanning. You should save the resulting tif file in the directory specified in the tools/options/scanning window as above NB. The resulting image file MUST be called Bulky.tif When you close the scanning program the image file will be saved to the transaction as always. If you decide to scan from within a patient file and use the option “Scanner – Text (OCR)”, Health one will open the OCR software specified in tools/options/scanning However, Health one has a new option here “edit the items before inserting the rtf file”. 272 Health One Version 7.1 User Manual. Copyright 2011Helix Health Ltd If this is ticked, then after you save the file in the OCR software as Bulky.rtf” and exit the OCR software, Health one will open a new scanner window which allows you to copy some or all of the text from the document to Health one items in the current transaction. If Health one also finds a tif file it will allow you to save both the text within Health one items AND the original tif file. Scanning multiple pages of reports from several patients. This is done from the patient selector. In this case Health one will open the relevant Image or OCR scanner software. You should now scan the multiple pages/reports to a single tif file or a single rtf file. These files should be named bulky.tif or bulky.rtf and saved to the location defined in tools/options/scanning 273 Health One Version 7.1 User Manual. Copyright 2011Helix Health Ltd Note: in most cases if you use OCR then you will use the same software for scanning/saving the image (tif) file and the text (OCR) file. Define these in Tools/options/scanning Below are some screen shots of the Health one scanner interface which is triggered after you scan the multiple pages to one tif file and exit the scanner software 274 Health One Version 7.1 User Manual. Copyright 2011Helix Health Ltd You can also scan multiple pages of reports from the patient selector as a single text file by using OCR software (which you to buy). I have tested the function using “Readiris 12” OCR software 275 Health One Version 7.1 User Manual. Copyright 2011Helix Health Ltd In this case Health one will open the scanner software defined in tools options/scanning “External scanning software” settings as for scanning images first, and later will open the OCR software. Of course the two may be the same. Health one now expects you to save both a multipage tif file and a multipage rtf file. Health one first opens the program defined as your scanning for images. After you save the tif file and close the scanner program, Health one will open the OCR program defined in tools options so you can convert the tif file to text. However, if the software path is identical for both programs then Health one will only open the scanner program once. In this case you are expected to save both the tif file and the rtf file before leaving the scanner software. When you have saved both these files to the specified location and then close the OCR software Health one takes over again with its scanner interface which now contains both the text file and the image (tif) file. You will see two tabs for displaying one or the other. 276 Health One Version 7.1 User Manual. Copyright 2011Helix Health Ltd The screen below explains what each section of the window is used for. Below we have two pages added to the tif file and several paragraphs entered to Health one items 277 Health One Version 7.1 User Manual. Copyright 2011Helix Health Ltd Remember you must “validate patient” to send the information to the patient file In this way each report can be sent to its correct patient as a tif file AND text can be seen in Health one items if so desired. This text can be searched. 278 Health One Version 7.1 User Manual. Copyright 2011Helix Health Ltd 279 Health One Version 7.1 User Manual. Copyright 2011Helix Health Ltd 280 Health One Version 7.1 User Manual. Copyright 2011Helix Health Ltd Text Messaging Client Managing Text Messaging Account Text messaging in HEALTHone is worked on a pre paid model. Users pre-purchase blocks of text credits and as text messages are sent, credit is deducted from their account. When the amount of credit available reaches a certain threshold, both an email and text message reminder are sent to the account holder to remind them to top up. Navigate to http://hip.diarybook.com. The SMS Text Reminder System log on screen is displayed. Enter the ‘User ID’ and the ‘Password’ that was supplied to you. Click ‘Log On’. Your account details are displayed. 281 Health One Version 7.1 User Manual. Copyright 2011Helix Health Ltd On this screen your account and balance details are listed. You can also top up your account. Top Up Your Account Select an amount from the available dropdown. If you select ‘Other’, enter the value within the text box to the right of the dropdown. 282 Health One Version 7.1 User Manual. Copyright 2011Helix Health Ltd Click ‘Top-Up’. You are directed to a secure payment page. Select the currency and select your payment method. Fill in your credit card information in a secure screen hosted by WorldPay. 283 Health One Version 7.1 User Manual. Copyright 2011Helix Health Ltd Once payment has been made, W orldPay returns you to the text messaging payment website. 284 Health One Version 7.1 User Manual. Copyright 2011Helix Health Ltd Once payment has been made, an electronic receipt of the transaction is sent to your email address (if provided). 285 Health One Version 7.1 User Manual. Copyright 2011Helix Health Ltd Transaction History Within the accounts menu on the left hand side click ‘Transaction History’. The transactions are listed on the right hand side. Any top-up transactions are listed here. Message Log Click ‘Message Log’ within the top menu. This screen shows a list of all messages sent and received through your account. 286 Health One Version 7.1 User Manual. Copyright 2011Helix Health Ltd Log Out Click ‘Log Out’ within the top menu. You are logged out and returned to the Log On screen. Text Messaging Setup Wizard Once your account as been created and you have successfully accessed http://hip.diarybook.com and topped up your account you are ready to install the text messaging within HEALTHone. Launch ‘SMS_Setup.exe’. The ‘Setup – Text Messaging’ window appears. 287 Health One Version 7.1 User Manual. Copyright 2011Helix Health Ltd Click ‘Next >’. The destination directory for the setup is listed for review. 288 Health One Version 7.1 User Manual. Copyright 2011Helix Health Ltd Review the details and click ‘Install’. The installing window appears. 289 Health One Version 7.1 User Manual. Copyright 2011Helix Health Ltd 290 Health One Version 7.1 User Manual. Copyright 2011Helix Health Ltd Once the installation is complete the final setup window is displayed. Click ‘Finish’. At this stage the setup has created a new folder within ‘C:\honewin\SOURCE’called ‘Text Messaging’. Within this folder a ‘TextMessaging.mdb’ file is created. The SMS Appointment Reminder System setup wizard appears. SMS Appointment Reminder System – Setup Wizard The ‘Setup Wizard’ appears. This wizard will allow you to setup the SMS appointment reminder system within Health One. 291 Health One Version 7.1 User Manual. Copyright 2011Helix Health Ltd Click ‘Next’. Enter your ‘User ID’ and ‘Password’ that you have been provided with for logging into http://hip.diarybook.com. Click ‘Next’. 292 Health One Version 7.1 User Manual. Copyright 2011Helix Health Ltd Enter your mobile number that you want texts to be sent from. You can also enter text here if desired i.e. Doctor Name. No spaces or special characters should be used. Click ‘Next’ to continue. 293 Health One Version 7.1 User Manual. Copyright 2011Helix Health Ltd Enter the location where your default HEALTHone database is stored and click next. 294 Health One Version 7.1 User Manual. Copyright 2011Helix Health Ltd A final confirmation screen appears. If you are satisfied with all the settings click ‘Finish’. 295 Health One Version 7.1 User Manual. Copyright 2011Helix Health Ltd The SMS Appointment Reminder System is setup and is linked to ‘TextMessaging.mdb’ that was created during the text messaging setup wizard. The system should now be running and appears in your icon tray. Icon tray 296 Health One Version 7.1 User Manual. Copyright 2011Helix Health Ltd HEALTHone SMS Once the setup is complete the HEALTHone SMS icon appears within the windows taskbar. Right click on this icon and select ‘Open SMS Manager’. The HEALTHone SMS Service is displayed. The service is listening for text messages. Click ‘Stop’. The service is stopped. Click ‘Start’ and the service is started again. Click ‘Send/Receive’. The service performs a send/receive. Click ‘Clear’ to clear all the events. Click ‘Tools > Settings’. The settings window is displayed. 297 Health One Version 7.1 User Manual. Copyright 2011Helix Health Ltd The User ID and Authentication refer to the logon details for http://hip.diarybook.com. The password is encrypted for security. Click ‘Change’. The authentication details window appears. Enter your User ID and Password and click ‘OK’. 298 Health One Version 7.1 User Manual. Copyright 2011Helix Health Ltd The ‘From Mobile’ field refers to the mobile number or text that the client will see when they receive a text. The ‘Auto-Start Messaging Service’, when ticked, causes the messaging service to automatically start. The ‘Polling Period’ refers to the amount of minutes between each send and receive, the messaging service automatically carries out. The ‘Data Connection String’ refers to the TextMessaging.mdb file that was created and linked to during the setup process. The ‘Show Debug Messages’, when ticked, causes additional informative messages to appear on the HEALTHone SMS Service screen when a send and receive takes place. If for any reason you need to start the HEALTHone SMS Service manually you can do so by navigating to C:\honewin\bin and launching HIPSMSAdmin.exe. 299 Health One Version 7.1 User Manual. Copyright 2011Helix Health Ltd Sending a Text Message from within HEALTHone Log into HEALTHone as normal. If text messaging has successfully been setup you will notice an active ‘Send text message’ button on the top horizontal menu. Active text send button. If, for any reason the setup has not been completed successfully, the button will be inactive. Inactive text send button Select a patient and ensure that they have a mobile number assigned against them. Click the ‘Send text message’ button. The following options are available: Text Message Message Queue My Account 300 Health One Version 7.1 User Manual. Copyright 2011Helix Health Ltd Text Message – Message Once you have clicked the ‘Send text message’ button, click ‘Text Message’. The ‘To’ filed is populated with the patients mobile phone number. The ‘Message’ dropdown contains a list of available templates that can be used. When you select a template the text box is populated with the corresponding text. The text box is a free text box where you can type in the content of the text message. The ‘Release date/time’ refers to the date and time that the text message should be sent. 301 Health One Version 7.1 User Manual. Copyright 2011Helix Health Ltd Once all the fields are populated click: Send Now: The text message is sent immediately by the HEALTHone SMS service. Queue: The text message is added to the queue and will be sent by the HEALTHone SMS service the next time the polling period is called. Queue – added to a queue to be sent during next polling. Each test message costs €0.12. This is deducted from your balance which can be viewed at http://hip.diarybook.com. A single text message can contain up to 160 characters. If your text message is over 160 characters and less than or equal to 320 character you will be charged for sending two text messages. If you enter more than 320 characters you will be charged for three text messages, etc. Text Message – Templates Click the ‘Templates’ tab. A list of current templates is listed. 302 Health One Version 7.1 User Manual. Copyright 2011Helix Health Ltd To add a new template click ‘New’. 303 Health One Version 7.1 User Manual. Copyright 2011Helix Health Ltd The ‘Template description’ appears in the message dropdown for a user to select. The ‘Template of message’ text are is the actual text message that will be sent. The ‘Insert field’ button allows you to insert placeholders to that the patient’s title, first name or last name can be inserted into the text message automatically. Once you have completed the template details click ‘Save’. The new template is added to the list of templates. To edit a template, highlight the description and click edit. The template details appear and can be edited. To deleted a template, highlight the description and click delete. A confirmation message appears. Click ‘Yes’ to delete the template or click ‘No’ to cancel the deletion. Message Queue – Text Messages Once you have clicked the ‘Send text message’ button, click ‘Message Queue’. The text message queue appears. 304 Health One Version 7.1 User Manual. Copyright 2011Helix Health Ltd The text message queue holds a record of the messages unsent, sent, failed or queued. You can filter according to the status. To delete one record highlight it and click ‘Delete selected’. The record is deleted. To delete all the records click ‘Purge messages’. A confirmation message appears. Click ‘Yes’ to purge all message or ‘No’ to cancel. Message Queue – System Messages 305 Health One Version 7.1 User Manual. Copyright 2011Helix Health Ltd Click the ‘System messages’ tab. This displays all the system messages. You can deleted a selected record or purge all records as above. My Account Once you have clicked the ‘Send text message’ button, click ‘My Account’. This launches http://hip.diarybook.com. You can log on as normal and manage your account. 306