1
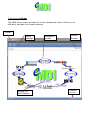
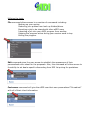
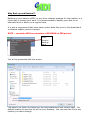
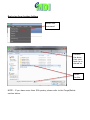
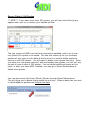
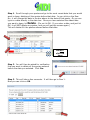
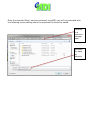
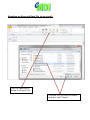
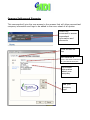
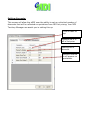
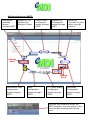
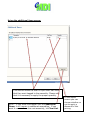
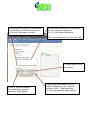
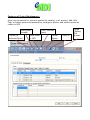
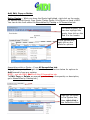
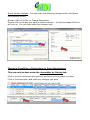
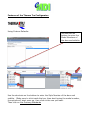
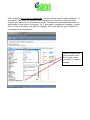
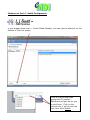
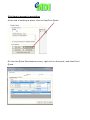
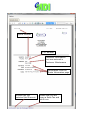
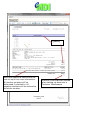
Millwork Distributors, Inc. Electronic Catalog User Manual It all starts at Home: The eMDI home screen provides all of the navigational tools to allow you to efficiently navigate our product catalog. Toolbar Active catalogs Access the MDI Website Navigation screen Version Number Network on line Utilizing the tools: File command allows access to a number of commands including: Backing up your quotes Restoring your quotes from back up folders/drives Exporting a job to be shared with other eMDI users Importing a job into your eMDI program from another Keeping the program active during your session-send to tray Exiting the program Edit command gives the user access to establish the appearance of their personalized cover sheet for the proposals. Also, this command will allow access to the ability to set dealer specific discounting from MDI list pricing for quotations Customers command will give the eMDI user their own personalized “file cabinet” with all of their client information. Quotes command will give the eMDI user access to all of their stored quotations through quote maintenance. Also, this is one of three areas that you can begin a new quotation. Help command contains the Frequently Asked Questions, which will bring up this help document. Why Back up and Restore?? Backing up your data on eMDI (or any other software package for that matter) is a smart way to protect your work. It is recommended to backup your data to an alternate drive or device on a regular basis. It is also a requirement that users back up their data files prior to the download of a software update (version change). NOTE – currently eMDI can maintain a MAXIMUM of 500 quotes. Click here to backup your You will be presented with this screen. The default file name for backup will be eMDIDataBackup with today’s date. The default location to save the file will be your Desktop. You can save this file to any location you desire though. Restoring from backup folders Select this command Located the drive that your back up is stored on Locate the file. NOTE – If you have more than 500 quotes, please refer to the Purge/Delete section below. Purge (Delete) Old Quotes ** NOTE ** If you have more than 500 quotes, you will have the following box appear when you try to restore your backed up data. The new version of eMDI has had core components updated, which, as of now, only allows 500 quotes to be saved. The box that comes up for you to delete quotes will only give you the date at which point you need to delete quotes to leave you with 500 quotes. You will want to delete more quotes than this. Once you have your old quotes restored, and start adding new quotes, you still will only be able to have a total of 500 quotes. You can delete additional quotes at this point, or after you have eMDI installed, you may go to Quote Maintenance to delete more quotes. You can also access the Purge (Delete) Quotes through Quote Maintenance. This will allow you to delete many quotes at one time. Select a date that you wish to delete ALL the quotes from before that date. Step 1. Scroll through your quotes and go to the most recent date that you would want to keep, deleting all the quotes before that date. As you click on the Row No., it will change the date in the box above to the date of that quote. Or you can type in a date directly in the date box. Once you have selected the oldest date you want to keep, hit Delete. (Do not hit OK. If you enter a date, and just hit OK, it will NOT delete any quotes, and you will get this screen again.) This will delete ALL the quotes entered before that date. Do NOT click OK here Step 2. You will then be asked for verification that you want to delete all the quotes entered before the date you selected. Click Yes. Step 3. This will take a few moments. It will then go to Row 1. Now you can click on OK. Exporting Data Files: Exporting files allow the eMDI user to copy jobs from the program to a format that can be attached to an e-mail and shared amongst other eMDI users. Select this command By clicking on headers throughout eMDI will re-sort lists by ascending or descending order. Once jobs are selected simply export by clicking this button Once the exported file(s) has been selected, the eMDI user will be presented with the following screen asking where the exported file should be saved. Desktop is a common storage spot Rename for ease of identity Attaching an Exported Data File to an e-mail: Click the Paperclip to attach the Export File. Click the File you want to attach, and then click “Insert” Company Settings and Discounts: This command will give the user access to the screens that will allow personalized company information and logo to be added to the cover sheet of all quotes. Select this command to access coversheet information and discounts. Click on tabs on top MDI account # (this is the same Customer ID on your MDI Invoices/Ack. Coversheet information about your company Add your company logo Setting discounts: This screen will allow the eMDI user the ability to set an unlimited number of discounts that will be reflected on quotations from MDI list pricing. Your MDI Territory Manager can assist you in setting this up. Click on tabs on top Discount as a % off of list price Description of discount Internal code as it will appear on quotations Setting Tax Rates: This screen will allow the eMDI user the ability to set an unlimited number of tax rates per county in your surrounding areas. Customer Maintenance: To establish a listing of your regular customers, you will access this section of the eMDI program. All information that you would like included on your quotation coversheets about specific customers, you will input their information through this set of screens. Create customer listing through this command. Add to or delete from customer list Customer listing in file Account Number Safe area for info that will not transfer to cover Active sections on eMDI: Star storm windows access through eMDI Access to PTQ software for Windsor Clients Interior door configurator access through eMDI Therma Tru Configurator access through eMDI Access to Therma Tru patio doors through internet Coming Soon Coming Soon Pella Storm Door configurator access through eMDI Apex configurator access through eMDI L.J. Smith Stairs configurator access through eMDI Mouldings Configurator access through eMDI Anytime and anywhere within the eMDI program, you can return to the home screen pointing and clicking here. Preparing a Quotation: Required fields to complete a quote. Shortcut to Customer Maintenance screen to add a new customer Look here to verify which catalog you are currently in Interior door configurator features: Use the checkbox on first assembly to insure easier navigation through larger selection listings (ie: jamb choices). Turn this off on second assembly to hold defaults set on first assembly you entered Expedite search for door styles by leading with number of panels being typed into description box. Any item in the assembly recipe can be changed in this screen. Click on the option you want to make a change to, it will go directly to that screen. Standard defaults Using the additional item screen: This section allows the user to input their own item that they want tagged to the assembly. Please note that it is necessary to apply the proper quantity. NOTE – If you enter information into the Additional Items, it will remain in additional assemblies. If you want to remove from the next assembly, hit Clear List. In the report screen you can choose whether or not to apply a discount to this pricing Check mark will transfer information you entered in the Notes section in the Quote Information screen. You can also add specific information for this particular assembly. (Ex. for the Master Bedroom) This information will print on unit tags To view and/or print the quote. If this is the last Interior Door Assembly you are entering, Save Quote. Adding another assembly in the same Configurator (ex. another Interior Door) – Add Assembly (It will automatically save quote) Combining catalog sections on a quotation: By switching to a new catalog section through the home screen will not allow the user to combine MDI products on one quote. In fact, it will begin a new quotation under that catalog section. To add products from different catalogs to the current quote, first Save Quote, then go to Quotes – Maintenance. Enter through quote maintenance to allow combined product quotes. Click on tab for All Assemblies Verify that your current quote is highlighted Right-click in gray box – Add Assembly – choose a catalog Features of Quote Maintenance: Here you can search for previous quotes (by catalog, or all quotes), Add, Edit, Copy or Delete quotes and assemblies, view/print quotes, and submit quotes as orders to MDI. Edit Quote Header Copies the Selected Quote Send Order to MDI Print / Preview Quote Delete Quote Save All Purge (Delete) Old Quotes Searching for a Quote Choose first to search Assemblies By Catalog or All Assemblies. Assemblies By Catalog will only show the quotes that contain that product. Click on the tab of the catalog you want to search through. You may sort the quotes by any of the headers. Just click on the header to sort ascending, or click again for descending. All Assemblies will show every quote. When a quote is highlighted, down in the Assemblies box it will show which assemblies are in that quote, and which Catalog they are from. You can also search for quotes by the Quote No. or by P.O. No. by typing in the number in the search boxes here Add, Edit, Copy or Delete Entire Quotes – While you have the Quote highlighted, right-click on the quote for options to Edit Quote, Copy Quote, Delete Quote, Print Quote or Send to MDI. You can do this from either the Assemblies By Catalog or All Assemblies tab. To Delete a quote, you can also highlight the quote, then click on the Red X in the header. In the Quotes box, right-click on the quote for options. Assemblies within a Quote – From All Assemblies tab: Highlight the quote, then right-click in the Assemblies box below for options to Add Assembly from any catalog. NOTE - you can ONLY Add from the All Assemblies tab. To Edit, Copy or Delete an assembly, or to change the quantity or description, go to Assemblies by Catalog tab.) Highlight the quote in the Quotes box, then right-click in the Assemblies Box. Assemblies within a Quote – From Assemblies By Catalog tab: Highlight the quote, then right-click in the Assemblies box below for options to Add Assembly, Edit Assembly, Copy Assembly or Delete Assembly. Highlight the quote in the Quotes box, then right-click in the Assemblies Box. NOTE - if you Add an assembly from the Assemblies By Catalog Tab, you can only add product from that same catalog. (Ex. if you are adding to an existing quote under the Interior tab, you can only add Interior doors to that quote. To Add from different catalogs, go to the All Assemblies tab. Quote Header changes - You can make the following changes within the Quote Maintenance screen: Quotes: Add a P.O. No. or Change Description Double-click in the box you want to make a change – the Quote Header Edit box will pop up. You can then make the changes here. Changing Quantities or Descriptions in Quote Maintenance This can only be done under the Assemblies by Catalog tab. Click in the box containing the quantity, and type in the number you want Click in the Description and make any changes you want Check to see if you placed an order with MDI There will be a in the Ordered? Box if a quote was electronically submitted to MDI Features of the Therma Tru Configurator: Using Custom Defaults: Use shortcut on bottom to enter the Model Numbers of the door and sidelite Use the shortcuts on the bottom to enter the Style Number of the door and sidelite. (Make sure to click inside the box, then start typing the model number, the options will start come up, then click on the one you want. Then click on Use Prehung Standards After selecting Use Prehung Standards, it will build the system using defaults. If you want to go with the defaults, and everything in the box on the left looks correct, you can click on the bottom option, Accessories and Additional Items, to go directly to the end of the quote. Or if you want to make any changes, simply click on the first option you want to change, then click Next to go through the remainder of the questions. Check if everything looks correct here. If not click where you want to make a change. Features of the Apex Configurator: If you do not have the Apex (or comparable) ID, click on Use Apex Wizard Mode to search by the different Types offered. If you already know the Apex ID or have a comparable (Fypon) ID, you can enter the quote by using those ID’s. Click on Enter Apex or Comparable ID. Search by Apex ID, Fypon ID, or Old Fypon ID Features of the L.J. Smith Configurator: If you already know the L.J. Smith Model Number, you can use the shortcut on the bottom of the first screen. Click in the box and start typing the ID number. Selections will pop up for you to pick from. Click on the correct one, it will go into the box, then click Search. You will be shown the item that you picked in the box on the left. If everything looks correct, you can click on the last item, Accessories and Additional Item to go directly to the last screen, then hit Next to finish. You can change the Quantity of any item by either highlighting the quantity and typing in the new quantity, or use the up and down toggles. It is time to present a quotation: At the end of entering a quote, click on View/Print Quote. Or from the Quote Maintenance screen, right-click on the quote, and select Print Quote. Click on Options in upper left-hand corner Applying Discounts Click on Catalog Discounts, then the Catalog you want to apply discount to, then select the correct Discount (Note – discounts are set up in Customer Maintenance, refer to page 11) A check mark will be added after selecting *** Make sure to click on Use Discount after setting up discounts. Applying Sales Tax Click on Sales Tax to select which sales tax you want to use on this quote. Then click on Apply Sales Tax IMPORTANT - When you have finished applying discounts and sales tax, click on Generate Quote. This will apply all your options to the quote. OR Auto Generate Any selections you make (discounts or sales tax) will automatically Generate your quote. Save as Default After you have your Discounts set, and Sales Tax set, you can select Save as Default. This will hold on to your selections for future quotes. Print and Export Print quote Go to page number Export a Paperless photocopy for e-mailing Change view of quote Quote Number P.O. Number Customer Information that was entered in Customer Maintenance Information from the Quote Information page Shows that you selected Use Discount Shows that you are using a Sales Tax and which one Quantity Note that additional items allow the user to input their own information. All positive numbers will be discounted if selected to. All negative numbers will be reduced as the whole number. Discount Code that was entered when setting up discounts in Customer Maintenance Description entered at end of each assembly prints here Sales Tax is added at the end noting the % used Summary and Vision: Our vision for eMDI is to make this program a complete tool that makes it more efficient for the user to present options, navigate effectively through all of the choices, present the absolute best in quotation format, and accurately convert the quotations to orders to be electronically submitted to Millwork Distributors, Inc for our complete product offering. This program is a perpetual project that will continue to evolve in the years to come. For this program to remain the leader in distributor software, we have committed the capital and resources to insure its effectiveness into the future. Here is a snapshot of our current priorities for this tool. Completion of all catalog sections on program- no need to use the printed catalog. More efficient and consistent way to handle major program downloads. Improve upon MDI-Connect Interface capabilities with the MDI operating system allowing a seamless transfer of your order to processing. Additional features added to current configurators including, but not limited to, rough opening information, detailed pricing, component pricing, etc. Interface capabilities with our dealer operating system to allow seamless transfer to your paperwork. In closing, this list will evolve through your input. Do not hesitate in sharing how we can develop eMDI to be an even more effective tool for you.