1
OBJ Inkdraw User Manual
Version 1.1
© 2009 HSA SYSTEMS
2
OBJ Inkdraw User Manual
Table of Contents
Part I Introduction
3
1 The screen
................................................................................................................................... 4
2 Tool bars
................................................................................................................................... 5
3 Bassic ...................................................................................................................................
commands
7
Part II Objects
9
1 Basic object
...................................................................................................................................
commands
9
2 General
...................................................................................................................................
Object Properties
11
3 Special
...................................................................................................................................
Object Properties
14
4 Date/Time
...................................................................................................................................
objects
15
5 Text objects
................................................................................................................................... 18
6 Counter
...................................................................................................................................
objects
19
7 Barcode
...................................................................................................................................
objects
21
8 Logo ...................................................................................................................................
objects
26
9 Field ...................................................................................................................................
objects
27
10 Schedule
...................................................................................................................................
Objects
28
11 Copy ...................................................................................................................................
Objects
30
12 System
...................................................................................................................................
Objects
31
Part III Other Features
32
1 Object
...................................................................................................................................
links
32
2 Parameters
................................................................................................................................... 32
3 Ink reduction
................................................................................................................................... 44
4 Databases
................................................................................................................................... 46
5 Prompts
................................................................................................................................... 52
6 Touch...................................................................................................................................
screen
58
7 Print log
................................................................................................................................... 64
8 User accounts
................................................................................................................................... 65
9 Cost calculation
................................................................................................................................... 67
10 Change
...................................................................................................................................
the language
68
11 Simple
...................................................................................................................................
User Input
70
12 Preferences
................................................................................................................................... 71
Part IV Support
86
Introduction
1
3
Introduction
Welcome to OBJ Inkdraw
Welcome to OBJ Inkdraw, the advanced drawing program for printers from HSA Systems.
OBJ Inkdraw is free software. You can download the software from our website even before
you decide to purchase our equipment.
This manual will help you understand and use the many different features available in the
software.
Important features in OBJ Inkdraw:
·
·
·
·
·
·
·
·
All objects are freely movable
Unlimited number of any object types
You can use windows fonts
Supports linear and 2D barcodes
Import data from Access, Excel and SQL servers
Touch screen mode
Remote control
Multi-language interface
© 2009 HSA SYSTEMS
4
1.1
OBJ Inkdraw User Manual
The screen
© 2009 HSA SYSTEMS
Introduction
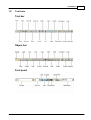
1.2
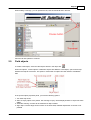
Tool bars
Tool bar
Object bar
Font panel
© 2009 HSA SYSTEMS
5
6
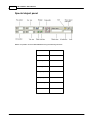
OBJ Inkdraw User Manual
Special object panel
Menus and panels can be enabled/disabled using the following shortcuts.
Tool bar
Shift+Ctrl+1
Object bar
Shift+ ctrl+2
Font panel
Shift+Ctrl+3
Design bar
Shift+Ctrl+4
Object panel
Ctrl+Alt+O
Template panel
Ctrl+T
Print Head panel
Ctrl+H
Rulers
Ctrl+R
© 2009 HSA SYSTEMS
Introduction
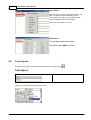
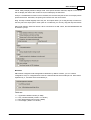
1.3
7
Bassic commands
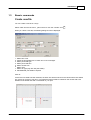
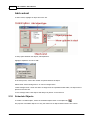
Create new file
You can create a new file in 3 ways:
Select "New" from the file menu , press Ctrl+N or click the "new file" icon
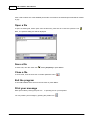
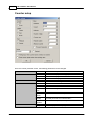
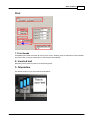
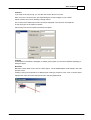
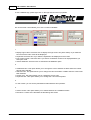
When you create a new file, the following dialog box will be displayed:
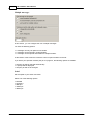
1.
2.
3.
4.
5.
6.
7.
8.
Select time zone.
Check the appropriate box to create TCU or CU messages.
Select print head type.
Select print head size.
Select canvas size.
Select units.
Select ink type (only with HP print heads).
Add additional print heads if required.
Click ok.
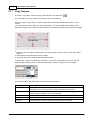
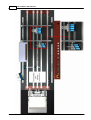
If more than one head has been selected, the stitch line will be marked on the canvas with a blue dotted
line. If there is more than one pen in your head the stitch line will be marked on the canvas with a red
dotted line.The dotted lines will not be visible on your print.
© 2009 HSA SYSTEMS
8
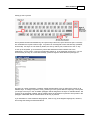
OBJ Inkdraw User Manual
Click a tab to select one of the available print heads. Print area for the selected print head will be marked
in grey.
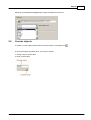
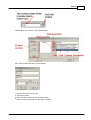
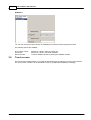
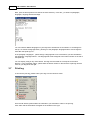
Open a file
To open an existing file, select "open" from the file menu, press Ctrl+O or click the "open file" icon.
Next, the open file dialog box will be displayed.
Save a file
To save a file, click the "save" icon
, select [File|Save] or press Ctrl+s.
Close a file
To close a file, click the close icon in the file operations menu.
Exit the program
To exit OBJ Inkdraw select exit from the file menu or press Alt+x.
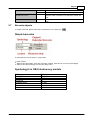
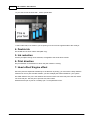
Print your message
Enter print mode by clicking the print icon
or pressing F10 on your keyboard.
You can preview your message by pressing the preview icon.
© 2009 HSA SYSTEMS
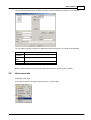
Introduction
9
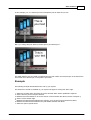
Select "Auto run" to display the prints continuously at
the rate entered in the box "interval".
Select "Single step" to display the prints one at the
time.
Select "Stop auto" to exit "auto run" mode.
Select "Start over" to reset.
Select "Exit" to exit preview mode.
2
Objects
2.1
Basic object commands
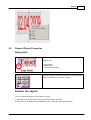
Creating new objects
To create a new object, follow this procedure:
· Click the icon for the object you want to create.
· Place the mouse cursor in desired starting position.
· Hold down the left mouse button and drag.
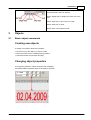
Changing object properties
To change the properties, select the object.This will display
the Special Object properties panel for the object in question.
© 2009 HSA SYSTEMS
10
OBJ Inkdraw User Manual
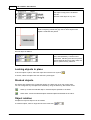
Deleting objects
To delete an object, select the object and press the Delete key .
Copy, Paste
You can copy an object in 3 ways:
1.
Select the object.
Click the copy icon.
Click the paste icon.
2.
Select the object.
Choose "copy" from the edit menu.
Choose "paste" from the edit menu.
3.
Select the object.
Press Ctrl+C.
Press Ctrl+v.
Right-click menu
For each object, there is a right-click menu when the object is selected.
From here, you have different options:
· Set as default. This will set the selected object as default. New objects of the same type will have the
same default values. Click default in the object bar to activate.
· Copy object to template: Will add a copy of this object to the template panel
· Copy, cut, paste, delete: same as above.
© 2009 HSA SYSTEMS
Objects
2.2
11
General Object Properties
Snap point
Any object created has 9 snap points to resize.
There are are:
4 corner points
4 middle points
1 center point(not visible)
Select a snap point in the object snap panel. The snap point
will remain fixed when you resize an object.
Position the objects
You can position the objects on the canvas in 2 ways:
1. Place the cursor on the object, press the left mouse button and drag.
2. Enter X and Y coordinates of the selected snap point under "general object properties".
© 2009 HSA SYSTEMS
12
OBJ Inkdraw User Manual
This object’s snap point is located at
182,109.
The size of the object is 3 by 352
The arrows illustrate the x and y axis. The gray area is the visible
canvas. Everything outside the gray area is where objects with
negative coordinates are placed.
The line object is different.
Notice that the width and height icons are
gone, and replaced by a second set of
coordinates, indicating start and end points.
The line itself will show one end in blue, the
other in yellow for easy reference.
Locking objects in place
To lock an object in place, select the object and click the lock symbol.
To unlock, select the object and click the lock symbol again.
Stacked objects
The objects are placed on the canvas like papers on a desk: they lie on top of each other.
You can change the way the objects are stacked by using the Stack up, Stack down icons:
Stack up: moves the selected object / selected objects upwards in the stack.
Stack down: moves the selected object /selected objects downwards in the stack .
Object rotation
All objects except line objects can be rotated.
To rotate an object, enter an angle and click the rotate icon.
© 2009 HSA SYSTEMS
Objects
13
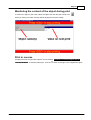
Monitoring the content of the object during print
To monitor an object in print mode, select the object and click the print monitor icon.
When you enter print mode, the value will be displayed in the print window.
Print in reverse
All objects that are not geometric objects can be reversed. Content of reversed objects will be
displayed like this. To activate reverse print, click the
© 2009 HSA SYSTEMS
button to the right of the magnification glass.
14
2.3
OBJ Inkdraw User Manual
Special Object Properties
Geometric objects
For rectangles and ellipses, the following options are
available:
Select
Select
Select
Select
line thickness.
line color.
fill.
transparency.
An object cannot both be solid and transparent.
Transparency overrides the solid command.
For lines only line thickness can be set.
Fonts
Choose font, size and font stile from the font panel. All fonts available in windows may be used.
To create a transparent background, select the object and click the transparency button on the right.
Pitch
Select pitch to display the text string with a fixed distance between the letters.
© 2009 HSA SYSTEMS
Objects
15
Stretch
The size of the text object remains constant when the text is changed and the text is stretched
horizontally and vertically to fill the box.
Text case
To change text case, go to the Text Case selector located in the font panel.
You have the following options :
Normal
Capitalize
lower case
upper case
2.4
The red fox
The Red Fox
the red fox
THE RED FOX
Date/Time objects
To create a date/time object, select the date/time button in the object bar.
The date/time object is able to show date and time in almost any format. The options are set in the
special object panel. The date objects are synchronized to your PC hardware clock.
© 2009 HSA SYSTEMS
16
OBJ Inkdraw User Manual
Select the formats
Select the format from the drop down menu.
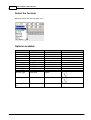
Options available
Format
dd-mm-yy
dd.mmmm.yyyy
yy-mm-dd
yyyy.mm.dd
yyyy-mm-dd
mmmm yyyy
dd.m.yy
dd"/"m yyyy
dd.mm.yyyy
dd.m.yyyy
dd"/"mm yyyy
Example
01-04-09
01.April.2009
01.04.09
2009.04.01
2009-04-01
April 2009
01.4.09
01/4 2009
01.04.2009
01.4.2009
01/04 2009
dd-mm-yy hh:nn 01-04-09 13:04
Format
#j (day of year)
#J (day of year)
#w (week number)
#W (week number)
#y (last digit of year)
#F
hh:nn
hh:nn:ss
hh:nn:ss a/p
hh:nn:ss am/pm
ANSEC
Example
91
091
4
04
9
Use specified date file
13:04
13:03:24
13:04:24 p
13:04:24 pm
ANMIN
dd-mm-yy hh:nn: 01-04-09 13:04:24
ss
© 2009 HSA SYSTEMS
Objects
17
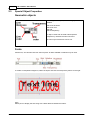
Setting date shift
The date shift is the difference between the current system date and the displayed date.
The value can be set in two different ways:
1. Enter a number in the Date shift fields and press enter.
2. Select a new date from a drop down menu.
Setting time shift
Enter a value in the time shift fields and press enter.
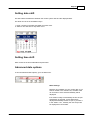
Advanced date options
To access advanced date options, go to the date menu.
Week Change
Displays next weekday as your current date. If you
enter a number in the ”weeks” box, the date of the
nth occurrence of the selected weekday will be
displayed.
If for instance today is Wednesday the first of April
and Monday is selected; current date will be
displayed as Monday the 6th of April. If you enter 1
in the “weeks” box, Monday the 13th of April will
be displayed as current date.
© 2009 HSA SYSTEMS
18
OBJ Inkdraw User Manual
Week Names
With this option you can change the names of the
days. Simply fill out the boxes and click OK.
This setting is per-object, so other date objects
may have different names for weekdays.
Use format code “#WN” to do this.
Month Names
You can also rename the months.
Use format code “#MN” to do this.
2.5
Text objects
To create a text object, please select the text button in the object bar.
Text object
Enter your text and press enter.
Select a character set from the drop down menu.
© 2009 HSA SYSTEMS
Objects
Please go to [File|Preferences|Regional] to select the default character set.
2.6
Counter objects
To create a counter object,please select the counter button in the object bar.
In the special object properties panel, you have two options:
1. Change current counter value
2. Enter Counter setup
© 2009 HSA SYSTEMS
19
20
OBJ Inkdraw User Manual
Counter setup
From the counter parameter screen, the following parameters can be changed:
Counter
Leadin
Start
Values
Format
Up
Down
Space
Zero
None
Minimum
Current
Maximum
Current
Minimum
Number of
digits
Counter step
Repeat
number
(Repeat
counter)
Thousand
separator
Decimal
Binary
Counter will count up.
Counter will count down.
Leadin will be displayed as empty space.
Leadin will be displayed as zeros.
Leadin will not be displayed.
Counter will start counting from minimum value.
Counter will start counting from current value.
Enter maximum counter value.
Enter current counter value.
Enter minimum counter value.
Enter number of digits.
How much counter increments after each sensor signal.
Number of times amount is repeated.
Counts print repeats. The repeats will be printed even if
you leave print mode and continue later.
Enter thousand separator, usually comma or dot.
Amount displayed as decimals.
Amount displayed as binary digits.
© 2009 HSA SYSTEMS
Objects
Printing stops when counter
reaches min or max
Reset current repeat number
2.7
Hexadecimal Amount displayed as hexadecimal digits.
Octal
Amount displayed as octal digits.
This options allows you to stop the counter when
maximum value is reached. If not selected, counter will
reset.
Current repeat number will be reset when you leave print
mode.
Barcode objects
To create a barcode, please select the barcode button in the object bar.
Simple barcodes
A simple barcode can be setup in 3 easy steps:
1. Enter content.
2. Select a barcode module. There are 2 barcode modules, each with its own set of symbologies.
3. Select a barcode symbology from the drop down menu.
Symbology's in OBJ Inkdraw org module
BCD
CODABAR
CODE39
CODE128
COMPRESSED
DATALOGIC
EAN8
EAN13
© 2009 HSA SYSTEMS
21
EAN128
FEMBAR
INDU
ITF
MATRIX
UPC
JAN (EAN)
NW7
22
OBJ Inkdraw User Manual
Symbology's in the expanded module
Code11
2OF5
2OF5IL
2OF5IATA
2OF5M
2OF5DL
2OF5IND
3OF9
3OF9A
EAN8
EAN8P2
EAN8P5
EAN13
EAN13P2
EAN13P5
EAN128
UPC12
CodaBar2
Code128
DPLeit
DPIdent
9OF3
UPCA
UPCAP2
UPCAP5
UPCE
UPCEP2
UPCEP5
PostNet5
PostNet6
PostNet8
PostNet10
PostNet11
PostNet12
Plessey
MSI
LOGMARS
PDF417
PDF417Trunc
MAXICODE
QRCODE
Code128A
Code128B
Code128C
9OF3A
AusPostCustom
AusPostCustom2
AusPostCustom3
AusPostReplyPaid
AusPostRouting
AusPostRedirect
ISBN
RM4SCC
DataMatrix
© 2009 HSA SYSTEMS
Objects
23
Advanced barcodes
For advanved barcode setup, go to the advanced setup menu.
From this menu , you can add either a text object a counter or a date/time object to your barcode.
Highlight an object and click "add". This will display the special object properties menu for the selected
objects.
For instruction on changing the settings for each content type, please refer to either the chapter on Text
objects, Counter objects or Date/time objects.
To continue, click ok. The object will now be visible in the box on the right.
© 2009 HSA SYSTEMS
24
OBJ Inkdraw User Manual
Application identifiers
If EAN 128 has been selected as your barcode symbology "Ean 128 app" will be on the list.
To create an identifier, select "Ean 128 app" and click "add". This will display the following menu:
1. Enter a value in the box "application identifier".
2. Select brackets from the drop down menu.
3. Click "ok" to continue.
An application identifier must be placed before a text object, a counter or a date/time object.
Use the "Object stacking" buttons to change the order.
Click "visual" in the box on the far left.
© 2009 HSA SYSTEMS
Objects
25
1. Select side lines and top/bottom lines. Adjust line width.
2. Compensates for ink saturation. Distance between lines will be increased.
3.
Readable characters. Turns readable characters on/off.
Select alignment, font type and font size.
Group characters. High numbers will place the numbers closer together.
Small numbers will place them further apart.
4. This option allows creation of a linear barcode and a special 2D symbol printed on top.
5. If module count is checked, barcodes can only be resized to a whole number of barcode modules.
If module count is unchecked, the barcode is freely scalable.
Click "checksum".
© 2009 HSA SYSTEMS
26
OBJ Inkdraw User Manual
This is only an option with barcodes where checksums are optional.
Otherwise the check boxes will be grayed out.
Let us assume that according to the checksum rule, the sum of the numbers in the barcode must be 8.
If you enter the numbers 2+2+2+2, the input will be accepted, whereas if you enter 2+2+2+3 it will not.
If you select "Show checksum" 22228 will be displayed as your output value.
"No-print text". If you want values from a database in your printout, a value will be repeated if the
following database filed is blank. (For instance if one costumer has a costumer number but the next
costumer on the list hasn't got one.) To avoid this, enter a value in the database field and enter the same
value in the "No-print text" field. When that value is read, nothing will be displayed on your printout.
2.8
Logo objects
To place a logo on your canvas, please select the logo button in the object bar.
The HS Automatic logo is the default logo.
Options:
1. To load a different logo, select "load logo".
2. To resize the picture, select “Original size”.
3. To make logo transparent, please check the box "transparent".
© 2009 HSA SYSTEMS
Objects
27
When loading a new logo, you can preview the file, both as thumbnail and in full size.
Close the full size preview to continue.
2.9
Field objects
To create a field object, select the field objects button in the object bar.
When text objects, counter objects or date/time objects are added to a field object, space will be kept
between the objects at all times. This options i useful when an object has been linked to a database
field.
In the special object properties panel, you have the following options:
1. Turn word wrap on/off.
2. Allow an empty object to be printed. The message "empty" will be displayed when no object has been
added.
3. Automatic resizing. Content will be resized to fit object window.
4. Align object. The text align function works on the entire field; individual adjustment of content is not
possible
© 2009 HSA SYSTEMS
28
OBJ Inkdraw User Manual
Add content
To add content, highlight an object and click "ad".
To keep space between the objects, add separators.
Highlight "separator" and click "add".
In the setup menu, choose the number of spaces between the object.
Select either "Allow Carriage return" or "Force Carriage return".
"Allow Carriage return". When text lines are longer than the specified window width, new object will be
placed on the next line.
"Force Carriage return" New objects will always be placed on the next line.
2.10
Schedule Objects
To create a schedule object, select the schedule objects button in the object bar.
The purpose of schedule objects is to vary the content of an object based on date / time criteria.
© 2009 HSA SYSTEMS
Objects
Add the object and click the "Add content" button.
Click "add" to add a new rule to your schedule.
1.
2.
3.
4.
Select a description for your rule.
Add object content.
Select the day to which the rule is going to apply.
Select the time of day when the rule goes into effect.
© 2009 HSA SYSTEMS
29
30
2.11
OBJ Inkdraw User Manual
Copy Objects
To create a copy object, select the copy objects button in the object bar.
The copy object, will copy content of one frame to one or more frames.
When you create a copy object, a source window and a destination window will be shown on your
canvas.
You can resize the source window by using the handles. You cannot adjust the dimensions of the
destination window. If you resize the source window, the destination window will be resized accordingly.
1. Make sure the copy object is placed first in the object panel. Use the "stack up" and "stack down"
buttons.
2. Place the source window over the source object.
3. The object will now be copied to the Destination window.
To display the content of the destination window on your screen, please select "full copy" from the
Special object properties panel. To add extra Destination windows, change "number of copies" .
In the special object properties panel, you have the following options:
Show objects as
Note
Don’t show
The windows will be completely invisible. In this mode, the windows can not be
rearranged. You can only access the windows from the objects panel.
Clear
The windows will be shown as thin red frame.
In this mode, the windows can not be rearranged.
Grayed
In this mode the windows will be displayed as grey boxes.
From/To
In this mode the windows will be named either "source" or "destination".
Full copy
In this mode, the content of windows will be shown on the canvas.
© 2009 HSA SYSTEMS
Objects
2.12
31
System Objects
To add a system object, please select the system object button in the object bar.
With system objects you can display one of the following:
1. Line name
2. Operator name
3. Lifetime counter
Make your selection from the drop down menu.
The line name displayed here must be entered at the following location: [File|Preferences|System]
Operator name is the user currently logged in. Lifetime counter counts all prints. The counter does not
reset when a new print job is loaded. To reset the lifetime counter, please go to the counter setup menu.
© 2009 HSA SYSTEMS
32
OBJ Inkdraw User Manual
3
Other Features
3.1
Object links
To create object links, enter the link menu.
Object links will copy content from one object to another.
In the window on the right,
drag one object onto another
to create a link
Active links are displayed in
the window on the left.
To delete a link, highlight it
and click "delete".
3.2
Parameters
To open the parameters menu, select [Functions|Parameters], press F9 or click the tools icon
.
© 2009 HSA SYSTEMS
Other Features
33
Print modes
Select either the velocity
option or the encoder
option.
Velocity
Type in the speed of the feeder.
© 2009 HSA SYSTEMS
34
OBJ Inkdraw User Manual
Encoder
Enter the encoder value.
To calculate the encoder value,
enter pulses/round, enter diameter
and click "calculate"
There are two encoder modes:
Position mode
A pulse will be transmitted every time the wheel has traveled a certain distance.
Modular mode
The calculation of the drop placement is based on the number of signals from the encoder.
Quadrature
Select quadrature, if your encoder transmits 2 pulses spaced 90 degrees apart.
Sensor
The settings for the sensor are shown in the second part of the setup parameters:
Start (mm): The sensor delay is the distance from
the sensor to the start of the print head.
Positive/Negative edge: Select if the output level
of your sensor goes high or low on activation.
Repeat number: Select how many times the print
is repeated for each activation of the sensor.
Distance between repeat: From end on one print
to the next.
Endless: Print continues as long as the sensor is
activated.
© 2009 HSA SYSTEMS
Other Features
35
Print
1. Print heads
All available print heads are shown at the top of the screen. Settings must be adjusted for each individual
print head. Click on a print head button to view the print head settings.
2. Inverted text
Everything will be printed in white on a black background.
3. Orientation
The default position of your print head is shown below.
© 2009 HSA SYSTEMS
36
OBJ Inkdraw User Manual
· If you want to turn the head 180º , select Upside-down.
· Select other side, if for instance you are printing on a box from the opposite side of the conveyor.
4. Double ink
The double amount of ink will be used (Xaar only).
5. Ink reduction
Like the per-object setting on ink reduction, but applied to the whole whole canvas.
6. Print direction
The print direction is the direction in which the print medium is moving.
7. Head offset/ Engine offset
Since the pens are displaced transversely to the direction of printing, you must enter a delay distance
measured in mm for pens and also heads if you have multiple print heads installed on your system.
The offset distance of a pen is the distance from the first nozzle row of the first pen to the first nozzle
row of second pen. The first pen to print has a 0,00mm offset.
However the first pen to print is not always pen 1 in the parameter menu.
© 2009 HSA SYSTEMS
Other Features
37
In this example, pen 3 is the first pen and consequently has an offset of 0,00 mm
But if you change the print direction the first pen to print will be pen 1.
The offset distance of a print head is measured from the first nozzle row of the first pen in the head to the
first nozzle row of the first pen in the previous print head.
Example
The following example will illustrate how to set up your system.
We assume an encoder is installed on your system.The paper is moving from left to right.
1.
2.
3.
4.
5.
6.
7.
Select the encoder option and enter the correct encoder value. Select quadrature if required.
Set the arrow to point in the print direction.
Measure the sensor distance. Go to the "sensor" menu and enter the value in the box "start(mm.)"
Set the correct sensor edge.
Measure the offset distance between the engines, go to the print menu and enter the values.
Measure the offset distance between the print heads and enter the values.
Select the option "Upside down".
© 2009 HSA SYSTEMS
38
OBJ Inkdraw User Manual
© 2009 HSA SYSTEMS
Other Features
39
8. Speed adjust
If the speed limit for the selected resolution has been reached, not only will your resolution go down, but
your printout will also be stretched. With speed adjust, you are able to adjust the size of your printout. If
you enter a higher value, placement of the drops will be based on a higher speed and thus your printout
will be squeezed.
·
·
·
·
·
·
600x600 dpi
300x300 dpi
300x300 dpi
300x150 dpi
600x300 dpi
300x600 dpi
one row
high speed
high speed
one row
Max
Max
Max
Max
Max
Max
speed 38 m/min
speed 152 m/min
speed 76 m/min
speed 306 m/min
speed 76 m/min
speed 38 m/min
Stitching
If some of the engines are overlapping, you can compensate by "turning off" nozzles.
Enter a number between 0 and 50. if too many nozzles have been turned off, white lines will appear in
your printout.
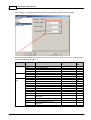
HP Values
When using HP print heads, you can modify the following parameters:
· Voltage - between 5 and 11,8 V DC
· Fire pulse width - measured in µs
· Warming pulse width - measured in ns
© 2009 HSA SYSTEMS
40
OBJ Inkdraw User Manual
These settings can greatly influence the quality of the print and the lifetime of the cartridge.
The list below shows data for the inks most commonly used. If your ink is not on the list, please contact
your ink manufacturer for advice.
Manufacturer Code
Ink name
Voltage
HP black inks C6195A
HP Fast Dry Black Ink
HP Versatile Black Ink
HP Dye Black 1918 Cartridge
HP45A 10 pack black ink cartridges
HP Spot Red Ink
HP Spot Green Ink
HP Spot Blue Ink
Collins Black Hi Speed Ink
Collins Black Hi Speed Ink Heads Up
Collins Black Fast Dry
Collins Black Coated Stock
Collins Black Coated Stock Heads Up
Collins Black Ink Fast Dry Coated
Collins Fluorescent Red Heads Up
Collins Black Ink Heads Up
Collins Black Ink
Collins Complete Black Ink
Collins BEAR Black Dye Ink ct
(flammable)
Collins SHARK Black Dye Ink ct
Collins ONYX Black dye ink (flammable)
Collins MAX Black pigment ink
(flammable)
Collins MAX2 Black pigment ink
11.2
11.2
11.2
11.2
11.2
11.2
11.2
10
10
10
10
10
10
10
10
10
10
7.4
Fire Pulse
width
1.9
2.25
2.25
1.9
1.9
1.9
1.9
2.25
2.25
2.25
2.25
2.25
2.25
2.25
2.25
2.25
2.25
2.25
10
10
10
2.25
2.25
2.25
10
2.25
C8842A
Q2344A
CG339A
HP color Inks C6168A
C6169A
C6170A
Collins black CM150
CM150H
inks
CM290FD
CM557
CM557H
CM796KB
CM838H
CM902H
CM903
Complete
TSK1750
TSK1948
TWK1268
TWK1369
TWK1386
© 2009 HSA SYSTEMS
Other Features
TWK1396
TWK1579H
TWK1818H
TWK1915H
TWK1921
TWK9015H
Collins
Collins
Collins
Collins
Collins
Collins
MAX3 Black pigment ink
Complete Black Ink Heads Up
Complete Black Ink, Heads Up
CORE Black Ink Heads Up
MAX PLUS Black pigment ink
Reliable Black Ink Heads Up
10
10
10
10
10
10
2.25
2.25
2.25
2.25
2.25
2.25
Fire Pulse
width
2.25
2.25
2.25
2.25
2.25
2.25
2.25
2.25
2.25
2.25
2.25
2.25
2.25
2.25
2.25
2.25
2.25
2.25
2.25
2.25
2.25
2.25
2.25
2.25
Manufacturer Code
Ink name
Voltage
Collins Color CM457
CM488
inks
Collins
Collins
Collins
Collins
Collins
Collins
Collins
Collins
Collins
Collins
Collins
Collins
Collins
Collins
Collins
Collins
Collins
Collins
Collins
Collins
Collins
Collins
Collins
Collins
10
10
10
10
10
10
10
10
10
10
10
10
10
10
10
10
10
10
10
10
10
10
10
10
CM500
CM501
CM502
CM503
CM506
CM784
CM785
CM787
CM788
CM789
CM790
CM791
Collins special CM631
TWB1374
inks
TWB1388
TWR1370
TWR1397
TWW1284
Tww1406
Tww1929
TWY1372
TWY1443
© 2009 HSA SYSTEMS
Blue Ink
Blue Ink
Red Ink
Cyan Ink
Blue Ink
Green Ink
Red Ink
Orange Ink
Yellow Ink
Magenta Ink
Brown Ink
Purple Ink
Green Ink
Red Ink
Invisible UV Ink
reliable blue dye ink Heads up
Max2 blue pigment ink
Reliable Red Ink Heads Up
Max2 red pigment ink
IR Invisible blue dye ink
invisible MAx UV ink
Invisible Uv Fluorescent red ink
reliable yellow ink heads up
MAX2 Yellow Pigment Ink
41
42
OBJ Inkdraw User Manual
Click the "resolution" tab.
Here the resolution can be set. Please note that for each resolution setting there is a speed limit.
Head Positions
Each pen installed on your system is managed by a controller board in the computer.
A controller board can manage up to 4 pens.
In this menu, you select which head is managed by which controller board.
Example. You install 2 print heads with 2 pens in each.
They can both be managed by controller board 1
High speed
This is only relevant for Xaar users. Any HP pen has two nozzle rows so the distance between the
© 2009 HSA SYSTEMS
Other Features
43
nozzle rows is fixed. However this is not the case with Xaar. Some print heads have only one nozzle
row, but others have two(Piezo). Therefore if you have a Xaar print head installed with two nozzle rows,
the distance between the nozzle rows must be entered manually.
Purge
From the purge menu, you can fire all channels to clear the nozzles.
Select either a specific pen(1) or all pens in the same time zone(2).
Test I/O
From the Test I/O screen you can monitor input signals from Sensor, encoder and the two input
channels input1 and input 2. This is used mostly for setting up the system. When a signal is detected,
the text in the boxes will change from high to low or low to high depending on the hardware.
© 2009 HSA SYSTEMS
44
OBJ Inkdraw User Manual
This can be done with all controller boards installed on your system. Please select a controller board
from the drop down menu.
Firmware
This menu is for updating FPGA and Micro processor firmware on the controller board.
This can be done with all controller boards installed on your system. Please select a controller board
from the drop down menu.
3.3
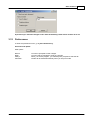
Ink reduction
This feature will reduce ink use by removing a percentage of the drops in the message. Use this feature
to save costs, or to compensate for ink flowing out when applied to non-porous materials. OBJ Inkdraw
allows you to set ink reduction for all objects, groups of objects, or single objects.
© 2009 HSA SYSTEMS
Other Features
45
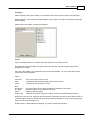
1. Select the object(s) and go to the drop down menu below the “lock” icon.
2. Click the ink reduction icon
to access the ink reduction panel.
In the window on the right, select ink reduction for individual objects or object groups.
On the left, choose method and adjust ink reduction level.
There are two different methods of ink reduction available: Masked and random.
· Masked arranges the remaining dots in rows and columns, and the messages will be created like
pictures in a newspaper.
· Random removes dots at random, creating a spray-paint like picture.
For each of the methods, there are 5 different levels of reduction to choose from. From 0% (no
reduction), to 100%.
© 2009 HSA SYSTEMS
46
OBJ Inkdraw User Manual
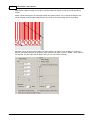
When ink reduction has been selected, a small icon will be displayed in the upper left corner of the
object(s). The icon will not be printed. It is only visible on your monitor.
Caution! Ink reduction takes up a lot of system resources and w ill reduce the m axim um num ber of prints
printed.
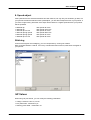
3.4
Databases
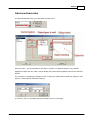
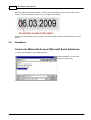
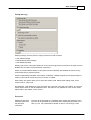
Connect to Microsoft Access/ Microsoft Excel databases
· Choose "load database" in the database menu.
Select a database. You can load
Access and Excel files.
© 2009 HSA SYSTEMS
Other Features
47
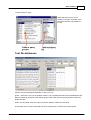
· Select a table or query.
Select the table or query in the
window on the right. A preview of the
data will be shown in the window on
the left.
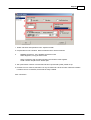
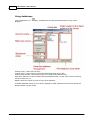
Text file databases
Choose one of the predefined separators or enter your own.
Ignore "" around text. The sue of quotation marks is not compatible with semicolon separated data and
data surrounded by quotation marks will be ignored. Select this option to ignore quotation marks and
display the data.
Strip"" from text fields. Select his option to remove quotation marks from text fields.
First dataset at line. Import of data will start at the selected line. Previous lines will be ignored.
© 2009 HSA SYSTEMS
48
OBJ Inkdraw User Manual
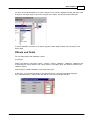
Use first line as header. Data in the first line will be used as column header.
The content of each data line is shown in the window on the left.
A preview of the finished result based on your selections is shown in the window on the right.
Select "force ansi conversion" to convert database content to ansi character encoding.
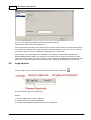
Connect to ODBC databases
Select ODBC from the database menu.
Select one of the available ODBC aliases. These are set up under Windows Control Panel.
Please enter user name and password. Username and password settings can be changed in the
preferences panel.
© 2009 HSA SYSTEMS
Other Features
49
When username and password have been accepted, you can access the data from the database panel.
SQL servers
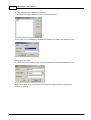
To connect to an SQL server, select [Database->Connect to SQL server] or Alt+L.
OBJ Inkdraw supports MySQL 3.1 and MS SQL 2000.
Next, please complete the following steps.
1.
2.
3.
4.
5.
6.
Select server type
Type in server name
Click connect
Select database name
Select table
Modify query if needed.
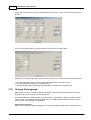
Quick access to SQL data
If you select save settings, your settings will be saved to a txt file with the extension sqs. This will allow
quick access to your sql server. Select [Database->SQL QuickConnect] or Alt+Q. Select the txt file
and click ok.
© 2009 HSA SYSTEMS
50
OBJ Inkdraw User Manual
Using databases
Click the database icon.
displayed.
Next, a dialogue box showing the selected table or query will be
Starting at entry. Select the start entry.
Looping at entry. Select the entry where OBJ Inkdraw will either stop or loop.
When looping start from. Select either stop print or restart at the selected entry.
Step value. Select the number of entries that OBJ Inkdraw will skip. To print every second or third row,
set this number to 2 or 3.
Repeat. Select the number of times an entry will be repeated.
To display database content on your canvas, highlight a header, hold down the left mouse button and
drag the header onto the canvas.
© 2009 HSA SYSTEMS
Other Features
51
You also connect the database to an object, already on your canvas. Highlight a header and drag it onto
an object in the object panel. If the cursor changes into a square, the objects accepts field input.
To remove database connection to an object, drag the header "Drag to delete" onto the object in the
object panel.
Offsets and fields
You can offset objects with database content.
An example.
Create 3 text objects. name them "name1", "name2", "name3", "address1", "address2", "address3" and
so forth.Drag the "name" header to the "name" objects in the object panel, the "address" header to the
"address" objects.
Click the button "Offsets and fields" in the lower right corner.
In this menu, you can offset the fields. If you offset the field by 1 the next field will be displayed.
If you offset the field by 2, OBJ Inkdraw will skip the next entry and display the third.
© 2009 HSA SYSTEMS
52
OBJ Inkdraw User Manual
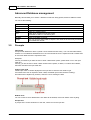
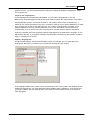
Advanced Database management
Basically this will allow you to select / deselect records from being printed, based on different criteria.
You can do the following:
3.5
General
Add / remove all from the list.
Search
Add to or remove from list based on search criteria.
Sort
Sort the data that has been added to the list.
Delete
Delete all / individual items.
Print
Select which records from the list to print.
Remember to select "x" use list for print.
Doublets
Check for doublets on the list.
Assign
Here you can also assign fields to objects. This works in the same way as with the
normal database window.
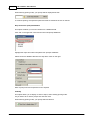
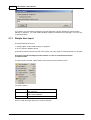
Prompts
Input mask
An input mask determines which symbols can be entered and how many. You can enter either letters,
numbers or a combination thereof.Enter an n for each number the user is required to enter. Please enter
an a for each letter the user is required to enter.
Examples.
Lets say for instance you want the user to enter a date with 8 ciphers, please enter 8 n´s in the input
mask box.
Lets say you ant the user to enter a batch number with 6 ciphers, 2 letters, 2 numbers and 2 letters,
then enter aannaa in the input mask box.
Visible input mask
Visible input mask is content displayed in the input box to show the user what to type.
If for instance the user is required to enter a date, the visible input mask could be "mmddyy".
The letters will be replaced by numbers, when the user is entering the date.
Default value
You can choose to set a default value. This value will be entered, if the user doesn't enter anything.
Prompt text
A prompt text is a short instruction to the user, shown next to the input box.
© 2009 HSA SYSTEMS
Other Features
53
Supervisor lock
This requires entry of a password for the prompt to be accepted.
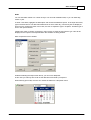
How to create a prompt
Click on the prompt icon in the objects menu.
Text
When you create a prompt for a text object, you can choose "simple input" or "drop down for prompts
database".
Simple input
First enter the input mask. In the example shown below, the user is required to enter measurements of
an object.
We assume that 2 ciphers will be needed for each measurement, therefore we enter eight n´s in the
"input mask" box.
In the "visible input mask" box, we will enter content to show the user in which order the measurements
shall be entered, in this case length, height, width.
Enter a prompt text to instruct the user.
Enter a supervisor password, if required.
© 2009 HSA SYSTEMS
54
OBJ Inkdraw User Manual
When entering printing mode, your prompt will be displayed like this:
To continue printing, the supervisor password must be entered in the box on the left.
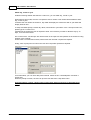
Drop down from prompts database
This option will allow you to enter content from a database field.
Click "file" in the upper left corner and choose "load prompt database".
Highlight the object and select "Dropdown from prompts database".
Please choose a database field from the drop down menu on the right.
Enter a prompt text and a supervisor lock if required.
Visibility
This option allows you to display or hide an object, when entering printing mode.
All you have to do is write a prompt text and click save.
When entering printing mode, your prompt will look like this.
© 2009 HSA SYSTEMS
Other Features
55
Dates
You can alter date content in a number of ways.You can enter a different date, or you can offset day,
month or year.
To enter a new date, highlights the date object and choose the Date/time option. In the input format box,
type in the date format. The date format determines in which order day, month and year are displayed
and how many ciphers are used. In this case, the user is required to type in 6 ciphers. Therefore type in
6 n's in the input mask box.
Visible input mask is content you display in the input box to show the user what to type. This will be
displayed in the input box and replaced when the numbers are being entered.
Enter a supervisor lock if needed.
Instead of following the steps shown above, you can use a datepicker.
In this case you will only have to fill out the date format and write a prompt text.
When entering print mode, the user can choose the date from a drop down menu.
© 2009 HSA SYSTEMS
56
OBJ Inkdraw User Manual
Offset day, month or year
Instead of entering another date than the current one, you can offset day, month or year.
When entering print mode, the user is required to enter a number. This number will be added to either
day, month or year.
If instance the user enters the number 2, day offset will display the 23rd as the 25th or year offset will
display 2009 as 2011.
To setup and offset prompt, choose day offset, month offset or year offset. In the "use input mask" box,
please type in a number of n's
representing the ciphers the user is required to enter. If for instance you want to offset the day by 10
days, 2 n's must be entered.
The content of the "Visual input" box will be shown in the input box and replaced as the number is being
entered. In the example
shown below 2 x's have been entered, which shows the user that 2 ciphers are required.
Finally, enter a prompt text to instruct the user and a supervisor password if required.
As an alternative, you can use a date picker instead. Check the box "use datepicker" and enter a
prompt text.
When the prompt is shown, the user can pick the new date from a drop down menu.
Important: Before creating a date prompt, please check Special Functions in the Preferences
menu,
© 2009 HSA SYSTEMS
Other Features
57
Counters
If you setup a counter prompt, you can alter the current value of a counter.
Enter n's in the "use input mask" box representing the number of digits in your counter.
Add for instance 6 n's when offsetting a 6 digit counter.
The content of the "visible input mask" box will be displayed in the input box and replaced
as the user types in the required numbers.
Add a prompt text and a supervisor password if required.
Visibility
As described in the previous paragraph, a visibility prompt gives you the choice between displaying or
hiding the object.
Barcodes
Barcodes contain either a text, date or counter object. All the added objects will be visible in the "edit
prompts" menu.
Creating a prompt for a barcode is no different than creating a prompt for a text, time or counter object.
Highlight the object and follow the instructions in the paragraphs above.
© 2009 HSA SYSTEMS
58
OBJ Inkdraw User Manual
Databases
You can also setup a prompt to search for a database record and continue printing from there.
The following options are available:
First column search.
Full search
Record number.
3.6
Search for a value in the first column only.
Search for a value in the entire database.
Locate a database record by entering the database number.
Touch screen
The touchscreen interface allows you to hide the standard screen and display a touch screen interface.
The Touch screen interface can be activated on start-up. [File|Preferences|Startup message]
© 2009 HSA SYSTEMS
Other Features
Log on screen
The log on screen can be turned on/off at [File|Preferences|Startup message]
1.
2.
3.
4.
Log on as operator.
Log on as administrator.
Close OBJ Inkdraw.
Shut down computer.
© 2009 HSA SYSTEMS
59
60
OBJ Inkdraw User Manual
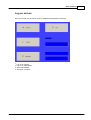
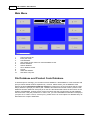
Main Menu
1.
2.
3.
4.
5.
6.
7.
8.
9.
10.
Load a new print job.
Enter print mode.
Load database.
This window shows content of current database record.
Browse database.
Search database.
Go to database record.
Log out.
Close OBJ Inkdraw.
Shut down computer.
File Database and Product Code Database
To load and print a message, you can also use a file database. A file database is a text document with
print job names and file locations separated by commas. Please select your file database at the
following location File|Preferences|Startup message. At startup a list of print job names will be shown.
Simply select the print job you wish to print. However, this feature will not work unless a product code
database has been loaded for each print job on the list. OBJ Inkdraw will search the first column of the
Product code database. Printing will not commence unless the print job name from the File database
has been found. If the print job name is in column one, you can enter additional information to display in
your print out in column 2 and 3, such as price, product id etc.Link a text object to a database entry as
described in the chapter "databases".
© 2009 HSA SYSTEMS
Other Features
Edit the touch screen
To access the touchscreen editor, go to [functions —› Special —› Touchscreen —› Setup]
In editor mode, you can edit object properties of the buttons.
Right click on the button and left click on properties to enter "object properties".
In the "object properties" menu you have the following options.
·
·
·
·
·
To hide the button, uncheck the "visible" box.
Position the button on the screen by adjusting the x and y values.
Adjust height and width of the button
Change the text.
Change the color.
© 2009 HSA SYSTEMS
61
62
OBJ Inkdraw User Manual
To use a different logo, please right click on the logo and left click on properties.
The Touch screen control allows you to set a number of variables.
1.
· Display login screen. Check this box to display the login screen at system startup. If you leave the
box uncheck the main menu will be displayed.
· Keyboard. Check this box if you want the keyboard to be displayed on the screen.
· Print confirm screen. Check this box if you want a confirmation screen to be displayed before you
enter print mode.
· Use file database. Check this box to activate the file database option.
2.
· Unselected color. This option allows you to change the color of windows or labels when the content
has not been selected.
· Selected color. This option allows you to change the color of windows or labels when the content has
been selected.
· Screen color. This option allows you ton change the screen color.
· Keyboard color. This option allows you to change the color of the keyboard.
3.
· In this section you can set the passwords for administrators and operators.
4.
· Choose screen. This option allows you to switch between the 7 available screens .
· File name. Location of the file where the file settings are stored.
© 2009 HSA SYSTEMS
Other Features
63
Setting up the k eyboard
The keyboard contains 48 standard keys and special keys like enter, space and back space. The keys
are numbered form top left to bottom right. 3 symbols can be assigned to each standard key (standard,
shift and alt). Two keys are not visible by default, the alt key and key 48, located next to the "a" key.
To set up the keyboard, go to the directory where OBJ Inkdraw has been installed. Go to the
subdirectory "Touch screen". Open the language file english.ini. In the paragraph "Extra keys" you will
find the alt key and key 48. To activate the keys, please change the value after the equal sign to 1.
The files has 3 other paragraphs, unshifted, shifted and alternated. Here you will find the number of all
available keys. To assign a symbol to a key, please type in the symbol after the equal sign. The symbol
you assign to the keys in the "unshifted" paragraph will be assigned to the keys as standard values. The
symbols in the paragraph "shifted" will be activated when the shift button is pressed. The symbols in the
paragraph "alternated" will be activated when the alt key is pressed.
If you would like to create a different language file, make a copy of the English language file, rename it,
and change the settings as described above.
© 2009 HSA SYSTEMS
64
OBJ Inkdraw User Manual
Next, open the file keyboard.ini located in the same directory. In this file, you will find 3 paragraphs,
languages, language buttons and flags.
You can install 5 different languages on your keyboard. The buttons are numbered 1 to 5 starting from
the top. To activate a language button, please go to the paragraph "language buttons" and change the
value after the equal sign to 1.
In the paragraph "languages" , please assign a language file to one of the button you have activated in
the paragraph "Language buttons". The language file will be assigned to the button number on the left of
the equal sign.
You can display a flag on any active button. The flag must be saved as a bitmap file to the same
directory. In the paragraph "Flags", please write the button number on the left of the equal sign and the
name of your flag file on the right.
3.7
Print log
To access the print log, please select "print log" from the functions menu.
From the left window, please select the information you would like to store in the print log.
Click "add" and the information will appear in the window on the right.
© 2009 HSA SYSTEMS
Other Features
65
You can add fixed values such as "date" and "user" and the content of the objects in your print job.
You can adjust a number of options to determine how the information in your print log is displayed.
Lead in
Data
Separator
Quotation
Marks
Lead Out
Example
Text at the beginning of every line.
Select symbol to separate data.
Data is separated by quotation marks.
Text at the end of every line.
Example of the finished result.
Finally, choose a location for your print log file and remember to check the box "activate".
3.8
User accounts
Changing access rights
To change the user access rights, select functions ->access rights.
© 2009 HSA SYSTEMS
66
OBJ Inkdraw User Manual
A menu will display the available user accounts.
To edit the access rights, highlight a user account and click edit.
In this menu you can change the password and choose a user level in the drop down menu.
Changing access rights
To create a new user account, simply click the add button in the user administration menu.
Type in an a name for the user account. Choose access rights and type in a password.
Click ok to continue.
© 2009 HSA SYSTEMS
Other Features
Activate user accounts
To activate user accounts and select "Display login screen" under startup message.
3.9
Cost calculation
To measure costs, load a file and select [Functions|Cost calculations]
If your print job is with only 1 pen in the head the menu below will be shown.
1) Type in the ink supply size. This is typically 42 mm for a HP cartridge.
2) Type in the ink supply cost, that is the price for a cartridge, in this case a
price of 15 $ has been used.
3) The software calculates prints per ink supply, cost/1000 prints and cost/
100000 prints.
© 2009 HSA SYSTEMS
67
68
OBJ Inkdraw User Manual
If your have created a print job with multiple heads, cost for each is shown. Total cost is shown on the
far right.
If you click the expand button, cost will be shown for each pen in the print head.
Although the calculations are often close to the actual costs, they will be limited by the following facts:
· Even the slightest change in font size can greatly influence the consumption of ink.
· It is rarely possible to empty an ink cartridge 100%.
· OBJ Inkdraw calculates a theoretical drop size which may differ from actual drop size.
3.10
Change the language
OBJ Inkdraw is easy to configure for different languages. This chapter will explain how to change the
language, and how to create your own language files.
The language files are normal text files. They are stored in a subdirectory called “Language” with the
extension .lan. The language file will translate every part of OBJ Inkdraw visible to the user such as
menus, dialog boxes, buttons and messages.
Select a new language
OBJ Inkdraw comes with different languages. To load a new language, please select "language" in the
© 2009 HSA SYSTEMS
Other Features
69
preference menu. You will be presented with a dialog box showing the available language files. Select
one and press OK.
Create a new language file
If your language is not included with OBJ Inkdraw, you can make a language file of your own.
Make a copy of the file english.lan and rename it; for instance narnian.lan. Open the file in a text editor.
The language file consists of a number of sections. The header of each section is identified by [ ].
Please do not change the header. Every line in a section is made up by two parts separated by an equal
sign. Translate the content on the right hand side. The content on the left side is in English. In the
English language file, the two parts are identical in most cases. Translation of menus contain an
ampersand(&). You can access the menu using the alt key and the character after the ampersand.
When the translation has been completed, save the language file to the subdirectory "language" in your
OBJ Inkdraw directory. If you made a translation and would like to donate it for OBJ Inkdraw, we will be
happy to include your file as well.
Update a language file
As OBJ Inkdraw evolves, new functions are added, others are changed. This of course affects the
language file. But there is no need for you to rewrite the language file from scratch.
In the language update menu, please enter a mark description and click "update". OBJ Inkdraw will now
update the language file. Your mark description will be added to every updated line. To locate the lines
you need to update, open the language file in a text editor and use the search function to locate the
mark description.
© 2009 HSA SYSTEMS
70
OBJ Inkdraw User Manual
If you wish to use non-western characters in the language file, typically double byte characters like
Chinese or Japanese, you must enable Windows support for text files in this language. You may have
to restart Windows.
3.11
Simple User Input
This feature allows the user to:
1. Change object content while printing is in progress.
2. Go to a specific database record.
A barcode scanner is typically used to enter content, but many types of scanning devices can be used.
Important! A keyboard wedge must be installed, in order to translate barcode data
to keyboard data.
To setup simple user input, please select "user input" from the "functions" menu.
You have 3 options:
Send to object
Add new content to an object. Enter object
name in the box .
Database SearchSearch for the entered value in the first
column of the database.
Database Goto Go to a specific record number.
The box "read user input during print" must be checked.
© 2009 HSA SYSTEMS
Other Features
71
Important! If you want the changes to take effect immediately, buffer mode most be set to off.
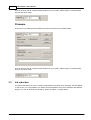
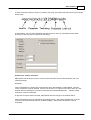
3.12
Preferences
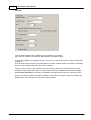
To enter the preferences menu, go to [File->Preferences] .
Save/exit and update
Save options
Normal.
Never.
Always.
Automatic.
© 2009 HSA SYSTEMS
You will be prompted to save changes.
You will never be prompted to save any changes.
When you exit the program, you will always be prompted to save the file.
The file will be saved automatically when you exit print mode.
72
OBJ Inkdraw User Manual
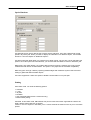
Running update. Even if printing is already in progress, you cant update both the layout and the
database.
Create a new file and save it to the update folder in the OBJ Inkdraw directory. OBJ Inkdraw will load the
new file instead and continue printing.
Print monitor. In print mode, the costs will be shown at the bottom of the window. Please refer to the
chapter on cost calculation for further details.
If the box "machine parameters" is checked, the machine parameters will be used.
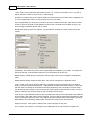
Regional
Font.This option allows you to change the font. The selected font will be used to display text in menus.
Main character set. Use this option if you want to install a language with a different character set. You
may have to change the language settings in Windows.
© 2009 HSA SYSTEMS
Other Features
73
Language
Select language. This options allows you to translate menus, dialog boxes, buttons and messages.
Update language. If new features have been added to the program, this option will change the language
file accordingly.
Please refer to the chapter "Change the language".
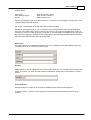
Layout
Layout. The option allow you to display either the classical or the modern menus.
Use advanced design bars.When this options has been selected, the special object panel will be
displayed in CU mode.
Unit. This option allows you to change the units used in OBJ Inkdraw. You can choose either pixels,
centimeters, inches and points.
Cursor
Cross hair
Hand
Cross
A big cross will be used as cursor.
A small hand with a pointing finger will be used as cursor.
A small cross will be used as cursor.
Grid
X/Y interval.
X/Y offset.
Visual.
Snap to grid.
This option allows you to adjust the distance between the grid points.
Offset the grid points any distance from (0,0).
Display or hide grid points.
If this option has been selected, an object cannot be placed between grid points.
Drag points. Here you can drag point size and proximity.The drag points are the small boxes shown on
a selected object. Proximity determines the minimum distance between the cursor and the drag points,
before you can snap the drag points.
Global settings. If global settings are applied, you cannot change the grid setup.
© 2009 HSA SYSTEMS
74
OBJ Inkdraw User Manual
Keep objects inside message. If this option has been selected, objects cannot be placed outside the
canvas.
Allows canvas resizing from the message window.This options allows you to change the length of the
canvas manually from the editor window.Place the cursor on the canvas edge, left click and drag.
Automatic pop up of object menus.When you add content to an object, such as adding a counter to a
barcode, this option will open the properties menu automatically when content is added. If this option is
not selected, only the object will be added. Later you can add content manually.
© 2009 HSA SYSTEMS
Other Features
75
Startup message
Startup message. Use this option to specify which file to load at startup.
· Last edited message
· Default OBJ Inkdraw message
· User-defined message
Display login screen. This option allows you to turn the the login screen on and off. If the login screen is
disabled, the user will not be prompted for a password.
Search for unsaved data at startup. If this option has been selected, OBJ Inkdraw will search for any
unsaved data from a previous session.
Wizard for generating new labels. If this option is selected, a wizard will guide you through all steps of
creating a print job each time every time a new file, is created.
Start options.This option allows you to select the startup mode. Select either editing mode, Touch
screen mode or print mode.
File database. A file database is a text document with a print job name and a file location. The print job
names will be shown on the file database screen. This option is only available in Touch screen mode.
Please refer to the chapter "Touch screen".
Passwords
Preference password
Parameter password
CU password.
connection.
© 2009 HSA SYSTEMS
The user will be prompted for a password when entering the preference menu.
The user will be prompted for a password when entering the parameter menu.
Here you can set a password for transfer of files to a CU through a LAN
76
OBJ Inkdraw User Manual
Log file
This option allows you to log program events. All information will be saved to logfile.txt located in
installation directory.There are 5 log levels: from None (No log) to Maximum (log all). Log level change
will not take effect before the program is restarted.
Error messages. Since OBJ Inkdraw can both be operated remotely and from a locale workstation, there
are 4 ways to display error messages.
Disabled
Message
Network
Serial
Errors appear only in log files
A message will be displayed on the screen
Error messages are transmitted with a TCP/IP connection
Error messages are transmitted with a serial connection
Database
Keep references when reloading. If this option has been selected, the currently open database will
connect to objects with the same name when a file is opened. This is great for using templates, because
you can use the same data with different layouts.
Reload database just before printing. If you have an application that modifies the database "on-line", this
feature ensures that you have the most up-to-date data before you enter print mode.
Always reset to first record when reloading. Normally if you reload a database OBJ Inkdraw will start
printing from record 1. Touch screen mode is different. If you reload a database after printing 100
records, OBJ Inkdraw will print the new database from record 101. "Always reset to first record when
reloading" OBJ Inkdraw will always go to the first record when the database is reloaded.
Prompt for username and password. When a database is opened, you are prompted for username and
password.
© 2009 HSA SYSTEMS
Other Features
77
Visual. Always display header in design mode. If this option has been selected, objects on the canvas
will not display the value of the current record, but will display the field name.
Prompt. Lock database to found record: If activated, the record found (see section on Prompts) will be
printed all the time. Otherwise, the printing will continue from the record found.
Drag and drop. Enable drag/drop from entry list. This option allows you to drag and drop content from
the entry list to the object panel. If this option is not selected, you can only drag and drop field names.
SQL server settings. Save local version: When connected to an SQL server, the retrieved database will
be saved to your pc.
Barcodes
OBJ Inkdraw configures EAN 128 application identifiers by default. However, you can create a
configuration script. A configuration file must be a standard text file with 4 fields per line. Each field is
separated by a ; and each line is terminated by a ;
Fields are:
·
·
·
·
1:
2:
3:
4:
Application identifier number (0..9999)
Only numbers allowed ("TRUE" or "FALSE")
Max length allowed (0=(no limit)..99999)
Check Digit ("TRUE" or "FALSE")
© 2009 HSA SYSTEMS
78
OBJ Inkdraw User Manual
Multiple messages
In this section, you can configure the use of multiple messages.
You have the following options:
· A message can only be opened in one window.
· A message can be opened in several windows.
· A message can be opened and saved from multiple windows.
At the bottom of the screen the maximum number of open windows can be set.
If you start a print job when another print job is in progress, the following options are available:
· The print job will be changed automatically.
· A prompt will be displayed.
· The print job will not be changed.
Serial
Set the speed of your serial connection.
Select one of the following options:
·
·
·
·
·
Disabled
Terminal-3
9600 bps
19200 bps
38400 bps
© 2009 HSA SYSTEMS
Other Features
79
A serial command consists of Lead in, preamble, text string, post amble and lead out as in the example
shown below.
In OBJ Inkdraw, you can select standards settings for lead in, lead out, preamble and post amble.
This way you will only have to transmit the text string.
Send/receive control characters
OBJ Inkdraw can be setup to send or receive control characters from an external device such as a
measuring weight.
Examples.
If the external device is sending the command OBJ:Text1;TEX;asfasdf# to OBJ Inkdraw, "Receive
control characters" must be checked. Lead in must be set to "o" and lead out must be set to #. If the
external device is sending the command <ESC>OBJ:Text1;TEX;asfasdf#<EOT> , "Receive control
characters" must be unchecked.
In response to the the serial command, OBJ Inkdraw will send a reply to the external device.
If the external device will only understand <ACK>Reply<EOT>, "Send Control Characters" must be
checked. If the external device will only understand Reply, "Send Control Characters" must be
unchecked.
© 2009 HSA SYSTEMS
80
OBJ Inkdraw User Manual
Network
Local ip address displays the ip address for the computer on the network.
Enter the port number to be used when OBJ Inkdraw is operated remotely.
To allow OBJ Inkdraw to be operated remotely, check the box "Allow connections". Specify a password
if required.
This will allow remote connection until OBJ Inkdraw is closed. To allow remote connections permanently,
check the box "automatically allow connection on startup".
If the box "Auto-connect to first message" has been checked, when an ethernet connection is being
established, OBJ Inkdraw will connect to the first open file. (See the Screen section) If the box Send
auto-connect information is checked, a confirmation message will be send to the connecting client.
Finally select which symbol to separate the different command lines and which symbol to separate the
different items in a command line. This is also used for RS232.
© 2009 HSA SYSTEMS
Other Features
81
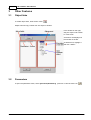
Special functions
Use date file.Specify here a date file that contains exactly 366 lines, each with a date format for that
specific day of the year. When you want to display the information in a date/time object, use the date
format # F. See the chapter on "Date/time objects".
Use day/month/year offset.When you create an time offset prompt, only the day can be changed if this
option is off. If this option has been selected, you can also shift the reference month or reference year.
Date format. This option allows you to select date formats for prompts. However, this is only for files
created with older version of OBJ Inkdraw. This option is only kept here for backward compatibility.
Date encryption. Encrypt a date by replacing individual digits with a different symbol. Notice that this
setting is global and affects all date objects.
TCU zero suppression. Select this option to disable counter leadin in TCU print jobs.
Printing
Print buffer mode. You have the following options.
·
·
·
·
·
·
Unlimited
1 print
10 prints
No Buffer
User managed buffer (remote connections only)
Bi-directional printing
Unlimited. In this buffer mode, OBJ Inkdraw one print for each start sensor signal will be saved to the
buffer, without erasing data not yet printed.
if there is room for 10 prints in the buffer, print 11 will be saved to the buffer as soon as print 1 has been
printed.
© 2009 HSA SYSTEMS
82
OBJ Inkdraw User Manual
1 print mode/10 print mode.There will always be either 1 or 10 prints in the buffer. Print 11 (or print 2)
will be saved to the buffer as soon as print 1 starts printing.
No buffer.In no buffer mode, a print will be saved to the buffer each time the start sensor is triggered. Like
in user managed buffer, there is no fixed number of prints in the buffer.
User managed buffer. For each print command a print will be saved to the buffer. There will be no fixed
number of prints in the buffer. If OBJ Inkdraw receives a print command when the buffer is empty, the
error message "Printbuffer overrun" will be shown.
Bi-directional printing. Select this option if your print head is mounted on a slide, moving across the
canvas.
2-sided print. This feature only works when multiple stalls are installed on you system. If "2-sided print"
has been selected, a second stall will print the same information as the first one.
Default velocity. Default velocity for printing in velocity mode. Value can be changed in the parameter
menu.
Default position setting. Default encoder value. Value can be changed in the parameter menu.
Lock no buffer. If this option has been selected, a print will be stored to the buffer only if the buffer is
empty or contains one print being printed. If OBJ Inkdraw receives a false sensor signal, an extra print
with the same time stamp will be saved to the buffer and printed on the next product, the time stamp
that should have been printed on the second product will be printed on the third and so forth. If "lock no
buffer" is selected, only the time stamp on the next product will be wrong.
Lock CB ram. If OBJ Inkdraw receives a print command before the print has been saved to the buffer the
error message "print buffer overrun" will be displayed. This may happen if the distance between the start
sensor and the print head is to short. If lock CB ram has been selected, data will be saved to the same
RAM address, thus overwriting previous data. Thereofore the previous print will be printed.
Purge on first print. If this option is selected, the system will purge on first print.
Out-1 function, Out-2 function. The outputs on the CB boards can be set to transmit a signal to an
© 2009 HSA SYSTEMS
Other Features
83
external device.
Print signal.
Print message signal.
Low ink.
When print mode is active.
When system is printing.
When ink level is low.
Use IN-1 for hardware purge. This option allows you to connect a manual trigger to the IN-1 port on the
controller board and purge remotely.
Anti chatter. Compensates for chatter effect with a small time delay.
Disable I/O when buffer empty. If you are working in user managed buffer mode, you are sending the
print jobs to the buffer using a serial or ethernet connection. A print job must be followed by a print go
command. If you do not send the print go command, an error message will be displayed as soon as the
start sensor is triggered. If "disable I/O when buffer empty" has been selected OBJ Inkdraw will ignore
the start sensor signal and the paper will be left blank.
Directories
This option allows you to add search directories. This is an advantage when OBJ Inkdraw is remotely
controlled, since you do not have to enter the path.
System
If OBJ Inkdraw is used at a production line, enter the line name here. If you create a system object and
select "line name", the value you enter here will be displayed. Please refer to the chapter on system
objects.
External devices
External devices is for settings up cameras for database lookup and barcode recognition.
To use this feature, cameras must be properly connected and the software HSA Camera must be
installed.
© 2009 HSA SYSTEMS
84
OBJ Inkdraw User Manual
You can setup up to 4 cameras. For each camera , please select an item. Item is the number of the
selected zone frame in HSA Camera
Next select a function
Database search will scan the barcode, search the database and print the value found.
Fast database search will scan the barcode, search first column in the database and print the value
found.
© 2009 HSA SYSTEMS
Other Features
85
Verification will perform a database lookup and verify content . Please enter the target object to verify in
the object box.
Select the validation tab. OBJ Inkdraw can be set up to transmit a signal to an external device in case of
NOREAD, ERROR or both. NOREAD is when the barcode is not readable. ERROR is when content is
not verified. A value will be transmitted to the pc serial port. Enter the value to transmit in the box "No
read string". Barcode data will be saved to a logfile. The file can be reset after each print.
© 2009 HSA SYSTEMS
86
4
OBJ Inkdraw User Manual
Support
For product support, please contact HSA SYSTEMS Customer Service department
HSA SYSTEMS CUSTOMER SERVICE DEPARTMENT
Phone: +45 66103401
Email: [email protected]
© 2009 HSA SYSTEMS