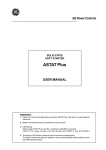
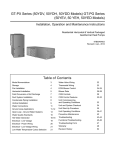
Transcript
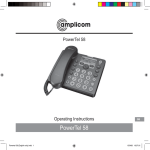
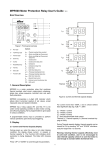
Quick guide And if you have a couple more minutes How to install it in just 1 minute Controls 9LJLP]PUNHJHSS Connect one end of the handset's coiled cord to the slot on the bottom of the handset (3), and the other end of the cord into the slot on the left-hand side of the cradle (4). - The ringer rings when there is an incoming call. 13. 9PUN volume switch: - Proceed to take the phone call. 2. Microphone 14. Switch for - 3. Coiled cord slot on the handset 15. 9PUNLY output 4. Coiled cord slot on the cradle 16. Slots for screws for wall assembly cradle. Redial last number dialled Basic telephone use - Pick up the handset. - Press the 4HRPUNHJHSS key. 6. Key : Mute 7. Key : Access to additional services from your telephone network provider 8. Key : Pause - - Pick up the handset. - Listen to the dialling tone and dial the telephone number. - Ringer volume adjustment: high and low. or - Redial. key: 100 ms or 300 ms - Mute: mute microphone. 1. Features 5. Numeric keypad (9) cradle. 9. Key cradle. 15 2. Cautions 15 3. Maintenance 16 4. Installation 16 4.1. Contents ............................................................ 16 4.2. Installation .......................................................... 16 4.3. Wall assembly .................................................... 16 5. Device settings 6. Operation 6.1. Making a call ...................................................... 6.2. Receiving a call .................................................. 6.3. Mute (6) .............................................................. 6.4. Flash key (7) ....................................................... 6.5. Pause key (8)...................................................... 6.6. Redial key (9) ...................................................... 18 - R / F key: to access supplementary services. 18 18 18 18 18 19 - Flash time: 100 ms or 300 ms Attention - Read these instructions before using the telephone. - Whenever possible, avoid installing the telephone in extremely cold or hot places and next to television sets, radios or other electrical appliances. 12. Line cord slot 1. Clean the housing surfaces with a soft, fluff-free cloth. 2. Do not use any cleaning agents or solvents. english 13 This telephone must be connected to telephone lines, which accepts tone (Dtmf) dialling. 5.2 Flash key adjustment 4.3 Wall assembly - A telephone - A coiled cord for the handset This device is can be easily wall-mounted. To do so: - A line cord - Drill two holes in the wall, 75 mm apart, as indicated in the drawing below for wall assembly. - User manual - Put the screws in. Use the following type of screws: 3.5 x 25KA, d=7mm. 300 - Remember that the telephone has two handset holder clips (10). One for when the telephone is on the hook and the other for when it is off the hook. - Fit the cradle into the slots (16) located on the bottom of the telephone for this purpose and make sure that it is securely Supplementary services - Check the receiver's coiled cord connections (3 and 4). - Check the installation and connect the handset directly to its PTR. If the problem persists, contact your telephone company. ;OL[LSLWOVULKVLZUV[KPHS[OLU\TILY - Check that with each digit you hear a keystroke tone in the receiver. ;OLYPUNLYPZ]LY`SV^ - Check that the ringer volume switch is in the (High volume). position (14) english 17 call waiting and conference facilities. These supplementary services can be used via the R/F-button. Please contact your telephone network provider regarding which Flash time must be set to use the supplementary services. Contact your telephone network provider with regard to enabling supplementary services. Declaration of Conformity This device fulfils the requirements stipulated in the EU directive: - 1999/5/EU directive on radio equipment and telecommunications terminal equipment and the mutual recognition of their conformity. Conformity with the above mentioned directive is confirmed by the CE symbol on the device. To view the complete Declaration of Conformity, please refer to the free download available on our web site www.audioline.de english 20 - Listen to the dialling tone and dial the telephone number. cradle. 6.2 Receiving a call - The ringer rings when it receives a call. - Pick up the handset. - Proceed to take the phone call. cradle. 6.3 Mute 6.4 Flash key 6.6 Redial key (7) This key lets you access the different additional services offered by your telephone network provider or PBX, such as: “call forwarding, call on hold”, answering machine service, etc. For further information please contact your telephone network provider. If your telephone is connected to a PBX, it can be necessary to set the flash time to 300 ms. Please refer to the documentation of your PBX. 6.5 Pause key (9) If you want to redial the last number dialled: - Pick up the handset. key and the telephone will automatically dial - Press the the last dialled number again. cradle. (8) When your are dialling digits you can enter a pause of approx. 3 seconds by pressing this key. This function is useful, for example, when you are going to make a call from a PBX, and after dialling the access code to the line you have to wait for a second tone. (6) Mute the microphone. Press and hold down this key , if you DO NOT want to be heard by the person on the other end of the line and release when you are ready for them to hear you again. english 19 english 18 Übersicht Guarantee You hear UV[OPUN when you take the phone off the Your telephone supports supplementary services provided by your telephone network provider, such as brokering, hook - Check the connections to the telephone line (12) and the wall socket in your home. - Pick up the handset. This key allows you to access to the different services, which offers its operator or PABX, such as, “call forward”, “call waiting”, “answering machine”, etc. For further information contact your telephone network provider. In delivery state, a flash time of 100 ms is set. When connected to a public telephone network in most cases no switching is necessary. If your telephone is connected to a PBX, it can be necessary to set the flash time to 300 ms. Please refer to the documentation of your PBX. english 16 Troubleshooting 6.1 Making a call Turn the (13) switch to the position for high volume and to the position for low volume. The default factory volume setting is high: . cradle (12), and the other end in the telephone wall socket in your home. Thread the flat cord through the guide that is designed for this purpose on the bottom of the telephone's cradle. 4.1 Contents 6 Operation 5.1 Ringer volume adjustment (13) 2. 4 Installation 5 Device settings 100 english 15 english 14 On the bottom of the telephone there are several switches which will help you to set several fundamental functions: 1. Connect one end of the handset's coiled cord to the slot on the bottom of the handset (3), and the other end of the cord into the slot on the left-hand side of the cradle (4). Packaging materials must be disposed of according to local regulations. - Do not expose the telephone to water or humidity. english 12 Illustration for wall assembly: - Table top operation or wall mounting. - 2 Safety instructions 11. Hook 4.2 Installation Disposal In order to dispose of your device, take it to a collection point provided by your local public waste authorities (e.g. recycling centre). According to laws on the disposal of electronic and electrical devices, owners are obliged to dispose of old electronic and electrical devices in a separate waste container. The adjacent symbol indicates that the device must not be disposed of in normal domestic waste! - Pause key. 17 5.1. Ringer volume adjustment (13) ........................... 17 5.2. Flash key adjustment (14) ................................... 17 : Redial last number dialled 10. Handset Ä_PUN ÅHUNLZ for wall installation 3 Maintenance Intended use The telephone is suitable for telephoning within a public telephone network system. Any other use is considered unintended use. Unauthorised modification or reconstruction is not permitted. Under no circumstances open the device or complete any repair work yourself. - Tone dialling. 1. Receiver - Pick up the handset. cradle (12), and the other end into the telephone wall socket in your home. 1 Features Index AUDIOLINE equipment is produced and tested according to the latest production methods. The implementation of carefully chosen materials and highly developed technologies ensure trouble-free functioning and a long service life. The terms of guarantee do not apply where the cause of equipment malfunction is the fault of the telephone network operator or any interposed private branch extension system. The terms of guarantee do not apply to the batteries or power packs used in the products. The period of guarantee is 24 months from the date of purchase. All deficiencies related to material or manufacturing errors within the period of guarantee will be redressed free of charge. Rights to claims under the terms of guarantee are annulled following tampering by the purchaser or third parties. Damage caused as the result of improper handling or operation, normal wear and tear, incorrect positioning or storage, improper connection or installation or Acts of God and other external influences are excluded from the terms of guarantee. In the case of complaints, we reserve the right to repair defect parts, replace them or replace the entire device. Replaced parts or devices become our property. Rights to compensation in the case of damage are excluded where there is no evidence of intent or gross negligence by the manufacturer. If your device shows signs of defect during the period of guarantee, please return it to the sales outlet in which you purchased the AUDIOLINE device together with the purchase receipt. All claims under the terms of guarantee in accordance with this agreement can only be asserted at the sales outlet. No claims under the terms of guarantee can be asserted after a period of two years from the date of purchase and hand-over of the product. Kurzanleitung Manual structure 2 Bedienungsanleitung Quick guide 12 How to install it in just 1 minute Basic telephone use Inbetriebnahme Bedienung 3 Bedienelemente And if you have a couple more minutes 13 Controls Inhaltsverzeichnis 4 Index 14 Ausführliche Bedienungsanleitung 5 Full instructions guide 15 Fehlersuche 10 Troubleshooting 20 Zusatzdienste 10 Additional services 20 Konformitätserklärung 10 Declaration of Conformity 20 Garantie 11 Guarantee 21 Service Hotline Germany: 0180 5 001388 (Costs for call from german landline at time of print: 14 ct/min, max. 42 ct/min from mobile phone providers.) (<+06305,.TI/5L\ZZ 0U[LYUL[!^^^H\KPVSPULKL,4HPS!PUMV'H\KPVSPULKL =LYZPVU english 21 Deutsch / english 23