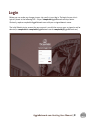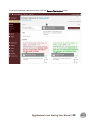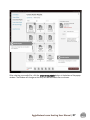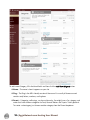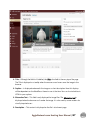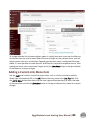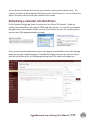
1
AggieNetwork.com Hosting User Manual WordPress 4.3 August 2015 hosting.AggieNetwork.com AggieNetwork.com Hosting User Manual WordPress 4.3 August 2015 This guide is a licensed and customized version of Anthony Hortin’s Easy WP Guide for WordPress 4.3. The text of the manual has been edited by the Web Team at The Association of Former Students to aid with your understanding of the WordPress content management system behind your AggieNetwork.com website. This guide also covers how to use many of the extra features included with your AggieNetwork.com Hosting Account. If you feel this document is missing information or needs more detail, please email the Web Team ([email protected]) with your suggestions and requests: we will help! AggieNetwork.com Hosting User Manual - WordPress 4.3 Portions written by Anthony Hortin Portions written and edited by Evan McClintock Copyright © 2015 Anthony Hortin, Used under license. Copyright © 2015 The Association of Former Students of Texas A&M University. All rights reserved. Table of Contents Table of Contents......................................................................................................................................................i Welcome to AggieNetwork.com Hosting ......................................................................................................... 1 Requesting an Account ..................................................................................................................................... 1 Vanity Domains ............................................................................................................................................... 1 Introducing WordPress.......................................................................................................................................... 2 Login ........................................................................................................................................................................... 3 Dashboard ................................................................................................................................................................ 4 Dashboard Menu Options ................................................................................................................................ 5 Dashboard ........................................................................................................................................................ 5 Posts .................................................................................................................................................................. 5 Media ................................................................................................................................................................. 5 Pages ................................................................................................................................................................. 5 Appearance ...................................................................................................................................................... 5 Plugins ............................................................................................................................................................... 6 Users .................................................................................................................................................................. 6 Tools .................................................................................................................................................................. 6 Settings ............................................................................................................................................................. 6 Toolbar................................................................................................................................................................... 6 Hiding the Toolbar .......................................................................................................................................... 8 Posts versus Pages ................................................................................................................................................ 9 Posts ...................................................................................................................................................................... 9 Pages .................................................................................................................................................................. 11 Adding your Site Content ................................................................................................................................... 13 Adding a New Page ......................................................................................................................................... 13 Adding a New Post .......................................................................................................................................... 14 Adding Content with the Visual Editor ....................................................................................................... 15 Switching to the Text Editor ......................................................................................................................... 18 Changing your Post Format .......................................................................................................................... 21 Reviewing Past Revisions ............................................................................................................................. 22 AggieNetwork.com Hosting User Manual | i Adding Images and Other Media ..................................................................................................................... 24 Inserting an Image ........................................................................................................................................... 24 Edit or Delete an Image .................................................................................................................................. 29 Setting a Featured Image .............................................................................................................................. 32 Insert an Image Gallery .................................................................................................................................. 33 Edit or Delete an Image Gallery.................................................................................................................... 35 Insert an Audio or Video Playlist .................................................................................................................. 36 Inserting Video, Audio or Other File Type .................................................................................................. 39 Embedding a Video, Image or Other Content ........................................................................................... 40 Adding HTML Links.............................................................................................................................................. 43 Inserting an HTML Link .................................................................................................................................. 43 Inserting Links to Media Files ................................................................................................................... 44 Editing an HTML Link ...................................................................................................................................... 46 Removing an HTML Link ................................................................................................................................ 46 Editing Existing Content ..................................................................................................................................... 47 Deleting Content .................................................................................................................................................. 48 Full Screen Editing ............................................................................................................................................... 50 Saving and Publishing Content......................................................................................................................... 51 Categories .............................................................................................................................................................. 53 Adding Categories within your Post ........................................................................................................... 56 Tags ......................................................................................................................................................................... 57 Adding Tags within your Post....................................................................................................................... 59 Media Library ........................................................................................................................................................ 61 Viewing a File in the Media Library.............................................................................................................. 63 Adding a File to the Media Library ............................................................................................................... 64 Editing the File Properties ............................................................................................................................. 65 Editing an Image .......................................................................................................................................... 68 Deleting a File from the Media Library ....................................................................................................... 71 Appearance ........................................................................................................................................................... 72 ii | AggieNetwork.com Hosting User Manual Selecting a Theme ........................................................................................................................................... 72 Restoring Aggie Presets ............................................................................................................................ 73 Previewing and Customizing your Theme ............................................................................................ 74 Adding a new Theme .................................................................................................................................. 75 Customizing your Site ................................................................................................................................ 77 Widgets .............................................................................................................................................................. 78 Updating the Menu ......................................................................................................................................... 80 Adding a New Menu.................................................................................................................................... 82 Editing an Existing Menu Item ................................................................................................................. 82 Adding a New Menu Item .......................................................................................................................... 84 Adding a Custom Link Menu Item ........................................................................................................... 85 Deleting a Menu Item ................................................................................................................................. 86 Managing Menu Locations ........................................................................................................................ 86 Header ................................................................................................................................................................ 87 Background ....................................................................................................................................................... 87 Editor................................................................................................................................................................... 88 Plugins .................................................................................................................................................................... 89 Preinstalled Plugins ........................................................................................................................................ 90 Adding a New Plugin ....................................................................................................................................... 91 Users ....................................................................................................................................................................... 94 Adding a New User .......................................................................................................................................... 95 Deleting a User ................................................................................................................................................. 96 Editing your Profile .......................................................................................................................................... 97 Tools...................................................................................................................................................................... 101 Available Tools................................................................................................................................................ 101 Press This .................................................................................................................................................... 101 Categories and Tags Converter.............................................................................................................. 101 Import ............................................................................................................................................................... 101 Export ............................................................................................................................................................... 101 Settings ................................................................................................................................................................ 102 General ............................................................................................................................................................. 102 AggieNetwork.com Hosting User Manual | iii Writing .............................................................................................................................................................. 104 Reading ............................................................................................................................................................ 105 Media ................................................................................................................................................................ 106 Permalinks ....................................................................................................................................................... 106 Keeping your Site Updated .............................................................................................................................. 107 Google Account .................................................................................................................................................. 108 Login.................................................................................................................................................................. 108 Google Calendar ............................................................................................................................................. 109 Calendar Permissions............................................................................................................................... 109 Calendar Settings ...................................................................................................................................... 110 Embedding a Calendar into WordPress ............................................................................................... 111 Google Maps ................................................................................................................................................... 114 Embedding Basic Maps............................................................................................................................ 114 Embedding Advanced Maps ................................................................................................................... 115 Aggie Network Analytics .................................................................................................................................. 118 Login.................................................................................................................................................................. 118 Piwik Videos .................................................................................................................................................... 119 DNS Settings for Vanity Domains.................................................................................................................. 120 Preferred Setup .............................................................................................................................................. 120 Alternative Setup ........................................................................................................................................... 120 What Now? .......................................................................................................................................................... 121 iv | AggieNetwork.com Hosting User Manual Welcome to AggieNetwork.com Hosting This AggieNetwork.com Hosting User Manual includes a WordPress guide intended to help you understand the various features within the WordPress Administrator Dashboard to keep your organization’s site or blog updated. If you are looking for more in-depth knowledge, there are many articles in the WordPress Codex that go into more detail. The WordPress Codex is great if you want to get really involved in developing your own WordPress theme or modifying your site with plugins, but it can be daunting for those who only need to use the Content Management side of WordPress or just need to update their site pages every so often. You should not print this entire manual as it is updated rather frequently to document new WordPress releases and features we release for your AggieNetwork.com Hosting Account. If you saved this guide to your computer a few months ago, please check to see if there is a newer version of this guide by visiting http://tx.ag/hostingmanual Requesting an Account 1) 2) 3) Contact the Web Team through the New Account Request form (http://tx.ag/newaccount) on the AggieNetwork.com Hosting website. You must completely fill out the form. You will need to decide your subdomain which will need to be in the format of “organization.AggieNetwork.com” (for instance, the McKinney A&M Club site is: https://mckinneyamc.AggieNetwork.com/ ). You must be a designated technical contact for the Class, Club, Constituent Network, or Aggie Mothers’ Club (i.e., Club President, or Class Agent). All other individuals must petition their organization’s leader to designate them as a “web contact” for proper authorization. Within a few days, the Web Team will send you an automated e-mail with your URL, username, password, and a link to this help guide. Vanity Domains You may also purchase your own vanity domain name at a later date (such as www.mckinneyags.com), and have it become the primary address of your WordPress site. If you have acquired your own domain, such as mckinneyags.com, you may use your vanity domain with our free hosting service. See DNS Settings for Vanity Domains, to find general configuration instructions. AggieNetwork.com Hosting User Manual | 1 Introducing WordPress WordPress is an open-source platform used by millions of people around the world to create beautiful websites and blogs. It is completely customizable by the use of themes and plugins. “WordPress is web software you can use to create a beautiful website or blog. We like to say that WordPress is both free and priceless at the same time.” Themes can be easily downloaded from the official WordPress site or from hundreds of other places around the web. The same goes with plugins, which are used to extend the functionality of your WordPress site. In addition to being a fantastic blogging and content management system, one of the huge benefits is the wealth of information out there. There’s a great community of people behind the design & development of the WordPress system itself. People from all over the world contribute their time, knowledge and skill to keeping WordPress updated and secure. There’s also a huge number of designers, developers & bloggers who share their knowledge through blog posts, tutorials, reviews, videos and the creation of thousands of themes and plugins. WordPress powers a staggering amount of websites. In fact, it powers 23% of the entire web! 2 | AggieNetwork.com Hosting User Manual Login Before you can make any changes to your site, you first must log in. The login for your site is typically found at the following URL - https://sampleclub.AggieNetwork.com/wp-admin. Obviously, replace sampleclub.AggieNetwork.com with your assigned domain name. The initial Administrator account for your account is usually the same as your assigned e-mail or domain (i.e. sampleclub for sampleclub.AggieNetwork.com or [email protected]). AggieNetwork.com Hosting User Manual | 3 Dashboard Once you’ve logged in, the WordPress Dashboard appears. This is your main administration homepage. At the very top of your Dashboard (and across every page) you will see the name of your site in the header area. In the example screenshot below (and throughout this documentation) the site name is Sample Aggie Club, and its administrator is Joe Aggie. This is also hyperlinked to your site's homepage. You will also see the either the name or username of the person who is currently logged in (e.g. Joe Aggie or jaggie90). Move your cursor over your name to reveal the Log Out link and also a link to edit your Profile. When a new or updated feature is introduced into WordPress, you will see a New Feature Pointer. The purpose of this pointer, is to bring to your attention a feature within the Dashboard that was added or updated. You may click Dismiss at the bottom of the pointer to hide it. On most pages, just below your Username there are a couple of small inverted tabs. One called Screen Options and another called Help. Clicking either of these links will cause a panel to slide down from the top of the page. The Help link, will display some help information. The Screen Options link will display various options that allow you to configure what is displayed on the current page. The details in this panel change depending on what page you are currently viewing. As an example, on your main Dashboard page the Screen Options allow you to set which panels you would like to have displayed on the Dashboard. 4 | AggieNetwork.com Hosting User Manual Dashboard Menu Options Down the left-hand side of the Dashboard and on every page you will see your main navigation menu. This is where you will find all the options to update and configure your site. Hovering your cursor over each of the main menu options will display a ‘fly-out’ menu with the various choices for that particular menu option. Once you click each of the main menu options, that particular menu will expand to show all the available options within that section (if there are any). The main menu options and their usage are: Dashboard This will display your main Dashboard ‘homepage’. In the top left of your Dashboard you will see some brief stats on the number of Posts and Pages. Posts This is where you can create a new Blog Post. You can also update your Categories and Post Tags. Media This is where all your uploaded images, documents or files are stored. You can browse through your Media library, and also edit and update the files. Pages This is where you create and maintain all your Pages. Appearance This menu is where you control how your site looks. You can choose a new Theme, manage your site Widgets or Menus and even edit your site theme files. AggieNetwork.com Hosting User Manual | 5 Plugins Plugins extend and expand the functionality of WordPress. You can add or delete plugins within here and also activate or deactivate them. Users This screen lists all the existing users for your site. Depending on your Role, you can also add new users and also manage their Roles. Tools This section gives you access to various convenient tools. You can also import data to your WordPress site or export all your WordPress data to a file. Settings This is where most of your site is configured. Among other things, it allows you to configure your site name and URL , where your Posts appear and numerous other settings. Most times, once your site is setup, there is no need to change any of the settings within this section. At the bottom of the menu you will see a link called Collapse menu. Clicking this will hide the menu and simply display their icons instead. Click the small arrow icon again to expand the menu. Occasionally when you install a plugin, they will have their own configuration or setup pages. The location of these will be entirely dependent on the individual plugin but most times these pages will either appear within the Tools section, the Settings section or in a completely new menu section at the bottom of the menu. Toolbar The WordPress Toolbar is a way of easily accessing some of the most common WordPress features. When you are logged into your WordPress dashboard and you visit your website, you will see the Toolbar running across the top of your site. This bar only appears if you are currently logged into your WordPress site, which means that it won’t be visible to your everyday site visitors. If you are not logged in, the Toolbar won’t be displayed. 6 | AggieNetwork.com Hosting User Manual The Toolbar allows you to quickly access the following commonly used features. Visit AggieNetwork.com Hosting support, the current version of this help guide, and other resources on AggieNetwork.com Display your site Dashboard and other commonly used menu options that allow you to update your site Themes, Widgets, Menus and depending on your theme, Background and Header Add a new Post, Media, Page, or User Edit the current Page or Post Perform a site Search View or Edit your Profile Logout from the WordPress Dashboard AggieNetwork.com Hosting User Manual | 7 Hiding the Toolbar You can stop the Toolbar from displaying by modifying the preferences associated with your Profile. Simply click on the Users link in the left hand navigation to display the list of Users. From this list of Users, click your user name or click on the Edit link that appears beneath the user name when hovering your cursor over each row. Alternatively, click on the Your Profile link underneath the Users menu option in the left hand navigation or within the fly-out menu. When editing your Profile there is a Toolbar option as shown in the screen above. Show Toolbar when viewing site – Checking this box will display the Toolbar at the very top of your website (only for the person who is currently logged in) 8 | AggieNetwork.com Hosting User Manual Posts versus Pages WordPress is built around two basic concepts. Posts and Pages. Posts are typically blog entries. A series of articles, listed (usually) reverse-chronologically. Pages are used for more static content (i.e. content that doesn’t change or changes infrequently). An ‘About us’ page is an example of a Page on a typical website. In most cases you will find that the content in the ‘About us’ page doesn’t change all that frequently. Now, you might be thinking, “but I don’t need a blog”. This might be true, but you can also use the blog concept if you have a site where you need to display your ‘latest news’ or even just club, class, or constituent network updates. Basically, any information that gets updated on a semiregular basis can benefit from the ‘blog’ functionality. Whether that’s a traditional blog, your affiliate organization’s ‘latest news’ or even just your own personal updates. Posts After clicking on the Posts menu option you will be shown a list of Posts that your site contains. Among the information displayed is the Post title, the Author, Categories, Tags, and either the Date Published, Date Scheduled or the Date the Post was Last Modified. The Posts screen will look similar to the screen on the next page. AggieNetwork.com Hosting User Manual | 9 At the top of the page you can view how many Posts in total you have in your WordPress site, how many are Published, Scheduled, Sticky, Pending, in Draft or in the Trash. When hovering your cursor over each row, a few links will appear beneath the Post title. Edit – Will allow you to edit your Post. This is the same as clicking on the Post title Quick Edit – Allows you to edit basic Post information such as Title, Slug, Date plus a few other options Trash – Will send the Post to the Trash. Once the Trash is emptied, the page is deleted View – Displays the Post. If the Post hasn’t been published yet, this will say Preview Next to each Post title is a checkbox. This allows you to perform an action on multiple items at once. You simply check the Posts that you would like to affect and then from the Bulk Actions dropdown select either the Edit option or the Move to Trash option and then click the Apply button. The Edit option will allow you to edit the Categories, Tags, Author, whether to allow Pings or not, the Status and whether or not the Posts are ‘Sticky’. The Move to Trash option will move the selected items to the Trash. 10 | AggieNetwork.com Hosting User Manual You can also filter the pages that are displayed using the dropdown lists and the Filter button. At the top of the list of Posts there are also two icons that change how the list is displayed. Click the List View icon ( icon ( ) to display the posts in the traditional List View or click the Excerpt View ) to display a short excerpt from the Post underneath the Post title. Pages After clicking on the Pages menu option you will be shown a list of Pages that your site contains. Among the information displayed is the Page title, the Author, and either the Date Published or the Date the Page was Last Modified. The Pages screen will look similar to screen below. At the top of the page you can view how many Pages in total you have in your site and how many are “Published” or in “Draft”. AggieNetwork.com Hosting User Manual | 11 When hovering your cursor over each row, a few links will appear beneath the Page title. Edit – Will allow you to edit your Page. This is the same as clicking on the Page title Quick Edit – Allows you to edit basic Page information such as Title, Slug, Date plus a few other options Trash – Will send the Page to the Trash. Once the Trash is emptied, the page is deleted View – Displays the Page. If the Page hasn’t been published yet, this will say Preview Next to each Page title is a checkbox. This allows you to perform an action on multiple items at once. You simply check the Pages that you would like to affect and then from the Bulk Actions dropdown select either the Edit option or the Move to Trash option and then click the Apply button. The Edit option will allow you to edit the Author, Parent, Template, and the Status of each of the checked items. The Move to Trash option will move the selected items to the Trash. You can also filter the pages that are displayed using the dropdown list and the Filter button. 12 | AggieNetwork.com Hosting User Manual Adding your Site Content Adding content to your site is an easy process no matter whether you are creating a Post or a Page. The procedure for both is almost identical. Apart from how they display on your site, which was described earlier, the other main difference is that Posts allow you to associate Categories and Tags whereas Pages don’t. What’s the difference between categories and tags? Normally, Tags are ad-hoc keywords that identify important information in your Post (names, subjects, etc.) that may or may not recur in other Posts, while Categories are pre-determined sections. If you think of your site like a book, the Categories are like the Table of Contents and the Tags are like the terms in the index. Adding a New Page To add a new Page, hover your cursor over the Pages menu option in the left hand navigation menu and in the fly-out menu, click the Add New link. Alternatively, click the Pages menu option and then click the Add New link underneath, or the Add New button at the top of the page. You will be presented with a page similar to the image below. AggieNetwork.com Hosting User Manual | 13 Adding a New Post To add a new Post, hover over the Posts menu option in the left hand navigation menu and in the fly-out menu, click the Add New link. Alternatively, click the Posts menu option and then click the Add New link underneath, or the Add New button at the top of the page. You will be presented with a page similar to the image below. 14 | AggieNetwork.com Hosting User Manual Adding Content with the Visual Editor The editor used to enter content into your Page or Post is very easy to use. It is much like using a regular word processor, with toolbar buttons that allow you to Bold ( ) or Italicize ( ) text or enter in Headings ( ) or bullet points ( ). You can even use most of the basic keyboard shortcuts used in other text editors. You can even use most of the basic keyboard shortcuts used in other text editors. For example: Shift+Enter inserts a line break, Ctrl+C/Cmd+C = copy, Ctrl+X/Cmd+X = cut, Ctrl+Z/Cmd+Z = undo, Ctrl+Y/Cmd+Y = redo, Ctrl+A/Cmd+A = select all, etc. (use the Ctrl key on a PC or the Command key on a Mac). The Visual Editor expands to fit your content, no matter how tall the Visual Editor becomes, the toolbar buttons will be available at all times by sticking to the top of the page. At the top of the editor there are two tabs, Visual and Text ( ). These switch the editor view between the Visual Editor and the Text (HTML) editor. The Text view will enable you to view the HTML code that makes up your content. If you are a more experienced user this can be helpful, but if you are not familiar with how to use HTML tags, you don’t need to worry about this feature. When creating a new Page or Post, the first thing to do is enter in your title in the top entry field where it says Enter title here. After moving the cursor down to the editor a new Permalink is created for your page. Permalinks are the permanent URL’s to your individual Posts, Pages, and Categories etc… Though not usually necessary, you can manually edit your permalink by clicking on the actual permalink (the part after the domain name with the yellow background) or by clicking the Edit button next to it. Once you’ve modified it, click Ok to save or Cancel to cancel your changes. Clicking the Toolbar Toggle button ( ) will show or hide a second line of formatting buttons which gives you extra functionality. The editor buttons perform the following functions: Add Media – Used to upload and insert media such as images, audio, video or documents Bold – Bold text Italic – Italicize text Strikethrough – Add a strikethrough to your text Bulleted List – Create an unordered (bullet point) list AggieNetwork.com Hosting User Manual | 15 Numbered List – Create an Ordered (numbered) list Blockquote – Used as a way of showing a quote. How this looks will be entirely dependent on the Theme that your site is currently using Horizontal Line – Inserts a horizontal line into your page Align Left – Align text to the left Align Center – Align text in the center of the page Align Right – Align text to the right Insert/edit link – Used to create a hyperlink link to another page or website. The text or image that you want to link needs to be selected first before the button will become active Remove link – Remove the hyperlink from the selected text. Your cursor must be sitting on an active link for the button to be active Insert Read More tag – Inserts the More tag into your Page. Most blogs only display a small excerpt of a Post and you are required to click the Post title or a ‘Read more...’ link to continue reading the rest of the article. When you insert a ‘More’ tag into your Post, everything prior to the tag is considered as this excerpt. Most times you’d only use this button when you are creating a blog Post, rather than a Page Toolbar Toggle – Used to show or hide the second row of formatting buttons on the editor toolbar. Distraction Free Writing – Clicking this button will enlarge the editor so that it fills the browser window. Clicking the Exit full screen link at the top of the screen will reduce it back to its original size Style – Used to format the Page text based on the styles used by the current Theme 16 | AggieNetwork.com Hosting User Manual Underline – Underline your text Justify – Align text on both the left and right (i.e. justify) Text color – Use to change the color of text Paste as text – Copying and pasting text from other sites or word processors sometimes leaves the text formatted differently to what you were expecting. The reason for this is that quite often the HTML tags or codes that formatted the original text are pasted along with the text itself. To avoid this, Paste as Text will strip all these formatting and HTML tags. The Paste as Text option acts like a toggle, staying on until you turn it off by clicking the button again or until you save your page content Clear formatting – Use this to remove all the formatting (e.g. Bold, Underline, text color etc..) from the highlighted text Special character – Used to insert special characters not easily accessible via the keyboard (e.g. ¼, ½, ¾, ©, €, ö etc...) Decrease indent – Removes one level of indenting Increase indent – Indents text by one level Undo – Undo your last action Redo – Redo your last action Keyboard shortcuts – Switches the editor view between the Visual Editor and the Text editor. The Text view will enable you to view the HTML code that makes up your content. If you are a more experienced user, this can be helpful but if you are not familiar with how to use HTML tags, you don’t need to worry about this feature. AggieNetwork.com Hosting User Manual | 17 Visual / Text – Switches the editor view between the Visual Editor and the Text editor. The Text view will enable you to view the HTML code that makes up your content. If you are a more experienced user this can be helpful, but if you are not familiar with how to use HTML tags, you don’t need to worry about this feature. Switching to the Text Editor At the top of the editor there are two tabs, Visual and Text ( view between + ). These switch the editor the Visual Editor and the HTML editor. The Text view allows you to view and edit the HTML code that makes up your content. For more experienced users this view is helpful. If you are a more experienced user this can be helpful but if you are not familiar with how to use HTML tags, you don’t need to worry about this feature. The Text editor is much like the Visual Editor, only not as intuitive. The numerous formatting buttons provide you with basic HTML formatting capabilities when editing your Page or Post content. 18 | AggieNetwork.com Hosting User Manual The buttons work in two ways. Clicking a button without highlighting any text first, will simply insert the opening HTML tag relevant for that button. As an example, clicking the Bold button will insert the <strong> HTML tag into your text. Clicking the Bold button again will close the tag by inserting the closing </strong> tag. If you highlight some text prior to clicking a button, both the opening and closing tags will be inserted around that highlighted text. For example, highlighting the text, ‘bold text’, prior to clicking the Bold button will insert ‘<strong>bold text</strong>’. The following editor buttons are available while in the Text editor: Bold – Bold text Italic – Italicize text Link – Used to insert a website link. When the button is clicked a popup window will appear where you type in the URL that you would like to link to Blockquote – Used as a way of showing a quote. How this looks will be entirely dependent on the Theme that your site is currently using Delete – Used as a way of showing deleted text. How this looks will be dependent on the Theme but is usually done by showing the text with a strikethrough Insert – Used as a way of showing inserted text. How this looks will be dependent on the Theme but is usually done by showing the text with an underline Image – Used to insert an image into the text. When the button is clicked a popup window will appear where you type in the URL of the image that you would like inserted Unordered List – Used to insert an unordered (bullet point) list Ordered List – Used to insert an ordered (numbered) list List Item – Used to insert a list item into your ordered or un-ordered list AggieNetwork.com Hosting User Manual | 19 Code –Used for indicating a piece of code More – Inserts the More tag into your Page. Most blogs only display a small excerpt of a Post and you are required to click the Post title or a ‘Read more...’ link to continue reading the rest of the article. When you insert a ‘More’ tag into your Post, everything prior to the tag is considered as this excerpt. Most times you’d only use this button when you are creating a blog Post, rather than a Page Distraction Free Writing – Clicking this button will enlarge the editor so that it fills the browser window. Clicking the Exit full screen link at the top of the screen will reduce it back to its original size Close Tags – Used to close open tags. If for example, you clicked both the Bold and Italic buttons to insert their opening tags, clicking the Close tags button will insert both of the matching closing tags, in the correct order 20 | AggieNetwork.com Hosting User Manual Changing your Post Format A Post Format is Meta information that can be used within a Theme to style or customize the presentation of a Post. The Post Formats feature provides a standardized list of formats that are available to all themes that support the feature. There is no requirement for Themes to support every format on the list and new formats cannot be introduced by themes or even plugins. If your Theme supports Post Formats you can choose how each Post looks by selecting a Post Format from a list of radio buttons, similar to the following screen. If your Theme doesn’t support Post Formats then the Format panel won’t be displayed. While the actual post content entry won't change, the theme can use the selected Format to display the post differently. How content is displayed is entirely up to the Theme. How content is displayed is entirely up to the Theme, but the following list of available Post Formats provides some general WordPress guidelines as to how they might be styled. Aside – Typically styled without a title. Similar to a Facebook note update Audio – An audio file, such as a Podcast Chat – A chat transcript Gallery – A gallery of images. Post will likely contain a gallery shortcode and will have image attachments Image – A single image Link – A link to another site AggieNetwork.com Hosting User Manual | 21 Quote – A quotation, most likely contained within a blockquote Status – A short status update, similar to a Twitter status update Video – A single video Reviewing Past Revisions When you are editing your Post or Page, the number of revisions for that particular Post or Page is shown in the Publish Panel, if you have any. Click the Browse link next to Revisions: in the Publish panel to browse through the various revisions for the current Post or Page. Use the slider at the top of the page or click the Previous and Next buttons to navigate through your various Post or Page revisions. Content that has been deleted will be shaded red and content that has been added will be shaded green. If there is content that is shaded dark red and/or dark green, those shades highlight specific content that was removed or added. If the paragraph or line is simply light red and/or light green, then the whole paragraph or line was affected by the change. You can also compare two different revisions by clicking the Compare any two revisions checkbox at the top of the page. 22 | AggieNetwork.com Hosting User Manual If you wish to restore a previous revision, click the Restore This Revision button. AggieNetwork.com Hosting User Manual | 23 Adding Images and Other Media Adding images and other media files such as videos, documents or PDFs is extremely easy within WordPress. All your images and files are stored in the Media Library. Once they are uploaded into the Media Library, it is a very simple matter to insert them into your Page or Post content. In the case of files such as Word Documents or PDFs, if necessary, it is a simple process to create links to those files so that people can then download them. Inserting an Image Using the WordPress media manager, it is extremely simple to insert, align and link your individual images and image galleries. To insert an image into your Page/Post, click the Add Media button ( ) and then simply drag your image(s) from wherever they are on your computer, into the browser window. Your file(s) will be automatically uploaded. Alternatively, click the Select Files button and then select the file(s) that you wish to upload, using the dialog window that is displayed. It is also possible to simply drag your image straight into the Visual Editor, rather than clicking the Add Media button. 24 | AggieNetwork.com Hosting User Manual No matter whether you’ve clicked the Add Media button or simply dragged and dropped your image into the Visual Editor, once your image is uploaded, your Media Library is displayed, which contains all your previously uploaded images. The image(s) that you’ve just uploaded will be automatically ‘selected’ for easy insertion into your Page or Post. Selected images are shown with a ‘tick’ icon in the top right corner of the image. After uploading your image(s), you can then select other previously uploaded images by holding down the Ctrl key (Cmd key on Macs) and simply clicking on them. To deselect an image, click the ‘tick’ in the top right corner of the image. At the bottom of the window, the number of images currently selected will be displayed. There are several options within this Insert Media window to help make it easier to add images into your Page or Post. AggieNetwork.com Hosting User Manual | 25 By default, all previously uploaded images are shown, starting with the most recent uploads. If you want to narrow this list down, at the top of the window is a dropdown list that allows you to filter your displayed images by All media items, items Uploaded to this post, or just Images, Audio files or Video files. There is also a Search field that allows you to search for specific images. The properties of the currently highlighted image (i.e. the image with the blue border) will be shown on the right-hand side of the Insert Media window. These properties include the filename, the date the file was uploaded and the image size. It is at this point you can also change the image Title, Caption, Alt Text and Description for each image, and also the Alignment, Link and the Size at which the image is inserted. Title – is displayed as a tooltip when the mouse cursor hovers over the image in the browser Caption – is displayed underneath the image as a short description. How this displays will be dependent on the WordPress theme in use at the time. You can also include basic HTML in your captions Alt Text – is displayed when the browser can’t render the image. It is also used by screen readers for visually impaired users so it is important to fill out this field with a description of the image. To a small degree, it also plays a part in your website Search Engine Optimization (SEO). Since search engines cannot ‘read’ images, they rely on the Alt Text Description – is usually displayed on the attachment page for the media, however this is entirely up to the theme that is currently in use 26 | AggieNetwork.com Hosting User Manual For each image, you can select how you would like the image aligned, either Left, Center or Right aligned, using the Alignment dropdown list. You can also select None for no alignment which will mean the image will display using the default alignment setting for your Theme. You can also change what your inserted image(s) will link to using the Link To dropdown list. You have the choice of linking to the image’s attachment page by selecting Attachment Page, or you can link to the full size image by selecting Media File. You can also link to any URL by selecting Custom URL. When you do this, a new field will appear that allows you to enter in the custom URL. You can also choose not to link to anything by selecting None. When your image(s) are uploaded, WordPress will also create several copies of your file at various sizes. You can choose which one you wish to insert into your Page or Post using the Size dropdown list. To insert the image at the exact size you uploaded, simply select Full Size. Next to each size listed in this dropdown will be the actual dimensions of the image, in pixels (e.g. 300 x 225). AggieNetwork.com Hosting User Manual | 27 Once you have selected all your images, click the Insert into post button to insert the selected image(s) into your Post at the current cursor position (when editing a Page, this button will say Insert into page). If you wish to change the order of your images, click the Edit link at the bottom of the Insert Media window. The window will change so that only the selected images are shown. Alternatively, clicking the Clear link will deselect all images. After clicking the Edit link at the bottom of the Insert Media window, all the currently selected images are shown. You can change the order in which the images will appear in your Page or Post by clicking and dragging each image to reorder them. You can also update the image Title, Caption, Alt Text and Description for each image. To remove one of your selected images from the selection, click the small ‘x’ that appears in its top right corner. Clicking the Return to library button will take you back to the previous screen that allows you to select or deselect your images. 28 | AggieNetwork.com Hosting User Manual When you are editing your Post/Page, if you wish to insert an image that you uploaded earlier (as opposed to uploading a new image), click the Add Media button again ( ). Once the popup window displays, click the Media Library link at the top of the popup window rather than dragging a new file into the upload window. All your previously uploaded images will be displayed, with the most recent ones shown first. Select the image(s) that you wish to insert into your Page or Post and then simply click the Insert into post button (or if you are editing a Page, this button will say Insert into page). As mentioned earlier, you can also click the Edit link at the bottom of the window if you wish to change the order the images are inserted. Edit or Delete an Image There are various options available for adjusting the layout of inserted images. After clicking on an image that has already been inserted into your Page or Post, a small toolbar will appear over the image. By selecting one of the alignment buttons ( change the alignment of the inserted image. ) you can Clicking the edit icon ( ) allows you to edit the image properties. Clicking the delete icon ( ) will delete the image from your content. It will only remove the image from your Page or Post, it will not delete the image from your Media Library. When you click on an image in your Page or Post, as well as the alignment, edit and delete icons mentioned above, the image also displays ‘resizing handles’. These are the small squares you see around the edge of the image. To resize your image, simply click and drag one of the corner resize handles. As with any image editing software though, if you try to enlarge a small image, it will tend to get quite pixelated. It is always best to insert a large image and then resize down. AggieNetwork.com Hosting User Manual | 29 After clicking the Edit Image icon ( ) the pop-up window on the following page will appear. 30 | AggieNetwork.com Hosting User Manual The Image Details pop-up window allows you to edit the various image and link properties: Caption – Displayed underneath the image as a short description. How this displays depends on the active WordPress theme. You may also include basic HTML in your captions. Alternative Text– Displayed when the browser cannot load the image. It is also used by screen readers for visually impaired users, so it is important to fill out this field with a description of the image. To a small degree, it also plays a part in your website Search Engine Optimization (SEO). Since search engines cannot ‘read’ images, they rely on the Alt Text Align – Allows you to select how you would like the image aligned. They can be either Left, Center, or Right aligned. Setting alignment to None will remove the other alignment settings. How this affects your image depends on the active WordPress theme in use. Size – Select a specific size from the dropdown list or select ‘Custom Size’ and then enter the Width and Height (in pixels) in the input fields that appear Link To – Select where you would like to link your image to from the dropdown list. You have the choice of linking to the image attachment page by selecting Attachment Page, or you can link to the full size image by selecting Media File. You can also link to any URL by selecting Custom URL. When you do this, a new field will appear that allows you to enter in the custom URL. You can also choose not to link to anything by selecting None AggieNetwork.com Hosting User Manual | 31 Image Title Attribute – Displayed as a tooltip when the mouse cursor hovers over the image in the browser Image CSS Class – By default, WordPress will assign several CSS Classes to your image. If, for some reason, there are other CSS Classes that you wish to assign to your image then you can add them into this input field Link Rel – Describes the relationship from the current document to the specified link. More information on the rel HTML attribute can be found on Wikipedia Link CSS Class – If there is a specific CSS Class that needs to be set on the HTML link then you can add it into this input field Clicking the Edit Original button allows you to perform some simple manipulation with your uploaded image. You can rotate and flip your image as well as scale and crop it to different sizes. If you wish to replace the image entirely, click the Replace button and you will be shown your Media Library where you can select a new image. Once you have updated the image properties, click the Update button to save your changes. Alternatively, click the small ‘x’ in the top-right of the pop-up window to close the pop-up without saving any changes. Setting a Featured Image Some themes allow you to specify a Featured Image for your Page and Post. A Featured Image, often called a Post/Page Thumbnail, is usually some sort of image that is representative for that particular Page or Post. How these images are displayed is dependent entirely on the Theme that is currently in use. If your Theme allows you to set a Featured Image, the following Featured Image panel will be displayed when you are editing your Page or Post. If Featured Images can’t be set then this panel won’t be displayed. Setting your featured image is very similar to adding an image into your Page or Post. After clicking the Set featured image link a popup window will display that looks similar to the one that displays when you add an image to your Page/Post. You can upload a new image to use as your Featured Image or you can simply choose from one of your previously uploaded images. 32 | AggieNetwork.com Hosting User Manual By default, you will be shown a list of the previously uploaded images. If you wish to upload a new image, click on the Upload Files link at the top of the popup window. After clicking the image you wish to use as your featured image you can then update the Title, Caption, Alt Text and Description. To set the image as your Featured Image, click the Set featured image button. Your chosen image will then appear in the Featured Image panel. Insert an Image Gallery WordPress has its own simple built-in Image Gallery that allows you to add multiple images to a page in one easy step. To insert an image gallery into your Page/Post, click the Add Media button ( ). A popup window will display that looks the same as the one that displays when you add an image to your Page/Post. You can upload new images to use in your gallery or you can simply choose from your previously uploaded images. AggieNetwork.com Hosting User Manual | 33 By default, you will be shown a list of your previously uploaded images. If you wish to upload a new image, click on the Upload Files link at the top of the popup window. Click the Create Gallery link in the left hand navigation then select the images that you wish to insert into your gallery. After selecting your images, click the Create a new gallery button at the bottom of the popup window. The window will change so that only the selected images are shown. All the images that appear will be used within your Image Gallery. To reorder the images simply click on an image and drag it to its new position. If you wish to add captions to your images, click the ‘Caption this image…’ text below each image and then type in your caption. Alternatively, click each image and then update the Title, Caption, Alt Text and Description on the right hand side of the popup window. You can also include basic HTML, such as links, in your captions. If you decide you no longer want a certain image to appear in your gallery, click the small ‘x’ that appears in the top right corner of the image. 34 | AggieNetwork.com Hosting User Manual Since the built-in gallery is quite simple, there are not that many options to choose from when setting it up. Link to – This sets what happens when the thumbnail image is clicked. Selecting Media File will open the full size image directly in your browser window. Selecting Attachment Page will open the image within one of your WordPress formatted pages Columns – Specifies the number of columns to use when displaying your thumbnail images. Ultimately, this will be dependent on your Theme and how wide your page is. If you find the gallery isn’t displaying properly after changing this number you may need to change it to another number Random Order – Click this checkbox to display your images in a random order Size – Selects the size of the image to use in your gallery Edit or Delete an Image Gallery Editing or Deleting an Image Gallery is much like editing or deleting an image. After clicking on an Image Gallery that has been inserted into your Page or Post, two icons will appear on top of the gallery. Clicking the left icon ( ) allows you to edit the image gallery properties. Clicking the right icon ( ) will delete the image gallery from your content. It will only remove the image gallery from your Page or Post, it will not delete any images from your Media Library. AggieNetwork.com Hosting User Manual | 35 After clicking the Edit Gallery icon you will be shown the same popup window and options as when your image gallery was inserted into your Page/Post. Insert an Audio or Video Playlist Inserting an audio or video playlist is almost identical to inserting an image gallery. Click the Add Media button ( ). A popup window will display that looks the same as the one that displays when you add an image to your Page/Post. You can upload new media files to use in your playlist or you can simply choose from your previously uploaded files. By default, you will be shown a list of your previously uploaded files. If you wish to upload a new media file, click on the Upload Files link at the top of the popup window. To create an audio playlist, click the Create Audio Playlist link in the left hand navigation. The popup window will display a list of your audio files. Alternatively, to create a video playlist, click the Create Video Playlist link in the left hand navigation. The popup window will display a list of your video files. 36 | AggieNetwork.com Hosting User Manual After selecting your media files, click the Create a new playlist button at the bottom of the popup window. The window will change so that only the selected media files are shown. AggieNetwork.com Hosting User Manual | 37 All the media files that appear will be used within your playlist. To reorder the files simply click on a file and drag it to its new position. You can change the title for each file by clicking the text below each file and then typing in your new title. Alternatively, click each file and then update the Title, Caption and Description on the right hand side of the popup window. If you decide you no longer want a certain media file to appear in your playlist, click the small ‘x’ that appears in the top right corner of the file when you hover your cursor over it. You can change how your playlist appears in your page by selecting which items you wish to appear. When inserting an audio playlist you have the following display settings. Show Tracklist – Ticking this checkbox will show a list of all the audio files within your playlist Show Artist Name in Tracklist – Ticking this checkbox will show the artists name next to each track name 38 | AggieNetwork.com Hosting User Manual Show Images – Ticking this checkbox will show any associated audio file images, like album cover art. When inserting a video playlist you have the following display settings. Show Video List – Ticking this checkbox will show a list of all the video files within your playlist Show Images – Ticking this checkbox will show any associated video file images Inserting Video, Audio or Other File Type The procedure for inserting any other type of file (PDF, DOCX, DOC, XLS, etc…) into your Page/Post is the same as you would insert an image. Simply click the Add Media button ( ). Once the relevant popup window displays, perform the same steps to upload your file to your site and to insert it into your Page or Post. When inserting video or audio files, you can select Embed Media Player from the Embed or Link dropdown list in the Insert Media popup window to use the new audio and video players that are now built into WordPress. Supported audio/video formats include: M4a, MP4, OGG, WebM, FLV, WMV, MP3, WAV and WMA files. AggieNetwork.com Hosting User Manual | 39 Please make your filenames ‘server friendly’! Ensure you name your file without spaces, apostrophes, slashes, or other non-alphanumeric characters (like $, % and &) in its name. Rename your file if it does before uploading! To preserve readability, some people replace spaces with an underscore or hyphen. For instance, My File Name.txt becomes My_File_Name.txt or My-File-Name.txt Embedding a Video, Image or Other Content Another way to add video or other content into your pages is through embedding. A popular example of this is embedding a YouTube video into your page. When you are embedding a file, there is no need to upload the file to your site. You are basically just creating a link to the file, from within your own page. WordPress is able to automatically embed files from a number of different services. 40 | AggieNetwork.com Hosting User Manual To embed something into your Post or Page, simply paste the URL into your content area. The URL needs to be on its own line and not hyperlinked. When embedding content in this manner (as opposed to using the embed shortcode mentioned on the next page), your URL will change to show a preview of that content. For example, when embedding a video from YouTube, after pasting in the URL to the editor, it will magically change to show the actual video content, right there in the editor. If you wish to specify the width and height, you can wrap the URL in the [embed] shortcode. Embedding your link using this shortcode does not require the URL to be on its own line. The format for using the shortcode is: [embed width= “123” height= “456”] URL [/embed] AggieNetwork.com Hosting User Manual | 41 WordPress can automatically embed content from the following sites: Animoto CollegeHumor DailyMotion Flickr Hulu Imgur Instagram Kickstarter Mixcloud Photobucket Polldaddy Scribd SlideShare SmugMug SoundCloud Spotify TED Twitter Vimeo Vine YouTube (only public and “unlisted” videos and playlists) Information about embedding a Google Calendar or maps using Google Maps is discussed later in this guide, under the Google Account section of this User Manual. 42 | AggieNetwork.com Hosting User Manual Adding HTML Links HTML links allow your site visitors to easily navigate around your site. They are also used when you want to allow people to download files from your site, such as PDFs or other documents, for viewing images or even just linking to other websites. HTML links will frequently be shown with an underline to differentiate it from other text, but this may vary depending on the theme you are currently using. Inserting an HTML Link Inserting an HTML link in your Page/Post to one of your own pages or another site is extremely easy. Simply click and drag the cursor and highlight the text that you want turned into a link and then click the Insert/edit link button ( ). In addition to being able to insert a link to another site, you can also easily insert a link to one of your existing Posts or Pages by simply selecting it from a list. In the pop-up window that is displayed, simply fill in URL and the Title and then click the Add Link button. AggieNetwork.com Hosting User Manual | 43 URL – URL of the page or website that you would like to create a link to Title – The text to display in tooltip form when the cursor hovers over the link Open link in a new window/tab – When someone clicks the link you can have it open in the same window (default setting) or have it open in a new browser window/tab Alternatively, if you wish to add a link to one of your existing Posts or Pages, simply click the Or link to existing content link to display a list of your existing content then select the relevant page from the supplied list. If you have a large number of pages within your site, you can type the Page or Post name in the Search field to make it easier to find. As you type, the list will repopulate based on matching results. After selecting one of your existing pages, the relevant details will be updated in the URL and Title fields. Click the Add Link button to add your link. Inserting Links to Media Files Adding a link to media files such as documents or PDF’s is just as easy as adding a standard html link. There are a couple of ways you can go about it. Click the Add Media button ( ) and then simply drag your file from wherever it is on your computer, into the browser window. Your file will be automatically uploaded. Alternatively, click the Select Files button and then select the file that you wish to upload, using the dialog window that is displayed. Once your file is uploaded, your Media Library, which contains all your previously uploaded files, is displayed. The file that you’ve just uploaded will be automatically ‘selected’ for easy insertion into your Page or Post. 44 | AggieNetwork.com Hosting User Manual Update the Title for your file. The Title will be used for the text link when it is inserted into your content. From the Link To dropdown list, select Media File. The field just below this will be automatically populated with the URL for the file. Click the Insert into post button to insert a link to the selected file in your Post at the current cursor position (when editing a Page, this button will say Insert into page). If you happen to know the URL for the media file that you wish to link to, or if you wish to create a link on some existing text, simply click and drag the cursor and highlight the text that you want turned into a link and then click the Insert/edit link button ( ). Just like previously, when adding a simple HTML link, enter the URL to your media file and the Title and then click the Add Link button. A standard HTML link will be created for the media file that you specified. AggieNetwork.com Hosting User Manual | 45 Editing an HTML Link Simply click the link within your Page/Post that you wish to edit, to position the cursor somewhere within it and then click the Insert/edit link button ( ). A pop-up window will appear, just like when the link was originally inserted. Update the required details and click the Update button. Removing an HTML Link To remove a link, click the link within your post that you wish to remove, to position the cursor somewhere within it and then click the Unlink button ( ). If you want to remove a link from an image, simply click the image once to select it and then click the Unlink button. If the link is for an uploaded file or image, clicking the Unlink button will not remove or delete that file, it only removes the hyperlink. 46 | AggieNetwork.com Hosting User Manual Editing Existing Content To edit an existing page, simply click on the relevant Page/Post title, when viewing your list of Pages or Posts. Alternatively, click on the Edit link that appears beneath the title when hovering your cursor over each row. The screen that appears will be exactly the same as the Add New Page/Add New Post screen, only with the existing content displayed. When you’ve finished editing your Page/Post, click the Update button. AggieNetwork.com Hosting User Manual | 47 Deleting Content If you wish to delete one of your Pages or Posts, click on the Trash link that appears beneath the title when hovering your cursor over each row. This will move the Page/Post to the Trash. To delete the Page/Post permanently or to restore the Page/Post, click the Trash link at the top of the screen. When the cursor is hovering over each item in the Trash, the Restore and Delete Permanently links appear. Click Delete Permanently to permanently remove a single Page or Post. Clicking Restore will restore the Page or Post. 48 | AggieNetwork.com Hosting User Manual If you would like to permanently delete or restore numerous items at once, click the checkboxes next to the items you would like to delete or restore and then choose either Restore or Delete Permanently from the Bulk Actions dropdown list at the top of the page. After selecting the appropriate action click the Apply button to make your change. Alternatively, click the Empty Trash button to delete all the items in the Trash. AggieNetwork.com Hosting User Manual | 49 Full Screen Editing WordPress allows for fullscreen composing. It provides for complete distraction free editing of your Page or Post. To enter fullscreen mode simply click on the Distraction Free Writing button ( ). With the Distraction Free Writing button turned on, the left-hand menu and the right-hand side panels fade out of view, leaving the screen with just the minimal required to compose your content. In Distraction Free Writing mode, only the Title field and Visual Editor is displayed until you move your cursor outside of the editor. Once you move your cursor outside of the editor, the menu and side panels fade back into view. To exit from Distraction Free Writing mode, click on the Distraction Free Writing button again. 50 | AggieNetwork.com Hosting User Manual Saving and Publishing Content Once you’ve added all your content to your Page or Post you have the option of Saving the Page as a Draft or Publishing the page. Clicking the Save Draft button will simply save your Page/Post. This is handy if you would like to come back at a later date to add more content or if you are simply not ready to publish yet. Clicking the Publish button will save your Page/Post and publish it on your website. Clicking the Preview button will show you a preview of the current Page/Post. There are also several options available when saving. By default the Status is set to Draft but this can be changed by clicking the Edit link just to the right of Status: within the Publish panel. Pending Review means the draft is waiting for review by an editor prior to publication. Draft means the post has not been published and remains a draft for you. AggieNetwork.com Hosting User Manual | 51 You can also change the visibility of the Page by clicking the Edit link just to the right of Visibility: within the Publish panel. Public is the default and means the page is viewable to all. There is also an option to make the Post ‘sticky’. Sticky posts are placed at the top of all blog posts and stay there even after new posts are published. Password Protected allows you to assign a password to your page. Only people who have the password will be able to access the page. Private hides the content from the public completely. Normal users and visitors will not be aware of private content. You will only see the private content when you are logged into your WordPress blog. By default, when you click the Publish button your Page/Post is published immediately. To change this, click the Edit link just to the right of Publish immediately within the Publish panel. You can then select the date and time that you want your Page/Post to be published. You must also click the Publish button when you have updated the date and time fields to publish at the desired date and time. 52 | AggieNetwork.com Hosting User Manual Categories You can use categories to define sections of your site and group related posts. The default category is Uncategorized but this can be easily changed in your Settings. Pages cannot be associated with Categories. You can only associate Categories to Posts. There are two ways to add Categories. They can be added while adding or editing your Post or they can be added via the Categories menu option. Adding Categories while editing your Post, will automatically assign those Categories to your Post. Adding Categories using the Categories menu option will simply add them to the list of available Categories. When you click on the Categories menu option you will be shown a list of Categories that have already been added along with some blank fields that allow you to add a new Category. AggieNetwork.com Hosting User Manual | 53 To add a new Category, fill in the blank fields and then click the Add New Category button: Name – The name is how it appears on your site Slug – The Slug is the URL-friendly version of the name. It is usually all lowercase and contains only letters, numbers, and hyphens Parent – Categories, unlike tags, can have a hierarchy. You might have a Car category, and under that have children categories for Ford, General Motors and Toyota. Totally optional. To create a subcategory, just choose another category from the Parent dropdown 54 | AggieNetwork.com Hosting User Manual Description – The description is not prominent by default; however, some themes may display it Once you add a new Category it will appear in the list of Categories on the right side of the screen. When hovering your cursor over each row in the list of Categories, a few links will appear beneath the Category name. Edit – Allows you to edit the Category properties such as Name, Slug, Parent and Description Quick Edit – Allows you to quickly edit the Category Name and Slug Delete – Deletes the Category permanently from the list of Categories. After clicking Delete you will be prompted to confirm your choice. Click OK to delete the Category or Cancel if you don’t want to delete it View – This will list all the Posts that are currently using this Category If you would like to permanently delete numerous Categories at once, click the checkboxes next to the Categories you would like to delete and then choose Delete from the Bulk Actions dropdown list at the top of the page. After selecting Delete, click the Apply button to immediately delete the selected Categories (you will not be prompted to confirm your choice). Deleting a Category does not delete the posts in that Category. Instead, posts that were only assigned to the deleted Category are set to the default Category, which is set to Uncategorized by default. The Default Post Category can be configured within the Settings > Writing section. AggieNetwork.com Hosting User Manual | 55 Adding Categories within your Post Adding Categories while editing your Post will automatically assign those Categories to your Post. When adding or editing your Post, the Categories panel can be found just below the Format panel if your Theme supports Post Formats. Alternatively, it will reside just below the Publish panel. To add an existing Category, simply tick the checkbox (es) next to the Categories you wish to assign to the Post. If you would like to create a new Category and assign it to the Post at the same time, click the + Add New Category link. Two fields will then appear. Type the name of the Category that you wish to add into the empty input field. If you wish the new Category to have a Parent, select it from the Parent Category dropdown list. Click the Add New Category button when done to create the Category and automatically assign it to the Post. 56 | AggieNetwork.com Hosting User Manual Tags Tags are ad-hoc keywords that identify important information in your post (names, subjects, etc.) that may or may not recur in other posts. Unlike Categories, Tags have no hierarchy, meaning there is no relationship from one Tag to another. Pages cannot be assigned Tags and cannot be associated with Categories. You can only associate Tags and Categories to Posts. Like Categories, there are two ways to add Post Tags. They can be added while adding or editing your Post or they can be added via the Tags menu option. Adding Tags while editing your Post, will automatically assign those Tags to your Post. Adding Tags using the Tags menu option will simply add them to the list of available Tags. When you click on the Tags menu option you will be shown a list of Tags that have already been added, along with some blank fields that allow you to add a new Tag. A list of popular Tags is also displayed in ‘cloud’ format. That is, the Tags are displayed in alphabetical order and the more often a Tag has been used, the larger the font it is displayed in. AggieNetwork.com Hosting User Manual | 57 58 | AggieNetwork.com Hosting User Manual To add a new Tag, fill in the blank fields and then click the Add New Tag button: Name – The name is how it appears on your site Slug – The Slug is the URL-friendly version of the name. It is usually all lowercase and contains only letters, numbers, and hyphens Description – The description is not prominent by default; however, some themes may display it Once you add a new Tag it will appear in the list of Tags on the right side of the screen. When hovering your cursor over each row in the list of Tags, a few links will appear beneath the Tag name. Edit –Allows you to edit the Tag properties such as Name, Slug and Description Quick Edit – Allows you to quickly edit the Tag Name and Slug Delete – Deletes the Tag permanently from the list of Tags. After clicking Delete you will be prompted to confirm your choice. Click OK to delete the Tag or Cancel if you don’t want to delete it View – This will list all the Posts that are currently using this Tag If you would like to permanently delete numerous Tags at once, click the checkboxes next to the Tags you would like to delete and then choose Delete from the Bulk Actions dropdown list at the top of the page. After selecting Delete, click the Apply button to immediately delete the selected Tags (you will not be prompted to confirm your choice). Adding Tags within your Post Adding Tags while editing your Post, will automatically assign those Tags to your Post. When adding or editing your Post, the Tags panel can be found just below the Categories panel. To add an existing Tag, click the Choose from the most used tags link. This will display a list of previously used Tags (if available). They are arranged alphabetically and in ‘cloud’ format. That is, the more often a Tag has been used, the larger the font it is displayed in. To add a previously used Tag, simply click on the Tag name and it will be assigned to your Post. To add a new Tag, simply write the Tag or Tags (separated with commas) into the edit field and click the Add button. Tags that are assigned to the Post will be displayed below the edit field. To remove a Tag from your Post, click the small ‘x’ icon next to the Tag name. AggieNetwork.com Hosting User Manual | 59 60 | AggieNetwork.com Hosting User Manual Media Library The Media Library is where you can find all the files that you’ve uploaded. In WordPress there are two different types of views you can select from when viewing your media library. You can click the List View icon ( ) to display your images in a list, similar to how they’ve been displayed in previous versions of WordPress, or you can click the Grid View icon ( ) to view your images in the new Grid layout. The Grid View will display a grid of thumbnail images for each of your media files. The Grid View employs infinite scrolling, rather than displaying your images over multiple pages. To view more images, simply scroll to the bottom of the page and more thumbnails are automatically loaded. AggieNetwork.com Hosting User Manual | 61 The List View will display your images in a list over multiple pages. Both views show the most recently uploaded files first. There are also dropdown lists that allow you to filter the list of files that are currently being displayed, along with a search field to help search for files. Within the List View, the list of files contains a small thumbnail version of the image or file, the file name and the type of file (JPG, MP3, etc.), the name of the Author who uploaded the file, the Page or Post which the image was uploaded to, and the date the file was uploaded. When hovering your cursor over each row in the List View, a few links will appear beneath the file name. Edit – Allows you to edit the file properties such as Title, Alt Text, Caption and Description. You can also perform some basic image manipulation Delete Permanently – Deletes the file permanently from the Media Library View – Will take you to the display page for that file 62 | AggieNetwork.com Hosting User Manual Viewing a File in the Media Library The Grid View will display a grid of thumbnail images for each of your media files. Depending on the file type, you will either see a thumbnail image for that particular file or an icon representation. After clicking on a thumbnail within the Grid View, a pop-up window will display the properties for that particular file. If the file is an image, you will also see a larger version of that image. For supported audio and video files (M4a, MP4, OGG, WebM, FLV, WMV, MP3, WAV and WMA) you will see the appropriate media player. For other file types such as PDF’s or Word Documents, there is a link to view the attachment page which has a link to the actual file. Within the List View, hover the cursor over one of the rows and click the View link. If the file is an image, you will see a larger version of that image. For supported audio and video files (M4a, MP4, OGG, WebM, FLV, WMV, MP3, WAV and WMA) you will see the appropriate media player. For other file types such as PDF’s or Word Documents, you will see the attachment page which has a link to the actual file. AggieNetwork.com Hosting User Manual | 63 Adding a File to the Media Library To add a new file to the Media Library, click on the Add New link in the left hand navigation menu or the Add New button at the top of the page. If you click the Add New button when you are viewing the Media Library in the List View, or click the Add New link in the menu, simply drag your images from wherever they are on your computer, into the area marked Drop files here. Your file(s) will be automatically uploaded. Once your images or files are uploaded, they are listed below the file uploader. If you wish to edit the file properties, click the Edit link next to the file. If you click the Add New button when you are viewing the Media Library in the Grid View, you can drag your images to anywhere on the screen. Your file(s) will be automatically uploaded. 64 | AggieNetwork.com Hosting User Manual Once your images or files are uploaded, they are displayed below the file uploader, with the rest of your media. When uploading files, you can also click the Select Files button and then select the files you wish to upload, using the dialog window that is displayed. Editing the File Properties If you are viewing your files using the Grid View, simply click on one of your media files and you will be presented with a pop-up window that displays the relevant properties for that particular file. After updating each field your changes will be automatically saved. You can use the arrow buttons at the top of the pop-up window to navigate to the previous or next image. Click the ‘x’ in the top-right of the pop-up window to return to the media Grid View. AggieNetwork.com Hosting User Manual | 65 To edit the properties of an existing file when using the List View within the Media Library, hover the cursor over the particular row that contains the file you wish to edit and click the Edit link. Alternatively, you can also click the file title or the thumbnail image. Clicking the Edit link next to the file after it is just been uploaded, will also allow you to edit its properties. After clicking Edit, the relevant properties for that particular media file are displayed, including the title, URL, filename, file type and in the case of an image, the file dimensions. When editing the file properties, the Alternative Text field will only be displayed for images. 66 | AggieNetwork.com Hosting User Manual Title – Although the field isn’t labelled, the Title is the field at the very top of the page. The Title is displayed as a tooltip when the mouse cursor hovers over the image in the browser Caption – is displayed underneath the image as a short description. How this displays will be dependent on the WordPress theme in use at the time. You can also include basic HTML in your captions Alternative Text – This field is only displayed for image files. The Alternative Text is displayed when the browser can’t render the image. It is also used by screen readers for visually impaired users Description – This content is displayed on the file’s attachment page AggieNetwork.com Hosting User Manual | 67 Metadata - Artist – This field is only displayed for audio files. It allows you to specify the recording artist Metadata - Album – This field is only displayed for audio files. It allows you to specify the album to which the audio file belongs to Once the file properties are updated click the Update button to save your changes. Editing an Image WordPress has a basic image editing tool that allows you to perform some simple manipulation with your uploaded images. You are able to rotate and flip your images and also scale them and crop them to different sizes. When editing the file properties of an image (as opposed to other file types like documents or PDFs), click the Edit Image button that appears just below the image to show the image editing tools. If you click the Edit Image button while using the Grid View, the image editing tools will appear in the pop-up window. 68 | AggieNetwork.com Hosting User Manual If you click the Edit Image button while using the List View, your page will look slightly different to the above Grid View. In addition to the image editing tools, you will also see the properties of the file such as the file size and dimensions. You can also still update the Caption, Alternative Text and Description. No matter what view you are using, just above the image you will find the following image editing buttons: Crop – Click on the image and drag the selection box to the size that you wish the image cropped. Click the Crop button to crop the image to the new size Rotate counter-clockwise – Rotate the image 90° counter-clockwise AggieNetwork.com Hosting User Manual | 69 Rotate clockwise – Rotate the image 90° clockwise Flip vertically – Flip the image vertically Flip horizontally – Flip the image horizontally Undo – Undo the last change Redo – Redo the last change To scale your image to a new size, simply enter the width or height dimensions in the appropriate field and click the Scale button. For best results, scaling should be done before performing any other operations like cropping, flipping or rotating the image. It is important to note that images can only be scaled down, not up. After entering one scale value, the other value will change automatically so as to keep the image in proportion. The original image dimensions are displayed just above the input fields, for your reference. There are several ways to crop your image. The easiest is to simply click on the image and drag the selection box to the appropriate size. If you wish your image cropped to a specific ratio, enter the values in the Aspect Ratio input fields (e.g. 1:1 (square), 4:3, 16:9 etc.). You can then hold down the shift key and drag one of the edges of your selection to enlarge or reduce the size, while keeping this aspect ratio locked. If there is already a selection made, specifying the aspect ratio will automatically change the selection to match it. Whenever the selection box is adjusted, the dimensions are displayed in the Selection input fields. You can also manually enter the dimensions of the selection box (in pixels) by entering values into these two fields. Once your selection box is adjusted, simply click the Crop button just above the image to crop the image to this new size. By selecting one of the options in the Thumbnail Settings panel, you have the option to apply your changes to All image sizes, just the Thumbnail image or All sizes except Thumbnail. Click the Save button to save your changes. Click the Update button to return to the main Media Library page. If you wish to revert back to your original image, click the Edit Image button again to return to the image editor. A new Restore Original Image link is displayed just below the Scale Image link. Click the Restore Original Image link and then click the Restore image button to discard your changes and restore your original image. 70 | AggieNetwork.com Hosting User Manual Deleting a File from the Media Library To delete a file from the Media Library when using the Grid View, first click an image to view the File Properties, then click on the Delete Permanently link that appears in the popup window. To delete a file from the Media Library when using the List View, click on the Delete Permanently link that appears beneath the file name when hovering your cursor over each row. After you click the Delete Permanently link in either view, get a confirmation prompt. Click the OK button to delete the file or click the Cancel button to return to the Media Library. AggieNetwork.com Hosting User Manual | 71 Appearance The various Appearance menus allow you to change how your site looks and behaves. If your site has been setup for you by a third party then it is more than likely that you won’t need to change any of the settings in here. Depending on the theme that your site is running, you may find that you don’t have all the menu options listed here, or you may have a couple of different ones. The reason for this is that a couple of the options under the Appearance section are theme based. For example, the initial default theme, The Box Plus, allows you to customize options for how your theme displays. Not all themes will have these option pages, or if they do, they may be under another menu entirely. Selecting a Theme The overall appearance of a WordPress site is controlled by the Theme you choose. The Association of Former Students has preinstalled five “Aggie” themes on all sites: Twenty Fifteen, Accent, First, The Box Plus, and McKinley. For most sites The Box Plus will be your initial theme on setup. You also have the ability to download a new theme, purchase one, or have one custom designed and built for your WordPress blog. There are hundreds of places where themes may be downloaded for free or small fee. The best place to find more WordPress themes is the official WordPress Themes Directory. Clicking on the Appearance menu option will bring up the Themes screen. The currently active theme is shown at the top left of the screen. The other themes shown are ones that are installed, but not currently in use. To see how your site would look in another theme (that isn’t currently active), you can click the Live Preview button associated with each theme. While the preview screen is displayed, you will be able to click your site’s links to preview your various pages in the new theme layout, and also make various theme changes. To change your site to another Theme, hover your cursor over the theme you want to activate and click the Activate button that appears underneath the Theme. Alternatively, if the preview window is displaying, you can click the Save & Activate button in the top left corner of the window to activate the theme. To view more details about a particular theme, hover your cursor over a theme thumbnail image and click on Theme Details. A pop-up window will appear that displays a larger image along with the theme description and other details. 72 | AggieNetwork.com Hosting User Manual Clicking on the Add New button at the top of the page allows you to upload a new theme to your site and also search the WordPress Themes Directory for new themes and install them within your Dashboard. Restoring Aggie Presets If you make changes to the color scheme of any of four preinstalled “Aggie” themes, you may restore the theme’s Aggie color preset. Go to the Themes screen, click the Activate button underneath the theme you wish to reset, and then click the Restore Aggie Style button (found in the Appearance menu). The original Aggie colors will be restored to that theme. AggieNetwork.com Hosting User Manual | 73 Previewing and Customizing your Theme In addition to previewing a theme, you can update various theme settings all while previewing your changes live. The options that you are able to change vary depending on the theme. For the currently active theme, clicking the Customize button allows you to update various settings while also previewing those changes. Until you click the Save & Publish button, only the theme preview window is updated, not the theme on your live site. For all other installed themes that are not currently active, click the Live Preview button to preview the theme, update its settings and activate the theme. Until you click the Save & Activate button, only the theme preview window is updated, not the theme for the live site. 74 | AggieNetwork.com Hosting User Manual Adding a new Theme You can add new themes to your site without leaving the WordPress Dashboard. At the top of the Themes screen there is an Add New button. Click this button to search and add new themes into your site. After clicking the Add New button, you will be shown the Add Themes screen. It should look similar to the screen below. The Add Themes screen allows you to search and install themes directly from the official WordPress Themes Directory. By default, the screen will show a list of Featured themes. You can use the links at the top of the page to filter the results to see Featured themes, Popular themes or the Latest themes. Click the Feature Filter link to filter the results based on the Tags you specify. There are Tags for Colors, Layout, Features and Subject. Alternatively, click the Search themes... input field and enter text to search for a specific theme. AggieNetwork.com Hosting User Manual | 75 Hovering your cursor over each theme thumbnail will display extra buttons. To view the details of a theme along with a preview, click the large Details & Preview button or the smaller Preview button. Clicking the Install button will download and then install the theme on your site. Once the theme is installed, you will be given the choice to view a Live Preview, immediately Activate the theme or return to the Theme Installer. 76 | AggieNetwork.com Hosting User Manual Customizing your Site Using the Customizer, you can modify certain parts of your website. When you click on the Customize menu option, you will be shown the various theme options that you can change. Depending on the theme that is currently in use, you may see more or less options than those displayed in the following image. Clicking the small arrows will open and close each of the panels, giving you access to each of the various options. You will find that some of the options in the Customize screen are also available via other menu options. As an example, you can change the Site Title and Tagline using the General option under the Settings menu. As you make your changes on the left-hand side of the Customize screen, the theme preview on the right-hand side is automatically updated. Until you click the Save & Publish button, only the theme preview is updated, not the theme on your live site. Most themes will display The Association of Former Students logo at the bottom of your site, and adjust its color according to your site’s background color. If your theme does not support this auto detection, you will be allowed to specify the color of the logo on this screen. AggieNetwork.com Hosting User Manual | 77 There is always a possibility any theme you install or update might cause errors that make your dashboard inaccessible. You will need to contact the Web Team ([email protected]), to have us manually delete that plugin from your site if you cannot access the dashboard. Widgets Widgets are independent sections of content that can be placed into any area of your theme that supports widgets. These areas of your theme that support widgets are commonly called ‘Sidebars’; they quite often are located in the left or right hand column, they can be also located anywhere within your site. The location of sidebars vary by theme. Many themes have sidebars in the footer area. There are numerous widgets available by default which allow you to add extra content to your site, such as Categories, Custom Menus, and search, just to name a few. New Widgets are able to be installed via plugins. The extra functionality each plugin’s widget will also vary. The Association of Former Students has provided Widgets that display various newsfeeds of AggieNetwork.com and Texas A&M Today. You can use these widgets to provide your site’s visitors with the latest news from both The Association of Former Students and Texas A&M University. 78 | AggieNetwork.com Hosting User Manual AggieNetwork.com Hosting User Manual | 79 The Available Widgets section contains all the widgets you may choose from. To populate one of your Sidebars, drag and drop a widget to the desired location. Once the Widget is dragged to a Sidebar, the widget will open up to allow you to configure its settings. Click the Save button within the Widget to save your settings. If you want to remove a widget from a Sidebar but save its settings for future use, drag it into the Inactive Widgets section. If you simply want to delete the Widget from your Sidebar, click the Delete link within the Widget. The small arrow next to the Sidebar title will toggle the sidebar to be open and closed. If you drag and drop a widget onto a closed sidebar, the sidebar and widget will automatically open. Updating the Menu If your theme supports custom menus, you can make modifications to them from the Menus options. Menus can contain links to Pages, Posts, Categories, Custom Links, or other content types. 80 | AggieNetwork.com Hosting User Manual AggieNetwork.com Hosting User Manual | 81 Adding a New Menu Depending on the current Theme, your site may use more than one navigation menu. Sometimes you might have multiple menus in your site header. At other times, you may even have menus located in the sidebar or footer of your site. To add a new menu, hover your cursor over the Appearance menu option in the left hand navigation menu and in the fly-out menu, click the Menus link. Alternatively, click the Appearance menu option and then click the Menus link underneath. On the screen that’s displayed, click create a new menu. You’ll be presented with a screen similar to below. Enter a name for your new menu in the Menu Name input field. Click the Create Menu button to create your new menu. Editing an Existing Menu Item Your current list of menu items resides in the right hand column on the menu screen. If there are multiple menus on your site, there will be a dropdown list displayed at the top of the page that enables you to select the menu that you would like to edit. Simply select the menu you would like to edit from the Select a menu to edit dropdown list and then click the Select button. The menu items for your selected menu will then be displayed. 82 | AggieNetwork.com Hosting User Manual The items in this right-hand column on the Menus page will match the menu items that appear on your website. Clicking on the down arrow next to each menu item name will show an options panel for that particular menu item. In this options panel, there are settings for that item that may be manipulated. You can show or hide extra fields such as Link Target, CSS Classes, Link Relationship (XFN) or Description using the Screen Options tab at the very top-right of the screen. URL – Only displayed for Custom Links and will contain the URL to navigate to when that menu item is clicked Navigation Label – This is the label that will display within the actual menu on your website Title Attribute – This is the tooltip that appears when the mouse cursor hovers over the menu item Open link in a new window/tab – (Hidden by default) You can set the menu item to open in the same window or tab (which is the default) or in a new window or tab. This option is made visible by ticking the Link Target option on the Screen Options panel CSS Classes – (Hidden by default) Optional CSS Classes to add to this menu item. This option is made visible by ticking the CSS Classes option on the Screen Options panel AggieNetwork.com Hosting User Manual | 83 Link Relationship (XFN) – (Hidden by default) Allows for the generation of XFN attributes so you can show how you are related to the authors/owners of site to which you are linking. This option is made visible by ticking the Link Relationship (XFN) option on the Screen Options panel Description – (Hidden by default) The description for the link. This may or may not appear, depending on the theme. This option is made visible by ticking the Description option on the Screen Options panel Each menu item can be moved to a new location in the menu hierarchy either by using the links underneath the Navigation Label input field or by clicking on the title area of the menu item and dragging ‘n dropping the menu to new location. If you choose to drag and drop your menu items, the cursor will turn into a four-pointed arrow when you are hovering over the correct area. After making updates to your menu items, click the Save Menu button at the top or bottom of the screen. Adding a New Menu Item By default, only the Pages, Links and Categories panels are shown. If you wish to add Posts, Tags or Post Formats as menu items, you simply use the Screen Options tab at the top-right of the screen to enable these panels as well. To add a new Page as a menu item, tick the checkboxes in the Pages panel, next to each of the Pages that you wish to add. You can select one Page at a time or multiple. After selecting your Pages, click the Add to Menu button. The new menu items will append to the bottom of the current list of menu items. The menu item name will default to the Page name. To change this, simply click on the down arrow next to the menu item name to view the options panel and then update the Navigation Label to your preferred name. After making your updates, click the Save Menu button at the top or bottom of the screen. The steps to add a Post, Post Format, Category or Tag as a menu item are exactly the same as adding a Page. 84 | AggieNetwork.com Hosting User Manual To change the order that the menu options appear in, simply place your cursor over the title area of the menu item you wish to move. When the cursor changes to a four-pointed arrow, click and drag the menu item to its new location. Depending on how your menu is configured within your theme, it is even possible to create the multi-level hierarchy required for dropdown menus. After moving your menu items around, don’t forget to click the Save Menu button at the top or bottom of the screen to save your changes. Adding a Custom Link Menu Item Use the Links panel to add a custom link to your menu, such as a link to an external website. Simply type in the website URL in the URL field and the menu name in the Link Text field. Click the Add to Menu button when done. Use the same steps outlined previously to adjust the order of the menu item and click the Save Menu button at the top or bottom of the screen to save your changes. AggieNetwork.com Hosting User Manual | 85 Deleting a Menu Item To delete a menu item click on the down arrow next to the menu item name to view the options panel for that item and then click the Remove link. After making your updates, click the Save Menu button at the top or bottom of the screen. Managing Menu Locations After you create a menu, you also need to tell WordPress where to use it. This is where the Manage Locations tab on the Menus page comes in. After clicking the Manage Locations tab on the Menus page, you will be shown a page similar to below, with a list of the various menu locations used in your Theme. You may have one menu location or you may have multiple, depending on the Theme currently in use. Your menu location won’t necessarily be called ‘Top primary menu’ either, as shown below. Again, that will depend entirely on your Theme. Assign an existing menu that you’ve created to the appropriate location by selecting it from the dropdown list. Click the Save Changes button to save your changes. Alternatively, you can choose to create a new menu and automatically assign it to the location by clicking the Use new menu link. 86 | AggieNetwork.com Hosting User Manual Header The Header menu option will only be available if your current Theme is making use of this option. It allows you to choose an image to display in the header area. You can choose one of the images that comes with the theme or you can upload your own image. You can also choose to display a static image or a random image. The Site Title and Tagline in the header area can be turned on or off using the Show header text with your image option on this page. Again, depending on the theme you are using you may or may not have this, or a similar option. Background The Background menu option is another theme specific menu. It allows you to choose a background image and the background color for the theme. Again, depending on the theme you use, you may or may not have this option, but you might find a similar option. Depending on the theme’s capabilities, The Association of Former Students logo at the bottom of your site will automatically adjust its color based on the background color option. AggieNetwork.com Hosting User Manual | 87 Editor The Editor menu allows you to edit the individual CSS and PHP files which make up your Theme. Normally once a theme is installed and configured on your site, there is no need to make any changes within here. Extreme care should be taken with this option to avoid making changes that will affect how your site is displayed. Incorrectly modifying any files within this section could cause your site to display incorrectly, or not at all. Extra caution must be taken if you intend to make any changes here. It cannot be stressed enough how dangerous this option is if you know nothing about HTML, CSS, or PHP. Modifying theme files can drastically change how your site displays, and potentially cripple your site. 88 | AggieNetwork.com Hosting User Manual Plugins Plugins extend and expand the functionality of WordPress. Once a plugin is installed, you may activate it or deactivate it here. Thousands of WordPress plugins exist, providing a limitless range of functionality. The easiest place to find them is within the official WordPress Plugin Directory. You can search and install new plugins by clicking on the Add New button at the top of the page or the Add New link in the left hand navigation menu. Once a plugin has been added to your site, it needs to be ‘turned on’. To do this, click the Activate link to activate it. Depending on the plugin, you might also find that there are settings that need to be configured. Activated plugins will be displayed with a different colored background within your list of plugins. They will also be highlighted with a blue vertical bar down the left side of the row. If an activated plugin also has an updated version available, the background color will change and the vertical bar will be red. If any of your installed plugins have available updates, a small number, representing the number of plugins with updates, will appear next to the Plugins menu option. A message will also be displayed just below the plugin’s name and description if it has an update. There will also be a link which will allow you to view the details for the new version and another link for updating a plugin. It is also recommended to check that the plugin and your site still works as expected, once it has been updated. Prior to updating a plugin, it is wise to verify that the plugin functionality has not changed significantly so as to adversely affect your site. It is also recommended to check that the plugin and your site still work as expected, once it has been updated. In WordPress 4.2, when you click the update now link for a plugin that has an update, you will no longer be taken to the Updates page. Instead, the plugin will automatically update while you remain on the plugins page. If you have plugins that have been deactivated because you are no longer using them, it is always good practice to remove them from your site. You can do this by clicking the Delete link underneath the plugin name. AggieNetwork.com Hosting User Manual | 89 Preinstalled Plugins On the Installed Plugins page, there is a Must-Use link. That page contains a list of plugins that The Association of Former Students manages and updates for you. These plugins are installed on all of our WordPress sites. You are able to change the options for some of these plugins in Settings. However, you are unable to override or disable these plugins. The Association will occasionally install new plugins to your site through this list. 90 | AggieNetwork.com Hosting User Manual Adding a New Plugin To add a new plugin, click on the Add New link in the left hand navigation menu or the Add New button at the top of the page. The Add Plugins page will display a list of the current featured plugins from the WordPress.org Plugin Directory. You can use the links at the top of the page to filter the results to see Featured plugins, Popular plugins or a list of the plugins that you have marked as ‘Favorite’ within the WordPress.org Plugin Directory. If you click the Favorites link, you will need to enter in your WordPress.org username and then click the Get Favorites button so that it can retrieve your list. You can also click the Search Plugins input field and enter text to search for a specific plugin. To view more information about a particular plugin, click the thumbnail image, the title or the More Details link. A pop-up window will display more information about the plugin such as the plugin Version, Author and the date it was Last Updated. You can also read the full plugin description, installation notes, view screenshots and read any reviews that have been left. AggieNetwork.com Hosting User Manual | 91 After clicking the Install Now button, the plugin will be automatically downloaded to your site and installed. You are then given the option to activate the plugin or return to the plugin installer page. On the Add Plugins page, you also can manually upload a plugin to your site. To upload a plugin, click the Upload Plugin button at the top of the page. 92 | AggieNetwork.com Hosting User Manual Select your plugin file from your computer by clicking the Browse... button. Your plugin file must be uploaded in .zip format. After clicking the Install Now button, your plugin will be automatically uploaded to your site and installed. You are then given the option to activate the plugin or return to the plugins page. There is always a possibility any plugin you install or update might cause errors that make your dashboard inaccessible. You will need to contact the Web Team ([email protected]), to have us manually delete that plugin from your site if you cannot access the dashboard. AggieNetwork.com Hosting User Manual | 93 Users This screen lists all the existing users for your site. Users with roles other than Administrator will see fewer options when they are logged in. Depending on your Role, you can also add new users as well as manage their Roles. At the top of the screen, there are links that allow you to filter the list of Users based on the User Roles. The number in brackets will advise how many there are for that particular type. When hovering your cursor over each row in the list of Users, links will appear beneath the user name. Edit – Allows you to edit the user profile Delete – Allows the User to be deleted. This link won’t be available for your own profile A User can have one of five defined roles as set by the site admin: Administrator, Editor, Author, Contributor, or Subscriber. Administrator – a user with access to all the administration features Editor – a user with the ability to publish and manage posts, and other users’ posts also. Author –a user who can publish and manage their own posts Contributor – a user who can write and manage their posts but can’t publish them 94 | AggieNetwork.com Hosting User Manual Subscriber – a user with no writing privileges who can only adjust their profile. When your site is first setup, the Web Team sends you to credentials to access the main site administrator account with all capabilities. The user name is the exact same as your assigned domain or e-mail (i.e. sampleclub for sampleclub.AggieNetwork.com or [email protected]). Adding a New User To add a new user, click on the Add New link in the left hand navigation menu or the Add New button at the top of the page. Once the above page is displayed, simply fill in the various fields and click the Add New User button. AggieNetwork.com Hosting User Manual | 95 Username – (required) Enter the username of the new user here. This will also be used as the Login name for the user. Once saved, the Username can’t be changed E-mail – (required) Enter a valid email address of the new user here. The email address must be unique for each user. First Name - Enter the first name of the new user here Last Name – Enter the last name of the new user in this text box Website – You may enter a website URL in this text box Password – (required) Enter a password for the new user in this password box. Repeat Password - (required) Re-enter the same password in this box to confirm it. Strength indicator – This indicates if the password you entered is Very Weak, Weak, Medium, or Strong (displayed in green). The stronger the password the more secure the login. Hint: The password should be at least seven characters long. To make it stronger, use upper and lower case letters, numbers and symbols) Send Password? – Check the box to send this password to the new user by email Role – Select the desired Role for this user from the dropdown list Deleting a User To delete a user, click on the Delete link that appears beneath the user name when hovering your cursor over each row. The Delete link won’t appear for the user that is currently logged in. In addition to deleting a user you will be given an option of what you would like to do with all the content currently assigned to that User. The available choices are: 96 | AggieNetwork.com Hosting User Manual Delete all posts – This will delete all the content which this user created Attribute all posts to – This will assign all the content currently linked to this User, to another User of your choosing. Simply select the User from the dropdown list After making your selection, click the Confirm Deletion button to remove the User. If you create additional admin accounts, they will be unable to delete the main site administrator account (i.e. sampleclub for sampleclub.AggieNetwork.com or [email protected]). Editing your Profile To edit your profile details, simply click on your user name, when viewing the list of Users or click on the Edit link that appears beneath your user name when hovering your cursor over each row. Alternatively, click on the Your Profile link in the left hand navigation. AggieNetwork.com Hosting User Manual | 97 If you are an Administrator and would like to edit someone else’s profile, click on their user name when viewing the list of Users or click on the Edit link that appears beneath their user name when hovering your cursor over each row. Update the appropriate fields and then click the Update Profile button to save all your changes. 98 | AggieNetwork.com Hosting User Manual Personal Options Visual Editor – Checking this box disables the Visual Editor when writing and uses the plain html editor Admin Color Scheme – Check this radio button next to the colour scheme desired for the administrative panels. You have the choice of eight different color schemes Toolbar – Checking this box will display the Admin Bar at the very top of your website (only for the person who is currently logged in) Name Username – You cannot edit your username because, as it is used as your username during the login process. Even an Administrator cannot change your username. First name – Enter your first name in this text box Last name – Enter your last name in this text box Nickname – (required) It may be the same as your Username or it can be different. If you don’t supply a Nickname, then your username will be placed in this field. Display name publicly as – Select how your name is cited on the site, from the dropdown list. You can choose from several choices: Nickname, Username, First Name, Last Name, ‘First Last’, or ‘Last First’. If you prefer ‘Last First’, insert a comma after your last name in the Last Name text field and choose the last option from the dropdown list. For security reasons, it is a good idea to keep this different from your Username Contact Info E-mail – (required) All users are required to list an email address in their respective Profiles. The email address must be unique to each user. Your site will use this address to notify you for administrative purposes. Only other registered users of your site will have access to this email address. Website – Enter your personal website or blog address, if you have one AggieNetwork.com Hosting User Manual | 99 About Yourself Biographical Info – Enter a short description or profile of yourself here. Depending on your theme, this optional information may be displayed when creating new Posts New Password – Enter your new password. Leaving this input field and the Repeat New Password field blank will retain your current password. Repeat New Password – Enter your new password a second time to confirm it Strength Indicator – This indicates if the password you entered is Very Weak, Weak, Medium, or Strong (displayed in green). The stronger the password the more secure your login. Hint: The password should be at least seven characters long. To make it stronger, use upper and lower case letters, numbers and symbols) If you have left your account logged in at a public computer or you have lost your phone, you may click the Log Out of All Other Sessions button to log out of everywhere except for your current browser. 100 | AggieNetwork.com Hosting User Manual Tools The Tools menu provides some handy administration tools. Most of the time though, they are used when setting up or configuring your WordPress site and so as such, they won’t be covered here in great detail. Available Tools The Available Tools menu option gives you access to two different tools. The Press This bookmarklet and the Categories and Tags Converter. Press This is a little browser app that allows you to grab bits of the web and easily create new posts. Categories and Tags Converter is a tool for converting Categories to Tags or vice versa. Press This Press This is a bookmarklet: a little app that runs in your browser that lets you grab bits of the web. It provides you with a handy shortcut within your browser to creating new Posts. Simply Drag-and-drop the Press This link to your browser’s bookmarks bar or right click it and add it to your browser favorites for a posting shortcut. Categories and Tags Converter The Categories and Tags Converter is a tool to convert existing Categories to Tags or Tags to Categories. Before it can be used it must be installed via the Import menu option. Import The Import option provides you with various tools for importing content from other blogging systems. You can import content from Blogger, LiveJournal, Moveable Type, TypePad and Tumblr. You can also import content from Blogrolls that use the OPML Format, posts from an RSS feed or content from other WordPress sites. To import content from another WordPress site you first need to install the WordPress Importer plugin. To import content from another type of site other than WordPress, you will be prompted to install the relevant Importer plugin after selecting the type of site that you wish to import your content from. Export The Export option is used to export your data in XML format, from your WordPress site. The export format is called WordPress eXtended RSS or WXR and will contain your posts, pages, custom fields, terms, navigation menus and custom posts. Once you’ve saved the download file, you can use the Import function on another WordPress site to import the content from this site. This is a great way to personally backup your site content. AggieNetwork.com Hosting User Manual | 101 Settings The various Settings screens are used to configure your WordPress site. Normally, once your WordPress site is set up there is no reason to change any of these settings. These Settings options will only be touched upon very briefly. You can find out lots more information in regards to configuring your site within the WordPress Codex. General The General settings configure your basic site preferences such as the Site Title and Tag Line, the WordPress Address and Site Address, the administrator’s email address and the date and time format, among other things. The WordPress Address (URL) is the location of your main WordPress core files, it is the same as your assigned domain. To change this, you need to contact the Web Team. 102 | AggieNetwork.com Hosting User Manual AggieNetwork.com Hosting User Manual | 103 Writing The Writing settings configure various options regarding your site content. Settings include defining the Default Post Category, Default Post Format (if supported by your Theme) and if the Link Manager plugin is installed, the Default Link Category. 104 | AggieNetwork.com Hosting User Manual Reading The Reading settings configure how your site is viewed. You can define whether your front page displays a static Page or your blog Posts, how many blog posts are displayed by default as well as Syndication/RSS options. If you configure your site to display a static front page, you can set which page to display, and a page that will show your blog posts. The Search Engine Visibility setting enables you to block your site from being found on search engines (Google, Bing, Yahoo, etc…) or allow it to be visible. AggieNetwork.com Hosting User Manual | 105 Media The Media settings define the default image sizes that are created when an image is uploaded. You can also configure whether your uploaded media files are stored in folders based on the year and the month of the upload. Permalinks The Permalink settings enable you to configure the URL format that is displayed in the web browser when someone browses your site. We have setup your site with a default permalink format, which helps with Search Engine Optimisation (SEO). If you desire to change the way your site URL is displayed, select one of the radio button options within the Common Settings section on this screen. Next to each option is an example of how the URL would appear. 106 | AggieNetwork.com Hosting User Manual Keeping your Site Updated From time to time, themes and plugins will require updating. Updates typically happen when developers release security patches or add extra functionality. It is always good practice to keep your Themes and plugins updated to the latest versions. The top two reasons for sites being hacked are insecure passwords & outdated (vulnerable) software. The Association’s Web Team will keep the WordPress core of your website, along with the included Aggie Themes updated frequently. The Association also will occasionally update all plugins on your site automatically. If your site goes down, please contact the Web Team through [email protected]. To update your themes and plugins, hover your cursor over the Dashboard menu option in the left hand navigation menu and in the fly-out menu, click the Updates link. You can also click the Dashboard menu option and then click the Updates link underneath. If there are any plugins that can be updated, these will be listed in the Plugins section on the page. To update your plugins, tick the boxes next to each of the plugins you wish to update and then click the Update Plugins button. The new plugin files will be downloaded and automatically installed. If there are any themes that can be updated, these will be listed in the Themes section on the page. To update your themes, tick the boxes next to each of the themes you wish to update and then click the Update Themes button. The new theme files will be downloaded and automatically installed. After your site has been updated, give your site a quick test to make sure its functioning as expected. This ensures new themes and plugins have not introduced new functionality that adversely affects your site or changes how your site operates. AggieNetwork.com Hosting User Manual | 107 Google Account When you registered for your AggieNetwork.com Hosting account, you were granted an @AggieNetwork.com Google Account for your organization to use alongside its website. This section provides a brief overview of how to use some of those features. Login You can login to your @AggieNetwork.com Google account by visiting https://mail.aggienetwork.com/. A Google login screen will appear. If this is your first time logging into the Google Account, use the credentials provided in the initial account the Web Team sent you. Click Sign In. When you login for the first time, you will be prompted with a license agreement to accept, and you will be asked to change your password. 108 | AggieNetwork.com Hosting User Manual Google Calendar To add a calendar to your website, you can use Google Calendar. Go to https://calendar.google.com, and login to your @AggieNetwork.com Google Account. For help with adding events to your calendar, go to http://tx.ag/h51ytsb, to read the Calendar Help. Calendar Permissions By default, your organization’s Google Calendar is private. You will need to make it public so you may embed the calendar into your WordPress site. After you add events to your calendar, hover over the calendar listed for your organization (i.e. Sample Club), and click Share this Calendar from the menu that appears. AggieNetwork.com Hosting User Manual | 109 On the screen that appears, ensure the box that says, Make this calendar public is checked. You can also delegate access to managing the calendar to other users from the same page. Click Save once you are done making these changes. Calendar Settings To change the settings for your calendar. From the main Google Calendar page, hover over the calendar listed for your organization (i.e. Sample Club), and click Calendar Settings from the menu that appears. The screen that appears will allow you to adjust various settings for your calendar. 110 | AggieNetwork.com Hosting User Manual You can ensure the Calendar Time Zone for your calendar is set to your desired time zone. The calendar time zone can be changed by clicking Set my time zone, if necessary. You can also set the Name, Description, and Location for your calendar on this screen. Embedding a Calendar into WordPress On the Calendar Settings page, there is a section that says Embed This Calendar. To add the calendar to your WordPress site, copy the HTML code from the box. Or, if you wish to customize the appearance of your calendar further, you may click Customize the color, size, and other options, and copy the HTML code generated by that page. Once you have the code copied, either create a new page in your WordPress site, or edit the page where you want the calendar displayed. To embed the calendar into your site, you must switch from the Visual Editor to the Text Editor before pasting your HTML code into the editor box. AggieNetwork.com Hosting User Manual | 111 After pasting the HTML embed code into the Text Editor, if you return to the Visual Editor, you will notice a gigantic grey box which represents the embedded calendar iframe. You may still add information above or below the calendar on your page. When you are done adding content, click Publish or Update (depending on whether you are adding or editing a page or post). 112 | AggieNetwork.com Hosting User Manual Your Google calendar will now appear on your WordPress site. AggieNetwork.com Hosting User Manual | 113 Google Maps This section will help you with providing maps and directions to the users visiting your WordPress site. Embedding Basic Maps Visit https://maps.google.com. On the top left corner of the browser, type a desired address, location, or business. Click the Gear Icon or embed map in the menu that appears. , on the bottom right corner of the page. Click Share A popup will appear that will have a Share link and Embed map tabs. Click the Embed map tab, select the map size you desire, and then and copy the HTML embed code from the box. 114 | AggieNetwork.com Hosting User Manual Once you have the code copied, either create a new page or post in your WordPress site, or edit the page or post where you want the map displayed. To embed the map into your site, you must switch from the Visual Editor to the Text Editor before pasting your HTML code into the editor box. After pasting the HTML embed code into the Text Editor, if you return to the Visual Editor, you will notice a gigantic grey box which represents the embedded map iframe. You may still add information above or below the calendar on your page. When you are done adding content, click Publish or Update (depending on whether you are adding or editing a page or post). The embedded map will now display on your site. Embedding Advanced Maps If you wish to embed a map that includes directions. You can find directions using Google Maps as you normally would. Then, click the Gear Icon , on the bottom right corner of the page. Click Share or embed map in the menu that appears. A popup will appear that will have a Share link and Embed map tabs. Click the Embed map tab, select the map size you desire, and then and copy the HTML embed code from the box. AggieNetwork.com Hosting User Manual | 115 When your site visitor clicks the More options button, they will be redirected to Google Maps with the directions for the route they select. Once you have the code copied, either create a new page or post in your WordPress site, or edit the page or post where you want the map displayed. To embed the map into your site, you must switch from the Visual Editor to the Text Editor before pasting your HTML code into the editor box. 116 | AggieNetwork.com Hosting User Manual After pasting the HTML embed code into the Text Editor, if you return to the Visual Editor, you will notice a gigantic grey box which represents the embedded map iframe. You may still add information above or below the calendar on your page. When you are done adding content, click Publish or Update (depending on whether you are adding or editing a page or post). The embedded map with directions, will now display on your site. AggieNetwork.com Hosting User Manual | 117 Aggie Network Analytics When you registered for your AggieNetwork.com Hosting account, you received an Aggie Network Analytics account to use alongside your new WordPress site. Aggie Network Analytics tracks site visitors and provides statistics about them. These include: pages visited and the duration of visits to those pages, generalized geographic locations of site visitors, web browsers used to access the site, the search keywords used to find the site, other sites that link to the site, and much more! Login Aggie Network Analytics is a customized version of Piwik, an open-source web analytics platform. Go to https://analytics.aggienetwork.com/ and a login screen will appear. Enter your initial account credentials in the boxes, and click Sign in. Your username should be the same as your WordPress login (i.e. sampleclub). If you forgot your password, you may click Lost your password and Piwik will email you a new password. 118 | AggieNetwork.com Hosting User Manual Once you login to Aggie Network Analytics (Piwik), you will see your site’s account dashboard. If nobody has visited your site since its creation, you WILL see the following screen instead. There is no need to panic if you see this screen. If you visit your site, your dashboard should change in a day or so to reflect your visit. Piwik Videos While using Aggie Network Analytics is somewhat self-explanatory, you may watch some Piwik Documentation videos at https://tx.ag/analyticshelp to better your understanding of the more advanced features Aggie Network Analytics provides. AggieNetwork.com Hosting User Manual | 119 DNS Settings for Vanity Domains If you have acquired your own domain, such as myaggieclub.com, you may use your custom domain with our free hosting service. However, you must first configure your domain’s DNS settings, and have your domain point to our server. Creating a CNAME record is the preferred setup, however you may use the alternative method if you cannot create a CNAME record. Please notify us of your new domain so we can assist you, and reconfigure your site to use the vanity domain once we add it to your hosting account. Please send us a screenshot of your DNS records, which will help us troubleshoot, if necessary. If you are using email through your new domain, we recommend you forward your @AggieNetwork.com Google Account to your club’s desired primary email address, this way you can still receive emails regarding your hosting account. Consult https://support.google.com/mail/answer/10957 to learn how to forward your @AggieNetwork.com email. Preferred Setup Login to your domain control panel (i.e. GoDaddy, Register.com, Network Solutions, Name Silo, Name Cheap) Open your DNS Records / DNS Settings panel. Set a CNAME record pointing to hosting2-mdc.aggienetwork.com Set an A record for www and point it to 128.194.206.44 Delete any unnecessary or “Parked” CNAME and A Records. Send an email to [email protected] with your vanity domain, to notify us. Send a screenshot of your DNS Records to aid if troubleshooting is necessary. If you are unable to setup a CNAME record, follow the instructions below. Alternative Setup Login to your domain control panel (i.e. GoDaddy, Register.com, Network Solutions, Name Silo, Name Cheap) Open your DNS Records / DNS Settings panel. Set A records for both www and @, and point them to 128.194.206.44 Delete any unnecessary or “Parked” CNAME or A Records. Send an email to [email protected] with your vanity domain, to notify us. Send a screenshot of your DNS Records to aid if troubleshooting is necessary. 120 | AggieNetwork.com Hosting User Manual What Now? If you are having any troubles with your website, please contact our Web Team! The Association of Former Students Web Operations Department 505 George Bush Drive College Station, TX 77840 [email protected] hosting.AggieNetwork.com Information about our AggieNetwork.com Hosting program is available on hosting.aggienetwork.com. If you are looking for more resources to further your WordPress knowledge check out the WordPress.org website. There you will find technical support and new resources like plugins, which are a fantastic way to add extra functionality to your site without having to modify your theme files. The Plugin Directory has over 33,000 different plugins that are available to download, for free. Furthermore, if you want to change how your site looks, have a look in the WordPress Themes Directory, which is also there on the WordPress site. If you find you need more information on a particular topic, have a search through the WordPress Codex that goes into more detail about how WordPress works. You will not only find information about updating your site content, there is plenty of other useful information that will help you with installing WordPress, troubleshooting, using plugins & themes, and even developing plugins and themes, if you are technically minded. AggieNetwork.com Hosting User Manual | 121 505 George Bush Drive College Station, Texas 77840 (979) 845-7514 hosting.AggieNetwork.com