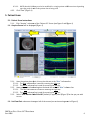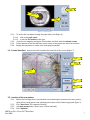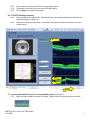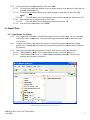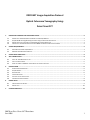
1
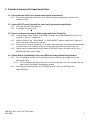
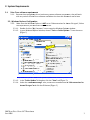
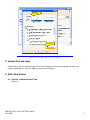
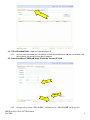
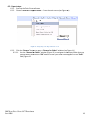
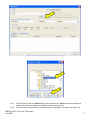
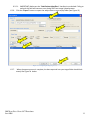
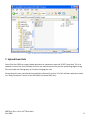
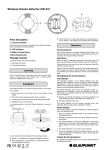
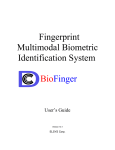
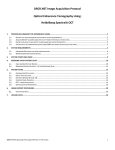
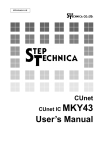
DRCR.NET Image Acquisition Protocol
Optical Coherence Tomography Using:
Zeiss Cirrus OCT
1.
PROCEDURE SUMMARY FOR EXPERIENCED USERS ...................................................................................................................2
1.1.
1.2.
1.3.
1.4.
2.
ENSURE THAT YOUR ZEISS CIRRUS SYSTEM MEETS SYSTEM REQUIREMENTS .............................................................................................. 2
ACQUIRE SD OCT SCAN(S)/RESCAN(S) FOR STUDY EYE(S) PER PROTOCOL SPECIFICATION ........................................................................... 2
EXPORT SCAN DATA TO NEW EMPTY FOLDER NAMED WITH STUDY ID AND VISIT ....................................................................................... 2
UPLOAD DATA TO COORDINATING CENTER USING DRCR.NET IMAGE UPLOAD CLIENT SOFTWARE ............................................................... 2
SYSTEM REQUIREMENTS ..........................................................................................................................................................3
2.1.
2.2.
ZEISS CIRRUS SOFTWARE REQUIREMENTS .......................................................................................................................................... 3
WINDOWS EXPLORER CONFIGURATION ............................................................................................................................................ 3
3.
SYSTEM START AND LOGIN ......................................................................................................................................................4
4.
ADD A NEW PATIENT ................................................................................................................................................................4
4.1.
4.2.
4.3.
5.
PATIENT EXAM .........................................................................................................................................................................6
5.1.
5.2.
5.3.
5.4.
5.5.
5.6.
6.
PATIENT EXAM INSTRUCTIONS ........................................................................................................................................................ 6
ACQUIRE SCREEN ......................................................................................................................................................................... 6
IRIS VIEW PORT ........................................................................................................................................................................... 6
FUNDUS VIEW PORT..................................................................................................................................................................... 7
LOCATION OF THE SCAN PATTERN .................................................................................................................................................... 7
THE OCT WILL BEGIN SCANNING ..................................................................................................................................................... 8
EXPORT DATA...........................................................................................................................................................................9
6.1.
6.2.
7.
CLICK THE “ADD NEW PATIENT” TAB ............................................................................................................................................... 4
FILL IN ALL BOLDED FIELDS ............................................................................................................................................................. 5
ENTER THE SUBJECT’S DRCR.NET STUDY ID INTO THE “PATIENT ID” FIELD ............................................................................................. 5
TARGET EXPORT FILE SYSTEM ......................................................................................................................................................... 9
EXPORT STEPS ........................................................................................................................................................................... 10
UPLOAD EXAM DATA ............................................................................................................................................................. 13
DRCR.net Zeiss Cirrus OCT Procedures
June 2009
1
1. Procedure Summary for Experienced Users
1.1. Ensure that your Zeiss Cirrus system meets system requirements
1.1.1.
See System Requirements (Section 2) for details on system configuration and minimum
software version
1.2. Acquire SD OCT scan(s)/rescan(s) for study eye(s) per protocol specification
1.2.1.
1.2.2.
Scan type: Macular Cube 512x128
Scan Signal Strength > 6/10
1.3. Export scan data to new empty folder named with Study ID and Visit
1.3.1.
1.3.2.
1.3.3.
1.3.4.
Example folder names include “J039-0246RU 10 week” and “O039-0246RU Zeiss Cirrus” for
protocol “J” and “O”, respectively.
Subject’s Study ID (e.g. “J039-0246RU” or “O039-0246RU”) must be saved in the “Patient ID”
field of the patient record prior to export
Export the scan data for the subject. At present, you must export all scan data associated with
a subject; there is no capability to select just the scans associated with a particular visit.
Export process should automatically produce a DATAFILES folder, an Export.xml file, and a
ZDBDIR.IB file in the export folder
1.4. Upload data to Coordinating Center using DRCR.net Image Upload Client software
1.4.1.
This is an updated version of the same software that is used to upload DRCR.net fundus
photography data
1.4.1.1. You must download and install version 2.0 of this software, even if you already have the
older version installed for photography uploads.
1.4.2. Software can be obtained from the “Study Documents” section of DRCR Web site
(www.DRCR.net)
DRCR.net Zeiss Cirrus OCT Procedures
June 2009
2
2. System Requirements
2.1.
Zeiss Cirrus software requirements
2.1.1.
Because these procedures do not involve any custom software components, they will work
with any version of Zeiss Cirrus software available at the time this document was written.
2.2. Windows Explorer Configuration
2.2.1. Make sure that Windows
indows Explorer is NOT set to “Hide extensions for known file types”; follow
the steps below if you are unsure how to do this
this.
2.2.1.1. Double-click the “My Computer” icon to open the Windows Explorer window
2.2.1.2. In your Windows Explorer window, choose “Tools >> Folder Options…” from the menu
(Figure 1)
2.2.1.2
Figure 1:: Accessing the Tools >> Folder Options dialog box from a Windows Explorer window
2.2.1.3. In the “Folder Options” dialog box, click the “View” tab (Figure 2))
2.2.1.4. Under the “Advanced settings” tree, uncheck the checkbox next to “Hide extensions for
known file types” and click the OK button (Figure 2)
DRCR.net Zeiss Cirrus OCT Procedures
June 2009
3
2.2.1.3
2.2.1.4
Figure 2: Unchecking the "Hide extensions" checkbox
3. System Start and Login
Please refer to the user manual for your Zeiss Cirrus system to turn on the hardware and launch the
supporting software to reach the startup screen shown in Figure 3.
4. Add a New Patient
4.1. Click
lick the “Add New Patient” tab
(Figure 3)
DRCR.net Zeiss Cirrus OCT Procedures
June 2009
4
4.1
Figure 3 : Cirrus Window, Find Existing Patient
4.2. Fill in all bolded fields – these are required ((Figure 4).
4.2.1. You may enter whatever your site desires in these required fields as they are not utilized in file
data checking, but entry of some data is required.
4.3. Enter the subject’s DRCR.net Study ID into the “Patient ID” field
4.3
Error!
5.1.1
Figure 4: Cirrus Window, Add New Patient
4.3.1.
Example values include “J039
“J039-0246RU” for Protocol J or “O039-0246RU”
0246RU” for Protocol O
DRCR.net Zeiss Cirrus OCT Procedures
June 2009
5
4.3.1.1. NOTE that this field may need to be modified for a single patient at different times depending
upon the study for which the patient data is being used.
4.3.2.
Click “Save” (Figure 4)
5. Patient Exam
5.1. Patient Exam Instructions
5.1.1. Click
ck “Acquire” at bottom of the “P
“Patient ID” Screen (see Figure 3 and Figure 4)
5.2. Acquire Screen will be displayed ((Figure 5)
5.2.3
5.2.3
Figure 5: Acquire Screen
5.2.1. Have the patient place their chin on the chinrest at the “Blue”” indicator line.
line
5.2.1.1. The Blue indicator line is used for scanning the right eye
5.2.1.2. The white indicatorr line is used for scanning the left eye.
5.2.2. Have patient place forehead against forehead rest with the “Blue”” indicator line
5.2.2.1. The Blue indicator line is used for scanning the right eye
5.2.2.2. The white indicatorr line is used for scanning the left eye.
5.2.3. Select “Scan Macular Cube 512x128” (default) in upper panel (Figure 5)
5 for the eye you wish
to scan
5.3. Iris View Port: observe at the upper left of the screen (see section enlargement in Figure 6)
DRCR.net Zeiss Cirrus OCT Procedures
June 2009
6
5.3.1.2
5.3.1.1
5.3.2
Figure 6: Iris View Port
5.3.1. To center the scan beam through the pupil either: (see Figure 6)
5.3.1.1. click on the pupil center
5.3.1.2. or use the X-Y controls to the right
5.3.2. Focus the iris image by moving the chinrest back and forth with the chinrest arrows
5.3.3. Tell the patient to look for and fixate on the center of the green star within the machine
5.3.4. Realign the scan beam to a clear area of the pupil as needed
5.4. Fundus View Port: observe the area located at the lower left of the screen (Figure 7)
5.5.2
5.5.3
5.5.1
5.5.4
5.5.7
Figure 7: Fundus View Port
5.5. Location of the scan pattern
5.5.1.
Within the live image that is overlaid with a box indicating the location of the scan pattern,
there will be a small green cross indicating the location of the fixation target (see Figure 7).
5.5.2. Click “Auto Focus” for automatic focusing.
5.5.3. Use small arrows below “Auto Focus” to focus manually.
5.5.4. Click “Optimize”
DRCR.net Zeiss Cirrus OCT Procedures
June 2009
7
5.5.5.
5.5.6.
5.5.7.
Tell the patient to blink right before starting image capture
Tell patient to not blink once you start the image capture
Click “Capture” to capture the images
5.6. The OCT will begin scanning
5.6.1.
5.6.2.
Upon completion of scanning, the “Review Screen” will be displayed automatically with the
captured images (see Figure 8).
The purpose of the review screen is to evaluate scan quality and save or delete or retry the
image capture.
5.7
5.7.2.2
5.7.2
Figure 8: Review Screen
Error!
5.7. Review captured data to ensure it is of acceptable quality (see Figure 8)
5.7.1. Signal strength should be at least 6 or higher. Higher values are preferred where possible.
DRCR.net Zeiss Cirrus OCT Procedures
June 2009
8
5.7.2. If the captured scan iss of good quality, then click “Save”
5.7.2.1. This will return you to the Acquire screen to obtain another scan such as for the other eye
if needed (see Section 5.2)
5.7.2.2. If the scan is not of good quality (e.g. ssignal strength is lower than 5), then click “Try
Again”
5.7.2.2.1.
This will return you to the Acquire screen to obtain repeat scan (see Section 5.2)
5.7.2.3. When repeat scan is of good quality, click “Save”.
5.7.2.3.1.
This will return you to the Acquire screen (see Section 5.2)
5.2
5.7.2.4. Once all scans are obtained, click “Finish”
6. Export Data
6.1. Target Export File System
6.1.1.
Your target export file system may be fixed media (C: drive, network drive, etc.) or removable
media (CDs, DVDs, USB devices). If you are exporting to removable media, insert the media
into its drive
ate a new folder on the export file system to contain all the exported data for a single
6.1.2. Create
patient visit, including data for both eyes (if required by protocol) and rescan data (if required
by protocol)
6.1.3. Name the new folder using the patient’s Study ID code aand
nd visit name; for example:
6.1.3.1. “J039-0246RU
0246RU 10 week” for a 10 week follow
follow-up
up visit in protocol J (Figure
(
9)
6.1.3.2. “O039-0246RU
0246RU Zeiss Cirrus” or “O039
“O039-0246RU
0246RU Heidelberg Spectralis” for one of the
machine-specific
specific visits in Protocol O
Figure 9: Example export folder on local (C:) drive
DRCR.net Zeiss Cirrus OCT Procedures
June 2009
9
6.2. Export steps
6.2.1.
6.2.2.
Start up the Zeiss Cirrus software
Choose “Records >> Export Exams…” from the main menu (see Figure 10)
10
Figure 10: Navigating to the Export Exams screen
6.2.3. Click the “Browse” button to open a “Browse for Folder” window (see Figure 11)
6.2.3.1. Use the “Browse for Folder” window (Figure 12)) to navigate to the empty folder that you
created above and click the “OK” button so that your folder name appears in the “Path”
field (Figure 13
DRCR.net Zeiss Cirrus OCT Procedures
June 2009
10
6.2.3
Figure 11: Specifying your empty folder as the target for export
6.2.3.1
6.2.3.1
Figure 12: Navigating to empty folder and selecting it
6.2.4.
6.2.5.
Enter Subject ID into the “Patient ID” text box and click the “Search” button to display the
patient record for your subject in the Results panel (see Figure 13)
Click the subject record listed in the Results panel to highlight it for export (see Figure 13)
DRCR.net Zeiss Cirrus OCT Procedures
June 2009
11
6.2.5.1. IMPORTANT: Make sure the “Omit Patient Identifiers” checkbox is unchecked. Failing to
uncheck this field will cause an error during DRCR.net Image Upload process.
6.2.6. Click the “Export” button to export the subject data to your empty folder (see Figure 13)
6.2.5.1
6.2.4
6.2.4
6.2.5
6.2.6
Figure 13: Completing the Export process
6.2.7.
When the export process is complete, the data exported into your target folder should look
exactly like Figure 14 below.
DRCR.net Zeiss Cirrus OCT Procedures
June 2009
12
Figure 14: Filesystem contents following data export of scans
7. Upload Exam Data
You will use the DRCR.net Image Upload application to upload your exported SD OCT study data. This is an
updated version of the same software that your site may have previously used to upload large digital image
files associated with Photography or Fluorescein Angiogram visits.
Please obtain the user manual and the installation software for version 2.0 of this software application under
the “Study Documents” section of the DRCR Web site (www.DRCR.net).
DRCR.net Zeiss Cirrus OCT Procedures
June 2009
13