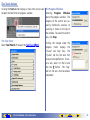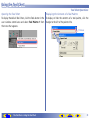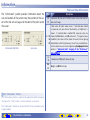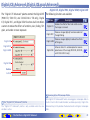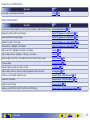
1
Nikon Scan 4 Reference Manual
Read This First ........................................................................................2–11
Introduction ............................................................................................. 2–5
Scanning Basics.............................................................................................6
Getting Started .......................................................................................7–10
Elements of Nikon Scan...............................................................................11
The Scan Window .................................................................................12–29
The Tool Chest ..................................................................................... 30–76
Preferences.........................................................................................77–105
Image Windows................................................................................106–126
Nikon View ...............................................................................................127
Scan Index ........................................................................................ 128–131
Appendices ....................................................................................... 131–139
Introduction
About This Manual
Welcome to Nikon Scan! Nikon Scan is used to control
Nikon scanners from a computer. It can be used to preview
images and adjust scanner settings before scanning, giving
the user control over advanced features supported by Nikon
film scanners, including:
• The Scan Image Enhancer automatically adjusts hue to
produce images with clear contrast (9000 ED, 5000 ED,
COOLSCAN V ED only)
• Digital ICE detects, analyzes, and automatically compensates for scratches and dust
• Digital ROC digitally restores faded colors in old film
• Digital GEM automatically corrects for film grain, smoothing pictures taken with high-speed film
• Digital DEE reveals details in shadows of backlit and underexposed shots and increases contrast in “washed-out”
areas of highlights to produce natural-looking exposure
(9000 ED, 5000 ED, COOLSCAN V ED only)
Nikon Scan also supports batch scanning and can be used
to scan images directly into third-party applications such as
Adobe Photoshop.
Read This First — Introduction
This manual has been written to guide the user through the
process of scanning and enhancing images. For information on how to perform specific tasks, see the “Scanning
Guide.” For information on specific elements of the Nikon
Scan interface, see “The Scan Window,” “The Tool Chest,”
“Preferences,” and “Image Windows.” For troubleshooting
information and a glossary of imaging terminology, see the
appendices.
Trademark Information
Adobe and Acrobat are registered trademarks of Adobe Systems Inc.
Apple, the Apple logo, Macintosh, and Mac OS are registered trademarks of Apple Computer, Inc. Digital ICE4 AdvancedTM is Digital ICETM,
Digital ROCTM, Digital GEMTM and Digital DEETM. Digital ICE4 AdvancedTM
are technologies developed by Applied Science Fiction. Pentium is a
trademark of Intel Corporation. Microsoft and Windows are registered
trademarks of Microsoft Corporation. Radius, ColorMatch, and PressView are registered trademarks of miro displays, inc. All other trade
names mentioned in this manual or the other documentation provided
with your Nikon product are trademarks or registered trademarks of
their respective holders.
2
To make it easier to find the information you need, the fol- Use the following buttons and links to navigate the manual:
lowing symbols and conventions are used:
Click to go back one page.
This icon marks cautions, information that should be
Click to go forward one page.
read before use to prevent damage to the scanner.
Click to go to the beginning of the section.
TOP
This icon marks notes, information that should be read
Click to return to the table of contents.
before using Nikon Scan.
Blue underlined text indicates a link to anThis icon marks tips, additional information that may
other part of this manual or the World Wide
be helpful when using Nikon Scan.
Web. Click the text to follow the link (note
and/or
blue under- that a web browser and an Internet connecThis icon indicates that more information is available
lined text tion are required to link to the World Wide
elsewhere in this manual or in other documentation.
Web).
Illustrations
Save where otherwise noted, the illustrations in this manual show the
menus and dialogs displayed when the SUPER COOLSCAN 5000 ED
is used under Windows XP. Illustrations from Mac OS X are included
where operations for Windows and Macintosh versions differ.
Background Knowledge
This manual assumes familiarity with operations common to the Macintosh and Windows operating systems. Refer to the documentation
provided with the operating system if in doubt concerning the meaning
of any of the terms used here.
Printing This Manual
To print this manual for ease of reference, select Print… from the Adobe Acrobat Reader File menu and specify the desired page range.
Read This First — Introduction
Life-Long Learning
As part of Nikon’s “Life-Long Learning” commitment to ongoing product support and education, continually-updated information is available
on-line at the following sites:
• For users in the U.S.A.: http://www.nikonusa.com/
• For users in Europe:
http://www.nikon-euro.com/
• For users in Asia, Oceania, the Middle East, and Africa:
http://www.nikon-asia.com/
Visit these sites to keep up-to-date with the latest product information,
tips, answers to frequently-asked questions (FAQs), and general advice
on digital imaging and photography. Additional information may be
available from the Nikon representative in your area. See the URL below
for contact information: http://www.nikon-image.com/eng/
TOP
3
System Requirements
Nikon Scan must be installed before the scanner can be used to scan images. See the documentation provided with the
scanner for complete installation instructions. Before installing Nikon Scan, make sure that the computer satisfies the following system requirements:
Windows
CPU
300 MHz Pentium or better
OS
Preinstalled versions of Windows XP, Windows 2000 Professional, Windows Me, Windows 98 SE
RAM*
128 MB or more (512 MB or more recommended)
Hard-disk space†
A minimum of 40 MB required for installation (200 MB recommended), with an additional 200 MB of free disk space available while Nikon Scan is running.
Video resolution
800 × 600 pixels or more with 16-bit color (High Color) or more.
Interface
Miscellaneous
USB‡
Built-in USB 1.1/USB 2.0 ports
IEEE 1394 OHCI-compliant IEEE 1394 interface required.
CD-ROM drive required for installation.
*More memory may be required depending on film type, scan size, resolution, bit depth, the number of scans performed in each session, the
film holder or adapter used, and on whether Digital ROC, Digital GEM or Digital DEE is used. A system with more than the minimum amount of
memory is recommended.
†More free disk space may be required depending on the film type and number of frames. Nikon recommends having as much free disk space as
possible when running Nikon Scan.
‡Depending on the type of interface installed, USB will operate at high speed (USB 2.0 only; maximum transfer rate 480 Mbps) or full speed (USB
1.1/USB 2.0; maximum transfer rate 12 Mbps). Windows XP and Windows 2000 Professional computers with a USB 2.0 interface support highspeed USB. For more information, consult the manufacturer.
Additional information technical and support information may be available at the Nikon web sites listed in this manual (
Read This First — Introduction
TOP
3).
4
Macintosh
CPU
Power PC G3 or later (G4 or later recommended)
OS*
Mac OS 9 (9.1 or later), Mac OS X (10.1.5 or later)
RAM†
• Mac OS 9: 64 MB or more (256 MB or more recommended)
• Mac OS X: 128 MB or more (512 MB or more recommended)
Hard-disk space‡
A minimum of 70 MB required for installation (200 MB recommended), with an additional 200 MB (Mac OS 9) or 550 MB
(Mac OS X) of free disk space available while Nikon Scan is running.
Video resolution
800 × 600 pixels or more with 16-bit color (thousands of colors) or more.
Interface
Miscellaneous
USB**
Built-in USB 1.1 ports, USB 2.0.††
Firewire Only built-in Firewire ports supported.
CD-ROM drive required for installation.
*For the latest information on supported versions of Mac OS, see the Nikon web sites listed in this manual ( 3).
†More memory may be required depending on film type, scan size, resolution, bit depth, the number of scans performed in each session, the
film holder or adapter used, and on whether Digital ROC, Digital GEM or Digital DEE is used. A system with more than the minimum amount of
memory is recommended.
‡More free disk space may be required depending on the film type and number of frames. Nikon recommends having as much free disk space as
possible when running Nikon Scan.
**Depending on the type of interface installed, USB will operate at high speed (USB 2.0 only; maximum transfer rate 480 Mbps) or full speed (USB
1.1/USB 2.0; maximum transfer rate 12 Mbps). Mac OS X computers with a USB 2.0 interface support high-speed USB. For more information,
consult the manufacturer. Users of Mac OS X whose computer is not equipped with USB 2.0 can install a RATOC PCIU3U USB 2.0 interface
board (for more information, visit Ratoc Systems English-language web-site at http://www.ratocsystems.com/english/index.html).
††The computer may fail to recover from sleep mode when a 5000 ED, COOLSCAN V, or COOLSCAN IV is connected via USB 2.0. To prevent the
computer from entering sleep mode, select System Preferences… from the Apple menu, open the “Energy Saver” pane (in Mac OS 9, select
Energy Saver from the Control Panels sub-menu in the Apple menu), and set the Put system to sleep whenever it is inactive for slider to
Never.
Additional technical and support information may be available at the Nikon web sites listed in this manual (
Read This First — Introduction
3).
TOP
5
Scanning Basics
Scanning Images with Nikon Scan
Required
Hardware
Nikon Scan
1 Open the scan window
2 Insert film
See the scanner User’s Manual for
details.
5 Scan
Scan
Click the Scan button to scan the
images. The images will be opened
in windows in the host application.
3 Preview
Preview
Nikon film scanner
To use Nikon Scan as a “stand-alone”
application, select Nikon Scan from
the Start menu (Windows) or double-click the Nikon Scan icon.
Film
Click the Preview button to preview
images in the scan window.
4 Adjust settings
Scan window
Adapter and/or
film holder
After installing Nikon
Scan and Nikon
View, connect the
scanner and ready
the film and adapter
or film holder. See
the scanner User’s
Manual for more information.
6 Save
Save the pictures using the Save or
Save As… command in the host application.
To use Nikon Scan to scan images
into third-party applications such as
Adobe Photoshop, select Nikon Scan
from the application’s list of acquire
or import sources.
Read This First — Scanning Basics
Nikon View
Tool Chest
Use the tools in the scan window
and Tool Chest to adjust settings and
enhance pictures before scanning.
Use Nikon View to organize saved
pictures.
TOP
6
Getting Started
Before Scanning
Supported Scanners and Film
Nikon Scan 4 supports the following scanners:
• SUPER COOLSCAN 9000 ED (9000 ED)
• SUPER COOLSCAN 5000 ED (5000 ED)
• COOLSCAN V ED
• SUPER COOLSCAN 8000 ED (8000 ED)
• SUPER COOLSCAN 4000 ED (4000 ED)
• COOLSCAN IV ED
The following types of film can be scanned:
Scanner
Film holder/adapter
Film
FH-835M
35-mm slides
FH-835S
35-mm film
FH-869S
5000 ED
4000 ED
COOLSCAN V ED
COOLSCAN IV ED
5000 ED
4000 ED
Medium-format (120/220, 2¼ or Brownie) film, electron microscope film
FH-869G
9000 ED
8000 ED
FH-896GR
Medium-format (120/220, 2¼ or Brownie) film, electron microscope film, 35-mm panorama film
FH-869M
Medium-format (120/220, 2¼ or Brownie) slides
FH-816
16-mm film
FH-8G1
Glass microscope slides
MA-21/MA-20 (S)
35-mm slides (batch scans and thumbnail preview not supported)
SA-21
35-mm film (in strips of 2–6 frames)
FH-3
35-mm film (in strips of 1–6 frames; batch scans and thumbnail preview not supported)
IA-20 (S)
APS (IX-240) film cartridges
FH-G1
Glass microscope slides (batch scans and thumbnail preview not supported)
SA-30
35-mm film (in strips of 2–40 frames)
SF-210/SF-200 (S)
35-mm slides (up to 50 slides 1.5 mm thick; thumbnail preview not supported)
Read This First — Getting Started
TOP
7
Starting Nikon Scan
Before scanning, complete the following steps (see the scanner documentation for details):
• Install Nikon Scan
• Connect the power and interface cables
• Turn the scanner on and insert the adapter, and/or place film in the film holder
Nikon Scan can be used as a “stand-alone” application to scan, process, print, and save images, or it can be used to scan
images into a third-party application such as Adobe Photoshop, where the images can then be processed, printed, or saved.
The application in which images are displayed after scanning is known as the “host application.”
Operation
Nikon Scan used as “stand-alone” application
Third-party host application
Opening the
scan window
Open the Start menu and select Nikon Scan 4 from the pro- Select Nikon Scan from the application’s list of “Acquire” or
gram list (Windows only) or double-click the Nikon Scan icon “Import” sources. For more information, see the documentain the install destination folder.
tion provided with the application.
Scanning
Images are previewed in the Nikon Scan scan window and modified using the tools in the Tool Chest. Scan settings are adjusted
in the scan window and “Preferences” dialog. When preview is complete, click the Scan button to scan the images into image
windows in the host application.
Processing
Images are processed in Nikon Scan.
Saving images Images are saved from Nikon Scan.
Images are processed in the third-party application.
Images are saved from the third-party application.
Starting Nikon Scan as a “Stand-Alone” Application (Windows)
If a shortcut was created during installation, Nikon Scan can be started by double-clicking the Nikon Scan icon on the desktop.
Starting Nikon Scan as a “Stand-Alone” Application (Macintosh)
If Nikon Scan was added to the Dock or an alias was created during installation, Nikon Scan can be started by clicking the Nikon Scan icon in the
Dock (Mac OS X) or by double-clicking the alias on the desktop (Mac OS 9).
Calibration (9000 ED, 8000 ED)
When the 9000 ED is turned on, the status LED will blink for one to two minutes while the scanner is calibrated. Do not start Nikon Scan until the
status LED has stopped blinking. In the case of the 8000 ED, calibration is not performed until Nikon Scan is started. Do not use the controls in
the scan window or Tool Chest until the status LED has stopped blinking.
Read This First — Getting Started
TOP
8
Starting Nikon Scan as a “Stand-Alone” Application
The scan window opens on the desktop and menus for the
Nikon Scan application appear in the Nikon Scan application
window (Windows) or menu bar (Macintosh). The Tool Chest
will also be displayed the first time Nikon Scan is used.
Starting Nikon Scan from a Third-Party Application
Selecting Nikon Scan from the application’s list of acquire or
import sources opens the scan window. If this is the first time
Nikon Scan is used, the Tool Chest will also be displayed.
Tool Chest
Tool Chest
Scan window
Scan window
Nikon Scan application window (Windows only)
Read This First — Getting Started
Third-party application (illustration shows Adobe
Photoshop)
TOP
9
Macintosh
Opening the Scan Window from Nikon Scan
When Nikon Scan is used as a “stand-alone” application, the • Select the scan window from the Tools menu.
scan window can be opened by selecting the scan window
from the Nikon Scan Tools menu. Use this option if the scan
window has been closed after scanning.
Windows
• Select the scan window from the Tools menu.
• Select Open Twain Source from the File menu.
• Click the
icon in the toolbar.
Read This First — Getting Started
TOP
10
Elements of Nikon Scan
Getting to Know Nikon Scan
The Nikon Scan interface includes the windows identified below. Click the links for more information.
Progress window ( 22)
Shows the status of current tasks and lists operations that have been or are
about to be performed.
Image windows ( 106)
Images are opened in image windows after scanning, where they can be
enhanced, printed, and
saved.
Scan window ( 12)
This is where images are previewed and modified before
scanning.
Read This First — Elements of Nikon Scan
Tool Chest ( 30)
The Tool Chest contains
tools for scanning and
enhancing images.
Preferences ( 77)
The “Preferences” dialog controls scan window settings.
TOP
11
The Scan Window
The Scanner-Computer Interface
The parts of the scan window are identified below. Click the links for more information.
Thumbnail drawer tab ( 23)
Click to display the thumbnail area, where multiple
frames can be selected for preview or scanning.
Title bar
Shows the scanner currently
connected.
Control area ( 13)
Contains frequently used scanning and preview controls.
Information panel ( 25)
Lists information on current
settings.
Preview button ( 26)
Click to view selected frames
in the preview area.
Scan button ( 28)
Click to scan the selected frames.
The Scan Window
Preview area ( 27)
Preview images before scanning.
Interactive help
(Windows only)
Displays a brief tip about the
control under the cursor.
Interactive help text and tool
tip for the Preview button
12
The Control Area
Scan Window Controls
The scan window control area contains frequently-used preview and scan controls. Click the links below for more information about the buttons and menus in the control area.
Name
Eject button (
Control
14)
Autofocus button (
Description
Eject the film or holder.
15)
Autoexposure button (
16)
Focus the scanner on the point selected with the
focus tool.
Optimize exposure automatically.
Zoom buttons (
16)
Zoom the crop selected in the preview area in or
out.
Settings menu (
17)
Save, reset, and load scan window settings.
Film type menu (
19)
Specify the type of film to be scanned.
Color model menu (
20)
Frame size menu ( 20)
(9000 ED/8000 ED only)
Preferences button (
21)
Choose to scan images in color or grayscale.
Specify the film frame size.
Open the “Preferences” dialog.
Help button (
21)
View help.
Tools button (
22)
Display the Tool Chest or progress window.
The Scan Window — The Control Area
TOP
13
The Eject Button
The
(eject) button ejects film
holders or ejects or rewinds film
as described below.
5000 ED/4000 ED/COOLSCAN V ED/COOLSCAN IV ED
The operation performed by the
button varies depending
on the adapter used.
Adapter
MA-21/MA-20 (S)
9000 ED/8000 ED
Clicking the
button ejects film holders from the scanner.
SA-21
Description
Eject button not available.
Ejects film from adapter.
IA-20 (S) (available separately)
Rewinds film.
SA-30 (available separately for
5000 ED and 4000 ED)
Ejects film from adapter.
Ejects current slide and feeds a
new one. To eject current slide
SF-210/SF-200 (S)
(available separately for 5000 ED without feeding a new slide, press
Ctrl (Windows) or option (Macinand 4000 ED)
tosh) while clicking eject button.
MA-21/MA-20 (S)
When the MA-21/MA-20 (S) is inserted in the scanner, the
button is
grayed out and unavailable. Use the eject button on the adapter.
The Scan Window — The Control Area
TOP
14
The Autofocus Button
Clicking the (autofocus) button
focuses the scanner on a selected
point (if no focus point has been
selected, the scanner will focus
on the center of the frame).
To select a new focus point, click the
button while pressing the Ctrl (Windows) or option (Macintosh) key. The cursor will take the shape of a set of cross hairs ( ). Move the
cursor over the point in the preview image that will be used
as the new focus point and click to focus the scanner on the
selected point.
Autofocus Preferences
Depending on the options selected in the “Preferences” dialog, an autofocus operation may be performed automatically when the focus point
is moved or an image is previewed or scanned:
• If Perform autofocus when focus point is moved is selected in the
“Automatic Actions” category of the “Preferences” dialog, the scanner will automatically refocus when a new focus point is selected using
the Focus Tool.
• If Auto focus is selected for “Before scan” in the “Single Scan”
category of the “Preferences” dialog, an autofocus operation will automatically be performed when the Scan button is clicked to scan a
single image.
• If a batch scan is performed when Auto focus is selected for “Before
each image” in the “Batch Scan” category of the “Preferences” dialog,
the scanner will automatically perform an autofocus operation before
each scanning each image.
• If Auto focus is selected for “Settings to be applied to preview”
in the “Preview Settings” category of the “Preferences” dialog, an
autofocus operation will automatically be performed when a frame is
previewed.
The Focus Tool
The focus point can be moved using the Focus Tool in the “Layout Tools”
palette. Click the
button in the “Layout Tools” palette to select the
Focus Tool, then click in the preview image to select a focus point.
The Scan Window — The Control Area
TOP
15
The Autoexposure Button
The Zoom Buttons
At default settings, the scanner
automatically adjusts exposure
as necessary before displaying
images in the preview area. The
(autoexposure) button is only
required if autoexposure has been
turned off by removing the check from the Auto exposure
for positive film or Auto exposure for negative film
options in the “Single Scan,” “Batch Scan,” or “Preview Settings” categories of the “Preferences” dialog. In these cases,
click the button before performing the selected operation
(single scan, batch scan, or preview) on film of the affected
type (positive or negative).
Click the
button to zoom in on
the current crop, enlarging it to fill
the preview area. If a smaller selection is made within the original
crop, clicking the
button will
zoom the new selection in to fill
the preview area. To zoom out
to the previous view, click the
button.
Preview Image Quality
The image in the preview area may seem rough and uneven at high
zoom ratios. This can be cured by clicking the Preview button to preview the image at the new zoom ratio.
The Scan Window — The Control Area
TOP
16
The Settings Menu
The settings menu can be used to
save and export the following settings and recall them as desired:
• the current scanner, film type,
color model, and the location
and dimensions of the current
crop
• all settings in effect in the Tool
Chest, including image orientation, curves, color balance, LCH
Editor, Unsharp Mask, and Digital ICE4 Advanced settings
The Scan Window — The Control Area
Tool Palette Settings Menus
The settings for the “Crop,” “Curves,” “Color Balance,” “LCH Editor,”
“Unsharp Mask,” and “Digital ICE4 Advanced” palettes can be saved
and recalled separately using the palette settings menu.
“Save Settings…” / “Export Settings…”
To save settings for the current image, use the Save Settings… or Export Settings… options before previewing another image.
TOP
17
The settings menu contains the following options:
Option
Description
Saves current settings under a user-specified name.
Save
Saved settings will be added to the end of the settings
Settings… menu.
Set User
Settings
Saves current settings as user default settings, which can
be recalled by selecting “reset to user settings” options
in the scan window or tool palette settings menus. Settings created with the SA-21, IA-20 (S), or SA-30 can be
used with any of these adapters, while settings created
with the 9000 ED/8000 ED apply to all film holders.
Option
Description
Last Saved Restores the most recent settings created with Save
Settings Settings…, Set User Settings, or Export Settings….
To apply saved settings to selected thumbnails or to the
Saved
image in the preview window, select the desired settings
settings list from the list at the end of the settings menu.
Export Exports current settings to a user-specified location.
Settings… Settings files have the extension “.set”.
Import Imports settings created with the Export Settings…
Settings… option.
Delete Displays dialog where settings created with Save SetSettings… tings… can be selected for deletion.
Clear User Deletes user defaults created with the Set User SetSettings tings option.
Restore
Factory
Defaults
Restores the settings in effect at installation.
Restores user default settings created with Set User
Settings. Settings created with the SA-21, IA-20 (S),
Reset User or SA-30 can be used with any of these adapters, while
Settings settings created with the 9000 ED/8000 ED apply to all
film holders.
The Scan Window — The Control Area
Settings for Other Adapters or Scanners
The maximum crop size and other settings differ depending on the
adapter and scanner used. When settings for a different scanner or
adapter are selected from the settings menu, only those options that
apply to the current adapter are affected.
TOP
18
The Film Type Menu
Choose the type of film to be scanned
from the options in the film type
menu.
9000 ED/8000 ED
The film type menu is only available when a film holder is inserted in
the scanner.
Glass Microscope Slides
Select Positive when scanning glass microscope slides with the optional
FH-G1 or FH-8G1 film holder.
Option
Description
Positive
Use with most makes of positive slides and reversal
film. These films have a black film base, and the image
in each frame appears in its actual colors.
Use with color film negatives. Color negatives can be
Neg (Color) identified by their orange-tinted film base and by the
fact that the colors in the images are reversed.
Neg (Mono) Use with black-and-white negatives.
Use with Kodachrome positives. Kodachrome film is
manufactured by Eastman Kodak and is usually mountKodachrome ed in cardboard or plastic slide mounts embossed or
printed with the label “Kodachrome.”
The Scan Window — The Control Area
TOP
19
The Color Model Menu
The Frame Size Menu (9000 ED/8000 ED Only)
Choose whether to scan images in
color or monochrome (grayscale).
The options available depend on
whether the Nikon Color Management System (CMS) in on (the default
setting) or off.
When scanning medium-format (120/
220, 2¼ or Brownie) film using the FH869S or optional FH-869G film holder,
select the frame size from the options
below (with other holders, the appropriate frame size is selected automatically). The maximum length of the film
strip that can be scanned in these holders depends on the frame size.
The color-model
menu (CMS on)
Option
Description
Grayscale
Choose when scanning images that will be printed
or displayed in monochrome.
Calibrated RGB Choose when scanning images that will be printed in
(CMS on)
color or edited or displayed on a computer monitor.
RGB
(CMS off)
Use to edit raw RGB data from the scanner.
Frame size
Maximum length
6 × 4.5 (cm)
Four frames
6 × 6 (cm)
Three frames
6 × 7 (cm)
6 × 8 (cm)
Two frames
6 × 9 (cm)
Nikon Color Management
Color management systems using ICC profiles ensure consistent color
reproduction among devices such as scanners, monitors, and printers.
The Nikon Color Management System is one such ICC profile system,
and functions to ensure that colors from the scanner are reproduced
accurately on the monitor. See the “Nikon Color Management System”
( 78) for details.
Calibrated RGB/RGB
Calibrated RGB is available when Use Nikon Color Management
is selected in the “Color Management” category of the “Preferences”
dialog, RGB when it is not.
The Scan Window — The Control Area
TOP
20
The Preferences Button
The Help Button
Clicking the Prefs (preferences)
button displays the “Preferences”
dialog ( 77).
Clicking the Help button displays
the Nikon Scan help dialog.
“Nikon Scan Help” dialog
“Preferences” dialog
Using Nikon Scan as a Stand-Alone Application
The “Preferences” dialog can also be opened by selecting Preferences… from the Edit menu (Windows, Mac OS 9) or the Nikon Scan
application menu (Mac OS X).
The Scan Window — The Control Area
TOP
21
The Tools Button
Clicking the Tools button displays a menu that can be used The Progress Window
to open the Tool Chest or progress window.
Selecting Progress Window
opens the progress window. The
progress of the current task (acquiring thumbnails, preview, or
scanning) is shown at the top of
the window. To cancel the current
task, click Stop.
The Tool Chest
Clicking the triangle under the
Select Tool Palette 1 to open the Tool Chest ( 30).
progress meter displays the
“Queue” and “Log” tabs. The
“Queue” tab lists the tasks that
have yet to be performed. To cancel a task, select it in the list and
click the
button. The “Log”
tab lists the tasks that have been
completed.
The Scan Window — The Control Area
TOP
22
The Thumbnail Drawer Tab
Selecting Frames
If the current adapter or film holder supports thumbnail previews, the frames to be scanned can be selected from the
thumbnail drawer. Click the thumbnail drawer tab to open the
thumbnail drawer. By default, frames are listed by number; to
display the frames as small “thumbnail” previews, click the
button. Frames can be selected for preview or scanning by
clicking the associated frame number or thumbnail. To select
multiple frames for a “batch” scan, click each frame while pressing the Ctrl (Windows) or command (Macintosh) key, or press
the shift key and click two images to select these images and all
frames between them.
Click to display thumbnails
Frame
numbers
Thumbnail
drawer tab
Thumbnail drawer
Click to hide thumbnails
Click to close
thumbnail
drawer
Selected thumbnail
Drag to resize
thumbnail
drawer
Film Holders and Adapters That Do Not Support Thumbnail Previews
The following film holders and adapters do not support thumbnail previews: MA-21 / MA-20 (S) (5000 ED, 4000 ED, COOLSCAN V ED, COOLSCAN
IV ED), SF-210 / SF-200 (S) (available separately for the 5000 ED and 4000 ED), and FH-869GR (available separately for the 9000 ED and 8000 ED).
The thumbnail drawer tab is not displayed when these adapters and holders are inserted in the scanner.
Batch Scans
Batch scans are supported with the following film holders and adapters:
9000 ED/8000 ED
5000 ED/4000 ED/COOLSCAN V ED/COOLSCAN IV ED
FH-835M
FH-835S
FH-869S
FH-869G (available separately)
SA-30 (available separately for 5000 ED and 4000 ED)
FH-869M (available separately)
FH-816 (available separately)
SF-210 / SF-200 (S)
(available separately for 5000 ED and 4000 ED)
FH-8G1 (available separately)
The Scan Window — The Thumbnail Drawer Tab
SA-21
IA-20 (S) (available separately)
TOP
23
High-Contrast Images
Thumbnails may have unusual coloration if the associated image is very high contrast. The preview image and final scan are unaffected.
Film Offset
Thumbnails generated with the FH-869S, FH-869G, SA-21, or SA-30 may be slightly out of position. Use the Strip Film Offset control in the
“Scanner Extras” palette to adjust thumbnail position.
Frame Count
The frame number display for the SA-21 (supplied with the 5000 ED, 4000 ED, COOLSCAN V ED, and COOLSCAN IV ED) always contains six frames
regardless of the actual number of frames in the film strip, while the frame number display for the SA-30 (available separately for the 5000 ED and
button is clicked to create thumbnail pre4000 ED) always contains forty frames. The correct number of frames will be displayed when the
views. Both the frame number and thumbnail displays for the 9000 ED and 8000 ED contain as many frames as there are apertures in the holder,
even if some apertures are empty.
The Thumbnail Display
The thumbnail display is stored in memory until new film is inserted in the scanner.
The Scan Window — The Thumbnail Drawer Tab
TOP
24
The Information Panel
Image Information
The information panel provides information about the image in the preview area.
Area
Orientation
Description
See also
Shows the orientation of the preview image, reflecting any flips or rotations that have been performed.
• Layout Tools (
If the image has been flipped, the letter “R” will be
shown in red.
33)
Dimensions/File size
Gives the height and width of the current crop in pixels, and the size of the file that will result if the crop is • Crop (
scanned at the current output size and resolution.
Image enhancement
Scanner extras
Color values
36)
Shows the status of analog gain, Digital ICE4 Ad• Analog Gain ( 69)
vanced, and the Scan Image Enhancer. A warning
•Digital ICE4 Advanced (
icon will be displayed if the preview image has not
•Scan Image Enhancer (
been updated to reflect changes to these settings.
Indicates the current bit depth (which determines the
number of colors in the image) and whether multi• Scanner Extras (
sample scanning (9000 ED, 8000 ED, 5000 ED, and
4000 ED only) is in effect.
61)
70)
71)
Lists the color values for the point under the cursor.
• Curves ( 41)
If changes are made to the settings listed at right, the
• Color Balance ( 51)
colors in the “Natural” tab will be listed in the top row,
• LCH Editor ( 56)
the colors in the “Processed” tab in the bottom row.
The Scan Window — The Information Panel
TOP
25
The Preview Button
Previewing Images
Click the Preview button to view the image to be scanned in the preview area. If multiple frames are selected in the thumbnail drawer, a preview will be performed for each frame. Click the selected thumbnails in the thumbnail drawer to switch
back and forth between previews.
Preview
button
Preview area
Updating Previews
Be sure to click the Preview button to update the image after selecting a new frame size (9000 ED/8000 ED only) or film type, or after making
changes to Digital ICE settings in the “Digital ICE4 Advanced” palette or to the Strip Film Offset option in the “Scanner Extras” palette.
The Scan Window — The Preview Button
TOP
26
The Preview Area
Previewing the Effects of Changes to Settings
The preview image created when the Preview button is clicked is displayed in the preview area. The preview area contains
two panels: a “Natural” panel showing the unprocessed image and a “Processed” panel that shows the effects of any
changes to settings. Click the “Natural” and “Processed” tabs for a quick “before-and-after” comparison that helps determine whether changes to settings are having the desired effect.
“Processed” (shows changes to settings)
“Natural” (unprocessed image)
Switching Between the “Natural” and “Processed” Panels
When Nikon Scan is used as a stand-alone application, the Show Natural Pane / Show Processed Pane options in the Scanner menu and the
Ctrl-T (Windows)/command-T (Macintosh) shortcuts can be used to switch back and forth between the “Natural” and “Processed” tabs.
“Analog Gain” / “Scan Image Enhancer”
Changes to analog gain and the Scan Image Enhancer are reflected in both the “Natural” and “Processed” panes.
The Scan Window — The Preview Area
TOP
27
The Scan Button
Scanning Images
Click the Scan button to scan begin scanning (if multiple images are selected in the thumbnail drawer, all the selected images will be scanned). When scanning is complete, the images will be opened in image windows in the host application.
Image
window
Scan button
“Host Application”
The “host application” is the application in which images are displayed after scanning. When Nikon Scan is used as a “stand-alone” application,
scanned images will be opened in Nikon Scan. If Nikon Scan is used as a TWAIN source or acquire plug-in for a third-party application such as
Adobe Photoshop, images will be opened in image windows in the third-party application.
The Scan Window — The Scan Button
TOP
28
Batch Scans
“Batch” scans allow a “batch” of multiple frames to be SF-210/SF-200 (S) Slide-Feeder Adapters
The slide feeder adapters available separately for the 5000
scanned with a single click of the Scan button.
ED and 4000 ED also support batch scans, allowing a series
Using the Thumbnail Drawer
of slides to be scanned automatically at the same settings.
Batch scans can be performed with film holders and adapters
that support thumbnail previews ( 23): all frames selected 1. Preview the first slide and adjust settings as desired.
in the thumbnail drawer are scanned when the Scan button 2. Select the number slides to be scanned in the “Scanner
is clicked. The images can be scanned at the same settings,
Extras” palette ( 76).
or settings can be adjusted separately for each frame.
3. Click the Scan button to scan the slides at current settings.
Multiple Frames, Same Settings
1. Select one frame in the thumbnail drawer.
2. Preview the image and adjust settings as desired.
3. Save changes to settings in the scan window settings
menu ( 17).
4. Select all the frames to be scanned in the thumbnail drawer.
5. Select the saved settings from the settings menu (if this
Batch Scan Settings
step is omitted, the settings in the scan window and Tool
Chest will apply only to the first frame; the remaining Settings in the scan window and Tool Chest will be reset to default values if the film or holder is ejected before the Scan button is clicked.
frames will be scanned at default settings).
Slide Feeder Adapters
6. Click the Scan button to scan the selected frames.
Because slide feeder adapters do not support thumbnail previews, images can not be selected in the thumbnail drawer, nor can settings be
adjusted separately for each slide in a batch scan. To scan a series of
slides at different settings, preview and scan each slide separately.
Multiple Frames, Different Settings
1. Select the frames to be scanned in the thumbnail drawer.
2. Preview the frames and adjust settings separately for each im“Preferences” > “Batch Scan”
age (use the thumbnail drawer to switch between frames).
The “Batch Scan” category ( 96) in the “Preferences” dialog contains
3. Click the Scan button to scan the selected frames.
a variety of batch scan options.
The Scan Window — The Scan Button
TOP
29
The Tool Chest
Setting up Scans and Enhancing Images
The tools in the Tool Chest can be used before scanning to select the area to be scanned, rotate and flip images, specify
size and resolution, adjust color, brightness, and contrast, improve sharpness, and mitigate the effects of dust, scratches,
and fading. When Nikon Scan is used as a “stand-alone” application, some tools can also be used to edit images opened
in image windows after scanning. Click the links below for more information.
Using the Tool Chest (
31)
Layout Tools (
33)
Information (
35)
Crop (
36)
Curves (
41)
Color Balance (
51)
Unsharp Mask (
53)
LCH Editor (
56)
Digital ICE4 Advanced (
Analog Gain (
61)
69)
Scan Image Enhancer (
Scanner Extras (
70)
71)
The Scan Window and Image Windows
The “Crop,” “Digital ICE4 Advanced,” “Analog Gain,” “Scan Image Enhancer,” and “Scanner Extras” palettes are available only in the scan window. When Nikon Scan is used as a “stand-alone” application, the other palettes can be used both before scanning (in the scan window) and
after scanning (in image windows).
The Tool Chest
30
Using the Tool Chest
Tool Chest Operations
Opening the Tool Chest
Displaying the Contents of a Tool Palette
To display the default Tool Chest, click the Tools button in the To display or hide the contents of a tool palette, click the
scan window control area and select Tool Palette 1 from triangle to the left of the palette title.
the menu that appears.
Title bar
The Tool Chest — Using the Tool Chest
TOP
31
Changing the Order of Palettes in the Tool Chest
Opening a Tool Palette in a Separate Window
To change the order of palettes in the Tool Chest, click a tool Tool palettes can be opened in a separate window by clickpalette title bar and drag it into a new position.
ing the palette title and dragging it outside the current window to create a new Tool Chest containing only the selected
palette.
Moving the “Layout
Tools” palette to a
position following
the “Crop” palette
Tools can be added to the new window by dragging additional palettes into the window. The new window will be
added to the tools menu in the scan window. If you close
the new window by clicking the window close box, you can
open it again by selecting the desired Tool Chest from the
tools menu.
The Tool Chest — Using the Tool Chest
TOP
32
Layout Tools
Setting up Scans and Orienting Images
The “Layout Tools” palette contains tools for making selecThe Hand Cursor (Image Windows Only)
tions and adjusting focus in the scan window. It can also be When Nikon Scan is used as a “stand-alone” application, the
used to flip and rotate images both before and after scan- Hand Cursor tool can be used to scroll images that have been
ning and to navigate images displayed in image windows.
opened in image windows after scanning. It can not be used
in the scan window or a third-party host application.
The Crop Cursor
The Crop Cursor tool is used to make a selection, or “crop.”
In the scan window, the crop is the area selected for scanThe tools available in the “Layout Tools” palette differ de- ning. In image windows, the crop is the source of the hispending on whether the active window is the scan window togram.
or an image window.
To make a selection, drag the mouse
Tool
Scan window
Image window
over the image in the active window.
Hand Cursor
—
✔
The size of the crop can be changed
by dragging its borders, its location by
Crop Cursor
✔
✔
placing the cursor anywhere inside the
Zoom Cursor
—
✔
crop and dragging it to a new posiFocus Tool
—
✔
tion. To cancel the crop, double click
Rotate
✔
✔
anywhere outside the selected area.
Flip
✔
✔
The Tool Chest — Layout Tools
TOP
33
The Zoom Cursor (Image Windows Only)
/
Rotate Buttons
When Nikon Scan is used as a “stand-alone” application, Clicking these buttons rotates the image in the active winthe Zoom Cursor tool is used to zoom the images in the ac- dow. Any rotations are reflected in the orientation of the
tive image window in or out. It can not be used in the scan letter “R” in the “Layout Tools” palette.
window or a third-party host application.
Button
Button
Rotates image 90 ° clockwise.
The Zoom Cursor tool can also be activated by selecting
Zoom Cursor from the Nikon Scan View menu.
/
ABC
Rotates image 90 ° counterclockwise.
ABC
Description
ABC
ABC
Select the Zoom Cursor tool and click anywhere within the
image window to zoom in on the selected point. To zoom
out, click the image while pressing Alt (Windows) or option
(Macintosh).
Description
Flip Buttons
The Focus Tool (Scan Window Only)
Clicking these buttons flips the image in the active window.
The Focus Tool is used to select the focus point in the scan The letter “R” in the “Layout Tools” palette turns red when
window. It is only available when the scan window is active. the image is flipped.
See “The Autofocus Button” ( 15) for more information.
Button
Description
ABC
ABC
Flips image horizontally.
Flips image vertically.
CB A
ABC
Show Grid
When this option is checked, a layout grid is displayed in the
active window. The “Grid Settings” category in the “Preferences” dialog ( 105) controls grid spacing and color.
The Tool Chest — Layout Tools
TOP
34
Information
Pixel and Crop Information
The “Information” palette provides information about the
size and location of the current crop, the position of the cursor within the active image, and the color of the point under
the cursor.
Calibrated RGB/RGB
Grayscale
Item
Description
X:
Y:
Horizontal (X) and vertical (Y) distance of cursor from top left
corner of image.
Color values for point under cursor. If selected color model
is grayscale, only one channel (Luminosity, or brightness) is
shown. If selected color is model RGB, separate values are
L: R: shown for Red, Green, and Blue channels. If image has been
G: modified, two values will be shown for each channel, giving
B: color before and after processing. Size of area sampled to determine color value can be changed using Sample point size
option in “Advanced Color” category of the “Preferences”
dialog ( 102).
L:
T:
Coordinates of Top Left corner of crop.
W:
H:
Height and Width of crop.
The “Information” Palette
The “Information” palette is automatically updated to reflect changes to
the crop in the “Crop” palette. All measurements are in pixels.
The “Information” palette can be used in both the scan window and in
image windows.
The Tool Chest — Information
TOP
35
Crop
Output Size and Resolution
The “Crop” palette is used to specify the dimensions and Three options are available for choosing output size and
resolution at which the current crop will be scanned.
resolution. Select an option according to how the image will
be used.
Crop
(input) size
(size of area
scanned)
Keep this Crop ( 38)
Adjust output dimensions, file size, and resolution without
changing the crop selected in the preview area.
Output
size
File size
Keep this Output Size ( 38)
Adjust file size, resolution, and the selection in the preview
area without changing the chosen output size.
Keep this File Size ( 39)
Adjust output size, resolution, and the selection in the preCustom… view area without affecting the chosen file size.
Scale
Output
resolution
button
The “Crop” Palette
The “Crop” palette is only available when the scan window is active.
The Tool Chest — Crop
TOP
36
The “Crop” palette contains the following items:
Item
Description
Crop
(input)
size
Gives the dimensions of the current crop. The units for
input size can be chosen from the menu to the right of
the display; the units chosen are reflected in the rulers in
the preview area.
Output
size
Gives the output dimensions of the current crop (i.e., the
size of the crop after scanning). The units for output size
can be chosen from the menu to the right of the display.
If a new value is entered for Width or Height when Keep
this crop is selected, the other value will change automatically to maintain the current crop. If Keep this file
size is selected when Pixels is chosen in the output units
menu, the other value will automatically change to maintain the specified file size. This change will be reflected in
the dimensions of the current crop.
File size
States the size of the file that will result if the crop is
scanned at current settings, before JPEG compression (if
applicable) and not including file headers (which typically
increase file size by about 10 KB).
Scale
Scale (output size relative to the size of the image on film)
can be set by direct entry or using the Scale slider.
Enter a value for output resolution (minimum 90 ppi).
Output The units for resolution can be chosen from the menu to
resolution the right of the text box.
The Tool Chest — Crop
Item
Description
Select from the following menu of custom resolutions:
Add Resolution .................. Add custom resolution
Delete Resolution .............. Delete custom resolution
Custom… Inkjet Printer ...................... Set resolution to 360 dpi
Dye Sublimation Printer .... Set resolution to 300 dpi
400 dpi Printer.................... Set resolution to 400 dpi
Choosing an Output Resolution
• Inkjet printers
Most inkjet printers require three or four dots of different colors to
reproduce a single pixel (simulated halftone). The target output resolution for an inkjet printer (in pixels per inch, or ppi) is therefore less
than the printer’s catalogue resolution (in dots in per inch, or dpi). In
general, a resolution of 360 ppi will produce acceptable results.
• Dye sublimation printers
Printers that use photographic or dye-sublimation processes reproduce
each pixel with a single dot (continuous halftone). The target output
resolution for these devices is therefore the same as the printer resolution.
• Commercial printing
Commercial printing processes typically use from 150 to 300 lines per
inch (lpi). As a rule of thumb, assume an output resolution (in ppi) of
about double the number of lines per inch when scanning for output
on a commercial printer.
• Monitors
Computer monitors are usually considered to have resolutions of from
72 ppi (Macintosh) to 96 ppi (Windows).
TOP
37
Follow the instructions below to choose an output size and Keep this Output Size
When Keep this Output Size is selected, the values enresolution.
tered for output Width and Height will not change when the
Keep this Crop
crop is resized or a new value is entered for file size. Choose
When Keep this Crop is selected, the size and location of
this option when scanning images that must display or print
the crop will not change when new values are entered for
at a specified size.
output size and resolution. This option is the best choice for
1. Select Keep this Output Size.
general-purpose scanning.
2. Choose an option other than pixels from the output units
1. Select Keep this Crop.
menu and enter the desired value for Width and Height.
2. Drag the mouse in the preview area of the scan window to
3. Choose an option from the resolution units menu and enselect a crop. If no crop is selected, the entire image will
ter the desired value for resolution, or select a resolution
be scanned.
for a specific output device from the Custom… button
3. Choose an option from the output units menu and enter
menu.
the desired value for Width or Height. The remaining di4. Adjust the size and location of the crop. The crop will be
mension will change automatically to maintain the current
maintained at the height-width ratio specified in Step 2,
crop. The output size can also be chosen using the Scale
and the value for scale will automatically be adjusted acslider.
cording to the size of the crop.
4. Choose an option from the resolution units menu and enter the desired value for resolution, or select a resolution
for a specific output device from the Custom… button
menu.
“Keep This Output Size”
Keep this Output size fixes the physical dimensions of the image when
output on a printer on monitor. When Pixels is selected in the output
units menu, adjusting resolution will cause the values shown in the output size text boxes to change. The physical dimensions of the image
when output on a printer on monitor will however remain constant.
The Tool Chest — Crop
TOP
38
File Size
Keep this File Size
When Keep this File Size is selected, the file size will not The file size listed in the “Crop” palette does not reflect file headers
change when the crop is resized or new values are entered (which typically increase file size by about 10 KB) or JPEG compression.
for output size or resolution. Choose this option to specify
the exact file size of the final image or to keep file sizes to a
minimum for storage or electronic distribution.
1. Select Keep this File Size.
2. Choose an option from the file size units menu and enter
the desired value for File size.
3. Drag the mouse in the preview area of the scan window to
select the crop. Output size, scale, and resolution will be
adjusted automatically.
The Tool Chest — Crop
TOP
39
The Crop Settings Menu
Clicking the triangle in the top right corner of the “Crop” palette displays the crop settings menu.
Macintosh
Windows
Option
Description
Copy Crop Settings to
Clipboard
(Macintosh only)
Copy current crop settings to the clipboard. These settings can then be pasted into the “Crop” palette by
selecting Paste from the Edit menu.
Save Crop Settings…
Save current crop settings under a user-specified name. These settings will be added to the end of the crop
settings menu, where they can be recalled by selecting the desired settings by name.
Delete Crop Settings…
Delete settings created using the Save Crop Settings… option. A dialog will be displayed where the settings to be deleted can be selected by name.
Import Crop Settings…
Import settings created using the Export Crop Settings… option.
Export Crop Settings…
Export current settings to a file in a location of your choice. Crop settings files have the extension “.ncc”.
Reset to Default Crop Settings Cancel the current crop and reset resolution and scale to default values.
Reset to User Crop Settings
Restore the default crop settings created with the Set User Settings option in the scan window settings
menu ( 17).
The Tool Chest — Crop
TOP
40
Curves
Highlights
Output
Mid-tones
Current channel
Shadows
The “Curves” palette is used to adjust brightness, contrast,
and color in specific portions of the tone range (highlights,
mid-tones, and shadows). The main editing tool in the
“Curves” palette is the curve edit display, which contains a
curve showing the relationship between input (the tones in
the original image) and output (how the tones in the input
will be represented in the final image). Separate curves
control the relationship between input and output for the
image as a whole (the “master curve”) and for each of the
component colors, or “channels,” in the current color model
(red, green, and blue in the case of the RGB color model).
The default curve in each case is linear, meaning that tones
will be output exactly as they are input.
Fine-Tuning Color, Contrast, and Brightness
Input is plotted along the horizontal axis, with shadows (the
dark areas of the image) to the left, highlights (the bright
areas of the image) to the right, and mid-tones in between.
The left end of the axis marks the minimum possible value
for colors in the selected channel (zero, or no color), the right
end the maximum value. In the case of the master curve, the
minimum value represents areas of the input image that are
a true black; the maximum value represents areas that are a
true white. Output is plotted along the vertical axis, with the
minimum possible output value (again, zero, or no color) at
the bottom and the maximum output value at the top.
Curve edit display
Input
The “Curves” Palette
The “Curves” palette can be used in both the scan window and in image windows.
The Tool Chest — Curves
The Curve Edit Display
Although values for input and output in the “Curves” palette range from
zero to 255 (eight-bit precision, familiar to users of other image editing
software), the results of any changes to curves are calculated at a precision of sixteen bits. This allows images scanned at twelve and fourteen
bits to be modified without lowering the quality of the output.
TOP
41
When the cursor is moved over the curve edit display, the
input and output values for the point under the cursor are
shown in the input/output display.
Apply button
Input/output display
Step 1—Viewing the Histogram
The first step in adjusting tone levels and
color balance in the “Curves” palette is
to view the histogram displayed in the
background of the curve edit display. The
histogram provides information on what
tones are present in the original image
and in what amounts, information that
is used when setting the black point and white point and
editing curves.
The histogram takes the form of a bar graph. The horizontal
axis shows the tone level (pixel brightness), with shadows to
the left and highlights to the right. The vertical axis gives the
number of pixels of each tone level found in the current crop,
scaled to fit in the curve edit display (note that the histogram
does not show the position of pixels within the crop).
To view the distribution of tones in the final, output image
after changes to curves, click the
button. Click the button again to view the input tone distribution.
The “Apply” Button
Changes to curves only apply when the button at the top left corner of
the “Curves” palette is checked. When this button is checked, changes
to curves will be reflected in the image in the active window. The box
can be checked and unchecked for a quick “before-and-after” comparison to determine whether changes to settings are having the desired
effect.
The Tool Chest — Curves
Sixteen-Bit Images
The histogram uses eight-bit precision, with the result that spikes may
be visible in the histogram when previewing images at a bit-depth of
sixteen bits. Sixteen-bit precision is however used when the image is
scanned.
TOP
42
Step 2—Channel Selection
Step 3—Setting White and Black Points
The channel menu is used to select components of the current color model for editing.
Select the master curve to modify tones for
all channels in the image. In the RGB color
model, the red, green, and blue curves can
be modified separately. The histogram shows tone levels for
the selected channel only.
The endpoints of the curve are referred to as the “white
point” and the “black point.” The black point for a given
channel represents the darkest shade (minimum value) for
that color, the white point, the brightest shade (maximum
value). By default, the input and output values for the black
point are zero. The darkest shade in the input image may
however be greater than zero, with the result that a portion
of the curve is dedicated to reproducing tones not actually
present in the image. Increasing the input value for the black
point until it matches the darkest shade in the image will
steepen the curve, enhancing overall contrast without causing a corresponding loss of detail in shadows. Similarly, if the
original image does not actually contain shades corresponding to the maximum value, the white point can be lowered
to match the brightest shade in the image.
When the master curve is selected, the auto-contrast button and white-point and black-point eyedropper tools apply
simultaneously to all of the red, green, and blue curves (the
master curve is unaffected). When one of the red, green,
and blue curves is selected, these controls can be used to
edit only the selected curve.
Channel Selection Shortcuts
The current channel can also be selected using the following shortcuts:
• Ctrl ~ (Windows)/ ~ (Macintosh)
Master channel (RGB)
• Ctrl 1 (Windows)/ 1 (Macintosh)
Red channel (RGB)
• Ctrl 2 (Windows)/ 2 (Macintosh)
Green channel (RGB)
• Ctrl 3 (Windows)/ 3 (Macintosh)
Blue channel (RGB)
The Tool Chest — Curves
There are two steps to selecting a white point and black
point for the final image: choosing the white-point and
black-point input levels, and selecting output levels.
TOP
43
White-Point and Black-Point Input Levels
Input levels for the white point and black point can be set
using any of the following three methods:
• automatic contrast adjustment
• white-point and black-point sliders
• direct sampling using the white-point and black-point
eyedropper tools
To perform an auto contrast operation, click the
button. The white and black points for each of the red, green,
and blue channels will be modified simultaneously and the
master curve will be displayed in the “Curves” palette (the
master curve itself is unaffected by this operation). Clicking
the
button with the Ctrl (Windows) or option (Macintosh)
key held down adjusts contrast only for the channel currently
selected in the channel menu.
Automatic Contrast Adjustment
In automatic contrast adjustment, Nikon Scan automati- To modify brightness and contrast without affecting color
cally selects white and black points that exclude a certain balance, select the master channel and click the
button
percentage of the brightest and darkest pixels in the image, while pressing Ctrl (Windows) or option (Macintosh).
steepening curves for enhanced contrast (the exact percentage of pixels excluded can be specified in the “Preferences”
dialog). By default, 0.5% of the brightest and darkest pixels
are excluded, producing a curve that makes optimal use of
the output tone range while preserving details in shadows
and highlights.
The Tool Chest — Curves
TOP
44
White-Point and Black-Point Sliders
The white-point and black-point sliders can be used to match
the white and black points to the histogram displayed in the
curve edit display. While these sliders can be used to edit
curves for any channel, the best results are usually obtained
when they are used to modify the master curve.
To edit the white point or black point, click the corresponding slider once to activate it, then drag it to the right or left (a
value can also be entered directly in the text box underneath
the slider). Matching the black-point slider with the lowest input value displayed in the histogram will set the minimum output value for the selected channel to the darkest
pixel actually present in the image, steepening the curve and
enhancing contrast without sacrificing detail in shadows.
Similarly, matching the white-point slider with the highest
input value displayed in the histogram will set the maximum
output value for the selected channel to the brightest pixel
present in the image, enhancing contrast without loss of detail in highlights. Any changes are applied instantly to the
active image.
White-point
slider
Black-point
slider
Black-point
input value
White-point
input value
The Tool Chest — Curves
TOP
45
Sampling the Image for White Point or Black Point
The white point or black point can be set by directly sampling the image, allowing the user to choose the pixels that
will be used to set the maximum (white point) or minimum
(black point) output value. This makes it possible to set the
black point by matching it to a pixel in the darkest part of
the image containing detail you want to preserve, eliminating details in darker areas that are not important to the final
image. Similarly, you can match the white point to a pixel in
the brightest area of the image containing details important
to the final image. While direct sampling can be used with
any channel, it is most effective when used with the master
curve. When the master curve is selected, sampling will set
the white or black point for red, green, and blue curves simultaneously; the master curve itself is unaffected.
To sample the white point, click the
button. When the
cursor is moved over the active image, it will take the shape
of an eyedropper. Move the cursor over the image to find
the pixel that you want to use to set the white point, keeping
an eye on pixel level display in the “Information” palette to
identify pixels with high input values. With the cursor over
the target pixel, click the mouse button. The input value
for the selected pixel will be used as the input value for the
white point. The image will automatically be altered to reflect the new value for white point and the master curve will
be displayed in the “Curves” palette.
To sample the image for the black point, click the
button
and move the eyedropper cursor over the image until you
find the point that you want to use to set the minimum input
value, then click the mouse button to select the black point.
Setting the White or Black Point for the Current Channel
By default, sampling sets the white point or black point for all channels
and displays the master curve. To set the white point or black point for
the current channel only, press the Ctrl key (Windows) or option key
(Macintosh) while clicking the
or
button. To modify brightness
and contrast without affecting color balance, select the master channel
and press Ctrl (Windows) or option (Macintosh) while clicking the
or
button.
The Tool Chest — Curves
TOP
46
White Point and Black Point Output Levels
Once the input levels for the black and white points have
been determined, output levels can be altered to reflect the
actual shade of the darkest and brightest pixels in the image.
If the darkest shade in the image represents a true black,
for example, the output level for the black point can be left
at zero. If, however, darkest shade present in the image is
a lighter color, the output level for the black point can be
raised to achieve more natural coloration.
To set the output level, click the slider once to activate it,
then drag it up or down until you have found the desired
output level (the output level can also be set by entering a
value directly in the text box to the left of the slider). The effects of the change will be reflected in the active image.
The output levels for the white point and black point are set
using the white-point and black-point output sliders on the
left side of the curve edit display.
White-point
output slider
Output Levels
In some cases, it is best if the darkest and lightest points of the image
are not printed or displayed as saturated black or white, even when the
colors in the original represent a true black or true white. For example:
• Making blacks less saturated can reduce the amount of ink consumed
• Making whites less saturated can prevent undesirable lines from appearing when a true white is printed in ink (for example, when white is
printed on a colored background)
Black-point
output slider
Default Output Values
The default output levels for white point and black point can be set in
the “Advanced Color” category of the “Preferences” dialog ( 101).
The Tool Chest — Curves
TOP
47
Step 4—Setting the Gray Point
The point midway between the maximum and minimum The Gray-Point Slider
input values is known as the “gray point” (or “midpoint”). The gray-point slider is located at the bottom of the curve
This point represents a neutral shade corresponding to an edit display.
output level of 128. The gray point is controlled by a slider at
the bottom of the curve edit display. Moving the midpoint
slider to the left increases the brightness of mid-tones without “washing out” highlights. Moving the slider to the right
darkens mid-tones without obliterating detail in shadows.
The midpoint can be set using the gray-point slider or by
directly sampling the image using the gray-point eyedropper
tool.
Gamma
Gamma (also written “γ”) is a fundamental property of video systems
which determines the intensity of the output signal relative to the input.
When calculating gamma, the maximum possible input intensity is assigned a value of one, and the minimum possible intensity (no input)
is assigned a value of zero. Output is calculated by raising input to a
power that is the inverse of the gamma value (output = input (1/γ) ). In
practical terms, raising the gamma value has the same effect as moving the midpoint slider to the left, raising mid-tone output values and
brightening the image while leaving the maximum and minimum values
untouched. Lowering the gamma value has the same effect as moving the midpoint slider to the right, lowering mid-tone output values
and darkening the image. The default value for gamma is one, which
produces a linear curve in which input and output values are the same.
Gamma can be set to any value between 0.45 and 3.00.
The Tool Chest — Curves
Gray-point
slider
Gamma value
Move the slider to the left to increase the brightness of
mid-tones in the selected channel, or move it to the right
to decrease brightness. Alternatively, you can enter a value
for gamma directly in the text box under the slider. The effects of changes to the gray point can be seen in the active
image.
TOP
48
Sampling the Image for Gray Point
The gray point can also be set by direct sampling. Regardless
of the channel currently selected in the channel menu, sampling simultaneously defines the gray point for each of the
red, green, and blue channels while leaving the gray point for
the master curve unchanged. Grayscale images can not be
sampled for gray point.
To sample the gray point, click the
button. When the cursor is moved over the active image, it will take the shape of an
eyedropper. Move the cursor over the image to find a pixel
to use to set the gray point, keeping an eye on the pixel level
display in the “Information” palette to identify pixels with a
neutral input value (look for pixels that should be a neutral
gray color in the final image). With the cursor over the target
pixel, click the mouse button. The gray point for each of the
component channels will be adjusted to alter color balance
without altering the brightness of the sampled pixel (the
weight assigned to each channel can be selected using the
“Gray point target” options in the “Advanced Color” category of the “Preferences” dialog;
101). The image will automatically be altered to reflect the new value for gray point.
Resizing the Curve Edit Display
The Tool Chest can be resized by dragging its borders (Windows) or
by dragging the handle at its lower right corner (Macintosh). The size
of the curves edit display changes with the size of the palette. For increased precision, enlarge the palette when editing curves.
The Tool Chest — Curves
Step 5—Editing Curves Directly
Curves can be reshaped to make adjustments to brightness
and contrast in specific portions of the tone range.
Adding New Points to the Curve
Move the cursor to the desired location in the curve edit
display and click. A new point will be added at this position
and the curve will automatically be adjusted to pass through
this point. Points can be repositioned by dragging them to
new locations in the curve edit display. Steepening a section
of the curve will enhance contrast in that portion of the tone
range, while changing the curve to map input to higher or
lower output levels will brighten or darken tones in the affected portion of the tone range. The image in the active
window will automatically be adjusted to reflect changes to
the curve.
Removing Points from the Curve
Points can be removed from the curve by dragging them out
of the curve window.
Resetting the Curves to Linear
The default linear curve for the current channel can be restored by clicking the
button in the “Curves” palette. To
reset all curves to linear, click the
button.
TOP
49
The Curves Settings Menu
Clicking the triangle in the top right corner of the “Curves” palette displays the curves settings menu.
Option
Description
Copy to Clipboard
Copy current curve settings to the clipboard. These settings can then be pasted into the “Curves” palette
for another window by activating the window and selecting Paste from the Edit menu.
Save Curve Settings…
Save current curves settings under a user-specified name. These settings will be added to the end of the
curves settings menu, where they can be recalled by selecting the desired settings by name.
Delete Curve Settings…
Delete settings created using the Save Curve Settings… option. A dialog will be displayed where the settings to be deleted can be selected by name.
Import Curve Settings…
Import settings created using the Export Curve Settings… option.
Export Curve Settings…
Export current settings to a file in a location of your choice. Curves settings files have the extension “.ncv”.
Reset to Default Curve Settings Reset all curves to linear.
Reset to User Curve Settings
Restore the default curves settings created with the Set User Settings option in the scan window settings
menu ( 17).
The Tool Chest — Curves
TOP
50
Color Balance
Adjusting Overall Color, Contrast, and Brightness
The “Color Balance” palette offers simple controls for adjusting brightness, contrast, and color balance for the entire image. Unlike the controls in the Curves palette, however, the
“Color Balance” palette does not allow changes that affect
only a portion of the tone range.
The controls in the “Color Balance” palette are described opposite. Note that when “grayscale” is selected for the color
model, the “Color Balance” palette contains only brightness
and contrast sliders.
Item
The brightness slider adjusts brightness for the entire image. Dragging the brightness slider in the “+” direction
brightens the image, while dragging the slider in the “–”
Brightness direction darkens the image. A value for brightness between –100 and +100 can be entered directly in the text
box to the right of the slider.
Contrast
Dragging the contrast slider in the “+” direction heightens the difference between highlights and shadows in
the image, increasing contrast. Dragging the slider in the
“–” direction decreases the difference between light and
dark portions of the image, lowering contrast. A value
for contrast between –100 and +100 can be entered in
the text box to the right of the slider.
Color
balance
(Red,
Green,
Blue)
While the brightness slider adjusts brightness for the image as a whole, the three color-balance controls allow
the user to adjust brightness for each color individually.
For example, dragging the red slider in the “+” direction
brightens the red portions of the image, making the image as a whole more red. Dragging it in the “–” direction dims the red elements in the image, bringing out
the remaining colors. Color balance can also be set by
entering values between –100 and +100 directly in the
text boxes to the right of the sliders.
Apply button
Sliders
The “Color Balance” Palette
The “Color Balance” palette can be used in both the scan window and
in image windows.
The “Apply” Button
Changes to color balance only apply when the button at the top left
corner of the “Color Balance” palette is checked. When this button is
checked, changes to color balance will be reflected in the image in the
active window. The box can be checked and unchecked for a quick “before-and-after” comparison to determine whether changes to settings
are having the desired effect.
The Tool Chest — Color Balance
Description
TOP
51
The Color Balance Settings Menu
Clicking the triangle in the top right corner of the “Color Balance” palette displays the color balance settings menu.
Option
Description
Copy to Clipboard
Copy current color balance settings to the clipboard. These settings can then be pasted into the
“Color Balance” palette for another window by activating the window and selecting Paste from
the Edit menu.
Save Color Balance Settings…
Save current color balance settings under a user-specified name. These settings will be added to
the end of the color balance settings menu, where they can be recalled by selecting the desired
settings by name.
Delete Color Balance Settings…
Delete settings created using the Save Color Balance Settings… option. A dialog will be displayed where the settings to be deleted can be selected by name.
Import Color Balance Settings…
Import settings created using the Export Color Balance Settings… option.
Export Color Balance Settings…
Export current settings to a file in a location of your choice. Color balance settings files have the
extension “.nca”.
Reset to Default Color Balance Settings Reset all sliders to ±0.
Reset to User Color Balance Settings
Restore the default color balance settings created with the Set User Settings option in the scan
window settings menu ( 17).
The Tool Chest — Color Balance
TOP
52
Unsharp Mask
Using Unsharp Mask, the user can increase the sharpness
of images by making edges more distinct. Unsharp Mask
works by increasing the contrast of edges in the image while
leaving other areas untouched. The amount of sharpness
is determined by three factors: intensity, halo width, and
threshold.
Apply button
Intensity
Halo width
Threshold
Increasing Sharpness
Unsharp Mask can be applied to all the colors in the image
or selectively to areas of the image in which red, green, blue,
cyan, magenta, or yellow predominate, as determined by the
color values for each pixel. The brightness (luminosity) of the
affected pixels is adjusted to sharpen edges without affecting color balance. The controls in the Unsharp Mask palette
can be used to create multiple masks, one for each color or
for all colors.
Unsharp Mask
Unsharp Mask sharpens edges without affecting color balance by adjusting only luminosity (brightness). The effect is the same as performing Unsharp Mask with the Luminosity channel selected in the Adobe
Photoshop Lab color model.
The “Unsharp Mask” Palette
The “Unsharp Mask” palette can be used in both the scan window and
in image windows.
The “Apply” Button
Changes to Unsharp Mask only apply when the button at the top left
corner of the “Unsharp Mask” palette is checked. When this button is
checked, changes to settings will be reflected in the image in the active
window. The box can be checked and unchecked for a quick “beforeand-after” comparison to determine whether changes to settings are
having the desired effect.
The Tool Chest — Unsharp Mask
Image Size and Resolution
The amount of Unsharp Mask required depends on the size and resolution of the final image. The more pixels in the image, the greater the
amount of Unsharp Mask required to achieve the same degree of apparent sharpness. Before applying a mask, scale the image to the desired
size and resolution.
Nikon Color Management ( 78)
Unsharp Mask is only available when the Nikon Color Management System (CMS) is on. If Nikon CMS is off, the tools in the “Unsharp Mask”
palette will be disabled.
TOP
53
Creating Unsharp Masks
Step 3—Check the Results
To compare the effects of the Unsharp Mask with the unStep 1—Select a Color
modified image, click the “Apply” button at the top left
Select a color from the color menu. Masks apply only to
corner of the “Unsharp Mask” palette to turn the effects of
edges where the selected color predominates. To create a
Unsharp Mask on or off.
mask that applies to all colors, select All.
Step 4—Create Additional Masks
Repeat steps 1–3 to create additional masks for different
colors. New masks will be added to the end of the Unsharp
Mask list. Masks apply in the order listed. To change the
order, select a mask in the Unsharp Mask list and click
to move it up in the list or
to move it down. To delete a
Step 2—Set Intensity, Halo Width, and Threshold
mask, select it and click the
button.
Use the sliders or enter values directly in the text boxes to
their right.
Intensity The amount the contrast of edges will be increased.
Halo
Width
The size of the area that will be affected. The greater
the halo width, the wider edges will appear. Too large a
value for halo width will produce a “halo” along edges
in the image.
The limit at which sharpening will be applied. If the
threshold is zero, sharpening will apply to all pixels in the
image. Increasing the threshold increases the amount of
Threshold contrast that must be present between pixels before the
mask will be applied, with the result that only more distinctly contrasting edges will be affected.
The Tool Chest — Unsharp Mask
TOP
54
The Unsharp Mask Settings Menu
Clicking the triangle in the top right corner of the “Unsharp Mask” palette displays the Unsharp Mask settings menu.
Option
Description
Copy to Clipboard
Copy current Unsharp Mask settings to the clipboard. These settings can then be pasted into the
“Unsharp Mask” palette for another window by activating the window and selecting Paste from
the Edit menu.
Save Unsharp Mask Settings…
Save current Unsharp Mask settings under a user-specified name. These settings will be added to
the end of the Unsharp Mask settings menu, where they can be recalled by selecting the desired
settings by name.
Delete Unsharp Mask Settings…
Delete settings created using the Save Unsharp Mask Settings… option. A dialog will be displayed where the settings to be deleted can be selected by name.
Import Unsharp Mask Settings…
Import settings created using the Export Unsharp Mask Settings… option.
Export Unsharp Mask Settings…
Export current settings to a file in a location of your choice. Unsharp Mask settings files have the
extension “.num”.
Reset to Default Unsharp Mask Settings Delete all masks in the Unsharp Mask list.
Reset to User Unsharp Mask Settings
Restore the default Unsharp Mask settings created with the Set User Settings option in the scan
window settings menu ( 17).
The Tool Chest — Unsharp Mask
TOP
55
The LCH Editor
Editing Colors
The hue editor features unique controls for unparalleled flexibility when editing colors. Using this tool, a specific range
of input colors can be mapped to another range of output
colors. This allows all the reds in the image, for example, to
be made more orange, or even green or blue.
The LCH Editor models color using three components: Lightness (brightness), Chroma (color saturation, or vividness),
and Hue. Each component has its own edit display. Luminosity and chroma are represented by curves, which can
be edited in much the same way as the tone curves in the
“Curves” palette. Steepening the luminosity curve increases
The desired editor is selected from the menu at the top of
the difference between bright and dark portions of the
the “LCH Editor” palette.
image, increasing contrast. Steepening the chroma curve
increases color saturation, making colors more vivid. Both Apply button
Editor menu
editors feature histograms, auto contrast, and white, black,
and gray-point sliders. Output sliders are also available to
edit the maximum and minimum values for output.
The “LCH Editor” Palette
The “LCH Editor” palette can be used in both the scan window and in
image windows.
The “Apply” Button
Changes to the LCH Editor only apply when the button at the top left
corner of the “LCH Editor” palette is checked. When this button is
checked, changes to settings will be reflected in the image in the active
window. The box can be checked and unchecked for a quick “beforeand-after” comparison to determine whether changes to settings are
having the desired effect.
The Tool Chest — The LCH Editor
Nikon Color Management ( 78)
The LCH Editor is only available when the Nikon Color Management System (CMS) is on. If Nikon CMS is off, the tools in the “LCH Editor” palette will be disabled. To use the LCH Editor with a color space that has
the same gamut as uncalibrated RGB data obtained directly from the
scanner, turn CMS on and select the Scanner RGB color-space profile.
TOP
56
The Lightness Editor
Although it affects brightness rather than color, editing luminosity has a similar effect to editing the master curve in the
“Curves” palette. Steepening the curve increases the difference between light and dark areas of the image, increasing
contrast. Moving the gray point alters the brightness of midtones while preserving detail in highlights and shadows.
Item
Description
Histogram
Shows the distribution of pixels of different luminosities in the input. The horizontal axis corresponds to
luminosity (in the range 0–255), the vertical axis to the
number of pixels.
Output
Choose the maximum and minimum values for outlevel sliders put.
Black-point
Choose the minimum input level.
slider
Gray-point
slider
Set the gray point (gamma value).
White-point
Choose the maximum input level.
slider
Output level
sliders
Histogram
Black-point slider
Input/output
levels
Gray-point
slider
White-point slider
Editor Selection Shortcuts
The editor can also be selected using the following shortcuts:
• Ctrl Shift 1 (Windows)/ option 1 (Macintosh)
Luminosity editor
• Ctrl Shift 2 (Windows)/ option 2 (Macintosh)
Chroma editor
• Ctrl Shift 3 (Windows)/ option 3 (Macintosh)
Hue editor
The Tool Chest — The LCH Editor
Input/output Input and output levels for the point under the cursor
levels
in the curve edit display.
Click to view the luminosity distribution for the final
image. Click again to view the input luminosity distribution.
Restore the luminosity curve to linear.
Restore all curves in the LCH Editor to linear.
Set maximum and minimum input levels to exclude values for 0.5% of the brightest and darkest pixels in the
crop. The percentage of pixels excluded can be adjusted in the “Advanced Color” category of the “Preferences” dialog ( 101).
TOP
57
The Chroma Editor
The chroma editor is a useful tool for adjusting color saturation. Steepening the curve increases saturation in the affected range, making colors more vivid. Flattening the curve
results in flatter, less vivid colors. Moving the gray point to
the left makes the image as a whole more vivid, while moving it to the right “averages out” differences between colors,
making the image grayer. One effective way to make full use
of the scanner’s dynamic range is to steepen the curve in the
portions of the histogram that contain the greatest number
of pixels, while leaving colors corresponding to a neutral gray
unaffected.
Item
Description
Histogram
Shows the distribution of pixels of different chromas in
the input. The horizontal axis shows chroma, the vertical axis the number of pixels.
Output
Choose the maximum and minimum values for outlevel sliders put.
Black-point
Choose the minimum input level.
slider
Gray-point
slider
Set the gray point (gamma value).
White-point
Choose the maximum input level.
slider
Input/output Input and output levels for the point under the cursor
levels
in the curve edit display.
Click to view the chroma distribution for the final image. Click again to view the input chroma distribution.
Restore the chroma curve to linear.
Output level
sliders
Restore all curves in the LCH Editor to linear.
Histogram
Gray-point
slider
Black-point slider
Input/output
levels
White-point slider
The Tool Chest — The LCH Editor
TOP
58
The Hue Editor
To determine the hue of a specific pixel, move the cursor
The controls for editing hue are unique, consisting of a rain- over the image. The point corresponding to the hue of the
bow-colored background bisected by a horizontal line which pixel under the cursor will be highlighted on the input line.
represents the hues (colors) in the original image (input colItem
Description
ors). Superimposed on this line is another horizontal line
Adjust the width of the curve that passes through the
representing the colors in the image after editing (output
Width slider selected point, increasing or decreasing the range of
colors). Before editing, the input line is the same as the
adjacent hues affected by the change.
output line, so that reds in the input are reproduced as reds
Click to change the vertical scale from 60 ° through
in the final image. By changing the shape of hue curve, the
120 ° to 180 ° and back again (the degrees in this scale
user can map input colors to different output colors over a Scale button refer to a 360 ° color wheel). Increasing the scale increases the range of hues visible in the display, while
selected portion of the color range.
decreasing the scale increases precision.
To edit the hue curve, click once in the edit window to activate the hue editor, then click the point on the curve over
the hue you want to edit. Drag this point up or down until it
intersects with the desired output color.
Output slider Map all input colors to different output colors.
Restore the hue curve to linear.
Restore all curves in the LCH Editor to linear.
Output slider
Width slider
Scale button
The Tool Chest — The LCH Editor
TOP
59
The LCH Editor Settings Menu
Clicking the triangle in the top right corner of the “LCH Editor” palette displays the LCH Editor settings menu.
Option
Description
Copy to Clipboard
Copy current LCH Editor settings to the clipboard. These settings can then be pasted into the “LCH Editor” palette for another window by activating the window and selecting Paste from the Edit menu.
Save LCH Curve Settings…
Save current LCH Editor settings under a user-specified name. These settings will be added to the
end of the LCH Editor settings menu, where they can be recalled by selecting the desired settings by
name.
Delete LCH Curve Settings…
Delete settings created using the Save LCH Curve Settings… option. A dialog will be displayed
where the settings to be deleted can be selected by name.
Import LCH Curve Settings…
Import settings created using the Export LCH Curve Settings… option.
Export LCH Curve Settings…
Export current settings to a file in a location of your choice. LCH Editor settings files have the extension “.nlv”.
Reset to Default LCH Curve Settings Reset all curves in the LCH Editor to linear.
Reset to User LCH Curve Settings
Restore the default LCH Editor settings created with the Set User Settings option in the scan window
settings menu ( 17).
The Tool Chest — The LCH Editor
TOP
60
Digital ICE4 Advanced (Digital ICE quad Advanced)
Digital ICE, Digital ROC, Digital GEM, Digital DEE
The “Digital ICE Advanced” palette controls the Digital DEE The following functions are available:
(9000 ED, 5000 ED, and COOLSCAN V ED only), Digital
Function
Description
ICE, Digital ROC, and Digital GEM functions built into Nikon
Reduces the effect of dust and scratches when
scanners to reduce the effects of scratches, dust, fading, film
Digital ICE the image is scanned.
62
grain, and under- or over-exposure.
4
Digital ICE
Digital ROC
Digital GEM
Processes images digitally to restore colors lost
Digital ROC through fading.
63
Processes images digitally to reduce the effects
Digital GEM of film grain.
64
Enhances detail in underexposed or overexDigital DEE posed areas of the image (9000 ED, 5000 ED,
and COOLSCAN V only).
65
Digital DEE
Redraw
button
The “Digital ICE4 Advanced” Palette
The “Digital ICE4 Advanced” palette is only available when the scan
window is active.
The Tool Chest — Digital ICE4 Advanced
Scanning Glass Microscope Slides
Turn Digital ICE4 Advanced off when scanning glass microscope slides in
the FH-G1 or FH-8G1 medical holders (available separately). Digital ICE4
Advanced may fail to produce the desired results with glass microscope
slides.
TOP
61
Digital ICE—Correcting for Scratches and Dust
Digital ICE (Image Correction and Enhancement) reduces
the effects of dust and scratches when images are scanned.
To use Digital ICE, select Enable Digital ICE and choose
On(Normal) or On(Fine) from the Digital ICE menu.
Enable Digital
ICE check box
Option
To view the effects any changes to Digital ICE settings, click
the Preview button in the scan window (the preview image
can not be updated using the Redraw button, which can
only be used with Digital ROC, Digital GEM, and Digital DEE).
The effects of Digital ICE are reflected in both the “Natural”
and “Processed” panels.
Description
The image is processed digitally to remove the effects
On(Normal) of scratches and dust.
On(Fine)
Use this setting to remove very thin scratches or dust
that is barely visible. Note that the overall sharpness of
the image may be reduced.
Scanning Time
Scanning times will increase when Digital ICE is enabled. Turn Digital
ICE off to reduce scanning times.
The Information Panel
When Digital ICE is enabled, the option selected in the Digital ICE menu
is displayed in the scan window information panel. A warning icon ( )
will be displayed if the preview image has not been updated to reflect
changes to Digital ICE settings.
The Tool Chest — Digital ICE4 Advanced
Film Negatives
Noise may appear if Digital ICE is used to process overexposed images
or images that have acquired very vivid colors through the developing
process. The best results will be obtained in correctly exposed images
that have been developed normally.
Monochrome Film
Digital ICE can not be used with monochrome film unless the film has
been developed in color.
Kodachrome Film
Digital ICE is not recommended when scanning Kodachrome film with
the 8000 ED, 4000 ED, or COOLSCAN IV ED. When scanning Kodachrome film with the 9000 ED, 5000 ED, or COOLSCAN V ED, select
Kodachrome in the film type menu. Depending on the frame scanned,
blurring or localized loss of detail may occasionally result when Kodachrome film is scanned with the 5000 ED or COOLSCAN V ED.
TOP
62
Digital ROC—Restoring Faded Colors
Digital ROC (Reconstruction of Color) digitally restores colors To preview the image at the new settings, click the Redraw
lost through fading of the original film. To use Digital ROC, button. If the desired results are not achieved, adjust setselect Enable Post Processing and choose a value for color tings and click the Redraw button again.
reconstruction using the Digital ROC slider or by entering a
value between 0 (Digital ROC off) and 10 (maximum effect)
in the text box to its right. The default setting is 5.
Enable Post
Processing
check box
Digital ROC
slider and
text box
Scanning and Preview Times
Scanning and preview times will increase when Digital ROC is enabled.
To reduce scanning and preview times, remove the check from the Enable Post Processing check box.
Monochrome Film/Grayscale Images
Digital ROC may add color to monochrome images or images scanned
in grayscale.
Digital ROC
The status of Digital ROC is shown in the scan window information
panel. A warning icon ( ) will be displayed if the preview image has
not been updated to reflect changes to Digital ROC settings. Digital
ROC is not available when the FH-816 or FH-8G1 is used with the 9000
ED or 8000 ED, or when the FH-G1 is used with the 5000 ED, 4000 ED,
COOLSCAN V ED, or COOLSCAN IV ED.
The Tool Chest — Digital ICE4 Advanced
TOP
63
Digital GEM—Reducing Film Grain
Digital GEM (Grain Equalization Management) digitally pro- To preview the image at the new settings, click the Redraw
cesses images to reduce the effects of film grain. To use button. If the desired results are not achieved, adjust setDigital GEM, select Enable Post Processing and choose a tings and click the Redraw button again.
value for grain equalization using the Digital GEM slider or
by entering a value between 0 (Digital GEM off) and 4 (maximum effect) in the text box to its right. The default setting
is 3.
Enable Post
Processing
check box
Digital GEM
slider and
text box
Scanning and Preview Times
Scanning and preview times will increase when Digital GEM is enabled.
To reduce scanning and preview times, remove the check from the Enable Post Processing check box.
Digital GEM
The status of Digital GEM is shown in the scan window information
panel. A warning icon ( ) will be displayed if the preview image has
not been updated to reflect changes to Digital GEM settings. Digital
GEM is not available when the FH-816 or FH-8G1 is used with the 9000
ED or 8000 ED, or when the FH-G1 is used with the 5000 ED, 4000 ED,
COOLSCAN V ED, or COOLSCAN IV ED.
The Tool Chest — Digital ICE4 Advanced
TOP
64
Digital DEE—Enhancing Detail in Shadows and Highlights
Digital DEE (Dynamic Exposure Extender) reveals details in To preview the image at the new settings, click the Redraw
shadows and highlights, correcting for underexposure in button. If the desired results are not achieved, adjust setback-lit subjects or shaded areas and for overexposure in tings and click the Redraw button again.
brightly lit areas. Digital DEE is only available with 9000 ED,
5000 ED, and COOLSCAN V ED film scanners.
Enhancing Details in Shadows
To enhance details in shadows, select Enable Digital DEE
and adjust shadow brightness using the Shadow Adjustment slider or by entering a value between 1 and 100 in the
text box to its right. The larger the value, the brighter shadows in the image will be. The default setting is 50.
Enable Digital
DEE check box
Redraw
button
Before processing
Shadow
Adjustment
slider and
text box
Selecting a Crop
When using Digital DEE, select a crop that excludes the frame borders
and other unexposed areas of the film.
Monotone Shadows
Digital DEE has no effect if details in shadows have been totally obliterated, leaving shadows a single, uniform color.
The Tool Chest — Digital ICE4 Advanced
After processing
Digital DEE
The status of Digital DEE is shown in the scan window information
panel. A warning icon ( ) will be displayed if the preview image has
not been updated to reflect changes to Digital DEE settings. Digital DEE
is not available when the FH-816 or FH-8G1 is used with the 9000 ED,
or when the FH-G1 is used with the 5000 ED or COOLSCAN V ED.
Scanning and Preview Times
Scanning and preview times will increase when Digital DEE is enabled.
To reduce scanning and preview times, remove the check from the Enable Digital DEE check box.
Medium-Format Film (9000 ED Only)
When using Digital DEE to scan medium-format film under Windows,
adjust “Crop” palette settings so that file size is 169 MB or less. A file of
169 MB is equivalent to a full frame of 6 × 9 film (crop size 6588 × 4482
pixels) scaled to 100% at 2000 dpi.
TOP
65
To preview the image at the new settings, click the Redraw
Enhancing Details in Highlights
Digital DEE can also be used to reveal details in highlights button. If the desired results are not achieved, adjust setwhere the background is much brighter than the subject or tings and click Redraw again.
the subject much brighter than the background. To enhance
details in highlights, select Enable Digital DEE and click
More.
More button
Redraw
button
Highlight
Adjustment
slider and
text box
Before processing
After processing
Adjust highlights using the Highlight Adjustment slider or
by entering a value between 1 and 100 in the text box to
its right. Increasing highlight adjustment increases contrast
in highlights, while decreasing highlight adjustment has the
opposite effect. The default value is 1.
Monotone Highlights
Digital DEE has no effect if details in highlights have been totally obliterated, leaving highlights a single, uniform color.
The Tool Chest — Digital ICE4 Advanced
TOP
66
Defining “Shadows” and “Highlights”
The Threshold slider in the detailed view of the “Digital
DEE” panel determines the border between shadows and
highlights.
Threshold
slider and
text box
Moving the slider is to the left or entering a lower value in the
Threshold text box increases the range of tones affected by
the Highlight Adjustment slider and reduces the range of
tones affected by the Shadow Adjustment slider.
Tone range affected by
Shadow Adjustment
Tone range affected by
Highlight Adjustment
Shadows
Highlights
Threshold
Moving the slider to the right or entering a higher value in Try decreasing the threshold value if highlight adjustment
the Threshold text box increases the range of tones affected fails to increase contrast in the desired tone range, or if
by the Shadow Adjustment slider and reduces the range of shadow brightness is affecting too great an area.
tones affected by the Highlight Adjustment slider.
Tone range affected by
Shadow Adjustment
Tone range affected by
Highlight Adjustment
Shadows
Highlights
Threshold
Try increasing the threshold value if shadow brightness fails
to brighten shadows in the desired tone range, or if highlight
adjustment is affecting too great an area.
The Tool Chest — Digital ICE4 Advanced
Threshold
Ideally, the threshold for shadow adjustment should be twenty to forty
greater than the highest of the R and G values in the brightest shadows.
The threshold for highlight adjustment should be twenty to forty less
than lowest of the R and G values in the darkest highlights. To choose a threshold that can
be used for both shadows and highlights, enter
the average of the highest value (R or G) in the
brightest shadows and the lowest value (R or G) in
the darkest highlights. Color values can be determined by moving the cursor over the image and
observing the R and G values in the scan window
information panel.
TOP
67
The Digital ICE4 Advanced Settings Menu
Clicking the triangle in the top right corner of the “Digital ICE4 Advanced” palette displays the Digital ICE4 Advanced settings
menu.
Windows
Option
Macintosh
Description
4
Copy Digital ICE Advanced
Settings to Clipboard
(Macintosh only)
Copy current Digital ICE4 Advanced settings to the clipboard. These settings can then be pasted into the
“Digital ICE4 Advanced” palette by selecting Paste from the Edit menu.
Save Digital ICE4 Advanced
Settings…
Save current Digital ICE4 Advanced settings under a user-specified name. These settings will be added to
the end of the Digital ICE4 Advanced settings menu, where they can be recalled by selecting the desired
settings by name.
Delete Digital ICE4 Advanced
Settings…
Delete settings created using the Save Digital ICE4 Advanced Settings… option. A dialog will be displayed where the settings to be deleted can be selected by name.
Import Digital ICE4 Advanced
Settings…
Import settings created using the Export Digital ICE4 Settings… option.
Export Digital ICE4 Advanced
Settings…
Export current settings to a file in a location of your choice. Digital ICE4 Advanced settings files have the
extension “.nla”.
Reset to Default Digital ICE4
Advanced Settings
Turn off all Digital ICE4 Advanced functions and restore all sliders to default settings.
Reset to User Digital ICE4
Advanced Settings
Restore the default Digital ICE4 Advanced settings created with the Set User Settings option in the scan
window settings menu ( 17).
The Tool Chest — Digital ICE4 Advanced
TOP
68
Analog Gain
Controlling the Scanner’s Light Source
The “Analog Gain” palette is used to adjust color by modify- The “Analog Gain” palette contains the following items:
ing exposure for the colored elements in the scanner’s light
Item
Description
source. Gain is measured in Exposure Values (EVs), the same
Adjust exposure for all elements by dragging the slider
unit used for measuring exposure compensation on many
or by entering a value between –2.00 and +2.00 in the
Master
cameras.
text box to its right.
Adjust exposure for the red, green, and blue elements
Red, Green, by dragging the sliders or by entering values between
Blue
–2.00 and +2.00 in the text boxes to their right.
Analog gain
sliders and
text boxes
Redraw
button
Redraw
Reset
Update the preview image to reflect changes to analog gain.
Reset all analog gain sliders to ±0.
Reset
button
The “Analog Gain” Palette
The “Analog Gain” palette is only available when the scan window is
active.
Exposure Values
Exposure Values are a measure of the quantity of light that falls on the
scanning element (Charge- Coupled Device, or CCD). At +1 EV, the
CCD is exposed to twice the normal amount of light, while at –1 EV, the
amount of light is halved. EVs are sometimes referred to as “steps.”
The Tool Chest — Analog Gain
Smear
Choosing too high a value for exposure may produce “smear” or other
defects in the scanned image.
Analog Gain
The status of analog gain is shown in the scan window information
panel. A warning icon ( ) will be displayed if the preview image has
not been updated to reflect changes to analog gain.
TOP
69
Scan Image Enhancer (9000 ED, 5000 ED, COOLSCAN V ED Only)
Automatic Color, Brightness, and Contrast Adjustment
The Scan Image Enhancer automatically adjusts brightness To preview the effects of the Scan Image Enhancer, click
and color saturation during scanning to produce an image Redraw.
with optimal contrast. It is only available with 9000 ED,
5000 ED, and COOLSCAN V ED film scanners.
To use the Scan Image Enhancer, select Enable Scan Image
Enhancer in the “Scan Image Enhancer” palette.
Enable Scan
Image
Enhancer
check box
Redraw
button
Scan Image Enhancer
The status of the Scan Image Enhancer is shown in the scan window
information panel. A warning icon ( ) will be displayed if the preview
image has not been updated to reflect changes to the Scan Image Enhancer.
Scanning Time
Scanning times may increase slightly when the Scan Image Enhancer is
enabled.
The “Scan Image Enhancer” Palette
The “Scan Image Enhancer” palette is only available when the scan
window is active.
The Tool Chest — Scan Image Enhancer
Dark Images
If the image is dark, the Scan Image Enhancer may have no effect or
may make the scanned image darker. Turn the Scan Image Enhancer off
if it fails to produce the desired results.
TOP
70
Scanner Extras
Controlling Scanner Settings
The options available in the “Scanner Extras” palette vary with the model of scanner connected and the film holder or
adapter in use.
“Scanner Extras” palette for 9000 ED
with FH-835S film holder
“Scanner Extras” palette for 5000 ED
with SA-21 adapter
The “Scanner Extras” Palette
The “Scanner Extras” palette is only available when the scan window is active.
The Tool Chest — Scanner Extras
TOP
71
The “Scanner Extras” palette contains the following options:
Scanner
Item
All (SA-21, SA-30,
FH-869S, FH-869G only)
Description
Strip film offset Reposition film to match the scan position.
Manual focus
adjustment
Focus scanner manually using slider or by direct text entry.
Perform
Perform autofocus when slide is inserted in MA-21/MA-20 (S) (5000 ED, 4000 ED, COOLSCAN
autofocus when V ED, COOLSCAN IV ED). When holder is inserted in 9000 ED or 8000 ED, perform autofocus
film is inserted on first frame (FH-869S, FH-869G, FH-869GR excluded).
All
Calibration
Pixel data size
Recalibrate scanner when film has been left in device for extended periods.
Control amount of color information acquired for each pixel (scan bit depth).
5000 ED, 4000 ED,
COOLSCAN V ED,
COOLSCAN IV ED
(IA-20 (S) only)
Crop choices
Choose crop settings to match different APS (IX-240) aperture settings.
9000 ED, 8000 ED,
5000 ED, 4000 ED
Multi-sample
scanning
Increase accuracy by increasing the number of passes the scanner makes over the image.
9000 ED, 8000 ED
5000 ED, 4000 ED
(SF-210/SF-200 (S) only)
CCD scan mode Select Super Fine Scan to perform a single-line scan instead of the normal three-line scan.
Slide feeder scan Choose the number of slides scanned each time the Scan button is clicked.
The Tool Chest — Scanner Extras
TOP
72
Strip Film Offset
This is option is used to
position the film in the
scan aperture. It is only
available with the SA-21,
FH-869S, and the optional
SA-30 and FH-869G.
Manual Focus Adjustment
Use manual focus adjustment
when the desired results can
not be achieved using autofocus. Adjust focus using the
Position slider or by entering a value in the text box to its
right, then click the Preview button in the scan window to
refocus the scanner. The new focus position will be used unTo use this option, the thumbnail drawer must be open with
til the next time film is inserted or Nikon Scan is restarted. To
thumbnails displayed. Select the desired thumbnail and adfocus the scanner automatically, click the autofocus button in
just its position using the Boundary Offset slider or by enthe scan window control area.
tering a value in the text box to its right. If the right edge of
the thumbnail is cut off, move the slider to the right or enter
Strip Film Offset
a larger value to bring it into position; if the left edge is cut
off, move the slider to the left or enter a smaller value. Note Numerical boundary offset ranges are shown below.
that the direction of adjustment changes when thumbnails 5000 ED, 4000 ED, COOLSCAN V ED, COOLSCAN IV ED
are flipped or rotated.
First frame
Subsequent frames
0–144
To view the effects of changes to the boundary offset, click
the Reload Thumbnail button and check the results in the Medium-format film (9000 ED, 8000 ED)
thumbnail drawer. The changes will not be reflected in the
Frame size
First frame*
preview area until the Preview button is clicked.
6 × 4.5
0–69
-144 – 144
Subsequent frames
-69 – 69
6×6
0–93
-93 – 93
6×7
0–114
-114 – 114
6×8
0–127
-127 – 127
6×9
0–137
-137 – 137
*Small negative values may be possible with the first frame of mediumformat film.
The Tool Chest — Scanner Extras
TOP
73
Perform Autofocus When Film Is Inserted
If this option is selected when the
MA-21/MA-20 (S) slide-mount
adapter is inserted in the 5000
ED, 4000 ED, COOLSCAN V ED, or COOLSCAN IV ED, an
autofocus operation will automatically be performed when
a slide is inserted.
Calibration
If the scanner is left on for an extended
period, the temperature inside the scanner
will rise and the scanner may need to be
recalibrated. Click Calibrate to recalibrate
the scanner.
If the MA-21 or MA-20 (S) is inserted, remove any slides
If this option is selected when
from the adapter before recalibrating. Users of the IA-20
the 9000 ED or 8000 ED is con(S) will be prompted to rewind the film before calibration
nected, an autofocus operation
begins. Film will automatically be ejected from the SA-21,
will be performed on the first frame when a film holder is in- SA-30, 9000 ED, or 8000 ED before calibration begins, and
serted (an autofocus operation will not be performed when will automatically be reloaded when calibration is complete.
the FH-869S, FH-869G, or FH-869GR is inserted).
The Status LED
The scanner status LED will blink while the scanner is being recalibrated.
Do not perform any additional operations in Nikon Scan until the status
LED has stopped blinking.
The Tool Chest — Scanner Extras
TOP
74
Pixel Data Size
The option selected in the Scan Bit
Depth menu determines the number of bits acquired per color channel for each pixel in the image. The options available depend
on the scanner used:
• 9000 ED, 5000 ED: 16 bits, 8 bits
• COOLSCAN V ED, 8000 ED, 4000 ED: 14 bits, 8 bits
• COOLSCAN IV ED: 12 bits, 8 bits
IX240 Crop Choices
The following crop choices are available
when the optional IA-20 (S) APS (IX-240)
film adapter is inserted in the 5000 ED,
4000 ED, COOLSCAN V ED, or COOLSCAN
IV ED:
Crop choice
Description
Classic
The size of the initial crop is adjusted for the “classic”
APS setting, with a width-height ratio the same as 35mm film (3 : 2).
Wide
The size of the initial crop is adjusted for the “wide”
APS setting, with a width-height ratio of 16 : 9.
The size of the initial crop is adjusted for the “panoraPanorama ma” APS setting, with a width-height ratio of 3 : 1.
Bit Depth, Color, and File Size
Scanning at a bit depth of eight bits yields 256 shades per pixel for each
component channel of the current color model (if the image is threecolor RGB, the result is 24-bit color, which can express roughly 16.7
million different color values). The maximum bit depth depends on the
scanner connected:
• 9000 ED, 5000 ED: 16 bits (65,536 shades per channel)
• COOLSCAN V ED, 8000 ED, 4000 ED: 14 bits (16,348 shades per channel)1
• COOLSCAN IV ED: 12 bits (4,096 shades per channel)1
Scanning at the maximum bit depth results in larger files but increases
accuracy.
1
Images scanned at fourteen and twelve bits are converted to sixteen
bits when opened in the host application.
The Tool Chest — Scanner Extras
TOP
75
Multi-Sample Scanning
In multi-sample scanning (available
only with the 9000 ED, 8000 ED,
5000 ED, and 4000 ED), the scanner
makes multiple passes over the image and averages the results
to reduce the effects of electronic “noise,” producing more
accurate reproductions with smoother changes in tone.
CCD Scan Mode
This option is available only with 9000
ED and 8000 ED film scanners. To speed
scanning, these scanners use a three-line
CCD. Although the scanner automatically
compensates for slight differences in output between each
line, the very small differences that do remain could cause
a drop in image quality when, for example, the image is
To use multi-sample scanning, select the desired setting
processed by sharply steepening curves to increase contrast.
from the Mode menu:
This can be prevented by selecting Super Fine Scan to scan
the image with a single line (note that scanning times will
Mode
No. of passes
Description
triple). Super Fine Scan produces no noticeable improveNormal (1×)
1
Multi-sample scanning off.
ment when scanning images with a standard tone curve.
Precision increased by equivalent of
Good (2×)
2
one bit per channel.
Fine (4×)
4
Precision increased by equivalent of
two bits per channel.
More Fine (8×)
8
Precision increased by equivalent of
three bits per channel.
Super Fine (16×)
16
Precision increased by equivalent of
four bits per channel.
Slide Feeder Scan
This option is available when an optional
SF-210 or SF-200 (S) slide adapter is
used with the 5000 ED or 4000 ED. Enter the number of slides to be scanned
in the Feed Images text box. This is the number of slides
that will be scanned in sequence when the Scan button is
clicked. To scan all the slides in the feeder, enter a large value
(the maximum value is 99).
Scanning Time
Scanning time increases in proportion to the number of passes.
The Tool Chest — Scanner Extras
TOP
76
Preferences
Fine-Tuning Nikon Scan
The settings in the “Preferences” dialog are used to fine-tune the controls in the scan window. To view the “Preferences”
dialog, click the Prefs button in the control area of the scan window.
The settings in the “Preferences” dialog are divided into the categories shown below. Click the links for more information.
78) *
Nikon Color Management (
Gamma (
82)
Color Management (
File Locations (
94)
Single Scan (
95)
Batch Scan (
96)
File Saving (
99)
Automatic Actions (
Prefs
button
84)
100)
Advanced Color (
101)
Preview Settings (
103)
Grid Settings (
105)
*Read “Nikon Color Management” before reading
the “Gamma” and “Color Management” sections.
Categories
Nikon Scan Menus
When Nikon Scan is used as a “stand-alone” application, the “Preferences” dialog can also be accessed by selecting Preferences… from the Edit
menu (in Mac OS X, select Preferences… from the Nikon Scan application menu).
Preferences
77
Nikon Color Management
The Nikon Color Management System, or Nikon CMS, ensures that image data from Nikon scanners are reproduced
consistently and accurately on monitors or printers. With this
powerful tool, colors can be manipulated in a calibrated RGB
color model before the data are passed to the host application. Profiles detailing the color characteristics of the chosen
color model and the output device (monitor or printer) ensure that colors will be reproduced accurately in almost any
operating environment.
Keeping Colors True
Nikon CMS involves two categories of preferences, one
(“Gamma”) for use when Nikon CMS is off and the other
(“Color Management”) for use when Nikon CMS is on.
“Gamma” specifies how data from the scanner will be modified for display on the monitor. Because monitor profiles
can not be used when Nikon CMS is off, this adjustment
must be made manually. “Color Management” is used to
turn Nikon CMS on and off and select the profiles for use
with the monitor and with the CMYK and calibrated RGB
color models when Nikon CMS is on.
Turning Nikon CMS Off
In general, much better results can be achieved with Nikon CMS on. It
may however be necessary to turn color management off to:
CMYK
Images can not be scanned in CMYK. If CMYK data are required, convert images to CMYK before saving them to disk. Note that images
can only be saved in CMYK if Nikon CMS is on (Nikon CMS is on by
default).
Preferences— Nikon Color Management
• Speed processing
If the computer has a slow CPU, the processing required for color
management may result in longer scan times. Try turning color management off for reduced scan times.
• Edit data from the scanner directly
Advanced users may want to turn Nikon CMS off to edit uncalibrated
RGB data from the scanner.
TOP
78
How Nikon CMS Works
When image data are passed from an input device, such as
a scanner, to an output device, such as a monitor or printer,
color management ensures that the image displayed on the
output device “looks the same” as the original. To accomplish this task, the color management system must have
information about the color characteristics of both the input
and output devices, as well as the color space used for editing. The files containing this information are called “ICC profiles.” Nikon Scan uses the following three types of profile:
Input Profiles
Input profiles provide information on the input device, i.e.,
the Nikon scanner. Fixed profiles detailing the color characteristics of supported Nikon scanners are provided with
Nikon Scan. An input profile is selected automatically based
on the model of scanner used and the type of media (positive or negative) being scanned.
Color-Space Profiles
Separate profiles are available for the RGB and CMYK color
models. Nikon Scan comes with a selection of profiles for
the RGB color model, while CMYK profiles for color printers
are usually provided by the manufacturer. Color-space profiles are used when editing images in the scan window and
when making the final scan.
Monitor Profiles
Monitor profiles are usually provided by the manufacturer,
although profiles for some common monitor types may be
included with the computer operating system. Monitor
profiles apply when images are displayed on a monitor, for
example when an image is displayed in the preview area or
an image window.
Creating Monitor Profiles
If desired, Adobe Photoshop can be used to create a monitor profile for
a specific environment. This profile can then be used in Nikon Scan.
For information on creating monitor profiles, see the documentation
provided with Adobe Photoshop. This option is not available in Adobe
Photoshop LE.
Preferences— Nikon Color Management
TOP
79
The Scanning Process
The illustration below shows the role Nikon CMS plays in
the scanning process. CMS profiles are shown in blue, user
operations in red.
When Nikon CMS is on, uncalibrated RGB image data from
the scanner are converted to grayscale or calibrated RGB,
depending on the color model selected in the scan window.
RGB data are processed according to the profile selected for
the calibrated RGB color space. These data are stored in
memory so that the color model can be changed without
performing another preview. Any changes made using the
color enhancement and Unsharp Mask tools also apply to
these data. When the image is displayed in the preview window, the monitor profile is used to ensure that the preview
image is as true as possible to the data in memory.
Before preview
Scanner Extras
Digital ICE4 Advanced
Scan Image Enhancer
Analog Gain
Preview
Film type selection
Color model and profile
selection
Image processing
Monitor
Curves
Color Balance profile
LCH Editor
Unsharp Mask
Preview
Scanner
Color-space
input profile
profile
When the Scan button is clicked to perform the final scan,
the scan data are processed according to the selected colorspace profile and any changes that were made using the
color enhancement and Unsharp Mask tools in the scan
window. The data are then transferred to the host appli cation. Where possible, the color-space profile is transferred
to the host application together with the image data. The
TWAIN interface used in Windows, however, does not allow
profiles to be passed to another application, with the result
that under Windows the profile is only transferred to the
host when Nikon Scan is used as a “stand-alone” application
(note that profile information is lost when the image is saved
in a format such as BMP that does not allow the profile to
be recorded). When images are displayed in image windows
in Nikon Scan, the monitor profile ensures that the image on
the screen reflects the original as closely as possible.
Scan
Processed tab
Host application
Scan
New colorspace profile
Changes to color
model or colorspace profile
Preferences— Nikon Color Management
Monitor
profile
Natural tab
TOP
80
Scanning with Nikon CMS Off
If Use Nikon Color Management System is not selected in
the “Color Management” category, profiles can not be used
to ensure that the data from the scanner are reproduced accurately when passed to another application or displayed in
the monitor. Because the color profiles required for a cali brated RGB color space are not available when Nikon CMS is
off, images can only be scanned as uncalibrated RGB or grayscale. Similarly, the absence of a monitor profile means that
gamma adjustment must be used to correct the image for
display on the monitor or for editing in another application.
These adjustments to gamma are made in the “Gamma”
category of the “Preferences” dialog.
Before preview
Scanner Extras
Digital ICE4 Advanced
Scan Image Enhancer
Analog Gain
Preview
Preview
The illustration below shows how scanning proceeds when
Nikon CMS is off. The image shown in the preview window
is adjusted for display in the monitor according to the value
chosen for preview gamma in the “Gamma” category. When
the Scan button is clicked, the main scan gamma and any
changes to curves and color balance are passed to the scanner, where they are applied to scan data before the image is
transferred to the host application (if Nikon Scan is used as
a “stand-alone” application, the value for preview gamma
is passed to the scanner instead of main scan gamma). The
LCH Editor and Unsharp Mask tools can not be used when
Nikon CMS is off.
Image processing
Curves
Color Balance
Preview
gamma
Scan
Processed tab
Host application
Scan
Main
scan
gamma
Gamma adjustment
Preferences— Nikon Color Management
Preview
gamma
Natural tab
TOP
81
Gamma
When the Use Nikon Color Management System option
in the “Color Management” category ( 84) is off, the controls in the “Gamma” category are used to adjust data from
the scanner so that they display correctly when previewed on
the monitor or opened in another application.
Preview gamma
Preview gamma applies to the image displayed in the preview area of the scan window. In general, preview gamma
is solely for display in the preview area and does not apply
to the image data that are passed to the host application
when the Scan button is clicked. There are two exceptions
to this rule, however. The first is when Nikon Scan is used as
a “stand-alone” application, the second when Use preview
gamma is selected as the main scan gamma option. In
these cases preview gamma is applied to image data passed
to the host application.
Preview gamma defaults to a value of 1.8 on the Macintosh,
2.2 on Windows computers. To choose a setting suited to
the current monitor, adjust the value so that the patterns of
gray lines and dots above the slider match in density. Gamma can be set by entering a value directly into the text box or
by moving the slider. When making this adjustment, set the
resolution on the monitor to a low value such as 640 × 480
and sit as far away from the monitor as possible. To restore
the default setting for your platform, click Reset.
Preferences— Nikon Color Management
TOP
82
Main scan gamma
Main scan gamma options are only
visible when Nikon Scan is being
used as a TWAIN source or acquire
plug-in for another program (when
Nikon Scan is used as a “standalone” application, preview gamma automatically applies
both to the preview image and to the final scan). Image data
passed to the host application are modified according to the
option chosen here. Three options are available:
Use preview gamma
The gamma value chosen for preview gamma is applied before the data are passed to the host application. Use this
setting when the host application does not support inde pendent gamma settings and you want the final image to be
modified for display on your monitor.
Use application gamma
In some environments, a value for gamma can be chosen
in the host application and passed to the Nikon Scan plugin. When Use application gamma is selected, this value is
applied to the main scan data before they are passed to the
host application.
Two conditions must be fulfilled if this option is to be effective. First, the interface between the application and Nikon
Scan must allow the gamma value to be passed to the Nikon
Scan plug-in. The TWAIN interface used under Windows
does not, however, allow the gamma value to be passed to
the TWAIN source (i.e., to Nikon Scan). Consequently, in the
Windows version of Nikon Scan a default value of 2.2 is used
for main scan gamma whenever Use application gamma
is selected. Second, the application must support gamma
transfer. If Use application gamma is selected with a
Macintosh application that does not support this feature,
Macintosh system gamma (1.8) will be used.
Use custom gamma
When this option is selected, a value for main scan gamma
can be entered in the text box.
Preferences— Nikon Color Management
TOP
83
Color Management
The profiles used by the Nikon Color Management System Use Nikon Color Management System
are specified in the “Color Management” category.
This option turns the Nikon Color Management System on
and off. Changes to this setting only take effect after Nikon
Scan has been quit and restarted.
When Nikon CMS Is On…
…images are processed to ensure consistent color repro duction, as described in “How Nikon CMS Works” ( 79).
Because color management profiles typically contain their
own settings for gamma, the controls in the Gamma tab are
dimmed and inactive.
When Nikon CMS Is Off…
…monitor and color-space profiles are not used, and the
controls in the Color Management tab are dimmed and inactive. The only tool available for ensuring that colors from
the scanner will be displayed accurately on the monitor is
the “Gamma” category ( 82). The only adjustments made
to the image before it is passed to the host application are
gamma adjustment and changes to curves and color balance
made in the scan window.
Preferences— Nikon Color Management
TOP
84
The “Monitor” Tab
The “Monitor” tab specifies the profile that will be used
when images are displayed on your monitor, either in the
scan window preview area or a Nikon Scan image window.
Monitor profiles contain information about the color and
gamma characteristics of the monitor, allowing images to be
adjusted for more accurate color reproduction.
Use factory default monitor profile (default)
Nikon Scan is supplied with default monitor profiles for use
when no other profile is available (see below). To use the
default profile for your platform, select Use factory default
monitor profile.
Default Windows Monitor Profile (Gamma 2.2)
The default Windows monitor profile (“NkMonitor_Win.icm”)
is identical to the sRGB profile.
Default Macintosh Monitor Profile (Gamma 1.8)
The default Macintosh monitor profile (“NkMonitor_
Mac.icm”) is identical to the profile used for Apple 17˝ monitors with a D50 white point.
Use custom monitor profile
Use this option to select a profile supplied by the company
that manufactured the monitor. When this option is selected, the Choose Custom Profile… button will be active.
Clicking this button displays a standard “open file” dialog;
navigate to the disk and folder containing the manufacturer’s
profile. The path to the selected profile will appear in the
text box below the Use custom monitor profile radio button.
Preferences— Nikon Color Management
TOP
85
The “RGB” Tab
The “RGB” tab is used to select a color-space profile for the
calibrated RGB color model. The profile used can be selected
from the Color space menu.
Preferences— Nikon Color Management
Each of the profiles listed may be classified according to its
gamma value and gamut. Gamma is a fundamental characteristic of imaging systems which determines the intensity
of the output signal relative to the input; in human terms,
gamma controls the subjective brightness of images through
alterations to the output level for mid-tones. Windows
and Macintosh systems process video signals differently,
and these differences are reflected in the difference in the
standard gamma values for these platforms. The default
system gamma for Macintosh computers is 1.8, the de facto
standard for Windows systems, 2.2. Nikon CMS includes
eight RGB profiles with a Windows gamma of 2.2 (sRGB,
Bruce RGB, NTSC [1953], Adobe RGB [1988], CIE RGB, Wide
Gamut RGB, compensated Wide Gamut RGB, and Scanner
RGB), and three profiles with a gamma value of 1.8 (Apple
RGB, ColorMatch RGB, and compensated Apple RGB), for
use on the Macintosh. When scanning images, choose a
profile with a gamma value suited to the system on which
the image will be edited.
TOP
86
Use factory default CMYK profile (default)
The “CMYK” Tab
The CMYK sheet is used to select a profile for use with the Nikon Scan is supplied with a default CMYK profile (the
SWOP color library) for use when no other profile is availCMYK color model.
able. This profile is used when Use factory default CMYK
profile is selected.
Use custom profile
Use this option to select a profile supplied by the company
that manufactured your printer. When this option is selected,
the Choose Custom Profile… button will be active. Clicking this button displays a standard open-file dialog; navigate
to the disk and folder containing the manufacturer’s profile.
The path to the selected profile will appear in the text box
below the Use custom CMYK profile radio button.
CMYK
Images can not be scanned in CMYK. If CMYK data are required, convert images to CMYK before saving them to disk. Note that images
can only be saved in CMYK if Nikon CMS is on (Nikon CMS is on by
default).
Preferences— Nikon Color Management
TOP
87
NTSC (1953)
This is the color space for video defined by the National
Windows Profiles (Gamma 2.2)
Television Standards Committee (NTSC) in 1953 and used in
sRGB
early color televisions. This color space is also used in some
This RGB profile is used in the majority of Windows monFar-East newspaper and printing organizations. The corre itors. It closely resembles the RGB commonly used in color
sponding RGB setting in Photoshop 5.0 is “NTSC (1953).”
television, and is also used in the digital television broadcasting system that is on its way to becoming the industry Adobe RGB (1988)
standard in the United States of America. Software and A color-space profile defined in Photoshop 5.0. It has a
hardware manufacturers use it as a default color profile and wider gamut than sRGB and includes the colors found in
guarantee operation when it used. It is also on its way to most CMYK gamuts, making it suitable for users involved in
becoming the standard for images on the web. This profile desktop publishing. The corresponding RGB setting in Phois suited to users who plan to use their digital images “as is,” toshop 5.0 is “Adobe RGB (1988).”
without editing or printing them. It however suffers from
CIE RGB
the drawback of a narrow gamut with a limited area availA video color-space profile established by the CIE. While
able for reproducing blues. The corresponding RGB setting
it boasts a fairly wide gamut, it suffers from the drawback
in Photoshop 5.0 is “sRGB.”
that the area devoted to the reproduction of cyan is relatively
small. The corresponding RGB setting in Photoshop 5.0 is
Bruce RGB
This color profile attempts to expand on the ColorMatch “CIE RGB.”
RGB gamut by defining the chromaticity for G as lying beWide Gamut RGB
tween the values for G in the Adobe RGB and ColorMatch
This color-space profile, designed by Adobe, incorporates
color-space profiles. It was proposed by Bruce Fraser, who
most of the visible colors. This however has the consequence
claims that it includes most of the colors in the SWOP CMYK
that most of the colors it can express can not be reproduced
gamut. It is not provided in the standard install of Photoshop
on standard monitors and printers. The corresponding RGB
5.0, but can be selected as the RGB color-space profile for
setting in Photoshop 5.0 is “Wide Gamut RGB.”
Photoshop by importing the profile “NkBruce.icm”.
RGB Profiles Provided with Nikon Scan
Preferences— Nikon Color Management
TOP
88
Wide Gamut RGB (compensated)
Nikon scanners can scan some colors that cannot be expressed using the Wide Gamut RGB color-space profile.
The compensated Wide Gamut RGB profile redefines Wide
Gamut RGB to include all the colors that can be output from
the scanner. Because many of the colors that can not be expressed in Wide Gamut RGB occur in the blue portion of the
gamut, the level of detail in the blue area has been greatly
increased (because the gamut has been expanded in a nonlinear fashion to incorporate just those colors that could not
otherwise be expressed, it can not be represented in chromaticity diagrams using a standard RGB triangle). As is the
case with Wide Gamut RGB, most of the colors defined in
this profile can not be reproduced on monitors and printers. It is output to the host application as Wide Gamut RGB.
When scanning images into Photoshop 5.0 using this profile,
set the Photoshop RGB profile to “Wide Gamut RGB.”
Preferences— Nikon Color Management
Scanner RGB
This profile replicates the color space achieved when scanning
with Nikon CMS off. Its main purpose is to allow the LCH
editor and Unsharp Mask tools, which are not available when
Nikon CMS is off, to be used to edit the colors produced by
the scanner. In order to produce the effect achieved by turning Nikon CMS off, the monitor profile is not used, nor is an
ICC profile included with the image when it is opened in the
host application.
TOP
89
Apple RGB (compensated)
This profile defines tristimulus (red, green, and blue) chroma ticity as the intersection of the curve that marks the limits of
the visible gamut with lines drawn from the Apple RGB white
point and passing through the points that define tristimulus
chromaticity in the Apple RGB color-space profile. This profile is unique in that it preserves the characteristics of Apple
RGB while allowing more saturated colors. It is not provided
ColorMatch RGB
in the standard install of Photoshop 5.0, but can be selected
The ColorMatch profile is native to Radius PressView monas the RGB color-space profile for Photoshop by importing
itors. It has a wider gamut than Apple RGB, with a particuthe profile “NKApple_CPS.icm”.
larly wide area devoted to the reproduction of blues. The
corresponding RGB setting in Photoshop 5.0 is “Color Match
RGB.”
Macintosh Profiles (Gamma 1.8)
Apple RGB
This profile is used in desk-top publishing applications and
in Adobe Photoshop versions 4.0 or earlier, and is the typical
RGB profile for Macintosh monitors. The corresponding RGB
setting in Photoshop 5.0 is “Apple RGB.” This profile is suitable for working with images displayed on the Macintosh.
Preferences— Nikon Color Management
TOP
90
“Gamut”
In addition to gamma, profiles can be classified according to
their gamut, or the range of colors that can be expressed using the profile. Gamut is conventionally expressed by means
of chromaticity, a measure of color developed by the Commission Internationale de l’Éclairage (CIE). The CIE system,
which is modeled on human color perception, maps the
physical wavelengths of light to three coordinates (known
as CIE X, Y, and Z) that give unique numerical expression
to the full range of color differences that can be perceived
by humans. Chromaticity is a measure of color from which
considerations of brightness have been factored out, giving
a two-coordinate system.
In the chromaticity diagram at right, the complete gamut of
colors visible to humans is in the area enclosed by the green
line. The curved portion of the line gives the chromaticity
of “pure,” unmixed colors with wavelengths in the visible
spectrum of 380–780 nm. The blue end of the spectrum
(380 nm) is at the bottom left corner, the red end of the
spectrum (780 nm) at the bottom right corner. The straight
diagonal line connecting these two points represents the different shades of purple created by combining red and blue
light. The colors inside the area enclosed by these lines are
created by mixing light of different wavelengths.
Preferences— Nikon Color Management
No color profile is capable of expressing the full range of colors visible to the human eye. The diagram below compares
the gamut of colors visible to the eye with the colors that can
be expressed in each of the RGB profiles provided with Nikon
CMS. The gamut for each profile is contained in the triangle
defined by the three points that mark the extremes of red,
green, and blue for that profile (red is at the bottom right
corner, green at the top of the triangle, and blue at the bottom left corner). The white point for each profile is shown
by the symbol in the center of the triangle.
y
1
Apple RGB
0.9
Color Match RGB
0.8
sRGB
0.7
NTSC (1953)
Bruce RGB
0.6
Adobe RGB (1988)
0.5
CIE RGB
Wide Gamut RGB
0.4
Human
0.3
0.2
0.1
x
0
0
0.1
0.2
0.3
0.4
0.5
0.6
0.7
0.8
TOP
0.9
1
91
The following table shows the gamma values for the profiles included with Nikon CMS, together with the chromaticity values for the white point and for red, green, and blue.
White Point
Profile
Name
sRGB
6500K (D 65 )
NTSC (1953)
Std Illuminant C
Bruce RGB
6500K (D 65 )
Adobe RGB (1988)
6500K (D 65 )
CIE RGB
Std Illuminant E
Wide Gamut RGB
5000K (D 50 )
Apple RGB
6500K (D 65 )
ColorMatch RGB
5000K (D 50 )
Apple RGB (Compensated)
6500K (D 65 )
Default Windows Monitor
6500K (D 65 )
Default Macintosh Monitor
5000K (D 50 )
Value
x
0.3127159
y
0.3290015
x
0.3101
y
0.3162
x
0.3127159
y
0.3290015
x
0.3127159
y
0.3290015
x
0.3333333
y
0.3333333
x
0.3457029
y
0.3585386
x
0.3127159
y
0.3290015
x
0.3457029
y
0.3585386
x
0.3127159
y
0.3290015
x
0.3127159
y
0.3290015
x
0.34570291
y
Preferences— Nikon Color Management
0.3585386
Chromaticity (x, y)
Gamma
Value
Name
2.2
HDTV (CCIR 709)
2.2
NTSC (1953)
2.2
Bruce RGB
2.2
Adobe RGB
(1988)
2.2
CIE RGB
2.2
700/525/450nm
1.8
Trinitron
1.8
P22-EBU
1.8
Custom
2.2
HDTV (CCIR 709)
1.8
Trinitron
R
G
B
x 0.64
x 0.3
x 0.15
y 0.33
y 0.6
y 0.06
x 0.67
x 0.21
x 0.14
y 0.33
y 0.71
y 0.08
x 0.64
x 0.28
x 0.15
y 0.33
y 0.65
y 0.06
x 0.64
x 0.21
x 0.15
y 0.33
y 0.71
y 0.06
x 0.735
x 0.274
x 0.167
y 0.265
y 0.717
y 0.009
x 0.7347 x 0.1152 x 0.1566
y 0.2653 y 0.8264 y 0.0177
x 0.625
x 0.28
x 0.155
y 0.34
y 0.595
y 0.07
x 0.63
x 0.295
x 0.155
y 0.34
y 0.605
y 0.077
x 0.65
x 0.265
x 0.14
y 0.341
y 0.717
y 0.0454
x 0.64
x 0.3
x 0.15
y 0.33
y 0.6
y 0.06
x 0.625
x 0.28
x 0.155
y 0.34
y 0.595
y 0.07
TOP
92
Keeping Colors True in Other Applications
When an image is scanned in the Nikon Scan TWAIN source or acquire
plug-in and opened in another application, or when an image saved
using Nikon Scan is opened in another application, the image will be
processed according to the color-space and monitor profiles selected in
the application before being displayed on the monitor. If the profiles
used in the application do not match those used in Nikon Scan, colors
may not be the same as those in the original image.
RGB Color Model
Choose a monitor profile that matches that chosen in the “Monitor”
tab and a color-space profile that matches that selected in the “RGB”
tab (the Photoshop profiles corresponding to those used in Nikon Scan
are listed on the preceding pages). If no matching RGB profile exists,
you can use the Nikon Scan profiles in the path Program Files\Common
Files\Nikon\Profiles (Windows) or System Folder : Preferences : Nikon
MAID : Profiles (Macintosh). The files containing the profiles listed in
the RGB sheet are given below.
Profile
File name
sRGB
NKsRGB.icm
Bruce RGB
NKBruce.icm
NTSC (1953)
NKNTSC.icm
Adobe RGB (1998)
NKAdobe.icm
CIE RGB
NKCIE.icm
Wide Gamut RGB
NKWide.icm
Apple RGB
NKApple.icm
Color Match RGB
NKMatch.icm
Apple RGB (compensated)
NKApple_CPS.icm
When Nikon Scan is used as an acquire plug-in to the Macintosh version
of Adobe Photoshop 5 or later (full version), the RGB profile will automatically be passed to Photoshop when the image is scanned. Be sure
that the monitor profile matches that used in Photoshop by selecting the
Photoshop monitor profile in the monitor sheet of the Nikon Scan color
management tab.
CMYK Color Model
Choose a monitor profile that matches that chosen in the monitor sheet
and a color-space profile that matches that selected in the CMYK sheet.
When Nikon Scan is used as an acquire plug-in to the Macintosh version of Adobe Photoshop 5 or later (full version), the CMYK profile will
automatically be passed to Photoshop when the image is scanned.
*Do not use the “Scanner RGB” profile when scanning images for use
in a third-party application.
Preferences— Nikon Color Management
TOP
93
File Locations/Scratch Disks
Choosing a Location for Temporary Storage
The “File Locations” (Windows) or “Scratch Disks” (Macintosh) category is used to choose the folder or volume (disk)
that will be used for temporary storage, or “virtual memory,”
while Nikon Scan is in operation. It is recommended that
only disks with a high data transfer rate, such as hard disks,
be selected for temporary storage.
Macintosh
The volume used for temporary storage can be chosen from
the Scratch disk menu. The amount of space available on
the selected disk is shown under the menu.
Windows
The folder currently selected for temporary storage is shown
under Folder for Temporary Data. To choose a different
location, click Change Location… and navigate to the desired drive and folder.
Changes to “File Locations”/”Scratch Disks” Settings
Changes to “File Locations” and “Scratch Disks” settings only take effect after you have quit and restarted Nikon Scan.
Preferences— File Locations/Scratch Disks
TOP
94
Single Scan
Scan Settings for Single Scans
The “Single Scan” category is used to specify the tasks per- After scan
formed automatically before and after single scans.
Option
Save to
disk
Before scan
Option
Description
Auto focus
If this item is checked (the default setting), an autofocus operation will be performed as necessary before making a scan.
Auto exposure If this item is checked (the default setting), an autofor positive exposure operation will be performed as necessary
before scanning film positives.
film
Auto exposure If this item is checked (the default setting), an autofor negative exposure operation will be performed as necessary
before scanning film negatives.
film
Preferences— Single Scan
Description
If this item is checked when Nikon Scan is used as a standalone application, the image created when the Scan button is clicked will be saved to disk instead of being opened
in an image window. When the Scan button is clicked, a
“Save” dialog will appear; specify a name, location, and
file type for the image. This option has no effect when
Nikon Scan is being used as a plug-in or TWAIN source for
another application. The default setting is off.
When this item is checked, the scan window automatically closes after scanning. Holders are automatically ejectClose
window ed from the 9000 ED/8000 ED, and film is automatically
and eject ejected from the SA-21, IA-20 (S), SA-30 (5000 ED/4000
ED), and SF-210/SF-200 (S) (5000 ED/4000 ED). The defilm
fault setting is off.
“Before Scan”
If Perform auto focus when film is inserted is selected in the
“Scanner Extras” palette, an autofocus operation will automatically be
performed when a slide is inserted in a slide-mount adapter (5000 ED,
4000 ED, COOLSCAN V ED, COOLSCAN IV ED) or when a holder other
than the FH-869S or FH-869G is inserted in the 9000 ED or 8000 ED.
As a result, an autofocus operation will not automatically be performed
before the image is scanned, even if Auto focus is selected for “Before
scan.” In the case of the 9000 ED and 8000 ED, this applies only to the
first frame in the holder; an autofocus operation will automatically be
performed prior to scanning for all subsequent frames.
TOP
95
Batch Scan
Scan Settings for Batch Scans
The “Batch Scan” category is used to specify the tasks per- Before batch scan
formed automatically before, during, and after batch scans.
Option
Description
If this item is checked (the default setting), a dialog conPrompt
taining the same options as appear in the “Batch Scan”
for this
information category will be displayed at the start of a batch scan.
If this item is checked (the default setting), a log showing the operations performed and errors that occurred
Create scan during the batch scan will be displayed in the “Log”
tab of the progress window. If Save to disk is selectlog
ed for “After each image”, the log will be saved to the
same folder as the scanned images.
Before each image
“Before Each Image”
If Perform auto focus when film is inserted is selected in the
“Scanner Extras” palette, an autofocus operation will automatically be
performed when a slide is inserted in a slide-mount adapter (5000 ED,
4000 ED, COOLSCAN V ED, COOLSCAN IV ED) or when a holder other
than the FH-869S or FH-869G is inserted in the 9000 ED or 8000 ED.
As a result, an autofocus operation will not automatically be performed
before the image is scanned, even if Auto focus is selected for “Before
each image.” In the case of the 9000 ED and 8000 ED, this applies only
to the first frame in the holder; an autofocus operation will automatically be performed prior to scanning for all subsequent frames.
Preferences— Batch Scan
Option
Description
Auto focus
If this item is checked (the default setting), an autofocus operation will be per formed as necessary before each scan.
Auto exposure If this item is checked (the default setting), an autofor positive exposure operation will be performed as necessary
film
before scanning film positives.
Auto exposure If this item is checked (the default setting), an autofor negative exposure operation will be performed as necessary
film
before scanning film negatives.
TOP
96
After each image
Option
Description
Save to
disk
If this item is checked (the default setting) when Nikon
Scan is used as a “stand-alone” application, scanned images will be saved to disk instead of being opened in image windows. When the Scan button is clicked, a dialog
will appear where the user can specify a location and file
type and choose how the files will be named. This option
has no effect when Nikon Scan is being used as a plug-in
or TWAIN source for another application.
The “File Saving Options” Dialog
If Save to disk is selected in the “Batch Scan” category
when Nikon Scan is used as a stand-alone application, a
“File Saving Options” dialog will appear at the start of a
batch scan.
If this item is checked (the default setting), scanning
will stop when minor errors are encountered. If it is not
Stop on checked, scanning will only stop when all the selected imerrors ages have been scanned, film jams in the scanner, or a
hardware error occurs.
After batch scan
Option
Description
When this item is checked, the scan window automatically closes after scanning. Holders are automatically
Close
window ejected from the 9000 ED/8000 ED, and film is automatiand eject cally ejected from the SA-21, IA-20 (S), SA-30 (5000 ED/
4000 ED), and SF-210/SF-200 (S) (5000 ED/4000 ED).
film
The default setting is off.
Preferences— Batch Scan
TOP
97
The “File Saving Options” dialog contains the following:
File Naming
Files saved during a batch scan are assigned names consisting
of a prefix, a file number of from one to six digits assigned
in ascending order from a user-specified starting point, and
a suffix. The options in the “File Naming” area control the
prefix, file number, and suffix.
Option
Description
Prefix
Enter a prefix of up to 65 characters.
Suffix
Enter a suffix of up to 65 characters.
File Saving
Option
Description
…
To choose a destination folder for the images, click
this button and navigate to the desired folder.
Select a format from NEF, TIFF, TIFF (CMYK), JPEG,
File Format BMP (Windows only), and PICT (Macintosh only).
If the selected file format supports compression, the
Compression amount of compression can be selected from this
Level
menu.
Number
of Digits Specify the number of digits in the file number.
Starting File numbers are assigned in ascending order starting from
Index this number.
Sample Shows a sample of the file names that will be assigned.
File-Naming Conventions
Windows
Where long file names are supported, the maximum length is 255
characters. File names may not contain quotes or any of the following
characters: “\\” “/” “:” “,” “;” “*” “<“ “>” and “|”.
In environments that do not support long file names, the maximum length is eight characters; file names may not contain spaces,
quotes, or any of the following characters: “\\” “/” “:” “,” “;” “*” “?”
“<“ “>” and “|”.
Macintosh
The maximum length for Macintosh file names is thir ty-one characters.
Colons (“:”) are not allowed.
Preferences— Batch Scan
TOP
98
File Saving
Choosing a Default File Format and Creator
The “File Saving” category is used to choose the default
file type for images saved when Nikon Scan is used as a
“stand-alone” application. The Macintosh version also has
an option for choosing the “creator” application, i.e., the application that will start when files saved from Nikon Scan are
double-clicked.
Windows
Option
Description
Default file
format
Select the default file format from NEF, TIFF, TIFF
(CMYK), JPEG, BMP (Windows only), and PICT (Macintosh only). Select Last used to choose the format most recently used to save images when Nikon
Scan was used as a “stand-alone” application.
If the selected file format supports compression, the
Compression amount of compression can be selected from this
level
menu.
Use alternate
creator code
(Macintosh
only)
If this option is selected, a new creator application
can be chosen by clicking the Choose Application… button and navigating to the desired appli cation. This option is not available in the Windows
version of Nikon Scan.
Macintosh
Preferences— File Saving
TOP
99
Automatic Actions
Preview Area Options
The “Automatic Actions” category controls the actions performed when media are inserted in the scanner or the focus
point is adjusted using the focus tool in the “Layout Tools”
palette.
Option
Description
If Single image adaptor is selected, the scanner
will automatically perform a preview when a slide is
inserted in the MA-21/MA-20 (S) slide-mount adapter or the optional SF-210/SF-200 (S) slide feeder. If
Preview
Multiple image adaptor is checked, the scanner
when film is will automatically perform a preview using user deinserted
fault settings when film is inserted in a multi-frame
adapter (if no user defaults are defined, factory defaults will be used). This option is not available when
the 9000 ED or 8000 ED is connected.
If Ten or fewer thumbnails is selected, the scanner will automatically generate thumbnails when APS
or strip film with ten or fewer frames is inserted in a
Thumbnail multi-frame adapter. If More than ten thumbnails
when film is is checked, the scanner will automatically generate
inserted
thumbnails when film is inserted in the SA-30 or IA20 (S). This option is not available when the 9000 ED
or 8000 ED is connected.
If this option is select, the scanner will automaticalPerform auto ly perform an autofocus operation when the focus
focus when point is changed using the focus tool in the “Layout
focus point is Tools” palette. If it is not checked, autofocus will
only be performed when the
button is clicked in
moved
the scan window control area.
Preferences— Automatic Actions
TOP
100
Advanced Color
White Point, Gray Point, Black Point, and Auto Contrast
The “Advanced Color” category is used to specify output White-, Gray-, and Black-Point Targets
colors for the black, white, and gray points and to change The targets in the “RGB” and “Grayscale” tabs specify dethe size of the area sampled when the eyedropper tools in fault output values for the white, gray, and black points in
the “Curves” palette are used. It is also controls the portion each color model. The factory default setting for white point
of the tone range excluded in auto contrast operations.
is 255 for each channel, which displays as white on most
computer monitors. The factory default for the gray point
is 128, which displays as a neutral gray. The default for the
black point is zero, which displays as black. To restore factory defaults for the color model in the selected sheet, click
Reset.
The Master Channel
To set the white and black points for the master channel in the RGB
color model, select RGB in the “Curves” palette channel menu, click the
white- or black-point eyedropper tool while pressing Ctrl (Windows) or
option (Macintosh), and sample the image.
Output Values
Although output values in the “Advanced Color” palette range from
zero to 255, calculations are per formed at a precision of sixteen bits.
Preferences— Advanced Color
TOP
101
Auto Contrast Calculations
The Auto contrast calculations option controls how
auto contrast operations in the “Curves” and “LCH Editor”
palettes calculate the input values for the white point and
black point. By default, the white point is set to a value that
excludes 0.5% of the brightest pixels in the current crop,
the black point to a value that excludes 0.5% of the darkest
pixels in the crop. This produces an optimal dynamic range,
with minimum loss of detail in shadows and highlights. To
preserve detail at the expense of dynamic range, lower the
“excluded” value for auto contrast (a value of zero will set
the black and white point respectively to the darkest and
brightest pixel in the crop). To increase the dynamic range at
the expense of detail, raise the “excluded” value.
Sample Point Size
This setting determines the size of the area sampled for the
color-value display and the white-point, gray-point, and
black-point tools. Sample point size can be set to 1 × 1, 3 × 3,
or 5 × 5 pixels. When the sample size is set to 3 × 3 or 5 × 5,
Nikon Scan averages the pixels sampled. Choosing a large
sample size reduces precision, but also minimizes the effects
of noise; choosing a small sample size has the opposite effects.
Digital DEE
When inspecting color values to determine the threshold for Digital
DEE, set the sample point size to 5 × 5 pixels. Note that color values
are displayed in the “Information” palette and information panel when
an eyedropper tool is selected; be careful not to click the image when
determining the threshold for Digital DEE. If an eyedropper cursor is
selected, clicking the image could reshape the active curve.
Preferences— Advanced Color
TOP
102
Preview Settings
Automating Previews
The “Preview Settings” category determines the operations performed automatically when the Preview button is clicked.
Preferences— Preview Settings
TOP
103
Option
Description
Auto focus
If this item is checked (the default setting), an autofocus operation will be performed as necessary when
the Preview button is clicked.
Auto
If this item is checked (the default setting), an autoexexposure for posure operation will be performed as necessary bepositive film fore previewing film positives.
Auto
If this item is checked (the default setting), an autoexexposure for posure operation will be performed as necessary benegative film fore previewing film negatives.
Multi
sampling
Check this item to perform multi-sample scanning
during preview (9000 ED, 8000 ED, 5000 ED, 4000
ED only). Multi-sample scanning will not be performed if Normal (1×) is selected in the “Scanner Extras” palette. Selecting this option increases the time
needed to complete a preview, while the effects of
multi-sample scanning may not be visible in the preview area at the normal zoom ratio.
Digital ICE
If this item is checked (the default option), the image
will be processed during preview to reduce the effects
of dust and scratches. This option only takes effect if
Enable Digital ICE is selected in the “Digital ICE4 Advanced” palette. Selecting this option increases the
time needed to complete a preview.
Cache
preview
image for
single image
adapter
If this item is checked (the default option), Nikon Scan
will store the last preview created with the MA-21/
MA-20 (S) slide-mount adapter. This preview will be
displayed the next time the scan window is opened or
the MA-21/MA-20 (S) is inserted.
Preferences— Preview Settings
Autofocus/Autoexposure
If an autofocus or autoexposure operation has already been performed
on the current frame, it will not automatically be repeated before a
preview or scan. The autofocus and autoexposure buttons in the scan
window can be used to perform these operations manually if desired. If
Perform auto focus when film is inserted is selected in the “Scanner
Extras” palette, an autofocus operation will automatically be performed
when a slide is inserted in a slide-mount adapter (5000 ED, 4000 ED,
COOLSCAN V ED, COOLSCAN IV ED) or when a holder other than the
FH-869S or FH-869G is inserted in the 9000 ED or 8000 ED. As a result, an autofocus operation will not automatically be performed before
the image is scanned, even if Auto focus is selected in the “Preview
Settings” category. In the case of the 9000 ED and 8000 ED, this applies only to the first frame in the holder; an autofocus operation will automatically be performed prior to scanning for all subsequent frames.
TOP
104
Grid Settings
Creating a Layout Grid
The “Grid Settings” category determines the color and spacing of the grid displayed over the image in the active window
when Show grid is selected in the “Layout Tools” palette.
Option
Color
Description
Choose the grid color.
Display grid Enter the spacing for the layout grid. Units can be seline every lected from the menu to the right of the text box.
Display n Enter the number of subdivisions into which each grid
subdivisions cell will be divided. The main grid appears as solid
per line
lines, the subdivisions as broken lines.
Show grid
for new
windows
Preferences— Grid Settings
If this item is selected, a layout grid will automatically be displayed in the preview area. If Nikon Scan
is used as a “stand-alone” application, a layout grid
will also be displayed on images newly opened in image windows.
TOP
105
Image Windows
Using Nikon Scan as a “Stand-Alone” Application
This chapter describes the operations that can be performed in image windows when Nikon Scan is used as a “stand-alone”
application. Click the links for more information.
Windows
Macintosh
Menu bar
Toolbar
The Nikon Scan Applet (
Image Windows (
107)
108)
Saving Images (
109)
The Settings Section (
111)
Rotating and Flipping Images (
Zoom (
112)
112)
Color Space (
113)
Printing Images (
113)
Editing Images (
114)
The Toolbar (
115)
The Status Bar (Windows Only) (
Menu Commands (
117)
118)
Image window
Status bar
Third-Party Applications
When Nikon Scan serves as a TWAIN source or acquire plug-in for a third-party imaging application such as Adobe Photoshop, images will be
opened in the third-party application after scanning. See the documentation provided with the application for information on the operations that
can be performed.
Image Windows
106
The Nikon Scan Applet
Getting Started
When Nikon Scan is used as a “stand-alone” application, Click OK to close the message. To open a previously-saved
images can be saved, viewed, and printed in image windows image for viewing, printing, or editing, select Open… from
opened in the Nikon Scan applet. The Tool Chest can also be the Nikon Scan File menu.
used to perform simple imaging tasks.
Windows
Macintosh
When Nikon Scan is used as a TWAIN source or acquire
plug-in for a third-party imaging application such as Adobe
Photoshop, images will not be opened in the Nikon Scan applet after scanning. Instead, they will be opened in the thirdparty application, where they can be viewed, edited, printed,
and saved according to the options available.
Starting the Nikon Scan Applet
For information on starting the Nikon Scan applet, see
“Starting Nikon Scan as a ‘Stand-Alone’ Application” ( 9).
If no scanner is connected, the following message will be
displayed when Nikon Scan is started:
Opening Images from the Toolbar (Windows Only)
Image files can also be opened by clicking the
button in the toolbar
(Windows only).
Image Windows— The Nikon Scan Applet
TOP
107
Image Windows
Viewing Images
When Nikon Scan is used as a “stand-alone” application,
images are opened in image windows after scanning (except
when Save to disk is selected in the “Preferences” dialog;
77) or when a file is selected using the Open… option in
the File menu.
Windows
Macintosh
Layout Grid
If Show grid is selected in the “Layout Tools” palette, a layout grid will
be displayed over the image in the active window. The grid can also be
displayed by selecting Show Grid from the View menu.
Selecting the Active Window
When multiple windows are open in the Nikon Scan applet, a window
can be activated and brought to the front by clicking the window or
by choosing it from the windows listed at the bottom of the Window
menu.
The Tool Chest
Many of the tools in the Tool Chest can be applied to images in image
windows. If multiple images are opened in image windows in the Nikon
Scan applet, settings can be adjusted and saved separately for each image. With the exception of images saved in NEF format, the settings
in each tool palette will be reset to default values when an image is
opened. When an image saved in NEF format is opened, the settings
in each tool palette will be reset to the values in effect when the image
was saved.
Image Windows— Image Windows
TOP
108
Saving Images
Supported File Formats
To save the image in the active window under a new name,
choose Save As… from the File menu. A “Save As” dialog
will be displayed; after navigating to the desired location,
enter a file name and choose a file type. Click Save to save
the image.
Choosing a File Type
Nikon Scan supports the following formats:
Format
Description
NEF
Changes to settings in the Tool Chest are not directly applied to images saved in NEF (Nikon Electronic Image Format). Instead, information about settings is saved separately in the same file as the image. When the image is opened
again in Nikon Scan, these settings will be loaded into the
Tool Chest and applied to the image. This allows settings to
be adjusted without affecting the original image (the “original image” is the image acquired from the scanner, modified according to the settings in effect in the scan window
at the time image was scanned). Note that Nikon Capture
does not support NEF images created in Nikon Scan.
JPEG
Format
Description
TIFF
Use TIFF when saving images for high-quality output or
editing. Images scanned at a bit depth of twelve or more
(twelve, fourteen, or sixteen bits) will be saved as sixteenbit TIFF, images scanned at a bit-depth of eight bits as
eight-bit TIFF. Although the lack of compression will result
in larger files, a high level of image quality will be maintained. TIFF is supported in a wide variety of applications
on both Windows and Macintosh platforms.
As above, except that the image is converted to the CMYK
TIFF
color model when saved. This option is available only
(CMYK) when Nikon CMS is on (Nikon CMS is on by default).
Most Windows users will be able to view files of this type.
BMP
This format is not available in the Macintosh version of
(Windows Nikon Scan, and does not support CMYK, sixteen-bit grayonly)
scale, or sixteen-bit RGB.
PICT can be viewed on most Macintosh computers, and
PICT
supports JPEG compression. This format is not available in
(Macintosh the Windows version of Nikon Scan, and does not support
only)
CMYK, sixteen-bit grayscale, or sixteen-bit RGB.
JPEG is a good choice for images that will be output at low
resolution or distributed in electronic form. Images can be
compressed, allowing more images to be saved in the same
amount of disk space. Note, however, that JPEG compression
results in loss of information that can not afterwards be restored. This format is not available when saving CMYK images or images with a bit depth of sixteen bits per channel.
Image Windows— Saving Images
TOP
109
Choosing a Compression Ratio
JPEG and PICT images can be compressed using JPEG compression, in which images are divided into blocks eight pixels on a side and detail within
each block selectively reduced. Although raising the compression ratio decreases the file size, it also makes the block pattern more visible and may
result in noticeable loss of detail (the actual effect depends on the output scale and the type of subject). It is recommended that files be saved at
the lowest compression ratio possible; if necessary, they can always be opened and saved again at a higher compression ratio.
The compression ratio can be chosen from a menu in the “Save As” dialog. Five options are available, ranging from Excellent Quality, which offers the lowest compression and highest image quality, to High Compression, which offers the highest compression and lowest image quality.
Image Windows— Saving Images
TOP
110
The Settings Section
Viewing Image Information
To view information about the image in an image window, click the Settings Section triangle or select Settings Section
from the View menu.
Click to view image
information
Image information hidden
Windows
Macintosh
Click to
hide image
information
Click to
hide image
information
Image
information
Image
information
Image information displayed
Image information displayed
The settings section gives information about the time and date the image was created, the film type, the scan bit depth,
analog gain, Digital ICE4 Advanced, and multi-sample scanning.
Image Windows— The Settings Section
TOP
111
Rotating and Flipping Images
Zoom
Changing Image Orientation
Zooming Images in and Out
To flip or rotate the image in the active window:
The active window can be zoomed in or out using the zoom
• Use the flip or rotate buttons in the “Layout Tools” pal- cursor or the zoom options in the View menu.
ette.
The Zoom Cursor
To select the zoom cursor:
• click the
button in the “Layout Tools” palette,
Rotate
• select Zoom Cursor from the View menu, or
Flip
• click the
button in the toolbar
“Layout Tools” palette
• Click the
(rotate clockwise) or
wise) buttons in the toolbar.
(rotate counterclock-
• Use the options in the Image > Transform sub-menu.
Click anywhere within the image window to zoom in on the
selected point. To zoom out, click the image while pressing
Alt (Windows) or option (Macintosh).
The View Menu
Open the View menu and select Zoom In to zoom in on the
center of the image in the active window. Select Zoom Out
to zoom out.
To scroll the image, use the image window scroll bars or use
the hand cursor to drag the image. To view the entire image
at the maximum possible zoom ratio, select Fit to Screen
from the Window menu. To view the image at a zoom ratio
of 1 : 1, select Actual Size from the Window menu.
Image Windows— Rotating and Flipping Images/Zoom
TOP
112
Color Space
Printing Images
Selecting a New Color Model and Bit Depth
Printing the Image in the Active Window
To convert the image in the active window to a new color To print the image in the active window, select Print… from
model and bit depth, select one of the following options the File menu. In the Windows version of Nikon Scan, imfrom the Image > Color Space sub-menu.
ages can also be printed by clicking the
button in the
toolbar.
Option
Description
8-bit
Convert image to eight-bit grayscale capable of expressGrayscale ing 256 shades of gray.
16-bit Convert image to sixteen-bit grayscale capable of exGrayscale pressing 65,536 shades of gray.
24-bit
RGB
Convert image to RGB at a bit depth of eight bits per
channel (twenty-four bit RGB).
48-bit
RGB
Convert image to RGB at a bit depth of sixteen bits per
channel (forty-eight bit RGB).
Converting Color Images to Grayscale
If a color image is converted to grayscale and then saved, the lost color
information can not be restored.
Print Preview (Windows Only)
To preview the image to be printed, select Print Preview… from the
File menu (Windows only).
Image Windows— Document Color Space/Printing Images
TOP
113
Editing Images
Editing Images After Scanning
The image in the active window can be edited using the following palettes in the Tool Chest:
Palette
Operation
Layout Tools (
33)
Flip, rotate, and scroll images, zoom images in or out, select an area to be copied to the clipboard, and display or
hide the layout grid.
Information (
35)
View information about the color of the point under the cursor and the size and location of the current selection.
Curves (
41)
Adjust contrast and color balance in selected portions of the tone range (shadows, mid-tones, or highlights).
Color Balance (
51)
Adjust brightness, contrast, and color balance over the entire image.
Unsharp Mask (
53)
Make edges more distinct, either over the entire image or in areas where a specific color predominates.
LCH Editor (
56)
Adjust brightness, color saturation, and hue.
Tool Palette Settings
The settings in effect in the scan window are applied to data from the scanner when the Scan button is clicked. Any further changes to settings
in image windows apply to these modified image data. To reflect this, tool palette settings are restored to their default values when the images
are opened in image windows.
Image Windows— Editing Images
TOP
114
The Toolbar
Quick Command Access
The toolbar gives access to many commonly used commands
with a single click. The Windows and Macintosh versions of
Nikon Scan have different toolbars.
Windows
To display or hide the toolbar, select Toolbar from the View
menu. When displayed, toolbar can be dragged out of the
menu bar to a new position anywhere within the Nikon Scan
application window, where it will “float” in an independent
window.
The toolbar contains the following buttons:
Button
Button
Hand Cursor
Save
Copy
Print
Select the hand cursor to scroll images.
Choose the selection cursor to select an area in the
Selection Cursor active window.
Zoom Cursor
Select the zoom cursor to zoom images in and out.
Rotate the image in the active window counterRotate 90° CCW clockwise.
Rotate 90° CW
Description
Help
Open
Description
Rotate the image in the active window clockwise.
Open Nikon Scan help.
Open an image in Nikon Scan.
Save the image in the active window.
Open Twain
source
Open the scan window.
Copy the current selection to the clipboard.
Print the image in the active window.
Image Windows— The Toolbar
TOP
115
Macintosh
In the Macintosh version of Nikon Scan, each image window
has its own toolbar.
The toolbar contains the following buttons:
Button
Description
Shows the orientation of the image, reflecting any
Image Orientation flips or rotations.
Zoom In
Zoom Out
Rotate 90° CCW
Rotate 90° CW
Button
Description
Choose the selection cursor to select an area in
the
window.
Selection Cursor
Zoom Cursor
Hand Cursor
Select the zoom cursor to the zoom image in and
out.
Select the hand cursor to scroll the image.
Copy Settings
Display a dialog where selected Tool Chest settings can be copied to the clipboard.
Paste settings
Paste settings copied with the
button into the
Tool Chest for the current image.
Zoom the image in.
Zoom the image out.
Rotate the image counterclockwise.
Rotate the image clockwise.
Image Windows— The Toolbar
TOP
116
The Status Bar (Windows Only)
Tool Tips
When the cursor is moved over a button or menu, a brief The status bar can be hidden or displayed by selecting Stadescription of its function appears in the status bar at the tus Bar from the View menu.
bottom of the application window.
Status bar display for the “Save” button
Image Windows— The Status Bar (Windows Only)
TOP
117
Menu Commands
Index to Menu Options
Windows
File
Edit
Copy Settings…
Copy to the clipboard selected
Tool Chest settings for the image
in the active window. A dialog will
be displayed where the desired
settings can be selected.
Print…
Print the image in the active window.
Print Preview
Preview the image to be printed.
Print Setup…
Adjust printer settings.
Open Twain Source
Open the scan window.
Recent files
Recent files are listed in the order
opened. Choose a file to open it
in an image window.
Open…
Open an image file.
Exit
Exit Nikon Scan.
Close
Close the active window.
Save
Save the image in the active window.
Undo
Undo the preceding operation.
Copy All Settings
Copy to the clipboard all Tool
Chest settings for the image in the
active window.
Cut
The Ctrl-X shortcut can be used in
dialogs to cut selected text to the
clipboard. The menu command
itself can not be used.
Paste
Paste the contents of the clipboard
to the Tool Chest. The Ctrl-V
shortcut can be used to paste text
in a dialog.
Copy
The Ctrl-C shortcut can be used in
dialogs to copy selected text to the
clipboard. The menu command itself can not be used.
Clear
Delete the contents of the current
text box.
Preferences…
Display the “Preferences” dialog.
Save As…
Save the image in the active window under a new name.
Image Windows— Menu Commands
TOP
118
Windows
View
Image
Settings
Toolbar
Display or hide the toolbar.
Status Bar
Display or hide the status bar.
Tool palettes
A list of Tool Chests is displayed in
the View menu. Select to display
or hide Tool Chests.
Zoom In
Zoom in on the image in the active
window.
Progress Window
Select to display or hide the progress window.
Color Space
Convert the image in the active
window to a new color space and
bit depth.
Transform
Copy, save, load, delete, or reset
settings for all tool palettes or for
selected tool palettes.
Settings Section
Display the settings section for the
active window.
Zoom Out
Zoom out from the image in the
active window.
Selection Cursor
Select the crop cursor.
Rotate or flip the image in the active window.
Zoom Cursor
Select the zoom cursor.
Hand Cursor
Select the hand cursor.
Show Grid
Display or hide the layout grid in
the active window.
Image Windows— Menu Commands
TOP
119
Windows
Scanner (displayed only when scan window is active)
Tools
Tile
Arranges image windows so that
they do not overlap.
Settings
Show Nikon Browser
Open the Nikon Browser component of Nikon View.
Copy, save, load, delete, or reset
settings for all tool palettes or for
selected tool palettes.
Film Type
Select type of film to be scanned.
Scan Color Space
Choose the scan color model.
Bit Depth
Choose the scan bit depth.
Transform
Eject
Eject the film or holder from the
scanner.
Window (continued)
Scanner/Firmware Version/Port
Open the scan window for the selected scanner.
Window
Arrange Icons
Arranges minimized image windows along the bottom of the
Nikon Scan application window.
Open windows
A list of the images currently open
is displayed at the end of the Window menu.
Help
Slide Feeder…
Choose the number of slides
scanned when a slide feeder is
inserted in the scanner.
Show Natural Pane /
Show Processed Pane
Switch between the “Natural”
and “Processed” panels in the
preview area.
Rotate or flip the image in the
preview area.
Image Windows— Menu Commands
Fit To Screen
Resize the active window to fit the
screen.
Actual Size
View image in active window at
100%.
Help Topics
Open Nikon Scan help.
About Nikon Scan…
Display version information for
Nikon Scan.
Cascade
Arranges image windows so that
they overlap.
TOP
120
Macintosh (Mac OS X)
Application menu
File (continued)
Edit
Close
Close the active window.
Paste
Paste the contents of the clipboard.
Save
Save the image in the active window.
About Nikon Scan…
Display version information for
Nikon Scan.
Preferences…
Display the “Preferences” dialog.
Quit Nikon Scan 4
Quit Nikon Scan.
Save As…
Save the image in the active window under a new name.
Revert
This command can not be used.
Page Setup…
Adjust printer settings.
Print…
Print the image in the active window.
File
New
This command can not be used.
Open…
Open an image file.
Image Windows— Menu Commands
Undo
Undo the preceding operation.
Cut
When entering text in a dialog,
cut selected text and place it in
the clipboard.
Copy
When entering text in a dialog, cut
selected text to the clipboard.
Clear
When entering text in a dialog,
clear the contents of the current
text box.
Select All
When entering text in a dialog, select all the text in the current text
box. When the scan window is
active, select all thumbnails in the
thumbnail drawer.
Copy Settings…
Copy to the clipboard selected
Tool Chest settings for the image
in the active window. A dialog will
be displayed where the desired
settings can be selected.
Copy All Settings
Copy to the clipboard all Tool
Chest settings for the image in the
active window.
TOP
121
Macintosh (Mac OS X)
View
Image
Progress Monitor
Display the progress window.
Tool palettes
A list of Tool Chests is displayed at
the end of the View menu. Select
to display or hide Tool Chests.
Zoom In
Zoom in on the image in the active
window.
Zoom Out
Zoom out from the image in the
active window.
Settings
Color Space
Convert the image in the active
window to a new color space and
bit depth.
Transform
Copy, save, load, delete, or reset
settings for all tool palettes or for
selected tool palettes.
Settings Section
Display the settings section for the
active window.
Hand Cursor
Select the hand cursor.
Selection Cursor
Select the crop cursor.
Rotate or flip the image in the active window.
Zoom Cursor
Select the zoom cursor.
Focus Cursor
Select the cursor used to choose
the focus point.
Show Grid
Display or hide the layout grid in
the active window.
Image Windows— Menu Commands
TOP
122
Macintosh (Mac OS X)
Scanner (displayed only when scan window is active)
Tools
Help
Settings
Show Nikon Browser
Open the Nikon Browser component of Nikon View.
Film Type
Select type of film to be scanned.
Color Space
Choose the scan color model.
Bit Depth
Choose the scan bit depth.
Transform
Copy, save, load, delete, or reset
settings for all tool palettes or for
selected tool palettes.
Scanner/Firmware Version/Port
Open the scan window for the
selected scanner.
Eject
Eject the film or holder from the
scanner.
Window(displayed only when
image window is active)
Slide Feeder…
Choose the number of slides
scanned when a slide feeder is
inserted in the scanner.
Show Natural Pane /
Show Processed Pane
Switch between the “Natural”
and “Processed” panels in the
preview area.
Rotate or flip the image in the
preview area.
Image Windows— Menu Commands
Nikon Scan Help
Open Nikon Scan help.
Fit To Screen
Resize the active window to fit the
screen.
Actual Size
View image in active window at
100%.
Open windows
A list of the images currently open
is displayed at the end of the Window menu.
TOP
123
Macintosh (Mac OS 9)
Apple menu
File (continued)
About Nikon Scan…
Display version information for
Nikon Scan.
Edit
Save As…
Save the image in the active window under a new name.
Copy All Settings
Copy to the clipboard all Tool
Chest settings for the image in the
active window.
Revert
This command can not be used.
Paste
Paste the contents of the clipboard.
Page Setup…
Adjust printer settings.
File
Print…
Print the image in the active window.
Quit
Quit Nikon Scan.
New
This command can not be used.
Open…
Open an image file.
Close
Close the active window.
Save
Save the image in the active window.
Image Windows— Menu Commands
Undo
Undo the preceding operation.
Cut
When entering text in a dialog,
cut selected text and place it in
the clipboard.
Copy
When entering text in a dialog, cut
selected text to the clipboard.
Copy Settings…
Copy to the clipboard selected
Tool Chest settings for the image
in the active window. A dialog will
be displayed where the desired
settings can be selected.
Clear
When entering text in a dialog,
clear the contents of the current
text box.
Select All
When entering text in a dialog, select all the text in the current text
box. When the scan window is
active, select all thumbnails in the
thumbnail drawer.
Preferences…
Display the “Preferences” dialog.
TOP
124
Macintosh (Mac OS 9)
View
Image
Show Grid
Display or hide the layout grid in
the active window.
Progress Monitor
Display the progress window.
Zoom In
Zoom in on the image in the active
window.
Tool palettes
A list of Tool Chests is displayed at
the end of the View menu. Select
to display or hide Tool Chests.
Zoom Out
Zoom out from the image in the
active window.
Hand Cursor
Select the hand cursor.
Selection Cursor
Select the crop cursor.
Settings
Color Space
Convert the image in the active
window to a new color space and
bit depth.
Transform
Copy, save, load, delete, or reset
settings for all tool palettes or for
selected tool palettes.
Settings Section
Display the settings section for the
active window.
Rotate or flip the image in the active window.
Zoom Cursor
Select the zoom cursor.
Focus Cursor
Select the cursor used to choose
the focus point.
Image Windows— Menu Commands
TOP
125
Macintosh (Mac OS 9)
Scanner (displayed only when scan window is active)
Tools
Help
Settings
Show Nikon Browser
Open the Nikon Browser component of Nikon View.
Film Type
Select type of film to be scanned.
Color Space
Choose the scan color model.
Bit Depth
Choose the scan bit depth.
Transform
Copy, save, load, delete, or reset
settings for all tool palettes or for
selected tool palettes.
Scanner/Firmware Version/Port
Open the scan window for the
selected scanner.
Eject
Eject the film or holder from the
scanner.
Window(displayed only when
image window is active)
Nikon Scan Help
Open Nikon Scan help.
Slide Feeder
Choose the number of slides
scanned when a slide feeder is
inserted in the scanner.
Show Natural Pane /
Show Processed Pane
Switch between the “Natural”
and “Processed” panels in the
preview area.
Rotate or flip the image in the
preview area.
Image Windows— Menu Commands
Fit to Screen
Resize the active window to fit the
screen.
Actual Size
View image in active window at
100%.
Open windows
A list of the images currently open
is displayed at the end of the Window menu.
TOP
126
Nikon View
Browsing Images
Selecting Show Nikon Browser in the Nikon Scan Tools
menu opens the Nikon Browser component of Nikon View,
where image files that have been saved to disk can be
browsed, and selected images viewed, edited, and printed.
For more information, see the Nikon View Reference Manual
or Nikon View’s on-line help.
The Show Nikon Browser option can only be used if Nikon
View 6 has been installed from the supplied Nikon View 6
CD. If an earlier version of Nikon View is already installed on
the computer, upgrade to Nikon View 6.
Browsing Images Created with Nikon Scan
Some functions are not available when browsing images created with
Nikon Scan. Nikon View does not support BMP (Windows) or PICT (Macintosh). Save files in TIFF or JPEG when using Nikon View. Large files
created with Nikon Scan may not display in slide shows.
Color Management
For accurate color reproduction, choose the same color-space profile in
Nikon Scan and Nikon View.
Product Registration
Nikon View 6 or later can be registered on-line. See the Nikon View
Reference Manual for more information.
Nikon View
127
Scan Index
Index to Scanning Options
This section lists common scanning operations. Click the links to view related sections of this manual.
Common Tasks
Operation
Open the scan window
Starting Nikon Scan (
8)
Specify the film type
The Film Type Menu (
19)
Choose a color model
The Color Model Menu (
Choose a frame size (9000 ED/8000 ED only)
The Frame Size Menu (
Select frames for scanning
The Thumbnail Drawer (
Preview images before scanning
The Preview Button ( 26)
The Preview Area ( 27)
Scan images
The Scan Button (
Save images after scanning
Image Windows—Saving Images (
Rotate images
Layout Tools (
Zoom images in and out
Layout Tools ( 33)
The Scan Window—The Zoom Buttons (
Image Windows—Zoom ( 112)
Select the area to be scanned (select a crop)
Layout Tools (
33)
View information about a selection
Information (
35)
Focus the scanner
The Autofocus Button (
Adjust exposure
The Autoexposure Button (
Scan Index
20)
20)
23)
28)
109)
33)
16)
15)
16)
128
Image Size and Resolution
Operation
Set image size and output resolution
Crop (
36)
Image Enhancement
Operation
Automatically adjust brightness and saturation to produce a high-contrast image
Reduce the effects of dust and scratches
Scan Image Enhancer (
70)
4
Digital ICE Advanced—Digital ICE (
62)
4
Restore colors lost through fading
Digital ICE Advanced—Digital ROC (
63)
Reduce the effects of film grain
Digital ICE4 Advanced—Digital GEM (
64)
4
Reveal details in highlights and shadows
Digital ICE Advanced—Digital DEE (
Adjust contrast in highlights, mid-tones, or shadows
Curves (
41)
Adjust color balance in highlights, mid-tones, or shadows
Curves (
41)
Adjust brightness, contrast, and color balance over the entire tone range
Color Balance (
51)
Sharpen edges
Unsharp Mask (
53)
Adjust brightness, color saturation, and hue
LCH Editor (
Adjust color balance by selectively adjusting exposure during scanning
Analog Gain (
Choose a scan bit depth (pixel data size)
Scanner Extras—Pixel Data Size (
Reposition thumbnails
Scanner Extras—Strip Film Offset (
Adjust scanner settings
Scanner Extras (
Reduce noise (9000 ED, 8000 ED, 5000 ED, 4000 ED only)
Scanner Extras—Multi-Sample Scanning (
Scan Index
65)
56)
69)
75)
73)
71)
TOP
76)
129
Batch Scanning, Automatic Processing, and Scan Window Settings
Operation
Reuse scan window settings
The Settings Menu (
17)
Specify actions performed before and after a single image is scanned
Preferences—Single Scan (
95)
Specify actions performed before, during, and after a batch scan
Preferences—Batch Scan (
96)
Choose a default file format
Preferences—File Saving (
99)
Specify actions performed when film is inserted
Preferences—Automatic Actions (
Specify actions performed when an image is previewed
Preferences—Preview Settings (
Choose the number of slides in a batch scan (SF-210/SF-200 (S))
Batch Scans ( 29)
Scanner Extras—Slide Feeder Scan (
100)
103)
76)
Miscellaneous
Operation
Adjust output for display on the current computer monitor
Preferences—Gamma (
82)
Choose a color profile for accurate color reproduction
Preferences—Color Management (
Choose where Nikon Scan stores temporary files
Preferences—File Locations/Scratch Disks (
Set target output levels for the white point, gray point, and black point
Preferences—Advanced Color (
Choose a color and spacing for the layout grid
Preferences—Grid Settings (
84)
101)
105)
Preferences—Nikon Color Management (
Ensure that colors are reproduced accurately on the monitor, between applications, Preferences—Gamma ( 82)
and on different output devices
Preferences—Color Management ( 84)
Scan Index
TOP
94)
78)
130
Appendices
Troubleshooting, Glossary, and Memory Requirements
Appendices
Appendix A: Troubleshooting ................................................
132–133
Appendix B: Glossary ..............................................................
134–137
Appendix C: Memory Requirements (Mac OS 9 Only) ........
138–139
131
Appendix A
Troubleshooting
If any problems are encountered with Nikon Scan, check the list below before contacting a Nikon representative.
Problem
Possible Cause
• The scanner is turned off or not connected. Connect the scanner as described in the scanner
User’s Manual.
• The USB or IEEE 1394 (Firewire) interface is not correctly installed, or the device drivers are
missing or corrupted. See the manufacturer’s manual for details.
Nikon Scan displays the error, “Nikon
• The scanner device drivers are not correctly installed (Windows only). See the scanner hardScan was unable to find any active
ware manual for details.
devices.”
• Your computer does not meet the specifications given in the system requirements.
• Nikon Scan is not correctly installed. Reinstall Nikon Scan as described in the scanner User’s
Manual.
The host application does not
recognize the Nikon Scan plug-in
(Macintosh).
—
—
—
4
—
• The plug-in has not been copied to the application’s plug-ins folder.
• The application does not support Adobe Photoshop plug-ins. Use a different host application.
—
—
Film jams in the scanner.
See the scanner User’s Manual for information on resolving jams.
—
Images are out of focus.
• An autofocus operation was not performed before the image was scanned.
• The focus point requires adjustment.
15
15
• The monitor profile chosen in the “Color Management” category of the “Preferences” dialog
does not match the monitor.
• The CMYK profile chosen in the “Color Management” category of the “Preferences” dialog
does not match the printer.
• The RGB color-space profile chosen in the “Color Management” category of the “Preferences” dialog has too narrow a gamut (colors too vivid) or too wide a gamut (image lacks
contrast).
• Curves ( 41), color balance ( 51), or LCH ( 56) settings are incorrectly adjusted.
• Negative film was scanned without an autoexposure operation.
• Monitor settings require adjustment.
85
Colors do not match the original.
Appendices Appendix A
Appendices—
TOP
87
86
—
16
—
132
Problem
Possible Cause
Images are too dark.
• The monitor profile chosen in the “Color Management” category of the “Preferences” dialog
does not match your monitor.
• The CMYK profile chosen in the “Color Management” category of the “Preferences” dialog
does not match the printer.
• The RGB color-space profile chosen in the “Color Management” category of the “Preferences” dialog has the wrong gamma value for your platform.
• You need to adjust the gamma value chosen in the “Gamma” category of the “Preferences“
dialog for use when Nikon CMS is off.
• The brightness setting on your monitor requires adjustment.
The scanned image has a rough,
jagged appearance.
File size is too large.
Print size is too large or too small.
85
87
86
82
—
• The resolution setting in the “Crop” palette does not suit the output device.
• The halo width or intensity settings in the “Unsharp Mask” palette are too high.
36
53
The value for resolution in the “Crop” palette is too high.
36
“Crop” palette settings are not adjusted correctly.
36
Appendices Appendix A
Appendices—
TOP
133
Appendix B
Glossary
This glossary provides definitions of some of the terms used in this manual.
Term
Definition
Bit depth
The number of bits used to express color, also referred to as color depth. The bit depth determines the amount of color information in an image. The greater the bit depth, the larger the number of colors, and the finer the gradations, that can be expressed. Bit depth can be used to refer both to the number of bits per channel and to the combined bit depth for all channels;
thus, for example, an image with a bit depth of eight bits per channel can be said to have a bit depth of twenty-four bits. An
image with a bit depth of one bit has only two colors, typically black and white, with no gradation between the two. See also
Channel.
Black point
The input value below which all input tones are mapped to the minimum output value (by default no color, or black). Any details darker than the black point will be lost. See also Tone, Tone curve.
Channel
The component colors in a given color space. The RGB color space is made up of red, green, and blue channels and a master
channel that combines the three. See also Color space.
CMS
CMYK
See Color management system.
A reflective (subtractive) color model commonly used in printing, which models color using combinations of the three secondary colors used in printer’s ink, Cyan, Magenta and Yellow. Because no combination of these three inks will create a true black,
blacK ink is also used.
A method of ensuring consistency of color reproduction between devices such as scanners, monitors, and printers, and beColor
tween different computer platforms. In the color management system used in Nikon Capture 3, accurate color reproduction is
management ensured through the use of profiles that provide information about the characteristics of the monitor or printer and the color
system
space used for editing. See also ICC, Profile.
Color space
A general term encompassing both the model used to define color (for example, CMYK or RGB) and the range, or gamut, of
colors that can be expressed in a given color model. See also CMYK, Gamut, RGB.
A method for reducing file sizes for storage or transmission. Compression algorithms can be divided into “lossless” algorithms,
Compression such as LZW, in which no information is lost when files are restored to their original size for display or editing, and “lossy” algorithms, such as JPEG, in which some information is lost when the file is restored. See also JPEG, TIFF.
Appendices Appendix B
Appendices—
TOP
134
Term
Definition
Crop
The selected portion of an image.
Curve
See Tone Curve.
dpi
dots per inch, a measure of resolution. The more dots per inch, the higher the resolution. See also ppi, Resolution.
Firewire
Apple’s term for the IEEE 1394 interface. See IEEE 1394.
Gamma
Gamma (also written “γ”), a fundamental property of video systems, determines the intensity of the output signal relative to
the input. When calculating gamma, the maximum possible input intensity is assigned a value of one, and the minimum possible intensity (no input) is assigned a value of zero. Output is calculated by raising input to the inverse of the gamma value
(output = input ( 1/γ) ).
Gamut
The range of colors that can be expressed by a given input device (for example, scanner or digital camera), output device (monitor or printer), or color profile. No gamut can reproduce all of the colors seen by the human eye. The gamut of primary RGB
(Red, Green, and Blue) transmitted light displays (film transparencies and color monitors) is very different from, and complementary to, the gamut of secondary CMYK (Cyan, Magenta, Yellow, and blacK) reflected light displays (printed materials). See
also CMYK, Profile, RGB.
Gray point
Controls the output level for mid-tones in the original image. See also Tone, Tone curve.
Grayscale
A color model reproduces image data in shades of gray. Eight-bit grayscale supports 256 shades, sixteen-bit grayscale 65,526
shades. See also Bit depth.
Halo width
The extent of pixels around a selected central pixel affected when Unsharp Mask is applied. Also referred to as “radius.” Increasing the halo width increases the width of edges affected by Unsharp Mask. Excessive application of Unsharp Mask results
in an undesirable halo along edges in the image. See also Unsharp Mask.
Histogram
A bar graph showing the distribution of tones or chroma in an image. The horizontal axis shows tone level (brightness) or chroma, the vertical axis the number of pixels. The bars in the graph show the number of pixels of a given brightness or chroma in
the image. The histograms displayed in the “Curves” and “LCH Editor” palettes shows the distribution for the selected channel, and can be used for reference when editing curves. See also Tone, Tone curve.
ICC
The International Color Consortium, an international organization working to develop standards for color management and
color management profiles. ICC profiles were developed for the conversion of color space information between devices, and
are now on their way to becoming a global standard. ICC profiles have been proposed as an International Organization for
Standardization (ISO) standard. See also Profile.
Appendices Appendix B
Appendices—
TOP
135
Term
Definition
IEEE 1394
A high-speed transfer protocol developed by the Institute of Electrical and Electronics Engineers for connecting peripherals such
as hard disks, MO drives, and digital cameras to a computer via a cable.
JPEG
A standard graphic format designed by the Joint Photographic Experts Group. Images are compressed using a discrete cosine
transform that takes advantage of the properties of human vision, which is more sensitive to light in the lower wavelengths,
to increase quantization at lower frequencies. JPEG compression is “lossy,” meaning that information is lost when images are
compressed, leading to a drop in image quality. A lossless compression option is also supported in some implementations.
JPEG images can be compressed to as much as 100:1, though quality will be significantly reduced. At a compression ratio of
20 : 1, image quality is not noticeably diminished.
NEF
Nikon Electronic Image Format, an image file format developed by Nikon to support high-resolution image data. In Windows,
NEF files have the extension “.nef”. The advantage of NEF is that while user settings such as curves and color balance are saved,
they are not applied to the original image data. NEF images may thus be edited and saved several times without degrading or
altering the original image.
Noise
Digital “artifacts,” or data in an image file that are not a part of the original image. The presence of noise is reflected in a loss
in image quality.
Plug-in
ppcm
ppi
Preferences
A software module that adds functionality to another application.
pixels per centimeter, a measure of resolution. The more pixels per centimeter, the higher the resolution. See also ppi, Resolution.
pixels per inch, a measure of resolution. The more pixels per inch, the higher the resolution. See also ppcm, Resolution.
Settings controlling basic operations performed by a given program, adjustable by the user.
Profile
A file defining the color characteristics of an input device such as a scanner or digital camera, an output device such as a printer
or monitor, or the color space used for editing images. Profiles are used by color management systems to ensure consistent color reproduction. The Nikon Color Management System used in Nikon Scan employs ICC profiles. See also Color space, ICC.
Resolution
The density of dots or pixels that make up an image, measured in dots per inch (dpi) or pixels per inch (ppi); the resolution of
Windows monitors, for example, is 96 ppi. The greater the density of dots or pixels, the higher the resolution and the greater
the capacity to express detail. Resolution is hence the digital equivalent of film resolving power. Computer monitors typically
have a resolution of 72 ppi, 90 ppi, or 96 ppi, while printers may have resolutions of 300 dpi, 600 dpi, 1200 dpi, or 2400 dpi. See
also ppcm, ppi.
Appendices Appendix B
Appendices—
TOP
136
Term
Definition
RGB
An additive color model commonly used in monitors, in which light emitted in three primary colors, Red, Green and Blue, is
combined to create a wide variety of colors. White is modeled by mixing 100% of all three colors.
Scale
The output size of an image as a percentage of the input size. At a scale of 50%, images are output at half their original size.
Threshold
The limit up to which Unsharp Mask will be applied. While it is generally the case that the higher the threshold, the greater the
amount of sharpening applied, the exact effect depends on other Unsharp Mask settings, such as halo width. See also Halo
width, Unsharp Mask.
Thumbnail
A small preview image, the digital equivalent of a photographic film contact sheet. If the current adapter can read multiple
frames, thumbnails will be displayed in the scan windows thumbnail drawer.
TIFF
Tagged Image File Format, an image file format for color or grayscale images, suited to storing bit-mapped images such as
digital photographs. In some implementations, TIFF supports “lossless” LZW and packbit compression (in “lossless” compression methods, no information is lost when the image is compressed, as opposed to “lossy” compression methods such as JPEG,
in which detail is sacrificed to achieve higher compression ratios). Images saved in TIFF format using Nikon Scan are not compressed. See also Compression, JPEG.
Tone
Pixel brightness, measured either as the combined intensity for red, green, and blue or the intensity of each of these colors
(channels) individually. The number of tones that can be expressed depends on the bit depth of the image. The distribution of
tones in the image can be seen in the “Curves” palette histogram. See also Bit depth.
Tone curve
A visual tool for editing tones, enhancing brightness and contrast in a selected portion of the tone range. Changing the shape
of the tone curve changes the mapping between input (the tones in the original image) and output (tones as they appear after
editing). The digital equivalent of a densitometric curve. See also Tone.
TWAIN
A standard for input devices such as scanners and digital cameras. Applications that support TWAIN can acquire data from and
TWAIN-compliant device.
A filter for increasing the apparent sharpness of bit-mapped images. Sometimes abbreviated as “USM.” Unsharp masks emUnsharp Mask phasize the differences in color and brightness between edges (outlines) and the rest of the image. See also Halo width,
Threshold.
USB
Universal Serial Bus. A standard for computer serial interfaces which allows automatic “plug-and-play” recognition of peripheral devices and “hot plug” connection of peripherals while the computer or device is on.
White point
The input value above which all input tones are mapped to the maximum output value (the default for the master channel is
white). Any details brighter than the white point will be lost. See also Tone, Tone curve.
Appendices Appendix B
Appendices—
TOP
137
Appendix C
Memory Requirements (Mac OS 9 Only)
Under Mac OS 9, the amount of memory required for best performance varies with the scanner used. The following table
lists the total system memory needed for full use of all scanner functions, together with the recommended memory allocation for Nikon Scan when used as a “stand-alone” application. Use these values as a guide when entering the preferred
memory size ( 139).
Scanner
Total memory
Memory allocation (“preferred size”)
9000 ED/8000 ED
1.5 GB or more
800 MB
5000 ED / COOLSCAN V ED†
1 GB or more
450 MB
4000 ED / COOLSCAN IV ED†
768 MB or more
450 MB
*
*Memory required when scanning 6 × 9 medium-format film at full size using FH-869S film holder with Digital DEE (9000 ED only), Digital ICE,
Digital ROC, and Digital GEM.
†Memory required when scanning forty frames using optional IA-20 (S) or SA-30 adapter (5000 ED, 4000 ED) or six frames using SA-21 (COOLSCAN V ED, COOLSCAN IV ED) with Digital DEE (5000 ED and COOLSCAN V ED only), Digital ICE, Digital ROC, and Digital GEM. Assumes all
frames are previewed and scanned at full size.
Turn virtual memory off when using Nikon Scan. To turn virtual memory off, quit all applications, open the Memory control
panel, select Off for “Virtual Memory,” and restart the computer.
Appendices Appendix C
Appendices—
TOP
138
Allocating Memory to the Host Application
1. After making sure the host application is not running, open the application folder and click the host application icon once
to select it. To allocate more memory to Nikon Scan when it is used as a “stand-alone” application, open the “Nikon
Software : Nikon Scan 4” folder in the install location (the default installation folder is the “Applications” folder on the
start-up disk) and click the Nikon Scan icon.
2. Select Get Info (
will be displayed.
I) from the Finder File menu. The application info dialog
3. Select Memory from the Show menu.
4. Consult the table on the previous page and enter the appropriate value for
“Preferred size.”
Appendices— Appendix C
TOP
139