1
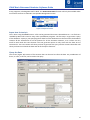
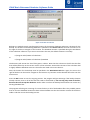
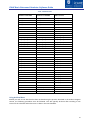
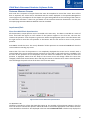
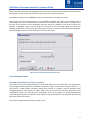
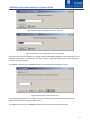
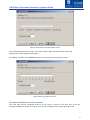
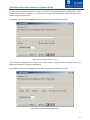
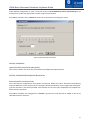
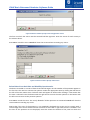
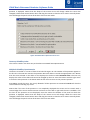
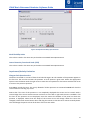
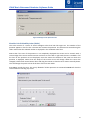
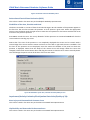
iCAHE Outcomes Calculator
Basic Version
Software Guide
Monitoring patient status over time using
common pain and musculoskeletal outcome measures
Prepared by
Research Team
The International Centre for Allied Health Evidence
University of South Australia
Adelaide, SA 5000
Note: This manual is to be used in conjunction with the iCAHE Outcomes Calculator
User Manual.
iCAHE Basic Outcomes Calculator: Software Guide
Table of Contents
Installing the Software ..................................................................................................... 1
Installation Patch
1
Running the Outcomes Calculator
2
Using the Quick Start Menu
2
Performing Tasks ............................................................................................................. 3
Create a New Episode of Care
3
Overview ....................................................................................................................... 3
General Controls ........................................................................................................... 3
Step 1 – Initiating an Episode of Care ........................................................................... 3
Step 2 – Enter Patient & Funding Details ...................................................................... 4
Step 3 – Configure Outcome Measures ........................................................................ 7
Add a New Patient
8
Looking Up Patient Data
8
Manage an Episode of Care
8
Overview ....................................................................................................................... 8
Open an Episode of Care for Management .................................................................. 9
The Episode Management Screen............................................................................... 10
Working with the Outcome Measures ........................................................................ 12
Progress Chart............................................................................................................. 12
Adding an Assessment ................................................................................................ 13
Data Series Analyses Metrics ...................................................................................... 15
Selecting Data Series to Display .................................................................................. 15
Adding a New Outcome Measure to an Existing EoC ................................................. 15
Selecting a Default Therapist ...................................................................................... 16
Editing the Scale Configuration................................................................................... 17
Adding Assessment Comments ................................................................................... 17
Managing the Data ........................................................................................................ 19
Using Another Database
19
Making Backups/Archive Function
19
Replacing the Database
21
Import/Export Data
21
Export Data for Analysis ............................................................................................. 22
Query the Data
22
Admitted ..................................................................................................................... 23
Discharged .................................................................................................................. 23
Select Patient .............................................................................................................. 23
Select Condition .......................................................................................................... 24
Select Outcome Measure ............................................................................................ 24
Include Demos............................................................................................................. 24
Execute the Query
24
Analyse Data
25
Archive Program
26
Using Archived Data ................................................................................................... 28
Outcome Measure Screens ............................................................................................. 30
Impairment/Pain
30
Short-form McGill Pain Questionnaire ........................................................................ 30
Visual Analogue Scales
31
i
iCAHE Basic Outcomes Calculator: Software Guide
Uni-dimensional Measures of Pain: Frequency........................................................... 31
Uni-dimensional Measures of Pain: Intensity ............................................................. 33
Activity Limitation
35
Upper Extremity Functional Index (UEFI) .................................................................... 35
Activity Limitation/Participation Restriction
35
Patient-Specific Functional Scale ................................................................................ 35
Roland-Morris Low back Pain and Disability Questionnaire ....................................... 36
Oswestry Disability Index ............................................................................................ 37
Whiplash Disability Questionnaire .............................................................................. 37
Neck Disability Index ................................................................................................... 38
Lower Extremity Functional Scale (LEFS) .................................................................... 38
Impairment/Activity Limitation
38
Glasgow Pain Questionnaire....................................................................................... 38
Shoulder Pain & Disability Index (SPADI) .................................................................... 39
Patient Rated Tennis Elbow Evaluation (PRTE) ........................................................... 40
Disabilities of the Arm, Shoulder and Hand ................................................................ 40
Impairment/Activity Limitation/Participation Restriction/Quality of Life
40
Knee Injury and Osteoarthritis Outcome Score........................................................... 40
Hip Disability and Osteoarthritis Outcome Score ....................................................... 40
Foot Function Index..................................................................................................... 41
Psychological Response to Impairment/Activity Limitation/Participation Restriction
41
Fear-Avoidance Beliefs Questionnaire ........................................................................ 41
Kessler Psychological Distress Score ........................................................................... 41
Yellow Flag
42
Örebro Musculoskeletal Pain Screening Questionnaire .............................................. 42
ii
iCAHE Basic Outcomes Calculator: Software Guide
List of Tables
Table 1 Database Files .................................................................................................... 28
List of Figures
Figure 1 Installation PDOXUSRS.NET Error ........................................................................ 1
Figure 2 Outcomes Calculator Icon.................................................................................... 2
Figure 3 Quick Start Menu ................................................................................................ 2
Figure 4 EoC Navigation Buttons ....................................................................................... 3
Figure 5 Initiate a New Episode of Care ............................................................................. 3
Figure 6 Patient, Funding & Risk Factors Detail Screen ...................................................... 4
Figure 7 Patient Information Screen ................................................................................. 5
Figure 8 Patient Information Screen with Search Function................................................. 6
Figure 9 Calendar ............................................................................................................. 6
Figure 10 Selecting Outcome Measures Screen ................................................................. 7
Figure 11 Select Episode of Care Screen ............................................................................ 9
Figure 12 Search for a Patient on the Select Episode of Care Screen ................................. 10
Figure 13 Episode Management Screen........................................................................... 10
Figure 14 System Menu .................................................................................................. 12
Figure 15 Episode Management Screen with Progress Chart ............................................ 13
Figure 16 Therapist Selection Screen............................................................................... 14
Figure 17 Set Assessment Date and Time Screen – Available only on versions that allow
demo episodes of care ................................................................................................... 14
Figure 18 Assessment Comments Screen. ....................................................................... 15
Figure 19 Selecting Additional Outcome Measures .......................................................... 16
Figure 20 Assessment Selection Screen ........................................................................... 17
Figure 21 Example of Assessment Comments .................................................................. 18
Figure 22 Data Menu ...................................................................................................... 19
Figure 23 Set Database Directory Screen ......................................................................... 19
Figure 24 Backup Tool – Archiving and existing database ................................................ 20
Figure 25 Directory Browser ........................................................................................... 20
Figure 26 Backup Tool – Replacing an existing database .................................................. 21
Figure 27 Export Functions ............................................................................................. 22
Figure 28 Develop Query Screen ..................................................................................... 22
Figure 29 Query Results.................................................................................................. 25
Figure 30 Query Analysis Screen ..................................................................................... 26
Figure 31 Archive Tool Screen ......................................................................................... 27
Figure 32 Short Form McGill Pain Questionnaire ............................................................. 30
Figure 33 Short Form McGill Pain Questionnaire ............................................................. 31
Figure 34 Pain Frequency Configuration Screen - Measure .............................................. 32
Figure 35 Pain Frequency Configuration Screen – Time Period ......................................... 32
Figure 36 Pain Frequency Time Count Screen .................................................................. 32
Figure 37 Pain Frequency Verbal Graphic Screen ............................................................. 33
Figure 38 Pain Frequency VAS Screen ............................................................................. 33
Figure 39 Pain Intensity Numeric Screen ......................................................................... 34
Figure 40 Pain Intensity Verbal Graphic Screen ............................................................... 34
iii
iCAHE Basic Outcomes Calculator: Software Guide
Figure 41 Pain Intensity VAS Screen ................................................................................ 35
Figure 42 Generic Patient-Specific Scale Configuration Screen ......................................... 36
Figure 43 Generic Patient-Specific Scale Screen ............................................................... 36
Figure 44 Roland-Morris Questionnaire Screen ............................................................... 37
Figure 45 Whiplash Disability Questionnaire ................................................................... 38
Figure 46 Glasgow Pain Questionnaire ............................................................................ 39
Figure 47 Shoulder Pain and Disability Index ................................................................... 40
Figure 48 Disabilities of the Arm, Shoulder & Hand (DASH) Screen .................................. 40
Figure 49 Fear-Avoidance Belief Questionnaire ............................................................... 41
Figure 50 Örebro Musculoskeletal Pain Screening Questionnaire: Screen for First Question
...................................................................................................................................... 42
Figure 51 Örebro Musculoskeletal Pain Screening Questionnaire: Screen for Second and
Third Questions ............................................................................................................. 43
Figure 52 Örebro Musculoskeletal Pain Screening Questionnaire: Screen for Last 28
Questions ...................................................................................................................... 43
iv
CNAHS Outcomes Calculator: Software Guide
Installing the Software
On the CD there will be the following directories:
Archive Program
CNAHS
Patch
To install any of the Outcomes Calculators, open the appropriate directory by double clicking on it. Run
the following file by double clicking on it:
setup.exe
Follow the simple instructions. The program will install the software on your computer. Once the
software is completely installed, an icon should appear on your desktop. Double click this icon to run the
software.
The Archive Program is a tool for making backups of the database. Follow the same procedure to install
it.
Important Notice!
Read before installing/uninstalling.
If you are installing a new version of the software after having used an older version, it is important to
make a back-up of the data before doing anything else. See the section on Making Backups/Archive
Function. Before installing the new version, the older version must first be uninstalled, but remember
that all data will be lost during the uninstall, so you must first make the backup! Uninstall the software
by clicking on the Windows start button and selecting the Control Panel. Then select Add or Remove
Programs. Another window will appear with a list of programs on your computer. Select the calculator
you wish to uninstall and press the Remove button. Now you are ready to install the new software
following the instructions given above.
Installation Patch
If the program opens and the following message appears (Figure 1), the patch must be installed. Open
the directory called “Patch” on your CD and run the file called “idapi32.exe”. It will open a small
program. Don’t change any of the settings. Just press the “Unzip” button. Then close this program. Now
you can open any of the calculators again by double clicking on the icon on your desktop.
Figure 1 Installation PDOXUSRS.NET Error
1
iCAHE Basic Outcomes Calculator: Software Guide
Running the Outcomes Calculator
The Outcomes Calculator installation will install a shortcut in the Start Menu to allow you to start the
software. For instance, if the default shortcut settings were accepted then the software may be run by
navigating to:
Start Menu > Programs > <name of calculator>
Select this shortcut and the calculator will start.
There will also be an icon (Figure 2) on the computer’s desktop. Double clicking this icon will also open
the software.
Basic
Outcomes
Calculator
Figure 2 Outcomes Calculator Icon
Using the Quick Start Menu
When the software opens, the Quick Start window (Figure 3) is shown. This provides a way of quickly
opening or creating an Episode of Care (EoC). Simply select what you want to do and press OK and the
appropriate screen will open. If you don’t want to open or create an EoC, press the Cancel button. This
window will not be displayed again while the software is running.
Figure 3 Quick Start Menu
2
iCAHE Basic Outcomes Calculator: Software Guide
Performing Tasks
Create a New Episode of Care
Overview
An episode of care is made up by the occasions of service provided to a patient from their first
presentation until they no longer require treatment. The process of creating a new episode of care
requires several stages. Firstly, information is gathered about the patient whom the episode of care
concerns. Secondly, information is gathered about the episode itself. Finally, outcome measures are
chosen to keep track of the episode's progress over time.
General Controls
On each screen in the process of creating a new episode of care a set of common controls is present:
Figure 4 EoC Navigation Buttons
The controls consist of three buttons labelled Prev (Previous), Next and Cancel. These controls are
located at the bottom of each screen. In the example above, the Prev button is not available because
there is no previous screen to return to.
Select Next after completing a screen in order to move to the next screen in the process. A dialog box
will pop up if required details have not been filled in. Select Prev to return to the previous stage in the
process to make changes and alterations to previously entered data. Select Cancel at any point to cease
the process of creating a new episode of care, and return to the main Outcome Calculator screen.
Once all the general EoC data is captured, the EoC will be created and assessments can be made.
Step 1 – Initiating an Episode of Care
Initiate a new EoC by following these commands on the menu bar.
Episode > New
This is shown in Figure 5.
Figure 5 Initiate a New Episode of Care
3
iCAHE Basic Outcomes Calculator: Software Guide
Step 2 – Enter Patient & Funding Details
Specify a Patient
The episode of care may be created for a new patient or for a patient already known to the Outcomes
Calculator. To enter a new patient’s details press the New button in the Create a New Episode of Care
screen (see Figure 6) and specify the name, date of birth and gender using the provided fields.
Alternatively press the Select button to choose a patient whose details are already recorded in the
Outcomes Calculator.
Figure 6 Patient, Funding & Risk Factors Detail Screen
The first time the calculator is used there will probably not be any patients to select from in the
database. In this case, the Select button will be disabled and you will only be able to create a new
patient. Once the patient’s database entry is successfully created, this patient will automatically become
the selected patient.
Selecting a Patient
If the Select button was pressed, the Patient Information screen will appear (Figure 7). There are two
ways of finding a patient.
The first method is to browse the database using the Navigation Buttons. The leftmost button opens the
first record in the database. In Figure 7, the button is disabled (grey), because the first record is
displayed. The second button from the left moves one record at a time back. Again, in Figure 7 this
button is disabled because the first record is displayed. The third button from the left moves one record
at a time forward. The button on the right moves to the last record in the database.
4
iCAHE Basic Outcomes Calculator: Software Guide
Navigation
Buttons
Search Button
Figure 7 Patient Information Screen
This method can be time consuming. A faster way of finding a patient is to press the Search button. The
Patient Information screen will change appearance and look as shown in Figure 8. Notice that the name
of the Search button has changed to Close. Pressing the Close button will change the screen back to its
original appearance.
Type the surname of the patient you are looking for in the box labelled Enter Surname to Search On:.
Now press the Go button. All the patients with this surname will be shown in the list at the bottom of the
screen. Click on the patient you are looking for. The selected patient’s details will be displayed in the top
part of the screen.
Once you have selected a patient, press the OK button. This will return you to the Patient & Funding
Details screen (Figure 6).
5
iCAHE Basic Outcomes Calculator: Software Guide
Figure 8 Patient Information Screen with Search Function
Specify an Initial Consultation Date
The date specified marks the beginning of the episode. Press the down arrow of the box labelled Initial
Consultation. A calendar will appear (Figure 9). The calendar will open at the current date. If you want to
specify another date in the same month, simply click on the date. Select another month by clicking on
the left and right arrows at the top of the calendar. The selected date will appear in the edit box.
Figure 9 Calendar
6
iCAHE Basic Outcomes Calculator: Software Guide
Select a Funding Source
The source of funds that the patient will use to cover the episode of care is specified using the provided
form. Only one fund source may be specified in the Choose Fund Source box. If standard options do not
suitably describe the fund source then select the Other option and enter a brief description in the text
field provided below it.
Creating a Demo Episode of Care
This option will not be available in all versions of the calculator. A demo EoC is used in class
demonstrations. Simply check the Demo box.
Select Risk Factors
The risk factors that may affect the episode of care are specified by ticking each one that applies in the
Specify Risk Factors box. Any number of risks may be selected. If the standard risks do not suitably
describe a risk then select the Other option and enter a brief description in the text field provided below
it.
Continue
If all patient and funding details have been entered then click Next to continue to the next step.
Step 3 – Configure Outcome Measures
After completing the previous step, a new screen (Figure 10) will open.
Figure 10 Selecting Outcome Measures Screen
7
iCAHE Basic Outcomes Calculator: Software Guide
Select Appropriate Outcome Measures
The available outcome measures are presented for selection. A minimum of one measure must be
selected. To select a measure and use it in the created episode, click on the box to the left of the
outcome measure. In Figure 10 only the Glasgow Pain Questionnaire is selected. To remove a measure
once you have selected it, simply click on the checkbox again to remove the checkmark.
Continue
If all desired measures have been selected then click Next to create the episode. The episode details will
be saved and the episode will automatically be opened for management. Note that once Next is pressed,
the data will immediately be saved to the database and cannot be changed again. If the data was
entered incorrectly, a new EoC must be created with the correct data. This is to ensure the integrity of
the data. However, other Outcome Measures can be added at any later stage and patient particulars can
also be edited later. This will be discussed later.
Add a New Patient
Adding a new patient to the Outcome Calculator is done during the creation of their first episode of care
(see the section on Create a New Episode of Care). Their details are recorded as part of the creation
process. When the episode of care is created, these details are used to create a new patient record.
Subsequent episodes of care may then be added for the patient without re-entering patient details.
New patient data can also be added at any time by using the following commands on the top menu bar.
Patient > New
Independent of the method that you decide to use to add a new patient, the Patient Information Screen
(Figure 7) will be displayed. Note that all the navigation buttons will be inactive and the boxes (except
the Date of Birth) will be empty. Enter the correct patient data in all the fields. Note that in the Gender
field, only a selection can be made by pressing on the down arrow on the right of the box. Do not type
anything in the Gender box.
Make sure that all the data is correct. Now press OK to save the data. Pressing Cancel will close the
window without saving the data.
Looking Up Patient Data
The details of any patient can be checked at any time by following these commands on the top menu
bar:
Patient > Browse
The Patient Information Screen (Figure 7) will be displayed. Patients can be found as explained in Step 2
– Enter Patient & Funding Details.
Manage an Episode of Care
Overview
Managing an episode of care allows viewing summary information that describes the episode, adding
new assessments, adding more outcome measures and viewing a chart of the progress of a patient’s
progress over time.
8
iCAHE Basic Outcomes Calculator: Software Guide
Open an Episode of Care for Management
To open a created episode of care, follow these commands on the menu bar:
Episode > Open
The Select Episode of Care screen will be shown (Figure 11). The patient data of all the patients in the
database are accessible. Browse to the correct patient using the Navigation Buttons on the top of the
screen. As you browse, note that all the episodes of care for the selected patient are displayed in the list
on the bottom of the screen. Each EoC is represented with a date range in the list box (Initial
Consultation and Completed). If the EoC is still open, there will be no date in the Completed column.
To open an episode of care for a patient first select a patient from the patient list and then select an
episode from the available episodes of care for that patient. Click OK to open the episode for
management, or Cancel at any point to close the dialog without opening an episode.
Figure 11 Select Episode of Care Screen
A faster way of finding a patient is using the Search button. Pressing it will extend the screen with
additional controls to find a patient (Figure 12). Note that the name of the button changed to Close.
Pressing the button again will close the extra search functions. Type the patient’s surname in the Enter
Surname to Search On: box. Then press the Go button. This will display all the patients in the database
with that surname in the list below the Go button. You can now select a patient from this list and their
details will be shown in the fields on the left of the screen.
9
iCAHE Basic Outcomes Calculator: Software Guide
Figure 12 Search for a Patient on the Select Episode of Care Screen
The Episode Management Screen
The Episode Management screen (Figure 13) will be the first screen to open when an episode is loaded.
Figure 13 Episode Management Screen
Work Area (Top Right Hand Pane)
The work area displays information of the currently selected item in the Item Selector (left hand pane).
In Figure 13 the Episode Summary is currently selected. In the work area general information on the
episode is displayed.
Chart Control Area (Bottom Right Hand Pane)
For charts with multiple data series, this area is used to control which series will be displayed in the work
area. Note that there are six identical boxes to select the series. These can only be used once an
outcome measure has been selected in the Item Selector. There are six, because the maximum number
of series that can be displayed simultaneously on the graph is six.
In this pane, on the right side, there is also a box in which comments will be displayed which the
therapist can enter after each assessment. Currently, nothing is displayed.
10
iCAHE Basic Outcomes Calculator: Software Guide
Control Area (Left Hand Pane)
The Item Selector contains an item called Episode Summary, always the first item. Below that all the
outcome measures selected for this episode are displayed. When the Episode Summary is selected, the
Episode Management Screen will look as displayed in Figure 13.
The Print button will print whatever is displayed in the work area, in this case the Episode Summary.
Pressing the Discharge button will change the episode status of ‘open’ to ‘complete’. This indicates that
no further assessments will be conducted for it. Assessments cannot be added to a completed episode.
To complete an episode of care first open an episode of care and then click the Discharge button in the
control area. A confirm dialog will be presented to double check that the episode should indeed be
closed – click Yes to perform the action, or No to return to the management screen without completing
the episode.
When a user clicks Discharge the episode will remain managed. It may be closed and managed again at a
later time, but it will no longer be possible to add assessments to it. An episode should be completed
only when there will be no more assessments relating to that episode of care in the future.
Note that once an episode’s status is changed to closed (using the Discharge button), it cannot be
changed back again.
Pressing the Close button will close the episode for management without changing the status of the
episode. Therefore, when the episode is again opened for management, it will be possible to add new
assessment data.
Toolbar
The toolbar is above the Control Area. It has three buttons. On the left is the Print button. This button
will print whatever is displayed in the Work Area.
Next is the Save button. This will save to a file whatever is displayed in the Work Area. If there is a graph
in the Work Area, then the graph can be saved in any of three file formats: Bitmap (.bmp), Windows
Metafile (.wmf) or Enhanced Windows Metafile (.emf). If there is a report in the Work Area, it will be
saved as a Rich Text Format (.rtf) document. This type of file is readable by most word processors
including Microsoft Word.
If an outcome measure is selected in the Control Area before pressing the Print or Save button, there will
be a pop-up after printing or saving the Work Area content asking you if the assessment comments must
be saved as well. (See the Adding Assessment Comments section for an explanation of assessment
comments.) If you choose to save them as well, it will also be saved as a Rich Text Format (.rtf) file.
The last button is the Close button and it will close the program.
The same functions are available under the System item on the main menu bar. See Figure 14.
11
iCAHE Basic Outcomes Calculator: Software Guide
Figure 14 System Menu
Working with the Outcome Measures
Assessments of an outcome measure may be added to an episode of care to record a patient’s progress
throughout the episode. To add an assessment, first open an episode of care for management. When the
episode is being managed use the Item Selector menu to select the outcome measure that will be
assessed.
Note that the management screen’s appearance has now changed. An Assessment and Data Series
panel are added to the Control Area. The Progress Chart for the selected outcome measure is displayed
in the Work Area.
Progress Chart
The work area will be updated to show the current progress chart (Figure 15) for the selected outcome
measure. If assessments are recorded then the date range of the assessments will be shown and each
data series that are available for assessments of that pairing will be plotted on the chart. Each data point
represents a data score for that series of the assessed outcome measure at the date/time that it was
assessed.
Notice that where applicable, the vertical axis displays the range of minimum to maximum scores. This is
done for all scales that have such a range. Otherwise the axis range is the range between the maximum
and minimum recorded scores.
12
iCAHE Basic Outcomes Calculator: Software Guide
Progress
Chart
Work Area
Control Area
Chart Control Area
Assessment
Comments
Figure 15 Episode Management Screen with Progress Chart
Adding an Assessment
To add an assessment for the selected outcome measure:
1. Click the New button on the Assessment panel.
2. Select a therapist, Figure 16. This option will not always be available. You can specify a default
therapist for the program and furthermore specify that this therapist will always be used. If the
latter is specified, then this step will be skipped as a time saving measure. See the section on
Selecting a Default Therapist.
3. Select a date, Figure 17. This is only available if your software can create demo Episodes of Care.
This allows you to specify the assessment date. If the option is not available, the current date of
your computer is used.
4. Next, the questionnaire will be displayed. This screen will depend on the selected outcome
measure (see the section on Outcome Measure Screens).
5. After all the questions are answered, a screen (Figure 18) will appear where you will be allowed
to enter comments on the particular assessment. It is not required that you write any comments.
The comments will be displayed, with the assessment date and therapist detail, in the bottom
right box of the Episode Management Screen (Figure 15). Once you press OK on this screen, the
assessment data will be saved and the results will appear on the graph. If you press Cancel, you
will return to the Episode Management Screen without saving the data. You can also go back and
redo or check any part of the questionnaire by pressing the Previous button. Once you have
pressed OK a prompt will appear to ask you if the data can be saved. It warns you that the data
cannot be edited once saved. This is for legal reasons.
13
iCAHE Basic Outcomes Calculator: Software Guide
Figure 16 Therapist Selection Screen
Figure 17 Set Assessment Date and Time Screen – Available only on versions that allow demo episodes of care
14
iCAHE Basic Outcomes Calculator: Software Guide
Figure 18 Assessment Comments Screen.
Data Series Analyses Metrics
The control area will automatically display a set of basic data series analyses metrics for any progress
chart that contains at least one data series with at least one data point. This is shown in the Data Series
area. If there is more than one data series on the displayed chart then the drop down box may be used
to select which data series is analysed.
Each metric describes a characteristic of the data series that is being analysed. The following metrics will
be displayed for a data series (when applicable):
Baseline Score
Latest Score
The raw baseline (initial) score.
The raw latest score.
Selecting Data Series to Display
As shown in Figure 15 some outcome measures have more than one data series. The names of the data
series are shown as a legend on the graph. They are also displayed in the boxes in the Chart Control Area.
The user can select which series must be displayed.
You can also choose not to display a specific series. Simply change the selection of the appropriate drop
down box in the Chart Control Area to a series that you actually what to display, i.e. the name of the
series you want to display now replaces the one you don’t want to display. Notice that the number of
series on the graph has reduced by one.
Adding a New Outcome Measure to an Existing EoC
After an EoC is created the user can add more outcome measures at any time while the EoC is ‘open’ (i.e.
not ‘complete’). This is done by pressing the Add button below the Item Selector in Figure 13. Note that
it is not possible to remove any outcome measure once it has been added to the EoC.
Once the Add button is pressed, the outcome measures selection screen (Figure 19) will be displayed
again. Notice that the outcome measures already selected will not be available for selection.
Simply select any number of additional outcome measures and press the Next button to return to the
Episode Management Screen (Figure 13).
15
iCAHE Basic Outcomes Calculator: Software Guide
Figure 19 Selecting Additional Outcome Measures
Selecting a Default Therapist
It can be annoying to enter the therapist name every time if the software is only used by one therapist.
The Default Therapist option allows the user to set the name of the default therapist. Use the following
commands from the menu bar:
Therapist > Set Default
The Therapist Selection screen (Figure 16) will be displayed. Navigate to the desired therapist and press
OK to make the selection the Default Therapist.
Next, make sure that the Always Use Default option is checked (there is a small check mark next to the
option). Use the following commands from the menu bar:
Therapist > Always Use Default
If there is no check mark next to it, click on the option. Repeat the above menu commands without
clicking on Always Use Default. Notice that there is now a check mark next to the command.
If the Always Use Default option is selected, step 2 for creating a new assessment will be skipped,
because the Therapists screen will not open. The Default Therapist will automatically be selected from
the database.
These options can be changed at any time.
16
iCAHE Basic Outcomes Calculator: Software Guide
Editing the Scale Configuration
Some outcome measures must be configured before using them. You will automatically be asked to
configure the scale before using it, so normally you don’t have to worry about missing this step. The
configuration of each scale is dealt with in the section Outcome Measure Screens under the specific
scales that require configuration.
Sometimes you may want to edit the configuration. Limited editing is allowed where it will not corrupt
existing data. You can edit the configuration by pressing the Edit Configuration button in the Control
Area of the Episode Management Screen (Figure 15). This will open the appropriate screens for the
selected outcome measure.
Adding Assessment Comments
While you cannot change comments that are already in the database, you can add additional comments
to any assessment. This is done by pressing the Add Comment button in the Control Area of the Episode
Management Screen (Figure 15). This will then display the assessment selection screen (Figure 20). This
screen displays all the assessment dates in consecutive order. Simply select the assessment you want to
add a comment to by clicking on it and then press OK. The comments screen (Figure 18) will then be
displayed and you can add any comment.
Figure 20 Assessment Selection Screen
In this example, a comment was added to the first assessment. All the comments are shown in Figure 21.
Note that below Assessment number 1, there are two sets of comments. The second assessment was
added at a later date (the comment date is automatically displayed with the new comment).
17
iCAHE Basic Outcomes Calculator: Software Guide
Assessment number: 1
On 2010/02/26 Yolandi Y Brink wrote:
This is the first comment. It was entered directly after the assessment.
On 2010/03/12 Yolandi Y Brink wrote:
This comment on the first assessment was added at a later date.
Assessment number: 2
On 2010/03/05 Yolandi Y Brink wrote:
This comment was added directly after the second assessment.
Assessment number: 3
On 2010/03/12 Yolandi Y Brink wrote:
<None>
Figure 21 Example of Assessment Comments
18
iCAHE Basic Outcomes Calculator: Software Guide
Managing the Data
Using Another Database
When the software is installed, the database is also installed. All the data created while using the
software will automatically be stored in this database and the entire process of saving and retrieving
data will be hidden from the user.
Under certain circumstances it may be necessary for the user to use another database. This can be done
by linking the program to the new database by selecting the Locate button on the Data menu (Figure
22). This will open up the Set Database Directory screen (Figure 23). Select the directory in which the
database is stored and press the OK button. If the program can find all the database files in that
directory, it will now be connected to it, otherwise an error message will be displayed and the original
database connection will be maintained. Note that when the program starts up, it will always try to
connect to the database that was created when the program was installed.
Figure 22 Data Menu
Figure 23 Set Database Directory Screen
Making Backups/Archive Function
The database can be stored in a safe location by using the archive function. This will copy the entire
database in the current database directory to a user specified location. Use the Archive option on the
Data menu (Figure 22). This will display the Backup Tool screen (Figure 24).
The Source Path (top edit box) displays the current directory where the database is stored. This cannot
be changed. The software automatically selected the location where the current database is stored, thus
relieving the user from trying to find it.
19
iCAHE Basic Outcomes Calculator: Software Guide
The user must specify where the database will be copied to. This is done in the Destination Path. It can
be typed in manually or by pressing the button to the left of the edit box. If the button is pressed the
Directory Brower screen (Figure 25) will be displayed. Simply select the directory where the database
must be copied to and press the OK button. The selected directory will then be displayed in the
Destination Path box.
Press the OK button to copy all the files to the selected directory.
Figure 24 Backup Tool – Archiving and existing database
Figure 25 Directory Browser
20
iCAHE Basic Outcomes Calculator: Software Guide
Replacing the Database
There may be situations when the existing/default database must be replaced with another one. This
may happen when installing a new version of the software. This function allows the user to continue
using the database created with a previous version of the software, provided that the old database is
compatible with, or can be upgraded to, the new version of the software.
Important Notice: Before uninstalling the previous version, it is vital to backup the database (see the
section on Making Backups/Archive Function).
This function will replace the existing database with another. Note: the existing database will be
deleted and all data will be lost. Backup this database before using this function if there are any data
that must be saved.
Replace the database by selecting the Replace option on the Data menu (Figure 22). The screen shown in
Figure 26 will be shown. Specify the database from which to copy by giving its location in the Source
Path box. Either type in the location or use the button on the right of the box. If the button is pressed the
Directory Brower screen (Figure 25) will be displayed. Simply select the directory where the database
must be copied from and press the OK button. The selected directory will then be displayed in the
Source Path box.
Press the OK button to copy all the files from the selected directory.
Figure 26 Backup Tool – Replacing an existing database
Import/Export Data
All the data entered in the software is saved automatically. Sometimes it may be necessary to extract
data from the database. This can be done using the export function. This is found under the Data menu
item. There are two export options as shown in Figure 27. The Excel function exports data generated by
a query of the database to a file readable by most spreadsheet programs, including Microsoft’s Excel.
This function also offers a limited possibility to analyse the data in the database. The Assessment Notes
function exports the notes generated for an assessment to a Rich Text Format file. This file is readable by
21
iCAHE Basic Outcomes Calculator: Software Guide
many programs, including Microsoft’s Word. The Assessment Notes function will only be available when
an outcome measure is selected in the Episode Management Screen.
Figure 27 Export Functions
Export Data for Analysis
This is done using the Excel function. A file can be generated that saves selected data to a .csv file that is
readable by Microsoft’s Excel or many other spreadsheet programs. The first step is to generate a query
of the database. A query is just specifying which data from the database must be extracted. The database
contains all the assessments for all the patients for all the outcome measures, so it is often not very
useful to work with the entire dataset. Thus we generate queries to only work with the data we are
interested in. The next section will show you how to generate the query and the sections thereafter will
show you how to work with the data and do all the export functions.
Query the Data
This screen (Figure 28) consists of five sections that can be used to refine the data. Any combination of
them, or none, or all five, can be used in the query.
Figure 28 Develop Query Screen
22
iCAHE Basic Outcomes Calculator: Software Guide
Admitted
The initial consultation date can be specified. The Select All option must first be unchecked to activate
the search options. Just click on Select All and notice that the options to the right become active. There
are three options:
Before
Episodes of Care which started before or on the date specified in the Before box
will be selected. Select the date using the drop down calendar (see Figure 9).
After
Episodes of Care which started after or on the date specified in the After box will
be selected. Select the date using the drop down calendar (see Figure 9).
Between
Episodes of Care which started after or on the date specified in the first box
(below Between) and before or on the date specified in the last box will be
selected. Select the date using the drop down calendar (see Figure 9).
Note that only one of the date options can be used. Notice that if the Select All option is checked, all the
dates will be used in the query.
Discharged
The date on which the episode was completed (i.e. status changed to “closed”) can be selected. The
Select All option must first be unchecked to activate the search options. Just click on Select All and
notice that the options to the right become active. There are three options:
Before
Episodes of Care which were completed before or on the date specified in the
Before box will be selected. Select the date using the drop down calendar (see
Figure 9).
After
Episodes of Care which were completed after or on the date specified in the
After box will be selected. Select the date using the drop down calendar (see
Figure 9).
Between
Episodes of Care which were completed after or on the date specified in the first
box (below Between) and before or on the date specified in the last box will be
selected. Select the date using the drop down calendar (see Figure 9).
Note that only one of the date options can be used. Notice that if the Select All option is checked, all the
dates will be used in the query.
Select Patient
One or more patients can be selected from the database. The episodes in which this patient was involved
in can be queried. The Select All option must first be unchecked to activate the search options. Just click
on Select All and notice that the options to the right become active.
Add a patient to the query by clicking on the Add button. The Patient Information screen will be
displayed (see Figure 7). Any patient can be selected using the normal patient search functions (see the
section on Step 2 – Enter Patient & Funding Details). Once the OK button on the Patient Information
screen is clicked, the patient will be added to the Select Patient text box.
Any number of patients can be added. To add another patient, just click the Add button again and follow
the same procedure as described above.
23
iCAHE Basic Outcomes Calculator: Software Guide
A patient can be removed from the list of patients in the Select Patient text box. Click on the patient that
must be removed so that the patient is highlighted. Then click the Remove button. The patient will no
longer be seen in the Select Patient text box.
Notice that if the Select All option is checked, all the patients will be used in the query.
Select Condition
One or more condition can be specified. The Select All option must first be unchecked to activate the
search options. Just click on Select All and notice that the options to the right become active. The
available conditions are displayed in the box on the right of the Add and Remove buttons. To add a
condition to the query, select it from the list on the right by clicking on it. Then press the Add button.
Notice that the condition appears in the left box and disappears from the right box. This means that only
Episodes of Care that had the selected condition(s) will be included in the database search. To remove
the condition, select it in the left box by clicking on it and press the Remove button. Notice that it will
disappear from the left box and reappear on the right. If all the conditions must be included in the
search, remember to click the Select All. All the conditions will then be used in the search regardless of
what conditions appear in the left box.
Select Outcome Measure
You can query Episodes of Care that used specified outcome measures. The Select All option must first
be unchecked to activate the search options. Just click on Select All and notice that the options to the
right become active. The list box on the right contains all the available outcome measures. Click on the
outcome measure that must be queried in the right hand list box. Then click the Add button. Notice that
the outcome measure is added to the list of selected outcome measures on the left and that is
disappears from the list of available outcome measures on the right.
Continue to add outcome measures to the list of selected outcome measures using the procedure
described above. You can add outcome measures until the list of available outcome measures is
exhausted.
An outcome measure can be deselected by clicking on the outcome measure in the list of selected
outcome measures. Then click on the Remove button. Notice that the outcome measure is removed
from the list of selected outcome measures and that it reappears in the list of available outcome
measures.
Notice that if the Select All option is checked, all the outcome measures will be used in the query.
Include Demos
This option is only available in some versions of the Outcomes Calculator. If the Include Demos option is
checked, all the episodes that were classified as demos will be included in the query, otherwise they will
be excluded.
Execute the Query
Once all the criteria are specified, click the OK button. This will execute the query. The results will be
displayed in the Query Results screen (Figure 29). Pressing the Cancel button on the Develop Query
screen, will close the screen without executing the query.
24
iCAHE Basic Outcomes Calculator: Software Guide
Figure 29 Query Results
The query result screen shows a list, with many columns, that contain all the information on each
assessment as specified by the query. Use the horizontal and vertical scroll bar to see all the results.
Notice the four buttons on the bottom left of the screen. The right hand button is the Close button which
will close this screen and return control to the main program. The next button is a print button. This is
disabled for the list of results, but will be used later (see explanation below). The third button from the
right is a Save button which will save all the displayed data to a .csv file which is readable by Microsoft’s
Excel or many other spreadsheet programs. The left most button is the Analyze Data button which will
be described in the next section.
Analyse Data
The purpose of the analysis screen is to help clinicians analyse aggregate results from the database. You
can analyse the results, for selected patients and EoC’s, of a particular outcome measure. A graph will be
generated that shows the progress of the selected patients after each assessment by displaying the
average, minimum and maximum result. This may give an indication of the effectiveness of a treatment.
The query result can be analysed in the Query Analysis Screen (see Figure 30). The screen consists of a
control area and a graph. The control area has a box with a list of all the outcome measures selected for
the query. If you click on one of these outcome measures, the graph will change to show the
corresponding results for that outcome measure.
The next box specifies whether patients with risk should be included or excluded or if all the patients
should be included regardless of associated risk. Simply select the appropriate option and see how the
graph immediately updates.
Many outcome measures have more than one data series associated with them. The appropriate data
series for the measure can be selected in the next box in the control area. Again, the graph should
immediately update with the result for that particular data series.
Lastly, the data used to generate the graph is displayed in the bottom box. This data can be saved by
pressing the Save Graph Data button (see Figure 30).
25
iCAHE Basic Outcomes Calculator: Software Guide
The graph shows three curves. The solid line is the average score for all the selected EoCs. The red
dashed line is the maximum score and the blue dashed line is the minimum score. The vertical axis shows
the score and the horizontal axis shows the assessment number. The graph can be saved (press the Save
Graph button) and printed (press the Print Graph button) (see Figure 30).
Control Area
Print Graph
Save Graph
Data
Save Graph
Figure 30 Query Analysis Screen
Archive Program
The Outcomes Calculator Archive Tool installation will install a shortcut in the Start Menu (of your
computer) to allow you to start the software. For instance, if the default shortcut settings were accepted
then the software may be run by navigating to:
Start Menu > Programs > Outcome Calculator Archive Tool
Select this shortcut and the tool will start. The tool has only one simple screen as shown in Figure 31.
26
iCAHE Basic Outcomes Calculator: Software Guide
Figure 31 Archive Tool Screen
Backups are made by simply specifying the location of the existing database and giving a location for the
backup. The location of the existing database is specified in the Source Path box. You can use the icon on
the right of the box to navigate to the location. The database location is specified during the installation
of the calculator software. If you are not sure where this was, the default location is normally:
C:\Program Files\<Name of Calculator>
or
C:\Program Files\<Name of Calculator>\Database
The directory will contain the list of files given in Table 1. Note that the column on the left lists the files
that will be backed up in the current version of the calculator. Some older versions of the calculator had
a slightly different database structure. These files are listed in the next columns.
Next, the location for the backup must be specified in the Destination Path box. Again, the icon to the
right of the box can be used to navigate to the location. Any location can be selected where the user has
write access.
Press the OK button to start the copying process. The program will give warnings if the backup location
already contains some or all of the files that needs to be backed up. Do not copy only some of the files,
because this will corrupt the database. Rather make sure that the backup location does not contain any
existing database files.
The program will also give a warning if it cannot find any or all of the database files. This probably means
that an incorrect database location has been selected. Make sure that the location contains all the files in
Table 1 and then restart the backup process.
27
iCAHE Basic Outcomes Calculator: Software Guide
Table 1 Database Files
Database V1.03.0000
Database V1.02.0000
Older Versions
assess_scores.db
assess_scores.db
assess_scores.db
assess_scores.PX
assess_scores.PX
assess_scores.PX
assess_scores.XG0
assess_scores.XG0
assess_scores.XG0
assess_scores.YG0
assess_scores.YG0
assess_scores.YG0
assessments.DB
assessments.DB
assessments.DB
assessments.PX
assessments.PX
assessments.PX
assessments.XG0
assessments.XG0
assessments.XG0
assessments.XG1
assessments.XG1
assessments.YG0
assessments.YG0
assessments.YG0
configured_pairings.db
configured_pairings.db
configured_pairings.db
configured_pairings.PX
configured_pairings.PX
configured_pairings.PX
configured_pairings.XG0
configured_pairings.XG0
configured_pairings.FAM
configured_pairings.YG0
configured_pairings.YG0
configured_pairings.XG0
EOC.db
EOC.db
configured_pairings.YG0
EOC.PX
EOC.PX
EOC.db
EOC.VAL
EOC.VAL
EOC.FAM
EOC.XG0
EOC.XG0
EOC.PX
EOC.YG0
EOC.YG0
EOC.VAL
Fund_custom.db
Fund_custom.db
EOC.XG0
Fund_custom.PX
Fund_custom.PX
EOC.YG0
Fund_history.db
Fund_history.db
Fund_custom.db
Fund_history.XG0
Fund_history.XG0
Fund_custom.PX
Fund_history.XG1
Fund_history.XG1
Fund_history.db
Fund_history.YG0
Fund_history.YG0
Fund_history.XG0
Fund_history.YG1
Fund_history.YG1
Fund_history.XG1
Patient.DB
Patient.DB
Fund_history.YG0
Patient.PX
Patient.PX
Fund_history.YG1
RiskMappings.db
Risk_custom.db
Patient.DB
RiskMappings.PX
Risk_custom.PX
Patient.FAM
RiskMappings.VAL
Risk_mappings.db
Patient.PX
RiskMappings.XG0
Therapist.db
Risk_custom.db
RiskMappings.YG0
Therapist.PX
Risk_custom.PX
Therapist.db
Risk_mappings.db
Therapist.PX
Therapist.db
Therapist.PX
Using Archived Data
Should you wish to use data that has been archived using the process described in the Archive Program
section, the following procedure must be followed. This will typically be done after installing a new
version of the calculator when there are no data in the new database.
28
iCAHE Basic Outcomes Calculator: Software Guide
Within the calculator, copy the archived data into the current database directory using the procedure
described in section the on Replacing the Database. This process will overwrite existing data, but
ensures the correct linking to the rest of the database.
The program may then warn you that the database must be upgraded to the latest version. This will be
done automatically and no data should be lost in the process.
29
iCAHE Basic Outcomes Calculator: Software Guide
Outcome Measure Screens
Each scale has a sequence of simple forms that must be completed to record the scores. Once all the
data is captured, the scores will be calculated and the results displayed in the Episode Management
screen (Figure 15). The objective of this chapter is to give some guidance to the recording of the scores in
the Outcomes Calculator. It does not give details on the outcome measures themselves. For that, the
accompanying Outcomes Measure Manual must be consulted.
Impairment/Pain
Short-form McGill Pain Questionnaire
All the questions, except question 16, are recorded in the same way. The data is recorded on a series of
forms that looks like Figure 32. The number of the question appears in the first line. The next line
contains the question. A list of options is given next. Select the appropriate option. Press the button with
the right arrow to move the next question or the button with the left arrow to move to the previous
question.
Press OK to record the score. This is only allowed if all the questions are answered. Cancel will close the
screen without recording any scores.
Notice that if the text of the question is not completely displayed the screen can be resized. Grab a
vertical edge of the screen with the mouse and move it to the left or right until the text is readable. If all
the lines of the question are not displayed, move the mouse the bottom of the panel on which the
question is displayed. Notice that the shape of the mouse cursor will change. When the cursor has
changed, hold the left mouse button down and drag the mouse so that the cursor moves vertically down.
This will enlarge the panel so that all the lines of the text are visible.
Figure 32 Short Form McGill Pain Questionnaire
For Question # 16
The data is recorded on a form that looks like Figure 33. The number of the question appears in the first
line. The next line contains the question. Move the slider to record the appropriate score. Notice that the
score selected on the slider is also displayed in the box marked Selected Value. This box only displays the
30
iCAHE Basic Outcomes Calculator: Software Guide
value of the slider and cannot be changed by the user. Press the button with the right arrow to move the
next question or the button with the left arrow to move to the previous question.
Press OK to record the score. Cancel will close the screen without recording any scores.
Notice that if the text of the question is not completely displayed the screen can be resized. Grab a
vertical edge of the screen with the mouse and move it to the left or right until the text is readable. If all
the lines of the question are not displayed, move the mouse the bottom of the panel on which the
question is displayed. Notice that the shape of the mouse cursor will change. When the cursor has
changed, hold the left mouse button down and drag the mouse so that the cursor moves vertically down.
This will enlarge the panel so that all the lines of the text are visible.
Figure 33 Short Form McGill Pain Questionnaire
Visual Analogue Scales
Uni-dimensional Measures of Pain: Frequency
This scale must first be configured before it can be used. Before the first assessment, the configuration
screen (Figure 34) will appear. Three different measures are given to determine the pain intensity, i.e. a
Time Count, a Verbal Graphic Frequency Rating Scale (shown as “Graphic”) and an Absolute Visual
Analogue Frequency Scale (shown as “VAS”). Select only one of them from the drop down box in the
configuration screen. The time period for evaluations must also be specified. A second configuration
screen will appear (Figure 35). There are three options in the drop down box: Past day, Past two days and
Past week. Select one of them.
This scale is configured only once per episode of care.
31
iCAHE Basic Outcomes Calculator: Software Guide
Figure 34 Pain Frequency Configuration Screen - Measure
Figure 35 Pain Frequency Configuration Screen – Time Period
Once the scale has been configured, a scoring screen will be displayed based on the configuration. If the
selected configuration is “Time Count”, the screen shown in Figure 36 will be shown. Enter the number
of days in the box provided.
Press OK to record the score. Cancel will close the screen without recording any scores.
Figure 36 Pain Frequency Time Count Screen
If the selected configuration is “Graphic”, the screen shown in Figure 37 will be shown. Select the
appropriate description using the slider button.
Press OK to record the score. Cancel will close the screen without recording any scores.
32
iCAHE Basic Outcomes Calculator: Software Guide
Figure 37 Pain Frequency Verbal Graphic Screen
If the selected configuration is “VAS”, the screen shown in Figure 38 will be shown. Select the
appropriate number using the slider button.
Press OK to record the score. Cancel will close the screen without recording any scores.
Figure 38 Pain Frequency VAS Screen
Uni-dimensional Measures of Pain: Intensity
This scale must first be configured before it can be used. It is done in the same way as the Unidimensional Measures of Pain: Frequency. This scale is configured only once per episode of care.
33
iCAHE Basic Outcomes Calculator: Software Guide
Once the scale has been configured, a scoring screen will be displayed based on the configuration. If the
selected configuration is “Numeric”, the screen shown in Figure 39 will be shown. Select the appropriate
number using the slider button.
Press OK to record the score. Cancel will close the screen without recording any scores.
Figure 39 Pain Intensity Numeric Screen
If the selected configuration is “Verbal”, the screen shown in Figure 40 will be shown. Select the
appropriate description using the slider button.
Press OK to record the score. Cancel will close the screen without recording any scores.
Figure 40 Pain Intensity Verbal Graphic Screen
34
iCAHE Basic Outcomes Calculator: Software Guide
If the selected configuration is “VAS”, the screen shown in Error! Reference source not found.Figure 41
will be shown. Select the appropriate number using the slider button.
Press OK to record the score. Cancel will close the screen without recording any scores.
Figure 41 Pain Intensity VAS Screen
Activity Limitation
Upper Extremity Functional Index (UEFI)
This scale is scored in the same way as the Short Form McGill Pain Questionnaire.
Activity Limitation/Participation Restriction
Patient-Specific Functional Scale
This scale must be configured for each patient and episode. When the scale is selected in the Selecting
Outcome Measures screen (Figure 10), the Configure Outcomes Measure screen (Figure 42) will appear.
Type the activities in the boxes provided. All five boxes do not have to be completed, but complete the
boxes from the top down.
Press OK to complete the configuration. If Cancel is pressed, the scale will not be added to the list of
selected outcomes measures.
35
iCAHE Basic Outcomes Calculator: Software Guide
Figure 42 Generic Patient-Specific Scale Configuration Screen
The form on which the scores must be entered look like Figure 43. Enter the scores for each activity in
the relevant boxes.
Press OK to record the score. Cancel will close the screen without recording any scores.
Figure 43 Generic Patient-Specific Scale Screen
Roland-Morris Low back Pain and Disability Questionnaire
The data is recorded on a series of forms that looks like Figure 44. The number of the question appears in
the first line. The next line contains the question. Select the appropriate item by clicking the little box to
the left of the item. Notice that a little tick mark will appear in the box after clicking it. That means that
the item is selected. Press the button with the right arrow to move the next question or the button with
the left arrow to move to the previous question.
Press OK to record the score. This is only allowed if all the questions are answered. Cancel will close the
screen without recording any scores.
Notice that if the text of the question is not completely displayed the screen can be resized. Grab a
vertical edge of the screen with the mouse and move it to the left or right until the text is readable. If all
the lines of the question are not displayed, move the mouse the bottom of the panel on which the
36
iCAHE Basic Outcomes Calculator: Software Guide
question is displayed. Notice that the shape of the mouse cursor will change. When the cursor has
changed, hold the left mouse button down and drag the mouse so that the cursor moves vertically down.
This will enlarge the panel so that all the lines of the text are visible.
Figure 44 Roland-Morris Questionnaire Screen
Oswestry Disability Index
This scale is scored in the same way as the Short Form McGill Pain Questionnaire.
Whiplash Disability Questionnaire
The data is recorded on a series of forms that looks like Figure 45. The number of the question appears in
the first line. The next line contains the question. Move the slider to record the appropriate score. Notice
that the score selected on the slider is also displayed in the box marked Selected Value. This box only
displays the value of the slider and cannot be changed by the user. Press the button with the right arrow
to move the next question or the button with the left arrow to move to the previous question.
Press OK to record the score. This is only allowed if all the questions are answered. Cancel will close the
screen without recording any scores.
Notice that if the text of the question is not completely displayed the screen can be resized. Grab a
vertical edge of the screen with the mouse and move it to the left or right until the text is readable. If all
the lines of the question are not displayed, move the mouse the bottom of the panel on which the
question is displayed. Notice that the shape of the mouse cursor will change. When the cursor has
changed, hold the left mouse button down and drag the mouse so that the cursor moves vertically down.
This will enlarge the panel so that all the lines of the text are visible.
37
iCAHE Basic Outcomes Calculator: Software Guide
Figure 45 Whiplash Disability Questionnaire
Neck Disability Index
This scale is scored in the same way as the Short Form McGill Pain Questionnaire.
Lower Extremity Functional Scale (LEFS)
This scale is scored in the same way as the Short Form McGill Pain Questionnaire.
Impairment/Activity Limitation
Glasgow Pain Questionnaire
The data is recorded on a series of forms that looks like Figure 46. The number of the question appears in
the first line. The next line contains the question. A list of options is given next. Select the appropriate
option. Press the button with the right arrow to move the next question or the button with the left arrow
to move to the previous question.
Press OK to record the score. This is only allowed if all the questions are answered. Cancel will close the
screen without recording any scores.
Notice that if the text of the question is not completely displayed the screen can be resized. Grab a
vertical edge of the screen with the mouse and move it to the left or right until the text is readable. If all
the lines of the question are not displayed, move the mouse the bottom of the panel on which the
question is displayed. Notice that the shape of the mouse cursor will change. When the cursor has
changed, hold the left mouse button down and drag the mouse so that the cursor moves vertically down.
This will enlarge the panel so that all the lines of the text are visible.
38
iCAHE Basic Outcomes Calculator: Software Guide
Figure 46 Glasgow Pain Questionnaire
Shoulder Pain & Disability Index (SPADI)
The scale consists of a series of Visual Analogue scales that look like Figure 47. The number of the
question appears in the first line. The next line contains the question. The answered is entered using the
slider. Notice that the selected number is displayed in the “Selected Value” box.
Notice that if the text of the question is not completely displayed the screen can be resized. Grab a
vertical edge of the screen with the mouse and move it to the left or right until the text is readable. If all
the lines of the question are not displayed, move the mouse the bottom of the panel on which the
question is displayed. Notice that the shape of the mouse cursor will change. When the cursor has
changed, hold the left mouse button down and drag the mouse so that the cursor moves vertically down.
This will enlarge the panel so that all the lines of the text are visible.
Press OK to record the score. This is only allowed if all the questions are answered. Cancel will close the
screen without recording any scores.
39
iCAHE Basic Outcomes Calculator: Software Guide
Figure 47 Shoulder Pain and Disability Index
Patient Rated Tennis Elbow Evaluation (PRTE)
This scale is scored in the same way as the Whiplash Disability Questionnaire.
Disabilities of the Arm, Shoulder and Hand
The data is recorded on a series of forms that looks like Figure 48. The number of the question appears in
the first line. The next line contains the question. A list of options is given next. Select the appropriate
option. Press the button with the right arrow to move the next question or the button with the left arrow
to move to the previous question.
Press OK to record the score. This is only allowed if all the questions are answered. Cancel will close the
screen without recording any scores.
Notice that if the text of the question is not completely displayed the screen can be resized. Grab a
vertical edge of the screen with the mouse and move it to the left or right until the text is readable. If all
the lines of the question are not displayed, move the mouse the bottom of the panel on which the
question is displayed. Notice that the shape of the mouse cursor will change. When the cursor has
changed, hold the left mouse button down and drag the mouse so that the cursor moves vertically down.
This will enlarge the panel so that all the lines of the text are visible.
Figure 48 Disabilities of the Arm, Shoulder & Hand (DASH) Screen
Impairment/Activity Limitation/Participation Restriction/Quality of Life
Knee Injury and Osteoarthritis Outcome Score
This scale is scored in the same way as the Short Form McGill Pain Questionnaire.
Hip Disability and Osteoarthritis Outcome Score
This scale is scored in the same way as the Short Form McGill Pain Questionnaire.
40
iCAHE Basic Outcomes Calculator: Software Guide
Foot Function Index
This scale is scored in the same way as the Whiplash Disability Questionnaire.
Psychological Response to Impairment/Activity Limitation/Participation Restriction
Fear-Avoidance Beliefs Questionnaire
The data is recorded on a series of forms that looks like Figure 49. The number of the question appears in
the first line. The next line contains the question. Move the slider to record the appropriate score. Notice
that the score selected on the slider is also displayed in the box marked Selected Value. This box only
displays the value of the slider and cannot be changed by the user. Press the button with the right arrow
to move the next question or the button with the left arrow to move to the previous question.
Press OK to record the score. This is only allowed if all the questions are answered. Cancel will close the
screen without recording any scores.
Notice that if the text of the question is not completely displayed the screen can be resized. Grab a
vertical edge of the screen with the mouse and move it to the left or right until the text is readable. If all
the lines of the question are not displayed, move the mouse the bottom of the panel on which the
question is displayed. Notice that the shape of the mouse cursor will change. When the cursor has
changed, hold the left mouse button down and drag the mouse so that the cursor moves vertically down.
This will enlarge the panel so that all the lines of the text are visible.
Figure 49 Fear-Avoidance Belief Questionnaire
Kessler Psychological Distress Score
This scale is scored in the same way as the Short Form McGill Pain Questionnaire.
41
iCAHE Basic Outcomes Calculator: Software Guide
Yellow Flag
Örebro Musculoskeletal Pain Screening Questionnaire
The data for the first question is recorded on a form that looks like Figure 50. The number of the
question appears in the first line. The next line contains the question. A list of options is given next.
Select the appropriate option. Any number of options can be marked. Press the button with the right
arrow to move the next question or the button with the left arrow to move to the previous question.
The second and third questions are completed on forms as shown in Figure 51. The number of the
question appears in the first line. The next line contains the question. A list of options is given next.
Select the appropriate option. Press the button with the right arrow to move the next question or the
button with the left arrow to move to the previous question.
The last 18 questions are completed on a series of forms that looks like Figure 52. The number of the
question appears in the first line. The next line contains the question. Move the slider to record the
appropriate score. Notice that the score selected on the slider is also displayed in the box marked
Selected Value. This box only displays the value of the slider and cannot be changed by the user. Press
the button with the right arrow to move the next question or the button with the left arrow to move to
the previous question.
Figure 50 Örebro Musculoskeletal Pain Screening Questionnaire: Screen for First Question
Press OK to record the score. This is only allowed if all the questions are answered. Cancel will close the
screen without recording any scores.
Notice that if the text of the question is not completely displayed the screen can be resized. Grab a
vertical edge of the screen with the mouse and move it to the left or right until the text is readable. If all
the lines of the question are not displayed, move the mouse the bottom of the panel on which the
question is displayed. Notice that the shape of the mouse cursor will change. When the cursor has
changed, hold the left mouse button down and drag the mouse so that the cursor moves vertically down.
This will enlarge the panel so that all the lines of the text are visible.
42
iCAHE Basic Outcomes Calculator: Software Guide
Figure 51 Örebro Musculoskeletal Pain Screening Questionnaire: Screen for Second and Third Questions
Figure 52 Örebro Musculoskeletal Pain Screening Questionnaire: Screen for Last 28 Questions
43