1
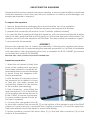
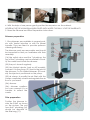
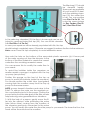
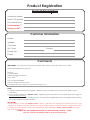
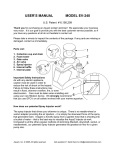
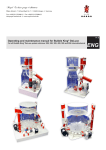
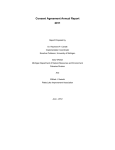
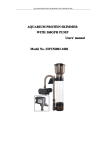
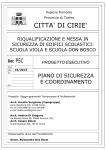
System Marine
Complete Reef System
USER MANUAL
www. eloseurope.com
PREFACE
Congratulations on your purchase of the Elos System.
The uniquely colorful and diverse underwater world of the coral reef and its inhabitants
has captivated man for ages. Since the early years, aquatic hobbyists have tried to
duplicate this wonderland in their homes, focusing on the equipment and technologies
required to achieve this.
Elos developed the System LINE Aquariums to provide a complete reef-ready system so
that from the beginning, you can focus on the aquarium’s inhabitants rather than the
hardware.
All our aquariums have been developed with all the knowledge we have developed
in years of experience. They are a fully working aquarium and, more sophisticated than
any other aquarium actually available on the market. They incorporate our Skimming
technology and, as an optional (in some model light is also included) a full range of
innovative LED lights, unsurpassed in term of innovation, low energy consumption and
quality.
This manual includes complete set-up and operational instructions for the System Line
aquarium.
We hope that you enjoy your ELOS System.
PLEASE READ AND FOLLOW ALL SAFETY INSTRUCTIONS
DANGER: To avoid possible electric shock, special care should be taken when handling a
wet aquarium. For each of the following situations, do not attempt repairs yourself; return
the appliance to an authorized service facility for service or discard the appliance.
WARNING: To guard against injury, basic safety precautions should be observed, including the following:
a. Do not operate any appliance if it has a damaged cord
or plug, if it is malfunctioning, or if it is dropped or damaged in any manner.
b. To avoid the possibility of the appliance plug or receptacle getting wet, position the aquarium stand and tank to
one side of a wall mounted receptacle to prevent water
from dripping onto the receptacle or plug. You should create a “drip loop” (see Figure 1) for each cord connecting
an aquarium appliance to a receptacle. The “drip loop” is
that part of the cord below the level of the receptacle, or
the connector. Use an extension cord, if necessary, to prevent water traveling along the cord and coming into contact with the receptacle. If the plug or receptacle does
get wet, DO NOT unplug the cord. Disconnect the fuse or
circuit breaker that supplies power to the appliance. Then
unplug the device and examine for presence of water in the receptacle.
c. Close supervision is necessary when any appliance is used by or near children.
d. To avoid injury, do not contact moving parts.
e. Always unplug an appliance from an outlet when not in use, before putting on or taking
off parts, and before cleaning. Never pull the cord itself to remove the plug from the outlet.
Grasp the plug and pull to disconnect.
f. Do not use an appliance for anything other than its intended use. The use of attachments
not recommended or sold by the appliance manufacturer may cause an unsafe condition.
g. Do not install or store the appliance where it will be exposed to the weather or to temperatures below freezing point.
h. Make sure an appliance mounted on a tank is securely installed before operating it.
i. Read and observe all the important notices on the appliance.
j. If an extension cord is necessary, a cord with a proper rating should be used. A cord
rated for less amperes or watts than the appliance rating may overheat. Care should be
taken to arrange the cord so that it cannot be tripped over or pulled accidentally.
SET-UP
The ELOS System aquarium comprises the following:
1. Tank with plumbing
2. Cabinet
3. External Filter (SUMP)
4. Protein skimmer
5. Level controller (optional on some models)
5. Circulation and skimmer pumps
6. Illumination with power cord and transformer (optional on some models)
7. Mechanical filter bag
Location
The first step in setting up the ELOS System is to choose a suitable location. The location
should be decided upon in advance because, once filled with substrate, rocks and water, the aquarium must not be moved. Consider the following parameters when choosing
the location.
Tank weight and support
The tank weighs is considerable, expecially when filled with water, reef base and live
rock. If you choose not to use the System Line cabinet (Elos SQUARE), consider this weight
when selecting an alternative aquarium support or stand. If the support you choose is not
designed specifically as an aquarium stand, ensure that it can both withstand the weight
and that it remains balanced and level; it should also be constructed from a material that
is splash proof. The ELOS System Aquarium, like all glass aquaria, may crack if subjected to
sudden movement as a result of uneven water pressure on the glass walls.
Accessibility
When choosing a location, ensure that you have enough room to open the cabinet’s
door(s) and remove the skimmer collection cup for regular maintenance. Make sure you
can reach the power plug on the wall and that the power plugs can be removed. Ensure
that the area surrounding the aquarium is waterproof and consider moving away anything that water might damage.
Room temperature
Site selection is important for correct temperature maintenance. We recommended that
you keep the ambient room temperature a comfortable and stable 22°C / 72°F. Avoid
placing the tank in front of an air conditioner, heating vents or direct sunlight. A well ventilated room with moderate light is the best place to position the aquarium.
NOTE
If you plan to use a water chiller, ensure that there is least 10 cm / 4” of clearance behind
the System Line Aquarium to allow for sufficient air circulation.
UNPACKING THE AQUARIUM
Please read this section carefully before proceeding. In some models the filter is positioned
inside the aquarium; if this is the case with your aquarium, in order to avoid damages, two
people are required to unpack it.
To unpack the aquarium
1. remove the protective packaging from around and the top of the aquarium.
2. remove the skimmer box from inside the aquarium and unpack the skimmer.
3. prepare the connection kit and the Osmo Controller (where included).
4. in case the filter is positioned inside the aquarium, with one person positioned at either
side of the tank, grasp the filter and lift it gently out of the tank and onto a flat surface. Pay
attention not to touch the aquarium with the filter. This may scratch the aquarium’s glass.
5. proceed with the assembly:
ASSEMBLY
Remove the cabinet from its carton and assembly it following the supplied instructions.
Shall you find difficulty in understanding the assembly procedure, on YouTube it is available
a full descriptive video that clearly shows how to assemble an ELOS CABINET. (just search
on Youtube the words: ELOS SQUARE)
Directlink: http://www.youtube.com/watch?v=hZo6BkE7ybo
Aquarium preparation
1. When the unit arrives it is likely that
some of the smaller parts and pipes
have been packed in a partially disassembled state to prevent damage
in transit. Study the diagrams overleaf to reassemble.
2. With the help of one person, place
the aquarium on its cabinet, in a way
so that you can easily access the
connections placed on the bottom
of the overflow (see drawing).
3. Tank Connector - when fitting the
tank connectors (7-10) at the bottom
of the overflow box please be sure to
fit the O-RING to ensure a good seal.
(in some models instead a white teflon tape is supplied)
4. Connect the corrugated tube (8)
to the outlet overflow tank connector (7) on the bottom of the aquarium and at the SUMP
where you have previously connected the coupling connector (12) and the rigid pipe.
Particolar attention should be taken to avoid water spilling.
3. Return plumbing: connect the silicon tube (11) to the inlet tank connector (10) on the
bottom of the aquarium.
4. With the help of one person gently position the aquarium on the cabinet.
NEVER MOVE THE AQUARIUM WHEN FILLED WITH WATER. THIS WILL VOID THE WARRANTY.
5. Read the Skimmer and Filter Preparation Instructions.
Skimmer preparation
1. Elos skimmers are available in several models, with Venturi Injection or with Pin Wheel
Impellor. They are sized to provide optimum
cleaning efficiency.
The skimmer parts are removable and should
be inspected so that you familiarise with their
assembly:
(16) the outlet valve and the T plumbing: the
top of the T plumbing can be rotated to modify the water level inside the skimmer.
(22) the pot: clean it regularly.
(25) the Venturi injector (only on NS models):
connect it to the pump (21) and to the inlet of
the skimmer. On Pin Wheel skimmers (PS models) the injector is positioned on the pump.
(23) air clamp: to modify the air. Start with the
clamp completely closed and regulate the air
flow to your need.
(24): silencer
(26): skimmer overflow:
you can connect it to a
canister to collect the
waste.
Filter preparation
Position the skimmer inside the SUMP as shown
on the picture. The exit
from the T plumbing (16)
should be directed to
the filter bag (17).
The filter bag (17) should
be cleaned weekly.
Spare part are available
at your local ELOS dealer. In the oxidising chamber (18) the water flow
is fast. You can position
here Elos Ca-Pur XL. This
is also the correct place
for Elos Carbon, Elos Filtra P, Elos Filtra P Fast.
In the reducing chamber (19) the flow is slower and can be adjusted by opening/closing the tap (20). You can fill this chamber
with Elos Filtra 1 or Ca-Pur.
In case your aquarium will be densely populated with fish, the tap
should be kept completely open. Otherwise we suggest to reduce the flow to the minimum.
Note: never Close this tap completely to avoid anaerobic areas.
Also note the hole on the bottom of the removable plastic separator (6). It forces part
of the water coming out from the skimmer, to the
bottom of the filter material to create the correct
water flow thus avoiding anaerobic areas.
You can reverse this to modify the water flow to
your needs.
To avoid fine bubbles inside the aquarium on
smaller models a sponge is supplied with the top
up pump (see picture).
Position this sponge on the front of the top up
pump to avoid fine bubbles inside the aquarium.
You should position the outlet tube (corrugated)
coming from the overflow away from the top up
pump for the same reason.
NOTE: pumps transmit vibrations and noise to the
SUMP. To reduce the noise use the supplied suction cups/plastic pins to fix the pumps. Position the
pumps away from the side glass of the filter will also
help reducing noise generated from vibrations.
3. With the help of a person, gently move the filter into the cabinet, while positioning the return
tube (silicon tube) coming from the overflow of
the aquarium previously connected to the return
pump. You will modify the water flow from the pump to your needs. The lower the flow, the
lower will be the noise from the overflow.
Fresh Water Reservoir (14):
On the ‘Standard System Aquarium’ there is a section of the sump, which is separate from
the main body of water. This is the fresh water reservoir, which is used to store water required for replacing evaporative losses from the aquarium. This reservoir is not present on
some larger models due to the extra volume required in the sump.
To utilise this reservoir it will be necessary to install the Elos OSMO Controller (optional on
some models), which will sense the drop in water level in the main sump and then pump
water from the reservoir into the system. Use the supplied pipings for this reason (13).
The overflow (1):
Elos overflow is the smaller internal overflow available on the market. The actual model, although
very simple, is the evolution of our first overflow introduced to the hobby in the eighties.
All our aquariums employes a similar overflow that
includes a 90° directional tail (4), to create surface
movement thus increasing oxigen exchange, a
straight removable pipe (3) to create deeper water flow, a removable plate (2) with a surface grid
and bottom grids (5).
A lower plate (6) is supplied to avoid the coral
sand to block the sliding plate.
OPERATION
Filling the Aquarium with Water: once all of the
pipeworks and parts have been assembled and
installed you are ready to fill the aquarium with
water.
Remove the cabinet doors, lids and any light units to give you good access prior to starting
and store them in a safe place where they will not be knocked over.
Fill the aquarium with salt water until the level reaches the top of the overflow box. Further
water added past this point will overflow down to the sump, which will also start to fill.
At this point check that there are no leaks at any of the pipe connections. If any are found
then tighten up the threaded unions until they stop.
Continue to fill the tank until the water level, with the whole system stabilised, reaches a
level 10-12cm (4”) from the top of the pumps. The pumps are not running at this point. Mark
this Maximum Fill Level with a piece of coloured tape.
If adding salt to RO water within the tank always allow 24 hours for proper mixing of the
solution before the addition of any life forms and check that the salinity is correct through
out the whole system.
Operation of Recirculation Pump and Skimmer: The System Aquarium is supplied with a
circulation pump to create good water movement within the tank to simulate the natural
flows on the reef.
Prior to starting up the Recirculation pump it is necessary to carry out the following steps.
1) Direct the directional tail (4) to the bottom of the aquarium, to avoid water from splashing out from the aquarium.
2) Be sure that the water level is above the pumps.
With the recirculation pump running observe the system and check for any pipework leaks.
Tighten if necessary.
The water should rise in the aquarium and fall in the sump and at this stage there will be a
gurgle as the water flows down the overflow box.
Slowly close the overflow shut-off valve (not available on all models) to reduce the gurgle.
It is also possible to reduce the water flow at the pump side.
During operation the resistance and subsequent flow rate through the overflow will change
requiring occasional adjustment of the valve to maintain the correct overflow level.
Skimmer Pump: We can now plug in the Skimmer Pump. If the small grey tap (23) on the air
line and the outlet valve (16) are both open, you will see that the skimmer body immediately fills up. Close off the air tap and observe that the foam disappears.
For all ELOS skimmers the ideal operating level for the water is just above the bottom of the
removable cup. Adjust the water level by raising or lowering the adjustable outlet valve
and the air flow.
Leave the skimmer to settle down for a day or so before further adjustment. Close down
the tap slightly if an initial very wet skimmate is being produced this is normally produced
by removal of a conditioning compound that is found in some salts. A similar effect may be
noticed after a thorough clean or after large water changes.
After two to three days the level of the initial foam in the skimmer should rise to half way up
the skimmer tube. Adjust the tap to achieve fine bubbles within the skimmer.
During normal operation it is recommended that the skimmer cup is emptied every 2-4
days and that during this operation the riser tube into the cup is wiped clean of any fatty
deposits as build up of this waste product will greatly reduce the ability for the foam to
climb the neck.
Ensure before removing the cup that the pumps are switched off.
Use of Skimmer with Ozone: ELOS skimmers are suitable for use with ozone and will automatically suck the gas through the venturi hose. A maximum volume of 50 mg/h per pump
should be used with special manifolds available for multi pump units. Do not use excessive
ozone, as it is dangerous and can cause severe headaches. Should the skimmer performance deteriorate check the ozoniser for blockage. Ensure that it is not possible for water
to siphon through the ozoniser by installing the unit above the skimmer water level.
Maintenance of Skimmer: ELOS skimmer should need very little adjustment and maintenance once set correctly, however due to the high levels of calcium in marine aquariums
and large volumes of air drawn in, it is common for deposits to accumulate requiring periodical cleaning. Regular introduction of a small amount of RO water into the inlet tap may
help to prevent any build up.
VERY IMPORTANT - A build up of calcium, dust and salt will restrict or block the venturi inlet
on the connecting pipework and reduce the skimming efficiency over time. This should
be checked and carefully cleaned on a monthly basis with a toothpick or fine drill rotated
between the fingertips.
General Maintenance of Aquarium: the aquarium should require little maintenance once
established other than cleaning of the glass, emptying of the skimmer and replacement of
evaporative loss however regular checks of all of the systems will prevent sudden problems.
The filter bag should be rinsed in aquarium water, (but not in the tank), once a week or as
required to remove debris. Change it regularly to prevent incorease of PO4.
Trouble shooting and Hints:
1 - On new aquariums with new salt or after large water changes it is possible that excess
production of bubbles is encountered at the skimmer, which do not burst and enter the
aquarium.
This is common with some salts and is caused by a conditioning agent added to the salt to
remove heavy metals. Once the aquarium becomes established with fish waste and food
etc this aeration will disappear but may take up to 6 weeks to fully mature. Starting up the
system with salt water from an existing aquarium will remove this problem but might not
always be an option.
2 - All new aquariums go through a maturation cycle whilst established bacterial colonies
develop on the filter media. Advice should be taken from your ELOS dealer as to how
quickly livestock can be added to the system as some systems mature faster than others.
3 – All new tanks will go through algal or diatom blooms during their maturation, which will
look unsightly. Removing the phosphates from the water by use of ELOS FILTRA P and FILTRA
P Fast can reduce this problem.
5 – Remember that although this is a relatively small tank that it is fitted with a powerful
skimmer and recirculation pump to produce exceptional results and like all marine aquariums it should not be expected to be totally silent.
Natural rotation of the recirculation pump or skimmer pump may cause the sump or pipework items to resonate in harmony with the vibration frequency and increase the perception of noise from the system. This can be reduced by placing rubber ‘O’ rings around the
pump body or standing the base of the pump body on a piece of filter sponge.
Moving the pump or sump slightly from time to time may change the frequency of resonance and reduce any noise.
IMPORTANT
Do not try to move the aquarium with any water inside. This will void your warranty.
WARRANTY
ELOS offers a limited 2 years warranty on all manufactured aquariums. Our aquariums are
guaranteed to be free of defects in materials or workmanship for 2 years from the purchase. The warranty is non transferable and is only available to the original purchaser who
has completed the product registration and has maintained original receipt. Under this
warranty ELOS will repair or replace, at its option, a product that under normal use is proven
to be defective in materials or craftsmanship. For this warranty to be valid, any defective
product must be returned by the original purchaser, freight prepaid, to ELOS, and allow
ELOS a reasonable time to verify alleged defect by inspection. ELOS will not be responsible
for any defect determined to be caused from misuse, abuse, modification, alteration, or
attempted repair from anyone other than a certified ELOS technician. Under no circumstance will ELOS be held responsible for any damages caused by defective products or for
incidental or consequential damages, or for loss incurred from manufacture, sale, use, or
misuse of these products.
Product Registration
Product Description
Aquarium Model
Date Of Purchase
Purchased From
Serial number (1):
Unique code(2):
Customer Information
Name
Address
City State
Zip CodeCountry
Phone Fax
E-Mail
Comments
IMPORTANT: This form must be received within thirty days of purchase date to be valid.
Mail or Fax Registration Card To:
ELOS srl,
via Torricelli 32,
37067 Valeggio sul Mincio
(VR) - ITALY
Fax: +39 (0)45 6370836
Mail to: [email protected]
Complete this form on line at: www.eloseurope.com
NOTE:
1) Serial number is written on supplied warranty card or is impressed on the bottom glass of your
aquarium.
2) You can also obtain the “Unique code”, registering your aquarium on the dedicated web page at:
www.eloseurope.com
You can also obtain it by sending a copy of this Product Registration Form via regular mail, email or
fax to the address mentioned above.
IMPORTANT:
It is important to obtain the Unique Code in order to validate your warranty and obtain service to your
aquarium during the warranty period. No warranty will be given in case the Product Registration Form
is missing the valid Unique code. ONLY AQUARIUM WITH MATCHING Serial - Unique Code are ORIGINAL ELOS AQUARIUM.
DISTRUST ALL THE AQUARIUM WITHOUT A VALID MATCHING “SERIAL - CODE”.
You can verify the matching serial at www.eloseurope.com