1
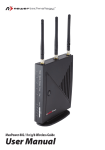
Super G™ Wireless Access Point
Model # AP421W
User’s Manual
Ver. 1B
Table of Contents
1. Introduction................................................................................................................................. 3
2. Getting Started ............................................................................................................................ 4
3. Gathering Information ................................................................................................................ 6
4. Configuring Network Address.................................................................................................... 7
5. Using Web Configuration Utility.............................................................................................. 14
6. Connecting to the Access Point ................................................................................................ 19
7. Web Configuration Utility ........................................................................................................ 20
7.1 Primary Setup...................................................................................................................... 20
7.1.1 Wireless Encryption Settings....................................................................................... 24
7.2 System................................................................................................................................. 27
7.3 Operating Mode .................................................................................................................. 29
7.4 Access Control .................................................................................................................... 34
7.5 Advanced Wireless ............................................................................................................. 36
7.6 Setting Status ...................................................................................................................... 38
7.7 Help..................................................................................................................................... 39
Technical Support ......................................................................................................................... 40
2
1. Introduction
Congratulations on your purchase of this Super G™ Wireless Access Point. The Access
Point features four operating modes. The Access Point mode connects your wireless
clients with the wired part of your network. The AP client mode acts as a wireless
network adapter for your PC or game console. The AP Repeater mode extends the
range of your access point/wireless router by repeating the signal to wireless clients that
are beyond the broadcasting range of the access point/wireless router. This provides
the wireless clients with greater flexibility and mobility. Finally, the Point to Point Bridge
mode bridges the network clients from two physically separate LANS into one virtual
LAN.
The Access Point is compatible with existing 802.11b and 802.11g network devices so it
will work with most existing wireless devices. If you have other Super G™ compatible
wireless network device, you can also enable Super G™ on the Access Point for faster
transfer rate.*
Instructions for installing and configuring this product can be found in this manual.
Before you install and use this product, please read this manual carefully for proper
operation of this product.
Package Contents
Before you begin the installation, please check the items of your package:
•
•
•
•
•
•
Super G™ Wireless Access Point
Power Adapter
RJ-45 Network Cable
Antenna
Quick Installation Guide
Manual CD
If any item contained is damaged or missing, please contact your local dealer
immediately. Also, keep the box and packaging materials in case you need to ship the
unit in the future.
3
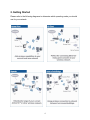
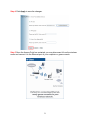
2. Getting Started
Please refer to the following diagrams to determine which operating mode you should
use for your network.
4
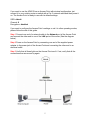
If you want to use the AP421W as an Access Point with minimal configuration, just
connect it to your existing router or switch with a Cat. 5 network cable and then power it
on. The Access Point is ready to use with its default settings:
SSID: default
Channel: 6
Encryptions: disabled
If you want to configure the Access Point’s settings or set it to other operating modes,
please follow the rest of this guide.
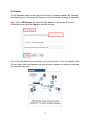
Step 1 Connect one end of a network cable to the Network port of the Access Point
and connect the other end to one of the LAN ports of the router (See the diagram
below).
Step 2 Power on the Access Point by connecting one end of the supplied power
adapter to the power jack of the Access Point and connecting the other end to an
electrical outlet.
Step 3 Verify that all three lights on the Access Point are lit. If not, verify that all the
connections are secure and try again.
5
3. Gathering Information
Step 1 On the wired computer, go to Start, Run, type command (for Windows
95/98/ME) or cmd (for Windows 2000/XP) and click OK.
Step 2 Type ipconfig and press Enter. Your network settings will be displayed.
Step 3 Write down the values for the IP Address, Subnet Mask, and Default Gateway
on a piece of paper.
Step 4 If you want to set the AP421W to a mode other than an Access Point, write
down the following values for your existing wireless router or AP:
1. SSID (Network Name)
2. Channel Number
3. Wireless Security Settings
The AP421W needs to use the same wireless settings in order for it to work properly.
You may gather these information from the web configuration utility of your wireless
router.
Step 5 Refer to the IP Address you’ve written down from Step 3.
If the first three numbers of your IP Address are 192.168.1, then you do not need to
configure your computer’s IP Address. Please continue to Section 5, Using Web
Configuration Utility.
If the first three numbers of your IP Address are not 192.168.1, (Ex. 192.168.2), then
please refer to the next section for instructions on how to change the IP Address.
6
4. Configuring Network Address
This section describes how to change your computer’s IP Address to access the Access
Point’s Web Configuration Utility and then to change the Access Point’s IP Address to
match your existing Network Address.
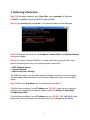
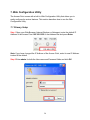
Step 1 Go to Start > Settings > Control Panel > Network and Internet Connections.
Step 2 Select Network Connections.
7
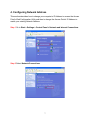
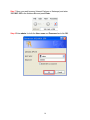
Step 3 Right-click on Local Area Connection and select Properties.
Step 4 Select Internet Protocol (TCP/IP) and click on Properties.
8
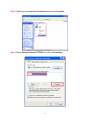
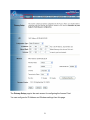
Step 5 Select Use the following IP address and enter the following:
IP Address: 192.168.1.101
Subnet Mask 255.255.255.0
Click OK when done.
Step 6 Click Close.
9
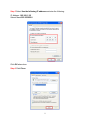
Step 7 Open your web browser (Internet Explorer or Netscape) and enter
192.168.1.250 in the Address Bar and press Enter.
Step 8 Enter admin for both the User name and Password and click OK.
10
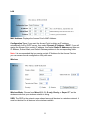
Step 9 Refer to the Network Settings you’ve written down from the previous section and
change the first three numbers of the IP Address to match your local network address.
For example: If your computer’s IP Address is 192.168.2.100, change the first three
numbers to 192.168.2 as well but leave the last number 250 alone.
Step 10 Enter the Subnet Mask and Gateway fields with exactly the same values as
you got from running ipconfig.
Step 11 Click Apply to save the changes.
11
Step 12 Return to Internet Protocol (TCP/IP) Properties and select Obtain an IP
address automatically and Obtain DNS server address automatically and click OK.
Step 13 Click Close.
12
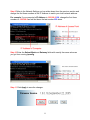
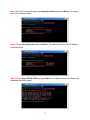
Step 14 At the Command Prompt, type ipconfig /release and press Enter. You should
see all 0’s as shown below.
Step 15 Type ipconfig /renew and press Enter. You should receive a valid IP address
as shown below.
Step 16 Type ping 192.168.2.250 and press Enter. You should receive four Reply from
messages as shown below.
13
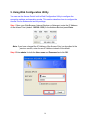
5. Using Web Configuration Utility
You can use the Access Point’s built-in Web Configuration Utility to configure the
encryption settings and operating modes. This section describes how to configure the
Access Point’s wireless and security settings.
Step 1 Open your Web Browser (Internet Explorer or Netscape), enter the IP Address
of the Access Point (default: 192.168.1.250) in the Address Bar and press Enter.
Note: If you have changed the IP Address of the Access Point, as described in the
previous section, enter its new IP Address instead of the default.
Step 2 Enter admin for both the User name and Password and click OK.
14
Step 3 At the Wireless section, enter the SSID (Network Name) of your wireless
network and the channel number.
Step 4 If you have enabled encryption for your wireless network, you’ll need to
configure the same security settings on the Access Point as well. Select Enable and
click on Configure Security.
15
WEP
Step 5a Select the same level of WEP encryption (64-Bits / 128-Bits) of your wireless
network from the drop-down menu.
Step 5b Enter the same WEP key (password) of your wireless network in the Key 1
field and click Save. Skip to Step 8.
16
WPA
Step 6 Select WPA from the drop-down menu and enter all the applicable fields. Click
Save and proceed to Step 8.
WPA-PSK
Step 7 Select WPA-PSK from the drop-down menu and enter all the applicalble fields.
Click Save and proceed to Step 8.
17
Step 8 Click Apply to save the changes.
Step 9 For best result, place the Access Point at a central location where it is
accessible to all the wireless computers.
18
6. Connecting to the Access Point
Once you have properly configured the Access Point, your wireless computers should
be able to detect its signal.
Use your wireless network adapter’s utility to detect and connect to the Access Point.
You can identify the Access Point by its MAC Address, which is displayed in the BSSID
field of your wireless network adapter’s utility.
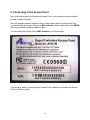
You can check the Access Point’s MAC Address on its bottom label.
If the signal is weak, try reorienting the Access Point’s antenna or relocate the Access
Point to a different place.
19
7. Web Configuration Utility
The Access Point comes with a built-in Web Configuration Utility that allows you to
easily configure its various features. This section describes how to use the Web
Configuration Utility.
7.1 Primary Setup
Step 1 Open your Web Browser (Internet Explorer or Netscape), enter the default IP
Address of the Access Point 192.168.1.250 in the Address Bar and press Enter.
Note: If you have changed the IP Address of the Access Point, enter its new IP Address
instead of the default.
Step 2 Enter admin for both the User name and Password fields and click OK.
20
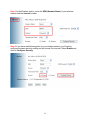
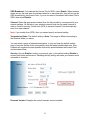
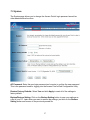
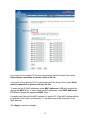
The Primary Setup page is the main screen for configuring the Access Point.
You can configure its IP Address and Wireless settings from this page.
21
LAN
MAC Address: Displays the Access Point’s MAC Address.
Configuration Type: If you want the Access Point to obtain an IP address
automatically from a DHCP server, then select Dynamic IP Address - DHCP. If you will
assign the Access Point a static IP address, then select Static IP Address and enter an
IP Address, Subnet Mask, and Default Gateway address in the corresponding fields.
Note: It is recommended that you assign a static IP Address for the Access Point so
you can access its web configuration utility with ease.
Wireless
Wireless Mode: Choose from Mixed (B & G), G-only, B-only, or Super G™ as the
wireless mode that your wireless network is using.
SSID: The SSID is the network name shared among all devices in a wireless network. It
must be identical for all devices in the wireless network.
22
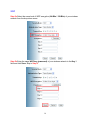
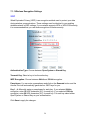
SSID Broadcast: To broadcast the Access Point's SSID, select Enable. When wireless
clients survey the local area for wireless networks to associate with, they will pick up the
SSID broadcast by the Access Point. If you do not want to broadcast the Access Point's
SSID, then select Disable.
Channel: Select the appropriate channel from the list provided to correspond with your
network settings, All devices in your wireless network must use the same channel in
order to function correctly. Select Auto (DFS) to have the Access Point automatically
scan for a clear channel.
Note: If you enable Auto (DFS), then you cannot specify a channel setting.
Transmission Rates: The default setting is Auto. The range is different according to
the Wireless Mode you select.
You can select a range of transmission speeds, or you can keep the default settingAuto to have the Access Point automatically uses the fastest possible data rate. AutoFallback will negotiate the best possible connection speed between the Access Point
and a wireless client.
Security: Choose Enable to select your security type, or the default setting Disable to
connect with better performance. Disabling security setting will make your network more
vulnerable to intrusion.
Firmware Version: Displays the current firmware version installed.
23
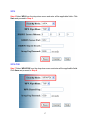
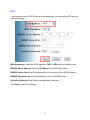
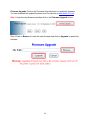
7.1.1 Wireless Encryption Settings
WEP
Wired Equivalent Privacy (WEP) is an encryption method used to protect your data
during wireless communications. These settings must be identical to your existing
wireless network’s WEP settings. If your network supports WPA or WPA-PSK security,
it is recommended that you use those encryptions for better security.
Authentication Type: Choose between Open System or Shared Key.
Transmit Key: Select a key to be the active key.
WEP Encryption: Choose between 64-bit and 128-bit encryption.
Passphrase: You can enter a passphrase and click on the Generate button and the
Access Point will automatically generate four WEP keys for you.
Key 1 – 4: Manually assign a passphrase for each key. If you selected 64 bits
encryption, enter 10 HEX characters (0-F) for each key. If you selected 128 bits
encryption, enter 26 HEX characters (0-F) for each key. For each key select either
Open System or Shared Key as your authentication.
Click Save to apply the changes.
24
WPA
If your network uses a RADIUS server for authentication, you may select WPA as your
encryption setting.
WPA Algorithms: Select the WPA Algorithm (TKIP or AES) that your network uses.
RADIUS Server Address: Enter the IP Address of your RADIUS server.
RADIUS Server Port: Enter the Authentication Port number of your RADIUS server.
RADIUS Shared Secret: Enter the Shared Key for your RADUS server.
Group Key Renewal: Enter the key renewal time (in seconds).
Click Save to apply the changes.
25
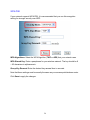
WPA-PSK
If your network supports WPA-PSK, it is recommended that you use this encryption
setting for stronger security over WEP.
WPA Algorithms: Select the WPA Algorithm (TKIP or AES) that your network uses.
WPA Shared Key: Enter a passphrase for your wireless network. The key should be 8
~ 63 characters in alphanumeric.
Group Key Renewal: Enter the desired key renewal time in seconds.
Note that these settings must be exactly the same as your access point/wireless router.
Click Save to apply the changes.
26
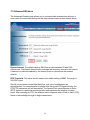
7.2 System
The System page allows you to change the Access Point’s login password as well as
other administrative functions.
AP Password: Enter the new login password and re-enter to confirm the new password.
This is the password used for logging into the Access Point’s Web Configuration Utility.
Restore Factory Defaults: Select Yes and click Apply to reset all of the settings to
factory default.
Backup/Restore Setting: Click on the Backup Setting button to save your settings as
a file in your PC. Later when you want to restore the settings, just click on the Restore
Setting button and browse to the previously saved file.
27
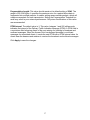
Firmware Upgrade: Click on the Firmware Upgrade button to update the firmware.
You can download the updated firmware from our web site at www.airlink101.com
Step 1 Unzip the new firmware and then click on the Firmware Upgrade button.
Step 2 Click on Browse to locate the new firmware and click on Upgrade to update the
firmware.
28
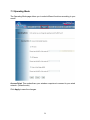
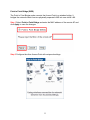
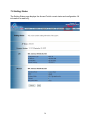
7.3 Operating Mode
The Operating Mode page allows you to select different functions according to your
needs.
Access Point: This mode allows your wireless computers to connect to your wired
network. (Default mode)
Click Apply to save the changes.
29
AP Client
The AP Client mode converts the Access Point to a wireless network adapter, allowing
the network device such as your computer or game console to become a wireless client.
Step 1 Select AP Client and enter the MAC address of the remote AP or click on the
Available Networks button to scan for any available wireless network.
Step 2 Select the desired wireless network from the list.
Step 3 Click Apply to confirm the selection.
30
Step 4 Click Apply to save the changes.
Step 5 Once the Access Point has restarted, you may disconnect it from the wireless
router and connect it to the Ethernet port of your computer or game console.
31
AP Repeater
The AP Repeater mode converts the Access Point to a wireless repeater. By extending
the wireless signal of the source AP/wireless router, the wireless coverage is expanded.
Step 1 Select AP Repeater and enter the MAC address of the remote AP (source
AP/wireless router) and click Apply to save the changes.
Step 2 Once the Repeater has restarted, you may disconnect it from the wireless router.
For best result, place the Repeater at a central location between the wireless router and
your wireless computers.
32
Point to Point Bridge (WDS)
The Point to Point Bridge mode converts the Access Point to a wireless bridge. It
bridges the network clients from two physically separate LANS into one virtual LAN.
Step 1 Select Point to Point Bridge and enter the MAC address of the remote AP and
click Apply to save the changes.
Step 2 Configure the other Access Point with reciprocal settings.
33
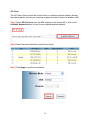
7.4 Access Control
The Access Control page allows you to control which PCs may or may not communicate
with the Access Point depending on their MAC address.
Select Enable from the drop-down menu to enable Access Control.
34
If you want to block specific PCs from communicating with the Access Point, select
Deny wireless connection to join the unit from the list.
If you want to allow specific PCs to communicate with the Access Point, select Allow
wireless connection to join the unit from the list.
To enter the first 20 MAC addresses, select MAC Addresses 1~20 and complete the
appropriate MAC fields. To enter additional MAC addresses, select MAC Addresses
21~40 and complete the appropriate MAC fields.
Complete each field with the MAC address of a specific PC. Each MAC address should
be entered in this format: xxxxxxxxxxxx ("x" represents the actual characters of the
MAC address).
Click Apply to save the changes.
35
7.5 Advanced Wireless
The Advanced Wireless page allows you to customize data transmission settings. In
most cases, the advanced settings on this page should remain at their default values.
Beacon Interval: The default value is 100. Enter a value between 20 and 1000
milliseconds. The Beacon Interval value indicates the frequency interval of the beacon.
A beacon is a packet broadcast by the Access Point to synchronize the wireless
network.
RTS Threshold: This value should remain at its default setting of 2347. The range is
256-2347 bytes.
Should you encounter inconsistent data flow, only minor modifications are
recommended. If a network packet is smaller than the preset RTS threshold size, the
RTS/CTS mechanism will not be enabled. The Access Point sends Request to Send
(RTS) frames to a particular receiving station and negotiates the sending of a data
frame. After receiving an RTS, the wireless station responds with a Clear to Send (CTS)
frame to acknowledge the right to begin transmission.
36
Fragmentation Length: This value should remain at its default setting of 2346. The
range is 256-2346 bytes. It specifies the maximum size for a packet before data is
fragmented into multiple packets. A smaller setting means smaller packets, which will
create more packets for each transmission. Setting the Fragmentation Threshold too
small may result in poor network performance. Only minor modifications of this value
are recommended.
DTIM Interval: The default value is 1. This value, between 1 and 255 milliseconds,
indicates the interval of the Delivery Traffic Indication Message (DTIM). A DTIM field is
a countdown field informing clients of the next window for listening to broadcast and
multicast messages. When the Access Point has buffered broadcast or multicast
messages for associated clients, it sends the next DTIM with a DTIM Interval value. Its
clients hear the beacons and awaken to receive the broadcast and multicast messages.
Click Apply to save the changes.
37
7.6 Setting Status
The Setting Status page displays the Access Point's current status and configuration. All
information is read-only.
38
7.7 Help
The Help page provides links to online help files regarding each page of the Web
Configuration Utility.
39
Technical Support
E-mail: [email protected]
Toll Free: 1-888-746-3238
Web Site: www.airlink101.com
* Super G™ technology (108Mbps) can only be obtained when using products with Atheron Super G™ chipset.
* Theoretical maximum wireless signal rate based on Atheros™ Super G™ and IEEE standard 802.11g specifications. Actual data
throughput will vary. Network conditions and environmental factors, including volume of network traffic, building materials and
construction, mix of wireless products used, radio frequency interference (e.g., cordless telephones and microwaves) as well as
network overhead lower actual data throughput rate.
Copyright © 2005 AirLink101. All rights reserved. AirLink101, the stylized AirLink101 logo, specific product designations, and all
other words and logos that are identified as trademarks and/or service marks are, unless noted otherwise, the trademarks and
service marks of AirLink101. All other product or service names are the property of their respective holders. AirLink101 products are
protected under numerous U.S. and foreign patents and pending applications, mask work rights, and copyrights.
40