1
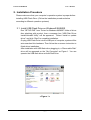
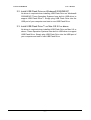
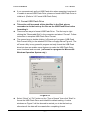
USB FLASH DRIVE
User’s Manual
Table of Contents
1.
INTRODUCTION ......................................................................................1
1.1.
1.2.
1.3.
1.4.
2.
INSTALLATION PROCEDURE ................................................................3
2.1.
2.2.
2.3.
3.
FEATURES ...........................................................................................1
SPECIFICATIONS...................................................................................2
PACKAGE CONTENTS ............................................................................2
SYSTEM REQUIREMENTS ......................................................................2
INSTALL USB FLASH DRIVE ON WINDOWS® 98/98SE ............................3
INSTALL USB FLASH DRIVE ON WINDOWS® 2000/ME/XP ......................4
INSTALL USB FLASH DRIVE™ ON MAC OS 9.0 OR ABOVE ......................4
OPERATION PROCEDURE.....................................................................5
3.1.
3.2.
3.3.
3.4.
3.5.
START TO USE USB FLASH DRIVE .........................................................5
FORMAT USB FLASH DRIVE ..................................................................6
BOOTABLE SETTING .............................................................................8
PASSWORD SETTING ...........................................................................8
PARTITION SETTING .......................................................................... 11
4. TROUBLESHOOTING ..............................................................................14
Printing Version: UDP1S-E
USB FLASH DRIVE
User’s Manual
1. Introduction
USB Flash Drive is a portable and pocketable USB storage device that allows
you to share data between any notebook and desktop system with USB port.
Without the use of floppy disk, you can store texts, presentations or multimedia
files by this Plug-and-Play USB Flash Drive.
Transferring data from one computer to another has never been so easier with
USB Flash Drive. Just simply plug in any USB port of your computer, and USB
Flash Drive will be automatically detected as another hard drive of your
computer.
Thumb size of USB Flash Drive is easy-to-carry and can be fastened with neck
strap. Various storage capacities are provided such as 8MB, 16MB, 32MB,
64MB, 128MB, 256MB, 512MB and up to 1GB. Just bring USB Flash Drive with
you and work through accessing computer anywhere.
There is password protection to secure all the files in USB Flash Drive. After
typing correct password, you can read/write data as you like. No body can
access your files without password. And it can be bootable disk to boot up your
computer after BIOS setting with your motherboard.
The best thing is that USB Flash Drive is driver-less on Windows ME/2000/XP,
and Mac 9.0 or above. With so convenient USB Flash Drive, take it and save
your work.
1.1. Features
Capacity – 8MB ~ 1GB.
Security – Password protection to remain private.
Bootable – Be a bootable disk to boot up your computer.
Partition – Can be divided into Public and Security Areas.
Compactness – Thumb size and lightweight.
Portability – No extra cable or battery needed.
Ease of use – USB port, Plug-and-Play and no software is
required.
Convenience – connectable with Desktop and Laptop via USB
port.
Reliability – Rewritable more than 1 million times & data reserve
up to 10 years
~1~
USB FLASH DRIVE
User’s Manual
1.2. Specifications
Host Interface
Operating System
Storage Capacity
Driver Setup
Security Function
Bootable Function
Partition Function
Reliability
Data Reading Speed
Data Writing Speed
USB (Universal Serial Bus) V1.1 Compliant
Windows® 98/98SE/2000/ME/XP, Mac OS 8.6 or above
8MB/16MB/32MB/64MB/128MB/256MB/512MB/1GB
Need to install driver only on Windows 98/98SE
Password Protection by Software (Windows Only)
Enabling with Windows 98/ME/XP only
Divide into public and security areas (Windows Only)
Green Light (Power on/Connected)
Red Light flashing (Data Accessing)
1,000,000 Read / Write Operations
880KB/sec
680KB/sec
Suspend Current
250uA±20% (Compliant to USB Specification, 500uA)
Operating Current
25mA±30% (Compliant to USB Specification, 100mA)
LED Indication
Operating Temperature -10℃ ~ 50℃
Storage Temperature
-25℃ ~ 75℃
Relative Humidity
5% ~ 95%
Regulatory Compliance FCC, CE
Weight
14g ± 5%
Dimension
Acoustic Noise
Shock Resistance
Power Supply
94 x 24 x 15 mm
0 dB @ one meter
1,000 G (Maximum)
USB bus power mode (4.5V~5.5V)
1.3. Package Contents
USB Flash Drive.
CD or Floppy Disk for driver of Windows® 98/98SE, mFormat
program & User's Manual.
USB Extension Cable.
Neck Strap.
1.4. System Requirements
IBM PC or 100% compatible Desktop PC / Notebooks /
Sub-Notebooks / Laptop PC (Intel® Pentium 100MHz or higher).
Windows 98 / 98 SE / 2000 / ME / XP, and Mac OS 9.0 or above.
One free USB port.
~2~
USB FLASH DRIVE
User’s Manual
2. Installation Procedure
Please make sure that your computer’s operation system is proper before
installing USB Flash Drive. (Follow the installation procedure below
according to different operation systems)
2.1. Install USB Flash Drive on Windows® 98/98SE
Run “SETUP.EXE” from “Driver for Windows 98/98SE” folder of driver
disc attaching with product, then a message box “USB Disk Driver
Install/Uninstall Utility” will be appeared. Select “Install or update
driver” and click “Start” to complete installation.
Or plug USB Flash Drive into the USB port of computer, system will be
auto-searched this hardware. Then follow the on-screen instruction to
finish driver installation.
After installation with USB flash drive plugging-in, a “Removable Disk”
drive will be appeared on the “My Computer” as Figure 1. You can
operate the USB flash drive as Hard Disk Drive.
< Figure 1 >
~3~
USB FLASH DRIVE
User’s Manual
2.2. Install USB Flash Drive on Windows® 2000/ME/XP
No driver is required when installing USB Flash Drive on Windows®
2000/ME/XP. These Operation Systems have built-in USB driver to
support USB Flash Drive™. Simply plug USB Flash Drive into the
USB port of your computer and start to use USB Flash Drive.
2.3. Install USB Flash Drive™ on Mac OS 9.0 or above
No driver is required when installing USB Flash Drive on Mac 9.0 or
above. These Operation Systems have built-in USB driver to support
USB Flash Drive. Simply plug USB Flash Drive into the USB port of
your computer and start to use USB Flash Drive.
~4~
USB FLASH DRIVE
User’s Manual
3. Operation Procedure
3.1. Start to use USB Flash Drive
Pull out the clip of USB Flash Drive, and directly plug USB Flash Drive into
one free USB port of your computer.
You can also take attached USB Cable to make connection easy and
convenient. Plug one end of USB cable into USB port of your desktop
computer, and plug the other end into USB Flash Drive.
After connecting USB Flash Drive with computer, the LED indicator on the
USB Flash Drive will be on with green light when computer is powered on.
When you are on the process of reading/writing/editing/copying files on the
USB Flash Drive, LED indicator on the USB Flash Drive will be kept
flashing with red light. After finish the work, the LED indicator will be
returned to be on with green light.
Please firstly stop the device of USB Flash Drive by double clicking the
right-corner task bar “Unplug or Eject Hardware” before pulling out it as
Figure 2. If a warning window showing that can’t be stopped the device,
please check if you have closed all the files on USB Flash drive, than do it
again
Please note that don’t plug out USB Flash Drive when you are
reading/writing files on it. This is possible to cause the data loss or damage
with USB Flash Drive. If you didn’t stop the device before pulling out, there
is an error message will be showed as Figure 3.
< Figure 2 >
< Figure 3 >
~5~
USB FLASH DRIVE
User’s Manual
If you unconsciously pull out USB Flash drive when operating it and result
in unable to access USB Flash Drive, please re-format USB Flash Drive to
initialize it. (Refer to 3.2 Format USB Flash Drive)
3.2. Format USB Flash Drive
This action will be erased all the data/files in the Disk, please
remember to do the back up for files on the USB Flash Drive before
formatting it.
There are two ways to format USB Flash Drive. The first way is right
clicking the “Removable Disk” in the computer and select “Format”. Follow
instruction to complete USB Flash Drive Format.
The second way is double-clicking “mFormat.exe” program (USB Flash
Disk Format Utility) in the attached CD Disc or floppy disk as Figure 4. The
mFormat utility is very powerful program not only format the USB Flash
drive but also can enable some features to make the USB Flash Drive
more functional and secured. (mFormat is a program for Microsoft®
Windows Operation System only.)
< Figure 4 >
Select “Quick” or” Full” button on the “Type of format” then click “Start” to
format the USB Flash Drive and initialize to default setting. A notice
windows as Figure 5 will be showed to remind you to do the back up
otherwise all the data will be erased after completing format.
~6~
USB FLASH DRIVE
User’s Manual
< Figure 5 >
After successfully finish format, you will see the window shown as Figure 6.
Please re-plug your USB Flash Drive before starting to use it.
< Figure 6 >
If you want to enable features of “Password”, “Bootable” or “Partition” by
selecting “Configure device only” and continuously set the features you
wish to enable. Click “Start” to complete the format. (Refer to 3.3, 3.4, and
3.5 for the detailed setting of three features enable/disable.
~7~
USB FLASH DRIVE
User’s Manual
3.3. Bootable Setting
You can make USB Flash Drive to be a bootable disk to boot up your
computer. However please make sure that your computer is
supported to reboot via USB-ZIP or USB-HDD mode. Check the BIOS
setting of your computer for the detail.
Operation System support for making Bootable disk:
1. Make USB-ZIP startup disk: Support on Windows 98/98SE/ME/XP
2. Make USB-HDD start disk: Support on Windows 98/98SE
To make the USB Flash Drive as bootable disk with the mFormat
utiltiy, you can choose either “Make USB-ZIP startup disk” or “Make
USB-HDD startup disk” which depends on the BIOS support of your
computer.
After you finish format with bootable feature enabled, those bootable
files will be copied to the USB Flash Drive automatically.
The process to use the bootable disk with your computer:
1. Turn on computer and enter the BIOS setting.
2. Make the setting of “First Boot Device” to USB-ZIP or USB-HDD
on the menu of “Advanced BIOS Features”. Then save the
changed setting and return the BIOS setting. (The operating way
for different versions of BIOS may be varied, so please refer to the
manual of your motherboard.)
3. Make sure that USB Flash Drive is already made a bootable disk.
And plug USB Flash Drive into the computer you wish to boot up.
4. Restart the computer, and system will be rebooted by USB Flash
Drive. The LED indicator on the USB Flash Drive will be flashing
until the DOS operation mode prompt on the screen.
3.4.Password Setting
To secure your files to remain private, you can make USB Flash Drive with
password feature enabled by running the mFormat.exe program which is
attached in the CD Disc or floppy disk.
Password feature can be enabled on Windows OS only.
~8~
USB FLASH DRIVE
User’s Manual
The process to enable and operate password feature:
1. Please select “Enable password protection” on the “USB flash Disk
Fromat Utility” as Figure 7:
< Figure 7 >
2. And a window of “Set default password” will be pop out to request
user to set default password as Figure 8. Please input the
password and password hint for a reminder, then click OK.
< Figure 8 >
3. Click “Start” to enable password by completing the mFormat.
4. Replug in USB Flash Drive after completing format.
5. After password enabled with USB Flash Drive, a “passid.exe” file
will be added when you click the “Removable disk” of “My
Computer” as Figure 9.
~9~
USB FLASH DRIVE
User’s Manual
< Figure 9 >
6. To access the USB Flash Drive, you must unlock it by double
clicking “passid.exe” file. And w window will be pop out to request
you to input correct password as Figure 10 in order to read/write
files in the USB Flash Drive. You may change the default password
by click “Change Password” button. Please remember your typing
password. You will be requested to key-in password each time you
access USB Flash Drive with computer.
< Figure 10 >
7. After apply correct password, the USB Flash Drive will be unlocked
and had “USB Flash Disk Password Utility” icon be shown on the
Task Bar.
8. You can also lock the USB Flash Drive anytime. Just right click
“USB Flash Disk Password Utility” in the Task bar to do lock/unlock
the Disk or change password as Figure 11. But make sure that you
have closed all using files in the disk.
~ 10 ~
USB FLASH DRIVE
User’s Manual
< Figure 11 >
9. Even though you don’t lock the disk before pulling it out, the USB
Flash Drive will be still auto-locked after plugging out USB Flash
Drive.
10. Password feature can be only operated on Windows OS only. If
you need to copy data to MAC OS, please disable Password
Feature via the “USB Flash Disk Password Utility” in the Task bar
of screen. Select “Change password”, type old password and
leave the new password blank. (Don’t enter any new password)
Click “Apply” and the password protection will be disabled.
! Note: Please remember your setting password. If you forget your
password and the hint isn’t able to help you remember, please run the
mFormat utility to initialize the USB Flash Drive. However this action
will erase all the data in the Drive.
3.4. Partition Setting
To make USB Flash Drive partible into two drives, you can partition it by running
the mFormat.exe program which is attached in the CD Disc of floppy disk.
Three features of “Password”, “Bootable”, and “Partition” can be enabled at the
same time.
Partition feature can be enabled on Windows OS only.
The process to enable and operate the partitioned disks:
1. Just simply slide the bar to do the partition for Disk 1 and Disk 2 as Figure 12
and click “Start” to complete the format. The minimum capacity for Disk 1
should be 2MB.
~ 11 ~
USB FLASH DRIVE
User’s Manual
< Figure 12 >
2. After complete the partition-enabled by running mFormat, replug the USB
Flash Drive into your computer. Then check the “My Computer”, system will
be detected two Removable Disks as Figure 14, which the capacity for each
disk will be, matched what you set.
< Figure 14 >
~ 12 ~
USB FLASH DRIVE
User’s Manual
3. USB Flash Drive is supported to do the partition feature together with
enabling bootable feature. However only Disk 1 can be a bootable disk.
4. USB Flash Drive is also supported to do the partition feature together with
enabling bootable and password features both. Under this circumstance,
only Disk 1 can be a Bootable & Public disk; and Disk 2 will be a Secured
Disk as Figure 15. Disk 2 is not allowed to be a bootable disk under partition
status. And Disk 1 is not allowed to be a Secured Disk under partition status.
< Figure 15 >
5. Windows 2000 OS can’t be recognized second partition, so if you enable
partition into two disks by the mFormat program. Please go to Microsoft
Web site to download “Win2000 Service Pack 3” and install it accordingly,
then the Windows 2000 OS can recognize the second partition (Disk 2) of
your USB Flash Drive.
6. Partition feature can be only enabled on Windows OS. If you need to copy
data to MAC OS, please note that the second partition (Disk 2) can be only
recognized on MAC OS 10.1.5 or above. If your MAC OS is the version
before 10.1.5, only the first partition (Disk 1) can be recognized.
~ 13 ~
USB FLASH DRIVE
User’s Manual
4. Troubleshooting
Q1: My computer can’t detect USB Flash Drive.
Ans: Please make sure if you have successfully install USB Flash Drive.
Check “Device Manager” of your computer to see if USB device of
USB Flash Drive in the “Universal Serial Bus Controller” lists. Or make
sure the USB function is enabled in the BIOS of your computer
operation system. Then try to install USB Flash Drive driver again.
Q2: Is it safe to pull out USB Flash Drive while files have been transferred?
Ans: No, it is not safe and will sometimes cause data missing or damage
USB Flash Drive, even shutdown your computer. We don’t suggest
plugging out USB Flash Drive™ while files in the USB Flash Drive are
in use or opening.
Q3: Do I need to turn off computer to install USB Flash Drive?
Ans: No, USB Flash Drive is a hot Plug-and-Play USB device. You can
install USB Flash Drive at anytime.
Q4: Can USB Flash Drive™ be used under DOS / Windows 95 / Windows
NT?
Ans: No, DOS, Windows 95/NT don’t support USB devices. So USB Flash
Drive can’t be operated in those operation systems.
Q5: You can’t write data into USB Flash Drive.
Ans: You must have overwritten the capacity limit of USB Flash Drive.
Please right click your mouse on the “Removable Disk”. Select
“Properties” to check the rest capacity you can use. You can delete
some files in order to write in the new data.
Q6. You can’t use USB Flash Drive on Mac 8.6 Operation System.
Ans: Please go to Apple website (http://www.apple.com/support) to
download USB Mass Storage driver for Mac 8.6 OS. For Mac 9.0
above, it’s plug and play by using Mac built-in USB driver.
Q7: Forget to lock your USB Flash Drive before pulling it out.
Ans: USB Flash Drive has software password setting to protect your files in
~ 14 ~
USB FLASH DRIVE
User’s Manual
the Disk. Even though you forget to lock the Disk before pulling it out, it
will be still auto-locked after plugging out. So you still need to type
password each time when you want to read/write data in the USB
Flash Drive.
Q8: You can’t use password feature with USB Flash Drive.
Ans: The default for USB Flash Drive™ is without password feature.
Please refer to 3.4 “Password Setting” on this User’s manual to enable
password feature. Please note that password feature can be only
enabled on Windows Operation system.
Q9. Forget your password so that you can’t access USB Flash Drive.
Ans: Please make sure to remember your setting password. If you
forget your password and the hint isn’t able to help you remember,
please run the mFormat utility to initialize the USB Flash Drive.
However this action will erase all the data in the Drive.
Q10: I can’t make my USB Flash Drive as a bootable disk.
Ans: Please refer to 3.3 Bootable Setting of this User’s Manual to make
USB Flash Drive as a bootable disk. Please remember to check the
BIOS of your computer is able to support USB-ZIP or USB-HDD as a
first boot device. Otherwise even you make the USB Flash Drive as a
bootable disk, you still can’t boot up via USB because BIOS of your
computer isn’t supported.
Q11: If the owned capacity in USB Flash Drive is changed or lost without
reason, what can I do?
Ans: Usually this symptom is happened on incorrect operation with USB Flash
Drive such as your pull out it without stopping the device firstly. Please
take attached CD Disc or floppy disk into your computer. Run
“mFormat.exe” program to do reformat on your USB Flash Drive in order
to recover your original capacity. Please note that this action will erase all
the files in the USB Flash Drive. If original capacity of USB Flash Drive
can’t be recovered after running mFormat program, we assume the flash
memory inside is damaged.
~ 15 ~