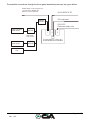
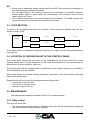
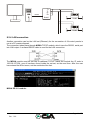
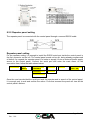
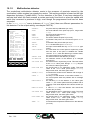
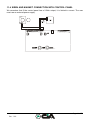
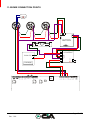
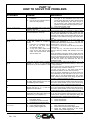
1
F1001L - F1002L - F1004L
User's manual
INDEX
Azienda certificata
UNI EN ISO9001:00
Page 1 of 70
Rev. 1.00
PART 1 PRELIMINARY REMARKS FOR A CORRECT INSTALLATION OF CONTROL
PANELS..................................................................................................................................................... 5
1.1
LINE CABLE TEST PROCEDURE BEFORE LOOP CONNECTION .................................... 5
1.1.1
Line continuity .................................................................................................................... 5
1.1.2
Shielded............................................................................................................................... 5
1.1.3
Isolation between positive and negative of loop................................................................. 5
1.1.4
Isolation between SHI / –LOOP and SHI / +LOOP........................................................... 5
1.2
HOW TO SELECT AN ITEM FROM THE MENU OF THE CONTROL PANEL ................... 7
1.3
PASSWORD MANAGEMENT ................................................................................................. 8
1.4
RAPID PROCEDURE OF CONFIGURATION ANALOGIC CONTROL PANEL ................. 9
PART 2 DETAILS .................................................................................................................................. 12
PART 3 CONTROL PANEL INSTALLATION ................................................................................. 15
3.1
HOW TO FIX THE CASE ........................................................................................................ 15
3.2
CONNECTION ........................................................................................................................ 16
3.2.1
The circuits of the detection.............................................................................................. 17
3.2.2
Siren output....................................................................................................................... 19
3.2.3
Outputs of auxiliary relays ............................................................................................... 19
3.2.4
Auxiliary output 24 Vac .................................................................................................... 19
3.2.5
Serial ports........................................................................................................................ 19
3.2.6
Connection to the power supply........................................................................................ 19
3.3
LOOP SECTION ...................................................................................................................... 20
3.4
LOCATION OF GROUND SHUNT IN THE CONTROL PANEL ......................................... 20
3.5
MAINTENANCE ..................................................................................................................... 20
3.5.1
Daily control ..................................................................................................................... 20
3.5.2
Weekly control .................................................................................................................. 21
3.5.3
Four-monthly control........................................................................................................ 21
3.5.4
Yearly control ................................................................................................................... 21
PART 4 ABOUT PROGRAMMING .................................................................................................... 22
4.1
ACCESS LEVELS.................................................................................................................... 22
4.1.1
Levels for user’s and installers......................................................................................... 22
4.1.2
Permission codes .............................................................................................................. 22
4.2
CONTROLS AND INFORMATION ....................................................................................... 23
4.2.1
Control panel controls ...................................................................................................... 23
4.2.2
Led indicators of the control panel................................................................................... 24
4.3
DATE / HOUR CONFIGURATION ........................................................................................ 24
4.3.1
Main menu ........................................................................................................................ 24
4.3.2
Setting menu...................................................................................................................... 25
4.3.3
Password request.............................................................................................................. 25
4.3.4
Date/time setting ............................................................................................................... 25
4.4
CONTROL PANEL CONFIGURATION SUPERVISED/UNSUPERVISED ........................ 26
4.4.1
Main menu ........................................................................................................................ 26
4.4.2
Setting menu...................................................................................................................... 26
4.4.3
Password request.............................................................................................................. 26
4.4.4
Supervisory setting............................................................................................................ 26
4.5
PROCEDURE OF ALARM RESETTING ............................................................................... 27
4.5.1
Silence ............................................................................................................................... 27
4.5.2
Event info .......................................................................................................................... 27
4.5.3
Active outputs.................................................................................................................... 27
4.5.4
Alarm resetting ................................................................................................................. 27
4.6
EVENT INFORMATION......................................................................................................... 28
4.6.1
Main menu ........................................................................................................................ 28
Page 2 of 70
Rev. 1.00
4.6.2
Event menu........................................................................................................................ 28
4.7
USE OF THE KEYBOARD THROUGH CONNECTOR PS2................................................. 28
4.7.1
Main menu ........................................................................................................................ 28
4.7.2
Connection menu .............................................................................................................. 29
4.7.3
Password request.............................................................................................................. 29
4.7.4
Information ....................................................................................................................... 29
PART 5 LOOP PROGRAMMING....................................................................................................... 30
5.1
LOOP STARTING ................................................................................................................... 30
5.1.1
Main menu ........................................................................................................................ 30
5.1.2
Loop menu......................................................................................................................... 30
5.1.3
Password request.............................................................................................................. 30
5.1.4
Loop start/restore (loop selection) ................................................................................... 31
5.1.5
Loop start/restore procedure ............................................................................................ 31
5.1.6
Information ....................................................................................................................... 31
5.1.7
Confirmation..................................................................................................................... 31
5.2
LOOP OUT OF SERVICE........................................................................................................ 32
5.2.1
Loop start/restore procedure ............................................................................................ 32
PART 6 POINT PROGRAMMING ..................................................................................................... 33
6.1
POINT INSERTION................................................................................................................. 33
6.1.1
Procedure for the acquisition of a point ........................................................................... 33
6.1.2
Main menu ........................................................................................................................ 34
6.1.3
Point menu ........................................................................................................................ 34
6.1.4
Password request.............................................................................................................. 34
6.1.5
Address assignation .......................................................................................................... 34
6.1.6
Type of point acquisition................................................................................................... 35
6.1.7
Loop selection ................................................................................................................... 35
6.1.8
Point address selection ..................................................................................................... 35
6.1.9
Detectors checkvalues....................................................................................................... 35
6.1.10
Information on the research ............................................................................................. 36
6.1.11
Information on the acquisition.......................................................................................... 36
6.1.12
Executed operation ........................................................................................................... 36
6.2
POINT INFORMATION.......................................................................................................... 36
6.2.1
Main menu ........................................................................................................................ 37
6.2.2
Point menu ........................................................................................................................ 37
6.2.3
Password request.............................................................................................................. 37
6.2.4
Loop selection ................................................................................................................... 37
6.2.5
Point address selection ..................................................................................................... 38
6.2.6
Point setting ...................................................................................................................... 38
6.3
POINTS REMOVAL ................................................................................................................ 38
6.3.1
Main menu ........................................................................................................................ 38
6.3.2
Point menu ........................................................................................................................ 39
6.3.3
Password insertion ........................................................................................................... 39
6.3.4
Points removal (options)................................................................................................... 39
6.3.5
Loop selection ................................................................................................................... 39
6.3.6
Point address selection ..................................................................................................... 40
6.3.7
Zone address selection...................................................................................................... 40
PART 7 ZONE PROGRAMMING....................................................................................................... 41
7.1
ABOUT ZONE ......................................................................................................................... 41
7.2
ZONE CREATION ................................................................................................................... 41
7.3
ZONE SETTING ...................................................................................................................... 41
7.3.1
Main menu ........................................................................................................................ 41
Page 3 of 70
Rev. 1.00
7.3.2
7.3.3
7.3.4
7.3.5
7.3.6
Zone menu......................................................................................................................... 41
Password request.............................................................................................................. 42
Loop selection ................................................................................................................... 42
Zone address selection...................................................................................................... 42
Zone setting....................................................................................................................... 43
PART 8 OUTPUTS PROGRAMMING ............................................................................................... 44
8.1.1
Main menu ........................................................................................................................ 44
8.1.2
Output menu...................................................................................................................... 44
8.1.3
Password request.............................................................................................................. 44
8.1.4
Output selection ................................................................................................................ 45
8.2
SERIAL OUTPUTS (RS232-RS485-LAN).............................................................................. 47
8.2.1
Control panel address....................................................................................................... 47
8.2.2
RS232 connection ............................................................................................................. 48
8.2.3
RS485 connection ............................................................................................................. 48
8.2.4
LAN connection................................................................................................................. 49
8.2.5
Repeater panel setting ...................................................................................................... 50
PART 9 TECHNICAL CHARACTERISTIC...................................................................................... 51
PART 10 POINTS DESCRIPTION AND UTILIZATION ................................................................ 52
10.1 DETECTORS ........................................................................................................................... 52
10.1.1
Detector addressing.......................................................................................................... 52
10.1.2
Manual zero setting of the address ................................................................................... 52
10.1.3
Smoke detector .................................................................................................................. 53
10.1.4
Heat detector..................................................................................................................... 54
10.1.5
Multicriterion detector...................................................................................................... 55
10.1.6
Electrical schemes ............................................................................................................ 56
10.2 RESETTABLE BUTTON ........................................................................................................ 57
10.2.1
Input and output description............................................................................................. 57
10.2.2
Button addressing ............................................................................................................. 57
10.2.3
Manual zero setting of the address ................................................................................... 57
10.2.4
Point setting ...................................................................................................................... 57
10.2.5
Electrical schemes ............................................................................................................ 58
10.3 INPUT/OUTPUT MODULE .................................................................................................... 59
10.3.1
Point setting ...................................................................................................................... 59
10.3.2
Electrical schemes ............................................................................................................ 59
10.3.3
Connection of a smoke linear detector ............................................................................. 60
10.4 LINE ISOLATOR MODULE ................................................................................................... 61
10.4.1
Point setting ...................................................................................................................... 61
10.4.2
Electrical schemes ............................................................................................................ 61
PART 11 GENERIC ELECTRICAL SCHEMES ............................................................................... 62
11.1
11.2
11.3
11.4
11.5
11.6
CONNECTION BEETWEN CONTROL PANELS AND PC (RS485).................................... 63
CONTROL PANEL CONNECTION ON LAN........................................................................ 64
CONNECTION WITH REPEATER PANEL........................................................................... 65
SIREN AND MAGNET CONNECTION WITH CONTROL PANEL .................................... 66
SOME CONNECTION POINTS.............................................................................................. 67
CONNECTION BETWEEN I/O MODULE AND AUXILIARY POWER SUPPLY.............. 68
PART 12 HOW TO SOLVE THE PROBLEMS ................................................................................. 69
Page 4 of 70
Rev. 1.00
PART 1
PRELIMINARY REMARKS FOR A CORRECT
INSTALLATION OF CONTROL PANELS
1.1 LINE CABLE TEST PROCEDURE BEFORE LOOP CONNECTION
For connection use twisted and shielded cable with electro conductive cable characteristics as
reported on table:
LENGTH (m)
Length up to 500 m
Length up to 1000 m
Length up to 2000 m
SIZE (mm2)
min 0,5
min 1,0
min 1,5
CAPACITY (pF/m)
max. 150
max. 120
max. 100
Check if line isolators are present: they must have been installed with zero address. In this
case, at unsupplied line, the contact of isolator will be off to allow the test of negative-positive
electro conductive cables and shielded at both ends of the loop.
TESTS TO EXECUTE FOR A CORRECT OPERATION OF CONTROL PANEL:
1.1.1 Line continuity
Check the resistance of line electro conductive cables with tester at 200 ohm of resistance for
line electro conductive cables superior to 40 ohm is too high!!
Possible causes can be:
the system line is too long ;
false contacts;
cable of insufficient section;
partly cut off or damaged cable.
The cables must usually present a resistance between 20 and 25 ohm. Besides the resistance
of the negative cable and the positive one must result similar.
1.1.2 Shielded
It must present treble the resistance of line cables at most.
Warning: if shielded cable presents a resistance superior to treble line cables, it is necessary
to check the path of shielded itself.
1.1.3 Isolation between positive and negative of loop
A value superior to 20Kohm with 127 installed points or gradually increasing values of
resistance with installed fewer points can be found with tester at 200Kohm or higher range.
1.1.4 Isolation between SHI / –LOOP and SHI / +LOOP
Infinite Ohm value must be found for the isolation-make sure you are not powered up.
If the infinite value is not found, please check the positive and negative wiring for short circuit
which may be found throughout the loop circuit.
Page 5 of 70
Rev. 1.00
NOTE: the clip SHI gets inserted only in the shielded side (that is shielded of start).
In the module isolator, connect the shielded cable wire between the common terminal and the
common wire terminal.
CHECK OF SHILDED SHORT CIRCUITS:
Connect the positive clip +24; to the loop
Set the tester at 200Vdc and measure the voltage between shielded and the negative (of the
battery or the clip –24): THERE MUST NOT BE VOLTAGE!!!
A possible reading of voltage may occur in the case of short circuit in one ore more detectors
or between the shielded clip means that a short circuit, inside a few detectors, between
shielded clip and the clip R and the terminal R and common terminal (common clip of base nr.
2 or nr. 3).
FURTHER CHECK FOR SHORT CIRCUITS ON THE LOOP LINE AND POWERED UP
SYSTEM:
Connect the negative cable of the loop to the clip –24; all leds must flash. The un-flashing leds
suggest a problem on the detector.
If the leds are still not flashing; check for short circuits along the line.
Warning: the presence of isolators along the line cuts off the check verification, so to have final
proof for the proper functioning I must “Jeri Wire” or “Hot Wire” the relay and bridge it to the
jumper terminal.
Page 6 of 70
Rev. 1.00
1.2 HOW TO SELECT AN ITEM FROM THE MENU OF THE CONTROL
PANEL
Button for item
select.
DATE
TIME
NO SUPERVISORY FUNC.
F.D.P. INTERNATIONAL
EXC2L CONTROL PANEL
Menu
navigator
Item selected
Point menu
view/mod.
insert
remove
d.b.reset
ACCESS LEVEL: 1
Sel. Back Esc.
Sel = SELECT;
Back = Preview
Esc = Escape
Button for menu
selection.
Page 7 of 70
Rev. 1.00
1.3 PASSWORD MANAGEMENT
The analogic control panel of the F1001L-F1002L-F1004L CENTRAL UNIT model presents
four different levels of access as provided in the EN 54-2 normative.
The possible request of the password is initially set up by the control panel providing character
differentiation:
• Small caps on the menu require a password in order to access;
• Capital writings means that a password isn’t required.
Main menu
POINT
SETTING
ZONE
CONNECTION
LOOP
ACC. LEVEL
OUTPUT
DIAGNOSTIC
EVENT
3b option
ACCESS LEVEL: 1
Sel. Esc.
Capital writing means
free access in case of
selection.
Small caps means
request of password in
case of selection.
Button for menu
selection.
Level 1
Level for the final user. It allows to check the status of the points, the loops and a large part of
the options of “Main menu”.
Level 2
Access allowing to manage the fire system all the instructions, controls and operate of status
of the control panel. It is possible to active or deactivate the zones or points, or change the
time and date settings.
Level 3
Enables allowing the installer to operate and access only information for the menu levels and
change set ups.
Level 4
Access allowed only to the manufacturer.
Page 8 of 70
Rev. 1.00
1.4 RAPID PROCEDURE OF CONFIGURATION ANALOGIC CONTROL
PANEL
WARNING: IMPORTANT NOTES FOR THE START UP OF THE CONTROL PANEL
Begin with checking the power supply and battery status.
Run check test to trouble shoot for short circuit or other malfunctions.
•
Push the reset grey button (system fault) placed to the main See manual on page16.
board.
When “Password request” appears, refer to page 88).
•
1.
LOOP INITIAL SET UP
a) Install the provided isolator with address zero.
Repeat starting procedure for
each loop procedure to reset
to zero address, manual on
page 52.
b) Install the input/output modules, buttons, place the bases
According to the method of
counter plates of provided detectors.
addressing it is possible to
install the detectors: see
different addressing methods,
manual page 33.
c) Check the loop status through the suitable procedure.
Enter “Main menu”, Æ “LOOP”, Æ “o.o.s/rest” Æ “Password
request”. Æ “Loop start/restore”. Æ “SELECT LOOP” to
decide which loop is being intended to start, or “SELECT ALL
LOOPS” to start up all loops in automatic succession.
There are three start up procedures/loop reset:
• LOOP RESTART: to select when isolators are not zero
address in loop.
•
RESTART+INST.ISOLAT.: to select when isolators are
•
OUT OF SERVICE: to select in case of maintenance of loop
To move in the menu see
page 7.
The starting procedure with
search isolator of each loop
must be made only once. See
manual on page 28.
present along the loop with address zero;
After the start up procedure, check in the menu for the
isolators which “POINT” Æ “view/mod.” are addressed in
succession starting from addresses 121.
or add on new points.
When loop has started without any faults, “COMPLETED OPERATION” press the “Ok” button,
otherwise an event will be caused and the found trouble will be pointed out.
Page 9 of 70
Rev. 1.00
2.
ADDRESSING POINTS
Procedure to follow if points with address=0 are installed in the It is possible to add a single
point
selecting
“SINGLE
loop.
POINT”
Enter “Main menu”, Æ “POINT”, Æ “insert”, “Password
request”, Æ “AUTOMATIC INCREASE”, Æ “ACTIVATION”, Æ
“LOOP”. The first free point to address is proposed.
However it is possible to insert a different number of address to
assign to the point if available.
Check the detector control value and give “Ok”.
Software will automatically check and search. (all the devices
with address zero flash signal).
See
chapter 6.1.5.
manual
on
The installed detectors with
out of range values are
identified out of service. See
manual on chapter 6.2.6.
Push the micro-button of input/output modules or bring the Starting, identification and
magnet near the reed so that there is a long flash signal to addressing of the point. See
manual on page 33.
assign the address and acknowledge it to control panel.
Whenever there is a point assignment or addressing, the
control panel will sound off a confirmation beep.
Repeat the above-mentioned procedure up to the last
consecutive expected addressing.
Push “Canc” and wait for the “SECTION CALCULATING” until the
message “COMPLETED OPERATION” appears on the display.
The same procedure can be repeated for the points with address=0, assigning and
acknowledgement for new starting addresses.
Example: on the first floor of a building the addresses are from 10 to 20 for detectors, from
80 to 84 for input/output modules, from 100 to 104 for buttons are assigned;
on the second floor the addresses from 21 to 40 for detectors, from 85 to 87 for
input/output modules, from 105 to 108 for buttons are assigned; etc.
Reserve the addresses from 10 to 60 for detectors.
Reserve the addresses from 80 to 90 for buttons.
Reserve the addresses superior to 100 for input/output modules.
First point
10
80
100
3.
Last point
60
90
115
Point type
Detectors
Buttons
Input/output
modules
Floor
First floor
Second floor
Third floor
PRE-ADDRESSED FURTHER ACQUISITION POINTS
Installed points
10-20; 80-84; 100-104
21-40; 85-87; 105-108
41-60; 88-90; 109-115
Case where there is the
preaddressed point.
Procedure to be executed to get formerly installed and preaddressed further points along a loop.
Enter “Main menu”, Æ “POINT”, Æ “insert” Æ “AUTOMATIC
INCREASE”, Æ “PRESET ADDRESS” Æ “LOOP”. The first free Warning: if a point with
address like a formerly
address to get is proposed.
installed point on the loop is
installed,
a
fault
for
loop
However it is possible to insert a different number of address to overload will be produced.
get if available.
Check the sensor control values and give “Ok”.
No point with address=0 must
The control panel will get the points in succession confirming be installed on the loop.
the occurred identification with a beep. In case of missing
Page 10 of 70
Rev. 1.00
points, these will not be acquired; the control panel will continue
to search for the missing point till the “time out” period ends,
then it will pass to the next address the procedure can be
interrupted when the writing “Canc” is present.
4.
INSTALLATION
DETECTORS
OF
UNADDRESSED
FURTHER
The point to add must have
Procedure to be executed to insert un-addressed further address zero.
detectors, on a formerly installed base, along a formerly active
loop and that presents addressed points (no points with A point at a time must be
inserted.
address zero).
Enter “Main menu”, Æ “POINT”, Æ “insert” Æ “AUTOMATIC
INCREASE”, Æ “INSTALLATION”, Æ “LOOP”. Select the first
programmable address.
However it is possible to insert a different number of address to
assign to the point if available.
Check the detector control values and give “Ok”.
Install a point at a time and check the sequence of flashes
that show the acquired address.
The control panel gives a beep for each acquired point.
To finish the installation, push “Canc”. Wait for the end of the
“SECTION
CALCULATING”.
The
message
“COMPLETED
OPERATION” will appear on the display.
Page 11 of 70
Rev. 1.00
PART 2
DETAILS
The fire-prevention F1001L – F1002L – F1004L control panel was designed in observance to
the rules EN54-2 and EN54-4, and it has the following characteristics:
•
•
The available versions of the control panel are at 1 – 2 – 4 loops.
It is possible to address on a single loop up to 127 points (detectors, buttons,
Input/output modules and isolators), distributed like as follows:
1. Up to 120 points among detectors, buttons and Input/output modules;
2. Up to 7 isolator modules of line, which will take the addresses from 121 to 127 and
they are compulsory to conform with the regulations at least with every 32 detectors
systems, buttons and Input/output modules;
3. Un-addressed infinite detectors that will refer to point “0”.
• The installation of a control panel at 2 loops allows to install a total of 254 points with
the possibility to address up to 120 points among detectors, buttons and Input/output
modules on each single loop.
• The addressing for the assignment to the detectors, buttons and Input/output modules is
free (see example in RAPID PROCEDURE OF CONFIGURATION ANALOGIC
CONTROL PANEL).
• The line isolators are addressed through automatic procedure directly by the control
panel, assigning in progression the addresses from 121 to 127.
The power supply and the communication to the device occurs through only two cables. A
twisted and shielded cable must be used in each loop.
Connectible detectors:
Smoke detector
FRFA
Heat detector
FRFTVA
Connectible modules:
Manual button
FPMA
Input / Output module
FMIO
Isolator module
FMIS
Cables used for connections:
Shielded and twisted cable 0,5 mm
Cab 205
Shielded and twisted cable 1 mm
Cab 21
Shielded and twisted cable 1,5 mm
Cab 215
¾ The detectors use a system of digital communication, a low frequency of communication
and revelation elements of errors that become highly free of interferences. The protocol has
a special system of communication (polling system) which allows a quick answer in case of
Page 12 of 70
Rev. 1.00
alarm (127 points scanner in less than half a second) and allows the control of the status,
the analogic value and the working parameters of detectors.
¾ Loop can be subdivided into 63 zones per loop; each of them can contain one or more
devices. A numerical address must be assigned to each element of the loop. The address
programming in the points occurs through the control of the panel itself.
¾ The control panel has a retro-illuminated alphanumeric display at liquid crystals 8x21,
characters for the signal display and the programming of control panel. Faults and alarms
are displayed through suitable luminous leds. It is possible to display the analogic level of
each detector, the detector type and the belonging zone. The historical memory can total
up to 1000 single or combined events carrying date and hour.
¾ The control panel has:
¾ 2 supervised outputs, one of which is preset for the siren;
¾ 2 outputs at programmable clean relay NO/NC;
¾ 4 open collector outputs programmable for typology of alarm and zone.
¾ The control panel is preset for three opto-isolated serial ports, RS-232 and RS-485.
¾ COM1
• Module RS 232: mininet, LAN TCP/IP.
• Module RS 485: LAN 485.
¾ COM2
• Module RS 232 (default): PC, LAN TCP/IP
• PS2: keyboard PS2.
¾ COM3
• Module RS 232: Report of detector check.
¾ The control panel is preset for a further output PS2 to which it is possible to connect a
keyboard for a quicker programming of points and zones.
¾ All the programming of the control panel can be made through the panel of the control
panel itself, using the keys that have alphanumeric function.
Page 13 of 70
Rev. 1.00
The possible connections through the three gates described previously are given below.
RS485 Slave control panels net
connected to Master PC,
(Max 64 control panels).
Rs232 SERVICE PC
Ps2 keyboard
MOXA
MODULE
RS232 PC
Detectors status info
SLAVE CONTROL
PANEL Rs485
MOXA
MODULE
1
2
3
LAN TCP-IP
max 64 C.P.
SLAVE CONTROL
PANEL Rs485
MOXA
MODULE
CONTROL PANEL
MASTER PC
LAN
Page 14 of 70
Rev. 1.00
PART 3
CONTROL PANEL INSTALLATION
3.1 HOW TO FIX THE CASE
The control panel weighs about 10Kg without batteries inside. When fixing the case at a
surface, make sure to use supporting elements fit to support this weight. In case reinforce the
surface if necessary.
Precaution: only qualified staff who is well acquainted with the procedures described in
this manual.
Insert the 230Vac net line in the case from the right upper corner, keeping far away the
same one from the printed circuits and the rest of wiring.
Supply to the control panel through a suitable magneto-thermic power switch. The net
cable must have minimum section of 1.5mm and work voltage of 250Vac.
ASSEMBLY (see picture fig. 1)
1.
2.
3.
4.
5.
open the control panel;
remove the complete panel of mother board;
punch out the pre-cut holes that are necessary to insert the cables;
install the case in the desired place using the four supporting holes;
replace the panel.
fig. 1
Page 15 of 70
Rev. 1.00
3.2 CONNECTION
The motherboard of the control panel in picture 2. The positions of the clips and fuses are
pointed out. Besides the connector PS2 for the keyboard and the grey button of resetting to
push at the first starting of the control panel are pointed out.
The left clips concern the control panel outputs (see charter PART 8 page 44), and exactly:
¾
¾
¾
¾
¾
¾
¾
¾
¾
(out5) Clips RL1 (SEL4): relay 1 is a clean relay that can be programmed NO/NC;
(out4) Clips RL2 (SEL3): relay 1 is a clean relay that can be programmed NO/NC;
(out9) Clips OC4: open collector No 4 programmable for typology of alarm and zone;
(out8) Clips OC3: open collector No 3 programmable for typology of alarm and zone;
(out7) Clips OC2: open collector No 2 programmable for typology of alarm and zone;
(out6) Clips OC1: open collector No 1 programmable for typology of alarm and zone;
(out3) Clips FAULT (SEL1,2): supervised output of fault;
(out2) Clips –S +S: supervised siren;
(out1) Clips +24 –24: auxiliary power supply 24Vdc.
Optional serial gates
LOOP
Control panel outputs
COM2
COM3
+2A
SHI
-2A
+2B
-2B
+1A
SHI
Out1 fuse
- 1A
- 1B
Out2 fuse
+1B
PS2
-24
SHI
+24
Out3 fuse
-S
- +
FAULT
+S
SHI
OC 2
OC 1
OC 4
RL2
OC 3
RL1
COM1
Ps2 keyboard
Resetting fault system
Battery fuse
- B1+
AUX power supply fuse
- AUX +
- B2+
FAULT +
-
(30Vdc)
Trimmer
-
+
+
-
12V 17Ah
12V 17Ah
FAULT
-
+ (30Vdc)
Vac fuse
N
L
AC-DC ADAPTOR
230Vac
30Vdc
Fig.2-Description of motherboard of the control panel.
Page 16 of 70
Rev. 1.00
3.2.1 The circuits of the detection
The control panel supports exclusively detectors and modules that use a communication
system of digital data (protocol FDP 1.03). A part from a few models, which need auxiliary
power supply 24Vdc, the elements are supplied and communicate with the control panel
through two cables connected to an input module. The detection circuit must be kept the
farthest possible from the other installations and the cables passage, to reduce the risk of
external interfaces. Don’t forget, use shielded and twisted cable, to reduce the interferences.
The section will depend on the length of loop.
Installations with cable length superior to 2Km are not advised, because the capacity and the
induction of cable can start to interfere with data communication from this length onward.
LENGTH (m)
Length up to 500 m
Length up to 1000 m
Length up to 2000 m
SIZE (mm2)
min 0,5
min 1,0
min 1,5
CAPACITY (pF/m)
max. 150
max. 120
max. 100
N.B.: test lines as provided in “LINE CABLE TEST PROCEDURE BEFORE LOOP
CONNECTION” before connecting loop to the control panel.
F1001L-F1002L-F1004L CENTRAL UNIT is preset for the installation up to four circuits of
detection (1, 2, 3 and 4 loops) with a maximum capacity of 508 points (detectors, buttons,
Input/output modules or isolator) with the possibility to install up to 120 points (exclude isolator)
in a single loop.
As reported in the instructions of the single products, the detectors, buttons and Input/output
modules must be addressed.
The descriptions of the different procedures of programming – addressing (single point; selfincrement; through series number) will be dealt with in PART 4 of this manual.
Page 17 of 70
Rev. 1.00
ELEMENTI ISOLATI
ISOLATOR
MUDULO
MODULE
ISOLATOR
MUDULO
MODULE
EX-MEI/O
EX-MEI/O
SHORT CIRCUIT
ISOLATOR
MUDULO
MODULE
EX-MEI/O
INTERRUPTED
LINE
ISOLATOR
MUDULO
MODULE
EX-MEI/O
The installation of a detection circuit is made connecting all the control devices so that one
closet ring is obtained. As regards the conformity of the system to the rules UNI 9795 and EN
54-2, it is necessary to insert at least a module isolator every 32 detectors or buttons. One can
install up to a maximum of seven modules isolators for each loop.
The connection uses the clips A-/ A+ for the installation output and B-/ B+ for the return of the
same one.
The cable shielding (shielded) is connected only the part of starting to the clip SHI. The
shielded of arrival must not be connected.
•
•
•
Start from +1A and arrive at +1B, start from –1A and arrive at –1B.
Connect the cable shielding (SHI) of the starting part to the clip SHI. The arrival
shielded must not be connected.
If a loop is not used it is necessary to short circuit it with the jumper (-A with –B and +A
with +B).
In case a short circuit on the line is produced, the part of circuit interested by the fault and
included between the two modules isolator will be disconnected, with the consequent loss of
communication of a maximum of 32 elements (maximum number of elements that the rule UNI
9795 allows to lose in case of line short circuit). In case of single interruption of loop, the
control panel will be able to communicate from the two sides (output and return) without losing
the communication with the other installed elements.
Both the short circuit and the line interruption produce a fault restorable only to executed
repair.
Page 18 of 70
Rev. 1.00
3.2.2 Siren output
The clips of siren output are identified with the initials S+ and S-. Each siren output is
supervised for different faults of short circuit or open circuit. It is necessary to connect a 5.6
K/ohm - 1/4 watt resistance of end of line on the last siren of each circuit.
In the picture below an example of connection of two sirens.
As regards the maximum supplied current from each siren output, see “TECHNICAL
CHARACTERISTIC”.
It is always advised to use fireproof shielded and twisted cable.
SIREN
SIREN
5.6 Kohm 1/4W
-24
+24
SHI
+S
- +
FAULT
-S
SHI
OC 1
OC 2
OC 3
OC 4
RL1
RL2
3.2.3 Outputs of auxiliary relays
The control panel circuit includes two outputs of programmable auxiliary relays, with contact
NO or NC free from 1A, 40V ac/dc voltage. For the connection of auto-supplied sirens refer to
the product instructions.
3.2.4 Auxiliary output 24 Vac
The circuit includes an auxiliary output 24 Vdc – 0.3 A. It is advised not to connect too many
devices not to overload this output. Do not exceed the maximum supplied current of 0.3 A. In
case use a source of auxiliary power supply.
3.2.5 Serial ports
¾ The control panel is preset for three opto-isolated serial ports, RS-232 and RS-485.
¾ COM1
• Module RS 232: mininet, LAN TCP/IP.
• Module RS 485: LAN 485.
¾ COM2
• Module RS 232 (default): PC, LAN TCP/IP
• PS2: keyboard PS2.
¾ COM3
• Module RS 232: Report of detector check.
3.2.6 Connection to the power supply
Execute the connections with suitable materials and procedures prescribed by the rules in
force. Do not execute the connection to the net without first disconnecting the external
magneto-thermic.
Page 19 of 70
Rev. 1.00
N.B.
•
•
•
At the time of installation always connect first the net 230 Vac and then the batteries. In
that way dangerous sparks are avoided.
The net input cable to the control panel must be connected to a suitable magnetothermic power switch to make easier the maintenance. The minimum section of net
cable must be of 1.5mm.
All the cables connected to the control panel must be fireproof. The cable of earth, the
net ground must be connected to the earth clip of net input.
3.3 LOOP SECTION
A section is a loop partition between two isolators. A loop carriyng no partition has only one
isolator, section (A-B).
CONTROL
PANEL
A-121
121-122
ISOLATOR
121
124-B
122-123
ISOLATOR
122
123-124
ISOLATOR
124
ISOLATOR
123
In this figure there is a example of loop with 5 sections. The clips A are the loop start and B are
the loop end.
3.4 LOCATION OF GROUND SHUNT IN THE CONTROL PANEL
The control panel checks the connection of the installation all the time to point out if some
external cables have a round dispersion. In this case an information in the control panel of
ground shunt is given through a yellow led.
The control panel will work properly with a round shunt in the system. However it is suitable to
solve the fault as soon as possible.
Most round shunts are located making resistance measures in the cables before collecting
them to the control panel.
Round shunts can be found in the following external connections:
• Connection of siren circuits.
• Connection of detection loop.
• Auxiliary output of 24 Vdc.
3.5 MAINTENANCE
The maintenance measures advised in EN 54-14 must be followed.
3.5.1 Daily control
The user will check that:
• The control panel works properly. Otherwise the faults will be reported and registered
and the maintenance staff must be informed.
Page 20 of 70
Rev. 1.00
•
It is advisable that all or any faults during testing or noted previously, are solved as soon
as possible, for a correct functioning of the control panel.
3.5.2 Weekly control
•
•
•
It is advisable to check the status of disconnected and connected batteries.
A detector or a button will be started up to test the control panel and the connected
fittings of alarm. It is suitable to check a different zone every month.
Where it is admitted, inform the fire brigade or the control centre.
Any malfunctioning must be noted in the event register. The problems must be solved as soon
as possible, in case contacting the installer.
3.5.3 Four-monthly control
The maintenance staff must carry out the following controls:
• Look over the notes of the event register.
• Examine all the connections of batteries.
• Check the alarm functioning, auxiliary fault of the control device and signaller.
• Visual inspection of the control devices and signaller, a possible rise in humidity or any
other type of decay.
• Check there are not structural changes that can cause the malfunctioning of the
detectors, manual buttons or sirens. In this case carry out a visual inspection, too.
Any problem must be noted in the event register, solving the probable problems as soon as
possible.
3.5.4 Yearly control
The maintenance staff must have the duty to perform the following controls:
• Carry out the control procedures advised daily, monthly and four-monthly.
• Test the control panel and check all the detectors work as recommended by the
manufacturer (check the parameters).
• Look over visually all the connections to the devices and relative supports are safe, they
are not damaged and are protected properly.
• Examine and check all the batteries.
Any fault must be noted in the event register, solving the problems as soon as possible.
Page 21 of 70
Rev. 1.00
PART 4
ABOUT PROGRAMMING
4.1 ACCESS LEVELS
4.1.1 Levels for user’s and installers
The fire-prevention analogic control panel has been designed in conformity with the EN 54-2
norms. This rule gives four different access levels, available for user’s and qualified workers.
The access levels are divided as described below:
Level 1
All the information is operative, the control panel controls are disabled; it is possible to silent
the control panel buzzer. The access to level 2 is obtained typing in a numerical code of level 2
through the keyboard.
Level 2
All the information and controls of the control panel are operative. In this level the system
configuration cannot be modified. How ever it is possible to put zones or sensors out of
service, to modify time and date. The access to level 3 is obtained typing in a numerical code
through the keyboard. After a previously programmed time has passed, the system will go
back to level 1 automatically.
Level 3
All the information of the configuration is accessible in this level and any change that concerns
the system configuration proves possible.
Level 4
Access allowed only to the manufacturer.
4.1.2 Permission codes
The control panel is generally at level 1. it is necessary to insert the suitable codes to enter the
superior levels.
N.B.: the codes of level 3 and 4 must be used only by the qualified technician to the
programming of the control panel.
Page 22 of 70
Rev. 1.00
4.2 CONTROLS AND INFORMATION
The EN-54 norms supplies two level of access for the control panel user. The access levels of
the user are defined as shown previously:
Level 1
All the information reads operative, the control panel controls are disabled.
The access to the superior level is obtained typing in a numerical code through the numerical
keyboard.
Level 2
All the information and controls of the control panel are operative. In this level the system
configuration cannot be modified. However it is possible to activate or disable zones or
sensors to modify time and date. The access to level 3 is obtained typing in a numerical code
through the keyboard. After a previously programmed time has passed, the system will go
back to level 1 automatically.
4.2.1 Control panel controls
Main control keys:
Silence
Reset
Evacuation
Confirm the verified events and silence the internal buzzer.
Delete all the alarm conditions and rearm the control panel.
Activate the supervised siren.
Besides there are other keys to enter the different functions.
1,2,3,4,5,6,7,8,9,0
Arrow up
Arrow down
Left arrow
Right arrow
Menu
Sel.
Pre.
Sub.
Mod.
Ok
Insertion of the numbers from 0 to 9 and the letters from a to z.
Advance up wards of the selection.
Advance down wards of the selection.
Advance left wards of the selection.
Advance rightwards of the selection.
Main menu input.
Select.
Preceding.
Subsequent.
Modify.
To confirm modification.
Page 23 of 70
Rev. 1.00
4.2.2 Led indicators of the control panel
The control panel has indicators led of yellow, green and red color for a quick identification of
its status.
Evacuation
Red Evacuation button has been.
Fire alarm
Red Press the control panel has pointed out a alarm condition.
Pre-alarm
Red The control panel has pointed out a pre-alarm condition.
Test
Red Active function of test.
Out of service
Yellow It lights up when a part of the system is put out of service.
Out of service / Yellow Delayed siren. For norms the control panel must signal if the
siren output
siren output is delayed. In this case, in the corner in top at right of
the display to appear a siren icon.
Activated output
Yellow Lit led at active outputs.
Fault
Yellow The control panel has pointed out a general fault.
System fault
Yellow The control panel has pointed out a fault to the system.
Battery fault
Yellow The control panel has pointed out to the batteries.
Aux supply fault
Yellow The control panel has pointed out a fault to the auxiliary output.
Siren output fault
Yellow The control panel has found a fault in the siren output line (SS+). It is possible that along this line there is a short circuit or an
interruption.
Power supply
Green This led indicates the presence of the power supply (220Vac). If
the power supply is not present, the led flashes.
4.3 DATE / HOUR CONFIGURATION
4.3.1 Main menu
Main menu
POINT
SETTING
ZONE
CONNECTION
LOOP
ACC. LEVEL
OUTPUT
DIAGNOSTIC
EVENT
3b option
ACCESS LEVEL: 1
Sel. Esc.
To programme date/hour enter the “Main menu” and select
“SETTING” With the suitable arrows. Confirm with the key
“Sel.” to pass to “Setting menu”.
Page 24 of 70
Rev. 1.00
4.3.2 Setting menu
Setting menu
supervis. password
evaquation loop act.
fir.restor re.default
date/time
prompt
ACCESS LEVEL: 1
Sel. Back Esc.
Inside the “Setting menu” there are different items. Using the
four arrows, it is possible to select the item “date/time”.
Confirm with “Ok” to enter the “Date/time setting” menu
directly.
4.3.3 Password request
Password request
LEVEL PWD 2:*****
Canc
Ok.
After “date/time” has been selected, the password to enter
the next menu is asked for. If a wrong number is typed in, it can
be delete selecting “Canc”.
The second level password supplied by the manufacturer is
“22222”. After the password has been inserted, it is necessary
to confirm with “Ok” to pass to the next menu.
4.3.4 Date/time setting
Date/time setting
►CURR. DATE: 20/01/05
CURR. TIME: 18:30:58
RTC CALIB.:
127
Esc. Mod.
After the user has entered the “Date/time setting” menu,
select the line to modify with the suitable arrows and confirm
the selection with the key “Mod.”. through the numerical
keyboard it is possible to modify the parameters. After the
programming is made, select “Esc.” to return to the “Main
menu”.
The item “RTC CALIB.” Services to compensate for the daily
phase difference of the inner clock. The value of the inner clock
at midnight (24:00) obtains the value given by the following
formula: x/64-1. In such a way if the clock is in phase with the
earth one, the value will be x=64. If it is slow x>64; if it is fast
x<64.
Page 25 of 70
Rev. 1.00
4.4 CONTROL PANEL CONFIGURATION SUPERVISED/UNSUPERVISED
4.4.1 Main menu
Main menu
POINT
SETTING
ZONE
CONNECTION
LOOP
ACC. LEVEL
OUTPUT
DIAGNOSTIC
EVENT
3b option
ACCESS LEVEL: 1
Sel. Esc.
To programme the procedure of the control panel configuration,
enter the “Main menu” and select “SETTING” with the suitable
arrows. Confirm with the key “Sel.” to pass to the “Setting
menu”.
4.4.2 Setting menu
Setting menu
supervis. password
evaquation loop act.
fir.restor re.default
date/time
prompt
ACCESS LEVEL: 1
Sel. Back Esc.
Inside the “Setting menu” there are different items. using the
four arrows, it is possible to select the item “supervis.”.
confirm with “Sel.” to enter the “Supervis.mod.setting”.
4.4.3 Password request
Password request
LEVEL PWD 2:*****
Canc
Ok.
After “supervis.” has been selected, the password to enter
the next menu is asked for. If a wrong number is typed in, it can
be delete selecting “Canc”.
The second level password supplied by the manufacturer is
“22222”. After the password has been inserted, it is necessary
to confirm with “Ok” to pass to the next menu.
4.4.4 Supervisory setting
Supervisory setting
►ENABLED:
YES
ACTIVE
NO
START DATE: 01/01/00
END DATE:
01/01/00
START TIME: 00:00:00
END TIME:
00:00:00
2^GLOB.CONSENSE: NO
DELAYED F.ALAR.s: Esc. Mod.
After the user has entered the “Supervisory setting” menu,
select the item to modify with the suitable arrows and confirm
the selection with the key “Mod.”. through the numerical
keyboard it is possible to modify the enabled parameters.
In unsupervised procedure the pre-alarm given by the double
consent is not enabled (the user must pass to the alarm signal
directly). To have the pre-alarm in the zones enabled to this
property, it will be necessary to be in supervised procedure.
After the programming has been executed, select “Esc.” To
return to the “Main menu”.
Page 26 of 70
Rev. 1.00
4.5 PROCEDURE OF ALARM RESETTING
4.5.1 Silence
FIRE ALARM: 001
001 ZONE ALARM 01-1
!OFFICES
Menu View Ala. Poi.
When an element (detector, button or module) is activated, the
signal of fire alarm with all the necessary parameters to identify
the activated point in the shortest possible time appears on the
display. A buzzer inside the control panel is activated and the
read led of alarm signal lights up.
It is possible to silence at once the buzzer inside the control
panel pressing the key silence placed to silence the external
signals there are different procedures.
4.5.2 Event info
To see the details of alarms, to select the item “View”.
Event 001/001
►DATE:
20/01/05
TIME:
18:30:58
EVENTO:
ZONE ALARM
ZONE ADDRESS:
01-1
Z. NAME: OFFICE
STATUS:
ACTIVE
Ok.
4.5.3 Active outputs
Event 001/004
►DATE:
20/01/05
TIME:
18:30:58
EVENT: ACTIVATED OU
OUTPUT ADDRESS:001-3
TYPE:
LOOP AUX.
STATUS:
ACTIVE
Ok.
The active output menu allows to check the status of the
outputs and the address of the activated output. Confirm with
“Ok” to pass to the identification of the point in alarm with date
and hour.
4.5.4 Alarm resetting
To restore the control panel, the user must press the button “Reset”. If the fire alarm source is
not been repaired, the alarm point comes put out of service.
Page 27 of 70
Rev. 1.00
4.6 EVENT INFORMATION
4.6.1 Main menu
Main menu
POINT
SETTING
ZONE
CONNECTION
LOOP
ACC. LEVEL
OUTPUT
DIAGNOSTIC
EVENT
3b option
ACCESS LEVEL: 1
Sel. Esc.
After the user has entered the “Main menu”, select “EVENT” and
confirm with “Sel.”.
4.6.2 Event menu
Event menu
view
remove
ALARM VIEW
ACCESS LEVEL: 1
Sel. Back Esc.
Inside the “Event menu” there are three items.
The first item is: “view” and it serves to view all the events.
The second item is: “remove” and it serves to set at zero the
event memory.
The third item is: “ALARM VIEW” and it serves to view only the
alarms.
4.7 USE OF THE KEYBOARD THROUGH CONNECTOR PS2
4.7.1 Main menu
Main menu
POINT
SETTING
ZONE
CONNECTION
LOOP
ACC. LEVEL
OUTPUT
DIAGNOSTIC
EVENT
3b option
ACCESS LEVEL: 1
Sel. Esc.
For the configuration of the external keyboard open the control
panel door and insert the keyboard on the suitable connector
PS2. Afterwards enter “Main menu”, select “CONNECTION” and
confirm with “Sel.”.
Page 28 of 70
Rev. 1.00
4.7.2 Connection menu
Inside the “Connection menu”, select the “keyboard” item to
activate the keyboard.
Connection menu
keyboard
ext.supply
local net
ACCESS LEVEL: 1
Sel. Back Esc.
4.7.3 Password request
After “keyboard” has been selected, the password to enter the
next menu is asked for. If a wrong number is typed in, it can be
delete selecting “Canc”.
The second level password supplied by the manufacturer is
“22222”. After the password has been inserted, it is necessary
to confirm with “Ok” to pass to the next menu.
Password request
LEVEL PWD 2:*****
Canc
Ok.
4.7.4 Information
Information
EXTERN.KEYPAD ENABLED
Once the password has been inserted properly, the control
panel supplies the confirmation the keyboard has been enabled
externally with the message “EXTERN.KEYPAD ENABLED”.
Ok.
The alphanumeric key, the number rising above the keyboard
letters, the direction keys, the “enter” key and the first four
function keys which reflect the buttons of the contextual menu
are recognized after the keyboard has been activated.
F1
F2
F3
F4
Page 29 of 70
Rev. 1.00
PART 5
LOOP PROGRAMMING
5.1 LOOP STARTING
5.1.1 Main menu
Main menu
POINT
SETTING
ZONE
CONNECTION
LOOP
ACC. LEVEL
OUTPUT
DIAGNOSTIC
EVENT
3b option
ACCESS LEVEL: 1
Sel. Esc.
The starting procedure of each loop must be executed only
once.
Enter “Main menu” and select “LOOP” using the four arrows
placed low on the display.
Confirm the made selection to pass to the “Loop menu” with
“Sel.”.
5.1.2 Loop menu
Loop menu
reset/reset
Once it has been entered the “Loop menu”, there is only item:
“o.o.s/reset” (out of service/resetting).
For the first loop starting and every time that it is necessary the
loop restart, “o.o.s/reset” must be selected.
ACCESS LEVEL: 1
Sel. Back Esc.
5.1.3 Password request
Password request
LEVEL PWD 2:*****
Canc
Ok.
After “o.o.s/reset” has been selected, the password to enter
the next menu is asked for. If a wrong number is typed in, it can
be delete selecting “Canc”.
The second level password supplied by the manufacturer is
“22222”. After the password has been inserted, it is necessary
to confirm with “Ok” to pass to the next menu.
Page 30 of 70
Rev. 1.00
5.1.4 Loop start/restore (loop selection)
Loop start/restore
►SELECT LOOP
SELECT ALL LOOPS
Sel. Canc
When it is necessary to start or reset loop, to enter the menu
“Loop start/restore” it is necessary to select “o.k./reset”
from the menu. It is now possible to select loop to start or
reset, selecting: “SELECT LOOP”, or it is possible to start or
reset all the available loops of the control panel selecting
“SELECT ALL LOOP”. Confirm the executed selection with
“Sel.”. If the user wants to return to the previous menu, select
“Canc”.
5.1.5 Loop start/restore procedure
Loop start/restore
►LOOP RESTART
RESTART+INST.ISOLAT.
OUT OF SERVICE
Sel. Canc
The menu “Loop start/restore” schedules two procedures
of loop starting or resetting and the possibility to place the loop
itself out of service (necessary operation in case of
maintenance). Starting or resetting procedures of the loop
depends on the characteristic of the line:
• “LOOP RESTART”: to select when isolator along the loop
with address 0 are not present;
• “RESTART+INST.ISOLAT.”: to select if isolators along the
loop with address 0 are present. In the case they are
installed with address beginning from 121. should there be
some addressed isolators, they will have to be taken back
first to address 0;
• “OUT OF SERVICE”: to select in case of maintenance of the
loop or the installed points.
5.1.6 Information
Information
►OPER.:
START
LOOP:
1
STEP: LOOP DISCHARG.
DIRECTION:
A->B
Once the loop resetting or starting procedure has been
selected and has been confirmed with “Sel.”, the control panel
starts the loop control, scanning from point a (control panel
starting) to the first possible isolator (point 121-127) and in
succession among isolators, as far as point B (control panel
arrival). After wards it will scan the loop inversely from point B
to point A. after the control, loop is activated. After the
operation is ended, the control panel passes to the confirmation
menu.
5.1.7 Confirmation
Information
COMPLETED OPERATION
After loop resetting or starting operation is completed, the
message “COMPLETED OPERATION” is read on the display.
Confirm with key “Ok” to complete the loop resetting or starting.
Ok.
Page 31 of 70
Rev. 1.00
5.2 LOOP OUT OF SERVICE
5.2.1 Loop start/restore procedure
Loop start/restore
LOOP RESTART
RESTART+INST.ISOLAT.
►OUT OF SERVICE
If the user wants to put a loop or all loops in out of service, the
user must access to “Loop start/restore” menu and to
select “OUT OF SERVICE”. To access at this menu see chapter
5.1.
The loop in out of service has 0V on the cables.
Sel. Canc
Page 32 of 70
Rev. 1.00
PART 6
POINT PROGRAMMING
6.1 POINT INSERTION
The configuration of the point along the loop, can be executed with four different procedures of
acquisition addressing:
1. Acquisition for installation;
2. Acquisition for activation;
3. Acquisition for serial number;
4. Acquisition for preset address.
For a suitable selection of the acquisition procedure, refer to the “PRELIMINARY REMARKS
FOR A CORRECT INSTALLATION OF CONTROL PANELS”.
Remember that:
The acquisition of points through the installation is preferred when it is necessary to insert
further un-addressed detectors on the loop, but on already installed base, along and
already active loop and that presents already addressed points (example: isolators
modules – buttons).
The acquisition of points through starting provides for the activation of already installed
points along the loop. Such points must have address 0.
The acquisition of points through serial number provides for the acquisition of a point
through the research of the series number of the same point.
The acquisition of points through the preset address provides for the acquisition of
further already installed points on the loop and addressed previously. The user must not
have points with address 0 on the loop.
HOW TO ASSIGN THE DETECTORS WITH ADDRESS 0
• Supply the detector placed on the base with power at 24 Vdc (it is possible to use the
auxiliary output of the same control panel, connecting the +24 to the clip 6(+) of the
base and the –24 to the clip 5(-) of the base).
• Approach to the detector with a magnet and a wait the leds view a long flash.
6.1.1 Procedure for the acquisition of a point
20/01/2005
18:30:58
NO SUPERVISOR MODE
F.D.P. INTERNATIONAL
CONTROL PANEL
Menu
In normal functioning, the date, the hour and the message “NO
SUPERVISOR MODE” is viewed on the display. The message
“Menu” appears low on the left. Typing “Menu” the display
lightens and passes to the “Main menu” where parameters of
the control panel can be modified or added with suitable
passwords.
Page 33 of 70
Rev. 1.00
6.1.2 Main menu
Main menu
POINT
SETTING
ZONE
CONNECTION
LOOP
ACC. LEVEL
OUTPUT
DIAGNOSTIC
EVENT
3b option
ACCESS LEVEL: 1
Sel. Esc.
After the user has entered the “Main menu”, to add some points
(detectors, modules, buttons), it is necessary to select “POINT”
using the four arrows placed low on the display.
Confirm the made selection with “Sel.”.
6.1.3 Point menu
Point menu
view/mod.
insert
remove
d.b.reset
After the user has entered the “Point menu”, to add further
points (detectors, modules, buttons), it is necessary to select
“insert”. Select “Back” to return to the “Main menu”. Select
“Esc”, to go out completely.
ACCESS LEVEL: 1
Sel. Back Esc.
6.1.4 Password request
Password request
LEVEL PWD 3:*****
Canc
Ok.
After “insert” has been selected, the password to enter the
next menu is asked for. If a wrong number is typed in, it can be
delete selecting “Canc”.
The third level password supplied by the manufacturer is
“33333”. after the password has been inserted, it is necessary
to confirm with “Ok” to pass to the next menu.
6.1.5 Address assignation
Address assignation
►SINGLE POINT
AUTOMATIC INCREASE
Sel. Del.
In the address “Address assignation” the programming
procedure is decided:
• Select “SINGLE POINT” to programme one only point;
• Select “AUTOMATIC INCREASE” to programme more
points in succession.
Use the four arrows to set oneself on the line that shows the
type of address assignment the user wants to select and
confirm with “Sel.”. Type in “Del.” to return to the “Point
menu”.
Page 34 of 70
Rev. 1.00
6.1.6 Type of point acquisition
Point acquisition
►INSTALLATION
ACTIVATION
SERIAL NUMBER
PRESET ADDRESS
Sel. Del.
After the user has entered the “Point acquisition” menu the
acquisition procedure of the point can be decided:
• For “INSTALLATION”;
• For “ACTIVATION”;
• For “SERIAL NUMBER”;
• For “PRESET ADDRESS”.
Use the four arrows to set oneself on the line that shows the
type of address assignment the user wants to select and
confirm with “Sel.”. Type in “Del.” to return to “Point menu”.
Refer to chapter 6.1 for further description of the items.
6.1.7 Loop selection
Loop selection
►LOOP 1
LOOP 2
LOOP 3
LOOP 4
Select the “Loop” to programme and confirm with “Sel.”, use
the four arrows to set oneself on the line that shows the loop
the user wants to programme and select and confirm with
“Sel.”. Type in “Canc” to return to the “Point menu”.
Sel. Canc
6.1.8 Point address selection
Point addr. select.
ADDRESS: 001
The control panel supplies the first free address to programme,
relative to the selected loop. Through the numerical keyboard it
is possible to assign a different number of address. Select
“Sel.” to pass to the programming.
Ok. Canc
6.1.9 Detectors checkvalues
Detect. checkvalues
►Min. TEMP:
015
Max. TEMP:
025
Min. SMOKE:
000
Max. SMOKE:
020
Ok. Mod. Del.
The values assigned to the default detectors correspond to the
current norms (EN 54). However, for particular positions of the
points, it is possible to modify the levels of time and alarm test
that the control panel tests during the acquisition of a detector
(it is not possible to modify the levels of the single detectors).
Set yourself on the line and select “Mod.”. The data are
modified with the numerical keyboard. At the end of the
possible modifications, confirm with “Ok” to pass to the next
menu.
Page 35 of 70
Rev. 1.00
6.1.10
Information on the research
Information
►OPER.: POINT SEARCH
POINT:
001-1
Canc
6.1.11
When the menu of point control values has been confirmed, the
control panel passes to the “Information” menu and begins
the pre-selected point research. The location procedure of the
point depends on the selection of the acquisition way.
The acquisition selection for “INSTALLATION” provides to insert
the sensor on the base.
The acquisition selection for “ACTIVATION” provides to press
the microbutton of the modules or to get near with the magnet
to activate the read of the detectors.
The acquisition selection for “PRESET ADDRESS” provides to
address the points previously.
Press “Canc” to finish the search.
Information on the acquisition
When the control panel locates the point, it starts the control.
Information
►OPER.: POINT ACQUIS.
POINT:
001-1
Canc
6.1.12
Executed operation
Information
COMPLETED OPERATION
Ok.
The point acquisition from the control panel is pointed out with
a beep and with the message “COMPLETED OPERATION” on the
display. In case of address assignment like single point, the
confirmation with “Ok” provides to return to the “Main menu”.
In case of address assignment like self-increment, the passage
to the research of the next point is automatic. Typing in “Canc”,
the acquisition of further points ends. If the detector presents
faults or out of range values, the control panel installs it and
places it out of service.
6.2 POINT INFORMATION
Besides begin able to view the information relative to each addressed point (detector,
input/output module, isolator, button), it is also possible to modify some parameters as an
example the zone of belonging or the element name.
Page 36 of 70
Rev. 1.00
6.2.1 Main menu
Main menu
POINT
SETTING
ZONE
CONNECTION
LOOP
ACC. LEVEL
OUTPUT
DIAGNOSTIC
EVENT
3b option
ACCESS LEVEL: 1
Sel. Esc.
After the user has entered the “Main menu”, select “POINT” and
confirm with the key “Sel.” To pass to “Point menu”.
6.2.2 Point menu
Point menu
view/mod.
insert
remove
d.b.reset
After the user has entered the “Point menu” select the item
“view/mod.”. Select “Back” to return to the “Main menu”. Select
“Esc.” To return to the “Main menu” and to go out completely.
ACCESS LEVEL: 1
Sel. Back Esc.
6.2.3 Password request
Password request
LEVEL PWD 2:*****
Canc
Ok.
After “view/mod.” has been selected, the password to enter
the next menu is asked for. If a wrong number is typed in, it can
be delete selecting “Canc”.
The second level password supplied by the manufacturer is
“22222”. After the password has been inserted, it is necessary
to confirm with “Ok” to pass to the next menu.
6.2.4 Loop selection
Loop selection
►LOOP 1
LOOP 2
LOOP 3
LOOP 4
Select the “Loop” to programme and confirm with “Sel.”, use
the four arrows to set oneself on the line that shows the loop
the user wants to programme and select and confirm with
“Sel.”. Type in “Canc” to return to the “Point menu”.
Sel. Canc
Page 37 of 70
Rev. 1.00
6.2.5 Point address selection
Point addr. select.
ADDRESS: 001
The control panel supplies the address of the first addressed
point. Through the numerical keyboard it is possible to select
the address of the point the user wants to view.
Select “Ok” To view the information relative to the selected
point. Select “Canc” to return to the “Point menu”.
Ok. Canc
6.2.6 Point setting
In the “Point setting” menu there are different parameters
that supply data of the point that has been examining. Among
there the “ZONE”, the “NAME”, the “TYPE”, the “SECTION” of
belonging, if “OUT OF SERVICE”, etc…
Go on the interested line with the arrow and pressing the key
“Mod.” enter modification line. Once the user has entered
modification with the alpha/numerical keyboard of the control
panel the information (to type in the number of the selected
zone, the name, …) is updated. After the modifications are
ended, press the key “Esc.”.
“Pre.” to go to the previous point;
“Next” to go to the next point.
Some data are not modifiable. Example the “Type” of point, the
“SECTION” of belonging, the “SW VERSION” etc…
To view other information relative to the point that has been
examining, it is necessary to wait a few seconds to go down
with the arrows. If the point was fault (“FAULT:
YES”), it is not possible to view the further information relative to
the same point. It is first necessary to remove the fault.
When the user wants to use the input of a input/output module, it is necessary to modify
“INPUT: DISABLED”, use the four arrows to set oneself on the line “INPUT:”, type in “Mod.” and
insert the password of third level.
Input options: “FIRE ALARM”, “TECHNOLOGICAL” and “BATH”.
For other information on the single point type, see chapter PART 10.
Point setting
►ADDRESS:
001-1
ZONE:
01
NAME: ROOM1
TYPE: SMOKE DETECTOR
SECTION:
A-B
OUT OF SERVICE:
NO
FAULT:
NO
LED ON:
NO
INPUT: DISABLED
SINGLE CONSENSE: NO
SERIAL NUM:002-00001
SW VERSION:
2.00
SUPERV.SMOK LEV: 130
NSUPER.SMOK LEV: 100
SMOKE (0-255):
003
DIRTY %:
000
EFFICIENCY %:
100
Esc. Pre. Next Mod.
6.3 POINTS REMOVAL
6.3.1 Main menu
Main menu
POINT
SETTING
ZONE
CONNECTION
LOOP
ACC. LEVEL
OUTPUT
DIAGNOSTIC
EVENT
3b option
ACCESS LEVEL: 1
Sel. Esc.
After the user has entered the “Main menu”, select “POINT” and
confirm with the key “Sel.” To pass to “Point menu”.
Page 38 of 70
Rev. 1.00
6.3.2 Point menu
Point menu
view/mod.
insert
remove
d.b.reset
After the user has entered the “Point menu” select the item
“remove”. Select “Back” to return to the “Main menu”. Select
“Esc.” To return to the “Main menu” and to go out completely.
ACCESS LEVEL: 1
Sel. Back Esc.
6.3.3 Password insertion
Password request
LEVEL PWD 3:*****
Canc
Ok.
After “remove has been selected, the password to enter the
next menu is asked for. If a wrong number is typed in, it can be
delete selecting “Canc”.
The third level password supplied by the manufacturer is
“33333”. after the password has been inserted, it is necessary
to confirm with “Ok” to pass to the next menu.
6.3.4 Points removal (options)
Points
►SELECTED
SELECTED
SELECTED
removal
POINT
ZONE
LOOP
Sel. Canc
In this menu different options to remove the points can be
selected:
“SELECTED POINT”: to remove one only point;
“SELECTED ZONE”: to remove all the points placed in a zone;
“SELECTED LOOP”: to remove all the points belonging to a loop.
Use the four arrows to set oneself on the line with show the
type of address assignment the user wants to select and
confirm with “Sel.”. Type in “Canc” to return to the “Point
menu”.
6.3.5 Loop selection
Loop selection
►LOOP 1
LOOP 2
LOOP 3
LOOP 4
Whatever the previous selection may be, the belonging loop of
the point or the zone must be selected.
Select the “Loop” to programme and confirm with “Sel.”, use
the four arrows to set oneself on the line that shows the loop
the user wants to programme and select and confirm with
“Sel.”. Type in “Canc” to return to the “Point menu”.
Sel. Canc
Page 39 of 70
Rev. 1.00
6.3.6 Point address selection
Point addr. select.
ADDRESS: 001
Ok. Canc
Should the user select to remove a single point, type in the
point address to remove. Through the numerical keyboard it is
possible to select the address of the point.
Confirm the removal selection with “Ok” the control panel
begins the research and removes the selected point. Select
“Canc” to return to the “Point menu”.
6.3.7 Zone address selection
Zone address select.
ADDRESS: 01
Ok. Canc
Should the user select to remove a zone of a loop, type in the
zone address to remove. Through the numerical keyboard it is
possible to select the address of the zone.
Confirm the removal selection with “Ok” the control panel
begins the research and removes the points of the selected
zone. Select “Canc” to return to the “Point menu”.
Page 40 of 70
Rev. 1.00
PART 7
ZONE PROGRAMMING
7.1 ABOUT ZONE
It is possible to define 63 zones per loop. Every zone is independent from the zones of the
other loops.
7.2 ZONE CREATION
It is not necessary to define a new zone; it is sufficient to assign a point to the new zone that
the user wants to create.
To do this, it is necessary to modify the value of the zone in the “Point setting” menu (see
the chapter 6.2.6).
7.3 ZONE SETTING
7.3.1 Main menu
Main menu
POINT
SETTING
ZONE
CONNECTION
LOOP
ACC. LEVEL
OUTPUT
DIAGNOSTIC
EVENT
3b option
ACCESS LEVEL: 1
Sel. Esc.
After the user has entered the “Main menu”, select “ZONE” and
confirm with the key “Sel.” To pass to “Zone menu”.
7.3.2 Zone menu
Zone menu
view/mod.
After the user has entered the “Zone menu” select the item
“view/mod.”. Select “Back” to return to the “Main menu”. Select
“Esc.”
ACCESS LEVEL: 1
Sel. Back Esc.
Page 41 of 70
Rev. 1.00
7.3.3 Password request
Password request
LEVEL PWD 2:*****
Canc
Ok.
After “view/mod.” has been selected, the password to enter
the next menu is asked for. If a wrong number is typed in, it can
be delete selecting “Canc”.
The second level password supplied by the manufacturer is
“22222”. After the password has been inserted, it is necessary
to confirm with “Ok” to pass to the next menu.
7.3.4 Loop selection
Loop selection
►LOOP 1
LOOP 2
LOOP 3
LOOP 4
Select the “Loop” and confirm with “Sel.”, type in “Canc” to
return to the “Zone menu”.
Sel. Canc
7.3.5 Zone address selection
Zone addres.selectio
ADDRESS: 01
The control panel supplies the address of the first addressed
zone. Through the numerical keyboard it is possible to select
the address of the point the user wants to view.
Select “Ok” To view the information relative to the selected
zone. Select “Canc” to return to the “Zone menu”.
Ok. Canc
Page 42 of 70
Rev. 1.00
7.3.6 Zone setting
Zone setting
►ADDRESS:
01-1
NAME: FIRST FLOOR
POINTS NUMBER:
015
FAULT POINTS:
000
O.O.SERV.POINTS: 000
OUT OF SERVICE:
NO
DOUBLE CONSENSE: NO
DELAYED OUTPUT:
NO
MAX ALARM DETECT.: 2
TEST RUN:
NO
RATE-OF-RISE EN: NO
RATE-OF-RIS.DIS: NO
SUPERV.TEMP LEV:
NSUPER.TEMP LEV:
SUPERV.SMOK LEV:
NSUPER.SMOK LEV:
Esc. Pre. Next Mod.
the zone and loop addresses (no mod.).
the name of the zone (mod.).
points number of the zone (no mod.).
the number of the fault points of zone (no mod.).
the number of the out of service points of zone (no
mod.).
O.OF SERVICE:
it indicates if the zone is in out of service (mod. YES or
NO).
DOUBLE CONSENSE: it is used when the control panel is supervisory mode.
If NO, when the detector goes to alarm status, the
control panel go to fire alarm too; if YES, the zone prealarm is enabled (mod. YES or NO).
DELAYED OUTPUT: it is used when the control panel is supervisory mode.
If NO, the alarm delayed is disabled. If YES, the alarm
delayed is enabled.
MAX ALARM DETECT.:
it indicates the maximum number of detectors
that can illuminate the leds in fire case (mod. 2, 4, 6,
8).
TEST RUN:
it enables the test function. All points begin to flash
and now it is possible test all points. The alarm
messages from the points only come visualize to the
display. The control panel does not go in alarm mode
(mod. YES or NO).
RATE-OF-RISE EN: all heat detectors are enabled at the rate-of-rise mode
(mod. YES or NO).
RATE-OF-RIS.DIS: all heat detectors are not enabled at the rate-of-rise
mode (mod. YES or NO).
SUP.TEMP LEV:
if set up, all the multicriteria heat detectors acquire the
temperature level in no supervisory mode on this
reported value. Beyond this value, the alarm go active
(mod. Range: 40°-70°).
NSUP.TEMP LEV: if set up, all the multicriteria heat detectors acquire the
temperature level in no supervisory mode on this
reported value. Beyond this value, the alarm go active
(mod. Range: 40°-70°).
SUP.SMOK LEV:
if set up, all the multicriteria smoke detectors acquire
the smoke level in supervisory mode on this reported
value. This level refers at the SMOKE value (mod.
Range: 80-150). Beyond this value, the alarm goes
active.
NSUP.SMK LEV:
if set up, all the multicriteria smoke detectors acquire
the smoke level in no supervisory mode on this
reported value. This level refers at the SMOKE value
(mod. Range: 80-150). Beyond this value, the alarm
goes active.
ADDRESS:
NAME:
POINTS NUMBER:
FAULT POINTS:
O.O.SERV.POINT:
Page 43 of 70
Rev. 1.00
PART 8
OUTPUTS PROGRAMMING
8.1.1 Main menu
Main menu
POINT
SETTING
ZONE
CONNECTION
LOOP
ACC. LEVEL
OUTPUT
DIAGNOSTIC
EVENT
3b option
ACCESS LEVEL: 1
Sel. Esc.
To programme the outputs of the control panel or the loop, it is
necessary to enter the “Main menu” and select “OUTPUT”. To
move inside the menu, always use the four arrows; confirm with
“Sel.”.
8.1.2 Output menu
Output menu
view/mod.
After you have entered the “Output menu”, select “view/mod.”
and confirm the selection with “Sel.”.
ACCESS LEVEL: 1
Sel. Back Esc.
8.1.3 Password request
Password request
LEVEL PWD 2:*****
Canc
Ok.
After “view/mod.” has been selected, the password to enter
the next menu is asked for. If a wrong number is typed in, it can
be delete selecting “Canc”.
The second level password supplied by the manufacturer is
“22222”. After the password has been inserted, it is necessary
to confirm with “Ok” to pass to the next menu.
Page 44 of 70
Rev. 1.00
8.1.4 Output selection
Inside the output menu there are two typologies:
1. “CONTROL PANEL OUTPUT”;
2. “LOOP OUTPUT”.
Use the four arrows to set oneself on the line, which shows the
type of selection you want to select and confirm with “Sel.”
Type in “Canc” to return to the “Output menu”.
Output selection
►CONTROL PANEL OUTPUT
LOOP OUTPUT
Sel. Canc
Selecting “CONTROL PANEL OUTPUT” the outputs inside the control panel will be able to be
programmed as follows:
¾
¾
¾
¾
¾
¾
¾
¾
¾
(out5) Clips RL1 (SEL4): relay 1 is a clean relay that can be programmed NO/NC;
(out4) Clips RL2 (SEL3): relay 1 is a clean relay that can be programmed NO/NC;
(out9) Clips OC4: open collector No 4 programmable for typology of alarm and zone;
(out8) Clips OC3: open collector No 3 programmable for typology of alarm and zone;
(out7) Clips OC2: open collector No 2 programmable for typology of alarm and zone;
(out6) Clips OC1: open collector No 1 programmable for typology of alarm and zone;
(out3) Clips FAULT (SEL1,2): supervised output of fault;
(out2) Clips –S +S: supervised siren;
(out1) Clips +24 –24: auxiliary power supply 24Vdc.
OUTPUTS ADDRESS
1
-24
+24
SHI
- +
FAULT
2
+S
3
-S
6
SHI
OC 2
OC 3
RL2
9 8 7
OC 4
RL1
4
OC 1
5
OUTPUTS TYPE
Selecting “LOOP OUTPUT” it is possible to programme the address of the point to which the
input/output module refers. The output of the input/output module is a contact of exchange to
which it is possible to connect a maximum load of 1A and 24Vdc.
At the end of a correct circuit, it is necessary to distinguish:
• Always active load and that is to deactivate at the click of the relay (example:
electromagnets).
• Loads to activate at the click of the relay (example: sirens or optic panels).
For circuit examples see chapter PART 10 POINTS DESCRIPTION AND.
Page 45 of 70
Rev. 1.00
Output setting
OUTPUT ADDRESS:001-1
TYPE:
LOOP OUTPUT
DEVICE:
RELAY
OUT OF SERVICE:
NO
FAULT:
NO
STATUS:
DISABLED
TEST RUN:
NO
►ACTIVATION:
NO
SILENT MODE:
NO
ACTIV. DELAY s:
OUT ACTI.TIME s:
INVERT:
NO
Esc. Pre. Next Mod.
Output setting
OUTPUT ADDRESS:001-1
TYPE:
LOOP OUTPUT
DEVICE:
RELAY
OUT OF SERVICE:
NO
FAULT:
NO
STATUS:
DISABLED
TEST RUN:
NO
►ACTIVATION:
STATUS
TECHNOLOG.ALARM [ ]
FIRE.PREALARM
[ ]
FIRE.ALARM
[ ]
EVACUATION
[ ]
EXTINCTION
[ ]
FAULT
[ ]
OUT OF SERVICE
[ ]
SILENT MODE:
NO
ACTIV. DELAY s:
OUT ACTI.TIME s:
INVERT:
NO
Esc. Pre. Next Mod.
Output setting
OUTPUT ADDRESS:001-1
TYPE:
LOOP OUTPUT
DEVICE:
RELAY
OUT OF SERVICE:
NO
FAULT:
NO
STATUS:
DISABLED
TEST RUN:
NO
►ACTIVATION: ZONE REP
LOOP REPETITION:
1
1st ZONE REPET.: 01
LAST ZONE REPET.: 01
SILENT MODE:
NO
ACTIV. DELAY s:
OUT ACTI.TIME s:
INVERT:
NO
Esc. Pre. Next Mod.
Inside a the “Output setting” menu it is possible to modify
the output parameters (for example in this picture there is a
input/output module).
To modify the data use the arrows to move inside the control
panel/loop and modify with “Mod.” key if it is allowed.
The output display presents the disabled status of the
input/output module (for example).
To activate the output status of the input/output module set
yourself on the activation line using the four arrows and type in
“Mod.”.
The third level password (default 33333) will be requested.
The output activation of the input/output module allows different
possibilities of programming of the same module. The selection
is made typing in “Mod.” And it is viewed with a cross (x).
It is possible to activate an output if a particular zone of a loop
is in fire alarm. To do this, it is necessary to select “ZONE
REPETITION”, to define the loop and the range of the zone.
Page 46 of 70
Rev. 1.00
Output setting
OUTPUT ADDRESS:001-1
TYPE:
LOOP OUTPUT
DEVICE:
RELAY
OUT OF SERVICE:
NO
FAULT:
NO
STATUS:
DISABLED
TEST RUN:
NO
►ACTIVATION: FORMULA
FORMULA: NOT AVAILAB
SILENT MODE:
NO
ACTIV. DELAY s:
OUT ACTI.TIME s:
INVERT:
NO
Esc. Pre. Next Mod.
The possibility to do activate an output through a formula, it is
not available now.
8.2 SERIAL OUTPUTS (RS232-RS485-LAN)
8.2.1 Control panel address
8.2.1.1 Main menu
Main menu
POINT
SETTING
ZONE
CONNECTION
LOOP
ACC. LEVEL
OUTPUT
DIAGNOSTIC
EVENT
3b option
ACCESS LEVEL: 1
Sel. Esc.
For the configuration of the local net address, enter “Main
menu”, select “CONNECTION” and confirm with “Sel.”.
8.2.1.2 Connection menu
Connection menu
keyboard
ext.supply
local net
Inside the “Connection menu”, select the “local net” item to
change the local net address.
ACCESS LEVEL: 1
Sel. Back Esc.
Page 47 of 70
Rev. 1.00
8.2.1.3 Password request
Password request
LEVEL PWD 3:*****
Canc
Ok.
After “local net” has been selected, the password to enter
the next menu is asked for. If a wrong number is typed in, it can
be delete selecting “Canc”.
The second level password supplied by the manufacturer is
“33333”. After the password has been inserted, it is necessary
to confirm with “Ok” to pass to the next menu.
8.2.1.4 Local net setting
Local net setting
►NET ADDRESS:
99
Insert the address the user wants to give to the control panel
(the default control panel goes out of the factory with address
99).
Esc. Mod.
8.2.2 RS232 connection
The connection cable for the direct connection to PC is a straight not crossed RS232 cable.
Into the central, the RS232 serial port must be installed on the COM1 or COM2 (see chapter
3.2.5).
The serial door must be set like that:
Baud rate: 9600
Data bits: 8
Stop bits: 1
Parity: even
Com: the one used at the time of the connection
8.2.3 RS485 connection
With RS485 connection it is possible to connect at a PC a maximum of 64 control panels. To
create this net the user must:
1. For every control panel the user must install the RS485 module (see chapter 3.2.2).
2. The PC must have a RS232-RS485 module installed with: DCE, T-RTS/R-RTS.
To following there is an example of connection between some control panels.
Page 48 of 70
Rev. 1.00
Rs232
T+
TRR+
B
Rs485
A dir -5V+
Rs485
B
A dir -5V+
Rs485
8.2.4 LAN connection
Another connection can be the LAN net (Ethernet) for the connection of 64 control panels in
net at a PC master disposal.
The connection takes place through MOXA TCP/IP module, which turns the RS232, serial port
into LAN output. A crossed RS232 cable is used for the LAN connection.
The MOXA module must be set like a traditional TCP/IP. Inside the module the IP code is
192.168.127.254, once it has been found inside the net set, as the user likes. After the user
has entered the NPort menu, set the serial door like that:
MOXA DE-211 module:
Page 49 of 70
Rev. 1.00
8.2.5 Repeater panel setting
The repeater panel is connected with the control panel through a crossed RS232 cable.
Repeater panel setting
For the repeater setting it is enough to install the RS232 serial port inside the control panel in
the first connector on the left. The control panel needs not be set, being already programmed
of default. As regards the repeater panel it is better to supply it from an external power supply
source to the control panel. Connect the serial port and enter the main menu. At the
connection item, follow the table shown below:
CONNESIONI
RETE
RS232
CONNESSIONE
CENTRALE
DISCONNESIONE
CENTRALE
LINK CENTRALE
SERIALE 1
RICERCA
CONFERMARE
CON – OK-
SERIALE 2
Once the user has decided the serial port and the repeater and in search of the control panel,
it is enough only to wait and confirm the action. From that moment the panel will view all the
control panel’s actions.
Page 50 of 70
Rev. 1.00
PART 9
TECHNICAL CHARACTERISTIC
Case size:
B x W x H 410x90x510mm.
Protection degree:
IP40.
Weight:
10Kg.
Operating Temperature:
- 5 = + 40°C.
Relative humidity:
95% maximum.
Siren output:
2 programmable outputs, short-circuit and open circuit control.
End line resistance: 5,6Kohm 1/4W.
Maximum output current: 250mA.
Auxiliary relays:
2 programmable outputs free from voltage (contacts C/NO or C/NC).
Contacts: max. 1A, 40V ac/dc.
Detection circuit:
1-2-4 loop. Every loop supports the communication with 127 elements
(detectors, buttons, input/output modules and isolators).
Normal current absorption :
90 mA + external circuits.
Alarm current:
250 mA + external circuits.
Definable zone:
Up to 63 configurable zones per loop.
Power supply:
230 Vac + 10% - 15%, 50Hz.
Power supply fuse:
1A.
Mother board power supply:
30 Vcc.
Outputs of power supply source:
2.3A at 24V in period inferior to 10 minutes at most, of which:
0.7A for the battery, auto power supplied;
0.5A for loop and internal circuit;
0.5A supervised outputs;
0.6A auxiliary output 24V.
1.7A at 24V in steady condition, including:
0.7A for the battery, auto power supplied;
0.5A for loop and internal circuits;
0.5A supervised outputs.
Output Voltage current 24V
24 V + 1.5 V –15 V entire current range
Battery Charger Output
27.6 V nominale a 20°C.
Batteries
Lead type (dry cell) 24Vdc – 2Ah / 6,5Ah / 17Ah.
Page 51 of 70
Rev. 1.00
PART 10
POINTS DESCRIPTION AND UTILIZATION
10.1 DETECTORS
All detectors of the F1001L-F1002L-F1004L
CENTRAL UNIT series (smoke, heat and
multicriterion) have the same base. These
detectors have a double led indicator at high
visibility (360°) and a low height.
From the control panel is possible to change
the settings, values, zones and alarm types.
CLIPS DESCRIPTION OF THE BASE
2
Reed
1/+
2/R
3/R
4 / SCR
5/6/+
10.1.1
3
1
4
6
5
Shielded.
Negative output for outside door
repeater.
Input.
Output.
- LOOP.
+ LOOP.
Detector addressing
For the addressing it is necessary to use a magnet near the reed. For the procedures refer to
the manual of the control panel.
10.1.2
Manual zero setting of the address
Normally the factory address is equal to 0 (zero). If the user must take back manually the
address to such a value, it is necessary to supply the detector at 24Vdc and, after about ten
seconds, approach reed a magnet and wait the leds make a longer flash signal.
Page 52 of 70
Rev. 1.00
10.1.3
Smoke detector
The smoke detector reacts to the presence of elements caused by the combustion (visible
smoke). The working principle is based on the light dispersion technique (Tyndall effect).
In the “Point setting” menu (submenu of “POINT” item) there are different parameters for
this detector. For the output setting, see chapter PART 8).
Point setting
►ADDRESS:
001-1
ZONE:
01
NAME: ROOM1
TYPE: SMOKE DETECTO
SECTION:
A-B
OUT OF SERVICE:
NO
FAULT:
NO
LED ON:
NO
INPUT: DISABLED
SINGLE CONSENSE: NO
SERIAL NUM:002-00001
SW VERSION:
2.00
SUPERV.SMOK LEV: 130
NSUPER.SMOK LEV: 100
SMOKE (0-255):
003
DIRTY %:
000
EFFICIENCY %:
100
Esc. Pre. Next Mod.
ADDRESS:
ZONE:
NAME:
TYPE:
SECTION:
O.OF SERVICE:
FAULT:
LED ON:
INPUT:
SING.CONSEN.:
SERIAL NUM:
SW VERSION:
SUP.SMOK LEV:
NSUP.SMK LEV:
SMOKE(0-255):
DIRTY %:
EFFICIENCY %:
the point and loop addresses (no mod.).
the zone address of the point loop (mod., range value
1-63).
the name of the point (mod.).
point type (no mod.).
the section where the point is (no mod.).
it indicates if the point is in out of service (mod. YES or
NO).
it indicates if the point is fault (no mod.).
if YES the leds flash (mod. YES or NO).
the input is activable like only TECHNOLOGICAL type
(mod.).
it is used when the control panel is supervisory mode
and the zone of the point is enabled the "double
consent". If YES, when the detector go to alarm status,
the control panel go to fire alarm too (mod.).
the serial number of the detector (no mod.).
the software version of the detector (it is changed
through PC).
the smoke level in supervisory mode. This level refers
at the SMOKE value (mod. Range: 80-150). Beyond
this value, the alarm goes active.
the smoke level in no supervisory mode. This level
refers at the SMOKE value (mod. Range: 80-150).
Beyond this value, the alarm goes active.
it indicates the smoke into the detector with a range of
0-255 (no mod.).
the dirty % of the detector. If the value exceeds 80%,
the control panel send the problem with a message
(no mod.).
the efficiency % of the detector. If the value goes
under 25%, the control panel send the problem with a
message. This value depends of the device sensor (no
mod.).
Page 53 of 70
Rev. 1.00
10.1.4
Heat detector
The heat rate-of rise detector has been designed to activate itself when the heat exceeds a
previously fixed level or when the speed with which this increment is produced is high, even
though the scheduled level has not been exceeded.
In the “Point setting” menu (submenu of “POINT” item) there are different parameters for
this detector. For the output setting, see chapter PART 8).
Point setting
►ADDRESS:
001-1
ZONE:
01
NAME: ROOM1
TYPE: HEAT DETECTOR
SECTION:
A-B
OUT OF SERVICE:
NO
FAULT:
NO
LED ON:
NO
INPUT: DISABLED
SINGLE CONSENSE: NO
SERIAL NUM:002-00001
SW VERSION:
2.00
RATE-OF-RISE:
NO
SUPERV.TEMP LEV: 058
NSUPER.TEMP LEV: 056
TEMP. °C:
25.32
Esc. Pre. Next Mod.
ADDRESS:
ZONE:
NAME:
TYPE:
SECTION:
O.OF SERVICE:
FAULT:
LED ON:
INPUT:
SING.CONSEN.:
SERIAL NUM:
SW VERSION:
RATE-OF-RISE:
SUP.TEMP LEV:
NSUP.TEMP LEV:
TEMP. °C:
the point and loop addresses (no mod.).
the zone address of the point loop (mod., range value
1-63).
the name of the point (mod.).
point type (no mod.).
the section where the point is (no mod.).
it indicates if the point is in out of service (mod. YES or
NO).
it indicates if the point is fault (no mod.).
if YES the leds flash (mod. YES or NO).
the input is activeable like only TECHNOLOGICAL type
(mod.).
it is used when the control panel is supervisory mode
and the zone of the point is enabled the "double
consent". If YES, when the detector go to alarm status,
the control panel go to fire alarm too (mod.).
the serial number of the detector (no mod.).
the software version of the detector (it is changed
through PC).
if value is YES, the heat detector has rate-of-rise
function too (no mod.).
the temperature level in supervisory mode. This level
refers at the TEMP. value (mod. Range: 40-70).
Beyond this value, the alarm goes active.
the smoke level in no supervisory mode. This level
refers at the TEMP. value (mod. Range: 40-70).
Beyond this value, the alarm goes active.
it indicates the temperature measure from the detector
(no mod.).
Page 54 of 70
Rev. 1.00
10.1.5
Multicriterion detector
The smoke/heat multicriterion detector reacts to the presence of products caused by the
combustion (visible smokes) as regards the smoke. The working principle is based on the light
dispersion technique (Tyndall effect). For the detection of the heat, it has been designed to
activate itself when the heat exceeds a certain previously fixed level or when the speed with
which this increment is produced is high, even though the programmed level has not been
exceeded.
In the “Point setting” menu (submenu of “POINT” item) there are different parameters for
this detector. For the output setting, see chapter PART 8).
Point setting
►ADDRESS:
001-1
ZONE:
01
NAME: ROOM1
TYPE: SMOKE+HEAT DE
SECTION:
A-B
OUT OF SERVICE:
NO
FAULT:
NO
LED ON:
NO
INPUT: DISABLED
SINGLE CONSENSE: NO
SERIAL NUM:002-00001
SW VERSION:
2.00
SUPERV.SMOK LEV: 130
NSUPER.SMOK LEV: 100
SMOKE (0-255):
003
DIRTY %:
000
EFFICIENCY %:
100
RATE-OF-RISE:
NO
SUPERV.TEMP LEV: 058
NSUPER.TEMP LEV: 056
TEMP. °C:
25.32
Esc. Pre. Next Mod.
ADDRESS:
ZONE:
NAME:
TYPE:
SECTION:
O.OF SERVICE:
FAULT:
LED ON:
INPUT:
SING.CONSEN.:
SERIAL NUM:
SW VERSION:
SUP.SMOK LEV:
NSUP.SMK LEV:
SMOKE(0-255):
DIRTY %:
EFFICIENCY %:
RATE-OF-RISE:
SUP.TEMP LEV:
NSUP.TEMP LEV:
TEMP. °C:
the point and loop addresses (no mod.).
the zone address of the point loop (mod., range value
1-63).
the name of the point (mod.).
point type (no mod.).
the section where the point is (no mod.).
it indicates if the point is in out of service (mod. YES or
NO).
it indicates if the point is fault (no mod.).
if YES the leds flash (mod. YES or NO).
the input is activeable like only TECHNOLOGICAL type
(mod.).
it is used when the control panel is supervisory mode
and the zone of the point is enabled the "double
consent". If YES, when the detector go to alarm status,
the control panel go to fire alarm too (mod.).
the serial number of the detector (no mod.).
the software version of the detector (it is changed
through PC).
the smoke level in supervisory mode. This level refers
at the SMOKE value (mod. Range: 80-150). Beyond
this value, the alarm goes active.
the smoke level in no supervisory mode. This level
refers at the SMOKE value (mod. Range: 80-150).
Beyond this value, the alarm goes active.
it indicates the smoke into the detector with a range of
0-255 (no mod.).
the dirty % of the detector. If the value exceeds 80%,
the control panel send the problem with a message
(no mod.).
the efficiency % of the detector. If the value goes
under 25%, the control panel send the problem with a
message. This value depends of the device sensor (no
mod.).
if value is YES, the heat detector has rate-of-rise
function too (no mod.).
the temperature level in supervisory mode. This level
refers at the TEMP. value (mod. Range: 40-70).
Beyond this value, the alarm goes active.
the smoke level in no supervisory mode. This level
refers at the TEMP. value (mod. Range: 40-70).
Beyond this value, the alarm goes active.
it indicates the temperature measure from the detector
(no mod.).
Page 55 of 70
Rev. 1.00
10.1.6
Electrical schemes
CONNECTION TO LOOP:
OUTSIDE DOOR REPEATER:
2
2
3
1
4
6
5
3
1
4
6
- +
5
Loop -
Loop -
Loop +
Loop +
SHI
SHI
Device with escape
to relay
INPUT:
WARNING:
Only “Technical” input.
2
NO
3
1
4
6
5
COM
NO
NC
COM
CMOS Interface
Low current
OUTPUT:
2
3
1
4
6
WARNING:
The output is Open Collector type.
You must use one CMOS interface
(low current) that controls a relay.
5
Page 56 of 70
Rev. 1.00
10.2 RESETTABLE BUTTON
Manual reset alarm button for F1001L-F1002L-F1004L CENTRAL UNIT control panel.
10.2.1
Input and output description
INPUT: The input is of the type of balanced resistance of the 27Kohm value. The input signal
is given opening the circuit between the two clips and the resistance; but, if it is short circuited,
a fault in the input line is indicated.
OUTPUT: the output is a Open Collector type. It is necessary to use a CMOS interface with a
low current supply to control a relay.
The input and output can be programmed with different types of meaning (Example: Alarm
fire, pre-alarm, technological...).
10.2.2
Button addressing
For the addressing in loop it is necessary to use a magnet near the reed. For the procedures,
refer to the manual of the control panel.
10.2.3
Manual zero setting of the address
Normally the factory address is equal to 0 (zero). If you must assign the address to zero, give
manually 24V to the detector and, after ten seconds, approach reed a magnet and wait for the
led to make a long flash signal.
10.2.4
Point setting
In the “Point setting” menu (submenu of “POINT” item) there are different parameters for
this detector. For the output setting, see chapter PART 8).
Point setting
►ADDRESS:
001-1
ZONE:
01
NAME: ROOM1
TYPE: MANUAL ALARM
SECTION:
A-B
OUT OF SERVICE:
NO
FAULT:
NO
LED ON:
NO
INPUT: DISABLED
SINGLE CONSENSE: NO
SERIAL NUM:002-00001
SW VERSION:
2.00
Esc. Pre. Next Mod.
ADDRESS:
ZONE:
NAME:
TYPE:
SECTION:
O.OF SERVICE:
FAULT:
LED ON:
INPUT:
SING.CONSEN.:
SERIAL NUM:
SW VERSION:
the point and loop addresses (no mod.).
the zone address of the point loop (mod., range value
1-63).
the name of the point (mod.).
point type (no mod.).
the section where the point is (no mod.).
it indicates if the point is in out of service (mod. YES or
NO).
it indicates if the point is fault (no mod.).
if YES the leds flash (mod. YES or NO).
the
input
is
activeable
with
the
types:
TECHNOLOGICAL, FIRE ALARM and BATH (mod.).
it is used when the control panel is supervisory mode
and the zone of the point is enabled the "double
consent". If YES, when the button go to alarm status,
the control panel go to fire alarm too (mod.).
the serial number of the button (no mod.).
the software version of the button (it is changed
through PC).
Page 57 of 70
Rev. 1.00
10.2.5
Electrical schemes
LOOP CONNECTION:
- LINE
+LINE
- LINE
+LINE
S L+ L-
-
27K ohm
ALARM
RELAY
S
L+
L-
out
INPUT MODULE:
NO
NC
S L+ L-
S
L+
L-
out
In
In
FAULT
RELAY
REED
NO
NC
REED
27K ohm
OUTPUT MODULE:
-
NC
COM
CMOS Interface
Low current
NO
+
IN
S L+ L-
S
L+
L-
out
27K ohm
In
WARNING:
The output is Open Collector type.
You must use one CMOS interface
(low current) that controls a relay.
REED
Page 58 of 70
Rev. 1.00
10.3 INPUT/OUTPUT MODULE
The input/output module is a device that it has an input module (balanced) and an output
module relay (C/NO/NC). It is possible to connect at the input clips a clean contact. (no open
collector); at this input is possible to associate a particular alarm (see chapter 6.2.6 )
The module output is a relay (C/NO/NC). It is possible to connect any loader with 1A
maximum. For the programming of the output see the chapter (PART 8)
10.3.1
Point setting
In the “Point setting” menu (submenu of “POINT” item) there are different parameters for
this detector. For the output setting, see chapter PART 8).
ADDRESS:
ZONE:
Point setting
►ADDRESS:
001-1
ZONE:
01
NAME: ROOM1
TYPE:
I/O MODULE
SECTION:
A-B
OUT OF SERVICE:
NO
FAULT:
NO
LED ON:
NO
INPUT: DISABLED
SINGLE CONSENSE: NO
SERIAL NUM:002-00001
SW VERSION:
2.00
Esc. Pre. Next Mod.
NAME:
TYPE:
SECTION:
O.OF SERVICE:
FAULT:
LED ON:
INPUT:
SING.CONSEN.:
SERIAL NUM:
SW VERSION:
10.3.2
the point and loop addresses (no mod.).
the zone address of the point loop (mod., range value
1-63).
the name of the point (mod.).
point type (no mod.).
the section where the point is (no mod.).
it indicates if the point is in out of service (mod. YES or
NO).
it indicates if the point is fault (no mod.).
if YES the led flash (mod. YES or NO).
the input is activeable like: TECHNOLOGICAL, FIRE
ALARM and BATH; (mod.).
it is used when the control panel is supervisory mode
and the zone of the point is enabled the "double
consent". If YES, when the module go to alarm status,
the control panel go to fire alarm too (mod.).
the serial number of the module (no mod.).
the software version of the module (it is changed
through PC).
Electrical schemes
LOOP CONNECTION:
+ LINE
+ LINE
- LINE
- LINE
OTPUT MODULE:
ELECTROMAGNETIC
POWER SUPPLY
24V
+ -
+ -
L - L + S L - L + NO C NC
RELAY
L - L + S L - L + NO C NC
LED
RELAY
LED
27K ohm
27K ohm
Page 59 of 70
Rev. 1.00
INPUT MODULE:
MAX. 1A on relay.
POWER SUPPLY
24V
+ -
NO
ALARM
NC
RELAY
L - L + S L - L + NO C NC
RELAY
Lamp
12V 3W
L - L + S L - L + NO C NC
12-24V
Automatic
RELAY
LED
NO
FAULT
NC RELAY
Lamp
12V 3W
+
-
LIGHT PANEL
LED
27K ohm
27K ohm
10.3.3
Connection of a smoke linear detector
+LINE
-LINE
L - L + S L - L + NO C NC
L - L + S L - L + NO C NC
Relay
Relay
LED
LED
27 Kohm
NC
NC
NO
NO
C
C
NO
NC
C
27 Kohm
NO
NC
C
Alarm
relay
Smoke
linear
detector
Fault
relay
Page 60 of 70
Rev. 1.00
10.4 LINE ISOLATOR MODULE
The UNI 9795 and EN 54-2 rules provide the maximum number of 32 points that can be out of
fault or error condition.
Therefore it is necessary to insert along loop of the isolator modules. So, in the case of
interruption of the loop, the control panel then will be able to communicate from both directions
(exit and return) without losing the communication with other elements installed by which are
not pertinent to the part interested from the two isolator modules.
10.4.1
Point setting
In the “Point setting” menu (submenu of “POINT” item) there are different parameters for
this detector. For the output setting, see chapter PART 8).
Point setting
►ADDRESS:
121-1
ZONE:
01
NAME: ISOLATOR 01
TYPE:
ISOLATOR
OUT OF SERVICE:
NO
FAULT:
NO
LED ON:
NO
INPUT: DISABLED
SINGLE CONSENSE: NO
SERIAL NUM:002-00001
SW VERSION:
2.00
Esc. Pre. Next Mod.
10.4.2
ADDRESS:
ZONE:
NAME:
TYPE:
O.OF SERVICE:
FAULT:
LED ON:
INPUT:
SING.CONSEN.:
SERIAL NUM:
SW VERSION:
the isolator and loop addresses (no mod.).
the zone address of the isolator loop (mod., range
value 1-63).
the name of the isolator (mod.).
point type (no mod.).
it indicates if the isolator is in out of service (mod. YES
or NO).
it indicates if the isolator is fault (no mod.).
if YES the led flash (mod. YES or NO).
it is not available.
it is not available.
the serial number of the isolator (no mod.).
the software version of the isolator (it is changed
through PC).
Electrical schemes
+LINE
-LINE
L - L + S L - L + NO C NC
Relay
LED
Jumper
Page 61 of 70
Rev. 1.00
PART 11
GENERIC ELECTRICAL SCHEMES
The following are some examples of connection between some control panels with points.
Connection between two control panels with RS485 serial port; utilization of a supervisor PC
through RS245 serial port; magnets, detectors and optical/acoustic lamps along a loop.
PC
MASTER
OC 4
SHI
OC 2
OC 1
OC 3
-S
SHI
-24
+S
+2 4
SHI
- 1B
+1B
- 1A
SHI
-2B
PS2
+1A
- +
FAU LT
-2A
RL2
+2B
RL1
+2A
SLAVE
Rs485
RS485
-
+
SIREN
5.6Kohm
3
1
5
MAGNET
50Kg
3
2
4
6
2
3
1
4
5
6
2
+
-
12-24Vdc
Automatic
1
4
5
6
S L+ L-
S
L+
L-
out
-
+
-
In
12-24Vdc
Automatic
BUTTON
REED
-
Power Supply
24V 2A
RS485
+
I/O MODULE
LED
RS232
SHI
-2A
+2A
+2B
SHI
-2B
+1A
- 1A
- 1B
+1B
PS2
-24
-S
SHI
+S
+24
SHI
OC 4
OC 1
OC 2
RL2
OC 3
RL1
- +
FAULT
-
Relè
L - L + S L - L + NO C NC
SLAVE
-
+
+
MAGNET
50Kg
- B1+
- B2+
- AUX +
FAULT
-
+ (30Vdc)
Page 62 of 70
Rev. 1.00
11.1 CONNECTION BEETWEN CONTROL PANELS AND PC (RS485)
RS485
-2A
+2A
-2A
+2A
SHI
+2B
-2B
+1A
SHI
- 1A
- 1B
+1B
PS2
-24
SHI
+24
-S
- +
FAULT
+S
SHI
OC 1
OC 2
OC 4
RL2
OC 3
RL1
SLAVE
Fs4
- B1+
Fs5
- B2+
FAULT
- AUX +
-
+ (30Vdc)
PC
MASTER
RS485
SHI
+2B
-2B
+1A
SHI
- 1A
- 1B
+1B
PS2
-24
SHI
+24
-S
- +
FAULT
+S
SHI
OC 1
OC 2
OC 4
RL2
OC 3
RL1
SLAVE
Fs4
- B1+
- B2+
Fs5
- AUX +
FAULT
-
+ (30Vdc)
With the RS485 serial port it is possible to connect maximum 64 control panels (slave), all of
them are controlled from a PC (master). The maximum length with RS485 is 1Km. Into the PC
must be installed the X-Advisor software to manage all the control panels.
Page 63 of 70
Rev. 1.00
11.2 CONTROL PANEL CONNECTION ON LAN
SWITCH
LAN
It is possible to make a control panel net with LAN connection. To connect a control panel with
the net, the user must use a MOXA module to interface the RS232 with LAN. Into the PC the
user must install the X-Advisor software and to set the software.
Page 64 of 70
Rev. 1.00
11.3 CONNECTION WITH REPEATER PANEL
Rs232
Rs232
Using the repeater panel it is possible to control one or two control panel with RS232 serial
port.
Page 65 of 70
Rev. 1.00
11.4 SIREN AND MAGNET CONNECTION WITH CONTROL PANEL
We remember that if the control panel has a 24Vdc output, it is limited in current. The user
must use an external power supply.
MAGNET
50Kg
+
-
+2A
SHI
-2A
-2B
+2B
+1A
SHI
-
- 1A
FAULT
- 1B
- AUX +
+1B
SHI
PS2
-24
+24
- B2+
-S
- +
FAULT
+S
- B1+
SHI
OC 1
OC 4
OC 3
RL2
OC 2
RL1
+ (30Vdc)
Page 66 of 70
Rev. 1.00
11.5 SOME CONNECTION POINTS
3
3
2
1
4
5
1
4
5
6
3
2
2
1
4
6
5
6
S L+L-
S
L+
L-
out
-
In
BUTTON
+
-
REED
24Vdc 2A
I/O MODULE
LED
L + S L - L +NO C NC
12-24V
Power Supply
+2A
SHI
-2A
-2B
+2B
+1A
SHI
- 1A
- 1B
PS2
+1B
-24
SHI
+24
-S
- +
FAULT
+S
SHI
OC 1
OC 2
OC 4
RL2
OC 3
RL1
Page 67 of 70
Rev. 1.00
11.6 CONNECTION BETWEEN I/O MODULE AND AUXILIARY POWER
SUPPLY
C NC
+
-
I/O MODULE
LED
L + S L - L +N
O
MAGNET
50Kg
24V 2A
Power Supply
+
+2A
SHI
-2A
+2B
-2B
+1A
SHI
- 1A
- 1B
PS2
+1B
-24
SHI
+24
-S
- +
FAULT
+S
SHI
OC 1
OC 2
OC 4
RL2
OC 3
RL1
-
Page 68 of 70
Rev. 1.00
PART 12
HOW TO SOLVE THE PROBLEMS
Problem
Cause
1.
System fault
LOOP OVERLOAD
DOUBLE ADDRESS
S.C.AFTER ISOLATOR
x-L
LOOP SECT. S.C. xy-L
-L/+L
L
SHORT
±L/SHI
L
CIRC.
SHORT
CIR.
±L INTERRUPT. L
BATTERY/FUSE FAULT
POWER
MISSING
SUPPLY
It usually appears for the first
installation.
One of the two microprocessors
does not work properly.
Solution
1.
Press the resetting key on the motherboard
and type in the requested level code. The
2.
control panel will start up again without losing
the made programming. The loops are put in
out of service. If the correct level code is not
typed in, the system fault will continue to exist.
2. Control panel under repair.
Properly uninstalled points have been Remove the last installed points.
inserted in the loop.
There are two or more elements with Their elements flash. It is necessary to remove them
the same address in one loop.
from the loop physically and such a point from the
control panel. Afterwards it is necessary to zero the
removed points (refer to the element manual for the
procedure of the address zeroing) and install them
again.
In the loop a short circuit and a cut off The fault message points out the loop where the
on the line +LOOP or –LOOP is problem has appeared (L = 1, .., 4) and the
isolator/side-control panel where there has been the
present.
1. If the line +L is aborted, one of short circuit (x = A, B, 121, .., 127).
the two cut off ends short- If x=A and L=2, the short circuit will be on the side a
of the loop 2.
circuits itself with the –L.
2. A loop thin cable might have If x=123 and L=1, the short circuit will be either
come off the clip and the thin before or after the isolator with address 123 of the
cable has short-circuited itself loop 1.
with the other one.
Once the starting point from where to begin the fault
research has been identified, the loop will have to be
put in out of service and to be disconnected from the
control panel. Search for the short circuit along the
line with the tester and afterwards the line cut
resetting the fault.
In the loop a short circuit is present The fault message points out the loop (L = 1, .., 4)
between +L and –L in the section and the section where the short circuit (x = A, B, 121,
pointed out by the line isolators x and .., 127) is present.
y.
If x=A, y=121 and L=2, the short circuit will be on the
side A of the loop 2 and the isolator 121.
If x=123, y=124 and L=1, the short circuit will be
between the isolator 123 and 124 of the loop 1.
Once the section interested by the short circuit has
been identified, the loop will have to be put in out of
service and to be disconnected from the control
panel. Search for the short circuit along the line with
the tester, resetting therefore the fault.
In the loop L (L = 1, .., 4) a short circuit Put the loop in out of service (if it has not already set
has taken place between the line and up by the control panel) and disconnect the loop from
the shielded generic mistake.
the control panel. Search for the short circuit along
the line with the tester, resetting therefore the fault.
In the loop L (L = 1, .., 4) a short circuit Put the loop in out of service (if it has not already set
between the line (+L or –L) and the up by the control panel) and disconnect the loop from
shielded has taken place.
the control panel. Search for the short circuit along
the line with the tester, resetting therefore the fault.
In the loop L (L = 1, .., 4) an Put the loop in out of service (if it has not already set
interruption has taken place along the up by the control panel) and disconnect it from the
positive line (+L) or negative (-L).
control panel. Search for the interruption along the
line with the tester, resetting there fore the fault.
1. The fuse related to the batteries 1. Check the fuse related to the batteries.
has broken down.
2. Check the batteries.
2. the batteries are disconnected.
3. Check the batteries.
3. the batteries have broken down.
1. Power supply missing.
1. Check the connection to the power supply
2. power supply broken fuse.
220V network of the control panel.
3. broken power supplier 30V.
2. Check the fuse of the power supply block.
3. Check the voltage presence on the output
cables of the power supply block.
Page 69 of 70
Rev. 1.00
LOW DC POWER
Problems to the power supply circuit.
BAT. CHARGER FAULT
Wrong connection of batteries.
Check the connections between the power supply
block and the control panel motherboard.
Check the voltages between the clip – and the clips +
and FAULT; the voltage must be of 30V. if the
measured voltage is lower, take the voltage back to
30V acting on the trimmer placed on the power
supply block.
Check that the two batteries are installed properly
(in series and between –B1 and +B2).
Page 70 of 70
Rev. 1.00