1
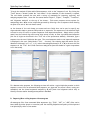
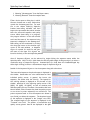
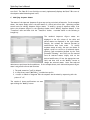
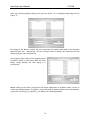
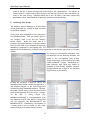
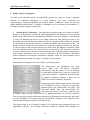
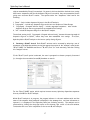
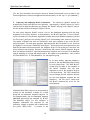
User’s Manual XplorSeq™ ©2000-2008 Daniel N. Frank, Ph.D. v1.0 XplorSeq User’s Manual 7/11/08 ***I apologize that this manual is a bit outdated. Efforts to expand XplorSeq’s capabilities and fix bugs have taken precedence rather than working on this manual. Although the lookand-feel of XplorSeq may differ somewhat from the pictures in this manual, the general workflow has not changed.*** TABLE OF CONTENTS I. Introduction: What is XplorSeq™? II. Copyright Notice III. System Requirements and Installation IV. TUTORIAL: XplorSeq Basics A. Getting Started B. Importing/Base-calling Sequence Chromatograms C. Modifying Sequence Names D. Grouping Sequence Runs 1. Grouping by Sequence Object Name 2. Grouping Selected Sequence Objects 3. Forcing Single Sequence Objects into Clone Groups E. Assembling Clone Groups F. BLAST Analysis of Sequences 1. Setting BLAST Preferences 2. Initiating a BLAST Search 3. Importing and Displaying BLAST Information G. Importing Phylogenetic Information H. Multiple Sequence Alignment I. Creating a Sequin Script. 1. Customizing Output 2. Exporting a Script. J. Exporting a Cluster Table 1. Vertical Sort Options. 2. Horizontal Sort Options. 3. Include Sequences. 4. Data Format. K. Automating analysis from Phred to BLAST L. Automating analysis from Phrap to BLAST V. SUMMARY OF COMMANDS A. Import Data. 1. Chromatogram. 2. PHD. 3. Contig. 4. BLAST. 5. FastA. 6. XplorSeq Library. 7. Lineage Info (Entrez/GenBank). B. Export Data. 2 XplorSeq User’s Manual 7/11/08 1. Phrap (FastA + Qual) 2. GenBank. 3. FastA. 4. BLAST Info. 5. Cluster Table. 6. Quality Scores 7. BLAST Accession #’s. 8. Sequin Script. 9. BLAST database. C. Analyze Data. 1. Basecall -> BLAST 2. Contig -> BLAST 3. Basecall. 4. Contig 5. BLAST NCBI. 6. BLAST Local. 7. Get Lineage Info. 8. Align. D. Transform Functions. 1. Modify Sequence Names. 2. Edit RFLPs. 3. Group. 4. UnGroup. 5. Clean. 6. Sort. 7. Set Oligos. 8. Trim/UnTrim. E. Analyze Alignment Functions. 1. OTU Clusterting. 2. Clearcut NJ Tree. 3. Phylip distance matrix 4. Phylip NJ/UPGMA Tree 5. Phylip seqboot. 6. Phylip consense. 7. RAxML. VI. References: Projects that have used XplorSeq VII. License 3 XplorSeq User’s Manual 7/11/08 I. Introduction: What is XplorSeq™? XplorSeq™ is a graphical user interface (GUI) based application that provides a set of tools for the analysis of nucleic-acid sequences. With XplorSeq, a user can perform many basic steps in DNA sequence – such as chromatogram import from automated DNA sequencers, base-calling, contig assembly, BLAST search, multiple sequence alignment, phylogenetics and much more. Many of the sequence analysis tools incorporated into XplorSeq are standalone, Unix/Linux-based programs that were developed by other research groups or myself. XplorSeq integrates these applications and provides a graphical interface for seamless workflow through the sequence analysis process. With XplorSeq, multiple clones can be analyzed in batch with the resulting data stored in a single document, thus eliminating the need for a user to be able to operate special computer scripts or to know the Unix command line. Additionally, the use of a document-based architecture allows the user to easily add and remove sequences from a project as necessary. Although XplorSeq was developed in order to expedite the phylogenetic analysis of ribosomal RNA (rRNA) gene libraries, it should prove useful to any sequencing project, particularly ones in which multiple clones must be analyzed in parallel. The current version of XplorSeq incorporates the following programs: 1. phred and ttuner – base-callers for chromatograms obtained from a variety of automated DNA sequencers (e.g. MegaBACE, LICOR, ABI). 2. phrap and TIGR_Assembler – contig assemblers. 3. blastcl3 and blastall – NCBI’s engines for homology searches against sequence databases. 4. formatdb – NCBI’s program to create BLAST searchable databases. 5. idfetch – provides access to NCBI’s databases. 6. clustalW – for construction of multiple sequence alignment. 7. clearcut and phylip neighbor – neighbor-joining tree calculation. 8. dnadist – phylip’s distance matrix calculation. 9. seqboot – phylip’s program for bootstrapping alignments. 10. consense – phylip’s program to build consensus trees. 11. sortx – fast clustering of OTUs. 12. biodiv – bootstrapped rarefaction of common OTU richness and diveristy measures. Any Unix/Linux program for DNA sequence analysis that can be ported to Mac OSX can be readily incorporated into XplorSeq. We welcome any suggestions for the addition of other modules to the XplorSeq package. II. Copyright Notice Official: XplorSeq™ and all code (other than third party executables) and images within the XplorSeq package are trademarked and copyright 2000-2008 by Daniel N. Frank. This version of XplorSeq is available free of charge to academic researchers performing not-for-profit work. For all other uses, contact [email protected]. Users agree not to distribute XplorSeq without the explicit permission of Daniel N. Frank. See section VI for full license agreement. 4 XplorSeq User’s Manual 7/11/08 Unofficial: Users are strongly encouraged to reference this software in their publications. I’d also appreciate receiving notice of these publications. III. System Requirements and Installation XplorSeq works on Macintosh computers that run the OS X operating system (OS 10.4 or later); both Intel and PowerPC microprocessors are supported. To fully implement XplorSeq, two auxiliary, third-party applications must be obtained and installed. Phred (base-calling) and phrap (contig assembly) may be obtained from Dr. Phil Green (www.phrap.org). Currently, these programs are available free of charge to academic researchers doing non-commercial work. Phred and phrap are provided as source code, with makefiles, that can be compiled with freely available compilers (Apple’s version of gcc can be found at www.apple.com or as part of the Xcode tools provided with the OS 10.x install discs). The user or system administrator can install phred and phrap wherever is appropriate. Once installed, the user should follow these steps to let XplorSeq know where to find the executables: 1. Open XplorSeq by double-clicking the application icon (or a document icon). 2. Select the “Preferences…” menu item in the “XplorSeq” menu, which opens the Preferences window. 3. Click on the “Paths” tab. 4. Type the full path name to the phred and phrap executables in the appropriate text fields. For instance, if the phred executable is stored in a directory named /usr/local/PhredDir, type /usr/local/PhredDir/phred into the phred path field. Check with a Unix guru or system administrator if these directions are confusing. 5. Click on the “O.K.” button to store the settings. Other software tools (i.e. blastcl3, blastall, formatdb, idfetch) that are included in the XplorSeq package, are freely available for non-commercial distribution, under a variety of open source licenses. For local, standalone BLAST analysis, databases can either be downloaded from NCBI (www.ncbi.nlm.nih.gov) or created with the NCBI tool formatdb (by use of either XplorSeq or the command line). As with the phred and phrap installations, the user can set the path to a default BLAST database in the Preferences window (open by selecting the “XplorSeq Preferences…” menu item; see above). Either type the path into the text field or click on the “Choose” button to the right of the text field to bring up a dialog box. If a database is available elsewhere on a network, XplorSeq can automatically download it if the “URL for Database Download” text field is filled in. 5 XplorSeq User’s Manual 7/11/08 IV. TUTORIAL: XplorSeq Basics A. Getting Started Please read section “III. System Requirements and Installation” for specific installation instructions. To open XplorSeq, simply double-click on the application icon or a document icon . A newly created XplorSeq document window will appear (this window will henceforth be referred to as the XplorSeq window). Click on the “Project Info” and “Sequences” tabs to toggle between pages displayed in this window. For example, under the “Project Info” tab the user can provide projectspecific details by filling in any (or none) of the text fields: 6 XplorSeq User’s Manual 7/11/08 To begin the analysis of DNA and/or RNA sequences, click on the “Sequences” tab. By clicking the “Tools” button, a drawer (called the “tool drawer” in the remainder of this document) is opened. The tool drawer presents the user with a variety of commands for importing, exporting, and analyzing sequence data. Note the five menus labeled “Import”, “Export”, “Analysis”, “Transform”, and “Alignment Analysis” at the top of the drawer. Each menu presents various options for manipulating data. Most action in XplorSeq proceeds by selecting a set of sequences then choosing an option from one of the tool drawer menus. At the bottom of the tool drawer are menus and text fields that can be used to specify any oligonucleotides used to generate PCR products or sequences. The sequences of the selected oligos are used to trim off vector or primer sequences from imported sequences. Simply select a primer name from the forward oligo and reverse oligo menus in order to enter a predetermined sequence (the list of oligos can be edited in the “Trim” tab of the preferences window). Otherwise, type a sequence into the text field below the menu. The actual sequence used to trim imported sequences is displayed in the text fields labeled “Trim”. Currently, the trimming algorithm works only for Watson-Crick bases (i.e. G, A, T, U, C), rather than ambiguous bases (ie. R, Y, M) so be sure that the sequences in the “Trim” text fields contain no ambiguities (searches based on regular expressions are in the works). For demonstration purposes, the following sections will outline a typical XplorSeq session in which sequence traces from an automated DNA sequencer are imported for several clones, contigs are assembled, and the cloned sequences analyzed by BLAST (basic local alignment search tool) to identify the most similar homologous sequences in GenBank. B. Importing/Base-calling Sequence Chromatograms Chromatogram files from automated DNA sequencers (e.g. “.ESD”, “.SCF”, or “.ABI”) files can be base-called (by either phred or tracetuner) and the resulting sequences and quality scores imported into XplorSeq by either of two means: 7 XplorSeq User’s Manual 7/11/08 1. Choosing “Chromatogram” from the Import menu. 2. Choosing “Basecall” from the Analysis menu. Either choice opens a dialog box in which the user chooses one or more folders that contain the chromatogram files. For each file in the chosen folder(s), XplorSeq invokes base-calling software and then imports the processed data, which includes both the extracted sequence and quality scores. While base-caling is in progress, the progess indicator in the main window twirls and the name of the sequence being imported is displayed in the message box. Base-calling can be terminated by clicking the Stop sign button at the bottom right corner of the main window. A Sequence Object is created for each file and given the name of the input file; objects are listed in the body of the main XplorSeq window Sets of Sequence Objects can be selected by single-clicking the sequence names within the XplorSeq table. Shift-click (i.e. hold down the shift key while single-clicking an object) to select a continuous range of Sequence Objects. Command-shift (i.e. hold down the Command/Apple key while single-clicking) to select a discontinuous range of Sequence Objects Double click a Sequence Object to view its sequence along with other data: The base-called sequence that phred output is displayed in the window. Nucleotides are color-coded based on their individual quality scores; in general, the better the sequence, the darker blue the coloring. The legend for the coloring scheme is displayed at the bottom of the window: swatches of color depicting quality scores of 20 (Q20), 30 (Q30), 40 (Q40), as well as minimum and maximum quality scores, are shown. Nucleotides that have been trimmed, either because they have low quality scores or are vector or primer sequences, are colored red. The primer sequences used to trim the sequence are shown in text fields just below the sequence. The absolute length of the sequence is displayed in the “Length” text field. The trimmed length of the sequence is displayed in the “Trimmed” text field. The number of nucleotides with quality scores greater than 20 are displayed in the Q20 8 XplorSeq User’s Manual 7/11/08 text field. The “Max. Bit” text field (not currently implemented) displays the BLAST Bit score of the sequence when blasted against itself. C. Modifying Sequence Names The names of the imported Sequence Objects may not be particularly informative. In the examples shown, the names simply reflect the well names of a 96-wll microtiter dish. XplorSeq provides several tools for editing Sequence Object names. To modify a group of sequence names, first select the Sequence Objects in the XplorSeq window, select “Modify Sequence Names” in the “Transform” menu and then click the “Transform” button. A window similar to the following is brought up: The unedited Sequence Object names are displayed in the left column of the table and edited names are displayed in the right column. Initially, the columns are identical because no modifications have been made. To modify sequence names in batch, the user can choose to append a prefix or suffix to all selected names. Similarly, path extensions (defined by the “Path Extension Following:” text field) can be removed from all selected names. Simply click on the desired modification, fill out the appropriate text field, and then click on the “Modify” button to change the selected names. Note that selected deletions are performed before additions. In the example shown, each selected Sequence Object name is subjected to three modifications: 1. The path extension (“.esd”) is deleted. 2. A clone library name (“MS138A1_”) is added as a prefix. 3. A suffix is added to designate that the sequence was obtained by sequencing with the primer t3 “.t3”. The results of these modifications are seen upon clicking the “Modify” button: 9 XplorSeq User’s Manual 7/11/08 Next, the remaining Sequence Objects are given the suffix “.t3” to designate sequencing with the primer T7: By clicking on the “Revert” button, the user can discard any modifications made to the sequence name and start over. Alternatively, click the “Accept” button to dismiss the window and set the Sequence Object name modifications. Any Sequence Object name can be manually edited by double clicking its table entry under the “New Name” column heading and then typing in a modification: Manual editing can be used in conjunction with batch replacement of sequence names in order to create more complex names. For instance, a selected group of sequence names can be replaced with a particular text string (e.g. “DNF123_”) as shown in the following example: 10 XplorSeq User’s Manual 7/11/08 Once this modification is made, entries can be further modified individually by manual editing. Finally, click on either the “Accept” button to save name changes or the “Cancel” button to leave the sequence names unaltered. D. Grouping Sequence Reads Typically, users import multiple sequence chromatograms for a particular clone. Following re-naming (if necessary), the next step is to group these Sequence Objects together, so that XplorSeq understands which sequencing runs belong to a particular clone. Sequence objects can be grouped either by comparing their names or by selecting a set of Sequence Objects. In either case, grouping is initiated by clicking the “Group” option within the “Transform” menu. 1. Grouping by Sequence Object Name. If Sequence Object names are chosen in a welldefined manner, then sequences that belong to a particular clone often can be grouped by inspection and comparison of these names. The “First N Characters”, “Last N Characters”, “Chars Preceding”, and “Chars Following” options in the “Group” dialog box allow the specification of simple rules for defining how to group Sequence Objects based on their names. In the working example, the names of sequence runs from the same clone are identical, except for their path extensions. Furthermore, each clone can be uniquely specified by the first eleven characters of each Sequence Object name. For example, the Sequence Objects MS138A1_A01.T3 and MS138A1_A01.T7 are two sequence runs from the clone MS138A1_A01. A simple rule can therefore be used to group Sequence Objects into Clone Groups: compare the first 11 characters of sequence name #1 to the first 11 characters of sequence name #2 and, if all characters are identical, cluster the two Sequence Objects into the same Clone Group. Thus, by selecting the “First N Characters” option, typing “11” in the adjacent text field, and 11 XplorSeq User’s Manual 7/11/08 clicking the “O.K.” button the Sequence Objects will be grouped based on this rule. The results obtained are as follows: The Sequence Objects now are clustered into “Clone Groups”, which are given names based on the rule (e.g. First 11 characters) by which the groups were derived. In some instances single Sequence Objects are the only representatives of their Clone Groups; usually this means that one of the sequencing runs failed and so its “.esd” file was not available for grouping. The “Last N Characters”, “Chars Preceding”, and “Chars Following” options provide similar means for grouping Sequence Objects based on commonalities between sub-strings within names. “Last N Characters” compares the final N characters in the names. “Chars Preceding” deletes any characters following the character set in the adjacent text field before comparing name strings. For instance, path extensions can be excluded by setting the character to “.”. If the designated character is not found in the name then the entire string is used in grouping objects. Similarly, “Chars Following” examines only the sub-strings that follow the character set in the adjacent text field. The contents of a Clone Group can be inspected by clicking the disclosure triangle to the left of the Clone Group name. As for ungrouped Sequence Objects, one can access information specific to a given Sequence Object, such as its sequence by double clicking the Sequence Object name. 12 XplorSeq User’s Manual 2. Grouping Selected Sequence Objects. Group: 7/11/08 To force a set of Sequence Objects into a Clone 1. Select the appropriate objects in the XplorSeq window. 2. Select the “Group” option in the “Transform” menu and click the “Transform” button to bring up the Group dialog box. 3. Click the “Create One Group” button. 4. Click the “O.K.” button. XplorSeq then prompts the user for the name of the new Clone Group. Either select “Cancel” or fill in the text field and select “O.K.”. The selected Sequence Objects are then clustered into a Clone Group with the specified name. Note that new groups are added to the Botttom of the list of sequence and clone objects. 3. Forcing Single Sequence Objects into Clone Groups. Any ungrouped Sequence Object can be “forced” into its own Clone Group by selecting the “Force Singlets” option in the “Group” dialog box (select the “Group” option in the “Transform” menu and then click the “Transform” 13 XplorSeq User’s Manual 7/11/08 button). A Clone Group is then created, using the name of the Sequence Object, and the Sequence Object is inserted into the new group. Why force the issue? Clone groups can store several pieces of information that are not part of the Sequence Object data structure (see following section). By creating a Clone Group for a single Sequence Object the user can utilize the Clone Group-specific data. 4. Inspecting Clone Group Specific Information. Double-clicking the name of a Clone Group in the XplorSeq window brings up the following window, which summarizes some of the data associated with a Clone Group. Most of the information that is displayed in this window relates to BLAST search results and so a more complete discussion of BLAST related items is presented in the sections of this manual that detail BLAST analyses (sections F and G). Data in the top section of the window is independent of BLAST. The text field labeled “Sequence Obs.” lists the number of Sequence Objects that are clustered in the Clone Group. The other two text fields, labeled “Clone Type” and “#Clones” are useful if the sequenced clone is a representative of other clones in a library. For instance, a clone library may be screened in some manner (i.e. by a restriction fragment length polymorphism [RFLP] assay) in order to identify like and unlike clones; only a few representatives of a set of like clones are then sequenced. The “Clone Type” text field can be filled in with an identifier that specifies a set of like clones. The “# Clones” text field can store an integer that specifies the number of 14 XplorSeq User’s Manual 7/11/08 clones in the set, of which the sequenced Clone Group is the representative. The default “# Clones” value for a newly created Clone Group is one, indicating that the clone represents only itself in the clone library. XplorSeq makes use of the “# Clones” field when constructing spreadsheet tables that summarize an XplorSeq document’s data (see below). E. Assembling Clone Groups The Sequence Objects belonging to a Clone Group can be assembled into contigs through execution of the Phrap command. Clone groups to be assembled are first selected in the XplorSeq window. Then, the “Phrap” option in the “Analyze” menu is set and the “Analyze” button clicked. While the phrap task is in progress, the progess indicator in the main window twirls and the name of the Sequence Group being assembled is displayed in the message box. The analysis can be terminated by clicking the Stop sign button at the bottom right corner of the main window. As contigs are successfully assembled, they are imported into the XplorSeq document and added to the corresponding Clone Groups. Those Clone Groups to which contigs have been added are labeled “+ Contig”. The absence of a label indicates that Phrap was unable to assemble a Clone Group’s Sequence Objects, perhaps because one or more of the Sequence Objects were of poor quality. Clicking the disclosure triangle of one of the assembled Clone Groups reveals the addition of a new Sequence Object to the Clone Group that contains the phrap-assembled sequence. Typically, the newly created contig is given the name of the Clone Group appended with the suffix “.Contig1”. To the user, a Contig Object (e.g. MS138A1.A01.Contig1) is indistinguishable from the Sequence Objects from which it was derived (e.g. the sequence runs MS138A1.A01.T7 and MS138A1.A01.T3). Consequently, the sequence of a Contig Object can be viewed as with other Sequence Objects by double clicking its name. 15 XplorSeq User’s Manual 7/11/08 F. BLAST Analysis of Sequences The Basic Local Alignment Search Tool (BLAST®) provides the means to search a sequence database for sequences homologous to a query sequence (for more information see ncbi.nlm.nih.gov). XplorSeq implements two forms of BLAST: 1) BlastCl3, a client for searching NCBI’s GenBank database and 2) BlastAll, a standalone tool for searching local databases (i.e. residing on the same computer as XplorSeq). 1. Setting BLAST Preferences. Two XplorSeq preference panels are relevant to BLAST searches. As described in section III, System Requirements and Installation, use of the local BLAST option requires that a local database be installed on the user’s computer. A default path to this local database may be set in the “Paths” preference panel (setting the path is not absolutely required, since XplorSeq allows selection of a database when local blast is initiated). At the bottom of this preference panel is a check-box labeled “Save Intermediate Files“. The default setting is to leave this box unselected. In this case, XplorSeq discards the files that are sent as input to, and received as output from, BLAST once the analysis is completed. These files are transiently stored in the “/tmp” directory. Alternatively, if the check-box is selected, the user is prompted for a location to save output files, prior to BLAST analysis. Regardless of where BLAST intermediate files are stored, if XplorSeq or BLAST execution is terminated before completion of the analysis, information in a BLAST output file can be imported into an XplorSeq document through the “Import” command in the tool drawer. Additional BLAST options are set in the “BLAST” preference panel: The “Descriptions” and “Alignments” text fields control output from the BLAST executable. “Descriptions” sets the number of one line homology hit descriptions (“BLAST hits”) that are returned for a given query sequence. “Alignments” sets the number of sequence alignments between a query and its BLAST hits that are included in the output. XplorSeq parses the BLAST output file and reads data for each BLAST hit that is returned for each query sequence (set by the “Descriptions” text field). The check-box labeled “Save only Best BLAST Hit” determines how much of this data is imported from the BLAST output file and incorporated into an XplorSeq document. If this box is selected, then for each query sequence XplorSeq retains only the information associated with the BLAST hit with the highest bit score (see below for more details). Otherwise, if the check box is not selected XplorSeq imports data from each BLAST hit. The options listed in the “Include in Analysis” box determine which Sequence Objects are dispatched to BLAST. The “Contigs” check-box includes or excludes Contig Objects (i.e. 16 XplorSeq User’s Manual 7/11/08 objects assembled by Phrap) from analysis. In general, this box should be checked since contigs have better sequences than do the Sequence Objects from which they were assembled, hence giving more accurate BLAST results. The options under the “Sequences” label control the following: 1. “None” – Don’t include Sequence Objects in the BLAST analysis. 2. “Ungrouped” – include only Sequence Objects that are not members of Clone Groups. 3. “Ungrouped + Grouped without Contig” – include ungrouped sequences. Also include Sequence Objects that are grouped but not assembled into contigs. 4. “All” – include all Sequence Objects in the BLAST analysis. The default setting is # 3, “Ungrouped + Grouped without Contig”, because this setting sends all Sequence Objects to BLAST, unless they have been assembled into contigs. In effect, XplorSeq defers BLAST analysis to the better quality Contig Objects. 2. Initiating a BLAST Search. Both BLAST variants can be accessed by selecting a set of sequences in the XplorSeq window, setting the appropriate option in the “Analyze” menu (either “BLAST NCBI” for GenBank searches or “BLAST Local” for local searches), and then clicking the “Analyze” button. If the “BLAST Local” option is selected, the user is prompted to choose a properly formatted (i.e. throught the executable formatDB) database to search: For the “BLAST NCBI” option, which requires internet access, XplorSeq dispatches sequences directly to NCBI for BLAST analysis. While BLAST analysis is in progress, the progess indicator in the main window twirls and the name of the sequence being analyzed is displayed in the message box. As blast information is imported, it is displayed in the XplorSeq table (see following section). The analysis can be terminated by clicking the Stop sign button at the bottom right corner of the main window. Termination will occur after completion of the current BLAST analysis. 17 XplorSeq User’s Manual 7/11/08 [For the Unix aficionado, the execution status of blastCl3 and blastall can be tracked in the terminal application, found in the Applications/Utilities folder, via the “top” or “ps” commands.] 3. Importing and Displaying BLAST Information. The results of a BLAST analysis are automatically parsed and imported into XplorSeq. Alternatively, a BLAST output file can be imported into an XplorSeq document by choosing the “BLAST” setting in the “Import” menu of the tool drawer and then clicking the “Import” button. For each query sequence, BLAST returns a list of the databased sequences with the best alignments to the query sequence, as determined by the BLAST algorithm. In brief, BLAST scores the quality of the pairwise alignments between query and database sequences (termed the “Bit Score”) and lists the resulting “BLAST hits” in descending order, based on this score. The number of BLAST hits that are returned for each query sequence is set in the “BLAST” preference panel. For each query sequence, XplorSeq parses the first BLAST hit (i.e. that with the highest bit score) into a “BlastInfo” data object. These objects are then imported into the XplorSeq document and clustered with the Sequence Object or Contig Object from which the query sequence was obtained. Because a Clone Group may contain several Sequence Objects that are analyzed by BLAST, XplorSeq automatically compares the bit scores of all BlastInfo objects belonging to a group and keeps track of the highest scoring BlastInfo – this is called the “Best BLAST Hit”, or “Best BlastInfo”, for the sequence group. In its main window, XplorSeq displays a portion of the best BlastInfo object’s data for each Clone Group. The “Best BLAST” column lists the name of the sequence in the BLAST database with the best alignment to one of the Sequence Objects in the Clone Group. The “%ID” column lists the percentage pairwise sequence identity for the local alignment between the two sequences. The “Bit Score” column lists the BLAST calculated bit score for the two sequences. Individual BLASTInfo objects can be perused by clicking on the disclosure triangles of a Clone Group and its constituent Sequence Objects. In the example shown, only the assembled sequence (MS138A1_A01.contig) was analyzed by BLAST. The BlastInfo object for this sequence is displayed underneath the sequence (if the disclosure triangle is opened) and is labeled with the prefix “Blast Info:”. A portion of the 18 XplorSeq User’s Manual 7/11/08 BlastInfo object’s data also is displayed in the “%ID”, “Bit Score”, and “Best BLAST” columns. This BlastInfo object is the “Best BLAST Hit” for its Clone Group, so the information in these columns is identical to that displayed for the Clone Group MS138A1_A01. More detailed information for a particular BlastInfo object can be seen by doubleclicking its entry in the XplorSeq table (This information also can be accessed for the best BlastInfo object by clicking the name of a Clone Group). The window that arises presents several text fields with information parsed from the BLAST output file. The “Query” text field names the sequence that was sent to BLAST. The date in which the BLAST analysis was started is presented in the “Date” field. The “Species” field records the source of the databased sequence with the best match to the query sequence, as measured by the BLAST bit score (shown in the “Bit Score” field). The accession number of this sequence is stored in the “Accession” field. The field “Blast %ID” displays the percentage sequence identity between the locally aligned query sequence and the sequence identified in the “Species” field. The expectation value, which measures the statistical significance of the BLAST hit (lower is better), is shown in the “Expect” field. The “Identities” field records the absolute number of sequence identities and extent of the local alignment between the query sequence and its best match. (The “% Max. Bit” field is not currently implemented.) The remainder of the fields, which can store phylogenetic information about the BlastInfo object, will be discussed in the following section. G. Importing Phylogenetic Information The data that BLAST outputs contains a ton of useful information. Unfortunately though, this information does not include any phylogenetic description of a BLAST hit’s sequence, such as that included in the GenBank record of a sequence. Because many BLAST hits are of “Uncultured” or “Uncultivated” organisms, the phylogenetic description can provide additional characterization of the BLAST hit. The phylogenetic lineage of a species belonging to a BlastInfo object can be imported into XplorSeq by the following: 1. Select the sequence or group objects for which you want to import phylogenetic lineages. 2. Choose the “Get Lineage Info” option from the “Analyze” menu. 3. Click the “Analyze” button. Behind the scenes, XplorSeq downloads a GenBank record for each BLAST hit, parses out the lineage information, and pushes the data into the appropriate 19 XplorSeq User’s Manual 7/11/08 BlastInfo objects. To view and/or edit this information, click on the name of a BlastInfo object, to bring up a window that displays its data. The phylogenetic lineage, as input from the GenBank file, is displayed in the “Lineage” text field. In this example, the Actinomyces sp. (listed in the “Species” field) was classified as a Bacteria belonging to the group Actinobacteria. Note also that the “Domain” of the species was set to “Bacteria”, based on the first entry in the “Lineage” field. Other species may have more elaborate phylogenetic classifications that have little relevance to the query sequence if it is not highly related to the BLAST hit sequence. In this case, the user can manually edit the “Lineage” field or select a phylogenetic group listed in the adjacent menu to more accurately reflect the assumed phylogeny of the query sequence. Changes made through the “Lineage” menu may also affect the “Domain” setting. Choose either “Accept” to alter the information in the BlastInfo object or “Revert” to discard changes. H. Multiple Sequence Alignment The sequences in an XplorSeq document can be aligned to one another through use of the program Clustal. To create an alignment, select a set of Clone Groups in the XplorSeq window, set the “Analyze” menu to “Clustal”, and click on the “Analyze” button. A dialog box then prompts the user to set options for Clustal. The upper group of buttons determines whether to include contigs (i.e. phrap-assembled sequences), sequences, or contigs and sequences in the analysis. Clicking the “Align to Self” button will create a multiple sequence alignment consisting solely of the selected sequences. Alternatively, the selected sequences can be added to an existing multiple sequence alignment (i.e. a “Profile” alignment in clustal-parlance) by first choosing the “Align to Database” option and then clicking the “Choose” button to select a previously aligned set of sequences. Once the desired settings are selected, click on the “Align” button to initiate the analysis. XplorSeq will then prompt the user to select a name and directory location for the soon-to-be created alignment file. XplorSeq currently does not have the ability to display or store the results of the clustal alignment file, which can instead be opened in a text editor. I. Creating a Sequin Script. Once a set of sequences are assembled, analyzed, and hopefully published, they should be deposited into the GenBank database, so that other researchers may access this data. NCBI provides a computer program called “Sequin” that facilitates the annotation of sequences in the proper format for GenBank submission. Sequin presents the user with several forms that are used to describe the type and source of a nucleotide or protein sequence. Sequin can be automated to an extent by providing some of the requisite information in a file along with a corresponding sequence – most of this information relates to the phylogenetic lineage data that can be imported into a BlastInfo object (see section G, Importing Phylogenetic Information, for details). XplorSeq can export such a Sequin script for any or all of the sequences in a document. 20 XplorSeq User’s Manual 7/11/08 1. Customizing Output A Sequin script consists, basically, of a FastA formatted sequence file in which additional information that describes the organism, clone name, phylogenetic lineage etc., is embedded in the nucleotide definition line. XplorSeq writes this data, along with a nucleotide sequence, to a Sequin script in the proper format for input into Sequin. What data to include in the script, and how to format the data, are specified in the “Sequin” preferences panel. XplorSeq can embed data for the GenBank lines labeled “Locus”, “Organism”, “Lineage”, “Clone”, “Definition”, and “Note”. The “Sequin” preference panel establishes a grammar for specifying how data in an XplorSeq document should be included in a Sequin script. Listed at the bottom of the “Sequin” preference panel are a set of tokens that refer to specific pieces of data in an XplorSeq document. When writing a Sequin script, XplorSeq will replace these tokens with strings that represent the appropriate bits of data from the Sequence Object being exported. For instance, the token “[clone]” is replaced with the name of the sequence or Contig Object that is exported. In the example shown, the name of the particular sequence that is being exported will be included in the “Locus”, “Clone”, and “Definition” fields. However, the user may include any of these tokens in the provided text fields in order to specify how XplorSeq data is to be included in the Sequin script. 2. Exporting a Script. To write a Sequin script to file, select the desired Clone Groups or individual sequences in the XplorSeq window, set the “Export” menu to “Sequin Script”, and click on the “Export” button. XplorSeq raises a window in which the user can select which type(s) of Sequence Objects to export to a Sequin script file. The “Contigs” check-box toggles whether to include selected Contig Objects (phrap assembled sequences) in the export. The buttons listed under the label “Sequences” determine which Sequence Objects to export. These buttons export the following sets of Sequence Objects: 1. “None” – no Sequence Objects are exported. 2. “Ungrouped” – only selected Sequence Objects that are not associated with Clone Groups are 21 XplorSeq User’s Manual 7/11/08 exported. 3. “Ungrouped + Grouped without Contig” -- selected Sequence Objects not associated with Clone Groups are exported. Also, any selected Sequence Objects belonging to Clone Groups that do not include Contig Objects (i.e. Clone Groups that failed to assemble) are exported. 4. “All” – all selected Sequence Objects are exported. In general, assembled Contig Objects have higher quality sequences than un-assembled, individual Sequence Objects, so contigs should take priority over Sequence Objects when exporting sequences for GenBank submission. Once the options are chosen and the “O.K.” button clicked, XplorSeq prompts the user for a filename and location in which to create a text file containing the Sequin script. For the default settings in the “Sequin” preference panel, export of the first Contig Object (MS138A1_A01.Contig1) in the example produces the following script: >MS138A1_A01.Contig1 [lineage=Bacteria; Actinobacteria] [clone=MS138A1_A01.Contig1] [organism=Uncultured Bacterium MS138A1_A01.Contig1] Uncultured bacterial clone MS138A1_A01.Contig1 16S ribosomal RNA, partial sequence CACATGCAAGTCGAACGCTGAAGCTCAGCTTTTGTTGGGTGGATGAGTGGCGAACGGGTGAGTAACACGTGAGT AACCTGCCCCCTTCTTTGGGATAACGCCCGGAAACGGGTGCTAATACTGGATATTCACTTGCCTTCGCATGGGG GTTGGTGGAAAGGGTTTTTTCTGGTGGGGGATGGGCTCGCGGCCTATCAGCTTGTTGGTGGGGTGATGGCCTAC CAAGGCTTT Finally, a screen shot from Sequin, shows the formatted GenBank entry that was created from this example Sequin script: J. Exporting a Cluster Table Sequence libraries often contain multiple sets of sequences that are similar to one another. These sequences form “relatedness” groups, which may indicate close phylogenetic relationships. The Cluster Table export option produces a spreadsheet that tabulates the number of occurrences of each sequence-type (i.e. each relatedness group) in an XplorSeq document. For example, following 22 XplorSeq User’s Manual 7/11/08 BLAST analysis, the user can create a table that lists how many clones in the library have the same BLAST hit. In this case, sequences are lumped together if they BLAST to the same sequence. As described below, XplorSeq’s Cluster Table export option also allows sequence grouping based on user-defined criteria. The Cluster Table options allow the user to divide an XplorSeq document into multiple sub-libraries, each of which is assigned a column in the output. An example spreadsheet displays such an output, which shows the clone distribution for rows A, B, and C of the 96-well sequencing run that was used to create an XplorSeq library: M n h e a d i n g s a r e Most of the table column headings are self-explanatory: see sections F and G for descriptions of the BlastInfo Object related terms. The “Blast ID” and “Bit Score” columns present the range and mean values for the sequences clustered in a row of the spreadsheet. Depending on the options set for export, following the “Bit Score” column will be one or more columns in which the number of instances of a particular sequence-type tabulated. In this example spreadsheet, these data are found in columns F, G, and H (other columns of data were excised for clarity) and represent absolute (or, raw) values – percentage values also can be exported. To export a table, select a set of Clone or Sequence Groups, select the “Cluster Table” export menu. The following savefile dialog box presents the user with a myriad of options: 23 XplorSeq User’s Manual 7/11/08 1. Table Row Definitions. Controls how to cluster sequences into relatedness groups (i.e. how to set up the rows of the table). The default setting groups sequences based on the results of BLAST analysis: sequences with identical BLAST hits are clustered together. The second option, “Lineage”, groups sequences based on the phylogenetic information associated with the BLAST hits (see section G). The third option, “Import list of phylogenetic clusters…” allows the user to cluster sequences based on other criteria. To do this, the user must create a text file that maps Sequence or Contig Object names to the names of user-defined clusters. Each line of this file must list a single sequence name and its cluster name, separated by a space or tab, and followed by a return character: MS128A1_A01.contig1 MS128A1_A02.contig1 MS128A1_A03.contig1 MS128A1_A04.contig1 MS128A1_A05.contig1 MS128A1_A06.contig1 MS128A1_A07.contig1 MS128A1_A08.contig1 group1 group1 group2 group2 group2 group3 group3 group3 This file directs XplorSeq to cluster sequences MS128A1_A01.contig1 and MS128A1_A02.contig1 into the same relatedness group, which would constitute a row in the resulting Cluster Table. Likewise, sequences MS128A1_A03.contig1, MS128A1_A04.contig1, and MS128A1_A05.contig1 would be assigned another row of the table. The actual names used to label groups can be arbitrary. XplorSeq simply compares strings and clusters sequences with identical strings. 2. Table Column Definitions. Controls whether, and how, to divide the sequences in an XplorSeq document into sub-libraries. For instance, a document may contain sequences from multiple clone libraries, each constructed from a different sample. Each sample can be consigned to its own column in the Cluster Table, if sequence/contig names differ in a uniform way between libraries. To sort the output in this manner, select the “Sort By Library Name, Defined By:” radio button. The two radio buttons below the “Sort By…” button establish how sub-libraries are defined. If the “First N characters” button is selected, and the adjacent text field filled in with an integer, then XplorSeq will compare the set number of characters between two sequence names to determine whether they belong to the same sub-library. For example, consider the following sequences: MS128A1_A01.contig1 MS128A1_A02.contig1 MS130A1_A01.contig1 MS130A1_A02.contig1 MS131A1_A01.contig1 MS131A1_A02.contig1 24 XplorSeq User’s Manual 7/11/08 The first 7 characters of each sequence name represent the sample from which the clone library was constructed. Thus, sorting by the first 7 characters would be adequate to divide the sequences into the appropriate groups. Alternatively, the “Name Preceding Character” radio button can be selected and the character ‘_’ typed into the adjacent text field in order to specify that a library name consists of all characters preceding the underscore character. Alternatively, to disable sub-library sorting choose the “Don’t Sort” radio button – all of the clones are tabulated in one column in this case. 3. Include Sequences. Controls which sequences to include in the exported table. The user may filter out sequences with lengths or BLAST bit scores below a cutoff value by editing the appropriate text field. Note that this is an “AND” operation, so a sequence’s length and bit score must both be greater than the set values for the sequence to be included in a table. Either or both values can be set to zero, however, to disable filtering. 4. Data Format. Controls the display of numerical values in the Cluster Table. The “Raw Data Only” option presents the absolute number of clones belonging to a particular sublibrary with a particular BLAST hit. The “Percentages Only” option converts these numbers to percentages of the total number of clones in a library. The “Raw Data and Percentages” option outputs both absolute and percentage values to the table. The absolute and percentage values can be displayed in adjacent columns by choosing the “Interleaved” button. Otherwise, click on the “Separate” button in order to, in effect, produce two tables, one with raw data and the other with percentage values. K. Automating analysis from Phred to BLAST. Sections A through F above describe a step-by-step analysis of sequence data from importing chromatograms to BLAST contigged sequences. This process can be combined into a single analytical step by selecting the “Phred -> BLAST” option in the “Analyze” menu and then clicking the “Analyze” button. A dialog box then opens that allows the user to select one or more directories of chromatograms for analysis. The options at the bottom of the window present a variety of options for fine tuning the subsequent analysis. The text field labeled “File Name:” can be used to select a file path name for automatically saving the new document at several steps during analysis. By clicking the “Save…” button, the user can invoke a save-file dialog box in order to choose a location for the document. The options presented in the “Modify Sequence 25 XplorSeq User’s Manual 7/11/08 Names” box allow the user to manipulate the names of the imported sequences (see section C above to see how the settings affect the names). The box labeled “Group” presents rules for building sequence groups from sequence objects associated with the same clone (see section D for details). Grouping can be toggled on or off by clicking the “Automatically Group” switch. Finally, the box labeled “BLAST” allows the user to select Local or NCBI BLAST (see section F for details). Clicking the “Open” button starts the analysis, which proceeds through base-calling (phred), name-modification, contig assembly (phrap), and BLAST analysis. A new document is created at the start of the process and automatically saved following the phred and phrap steps. L. Automating analysis from Phrap to BLAST. Assembly of contigs and BLAST analysis can be coupled into one process by selecting the “Phrap -> BLAST” item of the “Analyze” button and then clicking the “Analyze” button. A window is raised that allows the user to select either Local or NCBI BLAST. Selected sequence groups are dispatched to phrap and then BLAST V. SUMMARY OF COMMANDS A. Import Data. Options set in the “Import” menu of the tool drawer direct XplorSeq to import the following types of data into a document: 1. Chromatogram. As discussed in section B, this option directs XplorSeq to apply the base-calling program “phred” to a directory of automated DNA sequencing files. Both the base-called DNA sequence and its associated quality scores are imported into a newly created Sequence Object. 2. PHD. Reads “.phd” formatted files, which list base-called nucleotides and quality scores for a DNA sequence. Both the sequence and its quality scores are imported into a newly created Sequence Object. 3. Contig. Inputs the results of “phrap” analysis (i.e. assembly of sequences). The user is prompted to choose one or more FastA formatted files for input. Each sequence file “filename” must be associated with a file 26 XplorSeq User’s Manual 7/11/08 “filename.qual”, present in the same directory as its sibling, that lists quality scores for the sequence in “filename”. For example: The file My_sequences: >sequence1 GATTCGATTC >sequence2 GAATTC must be associated with a file My_sequences.qual: >sequence1 25 40 45 30 20 24 32 30 20 25 >sequence2 33 36 34 28 24 20 Each contig sequence, together with its quality scores, is imported into a newly created Contig Object. XplorSeq attempts to add the Contig Object to the Clone Groups, based on sharing a common sequence name. 4. BLAST. Reads one or more BLAST output files and imports a BlastInfo object for each properly formatted entry. 5. FastA. Reads one or more FastA formatted sequence files and creates a new Sequence Object for each properly formatted entry. 6. XplorSeq Library. Adds the contents of an XplorSeq document (selected through an openfile dialog box) into the current XplorSeq document. 7. Lineage Info (Entrez/GenBank). As described in section G, “Importing Phylogenetic Information”, this option parses a GenBank file for the phylogenetic information listed under the “Organism” heading. This data is imported into BlastInfo objects that bear the same accession numbers as the sequences in the GenBank file. B. Export Data. Options set in the “Export” menu of the tool drawer direct XplorSeq to export the following types of data from a document: 1. Phrap (FastA + Qual). For each selected Clone Group, two FastA formatted text files are exported. The first file contains the sequences and sequence names for Sequence 27 XplorSeq User’s Manual 7/11/08 Objects belonging to the Clone Group. The second file contains quality scores for these Sequence Objects. The user is prompted to select a name and location for a Folder/Directory in which to save files for the selected Clone Groups. Sequence files are given the names of their Clone Groups (e.g. sequences for Clone Group MS138A1_A01 are written to a file named MS138A1_A01). The suffix “.qual” is appended to the name of the sequence file for creation of the quality score file (e.g. MS138A1_A01.qual). Phrap can be called to assemble the sequences stored in a file, as long as the pair of sequence and quality score files remains in the same directory. 2. GenBank. Exports selected Sequence or Contig Objects in GenBank format. currently implemented). 3. FastA. Exports selected Sequence or Contig Objects in FastA format: e.g. >Sequence_Name_1 GGAATTTACTCCAGAGGG >Sequence_Name_2 TTCCAAATTACGGGG The save-file dialog box allows the user to customize the output of this export function: The “Export Options” box controls whether to include Sequence Objects and/or Contig Objects in the export. By choosing the “Best BLAST Sequences” button, the user can select to export only the sequences/contigs that are defined as “Best BLAST Hits” (see Section F for a definition) for selected Clone Groups. Otherwise, selecting the “All Sequences” object exports all selected sequences. The “Include Sequences” options allow further refinement of the FastA export by filtering out sequences based on trimmed length and BLAST bit score. Sequences with lengths or bit scores smaller than the values typed in the text fields are excluded from export. This filter can be disabled by setting the values in both boxes to zero. Finally, click on either “Cancel” or “Save” to proceed with the export. 4. Blast Info. Exports a spreadsheet that summarizes the BLAST information associated with selected Clone or Sequence Groups. Each line of the output presents the name of a Sequence or Contig object and the results of its BLAST analysis. The dialog box that appears after clicking the “Export” 28 (NOT XplorSeq User’s Manual 7/11/08 button presents several options for this export function. The “File” options determine whether to create a new file for the exported data or to append the data to and existing file. Depending on the option chosen, after clicking the “O.K.” button the user is prompted with a save-file or open-file dialog box in order to create a new file or choose and existing file, respectively. The “Save” options determine whether all BlastInfo objects (“All BLAST Information”) or only the Best BLAST hits (“Best BLAST Information” – described in section F) are exported. A portion of the output is as follows (the word processor has artificially wrapped the lines of output): Name Accession Bit_Score ID E_value Species Lineage MS138A1_A01.Contig1 gb|AF385522 98 0.0 Actinomyces sp. oral strain Hal-1083 16S ribosomal RNA gene, Bacteria; Actinobacteria MS138A1_A02.Contig1 gb|AF197036 99 0.0 Arthrobacter sp. 'SMCC G980' 16S ribosomal RNA gene, partial Bacteria; Actinobacteria; Actinobacteridae; Actinomycetales; MS138A1_A03.Contig1 emb|AJ277697 1019 94 0.0 Uncultured bacterium ARFS-30 partial 16S rRNA gene Bacteria; Actinobacteria; environmental samples. MS138A1_A04.Contig1 emb|AL117333 214 89 3e-54 Human DNA sequence from clone RP4-631M13 on chromosome 20. Contains the Eukaryota; Metazoa; Chordata; Craniata; Vertebrata; Euteleostomi; The exported file is best viewed in a spreadsheet program, any one of which should be able to display a tab-delimited file. The columns in the table present the following data derived from the first BLAST hit for a query sequence: 1) name of the query sequence, 2) accession # of the BLAST hit, 3) the BLAST bit score, 4) the % sequence identity between the query and BLAST hit sequences, 5) the expectation value for the alignment, 6) the species name for the BLAST hit sequence, and 7) the phylogenetic lineage of the BLAST hit sequence (from GenBank). See sections F and G for further details about the meanings of these data and how to import them into an XplorSeq document. 5. Cluster Table. The Cluster Table export option produces a spreadsheet that tabulates the number of occurrences of each sequence-type in an XplorSeq document. More details are presented in Section J. 6. Quality Scores. Outputs a table listing the quality scores of selected sequences/contigs. The table lists the name of a sequence, its untrimmed length, followed by the number of Q20, Q25, and Q30 bases it contains. The text file is tab-delimited and may be opened in most spread-sheet and word-processing applications. An example of the Quality Score output is as follows: Sequence MS138A1_A01.T3 MS138A1_A01.T7 MS138A1_A02.T3 MS138A1_A02.T7 MS138A1_A03.T3 MS138A1_A03.T7 MS138A1_A04.T3 MS138A1_A04.T7 MS138A1_A05.T3 Length 815 790 802 809 805 836 791 784 0 Q20 540 588 617 709 645 695 572 539 0 Q25 456 492 566 646 575 644 476 450 0 29 Q30 385 409 524 590 545 573 388 367 0 XplorSeq User’s Manual MS138A1_A05.T7 MS138A1_A06.T3 MS138A1_A06.T7 512 817 831 7/11/08 0 590 578 0 510 461 0 445 388 7. BLAST Accession #’s. Exports a file that lists the accession numbers of BLAST Hits identified by BLAST analysis. The list is non-redundant, meaning that any particular accession number is written to the file once, regardless of its number of instances in the selected Clone or Sequence Objects. 8. Sequin Script. Exports a script to aid submission of sequences to GenBank via Sequin. See section I for details. 9. BLAST database. Format a BLAST searchable database from selected objects. C. Analyze Data. 1. Phred -> BLAST. Automated workflow for base-calling through BLAST analysis. See section IV.K. for details. 2. Contig -> BLAST. Automated workflow for contig assembly through BLAST analysis. See section IV.L. for details. 3. Basecall. Import base-called sequences (See section IV.B.). 4. Contig. IV.E.). Assemble contigs (See section 5. BLAST NCBI. Dispatch sequences to BlastN analysis at NCBI (See section IV.F.). 6. BLAST Local. (See section IV.F.). Dispatch sequences to local BlastN analysis 7. Get Lineage Info. Import phylogenetic information about a BlastInfo Object (See section IV.G.). 8. Align. Construct a multiple-sequence alignment of selected sequences (See section IV.H.). 9. Biodiversity (biodiv). Calculates biodiversity indices (Sobs, Schao1, Good’s coverage, CACE, Shannon diversity, Simpson diversity) through random resampling and rarefaction. 30 XplorSeq User’s Manual 7/11/08 10. XplorSeq Doc Difference. Compares two XplorSeq document and creates third document listing data objects that are found in only one of the documents. D. Transform Functions. These functions can all be accessed by selecting items in the “Transform” menu of the tool drawer. 1. Modify Sequence Names. Edit names of selected Sequence Objects (See section IV.C) 2. Edit RFLPs. Edit clone types and clone #’s of selected Sequence Objects (See section IV.D4). 3. Group. Group selected Sequence Objects (See section IV.D). 4. UnGroup. Ungroup selected Groups: Sequence Objects and BlastInfo Objects are placed at the end of the XplorSeq Table. 5. Clean. This option allows the user to selectively delete information from an XplorSeq document. Clicking the “Clean” button (or choosing the menu option “Options -> Clean”) brings up a dialog box presenting several options for removing data objects. Select any combination of the check boxes “Delete Raw Sequences”, “Delete Contigs”, and “Delete BLAST Information” in order to remove selected Sequence, Contig, or BlastInfo objects from the document. The default setting is to “Delete All” selected objects. Alternatively, by choosing the “Retain Best BLAST Objects” option, a Sequence or Contig Object that is the Best BLAST hit for a Clone Group is NOT deleted (all other objects are deleted). This is a useful means for compacting the information stored in an XplorSeq document. 6. Sort. Clicking the “Sort” button in the tool drawer sorts the entries in the “Sequence Objects” column of the XplorSeq window’s table. The current implementation of the sort function simply alphabetizes, in ascending order, the names of the objects in the table. 31 XplorSeq User’s Manual 7/11/08 7. Set Oligos. Normally, forward and reverse oligos are automatically set for Sequence Objects when they are first created (after phred or phrap). The default values for these oligos are set in the “For. Oligo” and “Rev. Oligo” text fields at the bottom of the tool drawer. Oligo sequences can be assigned to individual Sequence Objects through the “Set Oligos” function of the “Transform” menu. This could come in handy, for instance, if the clones in a library were generated using different PCR primer sets. To use this function, first select a set of Sequence Objects or Groups. Then select the “Set Oligos” menu item and click the “Transform” button. A dialog box then appears that allows selection of primer sequences (the items listed in the menu can be edited in the “Trim” tab of the preferences window. 8. Trim/UnTrim. These functions control whether low quality bases or primer/vector sequences are trimmed from sequence objects. Trimmed bases are not deleted from the underlying sequences of Sequence or Contig Objects; rather, XplorSeq stores two variables that track the 5’ and 3’ boundaries of the trimmed sequence. Selecting the “UnTrim” menu item in the “Transform” menu clears the values in these two variables from selected Sequence Objects, thereby setting the sequences to an untrimmed state. Selecting the “Trim” menu item causes all selected Sequence and Contig Objects to be trimmed, subject to the rules established in the dialog box that is displayed. The text field labeled “Trim 5’ and 3’ ends with quality scores <” takes as input an integer value that represents the minimum acceptable quality score for nucleotides at the 5’ and 3’ ends of a sequence. XplorSeq performs a forward search from the 5’ end of the sequence and a reverse search from the 3’ end of the sequence and trims bases with quality scores less than the cutoff value. Primer or vector sequences can be trimmed by entering nucleotide sequences that define the unwanted sequences in the “Forward Primer” and “Reverse Primer” text fields. The initial values 32 XplorSeq User’s Manual 7/11/08 for these fields are those found in the tool drawer of the XplorSeq window. Alternatively, several commonly used rDNA primer pairs can be selected in the menus adjacent to these text fields. Oligo pairs can be specified in two additional manners: 1) by entering default values in the “Trim” tab of the preferences window (see below); or 2) by manually editing the “Trim Forward Primer” and “Trim Reverse Primer” text fields in the tool drawer. The “Trim” preference panel presents four other options that impact the “Trim” and “UnTrim” functions. Selecting the “Automatically Trim Raw Sequences” or “Automatically Trim Contigs” check boxes causes all subsequently imported Sequence or Contig Objects to be trimmed. If the “Automatically Reverse Complement” option is selected then sequences are reverse complemented if forward or reverse primers are found in the “wrong” order in the sequence (i.e. the reverse oligo is found at the 5’ end of a sequence and/or the forward oligo is found at the 3’ end). The “Phrap trimmed raw sequences (not recommended)” option controls whether the sequences that are exported for phrap analysis (i.e. for assembly) are trimmed or not. The phrap release notes suggest that sequences not be trimmed first, so the default setting is to leave the check box unselected, thus exporting full length, untrimmed sequences. Clicking the “Edit Oligo List” button raises the following dialog box: The user can customize the names, sequences, and trim sequences (i.e. the actual sequence used in the trimming algorithm) in this window. New oligos may also be added. 9. Rev.-Complement. Reverse complement selected sequences. 10. DNA -> RNA. Convert selected DNA sequence to RNA (T -> U). 11. RNA -> DNA. Convert selected RNA sequence to DNA (U -> T). 12. UPPER CASE. Convert selected sequence to upper case. 13. lower case. Convert selected sequence to lower case. 33 XplorSeq User’s Manual 7/11/08 E. Alignment Analysis Functions. This set of options perform analyses on multiple sequence alignments. XplorSeq assumes that it is provided an alignment. See user manuals of individual programs for more detailed overviews and explanations of the options. 1. OTU Clusterting. Fast radial clustering algorithm (sortx) to assemble OTUs at variety of pairwise sequence distance thresholds. Outputs contents of clusters and a separate file of repesentative sequences. 2. Clearcut NJ Tree. Fast neighbor-joining phylogenetic tree inference. 3. Phylip distance matrix. Calculates pairwise sequence distance matrices, through a variety of methods. 4. Phylip NJ/UPGMA Tree. Constructs phylogenetic trees through either neighbor-joining or UPGMA algorithms. 5. Phylip seqboot. Generates bootstrap replicates of a multiple sequence alignment. 6. Phylip consense. Assembles a consensus tree from a file listing multiple individual trees. 7. RAxML. Maximum-likelihood estimation of phylogenetic trees. 34 XplorSeq User’s Manual VI. 7/11/08 REFERENCES: Projects that have used XplorSeq. Numerous research studies have been facilitated by XplorSeq. We present here a partial list of papers that have used XplorSeq to analyze a variety of environments. {Frank, 2003 #27;Ley, 2005 #5;McManus, 2005 #2;Papineau, 2005 #3;Spear, 2005 #8;Spear, 2005 #9;Walker, 2005 #12;Baumgartner, 2006 #11;Dalby, 2006 #4;Ley, 2006 #7;Rawls, 2006 #6;Salmassi, 2006 #13;Spear, 2006 #10;Turnbaugh, 2006 #23;Frank, 2007 #15;Harris, 2007 #16;Lee, 2007 #1;Spear, 2007 #20;Walker, 2007 #14;Feazel, 2008 #18;Frank, 2008 #17;Frank, 2008 #25;Isenbarger, 2008 #19;Ley, 2008 #28;Peterson, 2008 #26;Sahl, 2008 #24;Turnbaugh, 2008 #21} 35 XplorSeq User’s Manual 7/11/08 VII. SOFTWARE LICENSE AGREEMENT PREAMBLE This license agreement allows you to use the software for personal or non profit purposes. This includes any use that does not involve making money, and does not include uses like: • deploying the software for use by a for-profit organization • providing a service to a paying customer For-profit companies may not use this software. If you work for a for-profit company, you may only use this software as an individual, for your personal use. This license includes other conditions that should be read carefully. This Software Agreement (the "Agreement") applies to XplorSeq™ and is between YOU and Daniel N. Frank. 1. DEFINITIONS "Software" means all or any portion of the human-readable software files of the software programs including without limitation, associated flow charts, algorithms, comments and other written instructions and technical documentation, and all corrections, updates, and new versions incorporated into such programs. "Personal Use" means use of Software by an individual solely for his or her personal, private and noncommercial use. An individual's use in his or her capacity as an officer, employee, member, independent contractor or agent of a corporation, business or organization does not qualify as Personal Use. "You" or "Your" means an individual or a legal entity exercising rights under this License. For legal entities, "You" or "Your" includes any non-profit entity which controls, is controlled by, or is under common control with, You, where "control" means (a) the power, direct or indirect, to cause the direction or management of such entity, whether by contract or otherwise, or (b) ownership of fifty percent (50%) or more of the beneficial ownership of such entity. 2. GRANT OF LICENSE Daniel N. Frank grants, and You accept, a personal, nonexclusive, nontransferable license to use Software, at no charge, in accordance with the terms herein, solely for (i) Personal Use, or (ii) academic or noncommercial research, development and deployment 3. LICENSE EXCLUSIONS a) EXCEPT AS EXPRESSLY PROVIDED HEREIN, YOU SHALL MAKE NO OTHER USE OF THE SOFTWARE. b) You acknowledge that the Software is a valuable, proprietary asset of Daniel N. Frank. You shall not market or sell the Software 4. TITLE AND PROTECTION OF SOFTWARE a) Daniel N. Frank retains all title, right and interest to the Software. b) Except for the Software, You retain all title, right and interest to the results of any analysis performed using the Software, subject to the terms of this Agreement. 36 XplorSeq User’s Manual 7/11/08 5. NO REPRESENTATIONS Daniel N. Frank DISCLAIMS ALL OTHER REPRESENTATIONS OR WARRANTIES, EXPRESS OR IMPLIED, NCLUDING BUT NOT LIMITED TO THE WARRANTIES OF MERCHANTABILITY AND FITNESS FOR A PARTICULAR PURPOSE. 6. ATTRIBUTION a) You agree to retain and reproduce in all copies of Software the copyright and other proprietary notices and disclaimers as they appear in the Software, and keep intact all notices in the Software that refer to this License. b) You agree to provide attribution to the authors of this Software in any article based on research performed using Software. 7. DEFAULT If You fail to perform any of its obligations under this Agreement, Daniel N. Frank, in addition to any other rights available to it under law or equity, may terminate this Agreement and the licenses granted hereunder by written notice to You. Unless otherwise provided in this Agreement, remedies shall be cumulative and there shall be no obligation to exercise a particular remedy. 8. TERMINATION In addition to this section, the sections entitled "Title and Protection of Software "No Representations" and “Limitation of Liability" shall survive termination of this Agreement. 9. GENERAL a) No agency, partnership or employment is created by this Agreement. b) You may not use Daniel N. Frank’s name in any advertising, public relations or media release without the prior written consent of the other. c) This Agreement shall be governed by the laws of the State of Colorado. Venue for any action or proceeding shall be Denver, Colorado. This Agreement constitutes the entire agreement between the parties and may only be modified by a written instrument signed by each parties authorized officers. 37