Transcript
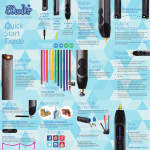
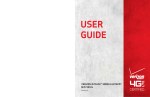
3Doodler 2.0
WARNINGS & NOTICES
ENGLISH
®
WA R N I N G
• BURN HAZARD. The nozzle of the
3Doodler and the adjoining rubber tip can
become extremely hot. DO NOT touch the
nozzle or the adjoining rubber tip, the parts
near the nozzle or the parts near the
adjoining rubber tip, or any melted
plastic/filament, or you may be severely
burned! DO NOT allow the nozzle or the
adjoining rubber tip near or in contact with
flammable materials. Inform others in the
area that the unit is hot and should not be
touched. Unplug and set the slide switch to
OFF when not in use or before storing. After
use, allow the nozzle and the adjoining
rubber tip to cool completely before storing.
The hot nozzle or adjoining rubber tip may
damage painted surfaces, plastics and cloth
if left in direct contact with these materials.
• BURN HAZARD. The Cleaning Tool can
become extremely hot. DO NOT touch the
metal part of the Cleaning Tool after using it
to clean your 3Doodler, or you may be
severely burned!
• If the 3Doodler is emitting black or brown
smoke, cease using the pen immediately,
unplug the pen, allow the pen to cool, and
then store it away safely. Failure to do so will
increase the risk of fire. Please contact us
immediately at [email protected] in such
circumstances.
• ADULT USE ONLY. KEEP OUT OF REACH
OF CHILDREN.
WARNING: DO NOT use the 3Doodler near
bathtubs, showers, basins or other vessels
containing water. This could result the in
death due to electric shock.
The 3Doodler should only be used with
3Doodler approved filaments or materials.
Misuse of your 3Doodler and/or use of
non-approved plastics, filaments or other
materials may result in damage to your pen
or injury to you, and will void your warranty.
Injuries to the user may include, but are not
limited to, harm sustained from inhaling
substances that are not suitable for heating,
or burns from flammable materials used in
the 3Doodler.
N O T I C E
SNIP THOSE ENDS!
After removing a strand/filament from the
3Doodler, cut and remove any partially
melted material at the end of your strand
before re-feeding it into the 3Doodler. This
will reduce blockages or clogging issues.
DO NOT pull plastic/filament from the back
of the 3Doodler. This will result in damage to
your pen and will void your warranty. If you
wish to reverse your plastic/filament, please
follow the instructions on page [3].
When switching from lower temperature
plastic/filament (such as PLA or WOOD) to
higher temperature plastic/filament (such as
ABS or FLEXY), the presence of any
residual plastic/filament in the pen’s heating
chamber may cause a slight amount of
smoke to emit from the pen. This is due to
the application of a higher melting
temperature being applied to lower melting
temperature materials.
For more information, customer service, repairs, or returns,
please contact us at [email protected]
IT’S TIME TO 3DOODLE!
You are now the proud owner of a 3Doodler 2.0. The 3Doodler puts
the power of creation in the palm of your hand and allows you to
draw objects in 3D quickly and easily!
#WhatWillYouCreate?
To find great ideas for what you can create, as well as tips, tricks &
free downloadable stencils, please visit our community website at:
www.the3Doodler.com/Community
TM
GETTING TO KNOW YOUR 3DOODLER
1
7
Protective
Cover
2
3
4
5
8
LED LEGEND:
Solid RED:
Heating up
(please wait)
BLUE: ABS
(230°C to 240°C;
446°F to 464°F)
GREEN: PLA
(190°C to 200°C;
374°F to 392°F)
Flashing LED:
Reversing plastic
9
10
11
6
12
13
14
Actual product may vary from the image found in this document
1
2
3
4
5
6
Nozzle
Extrusion Speed
Control (FAST)
Extrusion Speed
Control (SLOW)
Cooling Fan
LED Indicator
Power Cord
Maintenance Cover
Cleaning Tool
ON/OFF Switch & HI/LO
Temperature Adjuster
Control Port
Plastic/Filament Loader
Mini Screwdriver
Nozzle Removal Tool
7
8
9
10
11
12
13
14
ALWAYS 3DOODLE IN A WELL VENTILATED SPACE
USING YOUR 3DOODLER 2.0
Step 1: Connect your 3Doodler 2.0 to the power adapter
Connect the power adapter to the back of the 3Doodler and plug it
into a power source.
Note: If you have also purchased the 3Doodler JetPackTM you
can also connect this to the back of the 3Doodler as a power
source.
HI
Step 2: Turn on the pen and select
your plastic/filament
OFF LO
Turn the pen on by selecting the correct
heating temperature for the type of
plastic/filament you are using. Set the
slide switch to HI (“High”) for high
temperature plastics/filaments like ABS or
FLEXY, or LO (“Low”) for low temperature
plastics/filaments like PLA or WOOD.
Step 3: Allow your 3Doodler to heat up before loading
plastic/filament
The 3Doodler takes approximately 1.5 minutes to heat up. During
that time the LED indicator will be RED and it will not be possible to
use the pen. Once the correct melting temperature is reached and
the pen is ready, the LED indicator will change to BLUE (HI) or
GREEN (LO).
BLUE = HI (“HIGH”) (heating range between 230°C and
240°C; or 446°F and 464°F)
GREEN = LO (“LOW”) PLA (heating range between
190°C and 200°C; or 374°F and 392°F)
Step 4: Load the pen
Load the plastic/filament into the plastic loader 12 at the back of
the pen, feeding it down the length of the 3Doodler until you feel it
gripped by the gears inside the pen. It can take up to 30 seconds
for a newly loaded strand to begin extruding from the nozzle of the
pen.
NOTE: If you do not feel the plastic/filament being gripped
by the gears inside the pen, please give it a gentle
clockwise twist while pushing it down the shaft of the
3Doodler.
12
Plastic/filament
Step 5: Extrude/select your speed
Press and hold the button for the desired
2 or SLOW (4)
3 )
extrusion speed (FAST (3)
and wait for the heated material to
emerge from the pen tip. Releasing the
chosen speed button will cause the pen
to stop extruding the heated material.
2
3
If the pen stops and the RED LED
appears again, simply wait a moment for
the LED to change to the appropriate color again (the pen is simply
returning to its optimal heating temperature).
NOTE: After 5 minutes of inactivity the 3Doodler’s heating
system will automatically power down. You will need to
press one of the buttons OR toggle the power switch off
and then on again to continue use.
If the plastic/filament is not extruding, it may be because the
A is too short or has fed beyond the
existing plastic/filament (A)
gearbox, and you will not be able to reverse it. Please use a new
B or the Cleaning Tool to feed the
strand of plastic/filament (B)
remaining plastic/filament through the pen. In order to feed the
Cleaning Tool past the gear system you will need to gently twist it
counter clockwise until you feel it move past the gears.
Note: For those of you who are curious, the distance between
the gearbox and the nozzle is under one inch.
A
B
Step 6: Double Click for Continuous Flow
Your 3Doodler can be set to
continuously extrude
plastic/filament without you
having to hold down on the
extrusion buttons. Simply
double-click on the desired
2 or
extrusion speed (FAST (3)
3 ) and your 3Doodler
SLOW (4)
will continuously extrude
plastic/filament for up to ten
minutes before stopping.
X2
3
2
To stop the continuous flow of plastic/filament, simply click on either
2 or SLOW (4)
3 button on your 3Doodler.
the FAST (3)
To temporarily pause the continuous flow of plastic/filament, hold
down on either the FAST (3)
2 or SLOW (4)
3 button on your 3Doodler
and then release to resume continuous flow.
NOTE: Upon resumption of continuous flow, the extrusion
speed will change depending on which extrusion button
(FAST or SLOW) you used to pause the flow. The 10
minutes of continuous flow will restart after pausing.
Step 7: Unloading/reversing your plastic/filament
To unload the plastic:
1. Ensure that the device is still at the correct temperature required
for the type of plastic/filament being used:
HI (“High”) = BLUE LED indicator
LO (“Low”) = GREEN LED indicator
Otherwise, please press one of the
extrusion buttons and wait for the
3Doodler to heat up again.
3
2
2 and
2. Hold down BOTH the FAST (3)
3 extrusion buttons at the
SLOW (4)
5 will
same time. The LED indicator (5)
flash.
3. When the plastic/filament stops
moving in reverse you may gently
take it out from the back of the pen 12 .
Step 8: Power down
To safely turn the pen off, move the sliding switch to the OFF
position 9 . Allow the pen to cool completely before storing.
PRO-TIP: Optimize your melt
temperature; using the mini-screw
driver 13 , tweak your 3Doodler’s melt
temperature +/- 5°C, for minor flow
adjustments and expertly consistent
Doodles. To do this, insert the mini
screw driver into the potted
Temperature Adjuster 10 on the control
panel. Turn the mini screw driver
clockwise to increase the melt
temperature, or anti-clockwise to
decrease the melt temperature.
13
10
NOTE: Our 3Doodler is a sturdy and awesome tool, but
like any mechanical device it needs a break now and then.
We suggest giving it (and yourself) some downtime after 2
hours of continuous use (just a 30 minute break or so).
TROUBLESHOOTING AND CLEANING THE PEN
If the extrusion of plastic/filament has slowed down, stopped, or if
you are having trouble inserting plastic into the pen, please give the
plastic/filament a gentle clockwise twist while pushing it down the
shaft of the 3Doodler.
If the nozzle is loose, please gently tighten it, stopping when you
first feel resistance, and being sure to do so while the pen is hot.
Try to extrude again.WARNING: DO NOT force the nozzle or
overtighten it, as you could permanently damage your
3Doodler.
clockwise twist
If this does not work, we suggest cleaning the 3Doodler. Please
follow the steps below:
1. Ensure the LED light is BLUE or GREEN before starting this
process (indicating that the pen is hot).
2. Start by using the nozzle removal tool
14 and unscrew the nozzle anti-clockwise
while the pen is hot. Please be careful not
to touch the nozzle!
Turn nozzle
removal tool
anti-clockwise
3. Once you have removed the nozzle,
2 and SLOW
hold down either the FAST (3)
3 speed buttons. While holding down
(4)
either button, insert the Cleaning Tool 8
through the back of the pen and gently
14
push any any excess plastic/filament out
of the front of the pen. In order to feed the Cleaning Tool past the
gear system you will need to gently twist it counter clockwise until
you feel it move past the gears.
8
4. Turn the pen off and allow it to cool down a little, but not fully.
Screw the nozzle on clockwise a few turns, but don’t tighten it yet.
Turn the pen back on; once it’s hot and the LED is either blue or
green, tighten the nozzle with the nozzle removal tool, stopping
when you first feel resistance. WARNING: DO NOT force the
nozzle or overtighten it, as you could permanently damage
your 3Doodler.
5. If you are still experiencing problems extruding or suspect there
may be a blockage in your 3Doodler, please remove the
Maintenance Cover 7 as follows:
A) Ensure the LED light is BLUE or GREEN before starting this
process (indicating that the pen is hot)
B) There is a metal bar inserted through the body of the
Maintenance Cover. Simultaneously press the Maintenance
Cover into the body of the pen while using metallic tweezers or
a small flat-head metallic screwdriver to push the metal bar out
through the side of the Maintenance Cover. It does not matter
which side you push from. Once the metal bar is halfway out
you can remove the bar by hand. Lift the Maintenance Cover
out of the pen (rear end first).
7
7
C) If you can see plastic wrapped around the drive gear (the
mechanism that moves the plastic forward), press either
extrusion button until the plastic ceases to be wrapped around
the drive gear and comes loose. If no plastic is wrapped
around the drive gears, go straight to step D.
D) Ensuring that the LED light is still BLUE or GREEN, use your
tweezers/screwdriver to grip and pull the plastic/filament away
from the nozzle of the pen, towards the back of the pen. Once
the plastic is loose, and the end of the plastic/filament is visible
inside the opening of the pen, simply pull the plastic/filament
out of the opening using your tweezers.
Plastic/filament
E)
Replace the Maintenance Cover by inserting the latched
end into the opening at an approximately 35° angle (as
shown in the diagram). Make sure that the button is
properly aligned and slots into place easily before pushing it
back in. Once properly aligned firmly push it back down.
WARNING: DO NOT FORCE THE BUTTON INTO
POSITION AS YOU WILL BREAK THE INSIDE
PARTS OF THE 3DOODLER.
35°
F)
Once the Maintenance Cover is back in place,
simultaneously press the Maintenance Cover into the body
of the pen while inserting the metal bar back through the
Maintenance Cover from either end. Make sure the bent
part of the metal bar protrudes inwards towards the inside
of the pen (as per the diagram).
WARNING: Never insert the metal bar the wrong way
around or it will irreparably damage your pen. Use your
tweezers or a small metallic screwdriver to ensure the ends
of the metal bar are flush with the sides of the Maintenance
Cover. If you are struggling to insert the metal bar, please
ensure the inserted end is tucked under the lip of the far
side of the Maintenance Cover before pushing it through
again (see diagram for reference).
ensure the inserted
end is tucked
under the lip
For a full video of how to remove and replace your
Maintenance Cover please go to
the3Doodler.com/maintenance-cover
SPECIFICATIONS
Output Power: 6W
Output Voltage: 5V
Input Voltage: 5V
Specifications are subject to change
and improvement without notice.
CARE & MAINTENANCE
For care and maintenance information, and more advice on how to
use your 3Doodler, please refer to our website: the3Doodler.com
To troubleshoot, please visit: the3Doodler.com/troubleshooting
LIMITED WARRANTY
For more details on your limited warranty, pleae visit:
the3Doodler.com/warranty
For 3Doodler’s Terms and Conditions and other notices please
refer to our website: the3Doodler.com/terms-and-conditions
Patent Pending
ADULT USE ONLY. THE 3DOODLER IS NOT A TOY FOR
CHILDREN. ALWAYS USE THE PROTECTIVE COVER
PROVIDED WITH YOUR 3DOODLER.
This marking indicates that this product should not be
disposed of with other household wastes. To prevent
possible harm to the environment or human health from
uncontrolled waste disposal, recycle it responsibly to
promote the sustainable reuse of material resources.
3Doodler, DoodleStand, JetPack, StrandStand, and
“#WhatWillYouCreate?” are trademarks owned by WobbleWorks,
Inc.