1
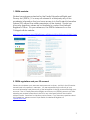
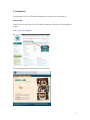
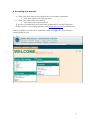
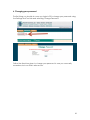
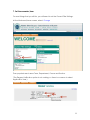
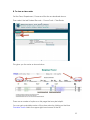
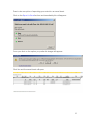
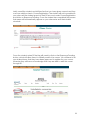
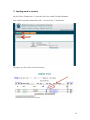
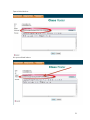
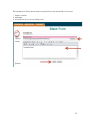
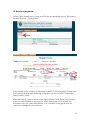
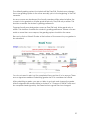
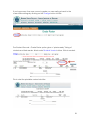
SIS Student Information System Hebrew Union College – Jewish Institute of Religion Faculty User’s Manual (SIS) November 18, 2014 1 Table of Contents 1. FERPA reminder .......................................................................................................... 3 2. FERPA regulations and your SIS account............................................................ 3 3. Introduction................................................................................................................. 4 4. Accessing your account: ........................................................................................ 6 5. List of courses offered for a semester .................................................................. 7 6. Changing your password...................................................................................... 10 7. Set the semester/term ............................................................................................ 11 8. To view a class roster .............................................................................................. 12 9. Other elections......................................................................................................... 14 10. How to grant consent for a class...................................................................... 15 11. Sending email to students .................................................................................. 19 12. How to enter grades ............................................................................................ 23 13. Quick instructions – grading ............................................................................... 27 14. Quick instructions – locating a class roster .................................................... 27 15. Final note ................................................................................................................. 27 2 1. FERPA reminder Student records are protected by the Family Educational Rights and Privacy Act (FERPA.) You may not release to a third party any of the academic information that you have access to in the Student Information System (SIS) without the written permission of the student. Should you have any questions, please do not hesitate to contact the National Registrar’s Office. For your reference, the FERPA statement is on the College-Institute website: http://huc.edu/registrar/docs/FERPA%20Annual%20Notice%20to%20Students%202012.pdf 2. FERPA regulations and your SIS account Please do not release your username and password to others. Activity in the SIS can be traced back to the person’s username. You are responsible for the security of your account information and the security of the information in the SIS accessed through your account. The U.S. Family Educational Rights and Privacy Act (FERPA) prevents you from releasing any student information in the SIS to any other party without the student’s written consent. Sanctions for violation can be severe. If you have any questions about this Federal law, please contact Clyde Parrish, the National Registrar, at [email protected]. 3 3. Introduction The website for SIS, our Student Information System, can be found at: sis.huc.edu There is also a quick link to the Student Information System on the registrar’s page: http://huc.edu/registrar/ The opening page of the website looks like this: 4 From here you can find information on how to: a. Locate forgotten password – Click on the Forgotten Password tab circled above. Enter the email address that you have on file with the College Institute, or your HUC email address. Once you enter your email address and date of birth, the SIS will email you your user name and password to the email listed. You do not need to enter Student ID Number. b. See all the courses offered in a given semester using the “Course Catalog” tab. c. Login to your account using your user name and password. 5 4. Accessing your account: a. Enter your user name in the textbox above the label: username. Your user name is not case sensitive. b. Enter your password in the textbox. Your password is case sensitive. (If you do not remember your user name or password, and the Forgotten Button option is not working please e-mail [email protected] for assistance.) After you enter your user name / password and are logged in, you will see a screen similar to this: 6 5. List of courses offered for a semester You may locate all courses through the National Registrar’s page and click on ALL Campus Courses or go through the Student Information System (SIS). Registrar: www.huc.edu/registrar SIS: www.sis.huc.edu You must choose a term and location for anything to populate. Enter as much information as you like, but again the minimum populated must be term and location. 7 Detail is an important and often overlooked link that will show the following: 1. Course Detail – Title and Number of the course 2. Other Information – Text, Non-text, Elective 3. Course Notes – Description of the course itself 4. Location – Which campus this course is being offered 5. Seats Offered 6. Seats Available Course details can also list other information about a course including additional expenses if needed and if consent of the instructor is required. When a red exclamation is shown next to the class (see image above) this means the course has met its capacity and students will need consent from the instructor to add more seats. 8 Off = Offered Avail = Available The number immediately to the left of Detail, is the number of seats available/empty in the course at a given time and the number to the left of that is the number seats offered. 9 6. Changing your password The first thing you should do once you login to SIS is change your password using the Settings and Tool tab and selecting Change Password. Follow the directions given to change your password to one you can easily remember, but one that is also secure. 10 7. Set the semester/term For most things that you will do, you will need to set the Current Filter Settings. At the Welcome/Home screen, select: Change Then populate each area: Term, Department, Course and Section. (The Degree Verification option is not working, so there is no reason to select Application Year.) 11 8. To view a class roster Set the Term, Department, Course and Section as described above. Then select the tab Student Records – Course Tools – Class Roster This gives you the roster as shown below. There are a number of options on this page that may be helpful. You can get a printable version of the class roster by clicking on the blue Printable Version link in the upper right hand corner of the list. 12 There is also an option of exporting your roster into an excel sheet. Click on the Export to Excel button and immediately this will appear: Once you click on the option you prefer this image will appear: Click Yes and the excel sheet will open: 13 9. Other elections If there are students listed below the class roster under (Other Elections), these students are NOT enrolled in this class. These students are listed here due to a time conflict with another course that is being offered at the same day and time, or they have exceeded the 18 credits per semester policy that is contained in the National Student Academic Handbook. Please contact the student and the Office of the National Registrar [email protected] if this occurs. You can email the student from this screen to let them know that they are not enrolled in this course. Click on the Send Out Selected Email oval at the bottom of the list to send email to all (or some) students in this class. Clicking on an individual student’s email address will allow you to send email to that particular student. 14 10. How to grant consent for a class If you are offering a course that is “By Permission Only,” you can grant the permission yourself without contacting the National Registrar’s Office. First, set the term in which the course is being offered, the Department, Course and Section. Select Student Records – Course Tools – Course Consent. This option gives you a list of your courses that require your consent. Select Grant CONSENT to get to the next screen. You will now have a list of students who are waiting for your consent to get into this course. 15 At this point, you have the option to Add the student to the class or to Send Reject Email. If you select to Add, then the following screen appears after the student has been added to your class. Your options are to Send a notice Email or click Done. 16 Email: If you select Done, there is an option whereby you can change your mind and deny consent. There is no need to add an expiration date or a comment. Select Student Records – Course Tools – Course Consent. 17 Lastly, email the student and tell him/her that you have given consent and they can now add the class in Course Registration. The student will not be enrolled in your class until the student goes into their SIS account under Course Registration and clicks on Reprocess Pending. Once the student has completed this process their name will automatically appear on your class roster and their student schedule. Once the student enters SIS he/she will need to click on the Reprocess Pending button, which will allow them to officially enroll in the course. You will have to let your student know that they have been approved to register for your course; otherwise they will have no knowledge that they are able to add this course through SIS. 18 11. Sending email to students Set the Term, Department, Course and Section under Global Variables. Then select the tab Student Records – Course Tools – Class Roster This gives you the roster as shown below. 19 At the bottom of the screen there is an option to Send Out Selected Email to students. You may click on all of the student’s email by checking the box at the top of the email list listed as E-mail Show Hide button. You can be as selective as to how many emails you send by clicking the box located under E-mail, and to the left of the students email address. If you wish to send an attachment to your student or students through SIS please note that there should be no spaces in the title of the attachment. You will need to save your document without a space in the title. Please remember that Word will automatically save the title with a space. For example: C:\Documents and Settings\My favorite syllabus.docx = NOT VALID C:\files\myfavoritesyllabus.docx = VALID 20 Space listed below: No space listed below: 21 Remember that these areas must be populated or the email will not be sent: 1. Subject matter 2. Message 3. Attachment (if you are sending one) 22 12. How to enter grades Set the Term, Department, Course and Section as described above. Then select Student Records – Grade Roster. In the middle of the screen you will need to select (F) for final grade. Please note that nothing will populate under Input Grades if you do not select Final under Select Interim / Final. After selecting (F) Final, located under Select Interim / Final, there is a pull-down menu for each student to allow you to select their grade. If the student has withdrawn from the class, there will be a “W” entered as the grade and this cannot be changed by the instructor. 23 If the student is listed as wanting letter grades this is what their option will look like when you click to input their grades. If the student requested Pass/Fail this is what their option will look like when you click to input their grades. Pass/Fail option only lists P,LP,AU, I and F. 24 The default grading system for students will be Pass/Fail. Students may change from one grading system to the other annually, prior to the beginning of the Fall semester. As new courses are developed, the faculty member will be asked whether the course is to be graded on a letter grade basis only, Pass/Fail only or either. This decision overrides the student’s grading preference. Program faculty may designate courses as Pass/Fail only, letter grade only or either. This decision overrides the student’s grading preference. Where a course exists on more than one campus, the grading system should be the same. Be sure to click on Submit Grades at the bottom of the screen for your grades to be submitted. You do not need to print out the completed form and turn it in to anyone. There are no signatures needed. Submitting grades via SIS is considered as official. After submitting a grade, you are not able to go back and change the grade. After final grades are made visible to students, a “Change of Grade” form must be completed and signed by the Dean before a grade can be changed. 25 If you have more than one course to grade you can easily go back to the current filter settings by clicking on the Change button in blue. The Student Records – Grade Roster option gives a “printer-ready” listing of students and their grades, listed under Printable Version in blue, if this is needed. This is what the printable version looks like. 26 13. Quick instructions – grading 1. Once you enter SIS you will need to click on the blue Change. 2. Then click on which term you want to use: Fall 2014 3. Click and populate Department, Course and Section. You will not need to populate Application Year. 4. At the far left hand corner click on Student Records and look for Grade Roster. 5. You will need to click on the middle of the screen for Final (F). 6. After you click Final (F) the types of grades will populate for your students on the right hand side. 7. Make sure after you enter the grades that you hit submit grades or nothing will be saved. 8. You will need to do this for each course that you are offering by going to Change Current Filter Settings. 14. Quick instructions – locating a class roster 1. Once you enter SIS you will need to click on the blue Change. 2. Then click on which term you want to use: Fall 2014 3. Click and populate Department, Course and Section. You will not need to populate Application Year. 4. At the far left hand corner click on Student Records and look for Course Roster. 15. Final note You are encouraged to explore other options available in SIS. If you believe that any need to be added to this Faculty User’s Manual, please contact the National Registrar’s Office at [email protected] and let us know. 27