1
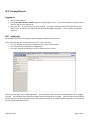
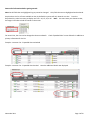
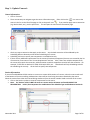
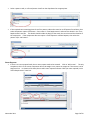
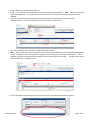
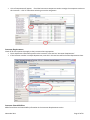
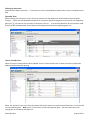
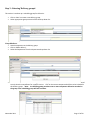
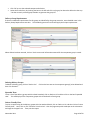
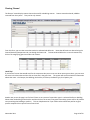
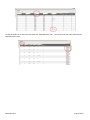
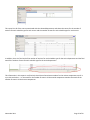
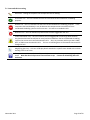
 DCU Training Manual Updated: November 2011 DCU Training Manual ......................................................................................................................................................... 3 Logging on: ..................................................................................................................................................................... 3 DCU – main page: ........................................................................................................................................................... 3 Logging on DCU from home: .......................................................................................................................................... 5 What do the icons mean? .......................................................................................................................................... 5 Step 1 – Update ‘Courses’: ............................................................................................................................................. 6 Step 2 – Entering & Updating ‘Instructors’: ................................................................................................................. 13 Step 3 – Entering ‘Delivery groups’: ............................................................................................................................. 17 Viewing ‘Rooms’: .......................................................................................................................................................... 19 Reports: ........................................................................................................................................................................ 21 Appendix ...................................................................................................................................................................... 23 A – Component types ............................................................................................................................................... 23 B – Room Types in DCU ............................................................................................................................................ 23 C – Room Characteristic List..................................................................................................................................... 23 D – Icons and their meaning .................................................................................................................................... 24 E – Scheduling Groups .............................................................................................................................................. 25 H – Known Issues ..................................................................................................................................................... 26 Glossary of terms ......................................................................................................................................................... 27 DCU Training Manual Logging on: 1. Open Internet Explorer. 2. Enter ‘http://10.120.201.17/dcu43’ to get to the login page for DCU. The recommendation is to open the link and then add it to your bookmarks. 3. Sign on to DCU. Enter the Username and Password. If anyone is unable to access DCU and needs to have access set up, contact the DCU Administrator Michelle Warrington (ext 5641). Click on Submit to complete signing on. DCU – main page: The headings on the left of the page will open the pages to update the items listed. At the top of the page are the menu selections ‘File’, ‘View’ and ‘Help’. • The ‘File’ selection at the top of the page must be used to exit the system. • The ‘View selection will display a message board. • The ‘Help’ selection will display the on‐line navigational user manual. At the top of the page, there is a Message Board. This will always show a message indicating whether you are logged into DCU. Any messages about upcoming outages will also be listed here as needed. Note that DCU may occasionally be closed early in the morning between 8:00 am to 9:00 am to allow for any needed updates to be done in Timetabler to provide needed information in DCU. November 2011 Page 3 of 28 Some useful information before getting started: Note that all fields that are highlighted in grey cannot be changed. Only fields that are not highlighted can be altered. Anytime there is a list of items available to view, by default the system will only show 10 at a time. From the drop‐down list, select how many to display at a time – 10, 15, 20, or all. Note: the more items you choose to view, the longer it will take to load all records on the screen. For certain lists, the view can be changed to show more details. Check ‘Expanded View’ to see all details in addition to primary information for the list. Example – Instructor list – Expanded View unchecked Example – Instructor list – Expanded View checked. Note the additional details now displayed. November 2011 Page 4 of 28 Note: on any page within the DCU application, for any ‘Type’ field with a drop‐down list, select an option from the drop‐down, even if there is only one option. Leaving ‘Type’ blank may result in an error. The example below is for the Academic Block type. Although there is only one option (Default), it must be selected for the type. Logging on DCU from home: As DCU is accessed via the web, it is possible to access DCU. However, network resources are required and you will need VPN access to login to the site. What do the icons mean? While working on the different entry pages, different icons may appear within lists of items or in data entry sections. Below is a list of the icons that may appear and their meaning. Pencil icon ‐ clicking on the pencil icon will open the item for editing. Checkmark icon – this icon indicates that the item checked has been enabled for scheduling purposes. Red Bar icon – this icon indicates that the item has been disabled for scheduling purposes. If the component has been disabled, it may be because the component was cancelled in the last coordinated scheduling cycle for the current term – this can be re‐enabled in DCU. Red Cross icon – this icon indicates a problem with the item flagged with the icon. Yellow Exclamation icon – this icon indicates that the flagged field has warnings about the data. Magnifying glass icon – this icon will display details attached to a specific item related to the column heading in the list of items. Blue question mark icon – this icon will open a help screen related to the particular page currently active. Note that these help screens have not been set up. Contact the Scheduling Office for assistance. •
If you are unsure of the meaning of the icon, move the cursor over the icon and the purpose of the icon will be displayed. Finally, before starting to enter data into DCU, review Appendix H, ‘Known Issues’, at the end of this document. The last upgrade of DCU, the known issues were resolved. Report any issues that may appear and that are not listed as a known issue to the Scheduling Office for investigation. In the meantime, this appendix identifies any workarounds or useful tips/tricks. November 2011 Page 5 of 28 Step 1 – Update ‘Courses’: Course Information: • Click on ‘Courses’. • There are two ways to navigate to get the course information open. Either click on the icon next to the course in the list on the left of the page or click on the pencil icon ( ). If you need to apply course constraints (e.g. Back‐to‐back, etc.), use the pencil icon. This will open the main course information page. •
•
•
Check any course constraints that apply to the course. Any checked constraint will be validated by the Scheduling Office to determine what kind of scheduling tie to create. Scheduling ties have to specify two components or two deliveries only. If there are any additional requirements for the course (all sections/components) that are not covered by the list of constraints, enter notes in the ‘Course Requirements’ text box. Also, if there are multiple components for the course that require the constraint, add information on which components need to have the constraint – for example; TUT07 back‐to‐back with TUT08, LEC01 with LEC02, etc. These details will help Scheduling to build the scheduling tie correctly. All ties have to specify two components. Section Information: If you wish to add additional DCU sections to a course or remove DCU sections of a course, select the course and scroll to the bottom of the course editing window where there will be a box listing the sections attached to the course. Select the section from either the Course Editing window or from the section number listed on the left of the screen. • Click on the Section number to view the components for the course. • Note: the ‘Section’ in DCU is NOT the same as a course section in Banner and has NO IMPACT ON REGISTRATION. In DCU, the Component is a combination of the Schedule Type and the Banner Section ID. November 2011 Page 6 of 28 •
•
If a component needs to be added, click on ‘Add’. This will open the Component Editing page for entering the details. If a component is to be updated, click on the course component either in the list within the Section Editing or in the list of components on the left side of the page to open the component in the Component Editing page. Component Information: • The component name is stored as the combination of an identifying number and the component type – e.g. ‘LEC01’ is a Lecture, and is component 01. • Select the component type from the drop‐down list. See Appendix A at the end of this document for a list of Component Type codes and what they mean. • Enter the component name (the 2‐digit number only). When adding additional components, create them in sequential order (01, 02, 03). • Update’ Max Enrolment’ if needed. Note: the Max Enrolment MUST be greater than 0 or the system will not schedule the component. This number tells the system know the minimum size a room must be assigned for the component. Deliveries: Deliveries capture information about the time/day meeting patterns, room requirements as well the instructor assignments. • The Start Date and End Date default to the dates associated with the term. The dates cannot be altered. If the dates are exceptions to these default dates, make a note in the Time Requirements section. • If the component is going to be running alternating weeks, update the Frequency as needed. This would be ‘2’ for every other week. •
Select ‘Pattern Request’ or ‘Forced Pattern’ from the Time Requests drop‐down list. November 2011 Page 7 of 28 •
Select a pattern code, or a forced pattern time from the drop‐down list as appropriate. •
If the required course meeting times do not fit a pattern code and so must be an off‐pattern forced time, then select the pattern request ‘Off Pattern – Enter notes in Time Requirements’ and enter the details in the ‘Time Requirements’ text box. The details should include the day(s) of the week, the start time and the duration of the component. If the component does not require a Time Request or a Room Request, then select the pattern ‘N/A – No Pattern’. Room Requests: • If there is no room request listed, then a room request needs to be entered. Click on ‘Add a room’. The only exception to this is if the course component will not be taught in any rooms on campus or if the course is to be taught on‐line. In situations like these, do not add a room request and enter ‘NRR’ (no room required) in the ‘Room Requirements’ note box. November 2011 Page 8 of 28 •
•
•
Select a Room Type from the drop‐down list. If LAB, L, or O is selected, you must select a room from the Room drop‐down list. Note: Be sure to select the specific lab requested. The system will not select from the list but will select whichever specific lab room selected. If specific room characteristics required, check Characteristic(s) required box and click on ‘Add’ for characteristics list – select required characteristics (can select more than one). •
•
Click ‘OK’ to attach the characteristics needed to the room request. Note: If the combination of room type and room characteristics do NOT exist in the combination selected, the system will display an error message when trying to save the changes for room request information. If this happens, remove the selected room characteristics one at a time until the save works. This will confirm which room characteristic is causing the error. •
If there are unique requirements for the room, enter notes in the ‘Room Requirements’ text box. November 2011 Page 9 of 28 •
•
•
•
If no room is required, enter ‘NRR’ in the ‘Room requirements’ text box. For an Adobe Connect link, please select Room Type “V”. Note: for deliveries to be scheduled offsite with a day and time, please select Room Type “O”, and select “OFFSITE” as the room. Note: a room cannot be assigned without a day/time request (pattern code is acceptable). Adding Deliveries • Click on ‘Add’ to create an additional delivery • To navigate between deliveries, click on the label of the delivery tab (e.g. Click on ‘01’, not in the box). An orange line will highlight the tab that is currently open for changes. Note: When course information was downloaded from Banner, the course components had at least one delivery attached to the component. The label on the tab for the delivery will have a label of ‘A1 01’, ‘B1 01’, ‘C1 01’ or something similar. The default label for deliveries in DCU is ‘01’ or ‘02’. If any changes are done to a delivery, the system will alter the label from ‘A1 01’ to ‘01’, etc. This cannot be altered. Therefore, if you add additional deliveries or alter existing deliveries the label will change. This is ok and will help ensure consistency for multiple deliveries under a component. These will be modified before going back to Banner. Deleting Deliveries • To delete deliveries, click in the box on the delivery tab and then click on ‘Remove’. • When all data entry is complete, click on ‘Save’ to ensure all information is saved. November 2011 Page 10 of 28 Instructors: In this section, one or more instructors can be assigned to a course section. • Components that do not have an instructor assigned may schedule in conflict with each other and into whichever time and space are available. • If there are no instructors assigned to the course component delivery, click on ‘Add’ to attach an instructor to the delivery. • If there is an instructor assigned and this needs to be changed, check the box for the instructor who is to be removed and then click ‘Remove’. Next click on ‘Add’ to attach a different instructor. •
•
A list of instructors associated with the department will appear. Check the box next to the instructor to be assigned to this section. Note: if the section is team taught, multiple instructors can be selected at this point. Identifying the Primary instructor will be done once the scheduling information is back in Banner. The ‘P’ and the ‘S’ beside the instructor name indicates if the department the instructor is listed under is the Primary or Secondary department for said instructor. If the instructor is from a different department, click on the drop‐down list for Departments and select the appropriate department or select "ALL”. The list of instructors in the selected department will appear – check the box for the desired instructor. Click ‘Ok’ to save the assigned instructor(s). •
When all data entry is complete for the course and section, click on ‘Save’ to ensure all information is saved. •
•
November 2011 Page 11 of 28 Expanded View: Once all changes to courses, sections, components & deliveries have been completed, click on ‘Back to List’ to get the list of all the courses. Just beneath the drop‐down list to select ‘Show All’, there is a box labeled ‘Expanded view’. Click on this to see all the details for each course and all is sections, components & delivery details. Printer Friendly View: Once all changes to courses, sections, components & deliveries have been completed, click on ‘Printer Friendly View’ to display all the details for each course and all of the sections, components & delivery details for the course. Click on ‘File’ and select ‘Print Preview’ – change the Page Setup to be Landscape orientation and select Legal as the paper size before printing this report. It is recommended to print this report upon completion of DCU data entry for the term. November 2011 Page 12 of 28 Step 2 – Entering & Updating ‘Instructors’: Instructor Types: In DCU, only TBA instructors can be added by the user. All instructors currently active in Banner have had their name and staff id down‐loaded from Banner into DCU. The instructor type code for these instructors can be one of 3 types: ‘PROF’, ‘SENS’, or ‘INST’. If an instructor is hired after the data has been downloaded to DCU, their information will not be available yet. Contact the Scheduling Office to have the instructor with Banner ID added to the system. Note: If there is an instructor missing from your department, contact the Scheduling Office to research and correct. If any of the instructor types need to have the instructor type changed, enter a note in the Instructor Requirements notes box. Adding new instructors: • Click on ‘Instructors’ and then select ‘New’. Global ID number information: • Note that the system defaults in the Staff ID as ‘TBA_ [dept code] _#’ where ‘#’ is an incremented count. Do NOT remove the department code from the default Staff Id. As all departments will be creating TBA instructors, the department code is required to ensure the instructor is unique to your department. You can alter the number – just be sure the number has not already been created for your department. • Can enter an Instructor name but this information will NOT go to Banner or EnCampus/Event. If you would like the TBA to appear in Banner, select a TBAU already listed under your faculty (will have a Banner ID). • Select ‘TBA’ from the ‘Instructor Type’ drop‐down list. This is the only option available but it must be selected. • Note: Whenever the option to create a new instructor is selected, the system will increment the counter that is part of the Staff ID REGARDLESS of whether the new instructor information is saved or not. Therefore, the counter may return a larger number than expected if the page to create a new instructor has been accessed but not updated. November 2011 Page 13 of 28 •
•
•
If this TBA is to represent an instructor who teaches in more than one department, contact the alternate department and coordinate the creation of the TBA number. If they have already assigned a TBA for such an instructor, use the same TBA already created. If they have not assigned a TBA number, create the TBA and let the other department know what TBA number was created for that instructor. Save the new instructor information. Add additional instructors as needed until the total number of TBA instructors has been created for your department. •
Click ‘Instructors’ and check the list of TBA instructors that have been created. If the incremented number got out of sync, the number for the Staff ID can be adjusted to correctly reflect the number created. Be aware that the internal counter will still be the higher number and will affect creating more TBA instructors. Delivery Assignment: In this section, add or remove course section deliveries to an instructor. Note that instructors can be assigned to a course through the ‘Courses’ section as well. When assigning a course delivery to an instructor in this section, it will not be possible to see other instructors also assigned to this component – to determine if there are multiple instructors assigned to a component, check under the ‘Courses’ section. ** Best practice: Although is it possible to attach components to an instructor in the Instructor screen, the recommendation is to use Instructors to create/update all instructor information except for assigning components. Once all instructor information has been entered, then use the ‘Courses’ screen to attach instructors to components. • Click on ‘Add’ to add a new delivery assignment to the instructor. November 2011 Page 14 of 28 •
A list of components will appear. Check the box next to component section to assign the component section to this instructor – click ‘ok’ when done selecting to save the assignment. Instructor Requirements: Check off all of the options that apply to the instructor where appropriate • Enter requirement information specific to the instructor in the text box ‘Instructor Requirements’. • If the instructor teaches in multiple departments, note this in this text box and list the other departments here. Instructor Unavailabilities: Add all restrictions and unavailability information in the Instructor Requirements section. November 2011 Page 15 of 28 Deleting an Instructor: Please DO NOT deletes instructors. If instructors are to be removed/deleted, please make a note in the Requirements field. Expanded View: When selecting the ‘Instructors’ screen, the list of instructors for the department will be listed without the details showing. If there are unavailabilities attached to an instructor or deliveries assigned to the instructor, the magnifying glass icon ( ) will show for the instructor’s information in the list. To view all the details for all the instructors listed, click on the box ‘Expanded View’ and all details will be displayed instead of the magnifying glass icon. Printer Friendly View: When all instructor information has been updated, click on ‘Printer Friendly View’ to have all instructor information displayed and formatted for printing. Select ‘File’ and then ‘Print’ to print the information and use the report as a record of what information is in DCU for the current scheduling term. Note: select ‘Print Preview’ to view how report will print – you may need to alter print settings such as orientation and paper size. November 2011 Page 16 of 28 Step 3 – Entering ‘Delivery groups’: This section is used set up a scheduling group for deliveries. • Click on ‘New’ to create a new delivery group. • Select appropriate group constraint from the drop‐down list. Group Members: • Attach components to the delivery group. • Click on ‘Add a delivery’. • Select the Department from the Department drop‐down list. •
A list of courses and components will appear. If the drop‐down list for courses is clicked, the list can be filtered to only show the components for a specific course. Click on the course component deliveries to be included in this delivery group. Note: A scheduling group must have two or more component deliveries attached to the group or the scheduling group will have no effect. November 2011 Page 17 of 28 •
•
Click ‘Ok’ to save the selected component deliveries Select the first delivery by checking the box on the left and click on the grey bar about the deliveries that says “Use the currently selected group member to generate the group ID”. Delivery Group Requirements: If there are additional requirements for this group not identified by the group constraint, enter detailed notes in the Delivery Group Requirements text box. The Scheduling team will review and apply the unique requirements. When all data has been entered, click on ‘Save’ to ensure all information entered for the component group is saved. Deleting Delivery Groups: To delete a delivery group, click on ‘Back to List’. Click on the box next to the component group(s) to be deleted and then click ‘Remove’. Expanded View: To see a list of the delivery groups with the detail attached, click on ‘Back to List’ and then click on the box ‘Expanded view’. This will display all the component groups with all the details of each group. Printer Friendly View: To print a report listing all the delivery groups with the attached details, click on ‘Back to List’ and then click on ‘Printer Friendly View’. Next, click on ‘File’ and then ‘Print Preview’ – alter the page setup with Landscape as the orientation and Legal as the paper size. Then print the report. November 2011 Page 18 of 28 Viewing ‘Rooms’: The ‘Rooms’ screen displays rooms that can be used for scheduling courses. Rooms cannot be altered, added or removed from the system. They can be only viewed. From this form, you can view room characteristics and attached deliveries. Note that deliveries are altered using the Courses/Sections/Components tab, not through the Room tab. To view attached deliveries or room characteristics, click on the magnifying glass icon under each column. Useful Tip! If you know of a room that would work for the component but you are not sure what room type to select, you can enter the room in the Room box and the click on the arrow in the green box. The system will come back with all information about that room – the Campus, the Building, the Pavilion, the Room, the Room Type, the Capacity, etc. Another way to use this page is to find out if there are any rooms of a particular type in a selected Pavilion or Building. Select either the Building or the Pavilion and then click on the arrow in the green box and the system will list all possible room matching that building or pavilion. This can help determine if you need to select a different pavilion to get a specific computer lab or special room of some kind. November 2011 Page 19 of 28 To view all details for all rooms at once, check the “Expanded View” box. This will show all the room characteristics attached to each room. November 2011 Page 20 of 28 Reports: Currently there are two reports available – the ‘Conflict(s)’ report and the ‘Seats and Sections by Term and Department’ report. To run either report, click on the report title on the list of reports on the left side of the screen. Conflict(s) report: Click on Conflict(s) report and then select the department from the drop‐down list. The click on ‘Generate Report’. This report will list the delivery components that are in conflict with each other. The example below is from the first simulation. As no courses have been scheduled yet in simulation 2, this report will be empty. Seats and Sections by Term and Department report: Click on the ‘Seats and Sections by Term and Department’ report and then select the department and term to be reported. Then click on ‘Generate Report’. November 2011 Page 21 of 28 This report lists all of the courses associated with the selected department and shows the counts for the number of sections for each schedule type for each course and the number of seats for each schedule type for each course. In addition, there is a final total of the number of sections for each schedule type for the entire department and the final total of the number of seats for each schedule type for the entire department. This information in this report is useful to help check that all enrolment numbers for the various components are all in sync with each other – i.e. the totals for the number of seats in all the tutorial components matches the totals of the number of seats in all the lecture components. November 2011 Page 22 of 28 Appendix A – Component types EXM ‐ Challenge/Module TSSA Exam FLD ‐ Field Placement IND ‐ Independent Study L&L ‐ Lecture & Lab LAB ‐ Laboratory LEC ‐ Lecture OTH ‐ Other SEM ‐ Seminar (No WebCT Access) THS ‐ Thesis/Project TUT ‐ Tutorial WEB ‐ Web Course WRK ‐ Work Term B – Room Types in DCU L ‐ Lab (DC) LAB ‐ Laboratory U ‐ UOIT Classroom V ‐ Virtual Room C – Room Characteristic List First ‐ First Floor Horseshoe ‐ Horseshoe seating L ‐ Laptop Data/Power LP ‐ Laptop Power Only Media Site ‐ Media Site Equipment MTC ‐ Moveable Tables and Chairs Second ‐ Second Floor Third ‐ Third Floor Tiered ‐ Tiered Seating Wired ‐ Hard Wired for Laptop November 2011 Page 23 of 28 D – Icons and their meaning Pencil icon ‐ clicking on the pencil icon will open the item for editing. Checkmark icon – this icon indicates that the item checked has been enabled for scheduling purposes. Red Bar icon – this icon indicates that the item has been disabled for scheduling purposes. If the component has been disabled, it may be because the component was cancelled in the last coordinated scheduling cycle for the current term – this can be re‐enabled in DCU. Red Cross icon – this icon indicates a problem with the item flagged with the icon. Yellow Exclamation icon – this icon indicates that the flagged field has warnings about the data. Any data that has been forced (time or room) and that rolled from the last coordinated scheduling cycle for the current term cannot be altered in DCU. Also, any instructor with a type that is PROF, INST, or SENS cannot be altered in DCU. This icon is indicating there is information that cannot be changed in DCU Magnifying glass icon – this icon will display details attached to a specific item related to the column heading in the list of items. Blue question mark icon – this icon will open a help screen related to the particular page currently active. Note that these help screens have not been set up. Contact the Scheduling Office for assistance. November 2011 Page 24 of 28 E – Scheduling Groups A scheduling group is created to ensure the system will schedule two or more deliveries at the same time, same day. These groups may be in the same room or in different rooms, may have the same instructor or may have different instructors. Additionally, the attached deliveries may have to schedule so that they alternate each week. When setting up a scheduling group, the time request information MUST match – same time pattern/duration. Room request information can be different but then the correct group must be selected (e.g. STDR is same time, different room). For the instructor, the assigned instructor can be the different for each component or delivery but the correct group must be selected (STSRDP – same time, same room, different professor). If the two deliveries will be running every other week and need to schedule on the same day and time, ensure the frequency is set to ‘2’ in the Time Request then select one of the alternating week group types (AWSTSR – alternating week, same time, same room). November 2011 Page 25 of 28 H – Known Issues Known DCU Issues – For any issues with DCU please contact Michelle Warrington, [email protected] or ext 5641. November 2011 Page 26 of 28 Glossary of terms Component: The component in Timetabler/DCU is the equivalent to a Banner section/CRN. Currently, the component identifier in Timetabler/DCU includes the component type and the Banner section number – e.g. LEC01 where ‘01’ is the Banner section and ‘LEC’ is the component type. Component type: The component type in Timetabler/DCU is equivalent to the Schedule type in Banner. This code indicates if the course component is a lecture (‘LEC’), a lab (‘LAB’), or a tutorial (‘TUT’), etc. Course: In Banner, the course is the combination of the course subject (e.g. PSCY) and the course number (100U). In Timetabler/DCU, the course is a term identifier (F = Fall, W= Winter, S=Summer), the subject and course code concatenated together (e.g. F12PSYC 1000U). Course Constraint: When a course needs to be scheduled in certain ways such as ‘lecture before the lab’ or ‘lecture before the tutorial’, this is a constraint on how the course can schedule. There is a list of course constraints that have been defined in the Timetabler/DCU system and that are available for selection in DCU. Selecting a course constraint allows Scheduling to know that a scheduling tie needs to be created for the course. Course Requirement Notes: When a course constraint is selected, additional information is usually needed to help Scheduling set up a scheduling tie to ensure the course components are scheduled as indicated by the constraint. If there are multiple lectures and multiple tutorial or lab components, the course requirement note needs to indicate which lecture component needs to be tied to which tutorial or lab. (E.g. LEC01 tied with TUT03 to meet ‘Lec before tut/lab’ constraint) DCU: Data Collection Utility (DCU) is a web‐based scheduling data entry system. This is used by academic departments to update scheduling information in preparation for the scheduling process. Delivery: The delivery in Timetabler relates to the meeting patterns in Banner. This includes the dates, the time patterns, the room requirements and the assigned instructor(s). Time Pattern request: A time pattern request is a code to define how to set up the time for delivering instruction of a course. For example, a 3 hour course may be run for 3 hours once a week (103) or 1.5 hours twice a week (215) or for 1 hour three times a week (301). Note that if the course component must schedule with day(s) & time(s) that do not fit a standard time pattern, then the time must be forced. This cannot be done in DCU – instead, the time pattern ‘Off‐Pattern’ must be selected and the details (day, time, duration) must be noted in the Time Requirement notes. Room Type: The room type indicates what kind of room is needed for the delivery of the class. Most courses will require a classroom (code is ‘CLS’). However, there are other types such as a computer lab (COMP), a language lab (LAB), etc. See the tab in the worksheet with the legend listing the room types. Scheduling Groups (Cross‐listings in Banner) Two or more different courses that need to be grouped together: November 2011 Page 27 of 28 STSR – Same Time, Same Room ‐ use this scheduling group when two courses need to be scheduled at the same time and in the same room STSRSP – Same Time, Same Room, Same Professor ‐ use this scheduling group when two courses are needed to be scheduled at the same time, in the same room by the same professor STDR – Same Time, Different Room – use this scheduling group when two courses need to be scheduled at the same time in different rooms STDR ‐ Alternating Weeks – use this scheduling group when two courses need to be scheduled at the same time in a different room and on alternating weeks with each other STSR – Alternating Weeks – use this scheduling group when two courses need to be scheduled at the same time and in the same room and on alternating weeks with each other Scheduling Tie: When there is a course constraint required for a course, scheduling creates a scheduling tie. The course constraint should have additional course requirement notes to indicate which components to attach to the scheduling tie – e.g. Lecture LEC01 and tutorial TUT04, etc. The scheduling tie is coded to have the system try to schedule one of the two components in a way that will result in the desired course constraint outcome. For example, if the course constraint selected is ‘Lech Before Tut/Lab’ and the associated course requirement notes indicates tutorial TUT03 should be tied with lecture LEC01 and TUT04 with LEC02 , etc., then there will be a scheduling tie for each pair of components. The first scheduling tie will be coded to ensure tutorial TUT03 will schedule after any occurrence of the lecture LEC01. The second scheduling tie will be coded to ensure tutorial TUT04 will schedule after any occurrence of the lecture LEC02. Section: In Timetabler, section is a numerical value. This is NOT the same as a section in Banner. For DCU, sections are used to allow the departments to group specific components so that specific types of components can be scheduled conflict free with each other. E.g. Course=BIOL 1010U, Section=x1, Components=LEC01, LAB04‐LAB8, TUT9‐12 Course=BIOL 1010U, Section=x2, Components=LEC02, LAB013‐LAB19, TUT20‐26 Timetabler: Scheduling software that is used to schedule classes into deliveries (days, times, rooms). November 2011 Page 28 of 28