1
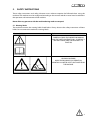
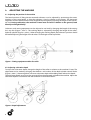
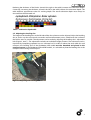
OPERATION AND
MAINTENANCE MANUAL
DISC CULTIVATOR
DM300
DM350
DM400
Starting from serial nr. 02265510
Original manual 01 / 2012
Contents
1.
FOREWORD............................................................................................................................................................................1
1.1. Purpose of use ..................................................................................................................................................................1
1.2. Type plate...........................................................................................................................................................................2
2.
SAFETY INSTRUCTIONS......................................................................................................................................................3
2.1. Warning labels ..................................................................................................................................................................3
2.2. Connecting and disconnecting the cultivator ......................................................................................................4
2.3. Transport on public roads ............................................................................................................................................4
2.4. Using the disc cultivator................................................................................................................................................4
2.5. Maintenance......................................................................................................................................................................4
3.
MEASURES BEFORE USING THE MACHINE..................................................................................................................5
3.1. Connecting the cultivator to a tractor......................................................................................................................5
3.2. Towing equipment..........................................................................................................................................................5
4. ADJUSTING THE MACHINE ...............................................................................................................................................6
4.1. Adjusting the position of the machine....................................................................................................................6
4.2. Adjusting cultivation depth.........................................................................................................................................6
4.3. Adjusting the levelling disc..........................................................................................................................................7
4.4. Lateral adjustment of the disc shaft..........................................................................................................................8
4.5. Roller scraper.....................................................................................................................................................................9
5. STUBBLE CULTIVATION................................................................................................................................................... 10
5.1. Cultivation pattern ....................................................................................................................................................... 10
6.
7.
MAINTENANCE, INSPECTION........................................................................................................................................ 12
6.1. Inspections after 10 hours of use or daily ............................................................................................................ 12
6.2. Inspections every 200 hours or yearly................................................................................................................... 12
MAINTENANCE, LUBRICATION..................................................................................................................................... 13
7.1. Lubrication every ten hours or daily...................................................................................................................... 13
7.2. Lubrication every 50 hours........................................................................................................................................ 13
7.3. Lubrication every 200 hours or once per season .............................................................................................. 13
7.4. Lubrication every 1000 hours (towed)................................................................................................................. 13
8. STORAGE.............................................................................................................................................................................. 14
9. WEAR PARTS....................................................................................................................................................................... 14
9.1. Washing and cleaning................................................................................................................................................. 14
10. WARRANTY ......................................................................................................................................................................... 15
11. EC DECLARATION OF CONFORMITY .......................................................................................................................... 16
Connection socket according to SFS 2473 ....................................................................................................................... 17
1.
FOREWORD
Multiva farming machinery is manufactured in Finland. The modern production technology, excellent
raw materials, careful production and excellent finishing guarantee a high-class product.
Thank you for selecting a high-quality Multiva disc cultivator. We hope that the product you selected
will meet your requirements and serve you for a long time. Please read this manual carefully before
operating the machine. The inspection and maintenance measures listed in this manual are crucially
important for flawless machine operation and the validity of the warranty.
All instructions, warnings and prohibitions regarding the use of the machine must always be observed.
They have been issued to ensure the safety of the user and durability of the machine.
This operation and maintenance manual covers the following disc cultivator models:
DiscMaster 300, 350 and 400 starting from serial number 02265510
1.1. Purpose of use
The Multiva disc cultivator is intended for shallow primary tillage (stubble cultivation) in the autumn or
spring, the main purpose of which is to loosen and aerate the soil, bury plant residue and prepare the
soil for cultivation. The disc cultivator can also be used for seedbed preparation. Use of the disc
cultivator for any other purpose is prohibited! Stubble cultivation performed with the disc cultivator
buries plant residue under the surface layer of the soil and compresses the surface of the field. The
machine is particularly well-suited to stubble cultivation, thanks to its excellent efficiency in burying
plant residue and its adjustable working depth.
The Multiva cultivators are equipped with thick 5 mm conical discs that can penetrate hard soil
extremely well. To prevent breakage due to rocks and other obstacles, the discs have been fitted with
rubber suspension mechanisms. The weight of the cultivator (adjustable with additional weight), its
open frame structure and the dense row of roller plates are also essential in achieving an even result.
Technical specifications
With standard equipment
DiscMaster
Working width cm
Discs, pcs
Disc diameter, mm
Section count
Power requirement, bhp (spring/autumn)
Transport width, m
Weight with standard equipment, kg
Towing equipment, kg
* levelling disc in the transport mount
300
300
23
510
1
100/120
3,35
1930
765
350
350
27
510
1
115/140
3,6*
2110
765
400
400
31
510
1
130/160
4*
2340
765
Due to ongoing product development, products and specifications discussed herein are subject
to change.
1
1.2. Type plate
The disc cultivator carries a type plate containing the information listed here. Write down the type plate
information in the fields provided below. When discussing with a seller or factory representative, please
state the model and serial number of the machine. This will help to prevent unnecessary delays and
misunderstandings.
2
2.
SAFETY INSTRUCTIONS
These safety instructions and safety distances must without exception be followed when using the
machine. The machine must be configured according to this manual and this manual must be utilised in
the operation and maintenance of the machine.
Never allow any person to ride the machine during work or transport!
2.1. Warning labels
The machine contains the warning labels listed below. Always observe the safety instructions of these
labels. Do not remove the machine’s warning labels.
Warning label
Explanation
CAREFULLY READ THE OPERATION MANUAL
AND THE SAFETY INSTRUCTIONS – ESPECIALLY
BEFORE CONNECTING THE MACHINE TO A
TRACTOR!
CRUSHING HAZARD!
WHEN THE MACHINE IS IN OPERATION,
MAINTAIN A 5-METRE SAFETY DISTANCE FROM
THE MACHINE.
3
2.2. Connecting and disconnecting the cultivator
The machine can only be connected to a tractor’s three-point lifting device. The cultivator fitted with
towing equipment is connected to the tractor’s link arms. All tractor safety instructions must be
observed when connecting or disconnecting the machine. The connection and disconnection of the
cultivator pose the danger of crushing. Moreover, you must exercise caution not to injure your feet,
fingers or hands. Touching the hydraulic cylinders, hoses and hydraulic connectors is strictly prohibited
when the cylinders are in operation. When the cultivator is connected to a tractor, unauthorised persons
must be cleared from the vicinity of the machinery.
2.3. Transport on public roads
When transporting the cultivator on public roads, always exercise caution and observe all laws and
regulations applicable to road traffic and slow-moving vehicles. Before departure, check the operation
and visibility of the machine’s reflectors and lights as well as those of the tractor. Before road transport,
always ensure that the machine is sufficiently clean. Do not transport or operate the machine when ill,
excessively fatigued or under the influence of alcohol. The driver is responsible for any injuries and
damage caused by the machine to other persons. The highest permissible speed for a cultivator with
towing equipment is 40 km/h.
NOTE! In order to reduce the total width for road transport, the levelling disc of the DiscMaster 400
model must be detached and placed in the transport mount, so that the machine does not exceed
the maximum transport width permitted by the road traffic legislation. The DiscMaster 350 and 300
models also include a transport mount for the levelling disc, and it is always advisable to use the rack in
road transport.
2.4. Using the disc cultivator
The driver must be familiar with the cultivator’s operation. In addition, he or she must have the
sufficient knowledge and skill to properly use the machine. The driver must carefully read the operation
manual and observe its instructions.
When connecting a disc cultivator to a tractor’s lifting device, the weight distribution between the
tractor’s front and rear axles changes. In order to ensure safe operation and optimal towing power,
install front weights on the tractor, if necessary.
Before beginning work, always check the condition of the machine and the tightness of the bolts. Never
adjust or clean a moving machine. All persons are strictly prohibited from being on the machine or
within its operating range (safety distance 5 m) when it is in operation. For purposes other than
adjustment, avoid reversing the machine when the discs are lowered. To avoid blockages, you should
also avoid reversing the machine when the roller is down. During cultivation, do not perform tight
turns with the discs down. Instead, raise the cultivator when turning.
Touching the hydraulic cylinders, hoses and hydraulic connectors is strictly prohibited when the
cylinders are in operation.
When installing or removing additional weights, you must exercise caution not to injure your feet,
fingers or hands.
2.5. Maintenance
Always stop the machine and prevent its movement for the duration of maintenance. The maintenance
must be performed on an even and stable foundation in order to ensure that the cultivator cannot tip
over or move. Do not conduct maintenance or other measures when the machine or one of its
components is raised and unsupported. When maintaining the machine, ensure safe working
conditions and sufficient illumination.
4
3.
MEASURES BEFORE USING THE MACHINE
The machine has been lubricated for the first time at the factory. However, it is advisable to familiarise
yourself with the lubrication points before initial use. The lubrication points are listed in Section 7.2 of
this manual.
3.1. Connecting the cultivator to a tractor
Connect the disc cultivator to the tractor’s three-point lifting device (category II or III connection). The
attachment point for the top link bar in the tractor must be lower than in the cultivator. Lock the pins of
the drawbars and push bar with linchpins. Adjust the side limiters in such a way that they lock the
cultivator in the centre of the lifting device. The correct adjustment will prevent the machine from
contacting with the tractor and its tyres. When working under variable conditions and during road
transport, the side limiters must always be locked. Connect the hydraulic hoses for the working depth
adjustment to the double-acting outlet. When disconnecting the machine from the tractor, always
remember to disconnect the hydraulic hoses.
3.2. Towing equipment
With the towing equipment, a lifting device-mounted disc cultivator can be arranged for towing. The
towing equipment includes a tow bar, wheel set and frame attachments. The frame attachments are
fastened to the machine's original frame with bolts. The tow bar is connected to the tractor’s drawbars.
The tow bar fastenings are accordant with category II. The tractor drawbars should be left in the
horizontal position as much as this is possible. In this way, the disc cultivator will not force the tractor in
any direction. The drawbars must under no circumstances be directed downwards, as this will cause the
tractor to lift the front end of the cultivator, resulting in variable working depth under various
conditions. The side limiters must always be locked when the towing equipment is used. The towing
equipment requires one double-acting outlet from the tractor hydraulics for wheel operation.
During cultivation, the machine can be made lighter to drag by lowering the wheel set. When on
headland, the cultivator can be raised to rest on the wheels or rollers. During cultivation, the wheel set
should be raised up to a position where it is suspended by the cylinders. This keeps the wheels cleaner,
and unnecessary soil is not carried onto roads and highways.
5
4.
ADJUSTING THE MACHINE
4.1. Adjusting the position of the machine
The lateral position of lifting device-mounted cultivators can be adjusted by positioning the tractor
drawbars at the same height, so that the cultivator is level in relation to the tractor. The horizontal
alignment of the machine frame can be longitudinally changed by adjusting the length of the tractors
top link. During cultivation, the machine's frame must be level in relation to the ground, both
laterally and longitudinally.
Cultivators with towing equipment can be adjusted to run level by changing the length of the towing
bar’s top link (Figure 1, item 1). The working depth is adjusted by changing the length of the roller’s
hydraulic cylinder (Figure 1, item 2) . When changing the working depth, the cultivator's position should
be levelled adjusting the height of the drawbars or the length of the top link bar.
Figure 1. Towing equipment with a disc roller
4.2. Adjusting cultivation depth
To adjust the cultivation depth, change the height of the roller in relation to the machine’s frame. The
adjustment can be made by changing the thickness and number of the depth cylinder control blocks
(Figure 2, item 1.). Removing blocks increases cultivation depth while adding them reduces the depth.
The cultivation depth must always be measured from the cultivated soil behind the machine. Adjust the
cultivation depth in accordance with the conditions of each field section.
Figure 2. Depth adjustment
6
Reducing the thickness of the blocks (towards the right in the table) increases the cultivation depth.
Conversely, increasing the thickness (towards the left in the table) reduces the cultivation depth. The
table indicates approximate values for working depth. The actual cultivation depth must always be
ensured from the cultivated soil.
Table 1. Cultivation depth table
4.3. Adjusting the levelling disc
The height of the levelling disc on the left side of the disc cultivator can be adjusted. Adjust the levelling
disc in such a way that no mounds or trenches are formed between passes, which leaves the surface of
the field as even as possible. The adjustment can be made by adjusting the levelling disc’s adjustment
bolt (Figure 3, item 1.). The adjustment includes ten individual height positions. The cultivation result is
improved by completing repeated runs on cultivated soil. In order to reduce the total width for road
transport, the levelling disc of the DiscMaster 400 model must be detached and placed in the
transport mount. In the DiscMaster 350 and 300 models, it is advisable to place the levelling disc in the
transport mount during road transport.
Figure 3. Adjusting the levelling disc
7
4.4. Lateral adjustment of the disc shaft
Upon significant alterations to the cultivation depth, the rear disc shaft can be adjusted in relation to
the front disc shaft, in order to ensure even disc alignment. E.g When moving from uncultivated land to
cultivated land. Figure 4 presents the disc alignment with correct adjustments. This ensures that the
height of the soil strip between the discs (measurement B) is as low as possible.
Figure 4. Operation of the lateral adjustment as viewed from the front of the cultivator
Factory adjustment is intended for a cultivation depth of 8 to 10 cm under normal conditions. In shallow
cultivation, move the shaft to the left (viewed from the back), which reduces measurement A in Figure
4. Loosen the bolts and remove a sufficient number of adjustment pieces. Tow the cultivator forward
carefully to move the shaft. When the cultivator is raised, the shaft can also be moved laterally by
pushing the disc shaft. Then reinstall the removed adjustment pieces under the nuts and tighten the
bolts.
NOTE! An equal number of adjustment pieces must be arranged in all adjustment points and in
both wing sections. If a disparate number of adjustment pieces is installed onto the cultivator,
the machine may break during cultivation or when lowering the wing sections!
Figure 5. Lateral adjustment
Other factors that affect the cultivation result are driving speed as well as soil type and composition. The
rubber suspension of a new cultivator will likely change during the cultivation of the first few dozen
hectares. For this reason, you should initially check the disc alignment regularly.
8
4.5. Roller scraper
The cleaning scrapers for the roller discs can be adjusted to two positions by means of a pin-locked
mechanism (Figure 6, item 1). Adjust the scrapers according to the conditions in such a way that
blockages are not formed in the roller discs. The upper hole (outer scraper position) is the default
adjustment. The lower hole (inner scraper position) should be used when cultivating soil that is prone to
forming blockages.
Figure 6. Adjusting the roller scraper
9
5.
STUBBLE CULTIVATION
The Multiva disc cultivator is intended for shallow primary tillage (stubble cultivation) and
seedbed preparation. Use of the cultivator for any other purpose is prohibited!
Stubble cultivation is a method where the primary tillage of a field is not conducted by means of
ploughing. In stubble cultivation performed with a disc cultivator, as little soil as possible is moved and
the cultivation is shallower than in, for example, ploughing. The plant residue is covered in the top layer
of soil, which is then compressed with the roller discs. Energy and time consumption per area unit are
lower compared to ploughing. After disc cultivation, the surface of the field must be even and the plant
residue must not get in the way of future work tasks. The field must also be in a condition to withstand
the effects of the weather.
Numerous studies have shown that shallow cultivation improves the composition and fertility of soil in
the long term. When stubble cultivation is used, this is evident in the increase of worms, microorganisms and organic matter. Cultivation becomes easier, moisture conditions improve and the
structure of the soil improves. Depending on the field, the change may take several years. Care must be
taken so as to not weaken the composition of the soil by cultivating excessively moist soil.
The cultivation depth and number of passes must be determined in accordance with the situation.
Factors that affect these choices are the amount of straw, length of the stubble and moisture of the soil.
The stubble must not be too long and the straw must be well-shredded. One cultivation run is
frequently sufficient. It should be conducted as soon as possible after harvesting. If necessary, the
second cultivation run is performed two to four weeks after the first one, when some of the weeds and
fallen grain seeds have germinated and the straw has begun to decompose. When completing two
cultivation runs, the first run should be shallow and the second one deep. A suitable speed for
cultivation is 10 to 15 km/h. The cultivation result normally improves as the speed increases.
5.1. Cultivation pattern
The pattern used for the cultivation should be carefully selected. Many factors affect this selection: the
size and shape of the field, contours of the terrain and trench arrangements. A correctly selected pattern
reduces the required work effort and enables the best result. If possible, you should align your passes
with the longest side of the field so that the time spent on turns is minimised. Some examples of
cultivation patterns are listed below. In the strip pattern (alternative 2 or 3), the use and adjustment of
the levelling disc is particularly important. When using the spiral pattern in an anticlockwise direction,
the levelling disc can be adjusted to the lowest position to function as one of the cultivation discs.
When using a cultivator with towing equipment, the turns can be carried out with the machine’s weight
on the roller or the wheels. However, only the transport wheels can be used when reversing. If you try to
reverse with the roller down, it may become blocked. When performing secondary tillage, perform the
turns with the roller down. This compresses the soil as minimally and as evenly as possible.
10
Cultivation patterns:
1 = Spiral pattern
2 = Strip pattern
3 = Strip pattern, overlaps
Turning techniques in strip patterns:
1 = Overlap turn
2 = Loop turn
3 = Reverse turn
Turning techniques in spiral patterns
1 = Loop turn
2 = Reverse turn
11
6.
MAINTENANCE, INSPECTION
The cultivation disc hubs contain maintenance-free, self-lubricated double-row ball bearings. They do
not require maintenance.
6.1. Inspections after 10 hours of use or daily
Check the tightness of all bolts.
The bolts may loosen during cultivation of the first hours.
Tightening torque table:
Disc attachment bolts
90 Nm
(installed with thread locking compound)
Rubber spring plate
120 Nm
Attachment bolts of the cultivator bars
600 Nm
Fastening bolts of the roller bearings
210 Nm
Fastening bolts of the roller shaft’s end plate 50 Nm
(installed with thread locking compound)
Towing equipment:
Wheel bolts
Frame attachment
320 Nm
330 Nm
Tyre air pressure ( towing equipment )
• Check the air pressure of the tyres after 10 hours of use. The correct air pressure for a 400/6015.5 tyre is 2.0 bar.
6.2. Inspections every 200 hours or yearly
Condition of the cultivator disc bearings
The condition of the cultivator disc bearings must be checked annually.
• To check the bearing condition, move the cultivator disc sideways. If you detect looseness,
replace the bearings.
• In conjunction with checking the bearings, visually inspect the condition of the hub seals and
replace damaged seals.
• When opening the bearings, always replace the locking nut used for fastening. Negligence will
result in bearing damage.
The condition of the hydraulic hoses
• The condition of the hydraulic hoses must be checked annually at the beginning of the
operating season.
• Inspect the hoses for cuts, wear and malformations.
• When checking the hoses, take special care to ensure that any possible oil jets discharging from
the hoses do not come into contact with your skin. Pressurised oil jets may penetrate clothes
and skin.
Wheel hub bearing clearance ( towing equipment )
The bearing clearance of wheel hubs must be checked every 200 hours.
• If hub bearings are found to be loose, they must be tightened.
• When tightening a bearing, lift the ring up and open the hub. Remove the locking pin of the
shaft’s castle nut and tighten the nut until you feel slight resistance in the bearing. Then open
the nut until the locking pin fits into the next nut’s slot, where the bearing is spinning freely. Do
not open the nut more than 30 degrees. Lock the pin in place. Install the hub.
12
7.
MAINTENANCE, LUBRICATION
Lubrication points
Inject lubricant into the nipples until clean lubricant is expelled. Wipe off the excess lubricant with a rag.
7.1. Lubrication every ten hours or daily
• Roller end bearings, 2 pcs, point 1
• Towing eye, 1 pcs, point 5
7.2. Lubrication every 50 hours
• Towing bar’s vertical pin, 1 pcs, point 4. (towed)
• Bearings of the towing bar's vertical pin, 1 pcs, point 5. (towed)
7.3. Lubrication every 200 hours or once per season
• Top link of the tow bar, 2 pcs, point 2.
• Surface of the rearmost disc bar’s slide shafts, 4 pcs, point 3.
• Oiling the lateral movement limiters, point 3.
• Joint bearings of the wheel set cylinders, 1 pcs, point 2.
• Depth adjustment cylinder’s joint bearing 4 pcs, point 6. (towed)
7.4. Lubrication every 1000 hours (towed)
• Replacing the grease of the transport wheels, 2 pcs, point 7
o Remove the old grease in its entirety and clean all components from the old grease with
diesel oil. Fill the gap between the bearings and 1/3 of the cup with fresh grease.
o When greasing wheel hubs, use lithium-based petroleum jelly with a drop point of at
least 190 ºC – for example, Teboil Multi-Purpose HT.
13
8.
STORAGE
For long-term storage, clean the cultivator carefully and lubricate it. It is recommended to store the
machine indoors. During storage, the hydraulic cylinders must be positioned in such a way that as little
as possible of the chromed piston rod is visible. The piston rod parts that remain visible must be
protected with petroleum jelly or thick oil.
Leaving the entire weight of the machine on the discs’ rubber suspension for the duration of a longer
storage period (winter) may damage the suspension. The best way to store the disc cultivator is to rest it
on the parking support and the rollers, which takes the weight off the discs. The rear of the machine can
be allowed to rest on the roller.
9.
WEAR PARTS
In matters concerning spare parts and supplies, contact the machine’s manufacturer or retailer.
By using original spare parts, you ensure that the cultivator remains in working order and functions as
intended. When replacing a cultivator disc, it is recommended to also replace the hub bearings with a
proper spare part kit.
9.1. Washing and cleaning
When washing the cultivator with a pressure washer, avoid aiming the water jet at the cultivation disc
bearings. Water may penetrate the seal and replace the lubricant. If this occurs, the bearings will fail
very quickly. Any dirt around the bearings must be mechanically removed before pressure washing.
All lubrication points must be lubricated after washing.
14
10. WARRANTY
Multiva agricultural machines come with a one-year warranty.
Warranty policy:
1.
The manufacturer shall replace, free-of-charge, any parts that become unusable due to defective
workmanship or defective raw materials within the warranty period. However, any parts subject to
wear are not covered by the warranty.
2.
Damage caused by misuse, inadequate service, changes unauthorised by the manufacturer, traffic
accidents and other reasons beyond feasible inspection are excluded from the coverage under this
warranty.
3.
Damage caused by powering the machine with a clearly over-sized tractor is also excluded.
4.
If a failure is repaired by a third party, the manufacturer will only compensate the costs for the
repairs if this procedure has been agreed upon in advance with a representative of the
manufacturer.
5.
The manufacturer is not liable for loss of income due to downtime caused by damage or for any
other indirect losses caused by damaged machinery.
15
11. EC DECLARATION OF CONFORMITY
DOMETAL OY
Kotimäentie 1
FI-32210 Loimaa, Finland
Finland
hereby states that the machine in question
Multiva DiscMaster disc cultivator
meets the requirements of Machinery Directive 98/37EU. The following standards were applied in the
design of the machine:
SFS-EN ISO 12100-1:2003
SFS-EN ISO 12100-2:2003
Furthermore, the following standards were applied in the design of the machine:
SFS-ISO 730-1:1994
SFS-EN 1553:2000
SFS-EN 982:1996
16
Connection socket according to SFS 2473
1/L
6/54
2/54G
7/58L
3/31
5/58R
4/R
1/L
2/54G
3/31
4/R
5/58R
6/54
7/58L
Left turn signal
Free
Ground
Right turn signal
Right rear light+reg. plate light
Brake light
Left rear light
yellow
white
green
brown
red
black
17