1
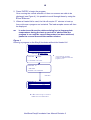
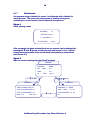
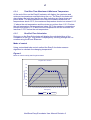
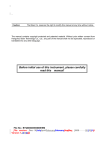
User Manual
2
NucliSens EasyQ Incubator has bioMérieux article number 285204. This
number can be found at the back of the instrument.
This User Manual has bioMérieux article number 45685205.
This User Manual is revision 3 and replaces the revision 2 User Manual.
The information in this manual is of proprietary nature. No part of this
publication can be reproduced, stored in a retrieval system, translated,
transcribed, or transmitted in any form or by any means without the prior
written permission of bioMérieux bv.
© Copyright 2001 bioMérieux bv. All rights reserved.
bioMérieux bv. reserves the right to make changes to this manual without
further notification. This manual is thought to be fully consistent with the
product it describes. bioMérieux bv does not assume liability for the contents
of this manual.
If this appliance is not used according to the description in this User Manual,
bioMérieux bv does not assume liability for any consequent effects.
Any comments on this publication are appreciated.
The manufacturer does not assume any responsibility for user modifications.
Such modifications might change the EMC-behavior of the instrument.
Any modification of this instrument by the user and any use of this instrument
outside the description in the User Manual ends the warranty given by the
manufacturer.
Any repair or modification to this instrument by another person than an
bioMérieux representative ends the warranty given by the manufacturer.
bioMérieux bv.
Boseind 15
P.O. Box 84
5280 AB Boxtel
The Netherlands
Phone +31 411 654321
Fax +31 411 654111
E-mail: [email protected]
NucliSens EasyQ Incubator User Manual Revision 3
3
Table of Contents
Page
1.
INTRODUCTION
4
2.
SYSTEM DESCRIPTION
5
3.
WARNINGS
6
4.
CONFORMANCE STATEMENT
7
5.
INSTALLATION
7
6.
OPERATING PROCEDURE
6.1
Operation
6.1.1
Introduction
6.1.2
Steps & Cycles of a Program
6.1.3
Self Test Check
6.1.4
Main Menu
6.1.5
Viewing an Existing Program
6.1.6
Running a Program
6.1.7
Run Screens
6.1.8
Hold & Pause Functions
6.2
Advanced Features
6.2.1
Clock
6.2.2
Alarm
6.2.3
Auto Power Failure Restart
6.2.4
Total Run Time /Maximum & Minimum Temperature
6.2.5
Run End Time Calculation
10
10
10
11
11
11
11
11
14
16
16
16
16
16
17
17
7.
MAINTENANCE AND CLEANING
18
8.
TECHNICAL SPECIFICATIONS
19
9.
GLOSSARY
20
10. ADDRESSES
NucliSens EasyQ Incubator User Manual Revision 3
21
4
1.
INTRODUCTION
How to use this User Manual
Before you start installing and using this NucliSens EasyQ Incubator, read this
User Manual completely.
Consider this User Manual as an integral part of the NucliSens EasyQ
Incubator.
Keep this User Manual for the life of the NucliSens EasyQ Incubator; pass it
to any subsequent holder of the instrument.
Make sure that any revision or amendment of this User Manual is made
available to the user of the NucliSens EasyQ Incubator.
If you have questions about installing and using the NucliSens EasyQ
Incubator, contact your local representative before you start installing and
using the NucliSens EasyQ Incubator. For addresses see section 10.
For every day use the sections 3 and 6 are relevant. If you have doubts about
the correct performance of the NucliSens EasyQ Incubator, see section 8.
Formatting and conventions
In this User Manual the formatting of section headings is in BOLD
CAPITALS, these section headings are numbered. Within sections there are
subsections which headings are underlined and bold, but not numbered.
In the section describing the Operating Procedure (section 5), the headings
are in BOLD SMALL CAPS, the sub-headings are in Bold Italic. Both items
are numbered.
Notes are in plain text and are meant to draw the user’s attention to specific
information. Warnings are given in bold and are indicated by the warning
symbol:
Names of controls and indicators are given in CAPS.
NucliSens EasyQ Incubator User Manual Revision 3
5
2.
SYSTEM DESCRIPTION
Symbols
In this User Manual and on the NucliSens EasyQ Incubator the following
symbols are used. The meaning of each symbol is given.
Caution, refer to accompanying documents
Manufactured by bioMérieux bv.
Consult instructions for use
This instrument complies to all relevant European Directives.
Arrow keys for navigation
Fuse rating
VA
Power rating
REF
Article number
SN
Serial number
Symbols used for the operation of the NucliSens EasyQ Incubator are
explained in section 6.
NucliSens EasyQ Incubator User Manual Revision 3
6
Basic theory and intended purpose of the instrument
The intended purpose of the bioMérieux EasyQ Incubator is to control the
temperature-time profile of a rack of 0.2 ml tubes.
This version (285204) can hold either up to 96 x 0.2ml tubes or 1 x “V” well 96
well plate.
The Heated Lid allows the EasyQ Incubator to be used for higher temperature
protocols without the need for mineral oil overlays. Such vapor barriers are
normally required to prevent evaporation of reaction constituents during
thermal cycling.
The EasyQ Incubator has a large display screen, which, in combination with
its advanced software, allows protocols to be programmed and run with ease.
The unit can store up to 10 programs each program is identified either by a
name and a number.
The EasyQ Incubator can be used for static temperature sample incubations,
within a sample temperature range of ambient +10 °C-99 °C. The EasyQ
Incubator can be run at an ambient operating temperature of +4 °C-30 °C.
Possibilities of extensions, updates, optional modules and extras
For the NucliSens EasyQ Incubator there are no extensions, updates, optional
modules and extras available. If you have questions about extensions,
updates, optional modules and extras, contact your local bioMérieux
representative; for addresses see section 10.
3.
WARNINGS
The EasyQ Incubator has been designed for reliability and ease of
maintenance. The EasyQ Incubator should only be used by suitably qualified
and trained personnel. The unit should only be used for it’s intended purpose
in accordance with the instructions and safety warnings contained in this
manual.
Refer to the installation instructions contained in this manual before
connecting to the mains supply.
THIS APPLIANCE MUST BE EARTHED
The EasyQ Incubator is a class 1 appliance. To minimize the risk
of electric shock, the unit must be connected to a protective earth
via the supplied mains cord.
Replacement fuses must be of the correct rated current, voltage
and type.
Do not operate the unit in an explosive environment.
NucliSens EasyQ Incubator User Manual Revision 3
7
Do not operate the unit if it appears to have been damaged or if a
liquid or foreign object has entered the enclosure. Disconnect
from the mains supply and consult your bioMérieux bv.
representative.
Do not attempt to dismantle the unit. To avoid the risk of personal
injury, and to ensure that the safety features of this unit are
maintained, servicing should only be carried out by authorized
personnel.
Follow the site requirements as given in section 5.
NB:
4.
If the NucliSens Easy Q Incubator is not used as specified in this
manual, the protection provided by the equipment may be impaired.
CONFORMANCE STATEMENT
This product is in conformance with the requirements of the applicable
EU Council Directives.
This product is in conformance with the requirements of the applicable UL and
CSA standards.
If you require the “declaration of conformity” document, please contact your
local bioMérieux representative; for addresses see section 10.
5.
INSTALLATION
Unpacking and inspection for transport damage
Please retain this packaging for future use; it is important that the NucliSens
EasyQ Incubator is always transported in this packaging. bioMérieux bv.
cannot accept responsibility for any damage incurred unless the instrument
has been correctly packaged.
The packaging consists of the following components:
NucliSens EasyQ Incubator
Power cables (110V & 240V)
User Manual
One tube mineral oil
Heated Lid removable protective shield
Pack of fuses and fuse labels
Remove the EasyQ Incubator from the packaging and place on the bench; do
not connect to the mains supply immediately.
NucliSens EasyQ Incubator User Manual Revision 3
8
Check the voltage label on the rear of the EasyQ Incubator, if the
voltage is incorrect contact your local service center immediately.
Check for visible signs of damage. If damage is found, retain the packing
material, request an inspection by the carrier and notify your supplier within
three days.
Connect the EasyQ Incubator to a suitable mains power supply (see section
8) via the cable provided. The voltage and power rating labels of the
instrument are found on the rear of the unit above the power socket. Avoid
connecting the unit to a circuit that may be subject to mains fluctuations such
as that shared by Ultracentrifuges, freezers or refrigerators.
Switch on the EasyQ Incubator at the power switch at the rear of the unit.
When switched on the unit will complete a start up and self test routine. The
self test routine checks the block thermistor, heating elements, the cooling fan
and the Heated Lid. This takes approximately 2 minutes.
This feature can be by-passed by pressing ‘CONTINUE’ whilst the NucliSens
EasyQ Incubator screen is displayed.
Since the block and lid will become hot during the self-test
procedure, bioMérieux strongly recommends that the heated lid
protective cover is placed onto the lid and that the operator is
extremely careful when close to the block. This protective cover is
to be used whenever the heated lid is used and the lid is open.
Picture1: Use of Protective Cover
If the start up procedure has been successful the Main Menu will be
displayed. If a fault has been detected one of a series of error screens may be
displayed.
NucliSens EasyQ Incubator User Manual Revision 3
9
Site requirements
The Heating Block should be used indoors and should not be located in direct
sunlight or next to radiators or heaters. A normal laboratory bench close to a
mains supply socket is quite suitable.
The EasyQ Incubator is cooled by a fan and therefore should be situated with
at least 15 cm clearance at the rear and 8 cm on either side of the unit. Do not
place the EasyQ Incubator in direct sunlight or strong air currents, which may
affect the performance of the unit.
The EasyQ Incubator may be used in a cold room (down to 4°C). However,
when removed it should be allowed to equilibrate for at least two hours before
being switched on.
If this is not done, there is a risk that condensation may form
within the unit and cause a short circuit.
The EasyQ Incubator can be run at an ambient operating temperature of
+4 °C-30 °C.
Storage conditions
The EasyQ Incubator can be stored at an ambient temperature of –20°C+35°C. When the unit is removed from storage it should be left in its working
environment for at least two hours before switching the unit on. This is to
avoid condensation build up within the unit.
End-of-life-treatment
At the end of the life of the EasyQ Incubator it must be disinfected and
decontaminated in accordance with section 7 of this manual. The EasyQ
Incubator can then be disposed of in accordance with ISO 14000.
NucliSens EasyQ Incubator User Manual Revision 3
10
6.
OPERATING PROCEDURE
Controls and indicators
The EasyQ Incubator is very easy to operate. Whilst the software is designed
to be intuitive, the following table gives a summary of the primary functions of
each of the keys.
ENTER
MENU Key
-
NUMBER Keys
-
ARROW Keys
-
STOP Key
CONTINUE Key
-
PAUSE Key
MEMORY Key
-
Moving between program positions.
Selecting program choices.
Always moves to the Main Menu - can be utilized
as an “escape” key.
Used for entering parameters and selecting
programs.
Moving cursor between program positions and in
Alphabetic naming of programs.
Used for rapid scrolling through programs and for
moving between run screens.
Cancels instructions/operations.
Used to delete programs.
Used to progress from “hold”, “pause” or “selftest” instructions.
Also used to access detailed editing functions.
Pauses a cycling program at current step.
Allows access to run the last program whilst the
block is inactive.
If viewing a program whilst block is active
pressing memory returns to the active program.
Each of these functions is discussed fully in the following sections.
6.1
OPERATION
6.1.1
Introduction
The memory will hold up to 10 complete thermal cycling programs. The
programs are identified on the screen by a number (01-10) and a name.
Programs numbered 01-05 do not utilize the heated lid. Programs numbered
06-10 use the heated lid.
To run a program you must select an existing program.
The EasyQ Incubator interface also includes a number of advanced program
features detailed in Section 6.2.
NucliSens EasyQ Incubator User Manual Revision 3
11
6.1.2
Steps & Cycles of a Program
The programs in the EasyQ Incubator are divided into ‘cycles’ and ‘steps’
when displayed on the screen. A cycle includes up to five steps where each
step refers to the temperatures and times associated with a typical thermal
cycling protocol. Each cycle can be repeated for up to 5 times, and a ‘hold’
added to the end of the program. The EasyQ Incubator can store 10 such
programs which are labeled with a number and a name.
6.1.3
Self Test Check
A screen will display “EasyQ Incubator going through a self check procedure”.
For further details refer to Section 5 of this manual.
6.1.4
Main Menu
After successful start up the first menu to be displayed is the ‘Main’ Menu. It is
possible to return to this menu at any time by pressing ‘MENU’. The Main
Menu displays the current date and time and the status of the block (active,
inactive, interrupted or active resumed).
RUN
VIEW
CLOCK
Select ‘RUN’ to run an existing program.
Select ‘VIEW to look at program.
Select ‘CLOCK’ to alter the way the time and date are
displayed and to set the date and time.
* HOTLID display only appears if the machine is running a program that
utilises the hotlid
6.1.5
Viewing an Existing Program
It is possible to view existing programs without altering the information
contained within them.
1. Select ‘VIEW’ from the Main Menu.
2. Use the ‘ENTER’ key and the
program.
6.1.6
and
arrows to move through the
Running a Program
You can run any stored program by selecting ‘RUN’ from the Main Menu.
(Also see Figure 1.)
1. The EasyQ Incubator will display ’01 NAME’. Scroll through the various
program numbers and names by using the
and
arrow keys. Press
‘ENTER’ to select the desired program number.
NucliSens EasyQ Incubator User Manual Revision 3
12
2. Press ‘ENTER’ to begin the program.
Once running the normal selection of three run screens are able to be
displayed (see Figure 4). It is possible to scroll through these by using the
and arrows.
3. Where a Heated Lid is used, the Lid will require 5-7 minutes to heat up
from cold once a program run is started. The load samples screen will then
be displayed.
NB:
In order to avoid reaction mixtures being kept at inappropriate
temperatures during the heat up period it is advised that the
program is run until the correct temperature has been achieved,
pause the run and then add the reaction mixture.
Figure 1:
Running a program on the EasyQ Incubator without the Heated Lid
DATE
T IM E
IN A C T IV E
M A IN M E N U
RUN
V IE W
<E N T E R >
PRO G NO
C LO C K
M AIN M E N U
scrolls th ro ugh p rogram
nu mbe rs. <E N T E R > selects a
pro gram to run.
01 N A M E
P 1 <E N T E R > T O C O N T
P R O G N O 01
S IM T U B E
<E N T E R > T O C O N F IR M
<E N T E R >
R U N N IN G 01
SET TEMP
TEMP
R1
xx.x
xx.x
T IM E
x:xx:xx
or
scro lls throug h run scree ns
M E N U retu rn s to M ain M en u
NucliSens EasyQ Incubator User Manual Revision 3
13
Figure 2:
Running a program on the EasyQ Incubator with the Heated Lid
DATE
TIME
INACTIVE
MAIN MENU
RUN
VIEW
<ENTER>
CLK
MAIN MENU
scrolls through program
numbers
PROG NAME 01 NAME
<ENTER> selects a program to run
P1 <ENTER> TO CONT
<ENTER>
RUN PROG 01
SIM TUBE
NAME
<ENTER> TO CONFIRM
<ENTER>
HOTLID PREHEATING
<STOP> TO ABORT
RUNNING 01
NAME
PAUSE: LOAD SAMPLES
<ENTER> TO START RUN
<STOP> TO STOP ALARM
or scrolls through run screens
MENU returns to Main Menu
NucliSens EasyQ Incubator User Manual Revision 3
14
6.1.7
Run Screens
On programs using a Heated Lid, screen 1 will alternate with a Heated Lid
warning screen. This serves the dual purpose of a safety warning and
confirming the correct function of the Heated Lid during the run.
Figure 3:
Hotlid warning screen
RUNNING
01
HEATED LID ON
**** WARNING ****
PLATE TEMP
> 100°C
After a program has been activated the three run screens can be displayed by
pressing the and arrows, scrolling through each screen in turn. A fourth
screen becomes available if the run has been interrupted by a power failure
(see Section 6.2).
Figure 4:
Main run screens displayed by the EasyQ Incubator
SCREEN 1
RUNNING
NAME
SET
xx.x
TEMP
TEMP
R1
xx.x
TIME
x:xx:xx
or
or
SCREEN 2
SCREEN 3
STEPS COMPLETED 01
RUNNING 01 NAME
CYCLES COMPLETED 21
TIME
CYCLES REMAINING 09
MAX 94.9
MIN 54.2
NOW
12 : 24
PROGRAM END 13 : 38
or
R10
NucliSens EasyQ Incubator User Manual Revision 3
15
Screen 1
Screen 1 is the main run screen which displays the following information:•
Program number and name.
•
Set (programmed) temperature.
•
Current (actual) temperature.
•
Time.
Screen 2
Screen 2 displays the following information:•
The current step of the running program.
•
The total number of cycles completed and remaining.
•
The maximum and minimum temperatures achieved during the run.
Screen 3
Screen 3 displays the following information:•
Program number and name
•
Time now.
•
The calculated run end time (an estimated value which is updated
throughout the run).
Power failure screen
This additional screen appears if the run has been interrupted by a power
failure or power fluctuation severe enough to affect the unit. (See advanced
features for further information.) It contains the following information:•
The duration of the power failure.
•
The stage in the run when the power failure occurred.
End of run screen
The EasyQ Incubator displays a further screen at the end of the run, this
provides the following information:•
The program name and number.
•
The total run time.
•
The maximum and minimum temperatures recorded during the run.
Block idle screen
If ‘BLOCK’ is pressed and there is no run in progress, the block idle screen is
displayed.
NucliSens EasyQ Incubator User Manual Revision 3
16
Error screens
A number of error screens may be displayed if a fault has been detected in
the unit. Always contact the bioMérieux BV. Service Department or your local
supplier for advice before attempting to use the instrument further.
6.1.8
Hold & Pause Functions
If the program being used has a ‘HOLD’ step at the end the EasyQ Incubator
will keep the samples at this set temperature indefinitely. If a “Hold” is
programmed at the last stage, pressing ‘CONTINUE’ will switch to the run
summary screen.
Extended “Hold” stages should not be used at the end of
reactions using the Heated Lid, as the Heated Lid will
remain switched on with potential for sample evaporation.
Pressing ‘PAUSE’ during a program will stop the EasyQ Incubator at the
target temperature for the step. Pressing ‘CONTINUE’ will continue the
countdown for the step.
6.2
ADVANCED FEATURES
The EasyQ Incubator includes a number of advanced features beyond the
basic programming discussed previously.
6.2.1
Clock
The time and date format of the clock display can be modified. To set the
clock or alter the format select ‘CLOCK’ from the Main Menu. Use the
keys
to alter the format and press ‘ENTER’. Use the numeric and ,
keys to
enter new time/date. Scroll to ‘SET’ and press ‘ENTER’ to save.
6.2.2
Alarm
The EasyQ Incubator is equipped with an audible alarm which sounds at the
end of the run. On programs using the heated lid, the alarm will also sound at
the end of the Hotlid pre-heat cycle. It will sound intermittently for the first
minute and then briefly until switched off. To silence the alarm press ‘STOP’
6.2.3
Auto Power Failure Restart
If there is a power interruption during a run the EasyQ Incubator will re-start
automatically. The Main Menu screen will display ‘RESUMED’ to indicate the
run was interrupted. An additional run screen will display the duration of the
power failure and the exact stage in the run that it occurred. This information
can be accessed by pressing ‘BLOCK’ and using the and arrow keys.
If there are several breaks in the power supply, only the most
recent interrupt is recorded.
NucliSens EasyQ Incubator User Manual Revision 3
17
6.2.4
Total Run Time /Maximum & Minimum Temperature
At the end of the run the EasyQ Incubator will display the maximum and
minimum temperatures recorded during the run. The EasyQ Incubator will
also display the total time that the run took including any ramp times and
pause times. The specifications of the EasyQ Incubator dictate that, at
temperatures above 50°C, the maximum temperature should not exceed 1.25
°C above the set temperature and the minimum not less than 1.25 °C below
the set temperature. At temperatures below 50°C the maximum temperature
should not exceed 0.75°C above the set temperature and the minimum not
less than 0.75°C below the set temperature.
6.2.5
Run End Time Calculation
During a run the EasyQ Incubator will display the calculated time of the
completion of the run. This screen is displayed by scrolling through the run
screens using the and arrows.
Mode of control
Using a simulated tube control method the EasyQ Incubator uses an
algorithm to calculate the changing temperature.
Figure 6:
Mode of control used by the EasyQ Incubator
Program 65°C 30 Secs
75
Temperature (°C)
70
65
60
55
50
45
40
0
5 10 15 20 25 30 35 40 45 50 55 60 65 70 75 80 85 90
Time (secs)
Block
Sample
NucliSens EasyQ Incubator User Manual Revision 3
18
7.
MAINTENANCE AND CLEANING
General Cleaning
The NucliSens EasyQ Incubator does not require any specific user
maintenance. The instrument should be cleaned as follows.
All surfaces of the EasyQ Incubator system and Heated Lid should be cleaned
regularly with a soft cloth, hot water and a mild detergent. It is important to
thoroughly dry all surfaces after cleaning. On no account should organic
solvents be used in the cleaning of any of this equipment.
Disconnect the instrument from the mains power supply when
cleaning the instrument. Reconnect the instrument to the mains
power supply only when the instrument is dry.
Disinfection and Decontamination Procedure
It is imperative that you follow the procedure below in the event of spillage of
infectious agents or a solution containing amplicons on the surface of the
Incubator. It is recommended that this procedure is also performed before
relocating the Incubator from one laboratory to another.
1. In case of a spill, absorb the spill with disposable towels prior to
cleaning and disinfection.
2. Switch off the Incubator and disconnect the power supply cables from
the power source.
3. Clean the surface with a disposable damp towel using 5% Extran or
other soap solution and subsequently rinse with a damp towel using
water.
4. Disinfect the surfaces with disposable damp towels using 0.1% sodium
hypochlorite solution.
Always use disposable gloves and protecting clothing and operate in a
well ventilated place when performing this procedure. Dispose of
gloves and towels according to local regulations.
5. Clean the surfaces with a damp towel using water.
NucliSens EasyQ Incubator User Manual Revision 3
19
8.
TECHNICAL SPECIFICATIONS
Description
NucliSens EasyQ Incubator with 0.2
ml Block & Heated lid
Catalogue N°
285204
Temperature Range
Control precision
Display resolution
Block uniformity
Control available
Ambient +10°C-99°C
±1.0°C
0.1°C
±0.5°C
Simulated tube control
Heated lid operating temp
110 °C
Block
Block capacity
96 x 0.2ml tubes/
1 OmniPlate 96
Standard Accessories
Removable heated lid protective
cover.
Power Requirements
220/240V, 50/60Hz or 110/120V,
50/60Hz
Maximum Power
160AV
Input Fuse Rating
2 x 1.6A(T) 220V or 2 x 3.5A(T)
110V
Programming
No. of programs
Max. no. of steps per stage
Max. programmed dwell time
Pause facility
Temp. ramping
Auto restart
Run “end time” calculation
Run end audible alarm
File protection
Alphanumeric program names
Output
Dimensions
10
5
9h 59 min 59 s
Yes
1.0 °C/s
Yes
Yes
Yes
Yes
Yes
RS232
Width 190 mm
Height 200 mm
Depth
Weight
280 mm
5.5 kg
NucliSens EasyQ Incubator User Manual Revision 3
20
9.
GLOSSARY
Accuracy: the deviation of the average measured value relative to the
required value
EMC: Electro Magnetic Compatibility, levels of susceptibility and emission
ensuring lack of mutual interference by electromagnetic effects.
Resolution: the smallest increment with which a value can be changed
NucliSens EasyQ Incubator User Manual Revision 3
21
10.
ADDRESSES
Should this instrument require service attention or if replacement parts are
required, please contact your local bioMérieux representative.
Please check our website, www.biomerieux.com, for up-to-date information
regarding the address of your local bioMérieux representative.
NucliSens EasyQ Incubator User Manual Revision 3