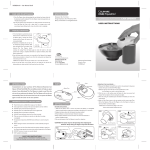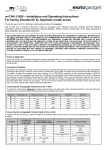
1
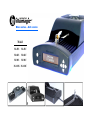
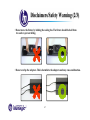
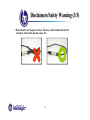
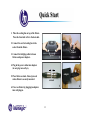
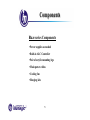
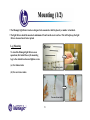
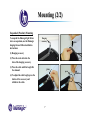
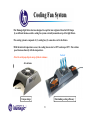
Blaze Series
User Manual
Blaze series – ALC version
Model
M-45S
M-45C
M-60S
M-60C
M-90S
M-90C
M-120S M-120C
Table of Contents
Warnings..............................................................1
Quick Start....................................................4
Components..............................................................5
Mounting..................................................................6
Cooling Fan System.................................................8
Maintainence............................................................9
Warranty..................................................................10
Disclaimers/Safety Warning (1/3)
• Incorrect usage of this device could cause bodily injury or death. Follow all safety
guidelines when assembling and using this fixture.
• Read all instructions and all warnings prior to use of the Illumagic light fixture.
• The Illumagic light fixture is NOT waterproof. Never submerge any part or cord in
water, saltwater, or other solutions.
• Illumagic is not responsible for shock, damage, or loss of livestock due to inadequate
mounting or nonintended use(s).
• Do not look directly into the LED’s or LED lenses any time the fixture is illuminated.
• Only use the provided electronics and hardware, as other pieces of equipment may not
be compatible with this fixture.
1
Disclaimers/Safety Warning (2/3)
• Do not move the fixture by holding the cooling fan. The fixture should be held from
two ends to prevent falling.
• Do not overlap the adapters. This is harmful to the adapters and may cause malfunction.
2
Disclaimers/Safety Warning (3/3)
• Do not bend or tie the power cables. This may result in abnormal electric
resistance of the cable and may cause fire.
3
Quick Start
1. Place the cooling fan on top of the fixture.
Press the front side to fix to the heat sink.
2. Connect the cord of cooling fan to the
socket from the fixture.
connect
3. Connect the bridging cables between
fixture and power adapters.
press
1
2
4. Plug in the power cables into adapters
(do not plug into wall yet).
adapter
5. Place fixture on tank - Do not proceed
unless fixture is securely mounted.
connect
3
6. Power on fixture by plugging in adapters
into wall plug-in.
4
4
Components
Blaze series Components
•Power supplies as needed
•Built-in ALC Controller
•Pair of acrylic mounting legs
•Main power cables
•Cooling fan
•Hanging kits
5
Mounting (1/2)
• The Illumagic light fixture has been designed to be mounted or held in place by a number of methods.
• The light fixture should be mounted a minimum of 5cm from the water surface. This will help keep the light
fixture clean and avoid water splash.
Leg Mounting
To stand the Illumagic light fixture on an
aquarium, first install the acrylic mounting
legs to the desired location and tighten screws.
(a) For rimless tanks
(a)
For rimless tanks
(b) For euro brace tanks
(b)
For euro brace tanks
6
Mounting (2/2)
Suspended (Pendant) Mounting
To suspend the Illumagic light fixture
above an aquarium, use the Illumagic
hanging kits and follow installation
instructions:
Hanging
accessory
press
(1) Hanging accessory
1
(2) Press the steel cable into the
hole of the hanging accessory.
(3) Press the cable until the length fits
the demand.
press
2
press
withdraw
(4) To adjust the cable length, press the
button of the accessory and
withdraw the cable.
3
7
4
Cooling Fan System
•The Illumagic light fixture has been designed to expel the heat originated from the LED lamps
by an efficient thermo-sensitive cooling fan system externally mounted on top of the light fixture.
•The cooling system is composed of: (1) cooling fan, (2) connection cord to the fixture.
•With the internal temperature sensor, the cooling fan can start at 38°C and stop at 30°C. The rotation
speed increases linearly with the temperature.
Cool air
Note: Do not lay any objects on top of the air entrance.
Air entrance
ed
pell
x
e
t
Hea
Air outlet
Unique design
Outstanding cooling efficiency
8
Maintainence
• Inspect the light fixture regularly.
• Do not lay objects besides the cooling fan on top of the fixture.
• Unplug the light fixture from the outlet when cleaning to prevent any shock hazards.
• The light fixture should be wiped off with a damp cloth once a week. Avoid the
power plug area. A can of compressed air may be used to blow dust out of the heat
sink fins. Wiping and blowing unwanted buildup will help prevent salt creep and
hard water spots from accumulating.
• Do not allow any liquids to pool on top of or inside the light fixture. The light fixture
is not water proof. Do not submerge in water, saltwater, or other solutions.
9
Limited Warranty
• The Illumagic light fixture includes a ONE YEAR limited warranty
starting at the date of original purchase.
• Any light fixture that exhibits tampering or modification will void
the warranty.
• The warranty for each fixture is recorded upon original sale. Each
light fixture can be identified by serial number.
10
E-mail: [email protected]
http://www.illumagic.com.tw