1
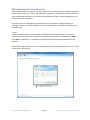
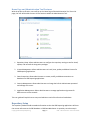
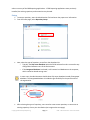
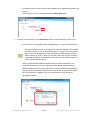
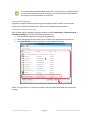
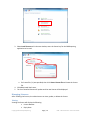
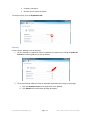
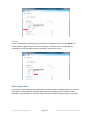
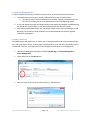
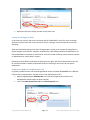
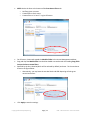
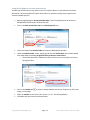
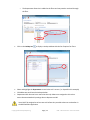
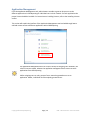
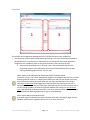
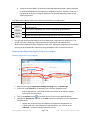
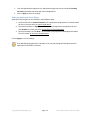
OneStop Reporting Administration Tool User Guide 3.0 Doc. Version 1.6 Updated: 2011-06-17 Table of Contents Introduction ............................................................................................................................................ 3 Who should read this manual .............................................................................................................. 3 What’s included in this manual ............................................................................................................ 3 Symbols and conventions .................................................................................................................... 3 Installation .......................................................................................................................................... 3 OSR Administration Tool Overview .......................................................................................................... 4 Login ................................................................................................................................................... 4 Home Page and Administration Tool Features ..................................................................................... 5 Repository Setup ..................................................................................................................................... 5 Setup ................................................................................................................................................... 6 Integration Packages ........................................................................................................................... 8 Installing an integration package...................................................................................................... 8 License Management .............................................................................................................................. 9 Installing Licenses ................................................................................................................................ 9 Managing Licenses............................................................................................................................. 10 Data Connections .................................................................................................................................. 12 Setting Up a New Data Connection .................................................................................................... 13 Security Management ........................................................................................................................... 15 Change Admin Password ................................................................................................................... 15 Change the built-in Administrator password .................................................................................. 16 Access Management.......................................................................................................................... 16 System Integration, Data Connection, and Company...................................................................... 17 Creating and Managing Roles......................................................................................................... 18 Creating a New Role....................................................................................................................... 18 Role Properties .............................................................................................................................. 19 Application Management ...................................................................................................................... 26 Interface............................................................................................................................................ 27 Granting and Removing Application Access Rights ............................................................................. 28 Granting Application Access Rights ................................................................................................ 28 Removing Application Access Rights .............................................................................................. 29 Appendix ............................................................................................................................................... 30 Copyright© OneStop Reporting Page | 1 OSR – Administration Tool User Guide Glossary............................................................................................................................................. 30 Change Log Date Ver. 5/23/2011 v1.0 5/25/2011 v1.1 Change Description First draft Repository Setup Added diagrams License Management Added diagrams Appendix Added glossary 5/25/2011 v1.2, Changed the product name 1.3 Removed second-person references 6/1/2011 v1.4 Inserted new section on ‘Data Connection’ Updated ‘home page’ screen shots 6/3/2011 v1.5 Revision CSB 6/6/2011 v1.6 Revision IL Copyright© OneStop Reporting Page | 2 OSR – Administration Tool User Guide Introduction The OneStop Reporting (OSR) Administration Tool is the application for users with administrative access to the OSR product suite from OneStop Reporting. The Administration Tool can be used to setup and manage the repository database, licenses, security features, and application assignments. In previous versions of the OSR product suite, administrators were required to configure settings for each application. However, The Administration Tool centralizes the administrative feature for the Reporting components within the OSR suite, including Report Designer/Player, Composer, and Publisher. Who should read this manual This manual is designed for OSR administrators, who are responsible for tasks such as repository setup, license, security, and application management. What’s included in this manual This manual is designed to give an in-depth understanding of how to use the features of the OSR Administration Tool. The manual is divided into the following parts: Overview: introduction to the OSR Administration Tool. Administration Tool usage: explanation of how to use each function of the OSR Administration Tool, such as repository setup, license management, data connections, security management, and application management. Symbols and conventions This manual uses the following symbols to make specific types of information stand out. Symbol Description The sunlight symbol indicates helpful tips, shortcuts, and suggestions. The warning symbol indicates situations we recommend to be aware of when completing tasks. Typically, this includes cautions about completing steps in their proper order or important reminders about how other information in OSR may be affected. Installation Please consult the OSR installation guide for details on installing the OSR Reporting application package. The installation guide can be found at http://products.onestopreporting.com/doc.html. Copyright© OneStop Reporting Page | 3 OSR – Administration Tool User Guide OSR Administration Tool Overview The OSR Administration Tool allows the system administrator to setup, install, or manage repositories, licenses, data connections, security, and application assignments. The Administration Tool should be the first application opened prior to any other OSR applications so that all reporting applications are secure and properly configured. In previous versions of OSR Reporting, administrators were required to configure settings per application. However, the Administration Tool conveniently centralizes administrative functions into one application. Login Anytime the Administration Tool is opened, the application will prompt the user for the built-in Administrator password. For first-time users, the default login username and password is “Admin” and “admin” respectively. It is important to note that both the username and password are casesensitive. After the initial login, follow the steps in Change the built-in Administrator password section to create a more secure environment. Copyright© OneStop Reporting Page | 4 OSR – Administration Tool User Guide Home Page and Administration Tool Features With the proper verification, users will be on the Home Page of the Administration Tool. From this page, the user will be able to access all five functions within the Administration Tool. 1. Repository Setup: Allows administrators to configure the repository settings as well as install, update, and uninstall the integration packages. 2. License Management: Allows administrators to install, view, update, and delete licenses for OSR Reporting applications. 3. Data Connections: Allows administrators to create, modify, and delete connections to databases for OSR Reporting applications. 4. Security Management: Allows administrators to change the built-in Administrator password and manage user access. 5. Application Management: Allows administrators to manage application assignments for different users on the network. This user guide will explain how to setup and administer each of the functions listed above. Repository Setup The repository database holds metadata information so that the OSR Reporting applications will have the correct references to the ERP database or OSR Data Warehouse. A repository must be setup in Copyright© OneStop Reporting Page | 5 OSR – Administration Tool User Guide order to use any of the OSR Reporting applications. If OSR Reporting applications were previously installed, the existing repository and connection may be used. Setup 1. To setup a repository, start the Administration Tool and enter the proper user information. 2. From the home page, select Repository Setup. Next, select the type of repository to use from the dropdown list. o Typically, the SQL server database option should be selected in order to centralize any configuration between users of the environment. o If the Integrated database is selected, it will create a local database on the computer, which cannot be shared among users. In most cases, the administrators should select SQL server database instead of Integrated database. The Integrated database is included to give flexibility for the specific need of the organization. After selecting the type of repository, users need to create a new repository or connect to an existing repository from a prior installation (see image on the next page). Copyright© OneStop Reporting Page | 6 OSR – Administration Tool User Guide o o An existing repository can be found in the dropdown box or manually entered into the text box. A new repository can be created by clicking the Create New button. To create a new repository, click Create New and fill in the information for the SQL server. o This will create a new database called “OSR_Repository” on the specified SQL server. The server name will consist of the SQL server name and instance in the standard SQL Server format (i.e. ServerName\SQLInstance). If a green check mark appears next to the server dropdown box, then a previously created database has been found. However, if a red ‘x’ shows up, then either the server name or instance is misspelled, the SQL Server cannot be found, or the repository database does not exist in the specified SQL Server. o When choosing between Windows Authentication and SQL Authentication, it is important that the chosen user has rights to create a database. When choosing Windows Authentication, any user that will be using the OSR Reporting applications will need to have read and write permission for their Active Directory profile against the “OSR_Repository” database. This can be administered via the SQL Server Management Studio. Copyright© OneStop Reporting Page | 7 OSR – Administration Tool User Guide It is recommended that the database reside on the same SQL server as the ERP systems. This will reduce the time for reports to execute, as the communication delay between the repository and ERP databases are minimized. Integration Packages Integration packages include the pre-built logic that integrates OSR to the ERP systems and are essential for communication between the SQL server and OSR Reporting applications. Installing an integration package Begin by accessing the Integration Packages window by selecting Home Page -> Repository Setup -> Integration Packages from within the OSR Administration Tool. 1. A list of available integration packages will be generated. 2. Select and highlight the ERP system that is installed in the organizational environment. 3. Click Install Selected to finish installing the proper integration packages. 1 2 3 *NOTE: The figure above is an example of installing the Solver Operational Data Store integration package. Copyright© OneStop Reporting Page | 8 OSR – Administration Tool User Guide The buttons near the bottom of the window are explained in the following chart: Button Function Refreshes the list of downloadable packages and installed packages. Allows the installation of a custom integration package. Displays the changelog. Installs the highlighted integration package. This is inactive if a package is already installed. This option can also be used to upgrade an already installed integration package. Uninstalls the highlighted integration package. This is inactive if a package is not installed. License Management Managing licenses for different OSR Reporting applications will be covered in this section. Note this section assumes that a license key has been provided and the administrator is setting up the OSR Reporting applications for the first time. After the initial setup, license management allows administrators to install additional licenses, update current licenses, view details of licenses, and delete licenses. Installing Licenses Prior to the use of any OSR Reporting application, the proper license key must be installed through the Administrative Tool and assigned to users. Assigning users to applications will be covered in the Application Management section. Remember that licenses are assigned to a specific repository and not the local computer. Follow these steps to install a license: 1. Start the Administration Tool and enter the built-in Administrator login credentials. 2. From the home page, select License Management (see following page). Copyright© OneStop Reporting Page | 9 OSR – Administration Tool User Guide 3. Select Install License and in the new window, enter the license key for the OSR Reporting application to be used. a. If a license file (.lic) was provided, then click I have a license file and locate the license file. 4. Click OK to install the license. 5. The list of installed licenses will update and the new license will be displayed. Managing Licenses After installing the licenses, the administrator can view, update, or delete the license. Viewing Viewing the license will display the following: License Number. Expiry Date. Copyright© OneStop Reporting Page | 10 OSR – Administration Tool User Guide Company Licensed to. Number of users under the license. To view the license, click the dropdown arrow: Updating Licenses can be updated in one of two ways. 1. The first method is to update all licenses installed in the repository by clicking on Update all Licenses and selecting Yes on the pop-up window. 2. The second method updates licenses for individual applications (see image on next page). a. Click the dropdown arrow for the application to be updated. b. Click Update and a confirmation window will appear. Copyright© OneStop Reporting Page | 11 OSR – Administration Tool User Guide Deleting Licenses are deleted by accessing the license detail via a dropdown arrow. By clicking Delete, the license will be unregistered from the current repository. The license can be installed again by following the license installation process mentioned in the previous section. Data Connections In previous versions of OSR Reporting applications, the administrator managed connections to various ERP systems in each application. Although data connection management is still available in each application, the Administration Tool offers a data connection setup as well (see image on next page). Copyright© OneStop Reporting Page | 12 OSR – Administration Tool User Guide Setting Up a New Data Connection After entering the Data Connection page, administrators will see a drop-down list with a list of integration packages previously installed in Repository Setup (see the section on Integration Packages for more details) and a Setup button to create and manage database connections. Setup 1. After clicking on the Setup button, click New to add a new connection. Copyright© OneStop Reporting Page | 13 OSR – Administration Tool User Guide 2. Enter the information required to create a new connection and click on Test to confirm access to the database. A new window will display the result of the test. An example is given in the image below. User and Password is only required if a SQL Authentication was created. For Windows Authentication, login information is not needed. If the connection test is unsuccessful, consult the organization’s IT department for the proper server and database information. After the new connection is created, click on OK to close the prompted window. The new connection should be displayed in the list of connections and can be modified or deleted using the Change and Delete buttons. Copyright© OneStop Reporting Page | 14 OSR – Administration Tool User Guide If a connection is modified or deleted in the Administration Tool, then it will affect data connections in ALL OSR Reporting applications. Security Management OSR Reporting has a robust set of features that allow the administrators of OSR Reporting to establish security settings across the reporting environment. These settings enable the assignment of security rights associated with user logins that will grant or restrict access to data and modules based on an individual’s area of responsibility, their role in the reporting process, and other facets of financial and operational information access that should be controlled. As opposed to earlier versions of the OSR Reporting applications, the Security Management feature in the Administration Tool centralizes data access management for all OSR Reporting applications. Security Management can be accessed from the Home Page of the Administration Tool. Change Admin Password When first installed, OSR Reporting has a built-in Administrator role and a default password established for the user. The built-in Administrator has access to EVERYTHING across the OSR Reporting environment and is the only user with access to the Administrator Tool. This administrator is unique and remains intact even if another administrator user, who has access to all modules and data, is created. The difference is that only the built-in Administrator has rights to access the Administration Tool. Since this built-in Administrator comes with a default password, which is the same across all OSR Reporting installations, it should be changed to add greater security to the installation. Default built-in Administrator credentials: Login = Admin (case sensitive) Copyright© OneStop Reporting Page | 15 OSR – Administration Tool User Guide Password = admin (case sensitive) Remember the new built-in administrator password, as this is the only way to gain access to the Administration Tool and all of its functions. However, if the password is forgotten or lost, Solver Technical Support can assist in resetting the password back to the default. Change the built-in Administrator password Access the Security Management function from the home page of the Administration Tool (see previous section). Select Change Admin Password from the options. Insert the old password, the new password, and confirm the new password in the newly displayed window. Remember to store the password in a secure location. Access Management Access Management provides control to keep sensitive data secure, while simultaneously allowing the finance team and other employees to gain the insight needed to make informed decisions that ultimately drive timely, productive, and efficient execution of work across the organization. Here are some key concepts and rules regarding Access Management in the Administration Tool before diving into the detailed steps for setup and application. Copyright© OneStop Reporting Page | 16 OSR – Administration Tool User Guide Windows user authentication (Active Directory [AD]) must be used for the OSR Reporting Access Management feature: o Access Management takes advantage of the Windows login credentials already established in AD to streamline the setup and the application. o Specific users and/or groups, which have already been established within the AD environment can be used. Security is per company and per role. o Meaning that if multiple companies are set up in the ERP system, then security must be setup for each company independently. o Access Management was established this way due to the fact that many ERP users are granted different rights to users in different companies. o Therefore, access can be segregated based on the company need. Security is set at the company and the role level. o Security is not set at the user level. o Instead users are associated to roles, thus inheriting the rights of the role. The order of security setup is the following; o Login to the Administrator Tool and open the Access Management tool. o Create roles. o Assign users to roles. o Assign access rights (filters) to roles. System Integration, Data Connection, and Company In the upper portion of the Access Management screen, users are able to create new roles for a specific ERP database and company by using the drop-down list. System Integration Select the proper integration package from the drop-down list that contains the desired database and company. If the desired integration package is not included in the drop-down list, it can be installed under Repository Setup -> Integration Packages. Data Connection Select the proper database from the generated list. The list is based on the system integration package selected in the previous step AND previous data connections created through Administration Tool or any other Reporting applications such as Designer or Composer. Company Select the proper company from the generated list. The list is based on the system integration package and the database selected in the previous two steps. Companies are automatically generated based on the integration package. For instance, OSR Data Warehouse only contains one company. However, Dynamics GP may contain multiple companies and will generate all companies associated with the database. Copyright© OneStop Reporting Page | 17 OSR – Administration Tool User Guide Creating and Managing Roles In order to explain security setup for different types of roles, three examples will be presented: 1. The administrator of the system, which is different than the built-in Administrator. a. This administrator is a person allowed to see all data, modules, and departments (i.e. the CFO or President), but is not an administrator of the OSR Reporting system. 2. A role from department 100, who designs and/or views reports and budgets in OSR Reporting, but should only have the ability to see data associated with their department 100. 3. An accounts payable department role, who designs and/or views reports and budgets in OSR Reporting, but should only have the ability to see data associated with accounts payable modules or posting data. Creating a New Role The following steps will explain how to create roles, to which the administrator will ultimately assign users and assign rights. Initially, as these steps are performed to create the roles, placeholders will be created with a role title; the assignment of users and rights will take place in succeeding steps. Open Access Management window by following Home Page -> Security Management -> Access Management. Under Roles clink on the New button. Enter the name of the role in the new window (i.e. administrator). Copyright© OneStop Reporting Page | 18 OSR – Administration Tool User Guide Click OK to create the new role. Repeat this process for any other additional roles (i.e. department 100, accounts payable, etc…). Existing roles can be modified by clicking Edit or erased by clicking Delete. Click the Apply button anytime to store changes. However, hitting Apply will take the user back to the home page. Role Properties In the Role Properties portion of the interface, the built-in Administrator can assign members to roles and manage the access level for each role. The name of the property menu will change to Role_name Properties. ( i.e. Administrator Properties, Accounts Payable Role Properties, etc.) Assigning Active Directory Users/Groups to Roles The next step is to assign users to the newly created roles. In this step, integration to Windows Active Directory comes into play. Active Directory users, Active Directory groups, or the combination of the two can be used when making assignments to the roles. Following is an example of assigning an Active Directory user to a role. Click on the name of the role created in the previous step. The list is located on the left side of the navigation menu under Roles. Select the Members tab on the right and click on Edit Members (see image on next page). Copyright© OneStop Reporting Page | 19 OSR – Administration Tool User Guide This will cause OSR Reporting to activate integration with Windows Active Directory (AD) and open a new window called Add Users and Groups. Use the following steps to add a user or group to the role. 1 2 3 4 1. In the Domain drop-down list, select the proper domain and hit the Refresh button to generate a list of established users and groups within the specified network. 2. Find the user/group to assign to the new role in OSR. 3. Select the user/group name and assign them to the role by clicking Add. This will create a list of assigned users at the bottom of the window. Repeat this step as necessary. 4. Once all users/groups are properly assigned, click OK to save the assignment. The Members button is only available when a group is selected from the list. It enables the user to observe the members of a group from the Administration Tool interface. This will associate the Windows Active Directory user/group with the Reporting role (see image on next page). Copyright© OneStop Reporting Page | 20 OSR – Administration Tool User Guide Repeat this process to assign members to any other roles. Setting Access Rights for Roles In this next step, security and access restrictions will be established for each role. Users associated with each role will inherit the access restrictions, hence creating a secure environment across OSR Reporting. Steps associated with setting access rights in Reporting are similar to the concept of setting filters in Report Designer and Composer. However, the difference is that different modules and dimensions are filtered dependent on the level of restriction for each role instead of filtering various accounts, periods or departments for specific data in a report. Following are three different examples of assigning access rights. One for an administrative role, one for restriction based on module, and another based on restricting a role’s access to one specific department. Setting Access Rights for an administrator role In general, an administrator role would be granted full access to all data. (REMEMBER this is different than the built-in Administrator, who has access to the Administration Tool.) Begin by highlighting the Administrator role in the left navigation pane of the Access Management window under the Roles selection. Click on the Data Access Filters tab in the Role Properties area. Copyright© OneStop Reporting Page | 21 OSR – Administration Tool User Guide NOTE: Notice the hints at the bottom of the Data Access Filters tab. o No filters gives no access. o Create filters to limit access. o Create a filter as ‘In’ and ‘*’ to give full access. For full access, locate and expand the Modules folder in the Access Management window. Drag and drop the Module filter into the blue shaded area underneath the heading Drag fields into area below to create filters. Specified by the hint, select In (which will be selected by default) and enter * in the text box as shown in the figure below. o Alternatively, you may leave the text box blank and OSR Reporting will also grant unrestricted access. Click Apply to save the settings. Copyright© OneStop Reporting Page | 22 OSR – Administration Tool User Guide Setting Access Rights for a module restricted role Another type of Role that you may wish to restrict is based on data in certain modules in the Data Warehouse. The next example will explain how to filter by module by setting access rights for the accounts payable (AP) role. Begin by highlighting the Accounts Payable Role in the left navigation pane of the Access Management window under the Roles selection. Click on the Data Access Filters tab in the Role Properties area. Locate and expand the modules folder in the Access Management window. Under the modules folder, locate, then drag and drop the module filter into the blue shaded area underneath the heading Drag fields into area below to create filters. o The module dimension is added to the filters and users may now specify restrictions through the filter. Click on the Lookup Icon to display a Lookup window with the list of options for filters (see image on next page). Select the module to restrict the role’s access. (i.e. AP – Purchasing Module) . Click OK to save and close the Lookup window. Copyright© OneStop Reporting Page | 23 OSR – Administration Tool User Guide Hit Apply to store the role settings. Setting Access Right for a departmental role The last type of access rights used in the examples is based on data associated with postings to certain departments. The role access will be limited to the specific dimension department 100 for all modules. Begin by highlighting the department 100 role in the left navigation pane of the Access Management window under the Roles selection. Click on the Data Access Filters tab in the Role Properties area. Expand the dimensions folder. o The dimensions folder is similar to the General Ledger – Actuals Summary or any other folder in which dimensions can be found in Report Designer or Composer. Under the dimensions folder, locate and drag-and-drop the department filter into the blue shaded area underneath the heading Drag fields into area below to create filters (see image on next page). Copyright© OneStop Reporting Page | 24 OSR – Administration Tool User Guide o The department dimension is added to the filters and may now be restricted through the filter. Click on the Lookup Icon Select and highlight the department to restrict the role’s access. (i.e. Dept100 in this example) Click OK to save and close the Lookup window. Department 100 role now has a restriction that only allows users assigned to this role to access data associated with postings done to department 100. to display a Lookup window with the list of options for filters. Users MUST be assigned to at least one role before they are able to become a subscriber in the OSR Publisher application. Copyright© OneStop Reporting Page | 25 OSR – Administration Tool User Guide Application Management From the Application Management tool, administrators are able to grant or deny access to the different applications in OSR Reporting for individual users in their network. For each application the proper license should be installed. For instructions on installing licenses, refer to the Installing Licenses section. This section will explain the interface of the Application Management tool and walkthrough how to add and remove access to different applications within OSR Reporting. The Application Management tool has a similar concept to assigning roles. However, the roles limit access to data, whereas the application management limits access to entire applications from OSR Reporting. Unlike assigning users to roles, groups of users cannot be granted access to an application. Rather, individuals must be uniquely granted access. Copyright© OneStop Reporting Page | 26 OSR – Administration Tool User Guide Interface 1 2 3 The interface of the Application Management tool is divided into three main components 1. The left portion of the window is dedicated to generating a user list in the domains available to the administrator. From the user list, administrators can add specific users to the application assignments list. In addition, there are two option functions, which apply to all users. a. Auto-login with Windows user: If checked, then a user automatically logs in to the application using the current Windows user instead of the administrative user when starting a Reporting application for the first time. NOTE: Applies to all OSR Reporting applications EXCEPT for Report Player In previous versions, users were automatically logged on as the Admin user the first time OSR Reporting started. However, in a deployment scenario the end-user has limited access and does not know the Admin password. When the Auto-login with Windows user setting is checked, first time users will be logged on as their Windows user allowing access to the appropriate application. After the initial login, OSR Reporting will store the username and reuse this setting regardless of the Auto-login with Windows user setting. For non-first time users, OSR Reporting will always prompt for a username and password at startup unless they have specified the Reporting application to log me in automatically. NOTE: Applies ONLY to OSR Report Player If the Auto-login with Windows user box is checked, Player will automatically login with the Windows authentication regardless of first time or non-first time users. Copyright© OneStop Reporting Page | 27 OSR – Administration Tool User Guide b. Always show Excel Ribbon: If checked, the OneStop Reporting ribbon is always displayed in MS Excel independent of the applications assigned to the user. However, if the user is not assigned the Player or Designer application, the OneStop Reporting ribbon will not display any buttons. The middle of the window contains four buttons as described in the table below. Button Function Adds the highlighted user from the Windows Users list to Application Assignments list. Removes the highlighted user from the Application Assignments list. Allows the administrator to manually search for Windows Users. Deletes the current Application Assignments list and creates a blank list. 2. The right-side of the window displays the list of application assignments for unique users. The number of licenses remaining is displayed under each application and updated as the administrator creates application assignments. Moreover, application assignments from previous versions can be automatically imported by using the Migrate users from previous version. Granting and Removing Application Access Rights Granting Application Access Rights 1 2 4 3 Begin by accessing the Applications Management page from the Home Page. Locate the proper domain in the Windows Users interface dropdown menu. o If the proper domain is not listed, domain information can be found in System Information in Control Panel. Click on the Refresh button to generate the list of users in the specified domain. Highlight the desired user and click on the Add >> button to add the user to the Application Assignments list. o Repeat until all desired users are added to the Application Assignments list. o If the desired user is not included in the generated list, you can click on the Advanced… button to manually search for the user. Copyright© OneStop Reporting Page | 28 OSR – Administration Tool User Guide From the Application Assignments list, application assignments can be created by checking the boxes associated with the proper user and application. Click on Apply to store the settings. Removing Application Access Rights Application access rights can be removed in three different ways: 1. The first method is to uncheck the boxes in the Application Assignments list associated with the user to remove access to specific applications. 2. The second method is to highlight the username in the Application Assignments list and click Remove to remove access for the specific user to all applications. 3. The third method is to click Reset… in the middle of the Application Management window. This will remove all users from all applications. Click on Apply to store all settings. If the OSR Reporting application is already in use, the new settings will take place once the application or MS Excel is restarted. Copyright© OneStop Reporting Page | 29 OSR – Administration Tool User Guide Appendix Glossary Active Directory: A special-purpose database designed to handle a large number of read and search operations and a significantly smaller number of changes and updates. Most often, it stores user data and system configuration data. Application: An application refers to a product within OSR suite. This term is used because some of the products are stand-alone programs (Data Warehouse, Report Composer, Publisher, Administrative Tool), whereas others are add-ins to already-existing programs (Solver InfoManager, Report Designer, Player). Assignment: Users are assigned access to different applications within OSR Reporting. If the user is assigned an application, they will be granted access. built-in Administrator: The built-in Administrator is automatically installed. The initial password is established automatically, but administrators should change the password as soon as possible to ensure security. The built-in Administrator has access to everything across the Reporting environment. This is different than an administrator-level user, who has access to all modules and data. Domain: A set of computers running Windows operating system that share the same Active Directory. ERP Database: Also known as enterprise resource planning, the ERP database contains information used across the entire organization. MS Dynamics AX, GP, NAV, and SL are all considered to be ERP software. Integration Packages: Integration packages include the logic to integrate to the ERP system and are required for communication between the SQL server and OSR applications. Licenses: A unique code that is provided to the user under a software license agreement. The key grants access to a limited number of users for the specified OSR application. Metadata: The metadata in data warehousing defines the elements in the Data Warehouse and how they work together. It may contain information ranging from data types and indexes to license keys and integration packages. Module: A component of the database, which is organized by financial modeling such as General Ledger, Accounts Payable, Accounts Receivable, etc. Users can define modules via Data Warehouse. Reporting Clients: The Reporting Client utilizes a network to access a specified server and database. Copyright© OneStop Reporting Page | 30 OSR – Administration Tool User Guide Report Publisher: An application which allows users to automatically schedule, run, and distribute reports and other office documents. Repository: A database that holds metadata information so that the Reporting clients will have references to the organization’s ERP database. The metadata may contain information on license keys and integration packages. Roles: Roles are used to manage access to data in the database for various users in the Active Directory. Subscriber: A function in Report Publisher that registers a network location or a user’s contact information. Then, Report Publisher can distribute reports to subscribers. Windows User Authentication: Confirms the identity of the user trying to access the domain by prompting for a username and password. The users must be registered in the Active Directory before they are authorized to access the domain. Copyright© OneStop Reporting Page | 31 OSR – Administration Tool User Guide