1
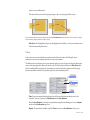
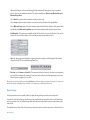
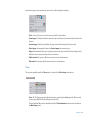
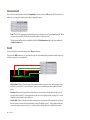
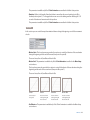
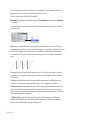
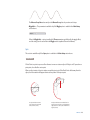
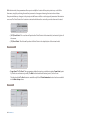
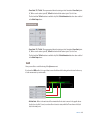
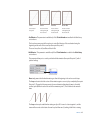
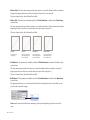
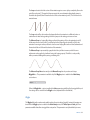
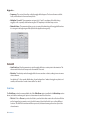
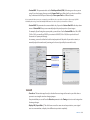
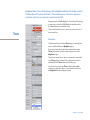
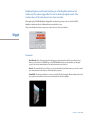
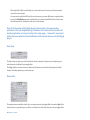
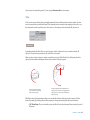
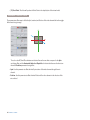
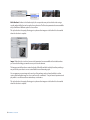
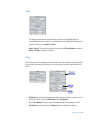
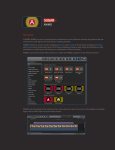
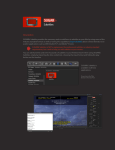
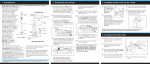
SUGAR fx MagiMoto User Manual www.sugarfx.tv Installation . . . . . . . . . . . . . . . . . . . . . . . . . . . . . . . . . . . . 5 MagiMoto . . . . . . . . . . . . . . . . . . . . . . . . . . . . . . . . . . . . . 7 Contents Using MagiMoto . . . . . . . . . . . . . . . . . . . . . . . . . . . . . . . 9 MagiMoto . . . . . . . . . . . . . . . . . . . . . . . . . . . . . . . . . . . . 13 Throw . . . . . . . . . . . . . . . . . . . . . . . . . . . . . . . . . . . . . . . . 37 Spin . . . . . . . . . . . . . . . . . . . . . . . . . . . . . . . . . . . . . . . . . . 39 Scale . . . . . . . . . . . . . . . . . . . . . . . . . . . . . . . . . . . . . . . . . 41 Wiggle . . . . . . . . . . . . . . . . . . . . . . . . . . . . . . . . . . . . . . . 43 Dissolve . . . . . . . . . . . . . . . . . . . . . . . . . . . . . . . . . . . . . . 49 Presets . . . . . . . . . . . . . . . . . . . . . . . . . . . . . . . . . . . . . . . 57 Support . . . . . . . . . . . . . . . . . . . . . . . . . . . . . . . . . . . . . . 59 Contents 3 www.sugarfx.tv In order to use SUGARfx with Final Cut Studio, Motion, After Effects CS3 or CS4 and Final Cut Express, you need to download and install the Free FxFactory plug-in from Noise Industries. FxFactory is the host plug-in that makes SUGARfx available to the host applications, so you need to first download FxFactory from the Noise Industries web site. • FxFactory is a free download and the web site address is: Installation http://www.noiseindustries.com/fxfactory/download/ • Install and follow the prompts during installation. Installing SUGARfx You should have received the code and information via e-mail, and downloaded the SUGARfx pack on your computer. If you successfully installed FxFactory, then the icon of the SUGARfx should look just like a square brown box shown here. • Double click and it should automatically be moved to its correct place and ready to be used with your host applications. For more information on FxFactory, please read the instructions and/or the help file that came with it, or visit their support page on their web site (www.noiseindustries.com). Installation 5 www.sugarfx.tv MagiMoto from SUGARfx MagiMoto is a collection of animation plug-ins that provide an easy way to move (throw) your elements across the screen, rotate (spin) them, change their size (scale) and apply automatic dissolve or wiggle effect to add life to your static video layer and create custom slide shows (still images or movies). MagiMoto plug-ins can be applied individually, as the MagiMoto Throw or the MagiMoto Spin and so on, or for a combination of effects and all the animation possibilities you can use the main plug-in with the name of MagiMoto. MagiMoto MagiMoto is a filter that you can find inside Final Cut Pro and the other hosts, and it should be found under the SUGARfx MagiMoto category. Being a set of filters, MagiMoto needs to be applied to an asset on the time line. Its control parameters allow you to customize all the settings and create auto animation setups and Presets. MagiMoto 7 www.sugarfx.tv Open your host application and browse to the Effects Menu or Tab. The screen shots shown on this manual are from Final Cut Pro, but there should be no difference in the functionality of the SUGARfx plug-in in all of the other host applications. When using Final Cut Pro / Express MagiMoto can be found under the SUGARfx MagiMoto category in your Filters menu. Using MagiMoto If you want to use the Filter, you need to have a video asset in your time line before you try to access the filters menu. So drop a video clip on the time line. As you may already know, the filters can be accessed in two different ways. One way is by going into the Effects tab in the Browser window where you will find the Video Filters folder, and inside there you should find another folder containing the SUGARfx MagiMoto filters. If you use this method to apply your filters, then select the filter of your choice and drag it and place it on top of the video asset in your time line until you see the video asset gets highlighted. Then, let the mouse go so the filter gets applied onto your video footage. Another method to access the filters is as follows: you need to first select the video asset you want to affect and then go to the menu Effects > Video Filters > SUGARfx MagiMoto> MagiMoto (filters). All of the MagiMoto filters have their own set of parameters and they can be customized as you desire. After applying the filter using either method, you now have to double-click the affected video in the time line Using MagiMoto 9 in order to see its control parameters in the Viewer window. Go to the Viewer window and click on the Filters tab to access its parameters. Here you can adjust the parameters to your liking, save presets or load your favorite ones. In the following sections you will be able to learn about the parameters of each filter. 10 Using MagiMoto www.sugarfx.tv MagiMoto is the more complete and powerful of all the MagiMoto filters. MagiMoto is capable of providing a combination of moves in one plug-in, like Throw, Spin and Scale, all at the same time. The animation process is done in a simple and interactive way that uses a special on-screen time line (HUD) and also offers an interface organization tool for easy control, focus and setup. MagiMoto In Final Cut Pro and after applying this filter, double-click the video affected and go to the Viewer window to access the parameters by selecting the Filters Tab. The first thing you may notice is that the SUGAR MagiMoto identifier and the User Manual buttons are MagiMoto 13 available on top. They can be hidden from view to save more room for the rest of the user interface. Parameters • User Manual : One of the most important things you need to know about all of our products is that when you click select the SUGARfx logo or the USER MANUAL button on the interface, you will gain access to the on-line manual that you can either download or read on-line. • Presets : If you would like to use a Preset, you can do that with the pull down menu, you can also create your own presets and save them or share them with your peers. Here is where you can save your own Presets after customizing the look and setups you use the most. The Presets marked with an [SS] at the end of their name refer to the possibility of using it as a Slide Show (check our tutorials for tips and uses of MagiMoto). • GUI : The User Interface can be selectively arranged by using this drop-down tool menu. Select All if you want to have all of the parameter sets available at once, or select the respective parameter set to just view and adjust the corresponding parameters in the interface and hide the others. –This is specially useful to focus on one particular move or set of parameters. • Show HUD : This button enables the on-screen time line (HUD) information that provides a visual representation of your setup animation and timing by using different colors. When enabled you will see a set of colored lines that represent the duration of your animation (and not necessarily the duration of your video asset), with labels that indicate the kind of move you have enabled and some numbers indicating the frame number being played back, and the total number of frames or seconds of the animation. 14 MagiMoto The colored lines indicate the timing of your animation. Let’s take a look at the following example. This screen capture shows that the video element is very long in duration, but the HUD is showing that the animation is playing back on frame 59 near the end of the animation time line. This means that the duration of the HUD time line shows only the duration of the animation and not the duration of the video asset. Also, only two types of animation are going on. The Throw and Spin. And we can clearly see that the full animation takes 72 frames or about 3 seconds (this sample uses video at 24fps) The light green color in the Throw time line shows that the element starts moving from the beginning, while the Spin time line shows a little red, indicating that it is waiting (stop) before it starts moving (light green). Then both stop (or wait) for one full second and then move again to finish the animation. In summary, the HUD time line shows the different colors that indicate when one type of animation is moving or waiting, therefore you can visually synchronize and adjust your parameters just by looking at the real time adjustments made on the HUD time line when you set your parameters. MagiMoto 15 It is strongly recommended to visit our support page to get some tutorials that show the functionality of these plug-ins, or visit ilearnfast.com for available tutorials. Main Setup This section allows you to select the types of moves you want to use either in combination with another ones, or select just one if you prefer. • Throw : Refers to the movement or translation of your video asset across the screen and when selected it enables the Throw parameters in the interface. • Spin : Refers to the rotation of your video asset in any direction and when selected it enables the Spin parameters in the interface. • Scale : Refers to the change of size or scale of your video asset and when selected it enables the Scale parameters in the interface. • Add Wiggle : This button enables the wiggle effect that can be applied to the Throw, Spin or Scale and also enables a Wiggle section where you can adjust its parameters. • Initial Size [ % ] : The default size of every video asset is 100%, therefore you can set a different size to use in your animation. Keep in mind that if you change this size to other than the 100% default, the Scale parameters will take this value as the 100% default. The Initial Size is useful when you don’t want to enable the Scale animation, but use a new size throughout your Throw or Spin animation. OPTIONS • Complexity : This parameter allows you to use your animation on a 2D plane or 3D, adding another axis for your Throw animation. • 3 Point Animation : This optional parameter allows you to add an additional point of animation. This means that your basic animation or move goes from point A to point B, and when you enable this 16 MagiMoto option you can add the point C. This option allows you to have a looping ending or a wipe-out style (going off the screen). B B A A C It is recommended that you start your animation by using the 3 Point Animation disabled, and then if necessary add or enable it at the end when you figure out that it is really necessary. • Slide Show : All the MagiMoto plug-ins, except Wiggle have the ability to convert your animation into a Slide Show by enabling this button. Timing In this section you can decide whether to use the duration of the video clip as the full length of your animation, or use your own settings and be able to loop your animation. The difference here is that when you use your own time settings, you can do loops and dissolves that happen every so often throughout the duration of the video clip. This is specially useful when the Slide Show option has been enabled. When using the video clip duration you are restricted to that duration and the looping becomes unavailable as well as other possible options become virtually impossible. • Time : Drop-down menu that allows the selection of the type of duration we want to use for the animation. There are 2 options: the Clip Duration and the User Duration. When the User Duration is selected, 2 new parameters appear below allowing you to select a Repeat mode and the User Duration input box. • Repeat : This parameter is available only if the Time has been set to User Duration. Here you can MagiMoto 17 define what happens at the end of the length of the animation allowing you to select a repetition pattern of your entire animation time line. The options available are: None, Loop, Mirrored Loop and Mirrored Loop Once. Select None if you just want the animation to play one time only. Select Loop to play the entire animation over and over for the duration of the applied filter. Select Mirrored Loop to play the entire animation back-and-forth for the duration of the applied filter. And finally, select Mirrored Loop Once to play the entire animation back-and-forth just one time. • User Duration : This parameter is available only if the Time has been set to User Duration. You can use the input box to enter the number of seconds that you want your animation to last. • Info : This parameter is for information only and shows two numbers, the full length of the duration selected, and the RTC or current Running Time Code. • Dissolve [ select Frames or Seconds ] : This parameter allows you to add a dissolve to your beginning and end of the animation. By entering 0 (zero), there will not be any dissolve happening, and you can select between using frames or seconds. This parameter is specially useful when using the Slide Show option when looping your animation. Please take a look at the available tutorials and tips on MagiMoto that you can find on our Support page or by visiting ilearnfast.com. Reverse Image In these parameter section you will be able to repeat the image being used as the main video asset. You want to use a Reverse Image only when you have enabled the Spin animation option in the Main Setup section, since this is the only animation type that will make your video element turn around and expose the reverse side. The default reverse side is a flat color, however you have the option to use the same video as the front side, or 18 MagiMoto add another image to be seen when the reverse side is visible during the animation. • Color : Set the color to be used in the reverse side of the video element. • Show Image : This button makes the same video clip in the front to be shown in the back of the video element. • Custom Image : Enables the possibility of using a custom Video-Image for the reverse side. • Video-Image : An image well to place the Custom Image that you want to use. • Adjust : This parameter allows you to adjust the video in the reverse side if the Custom Image video is different in size and proportion than the one in the front. • Flip Horizontal : An option to flip the reverse video in a horizontal manner. • Flip vertical : An option to flip the reverse video in a vertical manner. Throw This section is available only if the Throw option is enabled in the Main Setup section above. X Y POSITION • From - To - To : These parameters define the starting or initial position From (point A), To the second position (point B), To the third and final position (point C). The third and final To position is available only if the 3 Point Animation button has been enabled in the Main Setup above. MagiMoto 19 Z DEPTH POSITION This section becomes available only if the Complexity has been selected as 3D instead of 2D, because here is where you can change the depth position of your element (z space). • From - To - To : These parameters define the starting or initial position in Z space From (point A), To the second position (point B), To the third and final position in Z space (point C). The third and final To position is available only if the 3 Point Animation button has been enabled in the Main Setup above. TIME Here you are able to control the timing of the Throw movement. If you have the HUD enabled, it is a good idea to move the sliders while looking at how the time line lines up to other movements in your animation. • Hold at Start : Refers to the wait state of the animation before it starts to move. In the graphic above the Throw is on hold for 0.3 seconds before it starts to move, while the Spin starts right at the initial point. • Duration : Refers to the length of time that it takes to move from the initial position (point A), to the second position (point B). - In the graphic above we can see the light green bar showing the 1 second duration we have entered in the input box. • Hold to End : Refers to the wait state after arriving to the second point of the animation (point B), and before it starts to move to the third and final position (if enabled) (point C). - In the graphic above we can see the numeric value to be just 0.1 seconds, and the red bar reflects the small amount of time. 20 MagiMoto This parameter is available only if the 3 Point Animation was enabled in the Main Setup section. • Duration : Refers to the length of time that it takes to move from the second position (point B), to the final position (point C). - In the graphic above we can see the darker green bar reflecting the 1.25 seconds of duration we have entered in the input box. This parameter is available only if the 3 Point Animation was enabled in the Main Setup section. SETTINGS In this section you can control the way the animation behaves during the beginning or end of the movement or both. • Motion-Start : This drop down menu provides four options to control the behavior of the acceleration during the beginning and the end of the move (from point A to point B). These are: Linear, Ease-In, Ease-Out and Ease In-Out. • Motion-End : This parameter is available only if the 3 Point Animation is enabled in the Main Setup section above. This drop down menu also provides four options to control the behavior of the acceleration during the beginning and the end of the second move (from point B to point C). These are: Linear, Ease-In, Ease-Out and Ease In-Out. Linear Ease-In Ease-Out Ease In-Out Constant speed throughout Smooth acceleration in the beginning and linear at the end. Linear acceleration at the beginning and smooth at the end. Smooth acceleration at the beginning and smooth at the end. • End Behavior : This parameter is available only if the 3 Point Animation is enabled in the Main Setup section above. MagiMoto 21 This drop down menu provides four options to control the behavior of the acceleration during the beginning and the end of the second move (from point B to point C). These are: Linear, Ease-In, Ease-Out and Ease In-Out. • End Behavior : This parameter is available only if the 3 Point Animation is enabled in the Main Setup section above. This parameter allows you to control your third and final animation (from point B to point C), with 4 optional endings. None simply means that the final animation goes from the beginning to the end once and it stops. The Loop mode starts the final section of the animation again as soon as it plays completely (from point B to point C). The graphic below represents the curved animation that abruptly jumps to the initial position (point B) when it reaches the end of the animation (point C). This is known as the sawtooth wave. The Loop mode may be suitable when rotating an object 360° around so it starts again at 0, and the viewer will never notice that it starts the new loop back from zero (0) making it look like it is rotating around forever. The Loop mode will be obvious when the element finishes the animation in a different location or rotation than its initial setting, making it look like it jumps to the starting point over and over. The Mirrored Loop is a looping effect that goes from the beginning of the animation (point B) all the way to the end (point C), and then back to the beginning (point B), as if the animation is running in reverse, and then it does the same looping effect over and over (backwards and forwards until the end of the whole duration of the animation). The Mirrored Loop is represented by a graphic that looks just like a sine wave, and all the curve adjustments can be applied to it without loosing the looping property. This effect is used specially when you want a titillating effect, waving or vibrating look. 22 MagiMoto The Mirrored Loop Once does exactly as the Mirrored Loop, but only one time and it stops. • Wiggle this… : This parameter is available only if the Wiggle option is enabled in the Main Setup section above. When the Wiggle this… option is enabled, the Throw parameters get affected by the wiggle effect, and the settings can be controlled in the Wiggle section (explained later in this Manual). Spin This section is available only if the Spin option is enabled in the Main Setup section above. PIVOT POINT A Pivot Point is a point in space used for reference to move or rotate an object. All objects in 3D space have a pivot point, also called the center point. When an object rotates, it does its rotation around the pivot point. If the Pivot Point is offset away from the object, then the rotation will happen relative to the position of the pivot point. x x An object with the Pivot Point in the center will rotate around itself (around its center). x An object with the Pivot Point offset from the original position will rotate in a bigger diameter range (because its center point is offset from its original position). MagiMoto 23 With that in mind, these parameters allow you to modify the location of the pivot point in any or all of the three axes, simply by selecting the axis that you want to change and entering the start and end values. Keep in mind that any changes to the pivot point will have an effect on other types of parameters like rotation or moves. The Pivot Point is the location in a virtual world where the center of your video element is located. • [ XY ] Pivot Point : The cross hair will position the Pivot Point in the horizontal (x) and vertical (y) axis of the canvas. • [ Z ] Pivot Point : The slider will position the Pivot Point in the depth (z) axis of the virtual world. HORIZONTAL • From-Start / To / To-End : These parameters define the starting or initial orientation From-Start (point A), To the second rotation (point B), To-End the third and final rotation (point C) in the X axis. The third and final To-End rotation is available only if the 3 Point Animation button has been enabled in the Main Setup above. VERTICAL 24 MagiMoto • From-Start / To / To-End : These parameters define the starting or initial orientation From-Start (point A), To the second rotation (point B), To-End the third and final rotation (point C) in the Y axis. The third and final To-End rotation is available only if the 3 Point Animation button has been enabled in the Main Setup above. Z DEPTH POSITION • From-Start / To / To-End : These parameters define the starting or initial orientation From-Start (point A), To the second rotation (point B), To-End the third and final rotation (point C) in the Z axis. The third and final To-End rotation is available only if the 3 Point Animation button has been enabled in the Main Setup above. TIME Here you are able to control the timing of the Spin movement. If you have the HUD enabled, it is a good idea to move the sliders while looking at how the time line lines up to other movements in your animation. • Hold at Start : Refers to the wait state of the animation before it starts to move. In the graphic above the Spin has a hold of 0 (zero) seconds and then it starts to rotate, while the Throw shows a hold (red bar) at the initial point. MagiMoto 25 • Duration : Refers to the length of time that it takes to move from the initial position (point A), to the second position (point B). - In the graphic above we can see the light green bar showing the 1 second duration we have entered in the input box. • Hold to End : Refers to the wait state after arriving to the second point of the animation (point B), and before it starts to move to the third and final position (if enabled) (point C). - In the graphic above we can see the numeric value to be 0 (zero) seconds, and therefore there is NO red bar reflecting the zero amount of wait time, while the Throw shows some wait time. This parameter is available only if the 3 Point Animation was enabled in the Main Setup section. • Duration : Refers to the length of time that it takes to rotate from the second position (point B), to the final rotation (point C). - In the graphic above we can see the darker green bar reflecting the 1 second of duration we have entered in the input box. This parameter is available only if the 3 Point Animation was enabled in the Main Setup section. SETTINGS In this section you can control the way the animation behaves during the beginning or end of the movement or both. • Motion-Start : This drop down menu provides four options to control the behavior of the acceleration during the beginning and the end of the spin (from point A to point B). These are: Linear, Ease-In, Ease-Out and Ease In-Out. • Motion-End : This parameter is available only if the 3 Point Animation is enabled in the Main Setup section above. This drop down menu also provides four options to control the behavior of the acceleration during the beginning and the end of the second spin (from point B to point C). These are: Linear, Ease-In, Ease-Out and Ease In-Out. 26 MagiMoto Linear Ease-In Ease-Out Ease In-Out Constant speed throughout Smooth acceleration in the beginning and linear at the end. Linear acceleration at the beginning and smooth at the end. Smooth acceleration at the beginning and smooth at the end. • End Behavior : This parameter is available only if the 3 Point Animation is enabled in the Main Setup section above. This drop down menu provides four options to control the behavior of the acceleration during the beginning and the end of the second spin (from point B to point C). These are: Linear, Ease-In, Ease-Out and Ease In-Out. • End Behavior : This parameter is available only if the 3 Point Animation is enabled in the Main Setup section above. This parameter allows you to control your third and final animation (from point B to point C), with 4 optional endings. None simply means that the final animation goes from the beginning to the end once and it stops. The Loop mode starts the final section of the animation again as soon as it plays completely (from point B to point C). The graphic below represents the curved animation that abruptly jumps to the initial position (point B) when it reaches the end of the animation (point C). This is known as the sawtooth wave. The Loop mode may be suitable when rotating an object 360° around so it starts again at 0, and the viewer will never notice that it starts the new loop back from zero (0) making it look like it is rotating MagiMoto 27 around forever. The Loop mode will be obvious when the element finishes the animation in a different location or rotation than its initial setting, making it look like it jumps to the starting point over and over. The Mirrored Loop is a looping effect that goes from the beginning of the animation (point B) all the way to the end (point C), and then back to the beginning (point B), as if the animation is running in reverse, and then it does the same looping effect over and over (backwards and forwards until the end of the whole duration of the animation). The Mirrored Loop is represented by a graphic that looks just like a sine wave, and all the curve adjustments can be applied to it without loosing the looping property. This effect is used specially when you want a titillating effect, waving or vibrating look. The Mirrored Loop Once does exactly as the Mirrored Loop, but only one time and it stops. • Wiggle this… : This parameter is available only if the Wiggle option is enabled in the Main Setup section above. When the Wiggle this… option is enabled, the Spin parameters get affected by the wiggle effect, and the settings can be controlled in the Wiggle section (explained later in this Manual). Scale. • From-Start / To / To-End : These parameters define the starting scaling From-Start (scale point A), To the second scale (scale point B), To-End the third and final scale (scale point C). 28 MagiMoto The third and final To-End scaling is available only if the 3 Point Animation button has been enabled in the Main Setup above. TIME Here you are able to control the timing of the Scale transformation. If you have the HUD enabled, it is a good idea to move the sliders while looking at how the scale time line lines up to the other movements in your animation. • Hold at Start : Refers to the wait state of the animation before it starts to scale. In the graphic above the Scale has a hold of 0 (zero) seconds and then it starts to animate. • Duration : Refers to the length of time that it takes to change its scale from the initial size (scale point A), to the second scale (point B). - In the graphic above we can see the duration is 0.5 seconds. • Hold to End : Refers to the wait state after arriving to the second point of the animation (scale point B), and before it starts to scale to the third and final size (if enabled) (scale point C). - In the graphic above we can see the numeric value to be 0 (zero) seconds, and therefore there is NO red bar reflecting the zero amount of wait time. This parameter is available only if the 3 Point Animation was enabled in the Main Setup section. • Duration : Refers to the length of time that it takes to change its scale from the second size (scale point B), to the final size (scale point C). - In the graphic above we can see the duration to be null or 0 (zero) seconds in the input box. This parameter is available only if the 3 Point Animation was enabled in the Main Setup section. SETTINGS In this section you can control the way the scale animation behaves during the beginning or end of the movement or both. MagiMoto 29 • Motion-Start : This drop down menu provides four options to control the behavior of the acceleration during the beginning and the end of the scale (from scale point A to scale point B). These are: Linear, Ease-In, Ease-Out and Ease In-Out. • Motion-End : This parameter is available only if the 3 Point Animation is enabled in the Main Setup section above. This drop down menu also provides four options to control the behavior of the acceleration during the beginning and the end of the second scale (from scale point B to scale point C). These are: Linear, Ease-In, Ease-Out and Ease In-Out. Linear Ease-In Ease-Out Ease In-Out Constant speed throughout Smooth acceleration in the beginning and linear at the end. Linear acceleration at the beginning and smooth at the end. Smooth acceleration at the beginning and smooth at the end. • End Behavior : This parameter is available only if the 3 Point Animation is enabled in the Main Setup section above. This drop down menu provides four options to control the behavior of the acceleration during the beginning and the end of the second scale (from scale point B to scale point C). These are: Linear, Ease-In, Ease-Out and Ease In-Out. • End Behavior : This parameter is available only if the 3 Point Animation is enabled in the Main Setup section above. This parameter allows you to control your third and final scale animation (from scale point B to scale point C), with 4 optional endings. None simply means that the final scale animation goes from the beginning to the end once and it stops. 30 MagiMoto The Loop mode starts the final section of the animation again as soon as it plays completely (from scale point B to scale point C). The graphic below represents the curved animation that abruptly jumps to the initial scale (point B) when it reaches the end of the scale animation (point C). This is known as the sawtooth wave. The Loop mode will be obvious when the element finishes the animation in a different location or rotation than its initial setting, making it look like it jumps to the starting point over and over. The Mirrored Loop is a looping effect that goes from the beginning of the scale animation (point B) all the way to the end scale (point C), and then back to the beginning scale (point B), as if the scale animation is running in reverse, and then it does the same looping effect over and over (backwards and forwards until the end of the whole duration of the animation). The Mirrored Loop is represented by a graphic that looks just like a sine wave, and all the curve adjustments can be applied to it without loosing the looping property. This effect is used specially when you want a titillating effect, waving or vibrating look. The Mirrored Loop Once does exactly as the Mirrored Loop, but only one time and it stops. • Wiggle this… : This parameter is available only if the Wiggle option is enabled in the Main Setup section above. When the Wiggle this… option is enabled, the Scale parameters get affected by the wiggle effect, and the settings can be controlled in the Wiggle section (explained later in this Manual). Wiggle The Wiggle effect adds a random and variable value to the option being “wiggled” constantly changing over time. When the Wiggle option is enabled in the Main Setup section, the Throw, Spin and Scale get a new parameter available that allows to wiggle their setup values. This parameter is easily identified by its name : MagiMoto 31 Wiggle this… • Frequency : This controls how often or fast the wiggle effect happens. The slower the more subtle it looks, and the faster it is the more frenzy it feels. • Multiplier 1, 2 and 3 : These parameters act upon the X, Y and Z coordinates of the effect being wiggled, so this is specially useful when using the 3D Complexity in the Main Setup section. • Diminish Factor : This parameter allows you to set a spring like diminishing of the wiggle effect where it is stronger in the beginning and little by little it disappears as time goes by. OPTIONS • Start Point [sec] : Use this parameter to start the wiggle effect at a certain point in the animation. The value entered here should correspond to the number of seconds. • Elasticity : The elasticity makes the wiggle effect be more sensitive or elastic, making it move in a more obvious manner. An elasticity of 1 is the normal default value. Any value larger than 1 makes the wiggle very elastic and sensible, and lower than 1 makes it more stiff or less elastic. Slide Show The Slide Show section becomes available only if the Slide Show option is enabled in the Main Setup section above, and it offers a wide range of options to customize and control the slide show. • File List : Click on Choose to point to the folder in your hard drive that contains the collection of Videos and/or Images that you want to use in the slide show and select the files all at once or from different locations. The Edit File List window will allow you to add, delete and rearrange the order of your slide show elements. 32 MagiMoto • Content PAR : This parameter refers to the Pixel Aspect Ratio (PAR) of the images or videos you are using. If you select images, these are usually Square Pixel Aspect Ratio, but if you select to use Video clips, sometimes the Pixel Aspect Ratio may be Non-square Pixel or a different format. It is recommended that you use your content at the same PAR since it is not possible to decipher or adjust every clip’s PAR individually when using content with multiple PAR formats. Your video clips may look stretched or distorted. • Custom PAR : This parameter becomes available only if you select Custom Pixel AR in the drop down menu of Content PAR. Here you can manually adjust the pixel proportion of your images. For example, if your footage has square pixels, you would use 1 as the Custom PAR value. If it is HDV (1440 x 1080), you would use 1.33, if your content is full HD (1920 x 1080) then you should use 1 because it is a square pixel footage. In summary, you need to either find out the size/proportion of the pixels of your video content, or manually adjust the number until your images look correct (specially the ones with circles). OPTIONS • Transition : This transition applies only to dissolve from one image to the next in your slide show so you wont see a straight cut when changing images. Keep in mind that you can still use the Dissolve parameter in the Timing section to avoid seeing when the image changes. • Display AR [ Aspect Ratio ] : The slide show can use the same size and aspect ratio as your original asset or canvas window, or display it in a different aspect ratio completely. MagiMoto 33 • Custom AR : This parameter becomes available only if Custom Display AR has been selected in the previous parameter. Here you can insert a value related to the Aspect Ratio (AR) of your displayed image. For example, if you want a perfect square, you would type 1 meaning that the proportion in size is 1 unit horizontal and 1 unit vertical ( 1 divided by 1 equals 1). If you want to have a 16 x 9 proportion displayed, you would enter 1.777 ( 16 divided by 9 equals 1.777 ), and so on. SETTINGS • Panning : If your content has different sizes than that of the Display AR you are using, then you can enable the automatic Panning of your images by adjusting this slider, being 1 the maximum panning an image can do if it has room to do so. • Width Size : This controls the Width Size of your displayed image keeping the Display AR intact. TIME • Start at… [sec] : This parameter is enabled only if you have movies added to the content for your slide show. The default is 0 (zero seconds) meaning that your movies will start playing from the beginning when they are displayed. In the event that you want to start the movies and avoid the first few seconds of the movie title, then you can type your own number of seconds here, and all the movies will start playing from the number of seconds entered. • Offset : This parameter allows you to tweak or adjust the accuracy of the change of slides when and if necessary. The Offset adjustment may be necessary when using large high resolution images or some video clips. The value entered here corresponds to 1/100th of a second per unit. In other words, if you want to adjust the slide change for a whole second, you need to enter 100 in the positive or negative direction. It is recommended that when using the Slide Show option, to use the Dissolve parameter in the Timing section or bring-in and bring-out the slide every time it changes. 34 MagiMoto www.sugarfx.tv MagiMoto Throw is the individual plug-in of the MagiMoto collection that handles only the transformation of its position (or Throw). The animation process is done in a simple and interactive way that uses a special on-screen time line (HUD). After applying the SUGARfx MagiMoto - Throw filter, the first thing you may notice is that the SUGAR MagiMoto identifier and the User Manual buttons are available on top. Throw They can be hidden from view to save more room for the rest of the user interface. Parameters The Parameters for the individual Throw plug-in are virtually the same as with the full featured MagiMoto plug-in. If you want to learn about a particular parameter when using Throw, please look it up in the corresponding section of the MagiMoto plug-in. There may be some buttons, options or parameters not available in the Throw plug-in, however all the parameters and options available affect the Throw behavior and nothing else. If you feel the need to use the Throw combined with a Spin animation or other effect, then it is recommended that you use the MagiMoto full featured plug-in instead. MagiMoto - Throw 37 www.sugarfx.tv MagiMoto Spin is one of the individual plug-ins of the MagiMoto collection that handles only the transformation of its rotation (or Spin). The animation process is done in a simple and interactive way that uses a special on-screen time line (HUD). Spin After applying the SUGARfx MagiMoto - Spin filter, the first thing you may notice is that the SUGAR MagiMoto identifier and the User Manual buttons are available on top. They can be hidden from view to save more room for the rest of the user interface. Parameters The Parameters for the individual Spin plug-in are virtually the same as with the full featured MagiMoto plug-in. If you want to learn about a particular parameter when using Spin, please look it up in the corresponding section of the MagiMoto plug-in. There may be some buttons, options or parameters not available in the Spin plug-in, however all the parameters and options available affect the Spin behavior and nothing else. If you feel the need to use the Spin combined with a Scale animation or other effect, then it is recommended that you use the MagiMoto full featured plug-in instead. MagiMoto - Spin 39 www.sugarfx.tv MagiMoto Scale is one of the individual plug-ins of the MagiMoto collection that handles only the transformation of its size (or Scale). The animation process is done in a simple and interactive way that uses a special on-screen time line (HUD). After applying the SUGARfx MagiMoto - Scale filter, the first thing you may notice is that the SUGAR MagiMoto identifier and the User Manual buttons are available on top. They can be hidden from view to save more room for the rest of the user interface. Scale Parameters The Parameters for the individual Scale plug-in are virtually the same as with the full featured MagiMoto plug-in. If you want to learn about a particular parameter when using Scale, please look it up in the corresponding section of the MagiMoto plug-in. There may be some buttons, options or parameters not available in the Scale plug-in, however all the parameters and options available affect the Scale behavior and nothing else. If you feel the need to use the Scale combined with a Throw animation or other effect, then it is recommended that you use the MagiMoto full featured plug-in instead. MagiMoto - Scale 41 www.sugarfx.tv MagiMoto Wiggle is one of the individual plug-ins of the MagiMoto collection that handles only the random wiggle effect that can be selectively applied to each of the transformations of the video element (spin, throw and scale). After applying the SUGARfx MagiMoto - Wiggle filter, the first thing you may notice is that the SUGAR MagiMoto identifier and the User Manual buttons are available on top. They can be hidden from view to save more room for the rest of the user interface. Wiggle Parameters • User Manual : One of the most important things you need to know about all of our products is that when you click select the SUGARfx logo or the USER MANUAL button on the interface, you will gain access to the on-line manual that you can either download or read on-line. • Presets : If you would like to use a Preset, you can do that with the pull down menu, you can also create your own presets and save them or share them with your peers. • Show HUD : This button enables the on-screen guides (HUD) for the wiggle effect and they relate to the pivot point, since the effect is based on the center point of the video element. MagiMoto - Wiggle 43 When enabled the HUD, you will simply see a set of center lines and a center spot that represent the center of the video element. You may need to enable the HUD only if you need to move your center offset from its original position by using the Pivot Point parameters (explained later on), otherwise the HUD will show you the center of the element which is actually the center of your video element. Many of the Parameters of the Wiggle plug-in behave exactly as the corresponding parameters of the main MagiMoto plug-in, therefore in this section of the manual we will skip their explanation and ask you to refer to the earlier pages. – However this manual will explain those parameters that need clarification and that exclusively are used in the Wiggle plug-in. Main Setup The Main Setup only takes care of the Initial Size of the video element for simple reasons of adjusting your video element to be affected by the wiggle effect. The Wiggle effect is not based on time or duration of the animation, instead this will be applied to the full duration of the filter applied to your video element. Reverse Side These parameters are available only for those circumstances when the wiggle affects the rotation (Spin) of the video element to a point where you are able to see the back side of the video element, so if your wiggle effect 44 MagiMoto - Wiggle does not spin the element beyond 90°, then using the Reverse Side is not necessary. Offset In this section you are able to start your wiggle animation from an offset position and spin rotation. In other words, you may start your effect with your video element slanted or rotated some degrees to the side, or use the pivot point to make it spin from one of its corners, or from other point in the virtual 3D universe, etc. PIVOT POINT As explained earlier, the Pivot Point is a point in space used for reference to move or rotate an object. All objects in 3D space have a pivot point, also called the center point. When an object rotates, it does its rotation around the pivot point. If the Pivot Point is offset away from the object, then the rotation will happen relative to the position of the pivot point. x x An object with the Pivot Point in the center will rotate around itself (around its center). x An object with the Pivot Point offset from the original position will rotate in a bigger diameter range (because its center point is offset from its original position). With that in mind, these parameters allow you to modify the location of the pivot point in any or all of the three axes, simply by selecting the axis that you want to change and entering the start and end values • [ XY ] Pivot Point : The cross hair will position the Pivot Point in the horizontal (x) and vertical (y) axis of the canvas. MagiMoto - Wiggle 45 • [ Z ] Pivot Point : The slider will position the Pivot Point in the depth (z) axis of the virtual world. X HORIZONTAL / Y VERTICAL / Z DEPTH These parameters offer a way to offset the Spin (rotation) and Position of the video element before the wiggle effect starts doing its magic. The color coded X, Y and Z coordinates are indicated here as the axes that correspond to the Spin axis being offset, and the Horizontal, Vertical and Depth labels indicate that these are the directions where the Position parameter is being offset. • Spin : Use this parameter to offset the initial Spin rotation of the video element through the axis selected. • Position : Use this parameter to offset the initial Position of the video element in the direction of the axis selected. 46 MagiMoto - Wiggle www.sugarfx.tv Wiggle Effect Dissolve This section is where the Wiggle Effect gets enabled to act upon a certain transformation option such as Scale, Spin or Throw. The Settings will affect the strength of the effect as explained earlier in the manual. MagiMoto Dissolve is one of the individual plug-ins of the MagiMoto collection that provides a wide array of dissolve looks with an easy to use interface. The Dissolve works automatically by either using the duration of the clip placing the dissolve style at the beginning and at the end of the clip: or manually allowing you to place the dissolve anywhere in the entire duration of the clip or repeat the dissolve at intervals that you decide: These capabilities provide certain possibilities and interesting effects that can be done by simply using the MagiMoto Dissolve plug-in. After applying the SUGARfx MagiMoto - Dissolve filter, the first thing you may notice is that the SUGAR MagiMoto identifier and the User Manual buttons are available on top. MagiMoto - Dissolve 49 They can be hidden from view to save more room for the rest of the user interface. Parameters • User Manual : One of the most important things you need to know about all of our products is that when you click select the SUGARfx logo or the USER MANUAL button on the interface, you will gain access to the on-line manual that you can either download or read on-line. • Presets : If you would like to use a Preset, you can do that with the pull down menu, you can also create your own presets and save them or share them with your peers. Main Setup • Style : This drop down menu provides the several dissolve style options, and each style when selected, may expand the interface and provide new parameters to allow customizing. Let’s take a look at the drop-down style menu. Opaque : This is the default and most common dissolve used. The Opaque style makes your video to changes its opacity (or transparency) revealing the background or image behind it for the duration of the dissolve (see Timing later on this section). 50 MagiMoto - Dissolve To Color : This style provides a way to dissolve your video to a set color which can be selected by using the drop-down menu that becomes available underneath. This style does not provide opacity revealing the background or another image. This style dissolves your video to reveal the color selected. To Additive Color : This style provides a way to dissolve your video to a set color which is automatically applied as an Additive transfer mode to your video clip. The color can be selected by using the dropdown menu that becomes available underneath. To Self Negative : When this style is selected, the video clip dissolves from its normal mode to a negative of itself by using 2 colors of your preference. For an effect of a normal negative image, use the Black and White color palette, or experiment with other colors to get an out of the ordinary negative look. Gradient : This style provides a way to dissolve the video using a gradient effect in any direction. The Direction parameter becomes available and you will have 4 different options to choose from. This style dissolves the opacity, allowing you to place another image or video behind it to be revealed when the dissolve is complete. MagiMoto - Dissolve 51 Multi-Gradient : Similar to the Gradient style, this one provides a way to dissolve the video using a special gradient effect that can be applied in any direction. The Direction parameter becomes available and you will have 4 different options to choose from. This style dissolves the opacity, allowing you to place another image or video behind it to be revealed when the dissolve is complete. Image : When this style is selected, a new set of parameters become available in the interface where you can select the Image you want to use as your dissolve element. The Images provided have been created in shades of black (from black to white), therefore providing a way to dissolve your video in a more controlled fashion and interesting style. You can prepare your own image to be used as a Custom Image, and you have the ability to either create a black and white image or color, as well as a still or animated. – You just have to experiment and play with it to see if the results are extraordinary or otherwise. This style dissolves the opacity, allowing you to place another image or video behind it to be revealed when the dissolve is complete. 52 MagiMoto - Dissolve Timing The Timing parameters have been explained earlier, so please refer to the MagiMoto plug-in for detailed explanation, however, there is just one parameter that is only available here in this plug-in and that’s the drop-down to select Frames or Seconds. • Frames / Seconds : This drop down menu provides a way to set your Dissolve Duration in a number of Frames or Seconds according to your selection. Timing In this section you can decide whether to use the duration of the video clip to determine the placement of the dissolve (in the beginning and end of the clip), or use your own settings and be able to repeat the dissolve if desired. • Clip Duration : Drop-down menu that allows the selection of the type of duration we want to use to set the dissolve. There are 2 options: the Clip Duration and the User Duration. When the User Duration is selected, several new parameters appear below allowing you to set the User Duration using the input box and the Repeat mode and its delay between repetitions. MagiMoto - Dissolve 53 • User Duration : This parameter is available only if the Clip Duration has been set to User Duration. You can use the input box to enter the number of seconds or frames that you want your dissolve to be. • Info : This parameter and the one below provides the Current duration and the Time Code where your time line is located and the Repetition pattern (every so often or None). The information shown refers to the total duration of the animation and the current time on the animation time line, and the Repeat information changes depending on the selection made under the Repeat drop-down menu and the duration of the dissolve. • Dissolve Duration : This parameter allows you to enter a number for the duration of the dissolve You can choose to use Seconds or Frames by using the drop-down menu below. • Repeat : The Repeat parameter is available only if the duration happens to be the User Duration. This is the only way that you can actually repeat the dissolve effect. When the Repeat mode is set to Repeat, there is a new parameter that becomes available to give you the opportunity to place a delay or hold between your repetitions. This means that the dissolve will finish and then wait for the number of seconds entered here and then start doing the dissolve up again and so on. Repeat Delay 54 MagiMoto - Dissolve Repeat Delay Image This section is available only if the Style has been selected as Image in the Main Setup section above. • Image : This pull-down menu provides you with 23 images in black and white that will serve as the dissolve image. There is an additional Custom Image that you can select and it makes an additional parameter available when selected. • Custom Image : This image well becomes available only when the Image style has been selected as Custom Image, and you can place any image or movie here to use as your image dissolve. • Invert Mask : This button inverts the color values or the black and white shades of the image selected, giving you a somewhat different dissolve when using the Image as inverted. • Flip-Flop Image : This parameter helps in flipping or flopping the image being used. Color Palette This section is where the color palette is created. Simply change the palettes to a color that you prefer, and when the Style that requires a color selection, just select the palette of your choice. MagiMoto - Dissolve 55 www.sugarfx.tv The presets expand your plug-ins even further, specially when you can create your own styles and setups and save them for later use Presets Some of the SUGARfx filters already include several presets that you can use. MagiMoto includes many presets that provide excellent starting point setups or simply elements that can be used right off the box, just insert your own video, make a few adjustments and render. In the main MagiMoto plug-in you will find some presets that contain the letters in brackets [SS], this means that these presets may be used for a smart way of creating slide shows by using an embedded project with a synchronized image or video editing that matches the frequency of the preset. (Check our tutorials and tips for further explanation of the technique). In some cases it is a good idea to begin your own preset customizing by selecting one of the included presets and use it as a starting point to create your own. Have fun and start making your own, and remember that you can share the presets with other users or other computers as long as they have the same version of the plug-in installed in their system. Presets 57 www.sugarfx.tv Every SUGARfx theme or plug-in that you purchase comes with free technical support by sending all your questions via e-mail to our Support Team. Our Technical support team is available to answer your questions via e-mail and should respond within 24 hours or less from the time the e-mail was received. Things to know before contacting Technical Support Support Please visit our web site (http://www.sugarfx.tv) for possible answers to your technical support issues, or visit our tutorial site (http://www.ilearnfast.com) where you may also find a tutorial that will help you find the answer to your question before you contact our Support team. What to do when you need assistance. The first thing we recommend is that you read the Manual and instructions for installation. Second, find a tutorial that provides an explanation of the similar task you are trying to accomplish. If the problem is related to the Registration number, installation error or malfunction of the plug-in, please follow these 3 easy steps: 1. Browse to your hard drive’s applications folder and open the FxFactory Application. 2. When FxFactory is open, go to the Help Menu and select the option to “Contact Technical Support...” 3. When the Contact Form appears, make sure that the check box to attach your system profile is checked “on”, and take the time to enter a detailed description of your problem. Support 59 4. Someone from our Support team or Noise Industries will contact you with a solution to your problem. Other Issues If you need to contact us with a specific question about our plug-ins and themes, please send us an e-mail to : [email protected] with the f ollowing information: • Name and version of the SUGARfx theme. • The application name and version with which you are having the problem. • Screen shots of the problem (whenever possible). • Details and any other information you may think appropriate to describe the problem. Feedback The success of our products depend vastly on customer requests and feedback. We welcome all kinds of e-mails that provide useful information on how to improve our products, so we encourage you, as a user of these products, to send us your feedback or comments to our support team. Please visit our web site at http://www.sugarfx.tv MagiMoto Manual v1.0 / May 2010 60 Support © Copyright 2010 by SiDiCOM and SUGARfx SUGARfx is a trademark of SiDiCOM - Mac OS, Final Cut Pro and Final Cut are trademarks of Apple, Inc., registered in the U.S. and other countries. Adobe and After Effects are either registered trademarks or trademarks of Adobe Systems Incorporated in the United States and/or other countries. All other products mentioned in this publication are trademarks of their respective trademark holders.