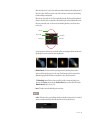
1
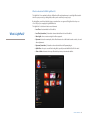
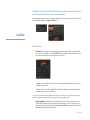
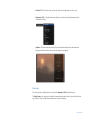
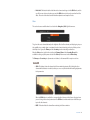
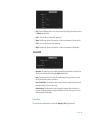
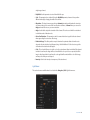
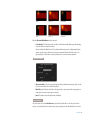
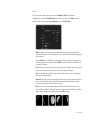
SUGAR fx LightPack 3 User Manual Installation4 Installing SUGARfx Contents 4 What is LightPack? 5 Using LightPack 6 Lens Flare 7 Filter Parameters Main Setup Glow Custom Flares Random Flares Stars Light Beams Halo Sun Obscuration Volumetric Quick Flare Filter Parameters Main Setup Animation Glow Lens Flare 7 8 11 13 15 20 23 24 26 27 32 34 34 35 35 36 37 Contents 2 Paparazzi41 Filter Parameters Main Setup Colors 41 41 42 Shine-o-Matic43 Filter Parameters Animation Time Adjustments Moon Light Filter Parameters Moon 43 44 44 45 47 47 48 Transitions50 Presets53 Light Pack 53 Support56 Things to know before contacting Technical Support What to do when you need assistance. Other Issues Feedback 56 56 57 57 Addendum58 Glow Custom Flares Conclusion 58 59 63 Contents 3 In order to use SUGARfx with the compatible host application of your choice, you need to download and install the Free FxFactory plug-in from Noise Industries. FxFactory is the host plug-in that makes SUGARfx available to the applications, so you need to first download FxFactory from the Noise Industries web site. • FxFactory is a free download and the web site address is: http://www.noiseindustries.com/fxfactory/download/ • Install and follow the prompts during installation. Installation Installing SUGARfx You should have received the Registration Code and information via e-mail, and downloaded the SUGARfx pack on your computer or it may be included with the installer. If you successfully installed FxFactory, then the icon of the SUGARfx should look just like a square brown box shown below. • Double click it (if not already installed) and it should automatically be installed and moved to its correct place in your hard drive and ready to be used with your applications. For more information on FxFactory, please read the instructions and/or the help file that came with it, or visit their support page on their web site (www.noiseindustries.com). Installation 4 What is included in SUGARfx LightPack 3.0 The LightPack 3.0 is an updated collection of filters that offer an alternative way to create light effects used in the video post-processing or editing field, and they can be used freely on any project. By being filters, you will need either footage on your time line or a segment of Slug (black color layer or a color Solid), so you can apply the LightPack filters to. The LightPack 3.0 collection includes several elements: • Lens Flare : A customizable Lens Flare effect. What is LightPack? • Lens Flare [ transition ] : A transition element derived from the Lens Flare effect. • Moon Light : A moon creator using the lens flare approach. • Paparazzi : Just as its name implies, this is a flash intensive shoot effect with several controls, color and other adjustments. • Paparazzi [ transition ] : A transition element derived from the Paparazzi plug-in. • Quick Flare : An easy to use and fast loading effect, specially created with Final Cut Pro X in mind. • Shine-o-Matic : Automatic shine rays effect with a point-to-point animation built in. What is LightPack? 5 Open your preferred application and browse to the Effects Tab. The screen shots shown on this manual are from Motion 5, but there should be no difference in the functionality of the SUGARfx plug-in on your preferred host application. Open your project in Motion 5 The LightPack contains several Filters and transitions. Using LightPack You will be able to find the SUGARfx LightPack filters under the Library : Filters : SUGARfx LightPack, so you need to have a video asset in your project time line before you try to apply any of the filters. After applying the filter, click on the Inspector tab to see its parameters. Every filter included in the SUGARfx Light Pack has its own set of parameters and their settings vary from one to the other. In the following sections you will be able to learn about the parameters of each individual filter. Using LightPack 6 SUGARfx Lens Flare is a powerful and alternative way to add a Lens Flare to your footage. It can be fully customized and it is open to your own creativity. After applying the filter to your video asset, make sure the filter is selected in the Layers panel in order to see its parameters by clicking on the Inspector : Filters tab. Lens Flare Filter Parameters • User Manual : One of the most important things you need to know about all of our products is that when you select the SUGAR logo or the USER MANUAL button on the interface, you will gain access to the on-line manual that you can either download or read on-line. • Presets : If you would like to use a Preset, you can do that with the pull down menu, or else skip it and do the setups yourself. These Presets are also available in Final Cut Pro X in the form of templates prepared specifically to be used inside this new version of Final Cut Pro. You can create your own Presets after customizing the look and setups you use the most. - It is a good idea to start selecting a predefined Preset if it resembles the style that you are looking for, instead of starting from scratch. • Compositing Mode : This button serves two purposes. One is to be able to view the lens flare over a black background while you edit your parameters, and another is to use it to “composite” the lens flare over some other footage layer while using the Screen or Add transfer mode. We recommend the Screen mode for the best compositing result. Lens Flare 7 • Position [ X Y ] : This enables you to position the center of your light anywhere on the screen. • Navigation [ G.U.I. ] : This pull-down menu allows you to select and isolate the parameters of the section that you want. • Statistics : This button enables the display of some important information in the Canvas window telling you what elements have been used in the setup you have applied. Main Setup This section becomes available when it is selected in the Navigation [ G.U.I. ] pull-down menu. The Main Setup section allows you to enable the elements that make up the style of your Lens Flare, like the type of Glow, or Flares, and the Central elements and other special settings. Lens Flare 8 This is the section of the interface where you need to select and enable the elements of your Lens Flare. You may also come back here and select or deselect additional elements at any time. Once you make your element selection here, the corresponding element section will be available when you call it up using the Navigation [ G.U.I. ] drop-down menu and ready for parameter customizing. SETTINGS • Main Color : This color well provides a way to colorize all of the Lens Flare elements into a one monochromatic color style. • Color Mixing : As its name implies, you can move the slider to determine how much of the Main Color will be mixed with the original colors of the different elements that form your Lens Flare, being 100 the full mixing value. • Orientation : This parameter provides a way to change the orientation of the Random Flares. ELEMENTS In this section you can enable the main elements that conform a typical lens flare Lens Flare 9 • Glow : This drop down menu provides a way to build the center glow of the lens flare by using a Primary Glow, a Secondary Glow or use both glows for interesting and organic results. • Custom Flare : This drop-down menu allows the use of 2 custom flaring elements that can be positioned with precision along the direction of the lens flare reflections. • Random Flare : This drop-down menu enables the Random Flare sets that conform the multiple elements of reflection along the lens flare center. CENTER ELEMENTS In this section you will find the elements that can be selected to be part of the center of your lens flare, including a sun or the phases of the moon. • Sun : Enables the use of a Sun element. • Stars : This button enables a center star that moves continually (living star) or a simple spike star. • Light Beam : This enables a customizing light beam. • Halo : This enables a customizing Halo. PREFERENCES Lens Flare 10 • Hide Label : This button hides the labels when the elements are being set in the SOLO mode; and the use of it becomes obvious only when you want the SOLO elements to be used as your final Lens Flare effect. -Please check the video tutorials for further explanation and samples of its use. Glow This section becomes available when it is selected in the Navigation [ G.U.I. ] pull-down menu. The glow is the center element that may be the brightest of the lens flare elements, and this plug-in gives you the capability to use a simple glow or customize it to make it more interesting, and on top of that you have the ability to use 2 glows, the Primary and the Secondary, to make interesting combinations. When the Glow section is visible in the interface, the Primary Glow and the Secondary Glow will be available for editing only if they were selected in the Glow pull-down menu inside the Main Setup. The Primary and Secondary set of parameters are identical, so this manual will show just one set here. PRIMARY • SOLO : This button isolates the element in the Canvas window by turning off (or hiding) the other elements while this button is enabled, so that you can see only this element while making adjustments to the parameters. When the SOLO button is enabled, the corresponding label shows up in the Canvas so that you know you are looking at this section’s parameters in the SOLO mode and remember to turn it off before you try to edit other elements. • HIDE : This button hides this element from rendering in the Canvas window. Lens Flare 11 • Presets : This parameter allows you to save and apply your own setups to this section only, that way you can create several setups ready to be used with other elements. The Presets drop-down menu already contains some setups for you to use. • Object : This pull-down menu provides a selection from a list of 20 different objects, as well as the option to use your own User object. When the User object is selected, the User Image well becomes available for you to place your own glow design. When creating your own Glow image, keep in mind that the glow image needs to be white in color, centered and concentric with the background transparent or black, avoiding any pixels touching the borders of the image, and the format should be PNG, TIFF or Photoshop. • Size : Controls the size of your glow image. • Aspect Ratio : You have the option to use a predetermined square or anamorphic proportion by using this drop down menu. • Proportion : Use this parameter if you need to adjust the proportion of your glow image, or leave it at 100 so it is exactly the proportion set in the Aspect Ratio parameter above. • Color : Apply a color to your glow. (When designing your own image, make sure the User glow image is white, so it can be colorized accurately using this parameter). • Intensity : Controls the Intensity or opacity of your glow image. ADVANCE SETTINGS The power of the glow parameters become evident when the Multi color button is enabled, to help you achieve glow styles not possible with just one layer. • Multi color : This button enables additional parameters with which you can play and experiment to achieve interesting and unique glow styles. Lens Flare 12 • Style : There are 24 different styles to choose from, and every style will change the random behavior of the Adjust parameters below. • Color 2 : The Color of the second layer of the glow image. • Adjust : This will change the size or the proportion, or both in a random manner of the second layer. • Color 3 : The Color of the third layer of the glow image. • Adjust : This will change the size or the proportion, or both in a random manner of the third layer. ORIENTATION • Orientation : The glow image can be controlled to automatically point towards the center of the lens flare direction or manually controlled using the Angle parameter below. • Angle : This parameter allows you to change the overall orientation of your glow image, even if you are using the automatic orientation option above. • Center Size Reduction : This parameter controls how much reduction is applied to the glow element when approaching the center area of the image. • Reduction Range : This slider provides a way to determine the perimeter distance from the outer edge when the reduction will happen, being 0 the full width and 100 the closest range to the center where the reduction should happen. Custom Flares This section becomes available when it is selected in the Navigation [ G.U.I. ] pull-down menu. Lens Flare 13 The Custom Flares are powerful elements that make your lens flare as customizing as possible by being able to place the custom flare exactly in the place that the user wants. The Custom Flare section can show up to 2 sub-sections that correspond to the number of Custom Flares selected in the Main Setup section. The set of parameters are identical, so this manual will show just one set here. CUSTOM 1 • SOLO : This button isolates the element in the Canvas window by turning off (or hiding) the other elements while this button is enabled, so that you can see only this element while making adjustments to the parameters. When the SOLO button is enabled, the corresponding label shows up in the Canvas so that you know you are looking at this section’s parameters in the SOLO mode and remember to turn it off before you try to edit other elements. • HIDE : This button hides this element from rendering in the Canvas window. • Presets : This parameter allows you to save and apply your own setups to this section only, that way you can create several setups ready to be used with other elements. • Image : The Custom elements are unique types of lens reflections, and this drop down menu provides you with 42 unique images that simulate such elements. You also have the option to use your own custom User Image. When the User Image is selected, the User Image well becomes available for you to place your own custom element. • Position : Controls the position along the line (or direction) of the lens flare reflections. • Size : Controls the size of the element. • Proportion : Use this parameter if you need to change the proportion or aspect ratio of the element. • Orientation : This drop-down menu provides an Automatic orientation which points to the center of the lens reflections at all times, or Manual where you can use the Angle parameter below to use your own fixed orientation. Lens Flare 14 • Angle : Use this dial to adjust the orientation of the element. This can be used while the orientation is in Automatic or Manual modes. • Center Size Reduction : This parameter controls how much reduction is applied to the custom element when approaching the center area of the image. • Reduction Range : This slider provides a way to determine the perimeter distance from the outer edge when the size reduction should happen, being 0 the full width and 100 the closest range to the center where the reduction should happen. MULTIPLE ITEMS Every Custom element has an option to use Multiple Items, making it extremely unique and versatile. • Object Count : This drop-down menu provides up to 7 objects that can be adjusted with the new parameters that become available below when more than one element is selected. • Amplitude : This parameter is a random value that has an effect on the Variation parameter below. • Variation : When using this parameter, you are actually applying a variation in the value of size, transparency and position to the number of elements selected in the Object Count. The amount of the Variation value is affected by the Amplitude parameter above. AXIS LIMIT CONTROL These parameters control and/or restrict the Horizontal and Vertical movement of the flares. This powerful feature is useful when you need to create special effect flares that need the restriction or control of movement in any axis. • Horizontal : Controls and/or restricts the horizontal movement in percentage values. • Vertical : Controls and/or restricts the vertical movement in percentage values. Random Flares This section becomes available when it is selected in the Navigation [ G.U.I. ] pull-down menu. The Random Flares are elements that make the repeated multiple reflections of your lens. The Random Flare section can show up to 2 sub-sections that correspond to the number of Random Flares selected in the Main Setup section, these are Random 1 and Random 2. Lens Flare 15 The set of parameters are identical, so this manual will show just one set here. RANDOM 1 The Random flares have many options to make the randomness as controllable as possible. The parameters are divided in several sections that control the objects, size and other settings unique to this type of flares. • SOLO : This button isolates the element in the Canvas window by turning off (or hiding) the other elements while this button is enabled, so that you can see only this element while making adjustments to the parameters. When the SOLO button is enabled, the corresponding label shows up in the Canvas so that you know you are looking at this section’s parameters in the SOLO mode and remember to turn it off before you try to edit other elements. • HIDE : This button hides this element from rendering in the Canvas window. • Presets : This parameter allows you to save and apply your own setups to this section only, that way you can create several setups ready to be used with other elements. FLARE OBJECTS • Image : The Flare Objects can be selected from this drop-down menu. There are 17 unique images that simulate such elements, and you also have the option to use your own custom User image. When the User image is selected, the User Image well becomes available for you to place your own custom element. • Amount : This slider allows you to dial the number of cloned objects you want to use. Lens Flare 16 • Spacing : Controls the space span between all the clones. COLOR The initial drop-down menu gives you two options to use either a Random Color or use a Custom Color. When the Custom Color option is selected, a Custom parameter to select the color becomes available and the randomizing parameters disappear from the interface. • Range : Controls the range of colors that the following parameters can modify. • Hue : Controls the starting color hue that becomes randomized. • Saturation : Use this parameter to control the saturation of the color. TRANSPARENCY • Random : This drop-down menu provides a random value to the transparency of each object. • Range : Controls the amplitude (or range of value) from which the transparency can be randomly applied to each object. • Adjust : Use this dial increase or decrease the transparency of all the objects while maintaining the randomness on the transparency values. ORIENTATION • Orientation : This drop-down menu provides an Automatic orientation which points to the center of the lens reflections at all times, or Manual where you can use the Angle parameter below to use your own fixed orientation. Lens Flare 17 • Angle : Use this dial to adjust the orientation of the element. This can be used while the orientation is in either Automatic or Manual modes. • Center Size Reduction : This parameter controls how much reduction is applied to the flare element when approaching the center area of the image. • Reduction Range : This slider provides a way to determine the perimeter distance from the outer edge when the size reduction should happen, being 0 the full width and 100 the closest range to the center where the reduction should happen. SIZE This section controls the size randomness by using a couple of Variable inputs that create a unique random value for each of the elements, as well as a more controllable Adjust slider. DIMINISH • Diminish : This button enables a special feature where the light flares diminish, or lower the intensity when reaching the center of the canvas window so that the multiple flares do not over blow when their luminance overlap in the same center point. When this button is enabled, additional parameters become available. • Transition Point : This slider represents a percentage value of a circular area around the center point where the transition should happen from fully illuminated to a diminished flare. Lens Flare 18 When the lowest value of 1 (one) is selected, this means that the diminishing effect will happen just 1% before the location of the flare reaches the center of the video frame. In other words, the diminishing transition will happen extremely fast. When the value is selected to be 100%, this means that the intensity of the flares will start to diminish when the center flare is at the out boundaries of the diminishing area and slowly diminish if the center flare moves towards the center. –In this scenario, the diminishing transitions is smooth and almost hard to notice. Value of 100 Value of 50 (fifty) Value of 1 (one) Canvas window (video frame) In the image sequence below you can see that the lens flare is moving diagonally down and when the light flares get closer to the center, their luminosity diminishes. • Diminish Amount : This slider controls the percentage amount of diminishing that you want to apply to your flares when they get close to the center. The full amount selected here represents the maximum being applied when the flares are actually in the center of the Canvas window. The Diminishing feature will be more obvious only if the lens flare is moving and getting close to the center of the Canvas, and also when the Transition Point value is around or below 50% and the Diminish Amount is high or close to 100%. • Invert : This button inverts the diminishing option and values. SCATTER • Scatter : This button enables a special feature where the random flares change position in a “scattered” manner, to simulate random lights or flare reflections that come from unknown sources. Lens Flare 19 When this button is enabled, additional parameters become available. • X Horizontal : This set of 3 sliders allow you to add random behavior to the horizontal position of the flares in a “scattered” manner. • Y Vertical : This set of 3 sliders allow you to add random behavior to the vertical position of the flares in a “scattered” manner. AXIS LIMIT CONTROL These parameters control and/or restrict the Horizontal and Vertical movement of the flares. This powerful feature is useful when you need to create special effect flares that need the restriction or control of movement in any axis. –Some of the Presets provide a perfect example of this feature. • Horizontal : Controls and/or restricts the horizontal movement in percentage values. • Vertical : Controls and/or restricts the vertical movement in percentage values. Stars This section becomes available when it is selected in the Navigation [ G.U.I. ] pull-down menu. Lens Flare 20 The Stars section is part of the Center Elements that conform your lens flare. • SOLO : This button isolates the element in the Canvas window by turning off (or hiding) the other elements while this button is enabled, so that you can see only this element while making adjustments to the parameters. When the SOLO button is enabled, the corresponding label shows up in the Canvas so that you know you are looking at this section’s parameters in the SOLO mode and remember to turn it off before you try to edit other elements. • Presets : This drop-down menu allows you to save and apply your own setups to this section only, that way you can create several setups ready to be used at any time with other elements. • Style : There are only two types of stars available here. The first style is the Legacy Star which corresponds to the star used on the previous version of Lens Flare. The legacy star is a very simple star that only has 3 additional parameters to change its Size, Color and Intensity. Legacy Star The second option is the Living Star which corresponds to an animated star that can be customized with the aid of several new parameters that become available. By default, the Living Star is always selected. Lens Flare 21 • Image : This drop-down menu provides 10 different built-in images to choose from, or if you prefer there is an option to use your own User Image. • User Image : This parameter is only available if you have selected the User Image in the Image selector menu. The Star element is an elongated graphic that gets replicated around a center point to give the illusion of being the rays of a star or glows coming out from its center. This element can be in white or in color that never reaches the border of the image element. When you prepare your own image, just make sure it looks similar to one of the elements shown here. • Size : Controls the size of the Star element. • Rays : This parameter allows you to dial in the number of Image elements being replicated as to create the simulation of the Star rays coming out from the center of the star. If you dial 1, this will show just a Lens Flare 22 single image element. • Ray Width : Use this parameter to control the width of the rays. • Scale : This parameter does a similar effect as the Ray Width parameter, however it does perform different internally by changing the width of the element. • Orientation : This drop-down menu provides an Automatic orientation which makes the star rotate as if it was pointing to the center of the lens reflections at all times, or Manual where you can use the Angle parameter below to use your own orientation. • Angle : Use this dial to adjust the orientation of the element. This can be used while the orientation is in either Automatic or Manual modes. • Center Size Reduction : This parameter controls how much reduction is applied to the star element when approaching the center area of the image. • Reduction Range : This slider provides a way to determine the perimeter distance from the outer edge when the size reduction should happen, being 0 the full width and 100 the closest range to the center where the reduction should happen. • Color : This color well allows you to set the color of your star element. Keep in mind that if the element is white in its raw form, the image will be colorized with the color you choose as expected, but if the image is other than white in its raw form, the color applied will be mixed with the color of the image, and may not look like you would expect. • Intensity : Controls the intensity or transparency of the star element. Light Beams This section becomes available when it is selected in the Navigation [ G.U.I. ] pull-down menu. Lens Flare 23 The Light Beams section is part of the Center Elements that conform your lens flare. • SOLO : This button isolates the element in the Canvas window by turning off (or hiding) the other elements while this button is enabled, so that you can see only this element while making adjustments to the parameters. When the SOLO button is enabled, the corresponding label shows up in the Canvas so that you know you are looking at this section’s parameters in the SOLO mode and remember to turn it off before you try to edit other elements. • Presets : This drop-down menu allows you to save and apply your own setups to this section only, that way you can create several setups ready to be used at any time with other elements. • Color : This color well allows you to choose and set the color of your beams. • Intensity : Controls the intensity or transparency of the beams • Number : This slider allows you to dial in the number of beams. • Size : Controls the size of the element. • Length : This controls the length of the beams • Sharp Factor : Makes the inside of the beams to appear sharper. • Rotation : Provides a rotation tool to offset the orientation of the beams. • Glow : As its name implies, this parameter adds a glow to the light beams. • Center Size Reduction : This parameter controls how much reduction is applied to the beam element when approaching the center area of the image. • Reduction Range : This slider provides a way to determine the perimeter distance from the outer edge when the size reduction should happen, being 0 the full width and 100 the closest range to the center where the reduction should happen. Halo This section becomes available when it is selected in the Navigation [ G.U.I. ] pull-down menu. The Halo section is part of the Center Elements that conform your lens flare. • SOLO : This button isolates the element in the Canvas window by turning off (or hiding) the other elements while this button is enabled, so that you can see only this element while making adjustments to the parameters. When the SOLO button is enabled, the corresponding label shows up in the Canvas so that you know you are looking at this section’s parameters in the SOLO mode and remember to turn it off before you try to edit other elements. • Presets : This drop-down menu allows you to save and apply your own setups to this section only, that way you can create several setups ready to be used at any time with other elements. Lens Flare 24 • Aspect Ratio : This drop down menu provides the options to use a square or anamorphic style halo. • Clones : This drop-down menu creates copies or clones of the initial halo and their location or position from the center point is controlled by the Separation parameter. • Separation : This parameter becomes available only if you have selected more than 1 (one) clone in the Clones pull-down menu. The Separation controls exactly what its name implies, the separation of the clones along its center axis. • Size : Controls the size of the element. • Center Size Reduction : This parameter controls how much reduction is applied to the beam element when approaching the center area of the image. • Reduction Range : This slider provides a way to determine the perimeter distance from the outer edge when the size reduction should happen, being 0 the full width and 100 the closest range to the center where the reduction should happen. • Contrast : Defines how sharp the strides that conform the halo will appear. • Speed : The Halo is a living element, which means that it moves or animates over time, therefore this parameter provides a way to change the speed of such animation. • Width : Controls the width or thickness of the color stride elements that conform a typical halo. This parameter renders new pixels as it increases the width of the color bands. • Compress : This parameter performs a similar change in thickness as the Width parameter, the difference is that the whole element is stretched without adding resolution, therefore the image quality may look somewhat pixelated when used at its maximum value. –Use this in combination with the width parameter for optimal results. Lens Flare 25 • Color : This color well allows you to choose and change the color of your halo. Since the halo element already is composed of the typical Red, Green and Blue bands, when the color of the halo is changed to other than white, then the halo colors will get suppressed or enhanced depending on the color selected that will affect the original colors. -In other words, if you choose a green color, then the Green element will become enhanced while the other colors will be muted depending on how much (or how less) of their color is in the color you’ve selected. Try to experiment with this setting using the SOLO button, and notice that if you select a dark color, the luminosity of the halo also goes down, meaning that you can control, not only the color hue but the intensity of your color just by using the Color well only. • Intensity : Controls the intensity or transparency of the halo. Sun This section becomes available when it is selected in the Navigation [ G.U.I. ] pull-down menu. The Sun element is available when it is enabled inside the Main Setup. • SOLO : This button isolates the element in the Canvas window by turning off (or hiding) the other elements while this button is enabled, so that you can see only this element while making adjustments to the parameters. When the SOLO button is enabled, the corresponding label shows up in the Canvas so that you know you are looking at this section’s parameters in the SOLO mode and remember to turn it off before you try to edit other elements. • Presets : This drop-down menu allows you to save and apply your own setups to this section only, that way you can create several setups ready to be used at any time with other elements. • Size : This controls the size of the element. • Sun Rays : This slider controls how sharp the sun rays will appear. The higher the number the more prominent they will be. • Color 1 and Color 2 : The Sun element is conformed of 2 colors. The Color 1 is the main color and Color Lens Flare 26 2 is the mixing color that gets added to the main color. • Color Mix : This slider controls the addition of the Color 2 into the Color 1. Keep in mind that the mixing is a form of adding the color, which may cause a high luminosity, specially in the center of the Sun element. Obscuration This Special Setting becomes available when it is selected in the Navigation [ G.U.I. ] pull-down menu. The Obscuration of a lens flare is a powerful feature that uses an image or video to simulate when a light passes behind an object and it becomes obstructed, therefore lowering its illumination. Obscuration Method : Same Video Source Obscuration Method : None The first time that you use the Obscuration section, it presents to you with a simple drop down-menu from which you will select the method you want to use to create the simulation. By default the method is set to None, but there are three additional methods that will be discussed in this manual. • Method : This drop-down menu provides the options to create the simulation of Obscuration. Select None if you would like to use the lens flare without any type of obscuration. Select Border Mask if you want to have your lens flare obscuration be activated when getting close to any of the borders of the video clip or moving away out of the Canvas window. Select Black and White Mask if you already have a video mask prepared that provides the correct masking for the objects that obscure the lens flare in your video. Lens Flare 27 These type of video masks may be created from a color key, or within a 3d animation program or from a compositing application, and usually look white over black, being white just the obstructing element that will have an effect on the obscuration of your lens flare. Whatever method you select, its corresponding parameters will become available. PREVIEW The Preview section appears whenever you select an Obscuration Method other than None. • Preview : This button enables the preview image of the black and white mask that will affect the lens flare. The Preview will show a black and gray image which represents where in the video clip are the areas that will have an effect on the obscuration. Preview On - Method : Black & White Mask Preview On - Method : Border Mask • Preview Color : You can change the color of your Preview image by selecting a different color here. The Preview color does not have an effect on the obscuration method or accuracy, it simply provides a way to see your preview in a color that may be more intuitive for you when working with the preview image and adjusting the parameters. Lens Flare 28 When any obscuration method is selected: • Solver Quality : This slider increases the resolution of the black and white image that the plug-in uses to achieve an accurate obscuration. Keep in mind that the default value of under 20 is optimal and that any increase in quality demands higher amounts of video memory and the plug-in may become slow depending on your video memory, therefore it is strongly recommended that if you feel the need to use a higher quality, do so with caution so that your system does not run into video memory problems. BORDER FRAME • Border Mask : This button allows you to enable the use of the Border Mask, and provides the necessary parameters to edit your obscuration image. • Height : This slider controls the height of the border frame image. • Width : Controls the width of the border frame image. • Smooth : Provides a way to smooth out the borders of the image so that the obscuration happens in a smooth progressive manner instead of a linear and abrupt change. • Horizontal Move : This moves the border frame image in the horizontal direction. • Vertical Move: This moves the border frame image in the vertical direction. Lens Flare 29 Height Smooth : 15 Horizontal Move Width Smooth : 96 Vertical Move When the Black and White Matte method is selected: • Solver Quality : This slider increases the resolution of the black and white matte image that the plugin uses to achieve an accurate obscuration. Keep in mind that the default value of 20 is optimal and that any increase in quality demands higher amounts of video memory, therefore it is strongly recommended that if you feel the need to use a higher quality, do so with caution so that your system does not run into memory problems. OBSCURATION MATTE • Obscuration Matte : This is the image well where the black and white matte image should go in order to be used as a matte in the obscuration simulation. • Matte Blur : Use this slider to add a blur to the image for those moments when the image may be too sharp and the obscuration may happen too abrupt. • Invert : This button inverts the alpha values of the Matte. CENTER ELEMENTS This section takes care of the Center Elements of your lens flare, like the Glow or Sun. Here you have the option to see them behind the obscuration image, and by doing this you will add a little bit more of realism Lens Flare 30 to the simulation. • Show Behind : This enables the center elements to be seen behind the obscuration layer. Specially useful when your center element is a glow that needs to show behind the obscuration object or matte, in anticipation of the lens reflections. • Image Spill : The spill refers to a smoothing out of the borders of the image so that the center element feels like it is glowing or spilling light into the borders of the obscuration layer instead of just going behind a sharp obscuration image. BORDER FRAME When using the Black and White Matte method, you have the option to include the Border Mask in the obscuration calculation, so this option is available here in case that you need to use the combination of the two methods. When the obscuration methods are used: • Solver Quality : This slider increases the resolution of the black and white matte image and the frame border image that the plug-in uses to achieve an accurate obscuration. Keep in mind that the default value of under 20 is optimal and that any increase in quality demands higher amounts of video memory, therefore it is strongly recommended that if you feel the need to use a higher quality, do so with caution so that your system does not run into memory problems. OBSCURATION MATTE Lens Flare 31 This section refers to the basic adjustments that can be applied to your black & white matte. • Matte Blur : This blur is applied when you need to smooth out the transition from light to dark on a highly contrasted image matte. • Invert : This button inverts the color of the black & white image matte. CENTER ELEMENTS This section takes care of the Center Elements of your lens flare, like the Glow, Sun or the Moon. Here you have the option to see them behind the obscuration image, with a little bit more of realism to the simulation. • Show Behind : This enables the center elements to be seen behind the obscuration layer. Specially useful when your center element like the glow shows behind, in anticipation of the lens reflections. • Image Spill : The spill refers to a smoothing out of the borders of the image so that the center element feels like it is glowing into the borders of the obscuration layer instead of just going behind a sharp obscuration image. BORDER FRAME When using the Black & White Matte method, you have the option to include the Border Mask in the obscuration calculation, so this option is available here in case that you need to use the combination of the two methods. Volumetric This Special Setting becomes available when it is selected in the Navigation [ G.U.I. ] pull-down menu. The Volumetric is an optional feature that needs to be enabled and it refers to the rays of light that are caused by the dark elements in your video footage. The Volumetric becomes more useful when used in combination with the Black and White Matte obscuration method. Lens Flare 32 • Style : This drop-down menu provides two options to handle your volumetric simulation. The Limited style gives you a way to restrict how much of the scene will be affected by the volumetric effect and it provides a parameter for such control called Smooth. The Full Scene style does exactly what its name implies, it applies the volumetric effect to the whole scene or the whole video frame. By using this style, there is no way to control how much of the area will have the effect applied around the light center. • Intensity : Controls the intensity of the volumetric effect. • Color : Provides a color well with which you can colorize the volumetric rays. • Smooth : This parameter is available only if you selected the style to be Limited. The Smooth parameter controls how wide the area around the light center will be affected by the Volumetric effect. This area is an invisible circular area around the light, where the higher the number the larger the area will become, therefore the Volumetric effect will extend to its maximum value in a very smooth manner from the center to the outwards direction of the light. Note : The Volumetric effect works similarly as if you had applied a Shine effect to your video. The Volumetric effect built in the Lens Flare filter is therefore useful because it follows and obeys the light position at all times. Tip : The Volumetric effect can be used just by itself instead of using a separate Shine effect. By doing that, you will have the option to eventually enable the light and flares to go with it. Lens Flare 33 SUGARfx Quick Flare is an easy way to add an animated lens flare effect to your project. Quick Flare was designed with the Final Cut Pro X users in mind. The ease of use, the variety of looks and fast loading make it ideal to use in this application. After applying the filter to your video asset, make sure the filter is selected in the Layers panel in order to see its parameters by clicking on the Inspector : Filters tab. Filter Parameters Quick Flare • User Manual : One of the most important things you need to know about all of our products is that when you select the SUGAR logo or the USER MANUAL button on the interface, you will gain access to the on-line manual that you can either download or read on-line. • Presets : If you would like to use a Preset, you can do that with the pull down menu, you can also create your own presets and save them or share them with your colleagues. Here is where you can save your own Presets after customizing the look and setups you use the most. • Compositing Mode : This button serves two purposes. One is to be able to view the lens flare over a black background while you edit your parameters, and the other is to use it to “composite” the lens flare over some other footage layer while using the Screen or Add transfer modes. We recommend the Screen mode for the best compositing result. • Show Guides : By default this button is enabled so that the beginning and end guide-points are visible to the user, and can easily be changed to create the movement desired. Quick Flare 34 The guides are used to help you in the setup and are not intended for rendering, so you should turn them off before you go ahead and render. You can always enable them again when you need to alter the direction or position of your animation. Main Setup This section allows you to set the main parameters that control the main features of your flare. • Glow : This button enables the center glow of your flare. • Lens Flares : This button enables the use of the flares. • Main Color : This color well provides a way to colorize all of the Quick Flare elements into a one monochromatic color style. • Color Mixing : As its name implies, you can move the slider to determine how much of the Main Color will be mixed with the original colors of the different elements that form your Quick Flare, being 100 the full mixing value. Tip: when selecting any color, you can choose a bright color if you want your lens flare to be illuminated and bright, but if you want to control the luminosity, you can select a darker color so the overall light is dimmed and subtle. Animation This important section should be used with the Show Guides turned on to set up your animation correctly. • Animate : This drop down menu provides the option to animate your quick flare in the Manual Animation mode or the Automatic [ From > To ] default mode. If you select the Manual Animation mode, you will notice that all the guides jump to the initial position and you will have to animate only the From position by hand. • From : The initial position of the flare when the Automatic [ From > To ] mode has been selected, or the only point to animate when the Manual Animation mode of animation has been selected. • To : The final point of your animation only enabled when the Automatic [ From > To ] mode has been selected. ( Moving this point when Manual Animation mode is selected will have no effect on the position, behavior or look of your flare). Quick Flare 35 • Behavior : This pull down menu allows you to select the behavior of your animation with 4 easy options. Use Linear when the speed of your animation must be constant. • Time Unit : Here you can select the units used for the timing of your animation. Select Frames (recommended) or Seconds. • Duration Method : The automatic animation needs to know how long should it take from the initial point to the end, therefore here is the option that you can choose a Manual Setting or use the length of the clip automatically by selecting the default Clip Duration option. • Duration : Use this slider when setting the Manual Setting for the duration of the animation. • Dissolve : This drop down menu allows you to choose if your flare will automatically dissolve at the beginning, or the end, or both. • Dissolve [ frames ] : The dissolve value must be set in frames. If you prefer not to have a dissolve at all, then type 0 (zero) as the dissolve value. Glow In this section you can control the look of the glow if enabled in the Main Setup section. Quick Flare 36 • Image : Select the Glow image • Size : Set the size of the Glow. • Color : Set the color of the glow image. • Rotation : You can set the glow to auto-rotate when the flare is traveling around the center of the canvas, or simply use the Manual rotation. • Orientation : You can add a rotation offset by using this parameter when using either type of Rotation. DIMINISH • Center Size Reduction : This parameter controls how much reduction is applied to the glow element when approaching the center area of the image. • Reduction Range : This slider provides a way to determine the perimeter distance from the outer edge when the reduction will happen, being 0 the full width and 100 the closest range to the center where the reduction should happen. Lens Flare In this section you can control most aspects of the flare objects once they have been enabled in the Main Setup section above. FLARE OBJECTS • Image : The Flare Objects can be selected from this drop-down menu. There are 13 unique images that simulate such element. • Aspect Ratio : You can easily change the aspect ratio of the image by using this slider and creating extreme distortions. Use 1 for native aspect ratio (or square), or 1.77 for 16x9. • Amount : This slider allows you to dial the number of cloned objects you want to use. • Spacing : Controls the space span between all the clones. Quick Flare 37 SIZE This section controls the size randomness by using a Random input that creates a unique random value for each of the elements, as well as a more controllable Adjust slider. • Center Size Reduction : This parameter controls how much reduction is applied to the flare element when approaching the center area of the image. • Reduction Range : This slider provides a way to determine the perimeter distance from the outer edge when the size reduction should happen, being 0 the full width and 100 the closest range to the center where the reduction should happen. COLOR The initial drop-down menu gives you two options to use either a Random Color or use the Glow Color. When the Glow Color option is selected, all the flares take up the tint or color of the glow. • Range : Controls the range of colors that the following parameters can modify. • Hue : Controls the starting color hue that becomes randomized. • Saturation : Use this parameter to control the saturation of the color. TRANSPARENCY • Range : Controls the amplitude (or range of value) from which the transparency can be randomly applied to each object. Quick Flare 38 DIMINISH • Diminish : This button enables a special feature where the light flares diminish, or lower the intensity when reaching the center of the canvas window so that the multiple flares do not over blow when their luminance overlap in the same center point. • Transition Point : This slider represents a percentage value of a circular area around the center point where the transition should happen from fully illuminated to a diminished flare. When the lowest value of 1 (one) is selected, this means that the diminishing effect will happen just 1% before the location of the flare reaches the center of the video frame. In other words, the diminishing transition will happen extremely fast. When the value is selected to be 100%, this means that the intensity of the flares will start to diminish when the center flare is at the out boundaries of the diminishing area and slowly diminish if the center flare moves towards the center. –In this scenario, the diminishing transitions is smooth and almost hard to notice. Value of 100 Value of 50 (fifty) Value of 1 (one) Canvas window (video frame) • Diminish Amount : This slider controls the percentage amount of diminishing that you want to apply to your flares when they get close to the center. • Invert : This button inverts the diminishing option and values. Quick Flare 39 ORIENTATION • Orientation : This drop-down menu provides an Automatic orientation which points to the center of the lens reflections at all times, or Manual where you can use the Angle parameter below to use your own fixed orientation. • Angle : Use this dial to adjust the orientation of the element. This can be used while the orientation is in either Automatic or Manual modes. SCATTER • Scatter : This button enables a special feature where the random flares change position and rotation angle in a “scattered” manner, to simulate random lights or flare reflections that come from unknown sources and to avoid pattern repetition when obviously visible. AXIS LIMIT CONTROL These parameters control and/or restrict the Horizontal and Vertical movement of the flares. This powerful feature is useful when you need to create special effect flares that need the restriction or control of movement in any axis. –Some of the Presets provide a perfect example of this feature. • Horizontal : Controls and/or restricts the horizontal movement in percentage values. • Vertical : Controls and/or restricts the vertical movement in percentage values. Quick Flare 40 SUGARfx Paparazzi is a plug-in that emulates the shooting frenzy of the photographers who follow the celebrities around the world also known as the Paparazzi. After applying the filter to your video asset, make sure the filter is selected in the Layers panel in order to see its parameters by clicking on the Inspector : Filters tab. Paparazzi Filter Parameters • User Manual : One of the most important things you need to know about all of our products is that when you select the SUGAR logo or the USER MANUAL button on the interface, you will gain access to the on-line manual that you can either download or read on-line. • Presets : If you would like to use a Preset, you can do that with the pull down menu, you can also create your own presets and save them or share them with your peers. Here is where you can save your own Presets after customizing the look and setups you use the most. - It is a good idea to start selecting a predefined Preset if it resembles the style that you are looking for, instead of starting to tweak it from scratch. Main Setup This section allows you to set the main parameters that control the main features of your plug-in. Paparazzi 41 • Frequency : Sets the speed or frequency between the multiple photo flashes that are being shot. The higher the number the more frequent and frenzy the flashes appear. • Flashes : This setting allows you to add more flashes to the scene. It also adds more brightness to the whole scene just because when more lights are added the more brightness is on the scene. A good modest number is between 2 and 4. • Spread : The spread makes the light flashes be further apart or get closer to the center of the screen. For a subtle effect, try using it to the lowest number possible or the furthest away from the center. • Transparency : Controls the presence of the flashes by controlling their transparency. The default transparency is in the middle ( 50% ) Colors These color parameters allow you to add a variation of color hues to the flashes. You can also control the illumination of the flashes when setting darker colors to illuminate the least, and use brighter colors when you want the effect to appear fully illuminated. Paparazzi 42 SUGARfx Shine-o-Matic is a plug-in that provides the light rays effect or shine effect that moves from one point to another in an automatic fashion. After applying the filter to your video asset, make sure the filter is selected in the Layers panel in order to see its parameters by clicking on the Inspector : Filters tab. Shine-o-Matic Filter Parameters • User Manual : One of the most important things you need to know about all of our products is that when you click on the SUGAR logo or the USER MANUAL button on the interface, you will gain access to the on-line manual that you can either download or read on-line. • Presets : Create your own presets and save them or share them with your peers. Here is where you can save your own Presets after customizing the look and setups you use the most. - It is a good idea to start selecting a predefined Preset if it resembles the style that you are looking for, instead of starting to tweak it from scratch. • Show Guides : This button enables the circular color guides on the Canvas window that will show you Shine-o-Matic 43 the initial point or From location, the destination point or To point, and the point where the effect center is located at a particular moment in the timeline. • Compositing Mode : This button enables the effect to be composited on top of another layer of video by removing the source clip from the background and allowing the shine rays to be placed on top of another layer of video using a Screen or Add transfer mode for optimal compositing. Animation This section provides the parameters that control the automatic movement of your shine effect. • From : Select the beginning point where you want the light causing the Shine-o-Matic effect to begin emitting light rays in your image. If the guides are on, this parameter corresponds to the Red circle. • To : Select the ending point where you want the light causing the Shine-o-Matic light rays to end its movement. If the guides are on, this parameter corresponds to the Green circle. •Behavior : This drop-down menu refers to the manner in which the effect animates from one point to the other. The behavior of the animation may be linear or have a smooth start, end or both. Time This section controls the time related parameters as well as the duration of the automatic Shine animation. • Time Units : This drop-down menu gives you the option to use either Frames or Seconds as your time unit count. If you are familiar and comfortable using a frame count it is recommended that you select this option since it is more accurate than using the Seconds option. When you select either unit, the numbers you are about to enter in the parameters of this section will correspond to the units selected in this menu. Shine-o-Matic 44 If you change your mind and change to the other unit option, make sure that you change the numbers in this section to match the duration in the units selected. • Duration : This drop-down menu provides two ways to set the duration of the automatic animation. The first one is to use the Clip Duration as the whole duration of the animation. When this option is selected, the plug-in will take the duration of the edited video clip as it is laid out in the timeline. In other words, if your clip was edited to be 3 and a half seconds in duration, then the shine animation duration will automatically be the same length, and you will see that the shine animation will do the duration for you. The second option is to use the User Duration where you would enter the duration of the animation by hand in the new parameter below, and remember to use the unit count selected in the Time Unit parameter above. Keep in mind that if you enter a duration that may be longer than the actual duration of the edited clip, your shine animation will not complete successfully. DISSOLVE The Dissolve refers to how the Shine effect appears on your video clip. You can have it dissolve in and out for an elegant way to apply the effect, and in this section you can control its parameters. • Dissolve : This is a time slider that controls the duration of the automatic Dissolve of the effect. The number entered here must be in accordance to the Time Units selected in the parameter above. If you prefer not to have a Dissolve at all, then you can set the duration to 0 (zero). • Option : This drop-down menu helps you determine where you want the automatic Dissolve. You can have it in the beginning of the effect, or only at the end, or better yet, at the beginning and at the end. Adjustments • Style : This menu provides two styles. The Limited style refers to a controlled circular area where the shine effect is applied, and the Full Screen option refers to the fact that the shine effect is applied to the whole video frame. • Amount : Controls the amount of the effect or the light rays applied to the image. • Softness : Controls the area and softness of the effect when the Limited Style has been selected. • Amount : Controls the amount of the shine effect. • Intensity : Controls the intensity of the filter affecting the image. Shine-o-Matic 45 • Blend Mode : Refers to the transfer modes available to composite the shine effect with the image. • Detail : This parameter uses a color enhanced and posterized version of the source image to obtain the Shine effect, bringing out some details and colors that may not be obvious in the original image. • Adjust Hue : This slider allows you to change the hue of the effect being applied on the image. Since the filter takes the colors of the image and creates its light rays, then the hue adjustment alters the overall image. • Color Tint : As its name implies, this parameter applies a color tint to the Shine effect. • Glow : Adds an additional luminosity value to the shine effect. • Atmosphere : Allows you to add a thicker wash to the effect making it look like an atmospheric fog. Shine-o-Matic 46 SUGARfx Moon Light is a plug-in that provides a Moon creation tool customizable with flares, obscuration features and other parameters. The Moon Light filter was previously part of the Lens Flare plug-in, therefore all of its parameters are equivalent to its parent filter. Moon Light Filter Parameters If you look at the UI carefully, you will notice that the Moon Light interface is quite similar to the Lens Flare plug-in, so please refer to the Lens Flare section to learn about the parameters’ functionality. Note: The Moon Light plug-in contains a lighter version of the features found in the Lens Flare as well as a complete section where you can manipulate the Moon element as described in the following paragraphs. Moon Light 47 Moon This section becomes available when it is selected in the Navigation [ G.U.I. ] pull-down menu. The Moon section is part of the Center Elements that conform your lens flare, and the Moon element is available only when it is selected in the Space Objects menu inside the Main Setup. • SOLO : This button isolates the element in the Canvas window by turning off (or hiding) the other elements while this button is enabled, so that you can see only this element while making adjustments to the parameters. When the SOLO button is enabled, the corresponding label shows up in the Canvas so that you know you are looking at this section’s parameters in the SOLO mode and remember to turn it off before you try to edit other elements. • Presets : This drop-down menu allows you to save and apply your own setups to this section only, that way you can create several setups ready to be used at any time with other elements. • Size : This controls the size of the Moon element. Notice that the slider goes up to 500% making the Moon element extraordinarily big. • Luminosity : This slider changes the luminosity of the element, being 0% the normal luminosity where you can see the details of the moon craters. Any higher luminosity value will start blowing out the color and losing the detail and contrast of the moon image. • Phase : This is a rotation dial that simulates the phases of the moon. When the dial is set at 0 (zero) you have a full moon. When the dial is set to 180 the moon phase would be the New Moon, and all the angles in between will give you the additional phases of the Moon element. Moon Light 48 • Mode : This parameter provides a way to make the dark parts of the Moon translucent so that you can see the background color through it. The Translucent mode is useful when you need to have a Moon during a day scene against a blue or light background. The Normal mode will show the Moon as a full circle with all of its dark color present. This is specially useful when you have a completely dark scene and you may want to put the Moon element against a dark background full of stars. • Color : This is the color for the lighter side of the Moon element. • Dark Side : This is the color for the darker side of the Moon element. Moon Light 49 SUGARfx LightPack 3 includes a few transitions that provide a creative alternative to the built-in transitions of your application. The included transitions are : Lens Flare and Paparazzi and they are also available in Final Cut Pro X. One way to access the LightPack transitions inside Final Cut Pro X, is to click on the Transitions icon to have them listed in your Transitions Browser window and select the SUGARfx LightPack transitions category on the side. Transitions Or better yet, click on the Themes icon and select LightPack from the category list on the side. Transitions 50 1. Lens Flare [transition] The Lens Flare [Transition] allows you to create a lighter version of the Lens Flare filter as a transition element. The interface in Final Cut Pro X is minimal and provides a lot of versatility for customizing. • Position : This parameter is available as a Canvas element where you can move it to the desired position interactively in the application. It is available at all times so that it is easy to move or reposition the initial point of the animated Lens Flare. The automatic animation uses the position as its starting point that moves the lens flare towards the exact same opposite side position of the canvas. • [ GLOW ] : This pull-down menu allows you to select any of the 19 glow elements included. • Size : Adjust the size of your glow element. Transitions 51 • Color : Sets the Color of the glow. • [ FLARE ] : This drop-down menu allows you to select another Flare image element. • Color Range : Defines the range of color that will be affected by the next slider, being 0 just one color. • Random Hue : Provides a way to randomize the color hue of the range selected. • Restrict Horizontal : This slider controls the movement restriction in the Horizontal direction, being 100 the normal, unrestricted movement and 0 no movement at all only in the horizontal direction. The 200 value makes it extend the 100 normal value to twice as much. • Restrict Vertical : This slider controls the movement restriction in the Vertical direction, being 100 the normal, unrestricted movement and 0 no movement at all only in the vertical direction. The 200 value makes it extend the 100 normal value to twice as much. 2. Paparazzi [Transition] The Paparazzi [Transition] is a lighter version of the Paparazzi filter. Its interface is very basic and consists of only 2 parameter, the Flashes and the Frequency. • Flashes : Refers to the amount of flashes or lens flares that may appear during the transition. • Frequency : Controls the speed or frequency of the flashes. Transitions 52 The presets expand your plug-in even further, specially when you can create your own styles and save them for later use. Some of the SUGARfx LightPack filters already include several presets that you can use. Presets It is a good idea to begin your own customizing by selecting one of the included presets and use it as a starting point to create your own. Have fun and start making your own, and remember that you can share the presets with other users or other computers as long as they have the same versions installed in their system. Light Pack Default Basic Flare Clean Start ( nothing is enabled ) Crescent Moon Presets 53 Deep Space Glare Deep Space Glare + Obscuration Desert Sun Desert Sun after Sand Storm ( Volumetric On ) Disco Night Evening Summer Sunset Full Moon Flaring Glory Presets 54 Glowing Moon Mother Ship Retinal Scan Sci-Fi Blue Screen Feedback Spotlight Happy Sunny Day Sunny Day Too Presets 55 Every SUGARfx theme or plug-in that you purchase comes with free technical support by sending all your questions via e-mail to our Support Team. Our Technical support team is available to answer your questions via e-mail and should respond within 24 hours or less from the time the e-mail was received. Things to know before contacting Technical Support Support Please visit our web site (http://www.sugarfx.tv) for possible answers to your technical support issues, or visit our tutorial site (http://www.ilearnfast.com) where you may also find a tutorial that will help you find the answer to your question before you contact our Support team. What to do when you need assistance. The first thing we recommend is that you read the Manual and instructions for installation. Second, find a tutorial that provides an explanation of the similar task you are trying to accomplish. If the problem is related to the Registration number, installation error or malfunction of the plug-in, please follow these 3 easy steps: 1. Browse to your hard drive’s applications folder and open the FxFactory Application. 2. When FxFactory is open, go to the Help Menu and select the option to “Contact Technical Support...” 3. When the Contact Form appears, make sure that the check box to attach your system profile is checked “on”, and take the time to enter a detailed description of your problem. Support 56 4. Someone from our Support team or Noise Industries will contact you with a solution to your problem. Other Issues If you need to contact us with a specific question about our plug-ins and themes, please send us an e-mail to : [email protected] with the following information: • Name and version of the SUGARfx theme. • The application name and version with which you are having the problem. • Screen shots of the problem (whenever possible). • Details and any other information you may think appropriate to describe the problem. Feedback The success of our products depend vastly on customer requests and feedback. We welcome all kinds of e-mails that provide useful information on how to improve our products, so we encourage you, as a user of these products, to send us your feedback or comments to our support team. Please visit our web site at http://www.sugarfx.tv LightPack 3 Manual v2 / January 2012 Support 57 Image Bank Light Pack contains many images built-in to be used for specific purposes, such as the glow, lens reflections, stars and others. Here is a comprehensive list that shows the available images in their raw form. Addendum Glow 1 2 3 4 5 6 7 8 9 10 11 12 13 14 15 16 17 18 19 20 Addendum - Image Bank 58 Custom Flares Circle 1 Circle 2 Glow 1 Glow 2 Ring 1 Ring 2 Octagon 1 Octagon 2 Crescent 1 Crescent 2 Pentagon 1 Pentagon 2 Pentagon 3 Hexagon 1 Hexagon 2 Hexagon 3 Texture 1 Texture 2 Texture 3 Texture 4 Addendum - Image Bank 59 Texture 5 Texture 6 Texture 7 Texture 8 Texture 9 Texture 10 Texture 11 Texture 12 Texture 13 Texture 14 Texture 15 Texture 16 Texture 17 Texture 18 Square 1 Square 2 Square 3 Square 4 Multiple 1 Multiple 2 Multiple 3 Multiple 4 Addendum - Image Bank 60 Random Flares Circle 1 Circle 2 Glow 1 Glow 2 Ring 1 Ring 2 Octagon 1 Octagon 2 Pentagon 1 Pentagon 2 Pentagon 3 Hexagon 1 Hexagon 2 Hexagon 3 Square 3 Square 4 Multiple 1 Addendum - Image Bank 61 Star The Star element provides 2 different styles as mentioned in the Manual. The Legacy element is a still graphic that can be manipulated using its available parameters, while the Living Star is a more complex, fully customizing and expandable system which also provides a User Image that you can generate on your own. Legacy Living Star The Living Star contains an element that makes the star the way it finally appears, so in this list you will see the star as it is shown rendered on screen and next to it the individual element used to make the single peaks. 1 2 3 4 5 6 Addendum - Image Bank 62 7 8 9 10 Conclusion The image bank is available for you to use in any of the elements described here and they should be selectable through the pull-down menus of their appropriate section and customize as you wish. These images show you the potential power of how you can easily add your own design to create a glow, lens flare, reflection or star that will be as unique as your own creativity. Addendum - Image Bank 63