1
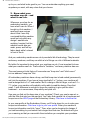
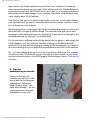
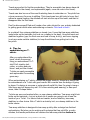
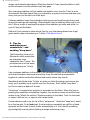
\Hi....I'm New Here (Volume 1)
Hi....I'm New Here (Volume 1)
Greetings! On a recent visit to an embroidery news group at Yahoo.com I saw a
message from a new embroiderer. She'd just gotten her machine, and it was so new
that it was still in the box. She was so excited -- and didn't know where to begin.
"Help!" she wrote to the list members. "I just got my machine. Where do I start?"
The other members of the group were delighted to give her advice, and emails flew
back and forth so fast they were a blur. Embroiderers and sewists are generous by
their very nature. Everyone remembers when they were new to the art, and I don't
know of anyone that learned to sew by themselves. It's a tradition that's passed on
through working together, whether it be in pairs, or sewing and quilting circles, or
classes and workshops. And in this age of technology, help is just a click away.
This Kenny's Korner article is intended to be a starting point for those that are new to
embroidery -- sort of a "embroidery for beginners" guide that folks can use to help
them along their journey. I'll share information that I've found to be helpful, and quick
links to get you right to it.
If you are new to embroidery, welcome! Kenny's Korner, and this article in particular,
is a place for you to get free information and advice, troubleshooting tips, and useful
help to make your sewing and embroidery time fun and successful.
If you're not a beginner, I encourage you to read this article, even though you're
experienced. Then, send me an email at [email protected]. Tell me what I've
missed, and what other information would be helpful to someone who is beginning to
embroider. I'd appreciate your suggestions, and will be glad to include them in the
next volume of this series!
Top Tips For New Embroiderers
1. You're the boss -- and the artist.
When you're embroidering and sewing, be fearless and brave. Want to put a design
upside-down on a shirt? Do it! Want to embroider a purple panda, a yellow turkey, a
bright green sun? Go for it! You have absolute autonomy when it comes to what you
do with your embroidery machine.
There. Doesn't that feel better? You might think that those are strange examples, and
you'd never think about embroidering a purple panda or a yellow turkey, and that's
okay.
But if you find yourself asking the question, "Should the design be 5.5 inches down on
the shirt, or 6 inches down?" just remember: you're the boss. You're the artist! It's all
file:///F|/Source/ELProjects/html/PR1390.html (1 of 9) [3/24/2014 12:43:54 PM]
\Hi....I'm New Here (Volume 1)
up to you, and what looks good to you. You can embroider anything you want,
anywhere you want, with any colors that you choose.
2. Know what your
machine can do -- and
what it can't do.
Whenever you shop for an
embroidery machine, you
hear what it can do. When I
bought my first machine, I
read such rave reviews
about it that I was fully
convinced that the machine
would not only stitch any
design I wanted onto
anything I wanted, but the
machine would also prewash, press, and fold my
fabric stash while I relaxed
in front of the tv.
And yes, embroidery machines are a truly wonderful bit of technology. They're smart
and savvy creatures, and they can stitch a lot of things on a lot of different materials.
But while it's important to know what your machine can do, it's as important to know
what your machine can't do. That's called a "limitation," and every machine has one.
The most common limits that you'll encounter are "hoop size" and "stitch count."
Let me address "hoop size" first.
All embroidery machines have a hoop, and that hoop size is hard-coded (permanently
set) into the machine. If you have a hoop size that's 5 x 7 inches, your machine will
read a design that is 5 x 7 and smaller. But if a design a little bit larger, such as 5.1 x
7.1 inches, your machine will probably not be able to read the design. Even that
small .1 inch difference is enough to cause the machine to give you the silent
treatment -- or in some cases, beep shrilly and pitch a fit.
How can you find out the hoop size of your machine? Check your user's manual, or
with the folks that sold you the machine. You'll also find a partial list of machines and
hoop size on the HELP page at the Embroidery Library. Click here to find that list.
In your user profile at the Embroidery Library you'll find a place for you to enter your
hoop size information. Click here to go to your user profile. Enter your machine's
hoop size information and click "save." Then, when you're shopping for designs, if
you add something to your basket that is larger than that size, the website will give
you a warning so that you can switch the size before you complete your purchase.
file:///F|/Source/ELProjects/html/PR1390.html (2 of 9) [3/24/2014 12:43:54 PM]
\Hi....I'm New Here (Volume 1)
Next, stitch count. Some machines have a "stitch count" limitation. For example,
some Janome machines can only read 64,000 stitches at a time. Certain BabyLock
machines can read up to 50,000 stitches at a time. And, if you're using a memory or
embroidery card to send designs to your machine, then those cards will have lower
limits, usually about 30,000 stitches.
How can you find out if your machine has a stitch count limit, or how many stitches
your card can hold? It's best to contact the folks that sold you the machine or writer
box, or check the user's manual.
What happens if you use a design that has more stitches than what your machine or
card can hold? A couple of different things. The machine could give you an error
message. A card-writer might give you a symbol of a hoop with a line through it, the
universal message for "No way, I'm not doing that!"
Or, the machine or software could split the design into two pieces -- and not tell you!
If that happens, you'll be having the best time stitching out the design and the
machine will just stop without a rhyme or reason. When that happens, you've got to
do some sleuthing to find out where that second piece is and load it to the machine.
So -- you see a design and love it, but it has more stitches than what your machine
can take at a time. What should you do? Just split it by stitch count! It's easy to do,
and free instructions are on the HELP page at the Embroidery Library. Click here to
find them.
3. Tips for
embroidering on towels.
When you first got your
machine and took it out of the
box, what's the first thing you
embroidered? Raise your
hand if it was a towel. Yep,
that's what I thought -- it's the
most popular item for a new
embroiderer to work with.
file:///F|/Source/ELProjects/html/PR1390.html (3 of 9) [3/24/2014 12:43:54 PM]
\Hi....I'm New Here (Volume 1)
Towels are perfect for first-time embroidery. They're accessible (we always have old
ones stuffed in the closet), and replaceable (again, more old ones in the closet).
Towels can also be one of the most frustrating items to embroider on. Terrycloth has
a loose weave so it's prone to shifting. Thick towels can be a bit tricky to hoop. And,
without a special topping, the stitches will sink into the nap of the towel, and start to
disappear after the first wash.
Don't be discouraged! Deb and I made a free video tutorial for you, entirely dedicated
to getting great results when embroidering on towels. Click here to find it.
In a nutshell: Use cutaway stabilizer on towels (yes, I know that tear-away stabilizer
looks better on the backside, but trust me, cutaway is the best). Hoop the towel and
stabilizer together (yep, the thick ones are hard to hoop, but try), and use a topping
(such as a water-soluble stabilizer) to keep the stitches from getting lost in the
terrycloth.
4. Tips for
embroidering on Tshirts.
After you embroidered the
towel, what's the second
thing you embroidered? A Tshirt! Soft, stretchy knit...
cotton, or cotton and poly
blend...and just like a towel,
T-shirts are easily accessible
and replaceable if something
goes awry.
When embroidering on T-shirts, choose the design carefully. Almost any design can
be embroidered on a T-shirt with good results. But consider how the design is going
to drape. If a design is a square or rectangle with solid fills, then it's going to hang a
little heavy and not drape very well. If it's more winding and weaving, or has open
areas, then it'll drape better.
T-shirts are worn and washed often, so use cutaway stabilizer. Tear-away might look
better on the backside -- but not a whole lot of people are going to ask to see the
inside of your T-shirt. For fabrics that are heavier, and not stretchy, tear-away
stabilizer is a fine choice. But a T-shirt is a stretchy knit, so cutaway stabilizer is the
better choice.
Tear-away stabilizer is designed to tear away quickly after a design has finished
embroidering. But when you're working with a design that has solid fills, or satin
stitches, the needle perforations will weaken the tear-away stabilizer before the
file:///F|/Source/ELProjects/html/PR1390.html (4 of 9) [3/24/2014 12:43:54 PM]
\Hi....I'm New Here (Volume 1)
design has finished embroidering. What does that do? It can cause the fabric to shift
and scoot around, and the stitches may have gaps.
Also, tear-away stabilizer will get weaker and weaker every time the T-shirt is worn
and washed. And that means that your embroidery is going to look less-and-less crisp
every time you pull the shirt out of the dryer.
Cutaway stabilizer keeps the embroidery looking crisp and neat through dozens and
dozens of wearings and washings. Worried about how the stabilizer feels next to your
skin? After a couple of washings the edges of the stabilizer get softer and softer, so
soon it'll feel just like fabric.
Deb and I have created a video tutorial (free for you) that demonstrates how to get
great results when embroidering on T-shirts. Click here to find it.
5. Tips for
embroidering on
sweatshirts -- and
avoiding "hoop burn."
The Embroidery Library is in
Minnesota, which means that
we embroider more
sweatshirts than T-shirts. The
principles are much the same
as embroidering on T-shirts.
Use a cutaway stabilizer on the inside of the sweatshirt to keep those stitches crisp
and clean throughout wearing and washing. Hoop the stabilizer and sweatshirt
together to make sure that the stitches land exactly where they should.
Sweatshirts are thicker than T-shirts, so when you finish the design and remove the
hoop, you'll probably see a ring left over from the hoop. That's called "hoop burn" -but it's not nearly as bad as it sounds.
"Hoop burn" is caused when moisture is removed from the fabric. When the hoop is
pressing the sweatshirt and stabilizer together, the moisture comes out and the hoop
makes a ring. What's the solution? Restore moisture to the fabric. Toss it in the wash,
or steam it with an iron, or spray it with a water bottle.
If embroiderers made a top ten list of their "pet peeves," I think that "hoop burn" would
be in the top spot. It just looks bad. If we're making a sweatshirt as a gift for a friend,
generally we don't want to wash it after embroidering on it. And, there's something
psychologically scarring about finishing a design and seeing a ring.
file:///F|/Source/ELProjects/html/PR1390.html (5 of 9) [3/24/2014 12:43:54 PM]
\Hi....I'm New Here (Volume 1)
How can you avoid "hoop burn?" Some folks will wrap their hoops with elastic braid to
relieve the pressure of the hoop on the fabric. Others wrap their hoops with strips of
muslin for a more gentle cushion. I just sigh and toss the sweatshirt in the wash.
Remember: you're the boss, so you do what works best for you.
There's a free video tutorial that shows you how to get great results when
embroidering on sweatshirts. Click here to find it!
6. Choosing the right
stabilizer for the fabric.
What's the difference
between good embroidery,
and great embroidery?
Stabilizer. And there are a
million different kinds:
cutaway, tear-away, watersoluble, heat-dissipating,
sticky-back -- the list goes on
and on.
When choosing the kind of stabilizer for your project, consider two things: the fabric,
and the design. If you're working with a light or stretchy fabric, choose cutaway. If
you're working with a heavier fabric, choose tear-away.
I have put together a fabric and stabilizer guide, and it's free for you to print or
download. Click here for that guide.
There are exceptions to that guide, and those exceptions depend on the kind of
design that you're going to use. If you're using a design with layering and shading, or
solid fills, cutaway stabilizer will be best. That's because the needle perforations from
making all of those stitches will really weaken the tear-away stabilizer.
Choosing the right stabilizer for the fabric will make sure that you're getting excellent
results. For example, having the right stabilizer eliminates puckering. Click here for
another Kenny's Korner that addresses that topic. And, having the right stabilizer
eliminates gapping, too. Click here for another Kenny's Korner about that topic.
file:///F|/Source/ELProjects/html/PR1390.html (6 of 9) [3/24/2014 12:43:54 PM]
\Hi....I'm New Here (Volume 1)
7. Downloading, Opening, and Uploading
One of the best things about having an embroidery machine is having instant access
to thousands of designs. The choices are endless! And here's where machine
embroidery intersects most strongly with being computer savvy.
Here's a tip when working with your computer: Remember that you're the boss. Make
your computer do what you want it to do! Tell it where you want to store the designs!
Be the boss of your computer -- don't let your computer be the boss of you. This
takes constant vigilance, as computers are sneaky creatures and will wreak havoc
whenever they get the chance.
Now that we've taken care of that, let's get into the details. When you find a design on
the Internet, there are three steps: Downloading, opening, and uploading.
First, downloading. It's the act of getting the design to your computer, or a disk or
storage device (like a cd, or thumb drive/memory stick).
Second, opening. It's an optional step. If you have an embroidery software program
on your computer, then you can open the design on your computer. A lot of folks like
to open designs on their computer to look at them first. But remember that you can
only do this if you have an embroidery software program installed on your computer.
Third, uploading. This is the process of getting the design to your machine.
Let's start with downloading. Generally you'll have the option to download files as
"zipped" files or "unzipped" files. The difference is that "zipped" files are compressed,
and they take up less space when you're storing them. And, "zipped" files must be
"unzipped" before your embroidery machine can read them.
Need instructions for unzipping files? Visit the Embroidery Library's HELP page,
there's great information there that shows you how to unzip files. Click here for that.
Now that you've decided what kind of files you want to download (zipped or
unzipped), click to download them. Your web browser will do all of the work for you -it actually handles the downloading process. (What's a web browser? It's the thing
you use to "browse" the "web", like Internet Explorer, Netscape, Firefox, etc.).
Your web browser will ask you where you want to save the file -- and you pick the
place. You can save it to a design folder, a "My Documents" folder -- anywhere you'd
like. Click here for more information about how to download designs.
After you have the designs on your computer, if you have embroidery software on
your computer, you can open the designs. But before you do, let's take a look at how
computers work.
Basically, a computer is powerful, but dumb. It only knows things that you tell it. For
file:///F|/Source/ELProjects/html/PR1390.html (7 of 9) [3/24/2014 12:43:54 PM]
\Hi....I'm New Here (Volume 1)
example, a computer doesn't know how to open an embroidery file. You need to tell it
how to open an embroidery file by setting what is called a "file association."
Computers run various software programs using an "operating system" (like
Windows). If you have a PC, you probably open files by double-clicking on them.
When you double-click on a file, your computer says, "Okay, s/he wants me to open
this file. And it ends in .doc. Let me check my list....okay, to open a .doc file I need to
open Microsoft Word." And then your computer opens Microsoft Word, and then it
opens the .doc file that you clicked on.
Of course, it does this in about .0003 seconds....but I'm sure you get my point. Your
computer knows to open the .doc file with Microsoft Word because the Microsoft
Word program is associated with .doc files. That's a "file association."
Now, let's imagine you're opening an embroidery file, a .pes file. You double-click on
a .pes file. Your computer says, "Okay, s/he wants me to open this file. And it ends in .
pes. Let me check my list....nope, no program associated with .pes, don't know what
to do." And it'll give you an error message that says "Hey! In order to open this I need
to know which program to use." Or, it might make a guess and open it in Adobe
Acrobat Reader or some other completely irrelevant and incorrect program.
So what do you do? Create a file association for your computer. Instructions vary
depending on the operating system that you have, so you'll need to go to Google and
search a bit to get that sorted out. Once you have the file association created, you
can double-click on the designs to open them.
Third, uploading. Different machines have different methods of uploading designs.
Some take wireless transfer, some take designs via USB cable. Others take floppy
disks, thumb drives, memory sticks, memory cards, ATA cards, flash drives -- and
probably other things that I've never heard of.
To find out how to upload designs to your machine, check your user's manual or with
the folks that sold you the machine. They'll know the steps that you should take. But
here are a couple of tips:
**Make sure that the design is unzipped. Embroidery machines can't read zipped
designs.
**If you upload the design to your machine and your machine gives you an error
message or doesn't display the design, check #2 on the list. What can your machine
do, and what can't it do? Specifically, is the design larger than the machine's hoop, or
does it have more stitches than the design can sew?
Usually if there's a problem reading the design, the machine will give you an error
message. For example, a "cannot be registered" error message on a Janome
machine means that the machine's memory is full. A "cannot be sewn in this mode"
on a Brother machine means that the wrong size hoop is attached. And, if you put a
disk or thumb drive in a ULT or Innovis, and the machine gives you the silent
file:///F|/Source/ELProjects/html/PR1390.html (8 of 9) [3/24/2014 12:43:54 PM]
\Hi....I'm New Here (Volume 1)
treatment and refuses to display the design, that means that the design is bigger than
the hoop.
Now, that's a lot to remember -- so the good news is that you don't have to. Just
remember that there are three steps: downloading, opening, and uploading (and the
opening step might be optional for you). If you're having troubles with any of the
steps, send an email to [email protected] and we'll be happy to help.
I hope you enjoyed the first installment of this guide. The next installments will have
information on thread tension, gapping, puckering, those crazy colors on your
machine and in your software, and more! If there's something that you'd like to have
included in another installment of this guide, please write to me at stitch@emblibrary.
com and let me know.
Click here for a printable version of this article.
You'll need to have Adobe Acrobat Reader installed on your computer. If you don't
have it, you can download a free copy by clicking on the icon below.
Kenny is a master digitizer and Vice President
of Production at Embroidery Library, Inc.
Ask Kenny! Send your questions and
comments to [email protected].
file:///F|/Source/ELProjects/html/PR1390.html (9 of 9) [3/24/2014 12:43:54 PM]