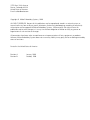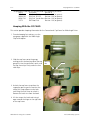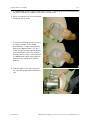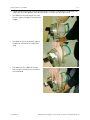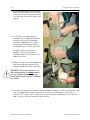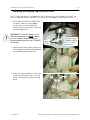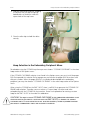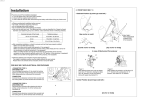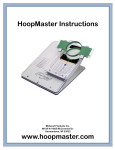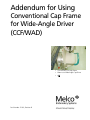
1
Addendum for Using
Conventional Cap Frame
for Wide-Angle Driver
(CCF/WAD)
• Conventional size cap frame
• Mounts to Wide-Angle Cap Driver
•
Part Number 12160, Revision B
1575 West 124th Avenue
Denver, Colorado 80234
United States of America
E-mail: [email protected]
Copyright © Melco Embroidery Systems, 1999
ALL RIGHTS RESERVED No part of this publication may be reproduced, stored in a retrieval system, or
transmitted in any form or by any means (electronic, mechanical, photocopying, recording, or otherwise)
without prior written approval of Melco Embroidery Systems. Melco reserves the right to revise this
publication and to make changes in it at any time without obligation of Melco to notify any person or
organization of such revisions or changes.
All precautions have been taken to avoid errors or misrepresentations of facts, equipment, or products.
However, Melco Embroidery Systems does not assume any liability to any party for loss or damage caused by
errors or omissions.
Printed in the United States of America
Revision A:
Revision B:
January, 1999
October, 1999
A-1
Addendum for Using the
Conventional Cap Frame for Wide-Angle Driver
Introduction
This addendum is generated to assist you in using your Conventional Cap Frame for Wide-Angle
Driver (CCF/WAD). You either received a user manual for the Melco Wide-Angle Cap Frame (WACF)
option or your embroidery peripheral operation manual contains WACF information. In the
applicable manual you are assisted with the installation of the WACF driver and how to hoop and
attach the WACF cap frame to the driver. Information in this addendum supersedes any similar
information in that manual when in reference to the CCF/WAD cap frame.
NOTE: You must refer to the WACF User Manual for information on installing the driver to your
embroidery machine.
The first section of this addendum provides you with the step-by-step process for proper hooping
with the CCF/WAD cap frame to achieve the best quality embroidery.
After the hooping process is completed, this addendum shows you how to attach the CCF/WAD cap
frame to the already installed WACF driver which has been properly modified for adaptation.
NOTE: Your cap frame option must include the latest revision of WACF driver, which is slightly
modified from the original driver to enable installation of both the WACF and the CCF/
WAD cap frames. If you received your WACF driver with the CCF/WAD cap frame, it is
already modified. If your Wide Angle Cap Frame option was purchased prior to February,
1999, the driver must be modified to accept the CCF/WAD cap frame. Contact your
Melco sales representative to arrange for obtaining WACF driver modifications.
Specifications
Intended use
The Conventional Cap Frame for Wide-Angle Driver is designed to embroider on caps of most
sizes and shapes by attaching to the Wide-Angle Cap driver modified for CCF/WAD adaptation.
Maximum embroidery field
2.75" (70 mm) x 6.00" (152 mm)
Compatibility
The CCF/WAD option is available for EMT 1, EMT 10T, EMT 10/4 & 10/4T, and EMC 10/12T
machines. To use the CCF/WAD option the following RSA files (or greater) must be installed:
RSA Number & Revision
Peripheral
EMT 10T
005343-B0, Revision 1.07 (or greater)
EMT 10/4
005343-B1, Revision 1.07 (or greater)
EMT 10/4T
005343-B2, Revision 1.07 (or greater)
EMT 1
005343-B3, Revision 1.07 (or greater)
12160, Rev. B
Addendum for Using the Conventional Cap Frame for Wide-Angle Driver
A-2
Hooping With the CCF/WAD
The previously listed RSA files are contained in the following RSA disks:
Disk Name
Revision #
Part #
005378-01
RSA Disk, EDS II
Revision 1.36 (or greater)
006441-01
RSA Disk, EDS EZ
Revision 1.36 (or greater)
005917-01
RSA Disk, Stand Alone Revision 1.36 (or greater)
11572
EMT Boot Disk
Revision 1.36 (or greater)
Hooping With the CCF/WAD
This section provides hooping information for the Conventional Cap Frame for Wide-Angle Driver.
1. To make hooping fast and easy, use the
cap gauge supplied in the Wide-Angle
Cap Frame option.
2. Slide the cap frame onto the gauge,
making certain the locating tab on the cap
gauge fits into the cap frame’s notch, and
the cap frame slips firmly under the two
roller clips.
locating
tab
notch
3. Unlatch the cap frame strap from the
support by pressing on the metal at the
end of the strap adjacent to the latch
and lifting the latch lever to unlock it.
Remove the latch wire from the hook.
4. Lift the strap at the latch and swing it
open around the hinges at the right side
of the cap frame.
Addendum for Using the CCF/WAD
Melco Embroidery Systems
Hooping With the CCF/WAD
A-3
5. If using backing, you must have a length that is at least 11 inches long so it will be captured by
the teeth at each of the supports at the sides of the cap frame.
6. Obtain the cap and turn the sweat band
completely out as shown.
7. To attach the backing, you may use one
of several methods. One method,
described here, is to position a piece of
backing cut approximately 4 1/2" by 11"
inside the cap. The backing should cover
the sweat band as well as the inside of
the cap crown as shown. Other methods
use double-back tape or spray adhesive
directly on the cap frame to hold the
backing.
8. Slide the cap onto the cap frame with
the visor facing upward and toward the
rear.
12160, Rev. B
Addendum for Using the Conventional Cap Frame for Wide-Angle Driver
A-4
Hooping With the CCF/WAD
9. Insert the cap visor into the slot in the
cap frame strap as you swing the strap
over the the front of the cap.
10. With the strap not latched and still loose
around the cap, center the front of the
cap to the middle of the cap frame.
11. Leaving your right hand free to perform
the next step, grasp and gather the
sweat band with your left hand and pull
it downward to snug the front of the cap
tightly around the cap frame supports.
Addendum for Using the CCF/WAD
Melco Embroidery Systems
Hooping With the CCF/WAD
A-5
12. While maintaining the cap visor centering and front snugness as described in the previous two
steps, you must now perform three basic functions in unison with your right hand:
• Push down on the end (top) of the visor
to seat it against the top of the cap frame
support
• Push back on the visor to hold it against
the plate at the front of the cap frame
strap
• Push down on the middle of the cap
frame strap at the top to seat it around
the sweat band.
12160, Rev. B
Addendum for Using the Conventional Cap Frame for Wide-Angle Driver
A-6
Hooping With the CCF/WAD
13. While holding the cap frame strap down
around the sweat band, release the rear
of the cap with your left hand and attach
the strap latch wire over the hook on the
support.
14. A CCF/WAD Visor Holder option is
available which is designed to hold the
cap visor away from the embroidery
head while embroidering. It may be
purchased from Melco and is directly
installed onto the CCF/WAD cap frame.
Although using the visor holder is
optional, if one is purchased and
installed, position the cap’s visor in the
holder at this time.
15. Remove the cap frame with hooped cap
from the cap gauge and move to the
already installed Wide-Angle Cap driver.
WARNING! TO AVOID DAMAGE TO THE
WIDE-ANGLE DRIVER YOU MUST REMOVE
THE CAP SUPPORTS (WINGS) FROM THE
DRIVER BEFORE INSTALLING THE CCF/WAD
CAP FRAME!
16. To remove the cap from the cap frame after embroidery is complete, unlatch the cap frame strap
from the support by pressing on the metal at the end of the strap adjacent to the latch as
shown. Do this as you lift on the latch lever to unlock the latch and remove the wire from the
hook. The cap is now free to remove from the frame.
Addendum for Using the CCF/WAD
Melco Embroidery Systems
Installing the Hooped Cap Onto the Driver
A-7
Installing the Hooped Cap Onto the Driver
The CCF/WAD cap frame is attached to the WACF driver by the same method as the WACF cap
frame is attached, however, you MUST first remove the cap supports (wings) from the driver.
1. FIRST, AND ABSOLUTELY MANDATORY,
you MUST remove the cap supports
(wings) from the Wide-Angle driver
when using the Conventional Cap Frame
for Wide-Angle Driver.
WARNING! TO AVOID DAMAGE TO THE
WIDE-ANGLE DRIVER YOU MUST REMOVE
THE CAP SUPPORTS (WINGS) FROM THE
DRIVER BEFORE INSTALLING THE CCF/WAD
CAP FRAME!
cap
supports
(wings)
remove cap
supports (wings)
before installing
the CCF/WAD
cap frame
2. Rotate the cap frame slightly to allow the
visor to be positioned around and behind
the embroidery head needle case.
3. Rotate the cap frame back until the visor
is pointing up and the notch in the cap
frame is centered to the tab on the cap
driver.
12160, Rev. B
tab
notch
Addendum for Using the Conventional Cap Frame for Wide-Angle Driver
A-8
4. Slide the frame onto the driver, snapping
it into place with the top two springloaded rollers of the driver inside the
square holes of the cap frame.
Hoop Selection in the Embroidery Peripheral Menu
roller inside
square hole
(left side)
5. Close the roller clips to hold the rollers
securely.
Hoop Selection in the Embroidery Peripheral Menu
To embroider using the CCF/WAD cap frame you must choose "CCF/WAD CAP FRAME" in the select
hoop section of the Options menu.
If the CCF/WAD CAP FRAME selection is not found in the Options menu, you must install the proper
RSA file to provide this selection. Refer to pages one and two for the proper RSA file revisions and
disk part numbers. When the proper RSA file is installed and downloaded to the embroidery
peripheral, you may then choose "CCF/WAD CAP FRAME" in the select hoop section of the Options
menu.
When using the CCF/WAD on the EMC 10/12T, there is no RSA file to generate the CCF/WAD CAP
FRAME hoop selection. Therefore, you must create a ’Custom Hoop’ size to be used when
embroidering with the CCF/WAD on that machine. Please find a procedure for creating a custom
hoop for the EMC 10/12T at the end of this addendum.
CAUTION! YOU MUST CHOOSE CCF/WAD CAP FRAME IN THE EMBROIDERY PERIPHERAL HOOP
SELECTION OPTION (OR CREATE A CUSTOM HOOP FOR EMC 10/12T) TO ENABLE THE CORRECT
SOFTWARE LIMITS. IF HOOP DEFINITION IS NOT SELECTED PROPERLY, SEVERE EQUIPMENT DAMAGE
MAY RESULT IF EMBROIDERY LIMITS ARE ACCIDENTLY EXCEEDED.
Addendum for Using the CCF/WAD
Melco Embroidery Systems
Installing the Visor Holder
A-9
Installing the Visor Holder
If you ordered the visor holder option for the CCF/WAD, installation instructions for it accompanied
the kit. If you have not ordered a visor holder option and wish to, contact your local Melco sales
office and order the CCF/WAD Visor Holder Option, part number 12180.
Parts List
The following parts may be ordered from Melco for replacing damaged or worn parts of the
Conventional Cap Frame for Wide-Angle Driver.
Lower Frame Assembly - 12206
Retaining ring - 12235-07
12160, Rev. B
Upper Frame Assembly - 12208
Addendum for Using the Conventional Cap Frame for Wide-Angle Driver
A - 10
Creating CCF/WAD Custom Hoop for EMC 10/12T
Creating CCF/WAD Custom Hoop for EMC 10/12T
When the Conventional Cap Frame for Wide-Angle Driver (CCF/WAD) option is used on the EMC
10/12T Embroidery machine, a custom hoop size must be created in the machine software. This
custom hoop is then selected during the job setup to limit the possible movement of the frame
beyond its mechanical extremes and damaging the cap frame or driver. The following is a step-bystep procedure for creating this custom hoop.
1. Turn the EMC 10/12T Embroidery machine ON and allow the software to load so the Control
Panel screen shows on the monitor.
2. In Control Panel screen, click the Advanced button to open the Advanced Features dialog box.
3. In the Advanced Features dialog box, click the Service button to open the Service dialog box.
4. In the Service dialog box, click the Hoop Setup button to open the Hoops dialog box.
5. Select the Wide Cap radio button in the Hoops dialog box.
6. In the Hoop size section of the Hoops dialog box, enter 6.79 into the X value box and enter 3.54
into the Y value box. Leave the Hoop center section entries blank.
NOTE: These dimensions provide an embroidery area of 6.00 inches x 2.75 inches when presser
foot allowance is considered.
7. Click the Add button to add the new custom hoop you have just defined to the system.
8. Exit to the Control Panel.
9. Check the Hoop Selection list for the new custom hoop which should be defined as:
Wide angle cap 6.7in x 3.5in (0.0, 0.0)
10. Select this custom hoop definition any time you are embroidering with the Conventional Cap
Frame for Wide-Angle Driver.
Addendum for Using the CCF/WAD
Melco Embroidery Systems