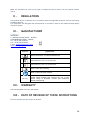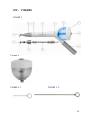
1
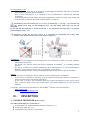
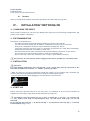
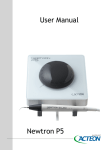
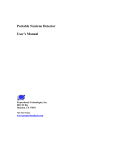
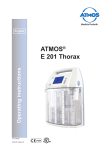
User’s Manual
1
2
ENGLISH
CONTENTS
I-
INTRODUCTION
5
II -
CAUTIONS
5
III -
DESCRIPTION
7
IV -
INSTALLATION/ SWITCHING ON
9
4. 1 UNPACKING THE DEVICE
9
4. 2 RECOMMENDATIONS
9
4. 3 INSTALLATION
9
4. 4 FIRST USE
9
V-
USING THE DEVICE
10
5.1 USING THE HANDPIECE
10
5.2 USING THE 90° AND 120°NOZZLES
12
VI - SERVICING,
STERILIZATION
PRE-DISINFECTION,
CLEANING,
DECONTAMINATION
6.1 RECOMMENDATION
AND
12
12
6.2 SERVICING, PRE-DISINFECTION, CLEANING AND STERILIZATION OF METAL 90°/ 120° SUPRA NOZZLES
AND HEAD
13
6.3 SERVICING AND CLEANING THE TANK
17
6.4 SERVICING, PRE-DISINFECTION, CLEANING AND STERILIZATION OF THE HANDPIECE
20
VII -
CHECKING/ MAINTENANCE
23
3
7.1 CHECKING
23
7.2 MAINTAINING THE “STOP POWDER” PISTON
23
7.3 MAINTAINING THE METAL SHAFT
24
7.4 MAINTAINING AND REPLACING THE SILICONE RING
25
7.5 MAINTAINING AND REPLACING O-RINGS
26
7.6 OPERATING FAULTS
27
VIII - DISPOSAL AND RECYCLING
27
IX -
MANUFACTURER RESPONSIBILITY
27
X-
REGULATIONS
28
XI -
MANUFACTURER
28
XII -
WARRANTY
28
XIII - DATE OF REVISION OF THESE INSTRUCTIONS
28
XIV - FIGURES
29
4
I-
INTRODUCTION
®
Congratulations on receiving your AIR-N-GO device.
Indications
This medical device is used in conjunction with SATELEC ® dental polishing powder.
This medical device is intended for prophylactic treatments of dental and prosthetic surfaces.
®
Created by SATELEC , AIR-N-GO is a dental air-polishing device used to perform treatments such as:
- Supragingival prophylaxis treatments using a sodium bicarbonate or calcium carbonate based
powder.
To maximise use of this cutting-edge product for as long as possible, please read this user’s
manual carefully before switching on, using and servicing the device.
Sentences containing the symbol
II -
are points of particular importance.
CAUTIONS
To reduce the risk of accidents, please read and adhere to the following precautions:
User population:
This medical device can only be used by skilled and capable qualified dental health professionals, as
a part of their normal activities.
- If you have received this device by mistake, contact your supplier to arrange for its return.
The user must have a perfect practical knowledge of accepted dental rules and practices in
compliance with established data of the science, and of the principles of medical hygiene such as
the cleaning, disinfection and sterilisation of medical devices, and must observe those rules,
practices and principles.
This medical device can be used irrespectively of specific (adult) user details, such as weight, age,
height, gender and nationality. The user must wear gloves. The user is not the patient.
Users must not have any of the following ailments:
- Eye problems, unless the latter are appropriately corrected.
- Disability of the upper limbs (correct holding of a handpiece) or of the lower limbs (operation of a
control pedal).
- Ear problems (use of audible signals, depending on the equipment).
- Memory or concentration problems (settings, sequences or medical procedures, etc.).
Specific training for users:
No specific training other than the original professional training is required in order to use this
medical equipment.
Precautions of use:
- The device is designed to be used with SATELEC ® “CLASSIC” or “PEARL” AIR-N-GO polishing
powders. The use of powders not supplied by SATELEC ® may compromise the effectiveness of the
device and the safety of your patient.
- Comply with the conditions of use for the powders recommended by SATELEC ® (Refer to “Powder
instructions”).
Patient population:
This medical device is intended for use on the following patient
Population: children, teenagers, adults and elderly people.
5
This medical device can be used irrespectively of specific patient details such as weight, age,
height, gender and nationality.
Interactions/Contraindications:
- The treatment of your patients with a dental device may cause bacteremia.
- Prior to any treatment, find out about the general health of your patients, in particular in the
case of patients:
with a known allergy to one of the components of the polishing powder used.
suffering from endocarditis,
with an immune deficiency,
following a course of antibiotic, chemotherapy, radiotherapy treatment, etc.
who are diabetic,
who are haemophiliac,
who are pregnant or breastfeeding,
suffering from asthma, chronic bronchitis or any other breathing disorders, shall
not be treated with this device.
- As with all similar devices, a sensitivity or allergy to the powder ingredients may become
apparent during treatment. In this case, rinse the mouth with plenty of water to fully remove
all traces of the powder.
- To reduce the risk of powder inhalation and/or of viral or bacterial air contamination, the
dentist and patient are advised to wear a protective mask and protective goggles.
- Never point the device at the eyes even if it is not being used.
- Accidental spraying of the powder into the eyes may cause ocular damage. We strongly
recommend that the dentist and the patient wear protective goggles during treatment.
- We strongly recommend that patients remove corrective glasses or contact lenses prior to
treatment.
Body areas or types of tissue treated:
The medical care can only be carried out in the patient’s oral environment.
Principle of operation of the medical device:
Air and water are supplied to the medical device equipped with its dental powder tank. The air
penetrating into the tank creates a cloud of powder, which is projected onto the clinical zone via a
polishing nozzle. The water, air and powder are mixed together at the output of the medical
device.
Use of the device (Refer to IV and V):
- Do not use the device if it appears to be damaged or faulty.
- Do not connect or use your device if the o-rings on your turbine connector are worn.
- Never open or fill the powder tank when the device is in use.
- Do not fill the powder tank over the “MAX” line (Fig.2).
- Use a completely dry powder.
- Make sure that the powder tank is completely dry.
- Do not put water in the powder tank.
- Do not use the device without irrigation.
- Do not use the device for any purpose other than that for which it was designed.
- Prior to treatment, do not shake the device. Moving powder may clog the device pipe.
- For best results from first use in the mouth, test first on an oxidised metal object (e.g. coin).
- Do not point the device at the patient’s eyes.
Environment:
- Do not cover the device during use.
- Do not use outside.
- Do not place the device near a heat source.
- Make sure that the cord connecting the device to the unit does not prevent people from
moving around unobstructed.
- When not in use, store the device in its original packaging, in a suitable place where it will
not endanger people.
6
Servicing (Refer to VI):
- Before and after each use, it is essential to thoroughly pre-disinfect and clean your device
using products recommended by SATELEC®.
- Prior to each intervention, it is essential to use pre-disinfected, cleaned and sterilized
accessories.
- If the device has not been used or has been misplaced for a period of time, fully empty and
clean the tank to remove all powder residues (Refer to Chap VI).
Sterilization: Only the nozzle (Fig.1-1 or Fig.1-2), head (Fig. 1-3 or Fig. 1-4), silicone ring
(Fig.1-5), plastic front body of the handpiece (Fig. 1-6) and metal shaft (Fig.1-12) can be
sterilized.
Do not sterilize the tank (Fig. 1- 8) and its lid (Fig. 1- 9), the plastic rear body (Fig. 1-7) and the
turbine adaptor (Fig.1-11).
Autoclave cycles dry out the o-rings. It is necessary to lubrificate all o-rings after
sterilization, with grease silicone paste only. Refer to Chap. VII
Accessories:
- The device was designed and developed with its accessories in order to provide optimum
safety and performance.
- The device can only be fitted with devices designed by SATELEC ® of a suitably adapted
purpose.
- The use of accessories or powders supplied by other manufacturers, or not recommended by
SATELEC®, may present a risk for you, your patients or your device.
- The infringement of these cautions fully implicates the dentist in the event of a problem.
Repair:
- Do not repair or modify the device without the prior authorization of SATELEC®.
- If the device is modified or repaired, specific inspections and tests must be performed to
ensure that the device can still be used safely.
- In the event of a fault, we recommend that you contact the supplier of your device rather
than a general repair center who could render your device dangerous for you and your
patients.
If in doubt, contact an approved dealer or the SATELEC® customer service department:
- www.satelec.com
- E.mail: [email protected]
III -
DESCRIPTION
3. 1 PHYSICAL DESCRIPTION (Refer to XIV)
The AIR-N-GO handpiece is comprised of:
An adjustable 120° SUPRA standard polishing nozzle (Fig.1-1)
A long metal head (Fig.1-3)
A handpiece body, which is comprised of:
7
o
o
o
o
o
A non-slip silicone ring (Fig.1-5)
A plastic front body (Fig.1-6)
A rear body (Fig.1-7)
A metal shaft (Fig.1-12)
A turbine adapter (Fig.1-11) depending on the quick coupling model of the turbine
(refer
to
the
listing
of
compatible
turbine
couplings
on
the
www.airngoconcept.com)
We encourage you to use exclusively the turbine coupling of the original manufacturer.
A blue SUPRA “CLIP-N-GO” powder tank with a bayonet system (Fig.1-8)
A SUPRA powder tank lid (Fig.1-9)
The basic AIR-N-GO box contains, in addition to the items mentioned above:
A short metal hygienist head (Fig.1-4)
A SUPRA nozzle cleaning probe (Fig.3-1)
An AIR-N-GO handpiece body cleaning probe (Fig.3-2)
A set of replacement o-rings
5 single-dose sticks(samples of 4 flavors + 1 “PEARL”)
A 250g bottle of “CLASSIC” peppermint powder
Optional:
An adjustable 90° SUPRA polishing nozzle (Fig.1-2)
Set of 4 x 250g multi-dose bottles, with pouring spout –or box of 50 x 20g single-dose
disposable sticks:
o AIR-N-GO “CLASSIC” powders: natural aromas available depending on option:
peppermint, lemon, raspberry, cola or neutral
o AIR-N-GO “PEARL” powder: neutral
An AIR-N-GO PERIO kit, transforming the AIR-N-GO into a sub-gingival treatment device.
The maximum powder level is marked by a “MAX” line (Figure 2).
The “STOP POWDER” piston used to bleed and rinse the device with air and water is located on the
tank lid (Fig.1-10).
The turbine adapter is equipped with check valves to prevent possible backflow of the dental chair
unit.
3. 2 TECHNICAL CHARACTERISTICS
a)
The device
Name of device:
AIR-N-GO®
Manufacturer:
SATELEC®
Air supply: by turbine cord, 3 to 5 bars (pressure recorded at the outlet of the turbine cord)
Water supply: by turbine cord, irrigation flow at 15ml/min ± 5ml/min
Temperatures:
Operating: + 10°C to + 40°C
Storage: 0°C to + 60°C
Humidity:
Operating: 30% to 75%
Storage: 10% to 75% condensation taken into account
Principal performance specifications:
Air pressure/ flow.
Water pressure/ flow.
SATELEC® abrasive dental powder (controlled grain size).
8
Part(s) applied:
Polishing nozzle.
Front section of the medical device.
b)
Powders
Refer to the AIR-N-GO powder instructions provided in the AIR-N-GO carrying case.
IV -
INSTALLATION/ SWITCHING ON
4. 1 UNPACKING THE DEVICE
Upon receipt of the device, check for any damage that may have occurred during transportation and
contact your supplier if necessary.
4. 2 RECOMMENDATIONS
Connection to the dental unit:
- The AIR-N-GO connection model must be identical to that of your turbine.
- Your device must be fitted with an adaptor compatible with your turbine connector.
- Using a non-compatible connector may permanently damage your device.
- Autoclave cycles dry out the o-rings. It is necessary to lubricate all o-rings after sterilization,
with grease silicone paste only (Refer to Chap. VII).
- The turbine function of your unit shall not be activated during connection of your device.
- The various connection accessories must be clean and completely dry.
- Prior to each use, check the condition of the o-rings on your turbine connector.
The presence of moisture may lead to clogging of the device powder/ air circulation pipes.
4. 3 INSTALLATION
Important:
For supra-gingival treatments: only use the 120° or 90° nozzle that must be connected to the
blue tank and AIR-N-GO “CLASSIC” or “PEARL” polishing powders.
- Make sure there are no signs of moisture around the nozzle or in the powder tank. Eliminate any
moisture found by wiping and blowing with air using the multipurpose syringe.
- Connect the device by simply plugging it into the turbine cord connector.
4. 4 FIRST USE
Before using your AIR-N-GO device for the first time, it is essential to service and to sterilize all
equipment in accordance with the procedures defined in chapter VI.
Sterilization: Only the nozzle (Fig.1-1 or Fig.1-2), head (Fig. 1-3 or Fig. 1-4), silicone ring
(Fig.1-5), plastic front body of the handpiece (Fig. 1-6) and metal shaft (Fig.1-12) can be
sterilized.
Do not sterilize the tank (Fig. 1- 8) and its lid (Fig. 1- 9), the plastic rear body (Fig. 1-7) and the
turbine adaptor (Fig.1-11).
9
Autoclave cycles dry out the o-rings. It is necessary to lubrificate all o-rings after
sterilization, with grease silicone paste only. Refer to Chap. VII
It is also vital to comply with the device user’s instructions (Refer to Chap V).
V-
USING THE DEVICE
5.1 USING THE HANDPIECE
Important:
- All accessories used must be previously pre-disinfected, cleaned and sterilized.
- In order to bleed the device, we strongly recommend you to connect the handpiece without
the powder tank and hold the control pedal for a minimum of 5 seconds. Repeat this action
three times before assembling the tank. Adjust the spray drop by drop.
Sterilization: Only the nozzle (Fig.1-1 or Fig.1-2), head (Fig. 1-3 or Fig. 1-4), silicone ring
(Fig.1-5), plastic front body of the handpiece (Fig. 1-6) and metal shaft (Fig.1-12) can be
sterilized.
Do not sterilize the tank (Fig. 1- 8) and its lid (Fig. 1- 9), the plastic rear body (Fig. 1-7) and the
turbine adaptor (Fig.1-11).
Autoclave cycles dry out the o-rings. It is necessary to lubrificate all o-rings after
sterilization, with grease silicone paste only. Refer to Chap. VII
- For your safety and that of your patient, AIR-N-GO must only be used with the accessories
supplied or recommended by SATELEC®.
- Thoroughly check the device and its accessories before and after each use to identify any
problem.
- If necessary, do not use the device and replace any faulty parts.
Use your AIR-N-GO device as follows:
In order to bleed the device and remove any water into the air circulation pipe or on the quick
coupling system:
- Connect the handpiece to the turbine cord connector.
- Rotate the tank 1/8 of a turn counter clockwise to release it.
- Remove the tank from the handpiece.
- Press the control pedal on the dental chair for a minimum of 5 seconds.
- Adjust the water flow (15ml/min ± 5ml/min).
- Repeat this operation three times between every reassembly of the tank.
10
- It is essential to repeat this action each time you must connect and disconnect the handpiece
on its cord connector.
- Unscrew and remove the lid from the powder tank.
- Fill the tank with the powder recommended by SATELEC® making sure you do not fill above the
“MAX” line.
- Put the lid back on the tank.
- Reinstall the tank on the handpiece.
- Rotate the tank a 1/8 of a turn clockwise to secure it by locking the bayonet system.
- Check that the tank is securely in place.
- Treat your patient as required by pressing the control pedal on the dental chair.
- At the end of the treatment, or prior to sterilization, simultaneously press the “STOP POWDER”
piston on the tank lid (Fig.1-10) and the control pedal on the dental chair to bleed and rinse the
device.
- Remove the tank from the handpiece.
- Bleed the device by pressing the control pedal on the dental chair for a minimum of 5 seconds.
- Unscrew and remove the lid from the powder tank.
- Empty all the powder from the tank (Disposal according to regulations in force).
- After each use, it is important to service and to sterilize all equipments in accordance with the
procedures defined in chapter VI.
11
5.2 USING THE 90° AND 120°NOZZLES
- The patient and dentist must wear suitable protection accessories (goggles, masks).
®
- Apply Vaseline to the patient’s lips before polishing.
- Point the nozzle at the tooth enamel ensuring a distance of 3 to 5mm.
- Ensure a spray angle between the nozzle and the surface of the tooth of 30° to 60° degrees.
- Do not spray directly on the gum.
- Make small circular movements over the treated area.
- Use a wide suction cannula and hold it near the area to be treated (reduces bacterial air
contamination).
- The air/powder spray continues for several seconds after releasing the control pedal. Take
this into account and wait before removing the nozzle from the patient’s mouth to prevent
irritation of the mucosa.
- After polishing, we recommend you apply a fluoride gel to the patient’s teeth.
Advise your patient not to smoke, eat or drink anything that could stain the teeth for up to
2 to 3 hours following treatment.
VI - SERVICING, PRE-DISINFECTION, CLEANING,
DECONTAMINATION AND STERILIZATION
Important:
- The servicing, pre-disinfection, cleaning and sterilization instructions that follow must be
applied after each use of the device or its accessories.
Utilisation:
Depending on the number of utilisations of the medical device, and/ or on the number of cleaning,
disinfection and sterilisation cycles performed on the sterilisable parts, the performance of the
medical device may decline.
6.1 RECOMMENDATION
a)
At the end of the working day, you must:
- Simultaneously press the “STOP POWDER” piston on the tank lid (Fig.1-10) and the control pedal
on the dental chair to transform the devise into an air and water syringe.
- Before disconnecting the handpiece from the turbine connector, remove the powder tank and
bleed the device by pressing the control pedal on the dental chair for a minimum of 5 seconds.
- Disconnect the handpiece from the turbine connector.
- Empty all the powder from the tank (Disposal according to regulations in force) and clean the tank
with compressed air.
- Unscrew and clean the nozzle.
b)
After each use of the device and its accessories.
- The device must be disconnected during pre-disinfection and cleaning procedures.
12
Sterilization: Only the nozzle (Fig.1-1 or Fig.1-2), head (Fig. 1-3 or Fig. 1-4), silicone ring
(Fig.1-5), plastic front body of the handpiece (Fig. 1-6) and metal shaft (Fig.1-12) can be
sterilized.
Do not sterilize the tank (Fig. 1- 8) and its lid (Fig. 1- 9), the plastic rear body (Fig. 1-7) and the
turbine adaptor (Fig.1-11).
Autoclave cycles dry out the o-rings. It is necessary to lubrificate all o-rings after
sterilization, with grease silicone paste only. Refer to Chap. VII
- Before starting the cleaning procedure, it is essential to disassemble the tank and its lid (see
6.3 “Tank disassembly procedure”).
- Do not use an abrasive product to clean the device.
- If the device has not been used or has been misplaced for a period of time, you will need to
empty the powder from the tank (Disposal according to regulations in force) and clean the
powder tank.
- Do not use the device if it appears to be faulty.
- Prior to any sterilization, check the cleanliness of your autoclave and the quality of the water
used.
- After each sterilization cycle, immediately remove the parts from the autoclave to reduce
risks of the corrosion of metal parts.
- Sterilized parts must be left to cool and dry until they reach ambient temperature prior to
being used again.
6.2 SERVICING, PRE-DISINFECTION, CLEANING AND STERILIZATION OF METAL
90°/ 120° SUPRA NOZZLES AND HEAD.
Sterilization: Only the nozzle (Fig.1-1 or Fig.1-2), head (Fig. 1-3 or Fig. 1-4), silicone ring
(Fig.1-5), plastic front body of the handpiece (Fig. 1-6) and metal shaft (Fig.1-12) can be
sterilized.
Do not sterilize the tank (Fig. 1- 8) and its lid (Fig. 1- 9), the plastic rear body (Fig. 1-7) and the
turbine adaptor (Fig.1-11).
13
Autoclave cycles dry out the o-rings. It is necessary to lubrificate all o-rings after
sterilization, with grease silicone paste only. Refer to Chap. VII.
Important:
During sterilization, metal parts of a different nature must not be in contact with each other.
Any contact will lead to the creation of galvanic couples resulting in local deterioration. To
prevent this phenomenon, place the objects individually in a sterilisable microporous bag or
cloth.
a)
Pre-disinfection and manual cleaning
i.
Precleaning of the SUPRA nozzles and head
This operation must be performed with gloves, immediately following the treatment.
- After each use, unscrew the nozzle (Fig.1-1 or Fig.1-2) from the body of the AIR-N-GO handpiece.
- Remove any possible residual powder from the 90° or 120°nozzle using the SUPRA nozzle cleaning
probe (diam. 0.5mm) (Fig.3-1) provided in the case. Repeat this action twice.
- Only use the cleaning probe (diam. 0.5mm) (Fig.3-1) supplied in your AIR-N-GO case.
- Remove any residue from inside the nozzle using the air spray of the chair multipurpose syringe.
14
- Unscrew the head (Fig.1-3 or Fig.1-4) from the AIR-N-GO handpiece body.
ii. Manual pre-disinfection and cleaning
- Rinse soiled devices (nozzle and head) under running cold tap water for one minute.
- Remove heavily soiled devices using a soft-bristled brush or clean, soft, lint-free cloth.
- Immerse the SUPRA nozzle and the metal head in a newly made alkaline ultrasonic tank cleaner
adhering to the concentration and contact time recommended by the solution manufacturer, in
terms of powder breakdown. Proceed for a minimum of 10 minutes.
- Remove the nozzle and the head used from the ultrasonic tank and tap them on a hard surface to
remove any remaining particles.
- Rinse the SUPRA nozzle and head under running tap water for at least one minute.
- Use a syringe or water jet to flush SUPRA nozzle, head and hard to reach areas.
- Manually rinse all the devices for 6 minutes in a freshly prepared alkaline cleaner solution,
adhering to the concentration and contact time recommended by the solution manufacturer.
- Use a soft bristled brush to remove soil and debris.
- Rinse devices thoroughly with deionized or purified water.
- Use a syringe or water jet to flush SUPRA nozzle, head and hard to reach areas.
- Repeat the manual cleaning procedure until no visible soil remains on devices.
- Perform final rinse using deionized or purified water.
b)
Drying
Using the multipurpose syringe air spray and/or a clean disposable non-woven cloth, dry until there
is no liquid left.
Proceed to sterilization as per chapter 6.2 e)
c)
Automatic pre-disinfection and cleaning
i.
Precleaning
Proceed to a pre-cleaning of the SUPRA nozzles and head as per chapter 6.2 a) i.
ii. Automatic pre-disinfection and cleaning
Proceed to the pre-disinfection of the SUPRA nozzles and heads as follows:
- Rinse soiled devices (nozzle and head) under running cold tap water for one minute.
- Remove heavy soil using a soft-bristled brush or clean, soft, lint-free cloth.
- Immerse the nozzle and head in a newly made enzymatic ultrasonic tank cleaner adhering to the
concentration and contact time recommended by the solution manufacturer, in terms of powder
breakdown.
15
Proceed for a minimum of 2 minutes.
- Remove the nozzle and the head used from the ultrasonic tank and tap them on a hard surface to
remove any remaining particles.
- Rinse the SUPRA nozzle and head under running tap water for at least one minute.
- Use a syringe or water jet to flush SUPRA nozzle, head and hard to reach areas.
- Manually clean all the devices for 2 minutes in a freshly prepared enzymatic cleaner solution,
adhering to the concentration and contact time recommended by the solution manufacturer.
- Use a soft bristled brush to remove soil and debris.
- Rinse devices thoroughly with deionized or purified water.
- Repeat the cleaning procedure until no visible soil remains on devices.
- Perform final rinse using deionized or purified water.
Automatic method: (after pre-clean)
Use the following cycle parameters:
Cycle
Time
(minutes)
Temperature/ Water
Pre-wash
2
Cold tap water
Wash
10
Hot tap water (>40°C)
Neutralize
2
Rinse
2
Dry
40
d)
Hot tap water (>40°C) with
neutralizer if necessary
Rinse with distilled or purified
water (>40°C)
90°C
Type of Detergent
N/A
Enzymatic or Alkaline
cleaner
Neutralizer if necessary
Distilled or purified water
N/A
Thermal disinfection
For automated cleaning, thermal disinfect at 90° for a minimum of 5 minutes.
e)
Sterilization of nozzle and head
CAUTION:
- Prior to sterilization, remove any liquid from the accessories.
- To ensure sterile and aseptic conditions, keep all parts in hermitically sealed tanks or bags
designed for medical use.
- After each treatment, store the disassembled nozzle and head separately in disposable
sterilization sleeves or bags, in compliance with the specifications defined in standard ISO 11607 or
in any equivalent standard that may be required by national regulations.
16
- Sterilize the nozzles and the heads separately in an autoclave in compliance with the following
parameters:
- Autoclave: Type B in compliance with standard EN 13060.
- Sterilization temperature: 134°C.
- Sterilization duration: 3 to 18 minutes.
- Pressure: at least 2 bars minimum.
- Autoclave: Type B in compliance with standard EN 13060.
- Sterilization temperature: 132°C.
- Sterilization duration: 4 minutes.
- Pressure: 1.85 bars minimum.
Autoclave cycles dry out the o-rings. It is necessary to lubrificate all o-rings after
sterilization, with grease silicone paste only. Refer to Chap. VII
f)
Storage
- Next, store the sterilized products in a dry place, free from dust and at ambient temperature.
- Before the next use, in the event of a packaging non-conformity, repackage and resterilize in
accordance with the defined protocol.
- In the event of visible contaminations in the bag, destroy the product.
g)
Product disposal
Dispose of the nozzles and the heads in bins reserved for waste following treatment with risks of
infection.
6.3 SERVICING AND CLEANING THE TANK
CAUTION:
Before using the device, it is important to carefully check the integrity of the materials (thread
condition of the tank and its cap, button "STOP POWDER" good maintenance of metal pins tank
etc.).
In case of damage observed, replace immediately the entire tank (tank and lid) to stay in
optimal conditions of safety during the pressurizing device.
a)
Tank disassembly procedure
- Firmly hold the AIR-N-GO handpiece in one hand.
- Hold the tank (Fig.1-8) with the other hand.
17
- Rotate the tank 1/8 of a turn counter clockwise to release it.
- Pull it to release it from its recess.
b)
Bayonet tank assembly procedure
Before fitting the tank on the handpiece, you must check that there is no powder on the oring shown on the back of the metal shaft.
- We strongly recommend checking the condition of the threads (powder tank and lid).
- Prior to each tank installation, we strongly advise you to remove all traces of powder using the
multipurpose syringe air spray or cleaning wipes.
- Reposition the tank in its recess by pushing it.
- Rotate the tank a 1/8 of a turn clockwise to secure it by locking the bayonet system.
- Check that it is securely in place.
c)
Cleaning and maintenance of the bayonet tank
We recommend that you clean the tank after each use.
18
- Fully and systematically empty all powder from the tank if the device is not going to be used for
several hours (e.g. overnight). Residual air humidity alters the properties of the powder.
i.
Inside of the tank and the lid
- Remove all traces of powder residue from inside the tank and the lid using the multipurpose
syringe air spray.
- Clean the tank central outlet orifice using the probe (diam. 1mm) (Fig.3-2).
- Fully eliminate all traces of powder residue by using the multipurpose syringe air spray again and
placing your index finger over the tank outlet.
- Use a dry cloth to clean the inside of the tank and its lid.
- Completely dry the powder tank and its lid using the multipurpose syringe air spray.
The presence of humidity may cause blockage of the device powder or air circulation pipe.
19
ii.
Outside of the tank and the lid
- The outside of the tank and its lid must be cleaned daily with a dry cloth.
6.4 SERVICING, PRE-DISINFECTION, CLEANING AND STERILIZATION OF THE
HANDPIECE
a)
Servicing and manual cleaning of the AIR-N-GO handpiece
i.
Cleaning of the AIR-N-GO handpiece
After each use, you must clean the handpiece in order to remove the residual powder.
The entire AIR-N-GO handpiece must be cleaned daily using cleaning wipes.
- Disconnect the AIR-N-GO handpiece from the turbine cord prior to pre-disinfection, cleaning and
sterilization of the silicone ring (Fig. 1-5) and the plastic front body (Fig.1-6) of the handpiece.
- After each use, remove the tank; unscrew the nozzle and the head from the body of the AIR-N-GO
handpiece.
- Remove all residual powder from the ducts of the handpiece metal shaft using the cleaning probe
(diam.1 mm) (Fig. 3-2) supplied with the device.
20
- Only use the handpiece body cleaning probe (diam. 1mm) (Fig.3-2) supplied in your AIR-N-GO
case.
- Remove any residue from the AIR-N-GO handpiece metal shaft using the multipurpose syringe air
spray.
- Pull the metal shaft to remove it from its recess.
- Rinse soiled devices (metal shaft and plastic front body with its silicone ring) under running cold
tap water for one minute.
- Remove heavy soil using a soft-bristled brush or clean, soft, lint-free cloth.
ii.
Manual pre-disinfection and cleaning
- Immerse the elements in a newly made alkaline ultrasonic tank cleaner adhering to the
concentration and contact time recommended by the solution manufacturer, in terms of powder
breakdown. Proceed for a minimum of ten minutes.
- Remove the plastic front body with its silicone ring and the metal shaft and rinse them under
running tap water for at least one minute.
- Use a syringe or water jet to flush the metal shaft air circulation.
- Manually clean all the devices for 6 minutes in a freshly prepared alkaline cleaner solution,
adhering to the concentration and contact time recommended by the solution manufacturer.
- Use a soft bristled brush to remove soil and debris.
- Rinse devices thoroughly with deionized or purified water.
- Use a syringe or water jet to flush the metal shaft air circulation.
- Repeat the cleaning procedure until no visible soil remains on devices.
- Perform final rinse using deionized or purified water.
21
b)
Automatic pre-disinfection, cleaning of the metal shaft, the silicone ring
and the plastic front body
Proceed to a pre-disinfection and precleaning of the metal shaft (Fig. 1-12), the silicone ring
(Fig. 1-5) and the plastic front body (Fig.1-6) of the handpiece as per chapter 6.4 a).
- Rinse soiled devices (metal shaft and the plastic front body with its silicone ring) under running
cold tap water during one minute.
- Remove gross soil using a soft-bristled brush or clean, soft, lint-free cloth.
- Immerse these elements in a newly made enzymatic ultrasonic tank cleaner adhering to the
concentration and contact time recommended by the solution manufacturer, in terms of powder
breakdown. Proceed to a minimum of 2 minutes.
- Rinse the metal shaft, the plastic front body with its silicone ring under running tap water for at
least one minute.
- Use a syringe or water jet to flush the metal shaft air circulation.
- Manually clean all the devices for 2 minutes in a freshly prepared enzymatic cleaner solution,
adhering to the concentration and contact time recommended by the solution manufacturer.
- Use a soft bristled brush to remove soil and debris.
- Rinse the devices thoroughly with deionized or purified water.
- Use a syringe or water jet to flush the metal shaft air circulation.
- Repeat the cleaning procedure until no visible soil remains on devices.
- Perform final rinse using deionized or purified water.
Automatic method: (after pre-clean)
Use the following cycle parameters:
Cycle
Time
(minutes)
Temperature/ Water
Pre -wash
2
Cold tap water
Wash
10
Hot tap water (>40°C)
Neutralize
2
Rinse
2
Dry
40
Hot tap water (>40°C)
Rinse with distilled or purified
water (>40°C)
90°C
c)
Type of Detergent
N/A
Enzymatic or Alkaline
cleaner
Neutralizer if necessary
Distilled or purified water
N/A
Thermal Disinfection
For automated cleaning, thermal disinfect at 90°C for a minimum of 5 minutes
d)
Sterilization of the plastic front body and the metal shaft
- After each treatment, store the metal shaft (Fig. 1-12), the silicone ring (Fig.1-5) and the plastic
front body (Fig.1-6) of the handpiece separately in disposable sterilization sleeves or bags, in
22
compliance with the specifications defined in standard EN ISO 11607 or in any equivalent standard
that may be required by national regulations.
The sterilization conditions and cycles are:
- Autoclave: Type B in compliance with standard EN 13060.
- Sterilization temperature: 134°C.
- Sterilization duration: 3 to 18 minutes.
- Pressure: at least 2 bars minimum.
- Autoclave: Type B in compliance with standard EN 13060.
- Sterilization temperature: 132°C.
- Sterilization duration: 4 minutes.
- Pressure: 1.85 bars minimum.
VII -
CHECKING/ MAINTENANCE
Important:
In the event of a fault, we recommend that you contact the supplier of your device rather than
a general repair center who could render your device dangerous for you and your patients.
7.1 CHECKING
You will need to check the device and its accessories regularly to detect any fault or deterioration.
Where necessary, replace faulty parts.
The tank and its lid are wearing parts (repetitive uses, abrasion, screwing/ unscrewing,
maintenance/ cleaning) as such, it is recommended to replace the entire tank (tank and lid)
preventively each 12 to 18 months.
CAUTION: you must comply with this advice, notably to prevent any risk of clogging (by the
powder) inside the AIR-N-GO handpiece.
7.2 MAINTAINING THE “STOP POWDER” PISTON (FIG.1-10)
- Make sure that the “STOP POWDER” piston on the tank lid is working correctly by pressing and
releasing it several times.
23
In case of malfunction, immerse the lid into the ultrasonic cleaner. This can also be done as a
preventive measure.
- Check that there is an o-ring in the lid.
- Check the status of wear of the o-ring and replace it if necessary.
Spare o-ring kit to order: F10205
7.3 MAINTAINING THE METAL SHAFT
Recommendation: To ensure the device works for as long as expected, we recommend that you
clean the outside of the metal shaft and check the condition of the o-rings at least once to
twice per month.
Autoclave cycles dry out the o-rings. It is necessary to lubrificate all o-rings after
sterilization, with grease silicone paste only. Refer to Chap. VII
a)
Metal shaft and nozzle disassembly procedure
- Disassemble the nozzle and the head and remove the plastic front body.
- Hold the rear body in one hand.
- Take hold of the metal shaft with your other hand.
- Pull the metal shaft to remove it from its recess.
b)
Maintaining the nozzle and metal shaft
- Clean the outside of the nozzle and metal shaft once or twice per month using cleaning wipes.
- Check wear of the o-rings. Replace them if necessary. (Refer to 8.4)
24
- Spare o-ring kit to order: F10205
- We advise you to lubricate the o-rings on the nozzle and the metal shaft with silicone grease
only. Replace then when necessary.
We strongly recommend removing the excess of silicone grease with a dry cloth.
c)
Metal shaft assembly procedure
- Relocate the metal shaft in its recess by pushing it.
- Check that it is securely in place.
In case of clogging of the metal shaft or nozzles, refer to the troubleshooting table or the
maintenance flyer.
7.4 MAINTAINING AND REPLACING THE SILICONE RING
- In the same way as for the handpiece, the outside of the silicone ring must be cleaned with
cleaning wipes.
- We recommend replacement of the silicone ring annually or when it appears faulty.
25
7.5 MAINTAINING AND REPLACING O-RINGS
It is important to check the integrity and presence of o-rings on the nozzle, metal shaft of the
handpiece and the tank.
SATELEC® recommends the carrying out of this inspection prior to each use.
Total number of o-rings:
- eight (8) on the metal shaft.
- two (2) on the nozzle.
- one (1) on the tank.
- one (1) on the tank lid.
- Check that the o-rings are in good condition.
- If necessary, replace any damaged o-rings with those supplied.
- Spare o-ring kit to order: F10205
- Return the metal shaft to its recess by pushing it.
- Check that it is securely in place.
Note: An o-ring in poor condition may prevent correct operation of the device or damage it.
26
7.6 OPERATING FAULTS
Refer to the table below:
Faults identified
No water
Possible causes
Solutions
Water connection
unattached or faulty
Check that the water inlet connection is correctly
connected
Water flow adjusting ring
If there is an adjusting ring on the turbine cord
connector: check that it is correctly adjusted
Check that air is arriving at the dental chair air
inlet.
Nozzle clogged
No powder, no air, but
presence of water or weak
spray
Drop in device
performance
Irregular spray but water
present
Leakage of water from the
handpiece, tank or nozzle
Unscrew the nozzle from the handpiece body:
Check that air comes out of the handpiece by
pressing the pedal.
If yes: see paragraph 7.1.
If no: go to the next step
Tank clogged and/ or
handpiece clogged
Unclip the tank.
Check once again that air is coming out of the
handpiece (tank side):
If yes: remove the lid from the tank and refer to
paragraph 7.2 - "inside the tank".
If not: contact your nearest SATELEC® dealer
Tank empty or too full
Fill the tank up to the “MAX” line or empty out
any powder that is over the “MAX” line
Unsuitable powder
Only use powders recommended by SATELEC ®.
Wet powder
Empty and clean the tank and fill with completely
dry powder.
“STOP POWDER” piston
blocked or still activated
Immerse the lid of the tank into the ultrasonic
bath.
Damaged o-rings
Check the presence and integrity of the o-rings at
the tank, the metal body and the nozzle.
If necessary, replace them with spares provided in
the case.
VIII - DISPOSAL AND RECYCLING
When your device or its accessories have reached the end of their service life, we recommend that
you contact your nearest dental equipment dealer (or visit the ACTEON GROUP site whose list is
included in chapter XI) to find out how to proceed.
IX -
MANUFACTURER RESPONSIBILITY
The manufacturer shall not be held responsible in the event of:
- non-compliance with manufacturer recommendations during installation.
- intervention, modifications, or repairs carried out by people who have not been authorised by the
manufacturer.
- usage other than that specified in this manual.
- the use of accessories and/or powders that have not been recommended by SATELEC ®.
- the non-compliance with the instructions in this document.
27
Note: the manufacturer reserves the right to modify the device and/or the user manual without
notice.
X-
REGULATIONS
This medical device is classified IIa in accordance with the applicable European directive pertaining
to Medical Devices.
This equipment was designed and manufactured in accordance with an ISO 13485-certified quality
assurance system.
XI -
MANUFACTURER
SATELEC
17 AVENUE GUSTAVE EIFFEL – BP30216
33708 MERIGNAC CEDEX – FRANCE
Tel: +33 (0) 556.34.06.07
Fax: +33 (0) 556.34.92.92
E.mail: [email protected]
www.acteongroup.com
Symbole
Signification
Washer-disinfector for thermal disinfection
Sterilization at 132°C in an autoclave
Sterilization at 134°C in an autoclave
Refer to the user’s manual
Refer to the instruction manual
Rx only
XII -
For USA only:
United States Federal Law restricts the use of this
device solely to qualified, trained and competent
dental professionals
WARRANTY
The warranty does not cover user misuse.
XIII - DATE OF REVISION OF THESE INSTRUCTIONS
This user manual was last revised in 05/2013.
28
XIV - FIGURES
FIGURE 1
FIGURE 2
FIGURE 3.1
FIGURE 3. 2
29
30
31
I10200 – V3 05/2013
A Company of Acteon Group • 17 av. Gustave Eiffel • BP 30216 • 33708 MERIGNAC cedex • France • Tel. +33 (0) 55632
34 06 07
Fax. +33 (0) 556 34 92 92 • E.mail : [email protected] • www.acteongroup.com • www.airngoconcept.com