1
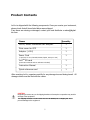
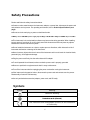
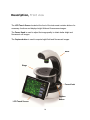
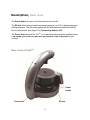
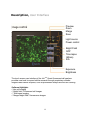
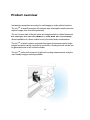
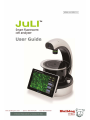
Developed and Manufactured by NanoEnTek, Inc.
NanoEnTek, Inc. (HQ)
12F, Ace High-end Tower, 235-2,
Guro-3 Dong, Guro-gu, Seoul, 152-711, Korea
Tel : +82-2-6220-7942
Fax : +82-2-6220-7721
Copyright
2010 by NanoEnTek, Inc. All rights reserved. Published in Korea.
All the materials in this user guide are protected by Korean and international
copyright laws.
They cannot be reproduced, translated, published or distributed without the
permission of the copyright owner.
JuLITM, User’s Guide
Manufactured
M
f t
db
by: NanoEnTek
N
E T k Inc.
I
12F, Ace High-end Tower, 235-2 Guro-3dong, Guro-u, Seoul,152-711, Korea
Tel: +82-2-6220-7942 Fax: +82-2-6220-7721
The information in this manual is described as accurately as possible.
possible Firmware and
software changes and updates may change without prior consent or notification.
Copyright 2010 by NanoEnTek, Inc.
All rights reserved. Published in Korea.
Documentation : NESMU-JUL-001E
Revision History : V.0.0
Date : Nov 2009
Revision History : V.1.1
V1 1
Date : July 2010
Table of Contents
Page
Product Contents -------------------------------------------------------------------------------
5
Safety Precautions -----------------------------------------------------------------------------
6
Product Specifications -------------------------------------------------------------------------
7
Setup ---------------------------------------------------------------------------------------------
8
Description of the JuLITM
Front view ----------------------------------------------------------------------------------------
10
Rear view -----------------------------------------------------------------------------------------
11
User Interface-----------------------------------------------------------------------------------f
12
Product overview -------------------------------------------------------------------------------
13
Operation of the JuLITM
Bright-field imaging -----------------------------------------------------------------------------
15
Fluorescence imaging -------------------------------------------------------------------------
16
Merging Images: Fluorescence and Bright-field
Bright field ----------------------------------------
17
Time-lapse imaging ----------------------------------------------------------------------------
19
Transferring data to a PC ---------------------------------------------------------------------
21
Updating software ------------------------------------------------------------------------------
22
Care & Maintenance --------------------------------------------------------------------------
23
Troubleshooting -------------------------------------------------------------------------------
24
Warranty -----------------------------------------------------------------------------------------
25
Appendix ----------------------------------------------------------------------------------------
26
Technical Support ----------------------------------------------------------------------------
27
Product Contents
JuLITM is shipped with the following components. Once you receive your instrument,
please check that all items listed below were shipped.
If any items are missing or damaged, contact your local distributor or [email protected].
Items
Quantity
JuLITM, Smart fluorescent cell analyzer
1
Plate cover for GFP
1
Adaptor (+12V)
1
Power Cord
1
(4 pcs/set, for U.S./Canada/Taiwan/Japan, Europe or UK)
JuLITM SD card
1
(Instruction Manual and PC software included)
Instruction Manual
1
Quick reference card
1
After receiving JuLITM, examine carefully for any damage incurred during transit. All
damage claims must be filed with the carrier.
CAUTION:
Neglecting to remove any or all shipping brackets or foams prior to operation may result in
damage to the equipment.
The shipping brackets or foam inserts must be reinstalled prior to shipping the unit to
prevent damage to the equipment.
Safety Precautions
Review and follow the safety instructions below.
z If water or other material enters the instrument, adaptor, or power inlet, disconnect the power cord
and contact a service person. For operating environment, refer to Product Specifications (next
page).
z Do not touch the main plug or power cord with wet hands.
z Always
Al
ensure that
th t the
th power supply
l input
i
t voltage
lt
matches
t h the
th voltage
lt
available
il bl att your location.
l
ti
z This instrument is air-cooled and its surfaces may become hot during operation. When installing
leave a space of more than 10 cm (4 inches) around the instrument and do not place any objects
between the instrument and the any walls.
z Do not install the instrument on a slant or a place prone to vibrations, which induces the risk of
instrument malfunction or damage of the instrument.
z Never insert any objects into the air vents of the instrument as this could result in electrical shock,
personal injury, and equipment damage.
z Plug the power cord firmly into the wall outlet and AC adapter.
z To avoid potential shock hazard, make sure that the power cord is properly grounded.
z Be sure to position the equipment such that it is easy to disconnect.
z Turn off the instrument before unplugging the power cord and/or moving the instrument.
z If the instrument is dropped or broken, disconnect the power cord and contact a service person.
Disassembly of case will void warranty.
z Use only authorized accessories (adaptor, power cord, and SD card).
Symbols
Symbol
Meaning
Caution & Warning
Protective earth (Ground)
This instrument and consumables conforms to the Declaration
of Conformity.
Product Specifications
Environmental Conditions
Operating Power
AC 100-240V
Frequency
50-60Hz
Electrical input
12 VDC, 1.0A
Installation site
Indoor use only
Operating Temperature
10–45°C
Maximum Relative Humidity
20-90%
Instrument Specifications
CPU
AMD AU1250
Magnification
Filter
Light source
Objective 4X and digital zoom
(10x and 20x compatible)
Excitation / Emission / Dichroic filter
White / Blue LED
GFP: 488nm excitation, 520nm emission
(Optional) White / Green LED
RFP: 530nm excitation, 590nm emission
Camera
CMOS 1.3M pixels (1280X1024)
p y
Display
7’ TFT-LCD ((WVGA,, 800X480))
Weight
< 5 kg
Size
240X350X320 mm
Data storage
SD card (8G)
Setup
1. After unpacking the instrument, place the instrument on a level, dry surface. Allow
at least 10 cm (4 inches) of free space at the back of the JuLITM to allow for
proper ventilation and prevent overheating of electronic components.
2. Plug the supplied power cord into the JuLITM instrument.
Attach the appropriate plug adaptor, based on the electrical outlet configuration of
your country.
3. Plug the power cord into the electrical outlet. Be sure to use only the power cord
supplied with your instrument. Powering the instrument with an unapproved power
cord may damage the instrument.
4 Wh
4.
When ready
d tto use, start
t t the
th JuLI
J LITM instrument
i t
t by
b pressing
i th
the Power
P
b
button.
tt
IMPORTANT! NEVER grasp the neck of JuLITM to transport.
Always carry the JuLITM with both hands. Place your hands and grasp the
sides of the base avoiding LCD screen.
IMPORTANT! NEVER expose
p
JuLITM to UV light.
g
UV light degrades many materials, including plastic. Damage from UV
exposure is not covered under the manufacturer’s warranty.
Setup,
Installing JuLITM in a Cell Culture Hood or a Cell Culture
Incubator
b
Fluorescent live-cell images from various cell culture dishes are directly captured in a cell
culture hood. This compact design allows installation of device in hood or incubator
prevents contamination by maintaining a sterile environment. Also the easily-viewed
display allows quick and convenient to use in a cell culture incubator for capture time
l
lapse
iimaging.
i
Dimensions & Features
Size
Width
24 cm
Depth
35 cm
Height
32 cm
Weight
< 5 kg
Power Cord
1
Cell Culture Incubator
Cell Culture Hood
IMPORTANT!
Do Not directly spray ethanol anywhere on the JuLI™. Always wipe
surfaces with ethanol-soaked paper towels instead.
Description, Front view
The LCD Touch Screen located at the front of the instrument contains buttons for
necessary functions and displays bright field and fluorescence images.
The Focus Knob is used to adjust the image quality to obtain better bright and
fluorescent cell images.
The Capture button is used to acquire bright field and fluorescent images.
Neck
Stage
Focus Knob
Capture
button
LCD Touch Screen
Description, Rear view
The Power button is used to turn the instrument on and off.
The SD slot allows you to transfer and save images to your PC for data storage and
printing purposes. The SD card supplied with the instrument is inserted into the SD
slot for data transfer. See page 21 for Transferring Data to a PC.
The Power Inlet connects the JuLITM to an electrical outlet using the supplied power
cord
d and
d th
the appropriate
i t plug
l (b
(based
d on the
th electrical
l t i l outlet
tl t configuration
fi
ti iin your
country).
Rear view of JuLITM
Power
button
Power inlet
SD slot
Description, User Interface
Preview
Zoom
Merge
Save
Light source
Power control
Bright Field
GFP
Time lapse
(Movie)
Info
Exposure
Brightness
The touch screen user interface of the JuLITM ,Smart fluorescent-cell analyzer
provides new tools to expand cellular research through proprietary software.
Insightful data can be acquired
acquired, such as proliferation assays and live-cell
live cell counting
counting.
Software Highlights
9Live cell imaging
9 Bright field / Fluorescent cell images
9 Time-lapse imaging
9 Merged bright field / fluorescence images
Product overview
Increasingly researchers are using live-cell imaging to study cellular functions.
The JuLITM, a smart fluorescent cell analyzer, was developed to easily view and
capture images from live-cell experiments.
The JuLITM uses state-of-the-art optics and image analysis to obtain fluorescent
li
live-cell
ll iimages ffrom cellll culture
l
di
dishes
h in
i a sterile
il h
hood.
d Th
The compact d
design
i
allows installation in a tissue culture hood or incubator limits contamination.
The JuLITM is able to capture sequential time-lapse fluorescence and/or bright
images and which can be converted to movie files. Growing live-cell movies can
be generated even in cell-culture incubator.
The JuLI
Th
J LITM performs
f
fl
fluorescent
t/b
bright
i ht cellll counting
ti measurements
t using
i the
th
user-friendly image processing software.
Product overview, continued
Important features of the JuLITM smart fluorescent cell analyzer :
z All-in-one stand-alone systems
The compact easy-to-use design allows the JuLITM to be placed in a tissue culture
hood or incubator. Integrated display and on-board computer allows JuLITM to
operate PC-free.
z 40,000 hr lifetime White / Blue LED
LED light utilized for bright-field and fluorescence imaging has a life expectancy of
approximately 40,000 hours. Consistent performance over multiple years of use is
provided with the white and blue LEDs.
z Dark-room
D k
f
free
Unlike a conventional microscope, fluorescence imaging can now occur with the
room lights on, and out in the main laboratory area.
z Counting & analyzing with image processing software*
Proprietary software expands the applicability of the JuLITM Smart fluorescent-cell
analyzer. Fluorescence experiments such as proliferation assays, live-cell
counting or biomarker labeling
counting,
labeling.
z Communication through wireless data transfer *
Utilizing Wi-Fi technology, all data (including images and movies) can be
transferred automatically from JuLITM to PC.
* Upcoming technology
Operation, Bright-field imaging
1. Press the Power button to start the JuLITM . The main screen will be displayed.
2. Place sample on the stage.
3. Turn on illumination using the Bright button, located on the right side of the LCD
touch screen.
4. Adjust the illumination intensity, using the Exposure and Brightness buttons.
5. The Zoom button and the section window allow the user to magnify the desired
region using software.
6. While viewing cells in the Zoom mode, use the Focus knob to further adjust the
image.
7. Press the Capture button to acquire image.
8. Press the Save button to save the image. The Save screen will pop up.
Operation, Fluorescence imaging
1. Press the Power button to start the JuLITM and display the main screen.
2. Place the sample on the stage.
3. Turn on illumination using the GFP button, located on the right side of the LCD
touch screen.
4. Adjust the illumination intensity, using the Exposure and Brightness buttons.
5. The Zoom button and the section window allow the user to magnify the desired
region using software.
6. While viewing cells in the Zoom mode, use the Focus knob to further adjust the
image.
7. Press the Capture button to acquire image.
8. Press the Save button to save the image. The Save screen will pop up.
Operation, Merged Image:
Fluorescence and Bright-field
1. Press the Power button to start the JuLITM and display the main screen.
2. Place the sample on the stage.
3. Turn on illumination using the Bright button, located on the right side of the LCD
touch screen.
4. Adjust the illumination intensity, using the Exposure and Brightness buttons.
5 Th
5.
The Zoom
Z
button
b tt
and
d th
the section
ti window
i d
allow
ll
th
the user tto magnify
if th
the d
desired
i d
region using software.
6. While viewing cells in the Zoom mode, use the Focus knob to further adjust the
image.
7. Press the Capture button to acquire image.
8. Turn on illumination using the GFP button, located on the right side of the LCD
touch screen.
Operation, Merged Image:
Fluorescence and Bright-field, continued
9. Adjust the illumination intensity if necessary, using Exposure and Brightness
buttons.
10. Adjust the image by using Focus knob.
12. Click the Capture button to acquire the image and then the Merge button will be
activated.
13. Press the Merge button to show the merged color image.
14. Press the Save button to save the image. The Save screen will pop up.
Operation, Time Lapse Imaging
With JuLITM , you can set up your cells and program the JuLITM to record time lapse
images. To use this feature, click the Movie button, program the settings (number of
Images, period), save the file name and click the Rec button.
1. Press the Power button to start the JuLI™ at room temperature for
approximately
i t l 20 minutes
i t before
b f
placing
l i
into
i t the
th incubator.
i
b t
2. Place the sample on the stage.
3. Turn on illumination using the GFP or Bright button, located on the right side of the
LCD touch screen.
4. Adjust the illumination intensity if necessary, using the Exposure and Brightness
button.
6. Adjust the image by pressing the Zoom button and choose the section.
7 While viewing cells in the Zoom In mode
7.
mode, use the Focus knob to adjust the cell
image.
8 Click the Movie button to make the time-lapse
8.
time lapse imaging
imaging.
Operation, Time Lapse Imaging, continued
8. Press the Required Time button and enter the total running time.
It will be automatically displayed the total images.
9. Press the Period button to set the time interval.
10. Press the Save file name to save the movie name.
11 To create a movie file
11.
file, choose the Bright/GFP/Merge button.
button
Bright button: To record the bright movie only.
GFP button: To record the GFP movie only.
Merge button: To record the merged movie only.
Bright + GFP: To record the bright and GFP movie
Bright + GFP + Merge: To record the all channels
* If you use the GFP cover, the only GFP images can be acquired.
12. Press the Apply button to confirm the movie options.
13. Press the Rec button to begin time lapse imaging.
JuLITM will display the live cell images during the time lapse imaging.
Operation, Transferring Data to a computer
1. To archive your data or generate a printed report, insert the JuLITM SD card into the
SD port.
2. Save your data on the SD card by pressing the Save button on the main screen.
The image is automatically saved as a .bmp file that can be opened with the JuLITM
imaging program.
3. Enter the file name using the keypad buttons displayed on the Save menu.
4. Transfer the JuLITM SD card to the SD port on your PC. You may open the .bmp file
using the JuLITM imaging program.
Operation, updating software
Periodically, Digital-Bio adds functionality and other improvements to the JuLITM user
interface. We recommend keeping your JuLITM up to date with the latest software.
If you have any questions about software updates, contact [email protected]
1. Visit the JuLITM website at www.digital-bio.com to download updated firmware which
is supplied as a .zip file to your desktop.
2 U
2.
Unzip
i the
h .zip
i fil
file and
d save the
h fifirmware to the
h SD card
d supplied
li d with
i h the
h iinstrument.
TM
3. Insert the SD card into the SD port on JuLI .
4. Press the Power button to start the instrument and click the INFO button.
5. Click the Update button. The update process takes a few minutes.
6. When the update is complete, you are prompted to restart the instrument by pressing
Restart.
Care & Maintenance
Clean the surface of the JuLI™ instrument with a damp cloth. To clean the LCD
screen, turn off the JuLI™ instrument, disconnect the power cable, and clean the
LCD screen with a soft cloth lightly moistened with LCD cleansing detergent.
Cleaning the screen with excessive force can damage the LCD the screen. Wipe the
screen dry immediately.
If liquid spills on the JuLI™, turn off the power immediately and wipe dry.
The JuLI™ does not need regular maintenance. To troubleshoot problems with
JuLI™, contact Technical Support (page 27).
IMPORTANT! Never
N
di
disassemble
bl or service
i th
the JuLI™
J LI™ yourself.
lf U
Unauthorized
th i d
repairs may damage the JuLI™ or alter its functionality, which will void your warranty.
Contact [email protected] or your local JuLI™ distributor to arrange for service.
ଝ IMPORTANT! Do not soak any surface in ethanol. NEVER spray
ethanol on the JuLI™. Wipe surfaces with ethanol-soaked paper towels instead.
ଝ IMPORTANT! Never expose JuLI™ to UV sterilization
sterilization. UV degrades many
materials, including plastic. Damage from UV exposure is not covered under the
manufacturer’s warranty.
Troubleshooting
Poor merged image
Re-capture images in bright-field /
fluorescence.
Poor bright-field image
Re-optimize the brightness and exposure
value
value.
Reset on the power button
Poor fluorescence image
Re-optimize the brightness and exposure
value.
Confirm fluorescence with a positive
control sample.
LCD screen is black
Touch the LCD screen with your finger .
Verify power supply is connected and
power switch is on.
Click the Bright or GFP button.
Reset on the power button.
Saving problems
Do not save too many files on the SD
card
d
Merge button does not
respond when clicked
Click capture first; It is only possible to
merge an image that is captured as
bright field and fluorescence images.
Bright-field time-lapse
images become dark and
b i ht
bright
Check for and remove any condensation
on the lid of the culture dish.
JuLITM does not power up
Check power switch on right side of unit.
Check power source or contact your
distributor.
Warranty
Digital Bio warrants that the JuLITM will be free from defects in material and
workmanship for a period of one (1) year from date of purchase.
If any defects occur in the JuLITM during this warranty period, Digital-Bio will repair or
replace the defective parts at its discretion without charge. The following defects,
however, are specifically excluded:
1. Defects caused by improper operation.
2. Repair or modification done by anyone other than Digital Bio or an
authorized agent.
3. Damage caused by substituting alternative parts.
4. Use of fittings or spare parts supplied by anyone other than Digital Bio.
5. Damage caused by accident or misuse.
6 D
6.
Damage caused
db
by di
disaster.
t
7. Corrosion caused by improper solvent or sample.
For your protection, JuLITM units being returned must be insured against possible
damage or loss. Digital Bio cannot be responsible for damage incurred during
shipment of a defective instrument. It is recommend that you save the original packing
material in which the instrument was shipped. This warranty is limited to the
replacement of defective products
products.
For any inquiry or request for repair service, contact [email protected] or your
local distributor.
Appendix
The following products can be used with the JuLITM ,
Smart fluorescent cell analyzer and are available separately from Digital-bio.
For more information, visit www.digital-bio.com.
Product
Quantity
Catalog no.
JuLITM, Smart fluorescent cell analyzer
1
JULI-B004
JuLITM SD card
1
(Instruction Manual and PC software included)
JuLITM, Adapter with power cods
1 set