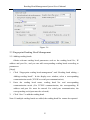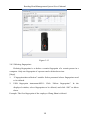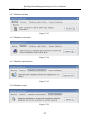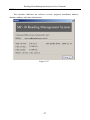
1
CONTENT
Chapter One System Installation and Configuration
1.1 System Application Flow Chart .......................................................... 1
1.2 System Installation ............................................................................ 1
1.3 System Configuration ........................................................................ 3
1.3.1 System Configuration ................................................................. 3
1.3.2 Modifying passwords .................................................................. 4
Chapter Two System Application Flow
2.1 Personnel Information Management ................................................... 4
2.1.1 Adding personnel ........................................................................ 4
2.1.2 Modifying/Deleting personnel ..................................................... 5
2.1.3 Querying Personnel..................................................................... 6
2.2 Setting Reading Head Parameters....................................................... 6
2.2.1 Obtaining reading head parameters.............................................. 7
2.2.2 Setting reading head parameters .................................................. 7
2.3 Fingerprint Reading Head Management ............................................. 8
2.3.1Adding reading heads .................................................................. 8
2.3.2 Initializing reading heads ............................................................ 9
2.3.3 Modifying/Deleting reading heads............................................. 10
2.4 Fingerprint data collection ............................................................... 10
2.4.1 Registering fingerprints............................................................. 10
2.4.2 Deleting fingerprints ................................................................. 14
2.5 Fingerprint Data Management .......................................................... 15
2.5.1 Personnel groups....................................................................... 16
2.5.2 Personnel registration................................................................ 18
2.6 Database Maintenance ..................................................................... 22
2.6.1 Database backup ....................................................................... 22
2.6.2 Database restoration .................................................................. 22
2.6.3 Database optimization ............................................................... 22
2.6.4 Database repair ......................................................................... 22
2.7 About .............................................................................................. 23
Reading Head Management System User’s Manual
Chapter One System Installation and Configuration
1.1 System Application Flow Chart
Figure 1.1 System Application Flow Chart
1.2 System Installation
Click the installation program to install the MF-10 reading head management
system to the specified path on your computer according to the setup wizard. After
the installation is completed, the system automatically runs the software.
Figure 1.2
1
Reading Head Management System User’s Manual
Figure 1.3
Figure 1.4
2
Reading Head Management System User’s Manual
Figure 1.5
1.3 System Configuration
1.3.1 System Configuration
You can configure the system simply before initial use. Click the “System
configuration” (Figure 1.5). In the displayed window, set the personnel No. length.
The default personnel No. length is 5 that indicates that 1-99999 people can be
entered (Figure 1.6). Please determine whether to reset according to actual
situations.
Note: After personnel is entered, the personnel No. length cannot be changed.
Figure 1.6
3
Reading Head Management System User’s Manual
Figure 1.7
1.3.2 Modifying passwords
The system login password is null by default. You can modify it. A password
can be English and numbers and is case sensitive. A password can be successfully
modified only when a new password is consistent with a confirmation password
(Figure 1.7). Please remember the new password after modification.
Chapter Two System Application Flow
2.1 Personnel Information Management
2.1.1 Adding personnel
[Steps]
1.
Click “Personnel information management”. In the displayed window, enter
the personnel name, gender, entry data etc.
2.
Click “Save” to add the personnel.
Note: Blue identifications must be filled. The personnel No. and the registration No.
are automatic numbers by default and cannot be repeated. Please tick “Continuous
entry” to continuously enter personnel.
4
Reading Head Management System User’s Manual
Figure 2.1
2.1.2 Modifying/Deleting personnel
If you want to modify/delete personnel, select personnel records and click
“Modify”/”Delete” to perform corresponding operations. Only one record can be
modified/deleted at a time.
Figure 2.2
5
Reading Head Management System User’s Manual
Figure 2.3
2.1.3 Querying Personnel
You can search personnel information through the personnel No., registration
No and name.
Figure 2.4
2.2 Setting Reading Head Parameters
You can obtain/set reading head parameters through the broadcast mode and
the known reading head. If you do not know parameters like reading head No.,
please obtain/set reading head parameters through the broadcast mode.
6
Reading Head Management System User’s Manual
2.2.1 Obtaining reading head parameters
Connect the reading head to the computer normally, and access the “Set
reading head parameters” module. In the displayed window, select a setting mode
(broadcast mode/known reading head mode), and click “Obtain reading head
parameters”.
Figure 2.5
2.2.2 Setting reading head parameters
If reading head parameters must be reset, please access the “Set reading head
parameters” module. In the displayed window, select a setting mode (broadcast
mode/known reading head mode). After reading head parameters are obtained, reset
reading head parameters, and click “Set reading head parameters:.
Note: If the reading head is set through the broadcast mode, the system can be
connected to one MF11 reading head only.
7
Reading Head Management System User’s Manual
Figure 2.6
2.3 Fingerprint Reading Head Management
2.3.1Adding reading heads
Obtain relevant reading head parameters such as the reading head No., IP
address and port No., and you can add corresponding reading heads according to
parameters.
[Steps]
1.
Click “Fingerprint reading head management” and “Reading head editing >
Adding reading heads”. In the display new window, select a corresponding
communication mode (TCP/IP or serial port communication).
2.
Enter the reading head name, reading head No. and corresponding
communication mode (For TCP/IP communication, the corresponding IP
address and port No. must be entered. For serial port communication, the
corresponding serial port must be selected).
3.
Click “Save” to add the reading head.
Note: If multiple reading heads are added, the reading head No. cannot be repeated.
8
Reading Head Management System User’s Manual
Figure 2.7
2.3.2 Initializing reading heads
If you use a reading head for the first time and there is no effective data saved
in the MF11 reading head, you shall perform the initialization operation first.
“Initialize reading head” will clear all registration information in the reading head
and thus shall be used with caution.
[Steps]
1.
Select a reading head to be initialized, and click “Online test” to check that the
reading head is normally connected.
2.
Click “Initialize reading head” to clear data.
9
Reading Head Management System User’s Manual
Figure 2.8
2.3.3 Modifying/Deleting reading heads
If you want to modify/delete reading heads, please select reading heads to be
modified/deleted and perform corresponding operations.
Note: Only one reading head can be modified at a time. Multiple reading heads can
be deleted at a time.
Figure 2.9
2.4 Fingerprint data collection
Fingerprint data collection is to register fingerprint data of the personnel into a
computer through a USB fingerprint instrument or MF11 reading head. Please select
a collection mode (USB fingerprint instrument or MF11) to collect fingerprints
according to actual situations.
2.4.1 Registering fingerprints
(1)
Registering fingerprints through a USB fingerprint instrument
10
Reading Head Management System User’s Manual
Before fingerprints are registered, please connect a USB fingerprint instrument to a
computer normally.
[Steps]
1.
Click “Fingerprint data collection”. In the displayed window, find
personnel whose fingerprints need to be registered (you can query through the
personnel No./name/registration No.). If query conditions are null, it indicates
querying all personnel.)
2.
Select personnel whose fingerprints need to be registered (only one person can
be registered at a time).
3.
USB fingerprint instrument: Click “Register fingerprints”. If the fingerprint
instrument is normally connected, the interface will prompt “Please press your
finger …”. Register fingerprints on the fingerprint instrument according to the
prompt by using unregistered fingerprints. If fingerprint data are successfully
collected to the system, the prompt “The fingerprint is successfully
registered” will be given and the first (second/third) fingerprint point will be
ticked (which indicates registered).
Note: One person can be registered with up to three fingerprints. If a certain person
has registered three fingerprints, a new fingerprint can be registered only after a
certain fingerprint is deleted. If you want to cancel the operation during registration,
click “Stop registration”.
Example: The employee Zhang Shan registers one fingerprint through a USB
fingerprint instrument.
11
Reading Head Management System User’s Manual
Figure 2.10
Figure 2.11
12
Reading Head Management System User’s Manual
(2)
Registering fingerprints through MF11
Before fingerprints are registered through MF11, please check that the
corresponding reading head has been added in the system and that the system can be
normally connected to the MF11 reading head.
[Steps]
1.
Click “Fingerprint data collection”. In the displayed window, find
personnel whose fingerprints need to be registered (you can query through the
personnel No./name/registration No.). If query conditions are null, it indicates
querying all personnel.)
2.
Select personnel whose fingerprints need to be registered (only one person can
be registered at a time).
3.
MF11: Select a reading head No., click “Register fingerprints” to start
collecting fingerprints.
Note: One person can be registered with up to three fingerprints. If a certain person
has registered three fingerprints, a new fingerprint can be registered only after a
certain fingerprint is deleted.
Example: The employee Li Si registers one fingerprint through MF11.
Figure 2.12
13
Reading Head Management System User’s Manual
Figure 2.13
2.4.2 Deleting fingerprints
Deleting fingerprints is to delete a certain fingerprint of a certain person in a
computer. Only one fingerprint of a person can be deleted at a time.
[Steps]
1.
“Fingerprint data collection” module: Select personnel whose fingerprints need
to be deleted.
2.
USB fingerprint instrument/MF11: Click “Delete fingerprints”. In the
displayed window, select fingerprints to be deleted, and click “OK” to delete
them.
Example: The first fingerprint of the employee Zhang Shan is deleted.
14
Reading Head Management System User’s Manual
Figure 2.14
Figure 2.15
2.5 Fingerprint Data Management
After personnel’s fingerprint data are collected to the computer, the registration
information (fingerprints) can be registered in the MF11 reading head. You can
register according to selected personnel or personnel groups. For registration
15
Reading Head Management System User’s Manual
according to personnel groups, personnel must be distributed to corresponding
reading heads before registration.
2.5.1 Personnel groups
Personnel groups are to distribute personnel to specific groups (reading heads)
[Steps]
1.
Click “Fingerprint data management > Personnel groups”. In
the
displayed window, find personnel. (You can query according to the personnel
No./name/registration No. If query conditions are null, it indicates querying all
personnel).
2.
Select a reading head in the reading head list.
3.
In the personnel information list, select personnel to be added to selected
reading heads. (If all personnel need to be added, this step can be omitted).
4.
Click “Add selected personnel”/”Add all personnel” to distribute selected/all
personnel to selected reading heads.
Note:
1.
Adding all personnel is to add all personnel in the personnel information list
into selected reading heads.
2.
If you want to remove selected personnel, please select personnel to be
removed and then remove them. If you want to remove all personnel, no
selection is needed.
Example: Distribute the personnel with the registration No. 00001, 00002, 00005
and 00006 to the group “Reading head 1”.
16
Reading Head Management System User’s Manual
Figure 2.16
Example: Add in the group “reading head 2” all corresponding personnel obtained
through the query mode of registration No.
Figure 2.17
17
Reading Head Management System User’s Manual
2.5.2 Personnel registration
(1) Registering according to selected personnel
[Steps]
1.
Click “Fingerprint data management > Personnel registration > Register
according selected personnel”. Select a reading head and perform online test to
check that the reading head is online.
2.
Find personnel to be registered and display them in a list.
3.
Click “Register personnel information into the reading head”, and the system
registers all personnel’s fingerprint information in the current list into a
selected MF11 reading head.
Note: For "Obtain registration information from the reading head”/”Delete
personnel information from the reading head”, the steps are the same as those of
“Register personnel information into the reading head”.
1.
Obtain registration information from the reading head is to obtain fingerprint
information of the personnel in the current list to the computer from MF11.
2.
Delete personnel information from the reading head is to delete fingerprint
information of the personnel in the current list from MF11.
Example: Write the registration information of the personnel with the registration
No. 00002, 00004 and 00006 into the reading head 1.
Figure 2.18
18
Reading Head Management System User’s Manual
(2) Registering according to grouped personnel
Registering according to grouped personnel is to register the fingerprint information
of grouped (reading head) personnel into corresponding MF11 reading heads.
[Steps]
1.
“Fingerprint data management” module: Select a reading head with personnel
to be registered, and perform “Online test” to check that it is online.
2.
Click “Register according to personnel groups”.
3.
Click “Register personnel information into the reading head” to finish
registration according to grouped personnel. The system automatically registers
personnel into the corresponding reading head.
Note: Before registration, please check whether the personnel in a group (reading
head) are correct. In case of incorrection, please modify them in the “Personnel
group” module.
Example: Register personnel registration information into corresponding reading
heads.
[Prerequisite] The personnel have been grouped into corresponding reading heads in
the “Personnel group” module (Figure 2.19).
[Results] After registration, the fingerprint information of the personnel with the
registration No. 00001, 00002, 00005 and 00006 is written into the reading head 1.
The fingerprint information of the personnel grouped in the reading head 2 is
correspondingly written into the reading head 2 (Figure 2.20).
19
Reading Head Management System User’s Manual
Figure 2.19
Figure 2.20
Note: For "Obtain registration information from the reading head”/”Delete
personnel information from the reading head”, the steps are the same as those of
“Register personnel information into the reading head”.
1.
Obtain registration information from the reading head: Obtain registration
information of the personnel under the selected reading head to the computer
20
Reading Head Management System User’s Manual
from the MF11 reading head (Figure 2.21).
2.
Delete personnel information from the reading head: Delete registration
information of the personnel under the selected reading head from the MF11
reading head (Figure 2.22).
Figure 2.21
Figure 2.22
21
Reading Head Management System User’s Manual
2.6 Database Maintenance
2.6.1 Database backup
Figure 2.23
2.6.2 Database restoration
Figure 2.24
2.6.3 Database optimization
Figure 2.25
2.6.4 Database repair
Figure 2.26
22
Reading Head Management System User’s Manual
2.7 About
This interface indicates the software version, program installation address,
database address and other information.
Figure 2.27
23