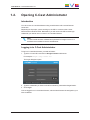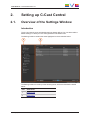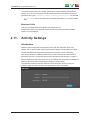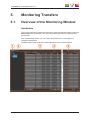
1
USER MANUAL
C-Cast Administrator
Version 3.2 - June 2015
USER MANUAL C-Cast Administrator 3.2
Disclaimer
This manual and the information contained herein are the sole property of EVS Broadcast
Equipment SA and/or its affiliates (EVS) and are provided “as is” without any expressed or
implied warranties, including, but not limited to, the implied warranties of merchantability
and fitness for a particular purpose. In particular, EVS makes no warranty regarding the
use or the consequences of use of this manual and the information contained herein.
Furthermore, EVS may not be held liable for any direct or indirect, incidental, punitive or
consequential loss, damage, cost or expense of any kind whatsoever and howsoever
resulting from the normal or abnormal use of this manual and the information contained
herein, even if advised of the possibility of such loss, damage, cost or expense.
While every effort has been made to ensure that the information contained in this manual
is accurate, up-to-date and reliable, EVS cannot be held liable for inaccuracies or errors
that may appear in this publication. The information in this manual is furnished for
informational purpose and use only and subject to change without notice.
This manual cancels and replaces any previous versions thereof.
Copyright
Copyright © 2014-2015 EVS Broadcast Equipment SA. All rights reserved.
This manual may not be reproduced, transcribed, stored (in a database or an retrieval
system), translated into any language, computer language, transmitted in any form or by
any means – electronically, mechanically, printed, photocopied, optically, manually or
otherwise – in whole or in part without the prior written consent of EVS.
Trademarks
All product and brand names are registered trademarks and trademarks of EVS or of their
respective owners.
Improvement Requests
Your comments will help us improve the quality of the user documentation. Please send
improvement requests, or report any error or inaccuracy on this user manual by e-mail to
[email protected].
Regional Contacts
You will find the full list of addresses and phone numbers on the following webpage:
http://www.evs.com/contacts.
I
EVS Broadcast Equipment SA
Issue 3.2.A - June 2015
User Manuals on EVS Website
The latest version of the user manual, if any, and other user manuals on EVS products can
be found on the EVS download center, on the following webpage:
http://www.evs.com/downloadcenter.
II
USER MANUAL C-Cast Administrator 3.2
Table of Contents
TABLE OF CONTENTS
III
1.
1
INTRODUCTION
1.1. Product Description
1
1.2. Opening C-Cast Administrator
3
1.3. Overview of the User Interface
4
2.
7
SETTING UP C-CAST CENTRAL
2.1. Overview of the Settings Window
7
2.2. Managing Settings
9
2.3. Setting Types
11
2.4. Rendition Profile Settings
14
2.5. Production Site Settings
16
2.5.1. C-Cast Agent Settings
16
2.5.2. C-Cast IPConnect Settings
18
2.6. Metadata Settings
2.6.1. Keyword Grid Settings
19
2.6.2. Metadata Fields Settings
20
2.6.3. Metadata Profile Settings
23
2.7. Recorder Profile Settings
24
2.8. Target Settings
28
2.9. Resource Settings
29
2.10. Publication Type Settings
30
2.11. Activity Settings
31
2.12. Delivery Settings
33
3.
SETTING UP AND MANAGING PRODUCTIONS
34
3.1. Overview of the Production Window
34
3.2. Managing Productions
38
3.2.1. Creating a New Production from Scratch
38
3.2.2. Creating a New Production Based on an Existing One
40
3.3. Setting up a Production
Table of Contents
19
42
3.3.1. Editing General Production Settings
42
3.3.2. Assigning Production Sites
43
3.3.3. Associating Recorders
46
3.3.4. Defining Gangs
48
3.3.5. Linking Metadata Profiles
50
3.3.6. Adding Targets
51
3.3.7. Linking Resources
53
III
EVS Broadcast Equipment SA
4.
3.3.8. Linking Keyword Grids
54
3.3.9. Associating Log Feeds
56
3.3.10. Viewing Channels
57
3.3.11. Viewing Channel Groups
58
SETTING UP MEDIA DISTRIBUTION
60
4.1. Overview of the Configuration for Media Distribution
60
4.2. Role of Channels and Channel Groups
61
4.3. Setting up Channel Groups
63
4.3.1. Description of the Channels Group Pane
63
4.3.2. Creating or Editing a Channels Group
65
4.3.3. Defining a Distribution Workflow
67
4.3.4. Defining a Productions Group
69
4.4. Setting up Channels
5.
IV
Issue 3.2.A - June 2015
71
4.4.1. Channel Parameters
71
4.4.2. Defining a New Channel
74
4.4.3. Managing Publication Channels
76
MONITORING TRANSFERS
77
5.1. Overview of the Monitoring Window
77
5.2. Filtering Monitoring Information
80
5.3. Adapting the Monitoring Grid Display
80
Table of Contents
USER MANUAL C-Cast Administrator 3.2
1.
Introduction
1.1.
Product Description
C-Cast Central Description
C-Cast Central is a service, running in the cloud, which orchestrates the C-Cast solution.
It makes it possible to manage the production definition and planning, as well as the
distribution workflow. As part of C-Cast Central, the C-Cast Administrator module allows
the definition of most configuration elements in the C-Cast solution.
C-Cast Central Modules
The C-Cast Central application consists of several modules:
•
C-Cast Administrator is the user interface for the advanced configuration of most
workflow parameters.
•
C-Cast Publisher is the HTML5 web interface to manage the distribution of media to
partners or viewers.
•
C-Cast Xplore is the interface to remotely access live feeds, select media and
transfer it to given destinations for further processing.
This manual deals with the C-Cast Administrator module. The other modules are dealt
with in separate user manuals.
Note
C-Cast Publisher replaces the former C-Cast Workspace. For this reason,
some elements referring to the old application name could still temporarily be
present in the user interface. Thanks for your understanding.
C-Cast Central Workflow
The C-Cast Administrator module allows you set up the configuration elements used in a
C-Cast workflow, as well as the C-Cast productions. As such, the C-Cast Administrator
is only indirectly involved in the C-Cast workflow.
Besides this, as the C-Cast Central allows the orchestration of the whole C-Cast
workflow, it is directly involved in the whole C-Cast workflow, as shown in the distribution
workflow presented below.
1. Introduction
1
EVS Broadcast Equipment SA
Issue 3.2.A - June 2015
1. From the OB van on the venue, the reference program feed is sent via satellite or
landline to an EVS server in the broadcast center.
2. In the broadcast center, the operator accesses, with IPDirector, the reference feed on
which (s)he defines IN and OUT points to identify the media to be made available in CCast Publisher.
3. The media selection information (IN and OUT points, and metadata) is transmitted to
the C-Cast Central via to the C-Cast IPConnect.
4. The C-Cast Central requests the C-Cast Agent to extract the media corresponding to
the selection. The C-Cast Agent, and the underlying Xsquare service, extracts and
transfers the preview files and mezzanine files to the C-Cast Central. Based on the
configuration, all camera angles associated to the selected media are also generated
as preview and mezzanine files.
5. In the broadcast center, the operator browses the preview files of all requested camera
angles (video asset1) in C-Cast Publisher. The operator validates the publication
items and video assets (s)he wants to publish to viewers.
6. The C-Cast Central requests the video transcoders to generate the requested output
files.
7. The C-Cast Central exposes the output files to the viewers' applications.
1Logical entity that contains a media part of the publication item (ex. thumb asset or video asset). It is
characterized, among others, by a source, an IN point, an OUT point. It does not contain any formatting
information. For example, each camera of a multicamera publication item is a video asset.
2
1. Introduction
USER MANUAL C-Cast Administrator 3.2
1.2.
Opening C-Cast Administrator
Introduction
You can access C-Cast Administrator using a web browser with a normal internet
connection.
Depending on the project you are working on, the URL to connect to the C-Cast
Administrator module will differ. Beforehand, you will receive the URL and the login
credentials you need to use to connect to C-Cast Administrator.
Note
C-Cast Central has been validated and optimized for Google Chrome. It is
therefore recommended to use this web browser.
Logging in to C-Cast Administrator
To log into C-Cast Administrator, proceed as follows:
1. Type the C-Cast URL received in a Google Chrome web browser.
For example: https://my.c-cast.tv/
The Login dialog box opens:
2. Type the credentials you have received for username, password and organization.
3. Click Login.
Your are logged on to C-Cast Administrator, with the Administrator role assigned to your
user credentials.
1. Introduction
3
EVS Broadcast Equipment SA
1.3.
Issue 3.2.A - June 2015
Overview of the User Interface
Introduction
The C-Cast Administrator module consists in four main parts accessible via a toolbar at
the top of the window. The item selected in the toolbar is underlined in blue:
4
Part
Description
Contribution
From the Contribution window, you can create, set up and edit all
productions managed in the C-Cast workflow.
See section "Setting up and Managing Productions" on page 34.
Distribution
From the Distribution window, you define the publication channels
and the publication channels groups, that means the components
that allow the media to be distributed to viewers or/and partners.
See section "Setting up Media Distribution" on page 60.
Settings
From the Settings window, you define all C-Cast configuration
elements.
These components will be used everywhere else in the C-Cast
workflow:
• In the production configuration
• In the distribution configuration
• In the C-Cast Agent configuration
• In the C-Cast IPConnect configuration
• By all the services responsible for communication between the
C-Cast modules, and for transfer and transport of the media
throughout the C-Cast workflow.
See section "Setting up C-Cast Central" on page 7.
Monitoring
When you click the Monitoring option in the toolbar, a separate
window opens in your browser with the general monitoring window.
From the Monitoring window, you can monitor all transfers from CCast Agents to contribution destinations.
See section "Monitoring Transfers" on page 77.
1. Introduction
USER MANUAL C-Cast Administrator 3.2
Illustration
You will perform different tasks in the three main windows of the module, but the
underlying structure is similar in the three main windows:
The three main windows in C-Cast Administrator are made up of the following zones:
1. Introduction
Part
Area Name
1.
Toolbar
2.
Selection Pane
3.
Configuration Pane
5
EVS Broadcast Equipment SA
Issue 3.2.A - June 2015
Area Description
Toolbar (1)
The toolbar includes two areas:
•
The central part provides links to the three main windows, as explained in the
Introductory section.
•
The right part displays the user name and the organization name. The arrow sign gives
access to commands to edit your user credentials and password, as well as to log out.
Selection Pane (2)
The Selection pane gives access to a tree view or item list in which you can select an
item:
•
a production in the Contribution window
•
the Channels or Channel Groups headings in the Distribution window
•
a parameter type in the Settings window
According to what you have selected in the Selection pane, the parameters of the selected
item are displayed on the Configuration pane on the right of the window.
Configuration Pane (3)
The Configuration pane gives access to detailed parameters of the item selected in the
Selection pane:
6
•
the parameters of the selected production in the Contribution window
•
the list of channels and/or channel groups in the Distribution window
•
the list of items belonging to the selected parameter type in the Settings window
1. Introduction
USER MANUAL C-Cast Administrator 3.2
2.
Setting up C-Cast Central
2.1.
Overview of the Settings Window
Introduction
The C-Cast Central comes with default settings already defined. You can either edit the
default settings or create your own settings based on the default ones.
The Settings window contains the areas highlighted on the screenshot below:
The Settings window is made up of the following areas, which are described in details
below:
Part
Area Name
1.
Settings tree
2.
Settings list
2. Setting up C-Cast Central
7
EVS Broadcast Equipment SA
Issue 3.2.A - June 2015
Area Description
Settings Tree (1)
The Settings tree gives access to all types of settings required in a C-Cast workflow.
When you click a type of settings in the Settings tree, the user interface behaves as
follows:
•
The selected setting type is displayed on a dark grey background in the tree and with a
vertical blue line in front of the type.
•
All items of this type are listed in the Settings list on the right.
See section "Setting Types" on page 11 for a short description of each setting type.
Settings List (2)
The list of items corresponding to the setting type selected on the left are displayed as a
list. For any setting type, the items are created, updated or deleted in the same way.
See section "Managing Settings" on page 9 for procedures on how to manage setting
items.
8
2. Setting up C-Cast Central
USER MANUAL C-Cast Administrator 3.2
2.2.
Managing Settings
General Principles
All operations on settings are performed in the same way, whatever the setting type.
For more information on the fields specific to the setting type, refer to the section on the
specific setting.
Warning
Should you change settings that are used in a live production, bear in mind that
these modifications will be taken into account only for future publication items or
publication items that are updated in the C-Cast Publisher further to the
modifications.
How to Add an Item of a Setting Type
1. Select a settings type in the settings tree on the left.
A table with a list of settings of the selected type is displayed on the right.
2. On the right, click the Create button located at the top of the list.
The name of the Create button depends on the setting type.
The Create window is displayed.
3. Fill in at least the required fields, marked with an asterisk, and click Create.
A new record is added in the setting list with the values you have entered.
How to Edit an Item in a Setting List
1. Select the requested settings type in the settings tree on the left.
A table with a list of settings of the selected type is displayed on the right.
2. On the right, click the Edit icon
in the row of the item you want to edit.
The Edit window is displayed.
3. Edit the field values and click Update.
The setting values have been modified in the updated item.
2. Setting up C-Cast Central
9
EVS Broadcast Equipment SA
Issue 3.2.A - June 2015
How to Delete a Single Item in a Settings List
Delete actions are not available with all settings.
1. Select the requested settings type in the settings tree on the left.
A table with a list of settings of the selected type is displayed on the right.
2. On the right, click the Delete icon
in the row of the item you want to delete.
A dialog box asking for confirmation is displayed.
3. Click the Delete button in the dialog box.
The item is deleted from the list.
How to Delete Several Items of a Settings List
Delete actions are not available with all settings.
1. Select the requested settings type in the settings tree on the left.
A table with a list of settings of the selected type is displayed on the right.
2. On the right, select the items you want to delete from the list.
The check box in front of the row is selected, and the row is highlighted in blue.
3. Click the Delete button on the top of the settings list.
A dialog box asking for confirmation is displayed.
4. Click the Delete button in the dialog box.
The items are deleted from the list.
How to Search for Items in a Settings List
This search feature is not available for all setting types. Some fields are not taken into
account in the search.
1. Select the requested settings type in the settings tree on the left.
A table with a list of settings of the selected type is displayed on the right.
2. In the Search field located upper right of the settings list, type the text string you want
to look for.
The list is filtered to display only the items whose fields include the text string searched.
10
2. Setting up C-Cast Central
USER MANUAL C-Cast Administrator 3.2
2.3.
Setting Types
Tree View
All setting types are presented in a structured list on the left of the Settings window.
This section describes each setting type, and their related fields.
General Settings
Users
The users of any C-Cast module must be defined in the Users settings.
The users can be granted one role that provides associated rights:
Role
Description
Administrator Has full access and privileges on the C-Cast Central, and access to both
C-Cast Administrator, and C-Cast Publisher.
Publisher
Operator
2. Setting up C-Cast Central
Has access to C-Cast Publisher and its content, but not to C-Cast
Administrator.
11
EVS Broadcast Equipment SA
Issue 3.2.A - June 2015
Rendition Profiles
The rendition profiles consist of a set of parameters and XML files used to create the
output files required in the C-Cast workflow: video, audio, thumbnails or thumbwall.
See section "Rendition Profile Settings" on page 14.
Contribution Settings
Production Sites
The production sites consist of the definition of the various physical locations where a CCast Agent or C-Cast IPConnect are used in the C-Cast workflow.
See section "Production Site Settings" on page 16.
Metadata
The metadata include the definition of all elements that provide information on the content
of publication items in the C-Cast workflow. These are keywords, metadata profiles and
metadata fields.
See section "Metadata Settings" on page 19.
Recorder Profiles
The recorder profiles consist of recorder groups to be used on a venue in the C-Cast
workflow.
See section "Recorder Profile Settings" on page 24.
Targets
A target consists of a group of physical destinations a user can decide to send content to.
The targets belong to the following type:
•
so-called "mezzanine" files used by other C-Cast processes to generate the final
output files in the distribution workflow.
See section "Target Settings" on page 28.
Resources
The resources are the documents or files that can be used to complete a C-Cast
workflow, or that can be useful in the C-Cast workflow.
See section "Resource Settings" on page 29.
12
2. Setting up C-Cast Central
USER MANUAL C-Cast Administrator 3.2
Distribution Settings
Publication Types
The publication types make it possible to categorize the publication items by defining the
type of content present in the publication item. The publication types are used in the
production timeline in C-Cast Publisher.
See section "Publication Type Settings" on page 30.
Activities
An activity corresponds to a type of output file required for an end user application (iPad,
iOS, website, etc.). The activity relies on a rendition profile to define what file is generated,
and how it is generated.
See section "Activity Settings" on page 31.
Deliveries
A delivery is the URL path through which the end-user application will access the media
content published on the C-Cast Central storage.
See section "Delivery Settings" on page 33
2. Setting up C-Cast Central
13
EVS Broadcast Equipment SA
2.4.
Issue 3.2.A - June 2015
Rendition Profile Settings
Purpose
The rendition profiles consist of a set of parameters and an XML file used to create the
output files required in the C-Cast workflow: video, audio or thumbnails.
Based on the profile definition, a transcoding engine will perform the rendition. Several
engines are supported. Depending on the requested output, you will use a different engine.
The profiles include, among others, the codec, the wrapper, the resolution, the bitrate, the
location, the DRM, etc.
When you create a rendition profile, you need to fill in descriptive fields, and attach the
complete XML structure of the profile in the Rendition Profile window:
The following screenshot shows an example of a rendition profile using the Xsquare
engine to generate a mezzanine file:
14
2. Setting up C-Cast Central
USER MANUAL C-Cast Administrator 3.2
Field Description
Name
This is the name of the rendition profile. In the profile name, try to specify the output type
the profile allows to create.
Description
This is the description of the rendition profile. In the profile description, try to specify the
output characteristics the profile allows to create, for example bitrate and resolution.
Shortcode
This is the code used in the C-Cast database to refer to the rendition profile.
A shortcode can only contain alphanumerical characters (a - z;0 - 9, as well as hyphen and underscore _ ). Uppercases are converted to lowercase.
A shortcode cannot be longer than 20 characters, and cannot contain special characters
such as o \, <, >, %, $, *, #, ‘,(espace), (, ), ", [, ], /, {, }, @.
The application will prevent you from using unsupported characters.
Type
This is the type of output file to be generated. The following values are possible:
Type
Description
Video
video file
Thumb
thumbnail used outside the C-Cast Publisher
Audio
audio file
Thumbwall
thumbnails used in C-Cast Publisher in the Content tab
Engine
This is the engine that will perform the rendition. The following engines are supported:
Type
Description
Xsquare
EVS engine to be used to do the extraction from the EVS servers or
form an IPDirector nearline.
Zencoder
3th party transcoder in the cloud that creates multiple types of
video/audio files based on the mezzanine file generated by
XSquare.
Refer to the Zencoder website (https://zencoder.com/en/) for more
information about Zencoder transcoding.
2. Setting up C-Cast Central
15
EVS Broadcast Equipment SA
Type
Issue 3.2.A - June 2015
Description
ThumbnailCloud Main engine to create thumbnails thumbwall for the C-Cast
Publisher and the application. In the XML structure you can define
the size and type of thumb.
Max Extraction
This is the maximum number of renditions the engine can process simultaneously.
Profile
This is the link to the XML file including the rendition definition and parameters.
If you do not have the XML file ready, you can directly type the profile in the Editor window
displayed below the Profile field.
2.5.
Production Site Settings
2.5.1.
C-Cast Agent Settings
Purpose
On a C-Cast setup, you will deploy a C-Cast Agent on each physical location where
content will be extracted and sent to C-Cast Central.
•
One C-Cast Agent will be deployed on each venue.
•
One C-Cast Agent will also be deployed in the broadcast center if, for example, clips
are created from the PGM feed in the broadcast center, or if content is extracted from
external feeds (feeds other than the ones on the venue).
For each deployed C-Cast Agent, you need to create a record in the C-Cast Agent
settings.
16
2. Setting up C-Cast Central
USER MANUAL C-Cast Administrator 3.2
The following screenshot shows the settings of a C-Cast Agent:
Field Description
Name
This is the name of the C-Cast Agent. It is recommended that the name refers to the
physical location of the C-Cast Agent.
Description
This is the description of the C-Cast Agent.
Offset
When there is a timecode difference between EVS equipment in different production sites
(mainly on the venue and in the broadcast center), the offset makes it possible for C-Cast
to take this TC difference into account.
This is relevant in a C-Cast workflow with EVS servers located on the venue, and an EVS
server receiving feeds (PGM) in the broadcast center and used in association with
IPDirector and IPConnect on a C-Cast workflow.
Television System
This is the video standard that you will use during the production.
2. Setting up C-Cast Central
17
EVS Broadcast Equipment SA
2.5.2.
Issue 3.2.A - June 2015
C-Cast IPConnect Settings
Purpose
On a C-Cast setup, you will deploy a C-Cast IPConnect application on each physical
location where IPDirector is used to select content to be made available in C-Cast
Publisher. This is typically in the broadcast center.
The IPConnect acts as a bridge for the data communication between IPDirector and CCast Central: Based on the clips created in IPDirector, C-Cast IPConnect will request CCast Central to extract content and make it available to the C-Cast Publisher.
For each deployed C-Cast IPConnect, you need to create a record in the C-Cast
IPConnect settings. A single IPConnect can be deployed on a C-Cast workflow.
The following screenshot shows the settings of a C-Cast IPConnect:
Field Description
Name
This is the name of the C-Cast IPConnect. It is recommended that the name refers to the
physical location of the C-Cast IPConnect.
Description
This is the description of the C-Cast IPConnect.
18
2. Setting up C-Cast Central
USER MANUAL C-Cast Administrator 3.2
2.6.
Metadata Settings
2.6.1.
Keyword Grid Settings
Purpose
Keywords and keyword types defined in keyword grids play an important role in a C-Cast
workflow, mainly:
•
The keywords associated to publication items make it possible to provide enhanced
information to viewers and partners, for example displaying icons, or generating
sentences based on keywords.
•
The keywords can be used as criteria to include publication items into publication
channels, and therefore make them available to viewers and partners.
If IPDirector is part of the C-Cast workflow, the IPDirector keyword grids should be
imported and used as basis for the C-Cast keyword grids.
The keyword grids defined in the C-Cast Central settings must have the XML format.
The following screenshot shows the settings of a keyword grid:
Field Description
Description
This should describe the keywords included in the keyword grids.
Type
The Type field categorizes the keywords of the keyword grid by assigning a type to them.
all keywords of the grid will be assigned this keyword type.
2. Setting up C-Cast Central
19
EVS Broadcast Equipment SA
Issue 3.2.A - June 2015
File
The File field specifies the name of the XML keyword file. You can use the Browse button
to link a keyword file when you create a new keyword grid in the settings.
Note
If you want to see the content of a keyword grid, you need to click on the
keyword file name in the settings list. This will download a copy of the keyword
file locally.
2.6.2.
Metadata Fields Settings
Purpose
The metadata fields provide additional information on the publication items that will be
published to viewers and partners. The Title and Description metadata fields are
provided by default. You can add additional metadata fields about the action, for example
the event name, the city and name of the venue, the teams, etc. All fields can be custom
made based on the customer needs.
In a workflow with IPDirector, you will most probably want some or all metadata
information to be transferred with the clips from IPDirector to C-Cast. To this end, you
need to define metadata fields with exactly the same label as in IPDirector.
20
2. Setting up C-Cast Central
USER MANUAL C-Cast Administrator 3.2
The following screenshot shows the settings of a metadata field when the Autofill check
box is selected:
Field Description
Shortcode
This is the code used in the C-Cast database to refer to the metadata field.
A shortcode can only contain alphanumerical characters (a - z;0 - 9, as well as hyphen and underscore _ ). Uppercases are converted to lowercase.
A shortcode cannot be longer than 20 characters, and cannot contain special characters
such as o \, <, >, %, $, *, #, ‘,(espace), (, ), ", [, ], /, {, }, @.
The application will prevent you from using unsupported characters.
Name
This is the name of the metadata field. It will be exposed in the final application via the CCast API.
2. Setting up C-Cast Central
21
EVS Broadcast Equipment SA
Issue 3.2.A - June 2015
Autofill
The Autofill check box makes it possible to activate by default the automatic completion
of the metadata field in C-Cast Publisher.
The automatic completion mechanism aims at filling a metadata field in a publication item
with a sentence or phrase generated automatically. The sentence is generated when
specific keywords and/or keyword types are linked to the publication item.
When you select the Autofill check box, the Manage Translation area is displayed. In this
area, you can link the files that contain the information required by the auto-completion
mechanism.
Keywords
In the Keywords area, you can select or drop the .csv file that contains the keywords and
keyword translations if you want the keywords used in the generated sentences to be
translated.
Sentences
In the Sentences area, you can select or drop the .csv file that contains the sentence
patterns used to generate the automatic sentences when specific keywords are used.
The following table shows examples of sentence patterns, required keywords, and results
of sentences generated based on the sentence pattern:
Keyords linked to
Publication Item
Example of
generated sentence
$Player$ scored a $ACTION$ where Messi (player), goal
Action = goal
(action)
and Player = *
Messi scored a goal.
$Player$ received a $ACTION$ where Action = red card
and Player = *
Messi (player), red card
(action)
Messi received a red
card.
A player received a
$ACTION$ where Action = red card
red card (action)
A player received a
red card.
Sentence Pattern
Note
When you have specified translations in the Keywords file, the keywords used
as variables in the sentence patterns will appear translated in the generated
sentences.
Download Template File
The Download Template File button allows you to download a .csv file with all keywords
included in the keyword grids defined the in C-Cast Central settings. If no keyword grid is
defined, the button is not available.
22
2. Setting up C-Cast Central
USER MANUAL C-Cast Administrator 3.2
Remove Translations
The Remove Translations button allows you to remove the links to the Keywords and
Sentences files in the Manage Translations area.
2.6.3.
Metadata Profile Settings
Purpose
Metadata fields can be grouped into a metadata profile. These metadata profiles are then
assigned to a production.
In the Settings, you need to create the following metadata profiles:
•
one metadata profile per publication type, that will be linked to the publication type in
the Publication Type Settings.
•
one metadata profile that will be linked to the production in the Contribution window.
In C-Cast Publisher, the metadata fields from two metadata profiles are indeed included in
each publication item:
•
fields from the metadata profile associated to the publication type;
•
fields from a metadata profile associated to the production.
The following screenshot shows the settings of the default metadata profile called
Production.
Field Description
Name
This is the name of the metadata profile. Choose a name that reflects the type of metadata
fields the profile contains.
Description
This field provides a description of the metadata profile. It is optional.
2. Setting up C-Cast Central
23
EVS Broadcast Equipment SA
Issue 3.2.A - June 2015
Metadata Fields
The top field, including the text Enter your metadata, is a search field to display, search
and select the metadata field you want to add to the metadata profile.
Once a field has been added to the metadata profile, it is displayed below this field, on a
black background.
On the above screenshot, two metadata fields have been added to the metadata profile:
Title and Description.
Managing Metadata Fields in a Metadata Profile
You can perform the following actions to add, reorder or remove fields in the metadata
profile:
2.7.
In order to ...
Proceed as follows:
Add a metadata field to a profile
1. Do one of the following to search for the field:
◦ If you do not know the metadata field name,
simply click on Enter your metadata and all
metadata fields will be listed.
◦ If you know the metadata field name or part of
it, type it on Enter your metadata to display
only the metadata fields matching the string
entered.
2. To select a field, use the Up and Down Arrow
keys.
3. To validate the selection, press Enter.
Remove a metadata field from a
profile
Click on the small cross in front of the metadata field.
Change the position of a
metadata field in the list
Drag and drop a field to another position in the list.
Recorder Profile Settings
Purpose
The recorder profiles serve the following purposes:
24
•
Defining the recorders used in a production. When you configure a production, you
indeed need to link the production to one recorder profile that includes all recorders you
will use on any of the production sites.
•
Defining a given order (sort indice) of priority between recorders for the extraction
process.
2. Setting up C-Cast Central
USER MANUAL C-Cast Administrator 3.2
The following screenshot shows the settings of a recorder profile for a football event:
Field Description
Shortcode
This is the code used in the C-Cast database to refer to the recorder profile.
A shortcode can only contain alphanumerical characters (a - z;0 - 9, as well as hyphen and underscore _ ). Uppercases are converted to lowercase.
A shortcode cannot be longer than 20 characters, and cannot contain special characters
such as o \, <, >, %, $, *, #, ‘,(espace), (, ), ", [, ], /, {, }, @.
The application will prevent you from using unsupported characters.
Description
This field provides a description of the recorder profile.
2. Setting up C-Cast Central
25
EVS Broadcast Equipment SA
Issue 3.2.A - June 2015
Image
This field allows administrators to link an image of the camera plan to the recorder profile.
Click the Browse button to point to the requested file. Once the file is selected, its name
is displayed in the Image field.
The image can be donwloaded from the Recorder Profile list.
Recorder List
The table in the bottom part of the window shows the recorders of the recorder profile. It
includes the following columns described below:
Field
Name
Description
Short
Indice
Number assigned to the recorder in the profile.
It is taken into account in the C-Cast workflow to define the priority in
which the media ingested from that recorder will be processed.
Most of the time, the PGM will be located on top of the list
Shortcode
Name of the recorder used in the API.
Description Description of the camera corresponding to the recorder, for example Main
Camera, Close Camera, SteadyCamera, Wide Angle, etc.
These definitions are available in C-Cast Agent to help people map the
recorders in the OB van.
All Frame
Check box to be selected when all frames of a recorder on an SLSM
camera have to be extracted.
Action
Provides the following buttons to perform actions on a row corresponding
to a recorder:
•
•
•
26
The Edit button allows users to edit the row.
The Save button is displayed when the row is in Edit mode, and
allows users to save the changes in the row.
The Delete button allows users to delete the row.
2. Setting up C-Cast Central
USER MANUAL C-Cast Administrator 3.2
Managing Recorders in a Recorder Profile
From a recorder profile window, you can perform the following actions to add, update,
reorder or remove recorders in the recorder profile:
In order to ...
Proceed as follows:
Add a recorder to a profile
1. Click the Add new recorder button.
A new row is added in the table for a new recoder.
2. Fill in the shortcode and the description for the
new recorder.
3. If relevant, select the All Frame check box.
4. Click
to save the recorder definition.
Edit a recorder in a profile
1. Click
in the row corresponding to the record
you want to edit.
The fields in the row become editable.
2. Edit the requested fields.
3. Click
to save the changes in the recorder
definition.
Change the position of a
recorder in a profile
Drag and drop a row to another position in the list.
The Sort Indice is updated as soon as you drop the
row to the new position.
Remove a recorder from a profile
Click
in the row corresponding to the record you
want to remove.
The row is directly removed, and the sort indices of
the other rows are updated.
Tip
If not all recorders are used during a production, this doesn’t affect the C-Cast
system: these angles will just not be extracted.
2. Setting up C-Cast Central
27
EVS Broadcast Equipment SA
2.8.
Issue 3.2.A - June 2015
Target Settings
Purpose
A target is the association of a physical resource including the media content (called a
rendition) and of a physical location in a given C-Cast setup where the physical resource
should be sent to.
When the content has been extracted, it can be sent to the cloud in C-Cast Central to be
used in the distribution workflow.
In the C-Cast workflow, the targets are specified in C-Cast Agent, as the C-Cast Agent
services take care for the rendition and transfer of files.
The following screenshot shows a Mezzanine target where the material is generated and
transferred to C-Cast Central:
Field Description
Name
This is the name of the target. It should ideally include information about the rendition and
transfer profiles.
Description
This field describes the target, what it does, what it is used for, ...
Type
The target belongs to the following type:
•
28
Mezzanine: Such target is used for the mezzanine file, which is the source file to
generate the outputs in the distribution workflow.
2. Setting up C-Cast Central
USER MANUAL C-Cast Administrator 3.2
Transfer Profile
This specifies the transfer profile that will be used to send the files to the destination.
Rendition Profile
This specifies the rendition profile that will be used to prepare and generate the targets.
2.9.
Resource Settings
Purpose
Resources are documents or files that can be used to complete a C-Cast workflow, or that
can be useful in the C-Cast workflow.
When resources are associated to a production, they are made available to the IPConnect
operator in the IPConnect production setup, so that he/she can download them during the
production.
The following screenshot shows the definition of a resource of type Document:
Field Description
Description
This should describe the resource content.
Type
The resource belongs to one of the following types:
•
Document: Assign this type to resources that are reference documents, such as
Word, PDF, Powerpoint, ... documents that should be shared or read by people in a CCast production.
•
IPDirector Layout: Assign this type to a resource that is an exported IPDirector
layout. The IPConnect operator will therefore has it on hand and can apply it to the
IPDirector application (s)he uses.
•
Other:Assign this type to any other resource.
2. Setting up C-Cast Central
29
EVS Broadcast Equipment SA
Issue 3.2.A - June 2015
File
The File field specifies the name of the resource file. You can use the Browse button to
link a resource file.
Note
If you want to see the content of a resource file, you need to click on the file
name in the settings list. This will download a copy of the resource file locally.
2.10.
Publication Type Settings
Purpose
The publication types make it possible to categorize the publication items by defining the
type of content present in the publication item. The publication types are used in the
production timeline in C-Cast Publisher.
Some publication types are used to refer to the content coming from the EVS server. They
will always be available.
Others publication types are defined based on the customer needs, such as weather, ads,
statistics, or maybe just thumbs. It directly relates to the type of content you will publish in
the event. This can change between different API outputs.
Field Description
Name
This is the name of the publication item.
Two publication types are directly associated to the content coming from the EVS server.
They are mandatory and must be defined on all C-Cast setups:
•
evs:monocam, used for publication items with a single camera angle.
•
evs:multicam, used for publication items with multiple camera angles.
Other publication types are defined based on the customer needs. They are based on the
content type.
30
2. Setting up C-Cast Central
USER MANUAL C-Cast Administrator 3.2
A customer could request, for example, a publication of type Weather, Advertisement,
Career, etc. In this case, the type name should be built on the same pattern as the evs
publication item types: <customer name>:<content description>, for example:
•
abc:weather, used for the publication of weather information by a customer called
ABC.
Metadata Profile
This is the metadata profile associated to the publication item.
All publication items of this type will include the fields from the associated metadata
profile in C-Cast Publisher.
2.11.
Activity Settings
Introduction
Different types of output files are required for each end user application (iPad, iOS,
website, etc.) to which media content will be made available in the distribution workflow.
The activities define the output files that might be necessary in the C-Cast setup.
Each activity relies on a rendition profile which includes the information about what is
generated, and how it is generated. See section "Rendition Profile Settings" on page 14.
When the renditions associated to an activity are created, they are stored on a predefined
bucket on the Amazon S3 storage system linked to C-Cast Central.
The following screenshot shows the definition of the iOS clips, which is one of the
'activities' (type of output file) that can be generated on the C-Cast setup:
2. Setting up C-Cast Central
31
EVS Broadcast Equipment SA
Issue 3.2.A - June 2015
Field Description
Shortcode
This is the code used in the C-Cast database to refer to the type of output file for the
distribution workflow.
A shortcode can only contain alphanumerical characters (a - z;0 - 9, as well as hyphen and underscore _ ). Uppercases are converted to lowercase.
A shortcode cannot be longer than 20 characters, and cannot contain special characters
such as o \, <, >, %, $, *, #, ‘,(espace), (, ), ", [, ], /, {, }, @.
The application will prevent you from using unsupported characters.
Description
This field describes the activity.
Rendition Profile
This field specifies the rendition profile (that means the set of parameters to create the
output file) based on which the output file corresponding to the activity will be built.
32
2. Setting up C-Cast Central
USER MANUAL C-Cast Administrator 3.2
2.12.
Delivery Settings
Introduction
A delivery is the URL path through which the end-user application will access the media
content published on the C-Cast Central storage.
The following screenshot shows the delivery settings to make the output files available
onto the default Amazon S3 bucket:
Field Description
Name
This is the name of the delivery. The name of the delivery can refer to the end-user
application that will access this delivery.
Description
This field provides more information about the delivery.
URL
This field specifies the path (URL) from which the end-user application can access the CCast output files.
The files are not stored and directly available on this path. The URL specified in the
delivery corresponds to a CDN (on the customer side) that connects to another CDN (on
C-Cast side) through which it accesses the media stored in the Amazon S3 storage
system linked to C-Cast Central.
Active
This check box allows users to automatically give access (Active check box selected) or
block the access (Active check box not selected) to the delivery URL from where the
output files are available.
2. Setting up C-Cast Central
33
EVS Broadcast Equipment SA
Issue 3.2.A - June 2015
3.
Setting up and Managing
Productions
3.1.
Overview of the Production Window
Overview
The Production window contains the areas highlighted on the screenshot below:
The Production window is made up of the following areas, which are described in details
below:
34
Part
Area Name
1.
Production tree
2.
Production configuration pane
3.
Title box
4.
Parameter icons
5.
Parameter areas
3. Setting up and Managing Productions
USER MANUAL C-Cast Administrator 3.2
Area Description
Production Tree (1)
The left window pane corresponds to the production tree, which contains an expandable
tree structure listing all the productions (visible or hidden).
From this pane, the following commands are available:
Button
Select this button to ...
add a new production in the production tree.
The new production is added in the selected folder.
filter the productions displayed in the tree view:
• When the left button is selected, only visible productions are
displayed in the tree.
• When the right button is selected, only hidden productions are
displayed in the tree.
• When both buttons are selected or no button is selected, all
productions are displayed.
The tree folders are always displayed even if they do not contain a
production for which the filter is active.
Production Configuration Pane (2)
The right window pane corresponds to the production configuration pane where you will
configure a new production or edit an existing production.
This pane displays the parameters of the production selected in the production tree.
The production configuration pane includes the areas 3 to 5 in the illustration.
Title Box (3)
The upper part of the Production Configuration pane includes the following elements:
#
Element
Description
1.
Path
Path where the selected production is located in the
production tree.
2.
Title
Production name
3.
3. Setting up and Managing Productions
Button to open the timeline of the selected production in
C-Cast Publisher.
35
EVS Broadcast Equipment SA
Issue 3.2.A - June 2015
Parameter Icons (4)
The Parameter Icons allows you to easily navigate in the production parameters. The
production parameters are grouped in several sets of parameters.
Click an icon to jump to the corresponding parameter box:
Icon
36
Parameter
Set
Description
Details
The production details are defined and editable in the Create
Production window, or Edit Production window.
From the Details area, the Edit Production button will open the
Edit Production window, and let you edit the production details.
See section "Managing Productions" on page 38.
Production
Sites
In the Production Sites parameters, you specify the C-Cast
Agent and C-Cast IPConnect software that will be used in your
C-Cast setup.
See section "Assigning Production Sites" on page 43.
Recorders
In the Recorders parameters, you mainly configure the
following:
• the recorders (record channels of EVS servers) you will use
in your production;
• the production sites where the corresponding media content
will be extracted.
See section "Associating Recorders" on page 46.
Gangs
In the Gangs parameters, you specify recorders you want to
group together.
When recorders are ganged together, the media content of all
recorders of the gang are extracted and made available in a
single multicam publication item in C-Cast Publisher.
See section "Defining Gangs" on page 48.
Metadata
Profiles
In the Metadata Profiles parameters, you specify the metadata
profiles you want to associate to the publication items in the
production.
See section "Linking Metadata Profiles" on page 50.
Targets
In the Targets parameters, you specify which files are
generated for the publication items published in C-Cast
Publisher, and where they are sent to.
See section "Adding Targets" on page 51.
Resources
In the Resources parameters, you specify the documents you
want to make available in the production.
See section "Linking Resources" on page 53.
Keyword
Grids
In the Keyword Grids parameters, you specify the keywords
grids you want to use in the production.
When the production timeline is open C-Cast Publisher, you will
be able to select keywords from these keyword grids and
associate them in publication items.
See section "Linking Keyword Grids" on page 54.
3. Setting up and Managing Productions
USER MANUAL C-Cast Administrator 3.2
Icon
Parameter
Set
Description
Log Feeds
In the Log Feeds, you can specify a data feed with logging
information from the venue.
This makes it possible to connect the data feed to the
production. This makes the logging information available in CCast Publisher, and allows users to import keywords and
metadata fields of a log into a publication item. The data you
receive has to correspond to the metadata fields you have
configured.
See section "Associating Log Feeds" on page 56.
Channels
In the Channels section, you can view the channels that have
been associated to the selected production in the Distribution
window.
See section "Viewing Channels" on page 57.
From this section, you can open the Edit Channel window
which allows you to change the productions associated to the
channel.
Channels
Groups
In the Channels Groups, you can view the channel groups that
have been associated to the selected production in the
Distribution window.
See section "Viewing Channel Groups" on page 58.
From this section, you can open the Channel Groups pane
where you associate production folders to channel groups.
Parameter Areas (5)
The parameters related to a given aspect of the production configuration are grouped into a
parameter area. You can access the requested parameter area from the parameter icons,
or simply by scrolling the window.
See section "Parameter Icons (4)" on page 36 for a short description of each set of
parameters.
See section "Setting up a Production" on page 42 and the section specific to each
parameter type for detailed instructions on how to set the various parameters.
3. Setting up and Managing Productions
37
EVS Broadcast Equipment SA
Issue 3.2.A - June 2015
3.2.
Managing Productions
3.2.1.
Creating a New Production from Scratch
Prerequisites
Before you create your production in C-Cast Administrator, you need to make sure that all
the General and Contribution settings have already been configured in the Settings
window ("Setting up C-Cast Central" on page 7).
Before you add a new production in the production tree structure, you need to make sure
that the requested folder structure is available in the production tree. Otherwise, you need
to create one or more folders in the production tree as described in the following procedure.
A production called Dummy is available in the production tree. It contains a default
configuration based on settings already defined in the C-Cast Central settings. You can
use this production as a basis for your own production by duplicating this dummy
production. See section "Creating a New Production Based on an Existing One" on page
40.
How to Create a Folder in the Production Tree
1. In C-Cast Administrator, select the Contribution menu.
The Contribution window opens.
2. In the Contribution window, in the production tree on the left, select a folder in which
you want to create a new folder. This can be the root folder, or another folder.
3. Click the Production icon
.
The Create Production window opens.
4. Select Folder in the Production Type field:
5. Type a name and description for the folder in the corresponding fields.
6. Do one of the following actions:
38
3. Setting up and Managing Productions
USER MANUAL C-Cast Administrator 3.2
a. To create the new folder based on the information you have entered, click the
Create button.
b. To create the folder and configure an additional folder, select Create another and
click the Create button.
The folder is added in the production tree at the requested location. A folder will always be
visible in the production tree.
If you have selected Create another, a new Create Production window is directly
displayed.
How to Create a Production from Scratch
1. In C-Cast Administrator, select the Contribution menu.
The Contribution window opens.
2. In the Contribution window, in the production tree on the left, select a folder where you
want to store your production configuration.
3. Click the Production icon
.
The Create Production window opens.
4. Select Production in the Production Type field.
The following fields are displayed in the Create Production window:
5. Type a name and description for the production in the corresponding fields.
6. If you want to hide the production in the production tree, select the Hidden status.
By default, the production will be visible.
7. Enter a start date and end date. This will set the time frame during which the
production will be live on the C-Cast setup. The start and end dates correspond to the
time zone of the venue.
3. Setting up and Managing Productions
39
EVS Broadcast Equipment SA
Issue 3.2.A - June 2015
8. If you want the start and end dates also to be expressed as the local time of a specific
time zone (time zone of the administrators or of the Broadcast Center), you can
specify the time shift corresponding to the requested timezone in the following fields:
9. Do one of the following actions:
a. To create the new production based on the information you have entered, click the
Create button.
b. To create the production and configure an additional production, select Create
another and click the Create button.
The production is added in the production tree at the requested location.
If you have selected Create another, a new Create Production window is directly
displayed.
Tip
You can assign the Hidden status to a production you already want to prepare,
keep aside, and only make visible before the production starts.
Using the filter above the production tree, you will always be able to display a
hidden production, and activate it later on.
3.2.2.
Creating a New Production Based on an
Existing One
Introduction
When the same kind of event takes place regularly, and you need to create a new
production similar to a previous production, you can create a production based on an
existing one using the Duplicate function.
A production called Dummy is available in the production tree. It contains a default
configuration based on settings already defined in the C-Cast Central settings. You can
use this production as a basis for your own production by duplicating this dummy
production.
40
3. Setting up and Managing Productions
USER MANUAL C-Cast Administrator 3.2
How to Create a Production Based on an Existing One
To create a production based on an existing one, proceed as follows:
1. In C-Cast Administrator, select the Contribution menu.
The Contribution window opens.
2. In the Contribution window, in the production tree on the left, select the production you
want to duplicate.
3. Click the Duplicate Production button
the Production Configuration pane.
on the right of
The Duplicate Production window opens:
4. In the Parent Node ID field, click Select, and select the folder in which the duplicated
production has to be added, then click the Select button.
5. In the Name and Description fields, modify the name and the description of the
production.
3. Setting up and Managing Productions
41
EVS Broadcast Equipment SA
Issue 3.2.A - June 2015
6. If you want to hide the production in the production tree, select the Hidden status.
By default, the production will be visible.
7. Enter a Start date and End date for your production. This will set the time frame
during which the production will be live on the C-Cast setup. The start and end dates
correspond to the time zone of the venue.
8. In the Configuration to duplicate area, select the parameter types whose values
you want to take over in the duplicated production.
9. Click Duplicate to create the duplicated production.
The duplicated production is added to the requested folder. You can now edit it as
explained in the section "Editing General Production Settings" on page 42.
3.3.
Setting up a Production
3.3.1.
Editing General Production Settings
Introduction
Once you have created a production, you can still edit the general settings you have
previously defined in the Create Production or Duplicate Production windows.
Note
When you edit general or specific production settings on a live production, the
configuration change will be taken into account only for the media content
extracted after the changes.
Procedure
To edit the general settings of a production, proceed as follows:
1. In C-Cast Administrator, select the Contribution menu.
The Contribution window opens.
2. In the Contribution window, in the production tree on the left, select the production
whose general settings you want to edit.
The production settings are displayed in the Production Configuration pane on the
right.
3. Click
on the right of the Production Configuration pane.
The Edit Production window opens.
4. Edit the settings in the production window as explained in the section "Creating a New
Production from Scratch" on page 38.
5. Click Update.
The general settings of your production are updated.
42
3. Setting up and Managing Productions
USER MANUAL C-Cast Administrator 3.2
3.3.2.
Assigning Production Sites
Introduction
A production site is the physical location where a part of the C-Cast distributed platform
will be deployed.
In the production configuration, you define production sites for the C-Cast Agent and CCast IPConnect used in a C-Cast workflow.
You will deploy a Cast Agent in each physical location where you need to extract and
transfer content into C-Cast Central.
You can deploy a single C-Cast IPConnect in a C-Cast workflow.
Note
• Each time you add a C-Cast Agent production site, you need to specify the
recorders to be made available in the C-Cast Agent in the Recorders area.
• When you change the configuration of a production site, you need to launch
the C-Cast Agent for changes to be taken into account in this application.
Where to Assign a Production Site
You assign production sites to the selected production via the Production Sites
parameters that you can reach as follows:
1. Select the Contribution menu at the top of the main window in C-Cast Administrator.
The Contribution window is displayed.
2. In the Contribution window, select the production you want to configure in the
production tree on the left.
The production parameters appear in the Production Configuration pane on the right.
3. Click
to bring the focus on the Production Sites area of the Production
Configuration pane:
How to Assign a C-Cast Agent Production Site
To assign a production site for a C-Cast Agent, proceed as follows:
1. In the Production Sites area of your production configuration, click
3. Setting up and Managing Productions
43
EVS Broadcast Equipment SA
Issue 3.2.A - June 2015
A table appears for C-Cast Agent production sites, with a new row. The list of C-Cast
Agent production sites defined in the Settings window is displayed in a drop-down field
in the Name column.
2. Select the relevant C-Cast Agent production site from the list:
The selected production site is added and a confirmation message is displayed in the top
right corner of the window.
By default, the production site is added with the parameters defined initially in the Settings
window.
How to Edit the Settings of a C-Cast Agent Production Site
Principles
When you edit the settings of a C-Cast Agent production site, the modified settings are
only valid for the production in which they have been modified.
You can edit the settings of a C-Cast Agent production site as it is connected to the
workflow. In this case, you need to relaunch the C-Cast Agent for changes to be taken
into account in this application.
Procedure
To modify the initial settings of the C-Cast Agent production, proceed as follows in the
Production Sites area:
1. Click
edit.
in the row corresponding to the C-Cast Agent production site you want to
The settings of the C-Cast Agent production site are displayed in an Edit window
2. Modify the settings as requested.
See section "C-Cast Agent Settings" on page 16 for a description of the various fields
displayed in the Edit window.
3. Click Update to validate the changes.
44
3. Setting up and Managing Productions
USER MANUAL C-Cast Administrator 3.2
How to Assign a C-Cast IPConnect Production Site
To assign a production site for C-Cast IPConnect, proceed as follows:
1. In the Production Sites area of your production configuration, click
A new row appears in the table for C-Cast IPConnect production sites. The list of CCast IPConnect production sites defined in the Settings menu is displayed in a dropdown field in the Name column.
2. Select the relevant C-Cast IPConnect production site from the list:
The selected production site is added and a confirmation message is displayed in the top
right corner of the window.
How to Unassign a Production Site from a Production
To unassign a production site (C-Cast Agent or C-Cast IPConnect) from a production,
proceed as follows in the Production Sites area:
1. Make sure the C-Cast Agent or C-Cast IPConnect application is closed, otherwise
you will not be able to unassign it.
2. Click
in the row corresponding to the production site you want to unassign.
The production site is directly removed and no confirmation is requested.
Troubleshooting
If you unassign a C-Cast Agent already configured ...
If you unassign a C-Cast Agent production site, and assign a new one whereas you have
already configured your C-Cast Agent application on the workstation, you need to perform
again the following configuration steps:
•
Reassign recorders to your C-Cast Agent in the Recorders area of your production
configuration in C-Cast Adminitrator.
•
Proceed again through the C-Cast Agent Setup Wizard of your C-Cast Agent
application.
3. Setting up and Managing Productions
45
EVS Broadcast Equipment SA
Issue 3.2.A - June 2015
If you unassign a C-Cast IPConnect already configured ...
If you unassign a C-Cast IPConnect production site, and assign a new one whereas you
have already configured your C-Cast IPConnect application on the workstation, you need
to perform again the following configuration steps:
•
3.3.3.
Proceed again through the C-Cast IPConnect Setup Wizard of your C-Cast
IPConnect application.
Associating Recorders
Introduction
Recorders are defined in the C-Cast Central settings in C-Cast Administrator with a name
and a shortcode. Each recorder is a source of content.
Recorder profiles, defined in the C-Cast Central settings in C-Cast Administrator, consist
of a list of recorders used as template on productions.
In this step of the production configuration, you will associate a recorder profile that
includes the recorders you want to use in your production. Once you have associated a
recorder profile, you need to specify the recorders to be made available in each C-Cast
Agent of the C-Cast workflow.
A single recorder profile can be assigned to a given production. The same recorder profile
can however be assigned to several productions.
Where to Associate a Recorder Profile
You associate a recorder profile to the selected production via the Recorders parameters
that you can reach as follows:
1. Select the Contribution menu at the top of the main window in C-Cast Administrator.
The Contribution window is displayed.
2. In the Contribution window, select the production you want to configure in the
production tree on the left.
The production parameters appear in the Production Configuration pane on the right.
3. Click
pane:
46
to bring the focus on the Recorders area of the Production Configuration
3. Setting up and Managing Productions
USER MANUAL C-Cast Administrator 3.2
How to Link a Recorder Profile
To link a recorder profile to the selected production, proceed as follows:
1. In the Recorders area of your production configuration, click
A field appears next to the button with the list of recorder profiles defined in the
Settings window:
2. Select the requested recorder profile from the list and click
All cameras of the selected recorder profile are added in a table with their shortcode
and description:
3. (Optional) If you want the media content from given recorders to be automatically set
to Published in C-Cast Publisher for this production, select the Automatic
Publishing check box for the requested recorders.
All video assets corresponding to recorders with Automatic Publishing activated will
therefore automatically be made available to viewers and partners when the
publication item including such video assets will effectively be published.
The recorders are linked to the production. See also the section "How to Make Recorders
Available in C-Cast Agent" on page 47.
Note
You can change the associated recorder profile by clicking
and following the above-detailed procedure again.
How to Make Recorders Available in C-Cast Agent
Each time you assign a C-Cast Agent production site to a production, you need to specify
3. Setting up and Managing Productions
47
EVS Broadcast Equipment SA
Issue 3.2.A - June 2015
which recorders should be made availble in this C-Cast Agent. A recorder can be made
available in only one C-Cast Agent at a time.
The actual selection of the recorders from which media content will be extracted is done in
the C-Cast Agent setup wizard, from the list of available recorders.
To make recorders available in a C-Cast Agent, proceed as follows:
•
In the Recorders area, in the column corresponding to a C-Cast Agent, select the
recorders you want to make available in this Cast Agent in one of the following ways:
◦
To select all recorders of the recorder profile for a C-Cast Agent, select the radio
button in the table header:
◦
To select individual recorders in the recorder profile for a C-Cast Agent, select the
radio button in the recorder row in the column of the C-Cast Agent:
The selected recorders will be made available in the setup wizard of the corresponding CCast Agent.
3.3.4.
Defining Gangs
Introduction
Gangs are groups of recorders defined for given production. A recorder can be associated
to several gangs. The C-Cast gangs differ from the ones defined in IPDirector.
The media content of all recorders mapped in a C-Cast Agent is extracted by this C-Cast
Agent. Based on the selection made by the IPDirector operator, the extracted media
content is made available in C-Cast Publisher as multicam publication items that include
the video assets corresponding to the recorders included in the gang.
You can define several gangs of recorders in a production, and a recorder can belong to
more than one gang. If the IPDirector operator creates a clip on a recorder included in two
C-Cast gangs, this will trigger the creation of a single publication item including the video
assets from all recorders of both gangs.
Note
You need to assign a recorder profile to a production before you can define
gangs of recorders.
Where to Define a Recorder Gang
You define a recorder gang in the selected production via the Gangs parameters that you
can reach as follows:
48
3. Setting up and Managing Productions
USER MANUAL C-Cast Administrator 3.2
1. Select the Contribution menu at the top of the main window in C-Cast Administrator.
The Contribution window is displayed.
2. In the Contribution window, select the production you want to configure in the
production tree on the left.
The production parameters appear in the Production Configuration pane on the right.
3. Click
to bring the focus on the Gangs area of the Production Configuration pane:
The recorders of the recorder profile associated to your production are displayed as a table
in the Gangs area.
How to Define a Recorder Gang
To define a gang of recorders in a production, proceed as follows:
1. In the Gangs area of your production configuration, click
.
A column without header is added to the table displaying the recorders of the
associated recorder profile:
2. In the Header field, type a name for the gang you want to add and click
the gang name.
to save
3. Do one of the following to select the recorders you want to include in the gang:
◦
To include all recorders of the recorder profile in the same gang, select the check
box in the header.
◦
To include one or more recorders of the recorder profile in a gang, select the check
box corresponding to the recorders you want to include in the gang.
Future multicam publication items will be created based on this gang.
3. Setting up and Managing Productions
49
EVS Broadcast Equipment SA
Issue 3.2.A - June 2015
How to Rename a Gang
1. In the Gangs area of your production configuration, click
you want to modify.
next to the gang name
The Gang Name field becomes editable.
2. Change the gang name and click
to save and validate the new name.
How to Remove a Gang
•
In the Gangs area of your production configuration, click
want to remove.
next to the gang you
The gang is directly removed, and a confirmation message is displayed in the top right
of the window.
3.3.5.
Linking Metadata Profiles
Introduction
You need to link a metadata profile to the production. This metadata profile usually
contains general metadata fields such as a title and a description. These fields will be
available in each publication item of the production in C-Cast Publisher, and in the whole
C-Cast workflow. You can only link one metadata profile to the production.
In C-Cast Publisher, the publication items will additionally inherit the fields from the
metadata profile associated to the publication type.
Where to Link a Metadata Profile
You link a metadata profile to the selected production via the Metadata Profile parameters
that you can reach as follows:
1. Select the Contribution menu at the top of the main window in C-Cast Administrator.
The Contribution window is displayed.
2. In the Contribution window, select the production you want to configure in the
production tree on the left.
The production parameters appear in the Production Configuration pane on the right.
3. Click
pane:
50
to bring the focus on the Metadata Profile of the Production Configuration
3. Setting up and Managing Productions
USER MANUAL C-Cast Administrator 3.2
How to Link a Metadata Profile
To link a metadata profile to the selected production, proceed as follows:
1. In the Metadata Profile area of your production configuration, click
A field appears next to the button with the list of the metadata profiles defined in the
Settings window:
2. Select the metadata profile you want to link to the production from the list and click
The name of the metadata profile is displayed next to the Link Metadata Profile button, and
all fields of the selected metadata profile are added in a table with their name and
shortcode:
Note
You can change the associated metadata profile by clicking
and following the above-detailed procedure again.
3.3.6.
Adding Targets
Introduction
A target is the association of a physical resource including the media content (called a
rendition) and of a physical location in a given C-Cast setup where the physical resource
should be sent to.
The following target has to be defined:
•
Mezzanine Target: This target type, called mezzanine in short, is always necessary
in a C-Cast workflow and is the resource file used to generate the output files
(activities). A single mezzanine file is generated per video asset in a C-Cast workflow.
In the production configuration, you need to specify the targets (mezzanine and target)
that will/can be used to process the video assets included in the publication items of your
production.
3. Setting up and Managing Productions
51
EVS Broadcast Equipment SA
Issue 3.2.A - June 2015
Where to Add Targets
You add targets to the selected production via the Targets parameters that you can reach
as follows:
1. Select the Contribution menu at the top of the main window in C-Cast Administrator.
The Contribution window is displayed.
2. In the Contribution window, select the production you want to configure in the
production tree on the left.
The production parameters appear in the Production Configuration pane on the right.
3. Click
pane:
to bring the focus on the Targets area of the Production Configuration
How to Add a Mezzanine Target
You need to associate one and only one mezzanine target to your production, otherwise
there will be no resource file available in the C-Cast workflow to generate the output files
for distribution.
To add a mezzanine target, proceed as follows:
1. In the Targets area of your production configuration, click
A table appears for the mezzanine target with a new row. The list of mezzanine targets
defined in the Settings window is displayed in a drop-down field in the Name column.
2. Select the relevant mezzanine target from the list:
The selected mezzanine target is added and a confirmation message is displayed in
the top right corner of the window.
3. In the added row, select the Automatic Publishing check box if you want to
automatically publish all video assets of your production to the mezzanine target
(recommended).
The mezzanine target has been added to your production and a mezzanine file will be
generated to all video assets of your production.
52
3. Setting up and Managing Productions
USER MANUAL C-Cast Administrator 3.2
How to Remove a Target
•
In the Targets area of your production configuration, click
corresponding to the target you want to remove.
in the row
The target is directly removed.
3.3.7.
Linking Resources
Introduction
Resources are documents or files that can be used to complete a C-Cast workflow, or that
can be useful in the C-Cast workflow.
You can link resources to your production to make them available via the setup wizard of
the C-Cast IPConnect application. This will allow IPConnect operators to have them at
hand in IPConnect and download them when needed.
Where to Link Resources
You link resources to the selected production via the Resources parameters that you can
reach as follows:
1. Select the Contribution menu at the top of the main window in C-Cast Administrator.
The Contribution window is displayed.
2. In the Contribution window, select the production you want to configure in the
production tree on the left.
The production parameters appear in the Production Configuration pane on the right.
3. Click
pane:
to bring the focus on the Resources area of the Production Configuration
How to Link Resources
To link resources to your production, proceed as follows:
1. In the Resources area of your production configuration, click
A table appears for the resources with a new row. The list of resources defined in the
Settings window is displayed in a drop-down field in the Name column.
2. Select the requested resource from the list:
3. Setting up and Managing Productions
53
EVS Broadcast Equipment SA
Issue 3.2.A - June 2015
The selected resource is added and a confirmation message is displayed in the top
right corner of the window.
The resource has been added to your production and it will be available in the setup wizard
of the C-Cast IPConnect application.
How to Remove a Resource
•
In the Resources area of your production configuration, click
corresponding to the resource you want to remove.
in the row
The resource is directly removed.
3.3.8.
Linking Keyword Grids
Introduction
If you want the publication items of your production to include keywords, you need to link
one or more keyword grids to your production.
When keywords are linked to media content upwards in a C-Cast workflow (for example in
clips created in IPDirector or in log feeds made available in C-Cast Publisher), a keyword
linked to the media content will only be imported into C-Cast if it matches a keyword of a
keyword grid associated to the production.
When keywords are not used upwards in the C-Cast workflow, you can associate
keywords to publication items in C-Cast Publisher: You will select the keywords from the
keywords grids linked to the production.
Keyword and keyword types can play an important role in the C-Cast workflow:
•
Keywords can be used as secondary criteria to filter the publication items made
available through a publication channel.
•
Keywords and their associated keyword types can be used as basis information to
automatically complete metadata fields with phrases.
•
Keywords and their associated keyword types can be used to display specific icons
when the media content is exposed to viewers.
Where to Link Keyword Grids
You link keyword grids to the selected production via the Keyword Grids parameters that
you can reach as follows:
1. Select the Contribution menu at the top of the main window in C-Cast Administrator.
54
3. Setting up and Managing Productions
USER MANUAL C-Cast Administrator 3.2
The Contribution window is displayed.
2. In the Contribution window, select the production you want to configure in the
production tree on the left.
The production parameters appear in the Production Configuration pane on the right.
3. Click
to bring the focus on the Keyword Grids area of the Production
Configuration pane:
How to Link a Keyword Grid
To link a keyword grid to your production, proceed as follows:
1. In the Keyword Grids area of your production configuration, click
A table appears for the keyword grids with a new row. The list of keyword grids defined
in the Settings window is displayed in a drop-down field in the Name column.
2. Select the requested keyword grid from the list:
The selected keyword grid is added and a confirmation message is displayed in the top
right corner of the window.
How to Remove a Keyword Grid
•
In the Keyword Grid area of your production configuration, click
corresponding to the keyword grid you want to remove.
in the row
The keyword grid is directly removed.
3. Setting up and Managing Productions
55
EVS Broadcast Equipment SA
3.3.9.
Issue 3.2.A - June 2015
Associating Log Feeds
Introduction
You can import keyword and metadata information from a log to a publication item in CCast Publisher. To this end, you need to reference in this section the log feed you want to
work with in C-Cast Publisher. You can reference more than one log feed in the production
configuration.
A log pane with the logs data will be displayed in C-Cast Publisher only when a log feed is
referenced in the production configuration.
Warnings
•
The log feed path must be defined in https://
•
The following parameters must be included in the header of the server response when
the server delivers the log feeds:
◦
Access-Control-Allow-Credentials: true
◦
Access-Control-Allow-Origin: https://my.c-cast.tv
Where to Associate a Log Feed
You associate a log feed to the selected production via the Log Feeds parameters that you
can reach as follows:
1. Select the Contribution menu at the top of the main window in C-Cast Administrator.
The Contribution window is displayed.
2. In the Contribution window, select the production you want to configure in the
production tree on the left.
The production parameters appear in the Production Configuration pane on the right.
3. Click
pane:
to bring the focus on the Log Feeds area of the Production Configuration
How to Associate a Log Feed
To associate a log feed to your production, proceed as follows:
1. In the Log Feed area of your production configuration, click
.
A table appears with a new row.
56
3. Setting up and Managing Productions
USER MANUAL C-Cast Administrator 3.2
2. In the Path field, type the full https:// path to the .json file used as the log feed:
3. If you want the log information to be automatically updated in the log pane of C-Cast
Publisher, select the Auto Refresh check box for the log feed.
The reference to the log feed is added to your production and a confirmation message is
displayed in the top right corner of the window.
When Publisher operators will use C-Cast Publisher, they will see the log feed in the
Publisher user interface, and will be able to import keywords and metadata from a log to a
publication item.
How to Dissociate a Log Feed
•
In the Log Feed area of your production configuration, click
corresponding to the log feed you want to dissociate.
in the row
The log feed is directly removed. Next time a Publisher operator will work in C-Cast
Publisher, the log feed will no longer be available.
3.3.10. Viewing Channels
Introduction
In the production configuration, you can view the channels through which the publication
items of the production will be delivered to viewers and/or partners:
From there, you can open the Edit Channel window of a given channel and change the
channel configuration.
See section "Role of Channels and Channel Groups" on page 61 for a detailed description
of channels and their roles.
3. Setting up and Managing Productions
57
EVS Broadcast Equipment SA
Issue 3.2.A - June 2015
Channels Area
The Channels area lists the channels in which the production is included, and provides the
following information:
Field Name
Description
Name
Name of the channel
Shortcode
Shortcode of the channel
Criteria
Keywords associated to the channel to filter the publication items to be
published through the channel.
Action
Opens the Edit Channel window for this channel, and allows the user to
change the channel configuration.
3.3.11. Viewing Channel Groups
Introduction
In the production configuration, you can view the channel groups in which the production is
included:
From there, you can open the Channel Groups pane in the Distribution window where you
edit the channels group.
See section "Role of Channels and Channel Groups" on page 61 for a detailed description
of channels and their roles.
58
3. Setting up and Managing Productions
USER MANUAL C-Cast Administrator 3.2
Channels Group Area
The Channels Group area lists the channel groups in which the production is included, and
provides the following information:
Field Name
Description
Name
Name of the channels group.
Description
Description of the channels group.
Herited from Parent folder associated to the channels group and included into the
Action
Opens the Channels Group pane for the given channels group. From this
pane, you can select groups of productions, stored in a folder, which will
all be published in this channels group.
3. Setting up and Managing Productions
59
EVS Broadcast Equipment SA
Issue 3.2.A - June 2015
4.
Setting up Media Distribution
4.1.
Overview of the Configuration for
Media Distribution
The parameters for the media distribution are configured in C-Cast Administrator, in the
Distribution menu:
The following elements need to be configured for the media distribution in a C-Cast
workflow:
•
Which media content has to be made available to the requested software platforms or
viewer categories.
The content to be made available is defined through Channels. The productions
available in the Channels must be specified in the Productions Groups configured in
the Channels Groups.
See section "Defining a New Channel" on page 74.
•
In which renditions the media content has to be made available to the requested
software platforms or viewer categories.
The renditions to be made available are defined via the Activities configured in the
Channels Groups.
See section "Defining a Distribution Workflow" on page 67.
•
Where the end-user applications will access the media content (renditions) published
on the C-Cast Central S3 storage.
The access path (URL) to the renditions is defined via the Deliveries configured in the
Channels Groups.
See section "Defining a Distribution Workflow" on page 67.
60
4. Setting up Media Distribution
USER MANUAL C-Cast Administrator 3.2
4.2.
Role of Channels and Channel
Groups
Role of Channels
A publication channel consists in an editorial selection of publications items grouped or
filtered on various criteria, that are distributed in a bundle to the viewers and/or partners.
The publication channel may be an ongoing sport event (e.g. A soccer game would be
published in one channel), or a topic based collection such as all publications relating to
one player, city, type of actions (e.g. goals), etc.
A publication item has to be included into and published in a publication channel to be
published to viewers and partners. This inclusion can be either automatic, based on rules,
or manual.
In C-Cast Administrator, administrators can associate one or more productions and/or
keyword sets to a publication channel. The publication items will be included in a
4. Setting up Media Distribution
61
EVS Broadcast Equipment SA
Issue 3.2.A - June 2015
publication channel based on these associations: The publication items belonging to at
least one production, and having at least one keyword in common with the criteria defined
in the publication channel will automatically be linked to this publication channel.
In C-Cast Publisher, the association to the publication channel is recomputed each time
the publication item is saved.
Role of Channel Groups
The publication channels groups provide a way to differentiate and/or group publication
channels: This might be needed for various reasons:
•
Technical reason: Same publication channels but different renditions (ex: iOS vs.
Android devices)
•
Content access rights: Different publication channels with different publication items
(ex: free vs. premium content, host broadcaster vs. partner content)
A publication channel group can include one or more publication channels.
A publication channel can be linked to one or more publication channel groups.
A publication channel group is made up of the following elements:
•
One or more workflows which define which activity (rendition) has to be generated
and made available through which delivery (URL) to the end-user application.
•
One or more production groups, which specify the productions you will be able to
assign to the publication channels.
To each publication channels group corresponds a publication channels API, that means
the .json files specifying all elements (channels, publication items, etc.) made available
within the C-Cast workflow.
62
4. Setting up Media Distribution
USER MANUAL C-Cast Administrator 3.2
4.3.
Setting up Channel Groups
4.3.1.
Description of the Channels Group Pane
Overview
The Channels Group pane contains the areas highlighted on the screenshot below:
4. Setting up Media Distribution
63
EVS Broadcast Equipment SA
Issue 3.2.A - June 2015
Area Description
The Settings window is made up of the following areas, which are described in details
below:
Part
Area Name
1.
Channel Group list
2.
Channel Group area
3.
Parameter icons
4.
Parameter areas
Channel Group List
The Channel Group list displays the list of channels groups. When you select a Channel
Group in the list, its parameters are displayed in the Channel Group pane on the right.
The button
opens the Create Channels Group window in
which you can create a new channel group that will be added to the list.
Channel Group Area
The Channel Group area displays the parameters of the channel group selected in the
Channel Group list.
The Channel Group area includes the areas 3 and 4 in the illustration.
Parameter Icons
The Parameter Icons allow you to easily navigate in the channel group parameters. The
channel group parameters are grouped in several sets of parameters.
Each icon corresponds to a set of parameters and allows users to jump to the
corresponding parameter area:
64
4. Setting up Media Distribution
USER MANUAL C-Cast Administrator 3.2
Icon
Parameter
Set
Details
Description
The channel group details are defined and editable only in the Edit
Channels Group window.
From the Details area, the
button will open
the Edit Channels Group window, and let you edit the channel
group details.
See section "Creating or Editing a Channels Group" on page 65.
Workflows
In the Workflow parameters, you specify which renditions will be
delivered (activities), and where they will be made available to
the customer applications (deliveries).
See section "Defining a Distribution Workflow" on page 67.
Production In the Production Group, you specify the productions or group of
Groups
productions to which the channels can be associated.
See section "Defining a Productions Group" on page 69.
Parameter Areas
The parameters related to a given aspect of the channel group configuration are grouped
into a parameter area. You can access the requested parameter area from the parameter
icons, or simply by scrolling the window.
See section "Parameter Icons" on page 64 for a short description of the parameters.
See section "Setting up Channel Groups" on page 63 and the section specific to each
parameter type for detailed information on how to set the various parameters.
4.3.2.
Creating or Editing a Channels Group
Introduction
The publication channels groups provide a way to differentiate and/or group publication
channels. The differentiation can hold, for example, in different software platform through
which the media will be distributed, or in different rights to access the media.
The channel group consists in a series of settings that specify the technical aspects of the
media distribution.
Once the channels group has been created, it cannot be removed.
Prerequisites
Before you create your channel groups in C-Cast Administrator, you need to make sure
that all the General and Distribution settings have been configured in the Settings window
("Setting up C-Cast Central" on page 7).
4. Setting up Media Distribution
65
EVS Broadcast Equipment SA
Issue 3.2.A - June 2015
How to Create a New Channels Group
To create a new channel group, proceed as follows:
1. In C-Cast Administrator, select the Disitribution menu.
The Distribution window opens.
2. In the Distribution window, select Channels Groups in the left pane.
The Channels Group pane opens in the Distribution window.
3. Click the icon
.
The Create Channels Group window opens:
4. Type a name and description for the Channels Group in the corresponding fields.
The name does not have to be unique.
5. Type an access key.
The string you type will be used to generate the access key made up of a prefix
(randomly assigned) followed by the string you have typed.
Once generated, the access key will not be editable.
6. Click Update.
A new Channels Group is available in the Channels Group list.
When you select it, the Channels Group parameters are displayed on the right.
In the Details area, you can see that the path to the .json publication channels API
includes the generated access key.
How to Edit a Channels Group
To edit a channels group, proceed as follows:
1. In C-Cast Administrator, select the Disitribution menu.
The Distribution window opens.
2. In the Distribution window, select Channels Groups in the left pane.
The Channels Group pane opens in the Distribution window.
3. Select the channels group you want to edit in the Channels Group list.
66
4. Setting up Media Distribution
USER MANUAL C-Cast Administrator 3.2
The parameters associated to the channels group are displayed in the Channels Group
area on the right.
4. In the Channels Group area, click the icon
.
The Create Channels Group window opens:
5. Modify the name and/or description.
The access key is not modifiable.
6. Click Update.
The Channels group details have been updated.
4.3.3.
Defining a Distribution Workflow
Introduction
Defining the distribution workflow consists in defining the following elements:
•
In which renditions the media content published through the channels group will be
delivered. This corresponds to a selection of Activities predefined in the Settings
window.
•
Where each rendition will be made available to the customer application. This
corresponds to the selection of one or more Deliveries per activity. The deliveries
have also been predefined in the Settings window.
Usually, you will have to define at least one workflow for the mezzanine files, one for the
output files and one for the thumbnails.
Where to Define the Distribution Workflow
You define the distribution workflow for a given channels group via the Workflows
parameters that you can reach as follows:
1. In the Distribution window, select Channels Groups on the left pane, and select the
channels group for which you want to define a workflow in the Channels Group list in
the central pane.
The Channels Group parameters appear in the Channels Group area on the right.
4. Setting up Media Distribution
67
EVS Broadcast Equipment SA
2. Click
Issue 3.2.A - June 2015
to bring the focus on the Workflows area of the Channels Group area:
How to Define a Workflow
To define a workflow, proceed as follows:
1. In the Workflows area of the selected channels group, click
A table appears with a new row to define the workflows.
2. In the Activities column, click the field and select an activity from the list. You can
limit the items listed by typing a text string to be included in the activity name:
The selected activity is added.
3. In the Deliveries column, click the field and select a delivery from the list. You can
limit the items listed by typing a text string to be included in the delivery name:
The selected delivery is added:
You can add other deliveries by selecting new ones from the field, and/or remove
deliveries by selecting the cross in front of the delivery name.
4. Click
to save the record.
The workflow is added to your channels group. From now on, the new publication items
published via the channels linked to the channels group will be published following the
defined workflow.
A warning message displayed when you save the record draws your attention to the fact
that the new workflow will not be applied to existing video assets included in existing
publication items. In other words, video assets for which the rendering process has
already been triggered will not processed again based on the new workflow.
68
4. Setting up Media Distribution
USER MANUAL C-Cast Administrator 3.2
How to Remove a Workflow
•
In the Workflow area of your channels group, click
the workflow you want to remove.
in the row corresponding to
The workflow is directly removed.
4.3.4.
Defining a Productions Group
Introduction
Defining a productions group consists in selecting the productions you will be able to link
to the publication channels when you will configure them.
Where to Define a Productions Group
You define the productions group for a given channels group via the Productions Groups
parameters that you can reach as follows:
1. In the Distribution window, select Channels Groups on the left pane, and select the
channels group for which you want to define a productions group in the Channels
Group list in the central pane.
The Channels Group parameters appear in the Channels Group area on the right.
2. Click
area:
to bring the focus on the Productions Groups area of the Channels Group
How to Define a Productions Group
To define a production group, proceed as follows:
1. In the Productions Group area of the selected channels group,
click
A window appears with the production tree.
2. In the production tree, select the production folder including the production(s) to be
made available in the configuration of the publication channels linked to the channels
group.
4. Setting up Media Distribution
69
EVS Broadcast Equipment SA
3. Click
Issue 3.2.A - June 2015
.
The name of the selected folder and its path are added in a row of a table.
4. Repeat step 3 for all production folders you want to add in the productions groups.
The productions included in the selected folder(s) and all sub-folders are available in the
configuration of the publication channels once the publication channels have been linked
to the channels group currently selected.
How to Remove a Productions Group
1. In the Productions Group area of the selected channels group, click
corresponding to the production groups you want to remove.
in the row
A configuration message appears.
2. Click OK to confirm the deletion.
The productions group is removed.
70
4. Setting up Media Distribution
USER MANUAL C-Cast Administrator 3.2
4.4.
Setting up Channels
4.4.1.
Channel Parameters
Channels Pane
Once you have selected Channels on the left of the Distribution window, the list of the
already defined channels appear in a table similar to the following one:
The table contains the main settings from the Create Channel or Edit Channel windows,
but not all of them.
Create/Edit Channel Window
You will create and edit publication channels in the Create Channel and Edit Channel
windows accessible from the Channels pane.
See section "Managing Publication Channels" on page 76 for more information on how to
add, edit or remove a channel.
This section details the settings of Create/Edit Channel window:
4. Setting up Media Distribution
71
EVS Broadcast Equipment SA
Issue 3.2.A - June 2015
Field Description
Name
This is the name of the publication channel. It could be named based on the keywords
and/or channel groups included in the publication channel.
Description
This field describes the publication channel. As it is available from the Channels pane, use
this field to give users a quick access to the main information on the channel
configuration, without requiring to open the publication channel.
Shortcode
This is the code used in the C-Cast database and in the publication API to refer to the
publication channel for the distribution workflow.
A shortcode can only contain alphanumerical characters (a - z;0 - 9, as well as hyphen and underscore _ ). Uppercases are converted to lowercase.
A shortcode cannot be longer than 20 characters, and cannot contain special characters
such as o \, <, >, %, $, *, #, ‘,(espace), (, ), ", [, ], /, {, }, @.
The application will prevent you from using unsupported characters.
Start Date
This is the date from which the publication channel is active. This date is for information's
72
4. Setting up Media Distribution
USER MANUAL C-Cast Administrator 3.2
sake, and is meant to inform customers that relevant content will be made available
through the given publication channel in the timeframe between the start and end date.
End Date
This is the date up to which the publication channel is active. This date is for information's
sake, and is meant to inform customers that relevant content will be made available
through the given publication channel in the timeframe between the start and end date.
Channels Groups
The Channels Groups field allows users to select the channels groups based on which
the publication items (and linked video assets) associated to the channel will be
published. You can select several channels groups.
If you select iPad as a channels group for the publication channel Match DE-NL
dedicated to a given football match, all media content that will be published through the
channel Match DE-NL will be processed and delivered as defined in the channels group
iPad.
Productions
The Productions field allows users to select from which production(s) the media content
will be published through the publication channel. You can select several productions.
The productions available are restricted to the ones selected as you configured the abovespecified channels group.
If you select the production Match DE-NL related to a given football match for the
publication channel Match DE-NL, the media content that will be set to Publish in this
production in the future will be published via the publication channel Match DE-NL.
Keywords
The Keywords field allows users to limit the publication items of the above-mentioned
productions taken into account to be published via the publication channel. You can select
several keywords.
If you select the Goal keywords for the publication channel Goals, and you have selected
the productions Match DE-NL, Match DE-IT, Match NL-PT, only the publication items
with the Goal keyword in the three specified productions will be published to the
publication channel Goals.
If several keywords are specified, the publication items with at least one of the keywords
specified are published via the publication channel.
4. Setting up Media Distribution
73
EVS Broadcast Equipment SA
4.4.2.
Issue 3.2.A - June 2015
Defining a New Channel
Introduction
The publication channel provides a way to group and filter publications items on various
criteria to distribute them in a bundle to the viewers and/or partners.
Prerequisite(s)
Before you define a publication channel, you need to have properly configured the
channels group you want to link to your publication channel.
How to Define a New Channel
As you will define a new channel, you can refer to the section "Channel Parameters" on
page 71 for a detailed description of the fields you will fill in.
To define a new publication channel, proceed as follows:
1. In C-Cast Administrator, select Distribution in the toolbar, then select Channels in
the left pane of the Distribution menu.
The Channels pane appears on the right with the list of existing channels.
2. Click
located at the top of the Channels pane.
The Create Channel window opens:
74
4. Setting up Media Distribution
USER MANUAL C-Cast Administrator 3.2
3. In the Name and Description fields, type respectively a name and description for the
publication channel.
4. In the Shortcode field, type a shortcode for the publication channel.
A shortcode can only contain alphanumerical characters (a - z;0 - 9, as well as hyphen
- and underscore _ ). Uppercases are converted to lowercase.A shortcode cannot be
longer than 20 characters, and cannot contain special characters such as o \, <, >, %,
$, *, #, ‘,(espace), (, ), ", [, ], /, {, }, @.The application will prevent you from using
unsupported characters.
5. In the Start Date and End Date fields, type the time frame during which media content
will be published to the publication channel. This information is for information
purpose.
6. Click the Channels Groups field and select one or more channels groups from the
list.
The media content published through the publication channel will be published with the
settings defined in the associated channel groups.
7. Click the Productions field and select one or more productions from the list.
The media content of the associated productions can be published via the publication
channel in given conditions specified in the Results section below.
8. If you want to filter, based on keywords, the media content to be made avialable via
the publication channel, do the following:
a. Click
.
A Keyword field appears.
b. In the Keyword field, select the keyword that should be contained in the
publication items for them to be published in the publication channel.
c. Repeat the steps a and b for all keywords you want to define as filter criteria.
9. Click
to save the defined publication channel.
Results
The publication items of the selected production(s) will effectively be published through
this publication channel in the following conditions:
•
They have been set to Publish in the C-Cast workflow.
•
They include at least one video assets also set to Publish.
•
They are not excluded due to the Keywords filter defined.
When you select several keywords as criteria, the publication items will be published
through the channel if they include at least one of the selected keywords.
The publication items published through this publication channel will be published with the
settings defined in the selected channels groups.
4. Setting up Media Distribution
75
EVS Broadcast Equipment SA
4.4.3.
Issue 3.2.A - June 2015
Managing Publication Channels
The publication channels can be managed from the Channels pane that appears when you
select Channels on the left pane in the Distribution window.
How to Search for a Channel
When many channels are defined, you can search for a channel based on its name or
shortcode, or part of it.
1. In the Channels pane in the Distribution window, enter the text you are searching for in
and press Enter.
The list of channels is automatically updated to include only the channels whose name or
shortcode include the string you have searched for.
To remove the filter, delete the text in the Search field and press Enter.
How to Edit a Channel
2. In the Channels pane in the Distribution window, click the Edit icon
the channel you want to edit.
in the row of
The Edit Channel window is displayed.
3. Edit the field values and click Update.
The channel configuration has been modified as requested.
How to Delete a Single Channel
1. In the Channels pane in the Distribution window, click the Delete icon
of the channel you want to delete.
in the row
A dialog box asking for confirmation is displayed.
2. Click the Delete button in the dialog box.
The channel is deleted from the list.
How to Delete Several Channels
1. In the Channels pane in the Distribution window, select the check boxes in front
channels you want to remove.
The check box in front of the row is selected, and the row is highlighted in blue.
2. Click the Delete button on the top of the Channels list.
A dialog box asking for confirmation is displayed.
3. Click the Delete button in the dialog box.
The channels are deleted from the list.
76
4. Setting up Media Distribution
USER MANUAL C-Cast Administrator 3.2
5.
Monitoring Transfers
5.1.
Overview of the Monitoring Window
Introduction
To access the Monitoring window from the main C-Cast Administrator window, select the
Monitoring menu in the toolbar. This opens the Monitoring window in a separate tab of
your browser.
From the Monitoring window, you can monitor all transfers from C-Cast Agents to
contribution destinations.
The Monitoring window contains the areas highlighted on the screenshot below:
5. Monitoring Transfers
77
EVS Broadcast Equipment SA
Issue 3.2.A - June 2015
The Monitoring window is made up of the following areas, which are described in details
below:
Part
Area Name
1.
Title bar
2.
Production tree
3.
Filter and Display options
4.
Monitoring grid
5.
Navigation buttons
Title Bar (1)
The Title bar gives access, via the Name menu on the right, to your profile settings, and
allows you to log out.
Production Tree (2)
The left window pane corresponds to the production tree. It features an expandable tree
structure listing all the productions (visible or hidden).
In the Production tree, click the check boxes corresponding to the productions you want to
monitor. When a production is selected, it appears on a blue background:
From this pane, the following commands are available:
Button
Select this button to ...
deselect all the productions selected in the tree view.
To select all productions, select the Root element.
filter the productions displayed in the tree view:
• When the left button is selected, only visible productions are
displayed in the tree.
• When the right button is selected, only hidden productions are
displayed in the tree.
• When both buttons are selected or no button is selected, all
productions are displayed.
The tree folders are always displayed even if they do not contain a
production for which the filter is active.
78
5. Monitoring Transfers
USER MANUAL C-Cast Administrator 3.2
Filter and Display Options (3)
The filter options, on the left, allow you to filter the monitored transfers based on their
status, and to hide the system jobs:
Button
Select this button to ...
display the transfer jobs in progress.
display the transfer jobs scheduled.
display the transfer jobs failed.
display the transfer jobs successful.
display the transfer jobs canceled.
display the system jobs.
See section "Filtering Monitoring Information" on page 80 for more information on how to
filter the monitored information.
The Display options are accessible through the Column's Options button. It opens the
list of all fields you can display in the result grid. In the list, By selecting the eye icon in the
Visibility column, you can display or hide the corresponding column in the result grid.
See section "Adapting the Monitoring Grid Display" on page 80
Monitoring Grid (4)
It shows the transfers performed by C-Cast Agent in the selected productions.
The results are filtered based on the filter options.
The results are displayed as specified in the display options.
Navigation Buttons (5)
The Navigation buttons allow you to navigate in the result pages:
Button
Description
Drop-down field to select the number of
items to be displayed on a page.
Buttons to jump to the first, previous,
next, last or specific page (1, 2, etc.).
Field that displays the total number of
items returned with the filters applied.
5. Monitoring Transfers
79
EVS Broadcast Equipment SA
5.2.
Issue 3.2.A - June 2015
Filtering Monitoring Information
Prerequisite
To access the Monitoring window from the main C-Cast Administrator window, select the
Monitoring menu in the toolbar. This opens the Monitoring window in a separate tab of
your browser.
How to Filter Monitoring Information
All the elements you can select to filter the monitoring information are displayed on a blue
background once they are selected.
You can activate one of more of the following options to filter the monitoring information:
•
(Compulsory) Select the production(s) you want to monitor in the Production tree on
the left.
•
(Optional) You can select the status of the transfers you want to monitor at the top of
the Monitoring grid via the Status buttons
•
5.3.
(Optional) You can select
video extraction for C-Cast Publisher).
.
to show the system jobs (thumbwall or
Adapting the Monitoring Grid Display
Introduction
You can modify the information displayed in the monitoring grid, and the way it is
displayed:
•
Display or hide columns
•
Change the column position
•
Sort the monitoring information
How to Hide one Column
1. In the Monitoring grid, click the down arrow next to the column heading:
This displays commands you can apply on the columns:
80
5. Monitoring Transfers
USER MANUAL C-Cast Administrator 3.2
2. Select the Hide Column command.
How to Display or Hide Columns
1. In the Monitoring grid, click
.
The Column's Options window opens. It lists all the columns that can be displayed in
the grid
2. Do one of the following:
◦
To display an hidden column, click
◦
To hide a displayed column, click
next to the requested column.
next to the requested column.
3. When you have selected the display or hide option for the requested columns, click
Update to validate the changes and come back to the Monitoring window where the
grid display has been updated.
How to Change the Column Position
1. In the Monitoring grid, click the down arrow next to the column heading:
This displays commands you can apply on the columns.
2. Select one of the following commands:
◦
Pin Left to move the column one position to the left
◦
Pin Right to move the column one position to the right
3. Repeat step 2 until the column has the requested position.
4. Repeat steps 1 to 3 for all columns you want to move.
5. Monitoring Transfers
81
EVS Broadcast Equipment SA
Issue 3.2.A - June 2015
How to Sort the Monitoring Information
You can sort the monitoring information based on the Received Date, State or Priority as
follows:
•
82
In the Monitoring grid, click the heading of the columns on which you want to sort the
jobs.
5. Monitoring Transfers
Corporate
+32 4 361 7000
North & Latin America
+1 973 575 7811
EVS Headquarters
Liège Science Park
13, rue Bois St Jean
B-4102 Seraing
Belgium
To learn more about EVS go to www.evs.com
Asia & Pacific
+852 2914 2501
Other regional offices
www.evs.com/contact
EVS Broadcast Equipment is continuously adapting and improving its products in accordance with the ever changing
requirements of the Broadcast Industry.
The data contained herein is therefore subject to change without prior notice. Companies and product names are
trademarks or registered trademarks of their respective companies.