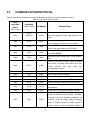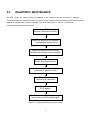
1
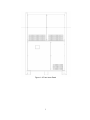
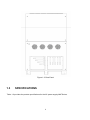
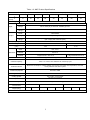
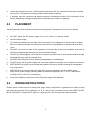
Intepro Systems
AMF SERIES
AC Power Supply
User Manual
©2015 All rights reserved by Intepro Systems
Version 1
Version History
Version
No.
V1.0
Release
date
3-2015
Writer
Description
Rev 1
Hardware
version applied
Intepro Systems provides a full range of technical support for our customers. Customers can
contact our offices or customer service centers nearby, or our headquarters. All rights reserved.
This manual is subject to change without notice.
Safety Precautions
Danger
Beware o f the high temperature of this equipment. DO NOT open the chassis without
technician present or authorization from Intepro Systems.
• When the AMF needs to be moved or rewired, please shut down the instrument completely
by disconnecting the input power lines and wait at least 20 minutes for the capacitors in the
instrument to discharge to prevent electric shock.
•
In order to ensure the personal safety of users, this series of power products must be grounded
before use.
• In case of fire, please use dry powder fire extinguishers instead of liquid fire extinguishers
to avoid the risk of electric shock.
•
Liquid or other foreign objects must not be allowed to enter the cabinet of the grid simulator.
Attention
The application environment and storage methods affect the service life and reliability of the
product. Extended use in the following conditions should be avoided:
• Ambient high or low temperatures or humidity beyond technical specifications (temperature:
-20℃to 40℃; relative humidity: 5% to 95%);
•
In direct sunlight or exposed to heat sources;
•
Places susceptible to vibration or collision;
•
Environments with dust, corrosive substances, salt and combustible gases;
Keep the air inlets and outlets unblocked to promote ventilation to avoid a rise in the internal temperature, which
may shorten the service life of components, and affect the service life of the product;
Grid simulators not in service for a long time should be stored in a dry environment. The temperature
range for storage is -40℃to 70℃.
To properly protect the equipment, only the personnel of Intepro Systems are allowed to open the
front door or side cover. If the quality assurance seal is broken, required services will incur charges
and guaranty is void.
Danger: conditions that may cause serious equipment damages or human casualties.
Attention: Conditions that may cause moderate injuries or damages to equipment.
Content
Safety Notice ..............................................................................................................i
Content ....................................................................................................................ii
List of Figures ................................................................................................... iii
List of Tables...................................................................................................... iii
1
General Description...........................................................................................1
1.1 Introduction................................................................................................ 1
1.2 Product Illustration.................. ...................................................................1
1.3 Specifications............................................................................................. 4
1.4 System Function Frame ........... ................................................................ 6
2
3
Installation........................................................................................................ 7
2.1
Introduction............................................................................................... 7
2.2
Unpacking ................................................................................................ 7
2.3
Placement ....... .........................................................................................8
2.4
Wiring Instructions..................................................................................... 8
Operation ...................................................................................................... 10
3.1
Introduction ........................................................................................... 10
3.2
Controls and Indicators ......................................................................... 10
3.3
Manual Operation ..................................................................................11
3.4
4
5
6
3.3.1
Set parameters .......................................................................... 12
3.3.2
Save Parameters ....................................................................... 13
3.3.3
Load Parameters .......................................................................14
Remote Operation ...................................................................................14
Communication ... ........................................................................................ 17
4.1
Introduction ............................................................................................ 17
4.2
Communication Connection ...................................................................17
4.3
Commuication Protocol ..........................................................................18
4.4
Protocol Command ..........................................................................19
Maintenance .................................................................................................. 20
5.1
Introduction ............................................................................................ 20
5.2
Visual Inspection of System .................................................................. 20
5.3
Fan Maintenance ................................................................................... 20
5.4
Quarterly Maintenance .......................................................................... 21
Troubleshooting ............................................................................................ 22
7 After-Sales Service ............................................................................................23
Warranty Card ...........................................................................................................25
ii
LIST OF FIGURES
Figure 1–1 Overview and Dimension ........................................................... 2
Figure 1–2 Front Inner Panel ....................................................................... 3
Figure 1–3 Rear Panel ................................................................................ 4
Figure 1–4 System Function Frame............................................................. 6
Figure 2–1 Input Terminals .......................................................................... 1
Figure 2–2 Output Terminals ....................................................................... 1
Figure 3–1 Front Panel.............................................................................. 10
Figure 3–2 Function Key ........................................................................... 10
Figure 3–3 Manual Operation Flow Chart ...................................................11
Figure 3–4 Standby Interface via Manual Mode ......................................... 12
Figure 3–5 Running display via Manual Mode ........................................... 13
Figure 3–6 Save/Load Parameters via Manual Mode ................................ 13
Figure 3–7 Set Communication Type ......................................................... 14
Figure 3–8 Standby Display via Remote Mode (RS232) ............................ 15
Figure 3–9 Running Display via Remote Mode (RS232) ............................ 15
Figure 3–10 Setting Display via Remote Mode (RS485) ............................ 16
Figure 3–11 Running Display via Remote Mode (RS485) .......................... 16
Figure 4–1 RS-232/485 Connector ............................................................ 17
Figure 5–1 Quarterly Maintenance Flow Chart .......................................... 21
LIST OF TABLES
Table 1-1 Cabinet Size ................................................................................ 1
Table 1-2 AMF Product Specification ........................................................... 4
Table 4-1 Pin Function ............................................................................... 17
Table 4-2 Communication Protocol ............................................................ 18
Table 6-1 Fault Code Indication ................................................................. 22
Table 6-2 Troubleshooting ......................................................................... 22
iii
1. GENERAL DESCRIPTION
1.1
INTRODUCTION
The Intepro Systems AMF Series is a new type of programmable AC Power simulation and frequency
conversion power supply. It not only offers continuous, pure, and steady sinusoid voltage, but also is
convenient to operate from the front panel keypad or remote interfaces. The interior circuit detects faults
and protects the power supply by sounding an alert and automatically discontinuing output power. The
AMF Series also includes laminated bus-bar technology which not only simplifies the process and cost of
production, but also improves product reliability. The AMF Series includes these features:
•
Programmable output via keyboard setting with LCD display
•
RS-232/RS-485 and GPIB interface
•
Laminated bus-bar technology reduces induction and improves reliability
•
Individual air channel
•
Full protection
•
Intelligent self-diagnosis
•
User-friendly design
1.2.
PRODUCT ILLUSTRATION
An overview of the AMF Series (Model 33075) AC power supply is depicted in Figure 1-1 and shows
the dimensions and the appearance; the input breaker is located on the front inner panel as shown in
Figure 1-2; the rear panel with input and output connections is shown in Figure 1-3. Instrument
cabinet dimensions are shown in Table 1-1
Table 1-1 Cabinet Sizes
SIZE
mm (Width x Depth x Height) / inches
CABINET
430 x 750 x 990 / 16.93 x 29.53 x 38.98
3
4
600 x 970 x 1240 / 23.62 x 38.20 x 48.82
5
800 x 1090 x 1600 / 31.50 x 42.91 x 63.00
1
Figure 1–1 Overview and Dimensions
2
Figure 1–2 Front Inner Panel
3
Figure 1–3 Rear Panel
1.3
SPECIFICATIONS
Table 1-2 provides the product specifications for the AC power supply AMF Series.
4
Table 1-2 AMF Product Specifications
400 Hz Solid State Frequency Converter Three Phase Input - Three Phase Output (6 -75kVA)
AMF Model
33006
33010
33015
33020
33030
33045
33060
33075
8
10
15
20
30
45
60
75
Power
(kVA)
Circuit Type
Input
Output
IGBT / PWMT
Phase
Three Phase
Voltage
3W+G: 220V (G) or 3W+N+G: 220/380 (T) ±15%
Frequency
Range
50Hz+-3Hz or 60Hz+-3Hz
Phase
Three Phase
Voltage
200V / 115V Output Voltage ±10 Adjustable
Frequency
Range
2-Step Output Frequency: 400Hz Fixed, 350Hz - 450Hz Adjustable
(Can comply with customer specs)
≤±0.01%
Frequency Regulation
Load Regulation
≤-1%
<±1.5%
Total Harmonic Distortion
(THD)
≤ 2%
≤ 3%
Meter/Res
4 digit freq
meter
4 digit
voltmeter
Digit
Ammeter
Res. 0.1Hz
Res 0.1V
4 Digit Ammeter / Res. 0.1A
5 Digit Ammeter/ Res 0.1A
Phase Shift
Balanced Load / Empty Load: ≤±2 Deg; 100% Unbalanced Load ≤±4 Deg
Overload Capacity
120% / 1hr 150%/1 min 200%/15 sec. 25% duty cycle
Protection Device
Electronic circuit trip for over/low voltage, over current, over load, over temperature, and short
circuit protection and alarm system
Insulation Equipment
≥DC500V 20MΩ
Voltage Insulation
AC 1800V 5mA/1 Min
Cooling System
Fan Cooling, Front to Rear
-20 Deg C to 45 Deg C
Temperature
0 to 90% (Non-condensing)
Humidity
Weight (lb/kg)
4
3
Case Number
331/150
386/175
585/265
761/345
5
849/385
Consult factory for power levels above 800kVA
5
1164/528
1400/635
1544/700
1.4
SYSTEM FUNCTION FRAME
Figure 1-4 briefly shows the system function of the AMF Series. The input power source passes
through the “Rectifier”, converting AC to DC, then the “Inverter” converts DC to AC and into
the insulated inductance. Lastly, the “Output Unit” passes the converted AC power to the load.
The “Inverter” unit is controlled by “Driver Circuit” from “PWM Circuit”. The “Voltage Feedback”
monitors and stabilizes the output voltage. The “Protection” monitors the error signal of the
instrument and controls whether to sound an alert. Sampled voltage, frequency, and current are
shown on the LCD display via Output Unit.
Input
Rectifier
(SCR)
Input Unit
Output
Insulated
Inverter
Output Unit
V, Hz, A
Display
Driver Circuit
Voltage
Feedback
PWM
Circuit
Over-Loading
Detection
Alarm
Protection
and
Control
Circuit
Over-Temperature
Detection
Soft-Start
Fuse Break Detection
Figure 1–4 System Function Frame
6
Output
2. INSTALLATION
2.1
INTRODUCTION
The AMF Series instrument has been configured, calibrated and tested prior to shipment. Therefore, the
instrument is ready for immediate use upon receipt. The following initial physical inspections should be
conducted to ensure that no damage has been sustained by the instrument during shipment.
WARNING
Hazardous voltages are present when operating this equipment. Read the “SAFETY NOTICE”
on page 1 before performing INSTALLATION, OPERATION, or MAINTENANCE.
The following topics should be thoroughly understood before making connections or applying AC
input power.
CAUTION
Do not apply AC input voltage to this instrument nor connect any load(s) without first verifying
correct input line voltage and output wiring configuration. This instrument and any external loads
or cables may be damaged by improper voltage settings, cable miss-wiring, etc.
2.2
UNPACKING
The instrument has been packed in accordance with industry standards for safe shipment. Upon receipt
of the unit, unpack and inspect the unit as follows:
a.
Inspect the shipping container prior to accepting the container from the carrier. If damage to the
container is evident, a description of the damage shall be noted on the carrier’s receipt, and signed
by the carrier’s agent.
b.
Be cautious of instrument falling or sliding while unwrapping.
c.
Inspect the instrument for any kind of damage that may have occurred during transportation.
d.
If damaged, forward a report of any damage to Intepro Systems immediately before use.
7
e.
Check the packing list to see if all accessories that came with the instrument have been received
and correct. If any parts are missing, please contact Intepro Systems.
f.
If possible, save the container and packing material for subsequent return of the instrument to the
factory. Repacking is straight-forward and is essentially the reverse of unpacking.
2.3
PLACEMENT
Correct placement of the instrument ensures normal operation. Placement of the unit is as follows:
a.
DO NOT place the AC power supply unit on an uneven or sloping surface.
b.
AVOID outdoor usage.
c.
The distance between the rear side of the instrument to any appliance or wall should be at least
80cm; the distance between the sides of the instrument to any appliance or wall should be at least
d.
10cm.
DO NOT cover the front side of the equipment. Covering may cause poor ventilation and result in
internal overheating and shortening of the instrument life-span.
e.
DO NOT put heavy objects, tools and other sundries on power lines so as to avoid insulation sheath
breakage that may result in personal injury.
f.
DO NOT place the power lines in between passageways to avoid danger.
g.
DO NOT place the AC power supply unit in an area exposed to sunlight, rain or a damp environment.
h.
KEEP AWAY from ignition sources and heat radiation sources to avoid increasing the temperature
of the equipment.
i.
j.
KEEP AWAY from environments with high dust, corrosive materials, salt and volatile gases
Keep the AC power supply operating within an ambient temperature of 0℃ to 45℃ and relative
humidity of 0% to 95% (non-condensing).
k.
2.4
Keep the installation environment of the AC power supply well-ventilated
WIRING INSTRUCTIONS
Please ensure correct input line voltage and output wiring configuration to guarantee the safety of both
the instrument and the user’s appliances. A, B, C, and N lines correspond to the colors RED, WHITE,
BLUE, and BLACK. Please refer to Figure 2-1 and Figure 2-2 for the input and output terminals.
8
Figure 2–1 Input Terminals
Figure 2–2 Output Terminals
DO NOT install while the instrument is in "ON" status. For long distance wiring, please consider
voltage drop. Wiring instructions are as follows:
a.
Confirm the diameter of cables
b.
Use voltmeter to confirm input line voltage
c.
Confirm that all breakers of the instrument are in "OFF" state
d.
Connect input cable lines to the corresponding input terminals of the equipment. Output wiring
should be connected to the corresponding output terminals of the equipment.
9
3.OPERATION
3.1
INTRODUCTION
Before operating the power source, the user must become familiar with the particular model
and its configuration.
3.2
CONTROLS AND INDICATORS
IntePro Systems
Figure 3–1 Front Panel
Figure 3–2 Function Key
[ESC] -To cancel (delete); used for editing parameters
[RESET] - To reset after instrument is turned on or stopped because of a fault. Button will be void if
fault is not relieved
[RUN] - To output power according to saved parameters
[STOP] - To stop outputting power
[SAVE] - To save parameters for further use
[LOAD/REM] - To recall saved parameter / To enable remote control press [SHIFT] and this function key.
[SHIFT] - To modify the function keys with double functions
[PROG.] - To switch between different parameter-setting interfaces
[UP] - To move the cursor upward
[DOWN] - To move the cursor downward
[LEFT/RANGE] - To move the cursor to the left / To choose output level range to be fixed Auto or
High voltage press this function key after pressing [SHIFT]
10
[RIGHT/LOCK] - To move the cursor to the right / To lock or unlock the function keys press [SHIFT]
and this function key. The function keys will be secured by a set password
[NUMBER KEY] -To set parameters from 0 to 9 with decimal system
[ENTER] -To confirm a set parameter
The LCD will go into energy saving mode after an idle time of one minute. Press any key to leave energy
saving mode.
3.3
MANUAL OPERATION
After the power source has been installed in accordance with the instructions in 2.INSTALLATION,
the power source can be manually adjusted to the desired value using configuration parameters on
the front panel. The following topics provide better comprehension of the equipment’s manual
operation. Topics are arranged as follows:
3.1.1. SET PARAMETERS
3.1.2. SAVE PARAMETERS
3.1.3. LOAD PARAMETERS
Figure 3-3 is a simple flow chart of the operation referenced above.
Figure 3–3 Manual Operation Flow Chart
11
3.3.1
SET PARAMETERS
After turning on the input breaker, the power supply will be in standby mode, displaying real-time setting
value, output parameters, and the output level range of “High” or “Auto” setting as shown in Figure 3-4.
“Auto” is when the input voltage is higher than 132V. The instrument will choose high level voltage to
output which maximum output current is rated current. When the input voltage is lower than 132V, the
instrument will choose low level voltage to output which maximum output current is double the rated
current; “High” is when the voltage is between 5 and 264V, the instrument will chose high level voltage to
output which maximum output current is rated current.
Users may configure voltage and frequency during standby mode. Directions to configure output
parameters are listed as following:
a.
VOLTAGE SETTING: move cursor next to “Vol” and enter desired output voltage. Press [ESC] to
delete. After confirming, press [ENTER] key to finish setting.
b.
FREQUENCY SETTING: move cursor next to “Freq” and enter desired output frequency. Press
[ESC] to delete. After confirming, press [ENTER] key to finish setting.
c.
OUTPUT RANGE SETTING: System default is Auto. Press [SHIFT] then [LEFT/RANGE] to choose
between Auto or High
After setting the parameters, press [RUN] to start power output through the instrument as shown in Figure
3-5.
If voltage value cannot be set after pressing [ENTER], please check whether the value is beyond the
system limit.
Set
Vol :220.0 V
Set
Freq:50.0
V (V)
I (A)
Ip (A)
A
0.00
0.00
0.00
B
0.00
0.00
0.00
C
0.00
0.00
0.00
Freq : 0.0
Stop
Hz
Auto High
Figure 3–4 Standby Interface via Manual Mode
12
Hz
Set
Vol :220.0 V
Set
Freq:60.0
V (V)
I (A)
Ip (A)
A
220.0
10.0
14.1
B
220.0
10.0
14.2
C
220.0
10.1
14.1
Freq: 60.0
Run
Hz
Hz
Auto High
Figure 3–5 Running display via Manual Mode
3.3.2
SAVE PARAMETERS
Parameters should be saved before pressing [RUN] or after pressing [STOP]. Directions to
save the parameters are as follows:
a.
After setting parameters, press [SAVE] then the display will switch to “Saved/Load Parameters” as
shown in Figure 3-6.
b.
Enter the desired number to save the parameters. Press [ENTER] key to finish saving and the
parameters will be saved in the group chosen.
c.
Press [PROG] key to return to standby interface as shown in Figure 3-4.
Please enter memory:02
No.
1
2
V(V)
128.0
220.0
Freq(Hz)
50.0
50.0
3
4
5
240.0
240.0
110.0
60.0
60.0
100.0
6
200.0
200.0
7
100.0
300.0
8
220.0
350.0
9
110.0
400.0
10
220.0
450.0
Figure 3–6 Save/Load Parameters via Manual Mode
13
3.3.3
LOAD PARAMETERS
Users can also recall saved parameters, as shown in Figure 3-6, by pressing [LOAD]. Directions to
load parameters are as follows:
a.
In Standby interface, press [LOAD] to switch to the list of saved parameters, Figure 3-6
b.
Enter the desired number and press [ENTER] to pull up corresponding saved parameters.
c.
Press [RUN] to start power output
3.4
REMOTE OPERATION
Remote operation enables users to set and operate the power supply via computer monitoring. Remote
mode is commonly actualized by RS-232, RS-485, and GPIB interfaces. Please configure the computer’s
address to 21 and baud rate to 9600Bps.
To set communication type, press [PROG.] to switch interface shown in Figure 3-7. Choose desired
communication type by pressing function keys 1, 2, 3, or 4, then the LCD display will switch to remote
control mode as shown in Figure 3-7. After connecting the instrument to the PC, users may directly
switch to Remote mode by pressing [SHIFT] then [ LOAD/REM ].
Comm.para.set
1. RS232
2 .RS4845
COM para :
9600 N. 8. 1
Local address 21
3. GPIB
4. WireLess (None)
Figure 3–7 Set Communication Type
14
Figure 3-8 and Figure 3-9 shows the LCD display while operating under Remote mode RS-232.
Figure 3-10 and Figure 3-11 shows the LCD display under Remote mode RS-485.
SHIFT
Remote………
21
Type
Addr
RS232 Func:
V (V)
I (A)
Ip (A)
A
0.00
0.00
0.00
B
C
0.00
0.00
0.00
0.00
0.00
0.00
Freq :
0.0
Hz
Figure 3–8 Standby Display via Remote Mode (RS232)
SHIFT
Remote………
21
Type
A
B
C
Addr
RS232 Func:
V (V)
I (A)
Ip (A)
220.0
220.1
220.2
0.00
0.00
0.00
0.00
0.00
0.00
Freq :
50.0 Hz
Figure 3–9 Running Display via Remote Mode (RS232)
15
SHIFT
Remote………
21
Type
Addr
RS485
Func:
Vol (V)
I(A)
Ip
A
0.00
0.00
0.00
B
C
0.00
0.00
0.00
0.00
0.00
0.00
Freq :
0.0
Hz
Figure 3–10 Setting Display via Remote Mode (RS485)
SHIFT
Remote………
21
Type
A
B
C
Addr
RS485
Func:
Vol (V)
I(A)
Ip
221.0
220.0
220.5
0.00
0.00
0.00
0.00
0.00
0.00
Freq :
50.0 Hz
Figure 3–11 Running Display via Remote Mode (RS485)
The function keys on the front panel will be disabled during Remote mode. To disable Remote mode, first
stop the output power via the computer and then press [SHIFT] and [LOAD/REM]. The [STOP]
function key is disabled when in Remote mode.
16
4.COMMUNICATION
4.1
INTRODUCTION
Programming provides a more precise timing control over t h e output voltage and frequency changes.
This section addresses connecting the AC power supply to the computer enabling users to control the
instrument remotely.
4.2
COMMUNICATION CONNECTION
As shown in Figure 4-1, RS-485/232 share one communication port while RS232 uses 2,3, and 5(ground)
line of port DB9, and RS485 uses 4 and 6 line of port DB9. Table 4-1 shows corresponding pin functions.
J?
1
6
2
7
3
8
4
9
5
RS485A
RS485B
DGND
RS232T
RS232R
DB9
Figure 4–1 RS-232/485 Connector
Table 4-1 Pin Function
DB-2
RS232R
DB-3
RS232T
DB-4
RS485B
DB-5
DGND
DB-6
RS485A
17
4.3
COMMUNICATION PROTOCOL
Table 4-2 shows the explanation of each command according to its communication protocol.
Table 4-2 Communication Protocol
DATA
PACKAGE
HEAD
ADDRESS
(HEX format)
COMMAND
EXPLANATION
(HEX format)
0x40
0x15
(default)
Online command: online is successful when
0xDD
the host instrument sends 0xdd and receives
0xdd.
0x40
0x15
0xEE
0x40
0x15
0x0B
0x40
0x15
0xE5
0x40
0x15
0xE6
Resetting order: general function resets when
the accessorial instrument receives 0xee.
Writing EEPROM order: write the appointed
value to the appointed cell of EEPROM.
Signal to stop output control, corresponds to
the button [STOP]
Resetting signal: Resets when meets system
fault
Used to exit current function. When changing
0x40
0x15
the function is needed, send 0xEE first to exit
0xEE
current
function
and
then
enter
the
corresponding function.
0x40
0x15
0xAA
General function data head and sign
0x40
0x15
0xBB
Sign of step function choosing
0x40
0x15
0xBC
Command of step function downloading
0x40
0x15
0xBD
Direct start-up command of step function
0x40
0x15
0xCC
Gradual change function data head and sign
0x40
0x15
0xCD
0x40
0x15
0xCE
Command
of
gradual
change
function
downloading
Direct start-up command of gradual function
Command of reading electrical parameter:
When host instrument receiving EA ,affiliated
instrument will send electrical parameter as
0x40
0x15
0xEA
following : phase A voltage, phase B voltage,
phase C voltage, phase A current, phase B
current, phase C current, the peak of phase A
18
current, the peak of phase B current, the peak
of phase C current ,total power, power factor,
VA, CF, frequency.
4.4
PROTOCOL COMMAND
Data section will be omitted if there is only data package head + address + order. The default address of
the system is 21(0x15), user may customize by using any value greater than 21. Please also note the
following:
a.
The command that computer sends to control board is HEX, for the data (voltage, frequency, cycle
parameter value) is ASCII.
b.
The data for communicating is HEX from control board and each parameter is two bytes.
c.
The format of downloading command for the setting of General Mode is 0x40 + address + ASCII
(data section) + 0x23 (terminal code) + checksum value. XOR ASCII and 0x23 by bit.
d.
The format of downloading command for the setting of Step and Gradual Mode is 0x40 + address +
command + ASCII 1 (N01 group setting data section) + 0x0D (terminal sign) + ASCII 2 (N02 group
setting data section) + 0x0D(terminal sign) +…+ ASCII 24 (N24 group setting data section) + 0x0D
(terminal sign) + checkout value (XOR ASCII 1 + 0x0D + ASCII 2 + 0x0D + … + ASCII 24 + 0x0D by
bit.)
19
5.MAINTENANCE
5.1
INTRODUCTION
Please read this section carefully and pay special attention to safety measures as follows:
a.
Avoid electric shock during maintenance: since AC power is connected with the equipment, be
sure to disconnect the input power before maintenance so as to prevent electric shock
b.
Circuit integrity: be sure to use specified parts when replacing circuit parts; do not modify the
circuit in any case
c.
Parts fixation and complete line recovery: for safety’s sake, certain internal parts of the instrument
are fixed using a n insulating sleeve or tape to isolate the parts from t he circuit board; some
internal wires are bound up to prevent contact between heating parts and high-voltage parts. Hence,
relevant parts and wires shall be restored to their original position after maintenance
d.
Safety inspection after maintenance: check the status of screws, parts and wires after
maintenance so as to ensure the safety of the instrument
e.
Never move the instrument upside down.
f.
Handle with care and avoid collision
5.2
VISUAL INSPECTION OF SYSTEM
Please read the SAFTY NOTICE carefully before performing maintenance. The following inspections
should be done on a regular basis:
a.
Keep the operation site clean and dry; inspect for damage caused by rodents.
b.
Check that the AC power supply functions normally.
c.
Clean the system, especially the air inlet and outlet so as to ensure the free circulation of air inside
the chassis; a vacuum may be used for cleaning, if necessary.
d.
5.3
Check whether anything is blocking or clogging the vent of the equipment.
FAN MAINTENANCE
The expected life-span of a fan under continuous operation is 20,000 to 40,000 hours. The higher
the operating ambient temperature, the shorter the life-span. Check periodically that all fans function
normally and that air flow is discharged from inside the instrument during system operation.
20
5.4
QUARTERLY MAINTENANCE
The AMF Series AC power supply is designed to be customer friendly and easy to maintain.
Thorough quarterly maintenance of the AC power supply ensures the instrument functions with precision.
Parameter adjustments may be necessary. The flow chart below in Figure 5-1 depicts the
recommended quarterly maintenance.
Inspect the PCBs for any
abrasion. Eliminate any dust.
Inspect the wiring for any abrasion,
looseness or disconnection
Inspect air channel and fan for any
obstacle preventing normal ventilation
Inspect external fuse to
ensure normal conduction
Inspect internal components for any
scorched or peculiar smell
Secure of all cables and
inspect for any abrasion
Verify normalization of
LCD display
Confirm whether input/output voltage
and current are within specification
Figure 5–1 Quarterly Maintenance Flow Chart
21
6.TROUBLESHOOTING
By removing the cover board of the equipment, users can use the fault codes indicated on the AFCPROB-3P PCB board’s LED display for simple troubleshooting. Table 6-1 shows the definition of the fault
codes. In case of equipment malfunction, please perform troubleshooting based on Table 6-2 which
shows various troubleshooting and solutions.
Please feel free to contact us for any questions on the operation, maintenance and servicing of the
equipment. If the malfunction continues, please have the model number of the equipment and the fault
code at hand and contact our customer service center immediately. We will respond to you as soon as
possible.
Table 6-1 Fault Code Indication
Fault Code
Definition
Fault Code
00
Start normally
05
A、B、C phase
01
02
03
04
06
over-voltage
Fault on the fuse
07
breaker
Over-temperature
08
Definition
IGBT over-current
in phase C
IGBT over-current
in phase B
IGBT over-current
in phase A
over-load
Input
under-voltage
Table 6-2 Troubleshooting
NO.
Description
Analysis
The utility is abnormal,
1
Does not start up, no response
or connection is
abnormal
Input connected to utility but cannot
2
RESET. At The LED indicator
displays
“04”
Input connected to utility but cannot
3
RESET. The LED indicator
displays “07”.
Input under-voltage
Phase A module error;
Phase A circuit short.
22
Solution
Check the utility and the
phase sequence of input
voltage, then eliminate the
errors and restart.
Check input voltage, eliminate
errors and restart
Check whether short circuit of
phase A. Replace the
correlative module hardware if
fault occurs in the inverter of
phase A.
Check whether short circuit of
Input connected to utility but cannot
4
RESET. The LED indicator displays
“06”.
Phase B module error;
Phase B circuit short.
phase B. Replace the
correlative module hardware if
fault occurs in the inverter of
phase B.
Check whether short circuit of
Input connected to utility but cannot
5
RESET. The LED indicator displays
“05”.
Phase C module error;
Phase C circuit short.
phase C. Replace the
correlative module hardware if
fault occurs in the inverter of
phase C.
Input connected to utility but cannot
6
RESET. The LED indicator
Over-load
displays
“08”
Input connected to utility but cannot
7
RESET. The LED indicator
Internal fuse burns out
replace the burnt ones and
restart.
Confirm the transient voltage
when pressing [RESET] after
Input connected to utility but cannot
RESET. The LED indicator displays
restart.
Check all inner fuse and
displays
“02”
8
Remove connected load and
Output over-voltage
“01”.
start up to verify
whether
over-voltage occurs Adjust the
gate limit of output
over-output.
Check internal ambient
9
Input connected to utility but cannot
The temperature
temperature, temperature
RESET. The LED indicator displays
protection circuit is
control switch and correlative
“03”.
abnormal
circuits. Eliminate the errors
and restart.
10
Abnormal speed and sound of the fans
Obstacles in the air
channel.
Clear air channel
LCD display
11
Display function is abnormal
malfunction or the
Replace the LCD display or
sampler circuit is
check the sample circuit.
abnormal.
23
7. AFTER-SALES SERVICE
Intepro Systems provides a full range of technical support to customers. Customers are encouraged to contact
our branch office or our technical personnel when you have purchased our product.
For the details of warranty, please refer to the terms of warranty. We provide paid customization service
packages at different levels, including fast response, preventive maintenance, and warranty renewal service.
Please contact the local service centers of our company.
•
Service Telephone
USA: +1.714.953.2686
UK/Europe: +44.1251.875600
Asia: +86.755.86500020
•
On-line technical service: www.InteproATE.com
•
Intepro Systems America, LP
14712-A Franklin Avenue
Tustin, CA 92780
USA
Tel: +1.714.953.2686
Fax: +1.714.673.6567
24
Quality
Service
Innovation
Warranty Card
Dear
,
Thanks for your support and patronage. This card is to ensure that in case the grid simulators you
have purchased (model: ____________, serial number:
fail in normal conditions of use within a year because of the process error or component
deterioration, Intepro Systems, LP. will have responsibility to provide after-sales service for free.
Please note:
The machine is required to be installed and used properly. Do not modify the structure, circuit or
component.
1. If the machine has faults, please call us or pack the machine properly and indicate the faults before
sending back to our company. We will serve you as soon as possible.
2. If the warranty period expires, and the customer keeps the card, we will charge a reasonable fee
after the completion of repair.
Attn:
Date:
25