1
User’s Guide
J2ME Wireless Toolkit
2.2
Sun Microsystems, Inc.
4150 Network Circle
Santa Clara, California 95054
U.S.A.
1-800-555-9SUN or 1-650-960-1300
October 2004
Copyright © 2004 Sun Microsystems, Inc., 4150 Network Circle, Santa Clara, California 95054, U.S.A. All rights reserved.
U.S. Government Rights - Commercial software. Government users are subject to the Sun Microsystems, Inc. standard license
agreement and applicable provisions of the FAR and its supplements.
This distribution may include materials developed by third parties.
Sun, Sun Microsystems, the Sun logo, Java, J2ME and the Java Coffee Cup logo are trademarks or registered trademarks of Sun
Microsystems, Inc. in the U.S. and other countries. The Adobe logo and the PostScript logo are trademarks or registered trademarks
of Adobe Systems, Incorporated.
Products covered by and information contained in this service manual are controlled by U.S. Export Control laws and may be subject
to the export or import laws in other countries. Nuclear, missile, chemical biological weapons or nuclear maritime end uses or end
users, whether direct or indirect, are strictly prohibited. Export or reexport to countries subject to U.S. embargo or to entities
identified on U.S. export exclusion lists, including, but not limited to, the denied persons and specially designated nationals lists is
strictly prohibited.
DOCUMENTATION IS PROVIDED "AS IS" AND ALL EXPRESS OR IMPLIED CONDITIONS, REPRESENTATIONS AND
WARRANTIES, INCLUDING ANY IMPLIED WARRANTY OF MERCHANTABILITY, FITNESS FOR A PARTICULAR PURPOSE
OR NON-INFRINGEMENT, ARE DISCLAIMED, EXCEPT TO THE EXTENT THAT SUCH DISCLAIMERS ARE HELD TO BE
LEGALLY INVALID.
Copyright © 2004 Sun Microsystems, Inc., 4150 Network Circle, Santa Clara, California 95054, Etats-Unis. Tous droits réservés.
Cette distribution peut comprendre des composants développés par des tierces parties.
Sun, Sun Microsystems, le logoSun, Java, J2ME et le logo Java Coffee Cup sont des marques de fabrique ou des marques déposées
de Sun Microsystems, Inc. aux Etats-Unis et dans d'autres pays.Le logo Adobe. et le logo PostScript sont des marques de fabrique ou
des marques déposées de Adobe Systems, Incorporated.
Les produits qui font l'objet de ce manuel d'entretien et les informations qu'il contient sont regis par la legislation americaine en
matiere de controle des exportations et peuvent etre soumis au droit d'autres pays dans le domaine des exportations et importations.
Les utilisations finales, ou utilisateurs finaux, pour des armes nucleaires, des missiles, des armes biologiques et chimiques ou du
nucleaire maritime, directement ou indirectement, sont strictement interdites. Les exportations ou reexportations vers des pays sous
embargo des Etats-Unis, ou vers des entites figurant sur les listes d'exclusion d'exportation americaines, y compris, mais de maniere
non exclusive, la liste de personnes qui font objet d'un ordre de ne pas participer, d'une facon directe ou indirecte, aux exportations
des produits ou des services qui sont regi par la legislation americaine en matiere de controle des exportations et la liste de
ressortissants specifiquement designes, sont rigoureusement interdites.
LA DOCUMENTATION EST FOURNIE "EN L'ETAT" ET TOUTES AUTRES CONDITIONS, DECLARATIONS ET GARANTIES
EXPRESSES OU TACITES SONT FORMELLEMENT EXCLUES, DANS LA MESURE AUTORISEE PAR LA LOI APPLICABLE, Y
COMPRIS NOTAMMENT TOUTE GARANTIE IMPLICITE RELATIVE A LA QUALITE MARCHANDE, A L'APTITUDE A UNE
UTILISATION PARTICULIERE OU A L'ABSENCE DE CONTREFACON.
Please
Recycle
Contents
Preface
ix
1. Introduction
1
1.1
Quick Start
1
1.2
The Tools in the Toolkit
1.3
Toolkit Features
1.4
Supported Technology
3
2. Developing MIDlet Suites
5
2
3
2.1
About Projects
2.2
The Simple Development Cycle
2.3
5
2.2.1
Edit Source Code
2.2.2
Build
2.2.3
Run
7
7
8
9
The Full Development Cycle
2.3.1
Package
2.3.2
Install
2.3.3
Run
11
11
12
14
2.4
Using an Obfuscator
2.5
Using a Debugger
2.6
Deploying Applications on a Web Server
3. Working With Projects
15
17
17
19
Contents
iii
3.1
Selecting APIs
3.2
Changing MIDlet Suite Attributes
3.3
Manipulating MIDlets
3.4
Using the Push Registry
3.5
Project Directory Structure
3.6
Using Third-Party Libraries
3.7
19
24
25
26
3.6.2
Third-Party Libraries for All Projects
26
Configuring KToolbar
26
3.7.1
Setting the Application Directory
3.7.2
Setting the javac Encoding Property
3.7.3
Working with Revision Control Systems
Emulator Skins
4.2
Using the Emulator
4.3
Setting Emulator Preferences
27
30
32
4.3.1
Network Proxies
4.3.2
Heap Size
4.3.3
Storage and Cleaning
4.3.4
Adjusting Emulator Performance
32
33
Pausing and Resuming
4.5
Running the Emulator Solo
4.6
Using Third Party Emulators
Using the Profiler
33
34
35
36
36
39
39
5.1.1
The Call Graph
5.1.2
Execution Time and Number of Calls
5.1.3
Saving and Loading Profiler Information
41
Using the Memory Monitor
5.2.1
27
29
4.4
5.3
27
29
4.1
5.2
25
Third-Party Libraries for One Project
5. Monitoring Applications
iv
23
3.6.1
4. Using the Emulator
5.1
21
41
41
42
Saving and Loading Memory Monitor Information
Using the Network Monitor
J2ME Wireless Toolkit User’s Guide • October 2004
44
44
5.3.1
Filtering Messages
5.3.2
Sorting Messages
5.3.3
Saving and Loading Network Monitor Information
5.3.4
Clearing the Message Tree
6. Security and MIDlet Signing
6.1
Permissions
6.2
Protection Domains
6.3
Signing a MIDlet Suite
6.4
Managing Keys
6.5
45
46
46
47
49
49
50
51
52
6.4.1
Creating a New Key Pair
6.4.2
Getting Real Keys
6.4.3
Importing an Existing Key Pair
6.4.4
Removing a Key Pair
Managing Certificates
52
53
54
54
54
6.5.1
Importing Certificates
55
6.5.2
Removing Certificates
56
7. Using the Wireless Messaging API
57
7.1
Setting Emulator Phone Numbers
57
7.2
Simulating an Unreliable Network
7.3
Sending Messages With the WMA Console
58
59
7.3.1
Sending a Text SMS Message
59
7.3.2
Sending a Binary SMS Message
7.3.3
Sending Text or Binary CBS Messages
7.3.4
Sending MMS Messages
61
62
7.4
Receiving Messages in the WMA Console
7.5
Using the Network Monitor with WMA
8. Using the Mobile Media API
60
63
64
65
8.1
Supported Formats and Protocols
8.2
Using MediaControlSkin
8.3
Media Capture
65
66
66
Contents
v
8.4
Well-Behaved MIDlets
66
9. Working With Mobile 3D Graphics
67
9.1
JSR 184 Overview
67
9.2
Immediate Mode
9.3
Retained Mode
9.4
Trading Quality for Speed
9.5
Creating Mobile 3D Graphics Content
67
68
68
10. Using the PIM and FileConnection APIs
10.1
The FileConnection API
10.2
The PIM API
71
71
72
11. Using the Bluetooth and OBEX APIs
73
11.1
Bluetooth Simulation Environment
11.2
OBEX Over Infrared
11.3
Setting OBEX and Bluetooth Preferences
73
73
11.3.1
OBEX Preferences
11.3.2
Bluetooth Discovery Timeout
11.3.3
Bluetooth System Properties
11.3.4
Bluetooth BCC Properties
12. Using Web Services
77
A. Application Demonstrations
vi
69
A.1
Overview
A.2
General Instructions
A.3
BluetoothDemo
A.4
Demo3D
79
79
81
82
83
A.4.1
Life3D
A.4.2
PogoRoo
A.4.3
retainedmode
A.5
JSR172Demo
A.6
mmademo
83
84
86
86
J2ME Wireless Toolkit User’s Guide • October 2004
85
74
75
75
75
74
A.6.1
Simple Tones
87
A.6.2
Simple Player
87
A.6.3
PausingAudioTest
A.6.4
Video
A.6.5
Attributes for mmademo
A.7
ObexDemo
A.8
PDAPDemo
A.9
89
89
90
90
92
A.8.1
Browsing Files
A.8.2
The PIM API
WMADemo
92
94
97
B. Command Line Reference
103
B.1
Prerequisites
103
B.2
The Development Cycle
B.2.1
Build
B.2.2
Package
B.2.3
Run
B.2.4
Debugging
103
103
104
106
107
B.3
Launching Toolkit GUI Components
B.4
Setting Emulator Preferences
B.5
Using Security Features
B.6
108
108
110
B.5.1
Changing the Emulator’s Default Protection Domain
B.5.2
Signing MIDlet Suites
111
B.5.3
Managing Certificates
112
Using the Stub Generator
B.6.1
Options
113
113
B.6.1.1
Example
C. Internationalization
114
115
C.1
Locale Setting
C.2
Emulated Locale
C.3
Character Encodings
C.3.1
110
115
116
116
Java Compiler Encoding Setting
117
Contents
vii
C.4
Font Support in the Default Emulator
Index
viii
119
J2ME Wireless Toolkit User’s Guide • October 2004
117
Preface
This document describes how to work with the J2ME Wireless Toolkit.
Who Should Use This Book
This guide is intended for developers creating Mobile Information Device Profile
(MIDP) applications with the J2ME Wireless Toolkit. You should already
understand how to use, the Mobile Information Device Profile (MIDP), and the
Connected Limited Device Configuration (CLDC).
If you need help getting started with Java programming, try the New to Java Center:
http://java.sun.com/learning/new2java/
For a quick start with MIDP programming, read Learning Path: Getting Started with
MIDP 2.0:
http://developers.sun.com/techtopics/mobility/learn/midp/
midp20/
Related Documentation
This book is not a tutorial in MIDP programming, nor is it a tutorial in
programming any of the additional APIs that are supported by the toolkit. This
section lists related specifications. Although specifications are definitive, they are
not always the most accessible kind of information. For a variety of developercentered articles, try Sun’s mobility web site:
Preface
ix
http://developers.sun.com/techtopics/mobility/
Topic
Title
Customizing the J2ME Wireless Toolkit
J2ME Wireless Toolkit Basic Customization Guide
Release Notes
J2ME Wireless Toolkit Release Notes
MIDP 1.0 - JSR 37
Mobile Information Device Profile for the J2ME™
Platform
MIDP 2.0 - JSR 118
Mobile Information Device Profile 2.0
CLDC 1.0 - JSR 30
J2ME Connected Limited Device Configuration
CLDC 1.1 - JSR 139
J2ME Connected Limited Device Configuration
WMA 2.0 - JSR 205
Wireless Messaging API (WMA)
MMAPI - JSR 135
Mobile Media API
JTWI - JSR 185
Java Technology for the Wireless Industry
J2ME Web Services JSR 172
J2ME Web Services Specification
PDAP Optional Packages - JSR 75
PDA Optional Packages for the J2ME Platform
Bluetooth and OBEX - JSR 82
Java APIs for Bluetooth
Mobile 3D Graphics - JSR 184
Mobile 3D Graphics API for J2ME
How This Book Is Organized
This guide contains the following chapters and appendixes:
Chapter 1 introduces the J2ME Wireless Toolkit and the development features it
provides.
Chapter 2 describes the development processes for creating and running
MIDlets.
Chapter 3 explains how to work with projects in KToolbar. You’ll learn how to
adjust project properties, manipulate MIDlets, work with the push registry, and
understand the project directory structure.
Chapter 4 describes the emulator and explains how to adjust its options and take
advantage of its many features.
Chapter 5 shows how you can examine the performance of your application
using the method profiler, memory monitor, and network monitor.
Chapter 6 describes how to sign MIDlet suites and manage keys and certificates.
x
J2ME Wireless Toolkit User’s Guide • October 2004
Chapter 7 details support for running and testing wireless messaging
applications.
Chapter 8 explains how the J2ME Wireless Toolkit supports the Mobile Media
API.
Chapter 9 contains information about developing 3D graphics content.
Chapter 10 describes how the toolkit implements access to local files and
personal information like contacts and calendar appointments.
Chapter 11 covers the toolkit’s Bluetooth and OBEX simulation environment.
Chapter 12 shows how to use the web services stub generator.
Chapter 12 shows how to use the web services stub generator.
Appendix A describes the application demonstrations that are included in the
J2ME Wireless Toolkit.
Appendix B explains how to use the functionality of the J2ME Wireless Toolkit
from the command line.
Appendix C describes internationalization features in the J2ME Wireless Toolkit.
Preface
xi
Typographic Conventions
Typeface
Meaning
Examples
AaBbCc123
The names of commands, files,
and directories; on-screen
computer output
Edit your .login file.
Use ls -a to list all files.
% You have mail.
AaBbCc123
What you type, when
contrasted with on-screen
computer output
% su
Password:
AaBbCc123
Book titles, new words or terms,
words to be emphasized
Read Chapter 6 in the User’s Guide.
These are called class options.
You must be superuser to do this.
Command-line variable; replace
with a real name or value
To delete a file, type rm filename.
Variable file names and
directories.
In the book, {toolkit} always refers to
the installation directory of the J2ME
Wireless Toolkit.
{AaBbCc.dir}
Accessing Documentation Online
The following sites provide technical documentation related to Java technology.
http://developer.sun.com/
http://java.sun.com/docs/
We Welcome Your Comments
We are interested in improving our documentation and welcome your comments
and suggestions. You can email your comments to us at:
[email protected]
xii
J2ME Wireless Toolkit User’s Guide • October 2004
CHAPTER
1
Introduction
This book describes how to use the J2ME Wireless Toolkit.
The J2ME Wireless Toolkit is a set of tools that makes it possible to create
applications for mobile phones and other wireless devices. Although it is based on
the Mobile Information Device Profile (MIDP) 2.0, the J2ME Wireless Toolkit also
supports a handful of optional packages, making it a widely capable development
toolkit.
1.1
Quick Start
If you’d like to get started right away, try the demonstration applications that are
included with the J2ME Wireless Toolkit.
To run the demonstrations, start KToolbar. On Windows you’ll do this by choosing
Start > Programs > J2ME Wireless Toolkit 2.2 > KToolbar.1 You’ll see a window
like this:
1. Depending on how Windows is configured, you might need to choose Start > All Programs instead of Start
> Programs.
1
FIGURE 1
The KToolbar window
Next, click on the Open Project... button to open a demonstration application.
You'll see a list of all the available applications. Pick one of them and click on the
Open Project button in the dialog.
Once the application is open, all you need to do is press the Run button. The
emulator will pop up running the example application.
Most demonstrations are self-explanatory, but some have additional instructions.
See Appendix A, “Application Demonstrations,” for additional details.
All the source code for the demonstration applications is available in the
{toolkit}\apps directory. Each demonstration has its own project directory. Inside
the project directory, the source files are in the src directory. For example, the
source code for the games demonstration is in {toolkit}\apps\games\src
directory.
1.2
The Tools in the Toolkit
The J2ME Wireless Toolkit has three main components:
■
■
■
2
KToolbar automates many of the tasks involved in creating MIDP applications.
The emulator is a simulated mobile phone. It is useful for testing MIDP
applications.
A collection of utilities provides other useful functionality, including a text
messaging console and cryptographic utilities.
J2ME Wireless Toolkit User’s Guide • October 2004
KToolbar is the center of the toolkit. You can use it to build applications, launch the
emulator, and start the utilities. Alternately, the emulator and utilities can be run
by themselves, which is useful in many situations. If you want to demonstrate
MIDP applications, for example, it’s useful to run the emulator by itself.
The only additional tool you need is a text editor for editing source code.
1.3
Toolkit Features
The J2ME Wireless Toolkit supports the creation of MIDP applications with the
following main features:
■
■
■
1.4
Building and packaging: You write the source code and the toolkit takes care of
the rest. With the push of a button, the toolkit compiles the source code,
preverifies the class files, and packages a MIDlet suite.
Running and monitoring: You can run a MIDlet suite directly in the emulator or
install it using a process that resembles application installation on a real device.
A memory monitor, network monitor, and method profiler are provided to
analyze the operation of your MIDlets.
MIDlet suite signing: The toolkit contains tools for cryptographically signing
MIDlet suites. This is useful for testing the operation of MIDlets in different
protection domains.
Supported Technology
The J2ME Wireless Toolkit supports many standard Application Programming
Interfaces (APIs) defined through the Java Community Process (JCP). TABLE 1
shows the APIs and includes links to the specifications.
TABLE 1
Supported JCP APIs in the J2ME Wireless Toolkit
JSR
API
Name
URL
JSR 139
CLDC 1.1
Connected Limited Device Configuration
http://jcp.org/en/jsr/detail?id=139
JSR 118
MIDP 2.0
Mobile Information Device Profile
http://jcp.org/en/jsr/detail?id=118
JSR 185
JTWI 1.0
Java Technology for the Wireless Industry
http://jcp.org/en/jsr/detail?id=185
JSR 205
WMA 2.0
Wireless Messaging API
http://jcp.org/en/jsr/detail?id=205
Chapter 1
Introduction
3
TABLE 1
4
Supported JCP APIs in the J2ME Wireless Toolkit
JSR
API
Name
URL
JSR 135
MMAPI 1.1
Mobile Media API
http://jcp.org/en/jsr/detail?id=135
JSR 75
PIM and File
PDA Optional Packages for the J2ME Platform
http://jcp.org/en/jsr/detail?id=75
JSR 82
Bluetooth and OBEX
Java APIs for Bluetooth
http://jcp.org/en/jsr/detail?id=82
JSR 172
J2ME Web Services Specification
http://jcp.org/en/jsr/detail?id=172
JSR 184
3D Graphics
Mobile 3D Graphics API for J2ME
http://jcp.org/en/jsr/detail?id=184
J2ME Wireless Toolkit User’s Guide • October 2004
CHAPTER
2
Developing MIDlet Suites
This chapter describes how you can use the J2ME Wireless Toolkit to create
applications. It begins with a description of toolkit projects, then works through the
development process.
There are two basic development cycles you are likely to follow in creating MIDlet
suite applications. The first is quicker and simpler; you will probably use it in your
initial development. The second cycle is longer but allows for more comprehensive
and realistic testing.
Toward the end of the chapter you’ll read about how to use the J2ME Wireless
Toolkit with advanced development tools like an obfuscator and a debugger. A
final section briefly describes how to configure a web server to serve MIDP
applications.
2.1
About Projects
In the J2ME Wireless Toolkit, MIDlet suites are organized into projects, where the
end result of one project is one MIDlet suite. A project contains all of the files that
will be used to build a MIDlet suite, including Java source files, resource files, and
the MIDlet descriptor.
The J2ME Wireless Toolkit works on one project at a time. You can create a new
project or open an existing project.
In this chapter you will work with a very simple example project. As you read
about each step in the development cycles, you can work along in the toolkit.
To create a new project, first start KToolbar. On Windows, choose Start > Programs
> J2ME Wireless Toolkit 2.2 > KToolbar.2 You’ll see the KToolbar window.
2. Depending on how Windows is configured, you might need to choose Start > All Programs instead of Start
> Programs.
5
FIGURE 2
The KToolbar window
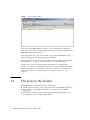
Click on New Project... The toolkit will ask you for the name of the project and the
name of the MIDlet class you will write. Fill in the names and click Create Project.
FIGURE 3
Creating a new project
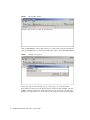
The project options automatically pop up, allowing you to set up the build
environment for the project. The default options are fine for this example; just click
on OK to dismiss the window. In the KToolbar console, you’ll see some messages
telling you exactly where to store the source code and resource files for this project.
6
J2ME Wireless Toolkit User’s Guide • October 2004
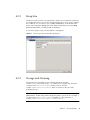
FIGURE 4
2.2
File locations in the console
The Simple Development Cycle
The simple development cycle looks like this:
Edit source code → Build → Run
1. Edit source code. In this step, you create Java source files and resource files that
will be used by your application.
2. Build. The J2ME Wireless Toolkit compiles and preverifies your Java source files.
3. Run. The compiled Java class files are run on the emulator.
If an error occurs when the toolkit attempts to compile your source files, go back
and edit them again. If you find a bug when you are testing your application in the
emulator, edit the source files to fix the bug.
Now that you understand the simple development cycle at a high level, the rest of
this section illustrates how you can accomplish each step using the J2ME Wireless
Toolkit.
2.2.1
Edit Source Code
Editing source code is the only step in which the J2ME Wireless Toolkit is no help
at all. You will need to use the text editor of your choice to create and edit source
code files.
Chapter 2
Developing MIDlet Suites
7
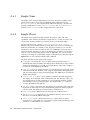
If you are following along with the example project, create a new Java source file
TinyMIDlet.java. It should be saved in the source directory of your project,
which will be {toolkit}\apps\Tiny\src\TinyMIDlet.java where {toolkit} is the
installation directory of the toolkit. The contents of the file are a very simple
MIDlet:
import javax.microedition.lcdui.*;
import javax.microedition.midlet.MIDlet;
public class TinyMIDlet
extends MIDlet
implements CommandListener {
public void startApp() {
Display display = Display.getDisplay(this);
Form mainForm = new Form("TinyMIDlet");
mainForm.append("Welcome to the world of MIDlets!");
Command exitCommand = new Command("Exit", Command.EXIT, 0);
mainForm.addCommand(exitCommand);
mainForm.setCommandListener(this);
display.setCurrent(mainForm);
}
public void pauseApp () {}
public void destroyApp(boolean unconditional) {}
public void commandAction(Command c, Displayable s) {
if (c.getCommandType() == Command.EXIT)
notifyDestroyed();
}
}
Save the file when you’re finished.
2.2.2
Build
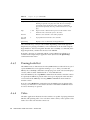
The next step is to build your source code. The toolkit makes this part very easy.
In the KToolbar window, click on the Build button. Assuming you saved your
source file in the right place, the toolkit will find it and compile it. Compilation
errors are displayed in the KToolbar console. If you have errors, go back and edit
the source code to fix them. Once you’ve eliminated your errors, the KToolbar
console tells you the project was successfully built.
8
J2ME Wireless Toolkit User’s Guide • October 2004
FIGURE 5
Messages about building
Behind the scenes, the J2ME Wireless Toolkit also preverifies the compiled class
files. MIDlet class files must be preverified before they can be run on a MIDP
device or emulator. The toolkit quietly handles this detail for you; you probably
won’t ever realize it’s happening. See the CLDC specification for more information
on preverification.
2.2.3
Run
Once the project builds successfully, you are ready to try it out in the emulator.
Click on the Run button. The emulator pops up and shows a list of all the MIDlets
in your project.
Chapter 2
Developing MIDlet Suites
9
FIGURE 6
List of project MIDlets
Choose the MIDlet you want and select Launch. If you’re following along with the
TinyMIDlet example, you’ll see the fruit of your labors:
FIGURE 7
10
TinyMIDlet in action
J2ME Wireless Toolkit User’s Guide • October 2004
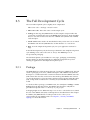
2.3
The Full Development Cycle
The second development cycle is slightly more complicated:
Edit source code → Package → Install → Run
1. Edit source code. This is the same as in the simple cycle.
2. Package. In this step, the J2ME Wireless Toolkit compiles and preverifies the
source files (essentially the same as the Build step from before). Then it bundles
the Java class files and resource files into a MIDlet suite JAR file and a MIDlet
suite descriptor.
3. Install. MIDlet suites need to be installed before they can be run. You can install
the MIDlet suite into the J2ME Wireless Toolkit emulator or a real device.
4. Run. As in the simple development cycle, run your application and test for
bugs.
In the full development cycle, the first step is identical to the simple development
cycle. Editing source code is the same as always. The Build step is now
incorporated in packaging.
The full development cycle includes two new steps, packaging and installing.
Finally, running an installed application is different in important ways from
running an application in the simple development cycle.
2.3.1
Package
The J2ME Wireless Toolkit automates the task of packaging a MIDlet suite. The end
result of packaging is two files, a MIDlet descriptor and a MIDlet suite JAR. The
descriptor is a small text file that contains information about the MIDlet suite. The
JAR contains the class files and resources that make up the MIDlet suite. Devices
can use the descriptor to learn about the application before downloading the entire
JAR, an important consideration in a memory-lean, bandwidth-starved wireless
world.
To ask the toolkit to package your MIDlet suite, choose Project > Package > Create
Package from the KToolbar menu. The MIDlet suite descriptor and JAR are
generated and placed in the bin directory of your project.
Packaging might involve additional steps. You can use a code obfuscator to shrink
the size of the MIDlet suite JAR, a technique that is described later in this chapter.
In addition, the J2ME Wireless Toolkit provides tools to allow you to
cryptographically sign MIDlet suites. See Chapter 6, “Security and MIDlet
Signing,” for more information.
Chapter 2
Developing MIDlet Suites
11
2.3.2
Install
To properly test a MIDlet suite, you should install it into the toolkit’s emulator or a
real device. When you press the Run button in KToolbar, the MIDlet suite is not
installed into the emulator. Instead, the emulator runs the MIDlet classes directly.
The emulator also has the capability of installing applications into its memory in a
process that resembles how applications are transmitted and installed on real
devices. To install applications in the J2ME Wireless Toolkit emulator, choose
Project > Run via OTA.
The emulator window pops open, but instead of running your MIDlet classes
directly, this time the emulator shows the welcome screen of its Application
Management Software (AMS). The emulator’s AMS is an example of the type of
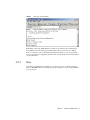
software that real devices must have to manage MIDlet suites.
FIGURE 8
Emulator AMS welcome screen
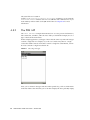
Choose Apps to go to the main list of installed applications. Select Install
Application and press the select button on the emulator. The emulator prompts
you for the URL location of the application you want to install. The URL is already
filled in for you.
12
J2ME Wireless Toolkit User’s Guide • October 2004
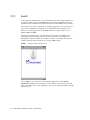
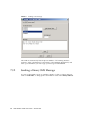
FIGURE 9
URL prompt
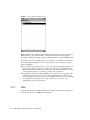
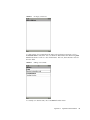
Choose Go from the menu to begin the installation. The emulator shows a list of
the applications it finds at the URL. Choose the only one and select Install from the
menu. The emulator gives you one last chance to confirm your intentions.
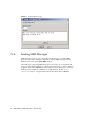
FIGURE 10
Confirming the installation
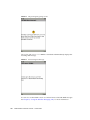
Choose Install again to finish the installation. You’ll be returned to the emulator’s
installed list of applications, which now includes the application you just installed.
Chapter 2
Developing MIDlet Suites
13
FIGURE 11
The application menu, again
Run via OTA is an extremely useful mechanism that makes it easy to install your
MIDlet suite on the toolkit emulator. Some features must be tested using this
technique, including the push registry and the installation of signed MIDlet suites.
If you want to test your MIDlet suite on a real device, you’ll need to install it first.
How this happens depends heavily on the device you are using. There are two
likely possibilities:
■
■
2.3.3
You can deploy the application on a web server, then transmit the application
from server to device using the Over the Air (OTA) protocol described in the
MIDP 2.0 specification. This is most likely the same mechanism that users will
encounter when they go to purchase or install your application.
You might be able to transfer the MIDlet suite to the device using a Bluetooth,
infrared, or serial connection. This is quite a bit simpler than running a web
server, and although it won’t give you any insights into the process of installing
your application on the device via OTA, it allows you to see how your
application performs on the device.
Run
Once the application is installed, running it is simple. Just choose the application
from the list and choose Launch from the menu.
14
J2ME Wireless Toolkit User’s Guide • October 2004
FIGURE 12
Launching the installed application
Running an application on a real device depends heavily on the device itself.
Consult your device documentation for information.
2.4
Using an Obfuscator
An obfuscator is a tool that reduces the size of class files. MIDlet suites need to be
compact, both to minimize download times and to comply with sometimes
stringent limits on JAR size imposed by manufacturers or carriers. Using an
obfuscator is one way (not the only way) that you can keep your MIDlet suite JAR
small.
You can use an obfuscator in the packaging step of the development cycle.
Although the J2ME Wireless Toolkit doesn’t come with an obfuscator, it is already
configured to use the ProGuard obfuscator. All you need to do is download
ProGuard and put it in a place where the toolkit can find it.
ProGuard is published under the terms of the GNU General Public License (GPL).
If you are comfortable with the terms of the license, you can download and use
ProGuard free of charge.
Installing ProGuard in the J2ME Wireless Toolkit is straightforward:
1. Go to the ProGuard web site, http://proguard.sourceforge.net/.
2. Download the latest version.
Chapter 2
Developing MIDlet Suites
15
3. Uncompress the proguard.jar file from the lib directory of the ProGuard
installation to the bin directory of your J2ME Wireless Toolkit installation.
Once ProGuard is installed, you can use it by choosing Project > Package > Create
Obfuscated Package.
In some cases you will need to provide a script file that controls how the obfuscator
works. If you are loading classes using Class.forName(), for example, you need
to tell ProGuard to leave the class names unchanged.
Create a script file using a text editor, then save it under the project’s main
directory. Consult the ProGuard documentation for information on script files.
Next you need to tell the toolkit how to find this file. To do this, edit
{toolkit}\wtklib\{platform}\ktools.properties, where {platform} is the name of
your underlying platform (most likely Windows or Linux). Add a line as follows:
obfuscate.script.name: scriptfile
Replace “scriptfile” with the name you used for the script file. You will need to quit
and restart KToolbar for the change to take effect.
The J2ME Wireless Toolkit also includes support for RetroGuard. If you want to use
RetroGuard, you’ll need to download it separately and change the toolkit’s
configuration.
1. Go to the RetroGuard web site, http://www.retrologic.com/retroguardmain.html.
2. Download the latest version.
3. Extract the retroguard.jar file from downloaded zip file to the bin directory
of your J2ME Wireless Toolkit installation.
4. Edit {toolkit}\wtklib\{platform}\ktools.properties so that it uses the
RetroGuard obfuscator plug-in:
obfuscator.runner.class.name: com.sun.kvem.ktools.RunRetro
obfuscator.runner.classpath: wtklib\\ktools.zip
Retroguard will be used when you create an obfuscated package.
To switch back to ProGuard, edit the obfuscator lines in the ktools.properties
file as follows:
obfuscator.runner.class.name: com.sun.kvem.ktools.RunPro
obfuscator.runner.classpath: wtklib\\ktools.zip
If you want to use a different obfuscator, you’ll have to implement an obfusctor
plug-in yourself. See the J2ME Wireless Toolkit Basic Customization Guide for an
example of how to implement an obfuscator plug-in.
16
J2ME Wireless Toolkit User’s Guide • October 2004
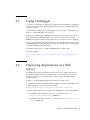
2.5
Using a Debugger
A variation on running your application is running it with a debugger. A debugger
allows you to monitor the running application more closely, set breakpoints, and
examine variables.
You will need to supply your own debugger. You can use the jdb debugger from
J2SE™ or another debugger of your choice.
Begin by choosing Project > Debug from the KToolbar menu. Enter the TCP/IP
port number that the debugger will use to connect to the emulator. Click on
Debug. The emulator begins running and waits for a connection from a debugger.
Start up your debugger and attach it to the port you specified. Make sure to set the
remote debugger to run in remote mode and to use TCP/IP. For more information,
consult the debugger’s documentation.
Information about using jdb with the J2ME Wireless Toolkit is here:
Debugging MIDlets
http://developers.sun.com/techtopics/mobility/midp/questions/
jdb/
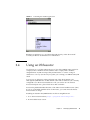
2.6
Deploying Applications on a Web
Server
The MIDP 2.0 specification includes the Over The Air User Initiated Provisioning
Specification, which describes how MIDlet suites can be transferred over-the-air
(OTA) to a device. You can test this type of scenario using the J2ME Wireless
Toolkit emulator.
To deploy a packaged MIDP application remotely on a Web server:
1. Change the JAD file’s MIDlet-Jar-URL property to the URL of the JAR file. The
URL should be an absolute path. For example:
MIDlet-Jar-URL: http://your.server.com/midlets/example.jar
2. Ensure that the Web server uses the correct MIME types for JAD and JAR files:
a. For MIDlet suite descriptors, map the .jad extension to the text/
vnd.sun.j2me.app-descriptor MIME type.
b. For MIDlet suite JARs, map the .jar extension to the application/javaarchive MIME type.
Chapter 2
Developing MIDlet Suites
17
The details of how to configure a Web server depend on the specific software used.
The emulator implements the device behavior during OTA provisioning. You can
use the emulator to test and demonstrate the full provisioning process of MIDlet
suites from a server to the device. All you need to do is launch the emulator’s
AMS. (You may already be familiar with the AMS if you have used KToolbar’s Run
via OTA option.
To launch the emulator’s AMS, you have two options:
■
In the Windows start menu, choose Start > Programs > J2ME Wireless Toolkit
2.2 > OTA Provisioning.
■
From the command line, run:
{toolkit}\bin\emulator -Xjam
Now follow the AMS prompts to install your application. This process is very
similar to the Run via OTA option described earlier in this chapter, except you will
need to enter the URL of your own server to install your application.
18
J2ME Wireless Toolkit User’s Guide • October 2004
CHAPTER
3
Working With Projects
In the last chapter, you learned how the J2ME Wireless Toolkit helps you with the
MIDP development cycle. This chapter delves more deeply into the details of
working with projects, including the following:
3.1
■
Selecting the target APIs for a project
■
Manipulating MIDlet suite attributes, including the list of MIDlets
■
Understanding the project directory structure
■
Including third-party libraries in a project
Selecting APIs
Each project is built against some set of APIs. The J2ME Wireless Toolkit supports
many APIs; the full list is detailed in Chapter 1, “Introduction.” The toolkit allows
you to develop applications for some subset of APIs based on the type of devices
you expect to run your software.
For example, even though the toolkit supports JSR 184, the Mobile 3D Graphics
API, you might want to develop applications that don’t make use of that API. The
project’s API Selection settings make it possible to choose only the APIs you want
to use.
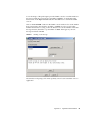
To see how this works, launch KToolbar and open a project. Then click on
Settings... to bring up the following window:
19
FIGURE 13
The project settings window
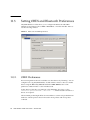
On the API Selection tab, the Target Platform setting controls the appearance of
the rest of the tab. Choose the setting that best suits your need, and tweak your
selection with the controls below. For example, if you’re developing applications
for JTWI-compliant devices, choose JTWI from the combo box. Then use the
controls below to specify which version of CLDC you want to use and whether
MMAPI should be present.
The toolkit applies your selections when you compile your source code.
Note – API selections do not apply to the emulator. The emulator always supports
all the available APIs. The API selections you make in the project settings apply
only to building a project. In essence, the API selections choose which classpath the
toolkit uses for compiling and preverifying your source files.
20
J2ME Wireless Toolkit User’s Guide • October 2004
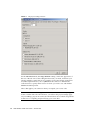
3.2
Changing MIDlet Suite Attributes
The project settings window also allows you to control the MIDlet suite attributes,
which are stored in the descriptor as well as the manifest file of the MIDlet suite
JAR.
To see the attributes, run KToolbar and open a project. Then click on Settings....
The three tabs that define attributes are Required, Optional, and User Defined.
Consult the MIDP 2.0 specification for the definitions of the required and optional
attributes. The J2ME Wireless Toolkit takes care of most of the details. In the early
stages of development, you might not have to worry about the attributes at all.
Once your application is stable and you’re starting to think about deploying on real
devices and going to market, you should come back and adjust the values.
To adjust a value on the Required or Optional tabs, click on the cell next to the
attribute key you wish to change. Type in the new value.
Chapter 3
Working With Projects
21
FIGURE 14
Editing MIDlet suite attributes
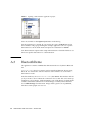
To create new user-defined attributes, click on the User Defined tab. Press Add and
fill in the key name. You can then edit the attribute value by clicking in the value
column next to the key, just as you would with required or optional attributes.
Select an attribute and click on Remove if you wish to remove the key and value
entirely.
22
J2ME Wireless Toolkit User’s Guide • October 2004
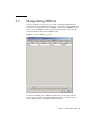
3.3
Manipulating MIDlets
The project settings also provide a way to add or modify the MIDlets that are
contained in the current MIDlet suite project. To see how this works, start KToolbar
and open an existing project. Click on Settings... and choose the MIDlets tab. You
will see a list of all MIDlets in the project. If you just created a new project, the
toolkit automatically fills in the first MIDlet entry.
FIGURE 15
The list of MIDlets in a project
To add a new MIDlet, click on Add. Fill in the name, icon file name, and class
name. You can leave the icon file name blank if you wish. To change values or
remove MIDlet entries, use the Edit and Remove buttons.
Chapter 3
Working With Projects
23
The MIDlet names are presented to the user in the order shown when the MIDlet
suite is launched. You can modify the order by selecting a MIDlet and clicking
Move Up or Move Down.
3.4
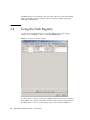
Using the Push Registry
You can also use project settings to work with a MIDlet suite’s push registry
settings. Click on Settings... and choose the Push Registry tab.
FIGURE 16
Project push registry settings
To add an entry to the push registry, press Add and fill in values for the connection
URL, MIDlet class, and allowed sender. To edit an entry, select the entry and press
the Edit button. To remove a push registry entry, select it and press Remove.
24
J2ME Wireless Toolkit User’s Guide • October 2004
If you do make push registry entries for your application, make sure you also enter
the appropriate permissions. See Chapter 6, “Security and MIDlet Signing,” for
details.
3.5
Project Directory Structure
Projects have a standard directory structure. The project itself is represented by a
directory in {toolkit}\apps. For example, the demos project is contained in
{toolkit}\apps\demos. Inside a project directory, the following directories are used:
TABLE 2
Project directory structure
Directory
Description
bin
The MIDlet suite descriptor and JAR are placed in this directory
when you package the project. This directory also contains the
unpackaged manifest information and might include an HTML file
that is used internally when you do Run via OTA.
classes
This directory is used by the toolkit to store compiled class files.
lib
Place a third-party library in this directory to include it in this
project.
res
Images, sounds, and other resource files go in this directory. They
are packaged into the root of the MIDlet suite JAR.
src
Place source files in this directory.
tmpclasses
This directory is used by the toolkit.
tmpsrc
This directory is used by the toolkit.
In addition, the project directory contains a project.properties file which
contains information about the project.
If you want to remove temporary directories and files from the project, choose
Project > Clean from the KToolbar menu.
3.6
Using Third-Party Libraries
The J2ME Wireless Toolkit allows you to incorporate third-party libraries in your
applications. Using third-party libraries can cut down on your development time
by providing functionality you don’t wish to build yourself, but you should keep a
close eye on the size of your MIDlet suite JAR.
Chapter 3
Working With Projects
25
When you use a third-party library in your application, your JAR will expand by
the size of the third-party library. You can use an obfuscator to reduce the code
size, and a good obfuscator will even eliminate whatever parts of the library you
are not using. Even with the use of an obfuscator, a third-party library will
probably still be larger than your own custom code, carefully written from scratch.
You have to evaluate the tradeoff between reducing your development time and
the size of your MIDlet suite JAR.
3.6.1
Third-Party Libraries for One Project
Any library files placed in your project’s lib directory will be included in the
building and packaging of your project. Libraries should be JAR or Zip files of Java
classes.
For example, if you installed the J2ME Wireless Toolkit in C:\WTK22 and your
application is called Tiny, the class library would go in
C:\WTK22\apps\Tiny\lib. When you build, run, debug, and package your
project, the class files in the lib directory are used.
3.6.2
Third-Party Libraries for All Projects
Some devices have libraries available to all installed MIDlet suites. A manufacturer,
for example, can make additional APIs available on all their devices. In this case,
you want to be able to use these libraries when you build and test your application.
You don’t want the libraries to be included in your packaged MIDlet suite because
you will be installing the MIDlet suite on devices where the library is already
present.
You can accomplish this by placing libraries in the {toolkit}\apps\lib directory.
For example, if you installed the J2ME Wireless Toolkit in C:\WTK22, you would
place the class libraries in C:\WTK22\apps\lib. Libraries in this directory are
available for all projects.
3.7
Configuring KToolbar
KToolbar includes some advanced configuration options. You can use these options
by editing the {toolkit}\wtklib\{platform}\ktools.properties file. To see the
effects of your changes, restart KToolbar.
26
J2ME Wireless Toolkit User’s Guide • October 2004
3.7.1
Setting the Application Directory
By default, the J2ME Wireless Toolkit stores applications in directories under
{toolkit}\apps. You can change this by adding a line to ktools.properties of
the following form:
kvem.apps.dir: <application_directory>
Any backslash ('\') characters in the directory’s path should be preceded by
another backslash. Also, the directory’s path should not contain any spaces.
For example, to set the application directory to D:\dev\midlets, you would use:
kvem.apps.dir: D:\\dev\\midlets
3.7.2
Setting the javac Encoding Property
By default, the Java compiler uses the encoding set in the J2SE environment that
you are running. For information on how to override the default source file
encoding, see Appendix C, “Internationalization.”
3.7.3
Working with Revision Control Systems
Using the filterRevisionControl property, you can configure KToolbar to
recognize and ignore auxiliary files created by the SCCS, RCS and CVS revision
control systems.
To recognize and ignore auxiliary files, include the following line in
ktools.properties:
kvem.filterRevisionControl: true
As a result, you prevent KToolbar from treating revision control files as source and
resource files. For example, KToolbar would treat a file named
src\SCCS\s.MyClass.java as being an SCCS revision control file and not a Java
source file.
Chapter 3
Working With Projects
27
28
J2ME Wireless Toolkit User’s Guide • October 2004
CHAPTER
4
Using the Emulator
The J2ME Wireless Toolkit emulator simulates a MIDP device on your desktop
computer. It is a convenient way to see how your application performs in a MIDP
environment and gives you a tight development cycle that is entirely contained on
your desktop computer.
The emulator does not represent a specific device, but it provides correct
implementations of its supported APIs.
4.1
Emulator Skins
A skin is a thin layer on top of the emulator implementation that provides it with a
certain appearance, screen characteristics, and input controls. The J2ME Wireless
Toolkit comes with skins that represent different kinds of devices.
TABLE 3
Emulator skins
Name
Screen size
Canvas size
Colors
Input
DefaultColorPhon
e
240 x 320
240 x 289
4096
ITU-T
DefaultGrayPhone
180 x 208
180 x 177
4096
ITU-T
MediaControlSkin
180 x 208
180 x 177
4096
ITU-T
QwertyDevice
636 x 235
540 x 204
4096
Qwerty
You can create your own emulator skins if you wish. See the Basic Customization
Guide for details.
29
4.2
Using the Emulator
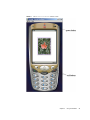
The emulator looks and acts like a mobile phone. In this section you’ll learn how to
control the emulator. Although the description and figures are based on the
DefaultColorPhone skin, all the skins operate in a similar way.
30
J2ME Wireless Toolkit User’s Guide • October 2004
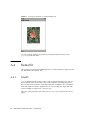
FIGURE 17
The DefaultColorPhone emulator skin
Chapter 4
Using the Emulator
31
You can use the mouse to click on the buttons to press them. Most buttons also
have keyboard shortcuts, which are generally easier to use. Keyboard numbers 0
through 9 correspond to the emulator’s 0 through 9 buttons. Some less obvious
keyboard shortcuts are in the following table.
TABLE 4
Keyboard shortcuts
Emulator button
Keyboard key
Left soft button
F1
Right soft button
F2
Power button
Esc
SELECT
Enter
Entering text works much as it does on many real devices. Press a number key
multiple times to get the letter you want. For example, press the 5 key twice for the
letter K. When you are entering text, the asterisk key (*) switches between upper
case, lower case, numbers, and symbols. The indicator at the top of the screen
shows your current mode. The pound key (#) enters a space.
Alternately, you can just type on your keyboard to enter text. Although this is
convenient for entering text, you must remember that it is a convenience your
users will most likely be lacking.
4.3
Setting Emulator Preferences
You can adjust the emulator settings to more closely resemble a specific device or
to test your application under different resource conditions.
4.3.1
Network Proxies
The emulator uses your desktop network connection. For example, if the emulator
runs a MIDlet that makes an HTTP connection, the emulator attempts to make the
HTTP connection using the desktop’s network setup.
If your development computer is behind a firewall, you might use a proxy server to
make HTTP connections. If you’re not sure, try examining your browser’s settings
to see if it uses proxy servers.
If you are using proxy servers, you need to configure the emulator to use the same
proxy servers. To do this, choose Edit > Preferences.... On the Network
Configuration tab, fill in the names and port numbers for the proxy server you
wish to use. You can also select which version of HTTP you wish to use.
32
J2ME Wireless Toolkit User’s Guide • October 2004
4.3.2
Heap Size
The heap is memory where your application’s objects are stored. Many real devices
have limited heap size. You can set a maximum heap size to more closely simulate
the conditions on a real device. Choose Edit > Preferences... from the KToolbar
menu and selecting the Storage tab. Fill in the maximum heap size in the Heap
Size field. Remember, one kilobyte (kB) is 1024 bytes.
If you don’t specify a heap size, the default is 2 megabytes.
FIGURE 18
4.3.3
The storage tab of the KToolbar preferences
Storage and Cleaning
The emulator has persistent storage, which by default is placed in
{toolkit}\appdb\{skin} in files with a .db extension. For example, the persistent
storage for the DefaultColorPhone emulator skin is stored in
{toolkit}\appdb\DefaultColorPhone. There is no limit on the size of the
persistent storage.
Note – If multiple instances of the same emulator skin run simultaneously, the
J2ME Wireless Toolkit will generate unique file paths for each one. For example, a
second instance of DefaultColorPhone might have a file path name of
{toolkit}\appdb\DefaultColorPhone.1089982856218.
Chapter 4
Using the Emulator
33
The toolkit enables you to choose a different location for the storage files, and you
can limit the size of the storage. This is useful if you wish to test your application’s
behavior when a small amount of persistent storage is available.
To adjust the persistent storage settings, choose Edit > Preferences... and click on
the Storage tab. Enter the name of the directory you wish to use for persistent
storage. You can only enter a relative path, and the directory you specify is created
in the {toolkit}\appdb directory.
If you wish, you can enter a limit in kilobytes for the size of the persistent storage.
Bear in mind that the storage implementation has some overhead in addition to the
space your application uses. For example, if you enter 8 kB for the persistent
storage size, 8192 bytes is available for both your application data and the storage
overhead.
If you wish to erase the persistent storage of the emulator, choose File > Utilities...
from the KToolbar menu. Click on the Clean Database button to wipe the
persistent storage clean.
4.3.4
Adjusting Emulator Performance
The emulator uses many of the resources of your desktop computer, including its
display and network connection. Compared to the desktop-based emulator, a real
MIDP device usually has a slower processor, less memory, and a slower network
connection, and might have a different type of display.
The J2ME Wireless Toolkit allows you to simulate the constrained environment of a
real device. Although the emulator does not represent a real device, adjusting the
performance settings gives you useful information about how your application
performs under varying runtime conditions.
Choose Edit > Preferences... and click on the Performance tab.
34
J2ME Wireless Toolkit User’s Guide • October 2004
FIGURE 19
Adjusting the emulator’s performance
Adjust the Graphics primitives latency to have an effect on the amount of time
that elapses between your application’s calls to drawing methods in the Graphics
class and when the drawing actually takes place.
To change the screen characteristics, choose one of the Display refresh types. If
you choose a Periodic type, you will also need to specify the Refresh Rate.
To simulate the slower speed of a real device, check Enable VM speed emulation
and choose the speed you want.
You can adjust the simulated network speed by checking Enable network
throughput emulation and choosing a speed.
4.4
Pausing and Resuming
MIDlets have a life cycle that is defined by the MIDP specification. MIDlets can be
started and stopped by the device. Furthermore, external events like incoming
phone calls can cause the device to pause a MIDlet.
The emulator provides a simple mechanism to pause and resume running MIDlets.
This is very helpful for testing your application’s behavior when it is paused.
Chapter 4
Using the Emulator
35
When the emulator is running, choose MIDlet > Pause from the emulator
window’s menu. The running MIDlet is paused and the screen displays an
“Incoming Call...” message.
To resume the MIDlet’s operation, choose MIDlet > Resume from the menu.
4.5
Running the Emulator Solo
During development, you will most often run the emulator directly from KToolbar
by pressing the Run button or using the Project > Run via OTA feature. For testing
or demonstrations, you might wish to run the emulator by itself. Several different
approaches are described in this section. The program group created by the J2ME
Wireless Toolkit installer includes several items that pertain to running the
emulator by itself.
To run an application directly, which is analagous to pressing KToolbar’s Run
button, choose the Run MIDP Application... item. The toolkit prompts you to
locate a MIDlet descriptor file on your local disk. Note that the corresponding
MIDlet suite JAR must also be present.
To run the emulator’s Application Management Software (AMS), choose the OTA
Provisioning item, which is roughly analagous to KToolbar’s Run via OTA feature.
The emulator pops up with the AMS welcome screen, and you can install
applications by typing in a URL.
To change the emulator’s preferences, choose the Preferences item from the toolkit
program group. This pulls up the same preferences window as choosing Edit >
Preferences... from the KToolbar menu.
The J2ME Wireless Toolkit utilities are also accessible without running KToolbar.
Just choose the Utilities item.
Finally, you can change which emulator skin is used by default. Choose the
Default Device Selection item, and choose one of the available emulator skins.
Next time you launch the emulator the selected skin is used.
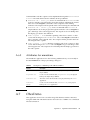
You can also run the emulator from a command prompt. See Appendix B,
“Command Line Reference,” for more information.
4.6
Using Third Party Emulators
Third party companies, like device manufacturers and wireless carriers, sometimes
create device emulators that are compatible with the J2ME Wireless Toolkit. You
can gain experience running your application on a wider variety of
implementations by installing additional emulators into the toolkit. The procedure
36
J2ME Wireless Toolkit User’s Guide • October 2004
is usually to unpack or install the third party emulator, then copy its directory into
the <toolkit>/wtklib/devices directory. Next time you run KToolbar, the
emulator is available.
A partial listing of some of the currently available emulators is available here:
http://developers.sun.com/techtopics/mobility/midp/articles/
emulators/
Chapter 4
Using the Emulator
37
38
J2ME Wireless Toolkit User’s Guide • October 2004
CHAPTER
5
Monitoring Applications
The J2ME Wireless Toolkit provides several tools to monitor the behavior of your
applications. These tools are helpful in debugging and optimizing your code.
■
The profiler lists the frequency of use and execution time for every method in
your application.
■
The memory monitor shows the usage of memory while your application runs.
■
The network monitor shows network data transmitted and received by your
application. It supports many network protocols including HTTP, HTTPS, SMS,
and CBS.
■
Tracing outputs low-level information to the KToolbar console.
Note – Monitoring features might slow down the execution of your application.
5.1
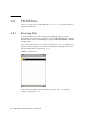
Using the Profiler
The profiler keeps track of every method in your application. For a particular run,
it figures out how much time was spent in each method and how many times each
method was called. After you finish running your application and shut down the
emulator, the profiler pops up, allowing you to browse through the method call
information.
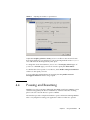
To turn on the profiler, choose Edit > Preferences... from the KToolbar menu. Click
on the Monitor tab. If you are interested in seeing profiling information for all the
system implementation methods, check Show System Classes. Otherwise, the
profiler shows only system methods that contain calls to your application methods.
39
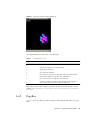
FIGURE 20
Turning on the profiler
Now run your application by clicking on the Run button. Interact with your
application as you normally would. When you’re finished, shut down the emulator.
The profiler pops up with information about all the method calls in your
application.
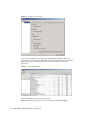
FIGURE 21
The method profiler
The profiler displays two types of information:
■
40
Method relationships are shown in a hierarchical list, the Call Graph.
J2ME Wireless Toolkit User’s Guide • October 2004
■
The right side of the profiler shows the execution time and number of calls for
each method and its descendants.
Note – The profiling values obtained from the emulator do not reflect actual
values on a real device.
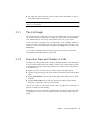
5.1.1
The Call Graph
The call graph shows a hierarchy of method calls. Methods that call other methods
are shown as folders. Double-click on a method to open it and see the methods it
calls. Methods that do not call any other method are shown as gray circles.
You can search for a particular class or method name. Click on Find... and fill in a
name. The search is performed from the current selection in the call graph to the
end. If you want to search the entire call graph, check Wrap before you click on the
Find button.
As you click on different nodes in the call graph, the right side of the profiler
shows details about the methods for that node.
5.1.2
Execution Time and Number of Calls
The right side of the profiler window displays detailed information about methods.
You can see the method name, the number of times it was called, and the amount
of time that the emualtor spent in the method. The execution time is described in
four distinct ways:
■
Cycles shows the amount of processor time spent in the method itself.
■
%Cycles is the percentage of the total execution time that is spent in the method
itself.
■
Cycles with Children is the amount of time spent in the method and its called
methods.
■
%Cycles with Children shows the time spent in the method and its called
methods as compared to the total execution time.
Click on any column to sort by that column. Click a second time to switch the sort
between ascending and descending.
The right pane shows the methods contained in the currently selected node in the
call graph. If you want to see every method, click on the <root> node in the call
graph.
Chapter 5
Monitoring Applications
41
5.1.3
Saving and Loading Profiler Information
To save your profiler session, click on the Save button in the profiler window.
Choose a file name.
To load a profiler session, choose File > Utilities... from the KToolbar menu. Click
on Open Session in the Profiler box. When you select a file, the profiler window
appears with all the session information.
5.2
Using the Memory Monitor
Memory is scarce on many MIDP devices. The J2ME Wireless Toolkit includes a
memory monitor that makes it easy to examine the memory usage of your
application. You can see the total memory used by your application and a detailed
listing of the memory usage per object.
To turn on the memory monitor, choose Edit > Preferences... from the KToolbar
menu. Click on the Monitor tab. Check Enable Memory Monitor.
Next time you run the emulator, the memory monitor window pops up, displaying
a graph of your application’s memory usage over time. The memory monitor slows
down your application startup because every object created is recorded.
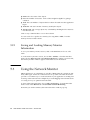
FIGURE 22
The memory monitor graph
The memory monitor graph shows the following information:
■
42
Current. The current amount of memory used by the application.
J2ME Wireless Toolkit User’s Guide • October 2004
■
Maximum. The maximum amount of memory used since program execution
began, shown in the graph by a broken red line.
■
Objects. The number of objects in the heap.
■
Used. The amount of memory used.
■
Free. The amount of unused memory available.
■
Total. The total amount of memory available at startup.
Remember, you can modify the heap size using the Storage tab of the KToolbar
preferences. See Chapter 3, “Working With Projects,” for details.
To request the system to perform a garbage collection, click on Run GC.
Note – The memory usage you observe with the emulator is not going to be
exactly the same as memory usage on a real device. Remember, the emulator does
not represent a real device. It is just one possible implementation of its supported
APIs.
To see details about the objects in your application, click on the Objects tab in the
memory monitor window.
FIGURE 23
The memory monitor objects display
You’ll see a table with the following columns:
Chapter 5
Monitoring Applications
43
■
Name. The class name of the objects.
■
Live. The number of instances. Some of these might be eligible for garbage
collection.
■
Total. The total number of objects that have been allocated since the application
began.
■
Total Size. The total amount of memory used by the objects.
■
Average Size. The average object size, calculated by dividing the live instances
into the total size.
Click on any column header to sort on that column.
You can search for a specific class name by choosing View > Find... from the
memory monitor window menu.
5.2.1
Saving and Loading Memory Monitor
Information
To save your memory monitor session, click on the Save button. Choose a file
name.
To load a memory monitor session, choose File > Utilities... from the KToolbar
menu. Click on Open Session in the Memory Monitor box. When you select a file,
the memory monitor window appears with all the session information.
5.3
Using the Network Monitor
MIDP applications, at a minimum, are capable of HTTP network connections, but
many other types of network connections are also possible. The network monitor
provides a convenient way to see the information your application is sending and
receiving on the network. This is helpful if you are debugging network interactions
or looking for ways to optimize network traffic.
To turn on the network monitor, choose Edit > Preferences... from the KToolbar
menu. Click on the Monitor tab. Check Enable Network Monitoring.
Next time you run the emulator, the network monitor window pops up.
44
J2ME Wireless Toolkit User’s Guide • October 2004
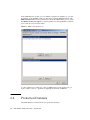
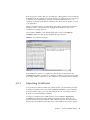
FIGURE 24
The network monitor
When your application makes any type of network connection, information about
the connection is captured and displayed. The figure shows two HTTP requests
and responses.
The display on the left side shows a hierarchy of messages and message pieces.
Click on a message or a portion of a message to see details in the right side of the
network monitor.
Message bodies are shown as raw hexadecimal values and the equivalent text.
Note – You can examine messages that are still in the process of being sent.
Incomplete messages are indicated by bold highlighting in the message tree.
5.3.1
Filtering Messages
Filters are useful for examining some subset of the total network traffic. Filter
settings are specific to the network protocol used.
Chapter 5
Monitoring Applications
45
Press the Filter Settings button to use the filter. Change the filter settings to suit
your needs.
TABLE 5
Network monitor filter settings
Network Protocol
Filter Settings
HTTP/HTTPS
Enter text to match the various parts of HTTP messages: URL,
status line, headers, or body. For example, entering “slashdot” in
the URL field would filter to show only messages whose URL
contained “slashdot”.
SMS/CBS
You can specify a protocol, message type, and direction to match.
Furthermore, you can enter text to match in the sender, receiver,
and message content.
MMS
Enter text to match the direction, sender, receiver, and copied (cc)
and blind copied (bcc) receivers. In addition, you can filter on the
subject, content ID, content location, MIME type, and encoding.
OBEX/SPP/L2CAP
You can filter using the URL or header content.
Socket/SSL/
Datagram/Comm
Enter text to match in either the connection string (URL) or content.
When you are done entering filter settings, press OK to return to the network
monitor. The Filter checkbox is checked, indicating that a filter is in use. To disable
the filter and see all messages, uncheck the checkbox.
5.3.2
Sorting Messages
To arrange the message tree in a particular order, click on the Sort By combo box
and choose a criteria.
■
Time. Messages are sorted in chronological order of time sent or received.
■
URL. Messages are sorted by URL address. Multiple messages with the same
address are sorted by time.
■
Connection. Messages are sorted by communication connection. Messages using
the same connection are sorted by time. This sort type enables you to see
messages grouped by requests and their associated responses.
Sorting parameters are dependent on the message protocol you choose. For
instance, sorting by time is not relevant for socket messages.
5.3.3
Saving and Loading Network Monitor
Information
To save your network monitor session, choose File > Save or File > Save As... from
the network monitor window menu. Choose a file name.
46
J2ME Wireless Toolkit User’s Guide • October 2004
To load a network monitor session, choose File > Utilities... from the KToolbar
menu. Click on Open Session in the Network Monitor box. When you select a file,
the network monitor window appears with all the session information.
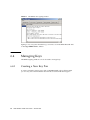
5.3.4
Clearing the Message Tree
To remove all messages from the network monitor, choose Edit > Clear from the
network monitor menu.
Chapter 5
Monitoring Applications
47
48
J2ME Wireless Toolkit User’s Guide • October 2004
CHAPTER
6
Security and MIDlet Signing
MIDP 2.0 includes a comprehensive security model based on protection domains.
MIDlet suites are installed into a protection domain which determines access to
protected functions. The MIDP 2.0 specification also includes a recommended
practice for using public key cryptography to verify and authenticate MIDlet
suites.
For definitive information, consult the MIDP 2.0 specification. For an overview of
MIDlet signing using the J2ME Wireless Toolkit, read this article:
Understanding MIDP 2.0's Security Architecture
http://developers.sun.com/techtopics/mobility/midp/articles/
permissions/
If you need more background on public key cryptography, try this article:
MIDP Application Security 1: Design Concerns and Cryptography
http://developers.sun.com/techtopics/mobility/midp/articles/
security1/
This chapter describes support for protection domains, permissions, and MIDlet
signing in the J2ME Wireless Toolkit.
6.1
Permissions
MIDlets must have permission to perform sensitive operations, like connecting to
the network. Permissions have specific names, and MIDlet suites can indicate their
need for certain kinds of permissions through attributes in the MIDlet suite
descriptor.
49
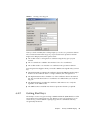
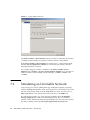
In the J2ME Wireless Toolkit, you can add these permission attributes to a project
by clicking on the Settings... button in KToolbar. Select the Permissions tab. The
MIDlet-Permissions box shows permissions which the MIDlet must possess, while
the MIDlet-Permissions-Opt box contains permissions that the MIDlet would like
to have but does not need absolutley.
FIGURE 25
MIDlet suite permissions
To add a permission to either box, click on Add and choose the permission you
want to add. To remove a permission, highlight it and click on Remove.
6.2
Protection Domains
The J2ME Wireless Toolkit includes four protection domains:
50
J2ME Wireless Toolkit User’s Guide • October 2004
■
MIDlets in the minimum domain are denied all permissions.
■
The untrusted domain provides a high level of security for applications whose
origins and authenticity cannot be determined. The user is prompted frequently
when the application attempts a sensitive operation
■
The trusted domain is a happy place for MIDlets where all permissions are
granted.
■
The maximum domain is equivalent to trusted.
When you press the Run button to run your application in the emulator, your code
runs in the untrusted protection domain by default. You can change which
protection domain is used by choosing Edit > Preferences... from the KToolbar
menu. Select the Security tab. You can now choose the default protection domain
from the combo box.
Things are different when you use Run via OTA. Your packaged MIDlet suite is
installed directly into the emulator, and it is placed in a protection domain at
installation time. The emulator uses public key cryptography to determine the
protection domain of installed MIDlet suites.
If the MIDlet suite is not signed, it is placed in the untrusted domain. If the
MIDlet is signed, it is placed in whatever protection domain is associated with the
root certificate of the signing key’s certificate chain.
For example, suppose Respectable Software, a hypothetical company, wants to
distribute a cryptographically signed MIDlet suite. Respectable Software buys a
signing key pair from Super-Trustee, a hyptothetical certificate authority. Using the
signing key, Respectable Software signs the MIDlet suite, and distributes their
certificate with the MIDlet suite. When the MIDlet suite is installed on the
emulator, or on a device, the implementation verifies Respectable’s certificate using
its own copy of Super-Trustee’s root certificate. Then it uses Respectable’s
certificate to verify the signature on the MIDlet suite. Assuming everything checks
out, the device or emulator installs the MIDlet suite into whatever protection
domain is associated with Super-Trustee’s root certificate.
The J2ME Wireless Toolkit provides tools to sign MIDlet suites, manage keys, and
manage root certificates.
6.3
Signing a MIDlet Suite
To sign a MIDlet suite, you must package it first. Then choose Project > Sign from
the KToolbar menu. The signing window appears.
Chapter 6
Security and MIDlet Signing
51
FIGURE 26
The MIDlet suite signing window
Signing is very easy. Just select the key you want to use in the Alias List and click
on the Sign MIDlet Suite... button.
6.4
Managing Keys
The MIDlet signing window can also be used to manage keys.
6.4.1
Creating a New Key Pair
To create an entirely new key pair, click on New Key Pair... The toolkit prompts
you for a key alias and information that will be associated with the key pair.
52
J2ME Wireless Toolkit User’s Guide • October 2004
FIGURE 27
Creating a new key pair
After you click on Create, the toolkit prompts you to choose a protection domain.
The connection between the key pair you just created and a protection domain
might seem oblique, but it makes perfect sense:
■
The toolkit creates a self-signed root certficate using the key pair you just
created.
■
The root certificate is added to the emulator’s list of root certificates.
■
The toolkit needs to associate the root certificate with a protection domain.
Now imagine what happens when you install a MIDlet suite signed with your new
key:
6.4.2
■
The implementation examines the certificate chain in the MIDlet suite descriptor.
In this case the certificate chain is a single certificate, the self-signed root.
■
The implementation tries to find the root of the certificate chain in its internal
list. This succeeds because the root certificate was added when you create the
key pair.
■
The implementation considers the certificate valid and uses it to verify the
signature on the MIDlet suite.
■
The MIDlet suite is installed into whatever protection domain you picked.
Getting Real Keys
The ability to create a key pair and sign a MIDlet within the J2ME Wireless Toolkit
environment is for testing purposes only. When you run your application on an
actual device, you must obtain a signing key pair from a certificate authority
recognized by the device.
Chapter 6
Security and MIDlet Signing
53
The procedure for signing MIDlet suites with real keys works like this:
1. Generate a new key pair. In the J2ME Wireless Toolkit you can do this by
pressing New Key Pair... in the MIDlet signing window, as described above.
2. Generate a Certificate Signing Request (CSR). Press Generate CSR... in the
signing window. To change the location of the CSR file, enter a new path or
press Browse... and choose a new file location. Press Create to write the CSR file.
After the CSR is written, you’ll see a message that indicates success.
3. Send the CSR to a certificate authority (CA). The CA will need more information
from you to verify your identity. You will also need to pay the CA for the
certificate they generate for you.
4. Once the CA has verified your identity and taken your money, you will receive
a certificate from the CA that certifies your public key.
5. Import the certificate into the J2ME Wireless Toolkit by pressing Import
Certificate... in the MIDlet signing window.
You can now use your own private key to sign MIDlet suites. The J2ME Wireless
Toolkit will take care of the details of placing the signature and your certificate into
the MIDlet suite.
6.4.3
Importing an Existing Key Pair
You may have keys in a J2SE keystore that you would like to use for MIDlet
signing. In this case, you need to import your signing keys to the J2ME Wireless
Toolkit so that you can sign your MIDlet suite. To do this from the MIDlet signing
window, click on Import Key Pair... Select a file that contains a J2SE keystore. You
will be prompted for the keystore passphrase. Then select the alias for the key pair
you wish to import. Finally, you will need to select a protection domain for the key
pair’s root certificate.
6.4.4
Removing a Key Pair
To remove a key pair from the MIDlet signing window, select its alias and choose
Action > Delete Selection.
6.5
Managing Certificates
You’ve already heard about the emulator’s list of root certificates. In this section,
you’ll learn how you can manage this list using the J2ME Wireless Toolkit.
54
J2ME Wireless Toolkit User’s Guide • October 2004
Real devices have similar lists of root certificates, although they cannot usually be
modified by the user. When you want to deploy your application on a real device,
you’ll have to use signing keys issued by a certificate authority whose root
certificate is present on the device. Otherwise, the device will be unable to verify
your application.
While you’re developing your application, the toolkit’s certificate management
utility provides a convenient way to manipulate the emulator’s list of root
certificates for testing purposes.
Choose File > Utilities... from the KToolbar menu. Click on the Manage
Certificates button to open up the certificate manager window.
FIGURE 28
The certificate manager
Each certificate is shown as a single line in the left part of the window, the
Certificate List. When you click on a certificate, its details are shown in the right
part of the window. You’ll also see the certificate’s associated protection domain.
6.5.1
Importing Certificates
You can import certficates either from certificate files or from J2SE keystore files.
To import a certificate from a file, click on Import Certificate... in the certificate
manager window. After you locate the certificate file, choose which protection
domain is associated with the certificate.
To import a certificate from a J2SE keystore, choose Action > Import J2SE
Certificate from the menu in the certificate manager window. First, choose a
protection domain for the certificate. Then select the keystore file and enter the
keystore password. Finally, select the alias for the certificate you wish to import.
Chapter 6
Security and MIDlet Signing
55
6.5.2
Removing Certificates
To remove a certificate from the list, select the certificate and choose Action >
Delete Selection.
56
J2ME Wireless Toolkit User’s Guide • October 2004
CHAPTER
7
Using the Wireless Messaging API
The J2ME Wireless Toolkit supports the Wireless Messaging API (WMA) with a
sophisticated simulation environment. WMA 1.1 (JSR 120) enables MIDlets to send
and receive Short Message Service (SMS) or Cell Broadcast Service (CBS) messages.
WMA 2.0 (JSR 205) includes support for MMS messages as well.
This chapter describes the tools you can use to develop WMA applications. It
begins by showing how to configure the emulator’s support of WMA. Next, you’ll
learn about the WMA console, a handy utility for testing WMA applications. The
chapter concludes with a brief description of the network monitor’s WMA support.
7.1
Setting Emulator Phone Numbers
Each running instance of the emulator has a simulated phone number that is
shown in the title bar of the emulator window. The phone numbers are important
because they are used as addresses for WMA messages. By default, the first
emulator instance has a phone number of +555000. Subsequent instances of the
emulator will have unique numbers in ascending order: +5550001, +5550002,
+5550003, etc.
You can affect the assigned phone numbers by choosing Edit > Preferences... from
the KToolbar menu and clicking on the WMA tab.
57
FIGURE 29
Setting WMA preferences
The Phone Number of Next Emulator field is just what it sounds like. If you fill in
a number for this field, the next emulator instance will have that number.
If the Phone Number of Next Emulator is already in use, or if the field is blank,
then the First Assigned Phone Number is used for the next emulator instance.
Subsequent instances count up.
For example, suppose you fill in +6269333 for the Phone Number of Next
Emulator and +5550000 for the First Assigned Phone Number. If you launch four
emulator instances, their numbers will be +6269333, +5550000, +5550001, and
+5550002.
7.2
Simulating an Unreliable Network
Long messages are sent by splitting them up, sending the fragments separately,
and reassembling the fragments on the receiving end. You can simulate some of the
hazards of the wireless network in the J2ME Wireless Toolkit. As before, choose
Edit > Preferences... from the KToolbar menu and click on the WMA tab.
If you’d like the toolkit to lose some message fragments, adjust the Random
Message Fragment Loss slider to the desired percentage. If you would like to
simulate a delay between the time message fragments are sent and received, enter
the delay in milliseconds in the Message Fragment Delivery Delay field.
58
J2ME Wireless Toolkit User’s Guide • October 2004
7.3
Sending Messages With the WMA
Console
The WMA console is a handy utility that allows you to send and receive messages.
You can, for example, use the WMA console to send SMS messages to a MIDlet
running on the emulator.
To launch the WMA console, choose File > Utilities... from the KToolbar menu.
Click on Open Console in the WMA box.
FIGURE 30
7.3.1
The WMA console
Sending a Text SMS Message
To send a text SMS message, click on Send SMS... The send window pops up.
Chapter 7
Using the Wireless Messaging API
59
FIGURE 31
Sending a text message
The window automatically lists the phone numbers of all running emulator
instances. Select a destination (Control-click to select multiple destinations) and
enter a port number if you wish. Type your message and click Send.
7.3.2
Sending a Binary SMS Message
You can use the WMA console to send the contents of a file as a binary message.
Click on Send SMS... to bring up the send window. Click on the Binary SMS tab.
60
J2ME Wireless Toolkit User’s Guide • October 2004
FIGURE 32
Sending a binary message
Selecting recipients is the same as for sending text SMS messages. You can type in
the path of a file directly, or click on Browse... to open up a file chooser.
7.3.3
Sending Text or Binary CBS Messages
Sending CBS messages is similar to sending SMS messages except that you don’t
need to choose recipients. To send a text or binary CBS message, click on Send
CBS... in the WMA console. The send window pops up.
Chapter 7
Using the Wireless Messaging API
61
FIGURE 33
7.3.4
Sending CBS messages
Sending MMS Messages
MMS messages consist of one or more files, usually images or sounds. MMS
message can be sent to multiple recipients. To send an MMS message from the
WMA console, click on the Send MMS... button.
The window for composing MMS messages has two tabs, one for recipients and
one for content. Begin by filling in a subject and recipient. If you wish to add more
recipients, click on the Add button. For example, to send a message to a running
emulator whose number is +5550001, you would fill in the To line as mms://
+5550001. To remove a recipient, first select its line, then click on Remove.
62
J2ME Wireless Toolkit User’s Guide • October 2004
FIGURE 34
Adding recipients for an MMS message
To add media files to the message, click on the Parts tab. Click on Add to add a
part to the message. To remove a part, select it and press Remove.
FIGURE 35
Adding parts to an MMS message
Chapter 7
Using the Wireless Messaging API
63
7.4
Receiving Messages in the WMA
Console
The WMA console can also receive messages. If you look at the WMA console
window, you’ll see it has its own phone number in the title bar. You can send
messages to the WMA console from your applications running on the emulator.
Received messages are shown in the WMA console’s text area.
7.5
Using the Network Monitor with WMA
The network monitor was fully described in Chapter 5, “Monitoring Applications.”
You can use the network monitor to track WMA messages that are sent to or from
the emulator.
Click on the SMS/CBS or MMS tabs to see WMA messages. Information about the
messages and their fragments is shown in the left pane of the network monitor.
Click on a message or message fragment to see its details in the right pane.
FIGURE 36
64
Using the network monitor to view a WMA message
J2ME Wireless Toolkit User’s Guide • October 2004
CHAPTER
8
Using the Mobile Media API
The Mobile Media API (MMAPI) provides a standard API for rendering and
capturing time-based media, like audio or video. The API was designed to be
flexible with respect to the media formats, protocols, and features supported by
various devices.
8.1
Supported Formats and Protocols
The emulator’s MMAPI implementation supports the following media types:
TABLE 6
Supported MMAPI media formats
MIME Type
Description
audio/midi
MIDI files
audio/sp-midi
Scalable Polyphony MIDI
audio/x-tone-seq
MIDP 2.0 tone sequence
audio/x-wav
WAV PCM sampled audio
image/gif
GIF 89a (animated GIF)
video/mpeg
MPEG video
video/vnd.sun.rgb565
Video capture
65
8.2
Using MediaControlSkin
The J2ME Wireless Toolkit comes with an emulator skin, MediaControlSkin, that
is focused on multimedia playback and control. The skin includes buttons with
symbols representing play, stop, volume up and volume down, and other
commands. To see the usefulness of MediaControlSkin, try it out with the
mmademo demonstration application.
8.3
Media Capture
The J2ME Wireless Toolkit emulator supports audio and video capture. Audio
capture is supported by using the capture capabilities of the system upon which
the emulator runs.
Video capture is supported by simulating a camera input.
See the mmademo example application for details and source code that
demonstrates how to capture audio and video.
8.4
Well-Behaved MIDlets
MIDlets have a life cycle that is defined in the MIDP specification. MIDlets can be
paused by events such as incoming phone calls. A well-behaved MIDlet releases
important device resources when it is paused and reallocates or restarts those
resources when the MIDlet is resumed. In the MMAPI arena, any Players that are
rendering content should be stopped when a MIDlet is paused.
The J2ME Wireless Toolkit will print a message to the console if you pause a
MIDlet and it does not stop its running Players. You can test this feature yourself
using the PausingVideoTest MIDlet in the mmademo demonstration application.
See Appendix for details.
The warning message is printed once only for each running emulator.
66
J2ME Wireless Toolkit User’s Guide • October 2004
CHAPTER
9
Working With Mobile 3D Graphics
This chapter provides a brief overview of working with 3D graphics content.
9.1
JSR 184 Overview
JSR 184 is a specification that defines the Mobile 3D Graphics (M3G) API for J2ME.
This API provides 3D functionality in a compact package that’s appropriate for
CLDC/MIDP devices. The API provides two methods for displaying 3D graphics
content. The immediate mode API makes it possible for applications to directly create
and manipulate 3D elements. Layered on top of this is a scene graph API, also called
retained mode, that makes it possible to load and display entire 3D scenes that have
been designed ahead of time. Applications are free to use whichever approach is
most appropriate or to use a combination of the retained mode and immediate
mode APIs. The JSR 184 specification also defines a file format (.m3g) for scene
graphs.
For more information, consult the JSR 184 specification:
http://jcp.org/en/jsr/detail?id=184
JSR 184 provides a standard API for CLDC/MIDP devices, enabling a new
generation of 3D applications. The immediate mode API, in turn, is compatible
with OpenGL ES, a standard lightweight API for 3D graphics. See http://
khronos.org/ for more information on OpenGL ES.
9.2
Immediate Mode
Immediate mode is appropriate for applications that generate 3D graphics content
algorithmically, like scientific visualizations or statistical graphs. The application
creates 3D objects and manipulates them directly.
67
For an example of immediate mode, see the Life3D MIDlet in the Demo3D
example application.
9.3
Retained Mode
Most applications, particularly games, will use the retained mode or scene graph
API. In this approach, a graphic designer or artist uses 3D modeling software to
create a scene graph. The scene graph is saved in the JSR 184 file format. The scene
graph file is bundled with the application. At runtime, the application uses the
scene graph API to load and display the file.
Applications can manipulate parts of a loaded scene graph to animate characters or
create other effects. The basic strategy is to do as much work as possible in the
modeling software. At runtime, the application can grab and manipulate parts of
the scene graph, which can also include paths for animation or other effects.
For an example of retained mode, see the retainedmode MIDlet in the Demo3D
example application.
9.4
Trading Quality for Speed
One of the challenges of MIDP development is the constrained environment of
typical devices. Compared to desktop computers, MIDP devices have slow
processors and little memory. These challenges extend into the arena of 3D
graphics. To accomodate a wide variety of implementations, the JSR 184
specification provides various mechanisms to make the display of a 3D scene as
efficient as possible.
One approach is scoping, a technique where you tell the 3D graphics
implementation when objects are not going to interact with each other. For
example, if you defined a scene graph for a house, you could use scoping to specify
that the light in the basement doesn’t affect the appearance of the bedroom on the
second floor. Scoping makes the implementation’s job easier by reducing the
number of calculations required to show a scene.
In general, however, the best way to improve the rendering speed of 3D scenes is to
make some compromises in quality. The Mobile 3D Graphics API includes
rendering hints so that applications can suggest how the implementation can
compromise quality to improve rendering speed.
68
J2ME Wireless Toolkit User’s Guide • October 2004
9.5
Creating Mobile 3D Graphics Content
Most mobile 3D applications will use scene graphs in resource files to describe
objects, scenes, and characters. Usually it is not programmers but graphic designers
or artists who create the scene graphs, using standard 3D modeling tools.
Several vendors offer tools for authoring content and converting files to the JSR 184
format. Superscape (http://superscape.com/) is one such vendor.
Because it is relatively difficult to create and manipulate 3D graphics content in an
application using the immediate mode API, most applications rely as much as
possible on a scene graph file. By putting as much as possible into the scene graph
file at design time, the application’s job at runtime will be considerably simplified.
Chapter 9
Working With Mobile 3D Graphics
69
70
J2ME Wireless Toolkit User’s Guide • October 2004
CHAPTER
10
Using the PIM and FileConnection
APIs
The J2ME Wireless Toolkit supports JSR 75, the PDA Optional Packages for the
J2ME Platform. JSR 75 includes two independent APIs:
■
The FileConnection optional package allows MIDlets access to a local device
file system.
■
The Personal Information Management (PIM) optional package includes APIs
for manipulating contact lists (address book), calendars, and to-do lists.
This chapter describes how the J2ME Wireless Toolkit implements the
FileConnection and PIM APIs.
10.1
The FileConnection API
On a real device, the FileConnection API typically provides access to files stored
in the device’s memory or on a memory card.
In the J2ME Wireless Toolkit emulator, the FileConnection API allows MIDlets
to access files stored on your desktop computer’s hard disk.
The files that can be accessed using FileConnection are stored in subdirectories
of {toolkit}\appdb\{skin}\filesystem. For example, the DefaultColorPhone
emulator skin comes with a root directory installed called root1, which contains a
file called Readme. The full path of the file is
{toolkit}\appdb\DefaultColorPhone\filesystem\root1\Readme.
Note – If multiple instances of the same emulator skin run simultaneously, the
J2ME Wireless Toolkit will generate unique file paths for each one. For example, a
second instance of DefaultColorPhone might have a file system path name of
{toolkit}\appdb\DefaultColorPhone.1089982856218\filesystem.
71
Each subdirectory of filesystem is called a root. The J2ME Wireless Toolkit
provides a mechanism for managing roots. While the emualtor is running, choose
MIDlet > External events from the emulator window’s menu. You’ll see a utility
window for adding and removing roots.
FIGURE 37
Managing filesystem roots
The mounted roots and their contents are available to applications using the
FileConnection API.
To add a new root directory, click on Mount New... and fill in a name for the
directory. To make a directory inaccessible to the FileConnection API, select it in
the list and click Unmount.
10.2
The PIM API
The J2ME Wireless Toolkit emulator stores contact, calendar, and to-do information
in standard files on your desktop computer’s hard disk. All information is stored in
{toolkit}\appdb\{skin}\pim. This directory is shared by all running emulators. Lists
are stored in subdirectories of the contacts, events, and todo directories. For
example, a contact list called Contacts is contained in
{toolkit}\appdb\{skin}\pim\contacts\Contacts.
Inside the list directory, items are stored in vCard or vCalendar format (see http:/
/www.imc.org/pdi/). Contacts are stored in vCard format, while calendar and
to-do items are both stored in vCalendar format.
72
J2ME Wireless Toolkit User’s Guide • October 2004
CHAPTER
11
Using the Bluetooth and OBEX
APIs
The J2ME Wireless Toolkit emulator supports JSR 82, the Java APIs for Bluetooth.
JSR 82 includes two independent APIs:
■
The Bluetooth API provides an interface to Bluetooth wireless networking,
including device discovery and data exchange.
■
The OBEX API allows applications to use the Object Exchange (OBEX) protocol
over Bluetooth or other communication channels.
This chapter describes how the J2ME Wireless Toolkit implements the Bluetooth
and OBEX APIs.
11.1
Bluetooth Simulation Environment
The J2ME Wireless Toolkit emulator allows you to develop and test application that
use Bluetooth without having actual Bluetooth hardware. The toolkit simulates a
Bluetooth environment for running emulators. Multiple emulator instances can
discover each other and exchange data using the Bluetooth API.
For an example, see the documentation of BluetoothDemo in Appendix A,
“Application Demonstrations.”
11.2
OBEX Over Infrared
The J2ME Wireless Toolkit implements OBEX transfer over simulated Bluetooth
and infrared connections. The simulated infrared connection follows the IrDA
standard (see http://www.irda.org/). Simulated infrared transfers can take
place between multiple running emulators.
73
11.3
Setting OBEX and Bluetooth Preferences
The J2ME Wireless Toolkit allows you to configure the Bluetooth and OBEX
simulation environment. Choose Edit > Preferences... from the KToolbar menu to
see the following window.
FIGURE 38
11.3.1
Bluetooth and OBEX preferences
OBEX Preferences
Devices using IrDA in the real world discover other devices by “listening”. You can
configure how long the J2ME Wireless Toolkit emulator waits to discover another
device using the Discovery timeout field in the IrDA OBEX section of the
preferences window. Enter a value in milliseconds.
At the API level, the discovery timeout value determines how long a call to
Connector.open("irdaobex://discover...") will block before it returns or
throws an exception.
The maximum packet length affects how much data is sent in each packet between
emulators. Shorter packet values will result in more packets and more packet
overhead.
74
J2ME Wireless Toolkit User’s Guide • October 2004
11.3.2
Bluetooth Discovery Timeout
In the Bluetooth section of the preferences window, the Device discovery timeout
is the amount of time, in milliseconds, the emulator will wait while attempting to
locate other devices in the simulated Bluetooth environment.
11.3.3
Bluetooth System Properties
The System Properties tab in the Bluetooth section of the preferences contains
properties that can be retrieved in an application using the getProperty()
method in javax.bluetooth.LocalDevice.
The Bluetooth properties are fully described in the JSR 82 specification.
11.3.4
Bluetooth BCC Properties
The Bluetooth Control Center (BCC) controls Bluetooth settings. Some devices may
provide a GUI to customize Bluetooth settings. In the J2ME Wireless Toolkit, the
BCC is configured using the BCC Properties tab of the Bluetooth preferences. The
properties are as follows:
TABLE 7
BCC properties
Property
Description
Enable Bluetooth
support
If this property is disabled, then
LocalDevice.getLocalDevice() throws a
BluetoothStateException and no connections can be created.
This is useful to test the behavior of your application on devices
that support JSR 82 but may have the Bluetooth feature turned off.
Device is
discoverable
This property indicates whether or not this emulator can be
discovered by other emulators.
Friendly name
The friendly name is a human-readable name for the emulator in
the simulated Bluetooth environment. If the name is left blank, the
emulator will not support the “friendly name” feature.
Encryption
This property determines whether connection encryption is
supported (on) or not (off). In addition, the force settings means
all connected must be encrypted. See the documentation for
RemoteDevice’s encrypt() method for details.
Authorization
This is similar to the Encryption property. See RemoteDevice’s
authorize() method.
Authentication
This is similar to Encryption and Authorization. See
RemoteDevice’s authenticate() method.
Chapter 11
Using the Bluetooth and OBEX APIs
75
76
J2ME Wireless Toolkit User’s Guide • October 2004
CHAPTER
12
Using Web Services
The J2ME Wireless Toolkit emulator supports JSR 172, the J2ME Web Services
Specification. JSR 172 provides APIs for accessing web services from J2ME
applications. It also includes an API for parsing XML documents.
The J2ME Wireless Toolkit provides a stub generator that automates creating source
code for accessing web services. To get to the stub generator, choose File >
Utilities... from the KToolbar menu. Click on Stub Generator.
FIGURE 39
The web services stub generator
The WSDL Filename or URL should point to the WSDL file for the web service
you want to access. The Output Path indicates the location where you want the
stub files to be placed. Output Package indicates the Java language package name
for the stub files. Finally, choose whether you want to generate CLDC 1.0 or CLDC
1.1 stubs.
Press OK to generate the stub files.
77
78
J2ME Wireless Toolkit User’s Guide • October 2004
APPENDIX
A
Application Demonstrations
This appendix describes the application demonstrations that are bundled with the
J2ME Wireless Toolkit.
A.1
Overview
The J2ME Wireless Toolkit includes demonstration applications that highlight some
of the technologies and APIs that are supported by the emulator.
The following table lists all the demonstration applications that are included in this
release. The demonstrations that are new or enhanced in this release are marked
with NEW.
The goal of these demonstrations is to give you a glimpse of the API features of the
emulator and the enhancements throughout the toolkit.
Most demonstration applications are simple to run. The next section contains
instructions for running most demonstrations. Demonstrations that have additional
documentation are linked in the table below.
The source code for every demonstration application is available in the
{toolkit}\apps directory. Subdirectories contain projects, and each project has a src
directory that contains Java source code. For example, if the toolkit is installed in
79
\WTK22, the source code for the SMS sender MIDlet (example.sms.SMSSend) in
WMADemo is contained in
\WTK22\apps\WMADemo\src\example\sms\SMSSend.java.
TABLE 8
Special
Instructions
Demonstration
APIs
Description
Audiodemo
MMAPI 1.1
Demonstrates audio capabilities,
including mixing and playing
audio with an animation
BluetoothDe
mo
JSR 82
Bluetooth
Demonstrates device discovery
and data exchange using
Bluetooth
Section A.3
Demo3D
JSR 184 Mobile
3D Graphics
Contains MIDlets that
demonstrate how to use 3D
graphics, both immediate mode
and retained mode
Section A.4
Demos
MIDP 2.0
Includes various examples:
animation, color, networking,
finance, and others
FPDemo
CLDC 1.1
Simple floating point calculator
Games
MIDP 2.0
Includes TilePuzzle,
WormGame, and PushPuzzle
JSR172Demo
Web services
Demonstrates how to use the
JSR 172 API to connect to a web
service from a MIDlet
Section A.5
mmademo
MMAPI 1.1
Demonstrates MMAPI features,
including tone sequences, MIDI
playback, sampled audio
playback, and video
Section A.6
NetworkDem
o
MIDP 2.0
Shows how to use datagrams
and serial connections
NEW
ObexDemo
JSR 82 OBEX
Demonstrates transferring data
using OBEX over IrDA
Section A.7
NEW
PDAPDemo
JSR 75 PIM and
FileConnection
Shows how to manipulate
contacts, calendar items, and todo items. Demonstrates
accessing local files.
Section A.8
NEW
NEW
80
Application demonstrations
J2ME Wireless Toolkit User’s Guide • October 2004
Application demonstrations
TABLE 8
NEW
A.2
Special
Instructions
Demonstration
APIs
Description
Photoalbum
MIDP 2.0
Demonstrates a variety of image
formats
UIDemo
MIDP 2.0
Showcases the breadth of MIDP
2.0's user interface capabilities
WMADemo
WMA 2.0
Shows how to send and receive
SMS, and CBS, and MMS
messages
Section A.9
General Instructions
It's usually very simple to run one of the demonstration applications. This section
describes the general procedure. More detailed instructions for specific
demonstrations are referenced in the table above.
The first step is to run KToolbar. To do this, go to the Windows Start menu and
choose Start > Programs > J2ME Wireless Toolkit 2.2 > KToolbar. The KToolbar
window pops up:
FIGURE 40
KToolbar
Click on the Open Project... button to open a demonstration application. You'll see
a list of all the available applications.
Appendix A
Application Demonstrations
81
FIGURE 41
Opening a demonstration application project
Select one and click on the Open Project button in the dialog.
Once the application is opened, all you need to do is press the Run button. The
device emulator will pop up running the example application. Choose a specific
demonstration to run from the menu and press the soft button for Launch.
Some demonstrations require other setup and instructions. Check the full list to see
if there are specific instructions for a demonstration.
A.3
BluetoothDemo
This application contains a MIDlet that demonstrate the use of JSR 82’s Bluetooth
API.
Bluetooth Demo shows how images can be transferred between devices using
Bluetooth. You will need to run two instances of the emulator to see how this
demonstration works.
In the first emulator, choose Bluetooth Demo, then Server. The emulator will ask
you if you want to allow a Bluetooth connection. Choose Yes. The server starts up
and displays a list of images. At the beginning, none of the images are being made
available on the Bluetooth network. To make images available, select them and
choose Publish image from the menu. Images with a green icon are published,
while those with a purple icon are not.
82
J2ME Wireless Toolkit User’s Guide • October 2004
FIGURE 42
Running the Bluetooth Demo server
On the second emulator, choose Bluetooth Demo, then Client. The MIDlet tells
you it’s ready to search for images. Choose Find. The MIDlet will find the other
emulator and get a list of images from it. Select one from the list and choose Load.
The emulator asks if you want to allow the connection. Choose Yes.
In the first emulator, the server, a prompt appears, asking if you want to authorize
the connection from the client. Choose Yes. The image is transferred via simulated
Bluetooth and shown on the client emulator.
Appendix A
Application Demonstrations
83
FIGURE 43
An image transferred via simulated Bluetooth
You can avoid the permission prompts by running the demonstration in the
trusted protection domain.
A.4
Demo3D
This application contains three MIDlets that show off the emulator's support of JSR
184, the Mobile 3D Graphics API.
A.4.1
Life3D
Life3D implements the popular Game of Life in three dimensions. Live cells are
represented by cubes. Each cell has 26 possible neighbors (including diagonals).
For each step of the animation, cells with fewer than 4 neighbors die of loneliness,
while cells with more than 5 neighbors die of overcrowding. An empty cell with
exactly 4 neighbors will become a new live cell.
The view of the playing board rotates slowly so you can view the board from all
angles.
84
J2ME Wireless Toolkit User’s Guide • October 2004
FIGURE 44
The Game of Life in three dimensions
The keypad buttons provide control over the game.
TABLE 9
Controls for Life3D
Button
Description
0
Pause the animation
1
Resume the animation at its default speed
2
Speed up the animation
3
Slow down the animation
4
Choose the previous preset configuration from a list that includes
gems like P4 Glider, Skew beehive plus, and P4 Rotor.
5
Choose the next preset configuration from the list.
*
Generate a random configuration and animate until it stabilizes or
dies. If it dies, generate a new random configuration.
This source code for this example is particularly well-documented. Take a look at
{toolkit}\apps\Demo3D\src\com\superscape\m3g\wtksamples\life3d\Lif
e3D.java.
A.4.2
PogoRoo
PogoRoo shows you the rear end of a kangaroo bouncing up and down on a pogo
stick.
Appendix A
Application Demonstrations
85
FIGURE 45
A bouncing kangaroo
You can get the kangaroo to bounce around the landscape by using the arrow keys.
Push up to go forward, down to go backward, and left and right to change
direction. You might need to hold down the keys to see an effect.
A.4.3
retainedmode
The retainedmode MIDlet plays back a scene file that shows a tireless
skateboarder in an endless loop.
86
J2ME Wireless Toolkit User’s Guide • October 2004
FIGURE 46
A.5
A tireless skateboarder
JSR172Demo
JSR172Demo shows how to access a web service from a MIDlet. The web service is
already running on an Internet server. You should be able to simply build and run
the example.
If you are behind a firewall, you’ll need to configure the emulator’s proxy server
settings. Choose Edit > Preferences... from the KToolbar menu, then select the
Network Preferences tab. Fill in the proxy server addresses and ports.
JSR172Demo contains a single MIDlet, Server Script. Launch it and follow the
prompts. You can browse through simulated news headlines, all of which are
retrieved from the web service.
To see what’s going on behind the scenes, use the network monitor.
A.6
mmademo
The mmademo application contains four MIDlets that showcase the multimedia
capabilities of the J2ME Wireless Toolkit. This section describes the MIDlets and
includes additional information about using multimedia from your applications.
Appendix A
Application Demonstrations
87
A.6.1
Simple Tones
The Simple Tones example demonstrates how to use interactive synthetic tones.
The first menu entries play tones with different pitch and duration using
Manager.playTone(). Choosing the third menu item will play a chord on the
interactive MIDI device (locator "device://midi"). The shortMidiEvent()
method of MIDIControl is used to trigger the notes of the chord.
A.6.2
Simple Player
The Simple Player application demonstrates the range of audio and video
capabilities of the emulator. It includes example files in a variety of formats and
can play files from the emulator's persistent storage or from HTTP URLs.
The player portion uses a generic javax.microedition.media.Player
interface. The player displays duration, media time, and controls for running the
media file. If metadata is available in a file, the player enables you to view the
information, such as author and title. In the case of MIDI files, if karaoke text is
present in the file, it displays on the screen during play. Graphical user interface
controls can be viewed on the display screen if applicable. You can access these
controls by selecting one of the media samples in Simple Player, then pressing the
Menu button to view and select the desired command.
The demo includes the following media samples:
88
■
Bong plays a short WAV file. You can adjust certain playback features, as
described later in this document. The display shows the duration of the sound in
minutes:seconds:tenths of a second, for example 00:17:5. This audio sample is a
resource file in the MIDlet suite JAR file.
■
MIDI Scale plays an example musical scale. The display shows the title of the
selected music file, the duration of the song, the elapsed time during playback,
and the current tempo in beats per minute (bpm). This MIDI file is stored in the
MIDlet suite JAR file.
■
Simple Ring Tone plays a short sequence of Beethoven's Fifth Symphony.
The display shows the title of the selected music file, the duration of the song,
the elapsed time in seconds and tenths of a second during playback, and the
current tempo in beats per minute (bpm). This ringtone file (.jts format) is
stored in the MIDlet suite JAR file.
■
WAV Music plays a brief audio file. The display shows the title of the audio file,
the duration of the audio the elapsed time during playback, and the playback
rate in percent. This WAV file is retrieved from an HTTP server.
■
MIDI Scale plays a MIDI file that is retrieved from an HTTP server.
■
The Animated GIF example shows an animated GIF that counts from 1 to 5.
The file is stored in the MIDlet suite JAR.
■
Audio Capture from a default device lets you capture audio from the
microphone or connected device. The sound is captured and played back on the
speaker. To avoid feedback, use a headset.
J2ME Wireless Toolkit User’s Guide • October 2004
■
Video Capture Simulation simulates viewing input video such as might be
possible on a device equipped with a camera.
■
[enter URL] allows you to play back media files from arbitrary HTTP servers.
Type a valid URL at the insertion point and click OK to play a file. If you want
to open an HTTP directory from which to select media, be sure to add a slash to
the end of the URL.
In addition, Simple Player parses ring tones in Ringing Tones text transfer
language (RTTTL). See http://www.convertyourtone.com/rtttl.html for
information on RTTTL.
A key feature of Simple Player is a common set of commands that control media
playback. The commands are available from the Simple Player menu, and some
have associated keypad buttons. The following table describes these commands.
TABLE 10
Simple Player commands
Command
Key
Description
Mute/
Unmute
0
Turns off sound but the file continues to play. This command
toggles to Unmute.
Volume
* and
#
Increases or decreases loudness.
META Data
Displays information provided by the media file such as
copyright information, title, and track list.
Stop in 5
seconds
Pauses the audio play in five seconds when set during
playback.
Rate
4 and
6
Tempo
Pitch
Alters the rate of speed of playback.
Increases or decreases the tempo of the tone sequence or MIDI
file.
Up
and
down
Start/Stop
Recording
Lowers or raises the notes in a MIDI file.
Records the audio playback. A file is created containing the
recorded audio in the directory in which the emulator is
running. If you do not specify a filename, a file called
recording.wav is created. This command toggles to Stop
Recording.
Step Frame
7 and
9
Jumps forward or backward one frame at a time in a video file.
Play/Stop
2 and
Select
Starts or stops the media.
Appendix A
Application Demonstrations
89
TABLE 10
Command
Simple Player commands
Key
Loop Mode
Skip
Plays back the audio file immediately after completion of play.
Running Loopmode once plays the audio file once. Pressing a
second time plays the file three times. Pressing a third time
plays the file repeatedly. Pressing a fourth time returns to single
play.
1 and
3
Rewind
Stop and
Rewind
Quick Help
Description
Skips forward or backward five percent of the duration of the
media file. The sound track syncs to the video.
Returns to the start time of the audio playback.
5
Stops plaback and rewinds to the start time.
Displays a list of commands and keypad buttons.
The commands may or may not be available depending on the media type that
Simple Player is playing. In addition, some commands can be invoked using the
keypad buttons. The following table describes the availability of commands, their
keypad equivalents, and the relevant class from MMAPI.
Note that a short list of commands and the corresponding keypad buttons is
available in the Simple Player application itself. Just choose the Quick Help
command from the menu.
A.6.3
PausingAudioTest
This MIDlet exists to demonstrate how the J2ME Wireless Toolkit will warn you if
a paused MIDlet has not stopped its running Players. After you launch the
MIDlet, choose the Play command to start playing some audio. The screen displays
a status, which is either “Well-behaved” or “Not Well-Behaved.”
Pause the MIDlet by choosing MIDlet > Pause from the emulator window’s menu.
As expected, the MIDlet is paused and no message is displayed on the KToolbar
console. Restart the MIDlet by choosing MIDlet > Resume from the emulator
window’s menu.
Now choose the Misbehave command. Pause the MIDlet again. In the KToolbar
console, you will receive a short lecture about how well-behaved MIDlets release
resources when they are paused.
A.6.4
Video
The Video application illustrates how the emulator is capable of playing animated
GIF files and capturing video. On a real device with a camera, video capture can be
used to show the user what the camera sees.
90
J2ME Wireless Toolkit User’s Guide • October 2004
Animated GIFs and video capture can be implemented using either a Form Item or
a Canvas. The Video demonstration includes all the possibilities:
A.6.5
■
Animated GIF - Form [jar] shows an animated GIF as a Form Item. The
form also includes some information about the playback, including the current
time. Choose the Snapshot command to take a snapshot of the running
animation. The snapshot will be placed in the form following the animated GIF.
■
Animated GIF - Canvas [jar] shows an animated GIF in a Canvas. A
simple indicator shows the progress through the animation. Choose Snapshot to
get a still image of the current appearance. The snapshot is shown briefly, then
the display goes back to the animation.
■
Video Capture - Form simulates capturing video from a camera or other
source and showing it as an Item in a Form. Choose the Snapshot command to
take a snapshot of the captured video. The snapshot will be placed in the form
following the video capture.
■
Video Capture - Canvas simulates capturing video from a camera or other
source and showing it in a Canvas. Choose Snapshot to get a still image of the
current appearance. The snapshot is shown briefly, then the display goes back to
the video capture.
Attributes for mmademo
The mmademo applications have the following attributes that you can modify in
the User Defined tab of the project settings dialog box:
TABLE 11
A.7
Descriptions of MMAPI-specific MIDlet attributes
Attribute
Description
PlayerTitle-<n>
Name of the nth media title to be played back by the Simple
Player MIDlet.
PlayerURL-<n>
Location of the nth media title, PlayerTitle-<n>, to be played
back by the Simple Player MIDlet.
VideoTest-<n>
The name of the nth media title to be played back by the Video
application.
VideoTestURL<n>
Location of the nth media title, VideoTest-<n>, to be played
back by the Video application.
ObexDemo
This application shows how to transfer image files between emulator instances
using the OBEX API. This demonstration shows the use of OBEX over a simulated
infrared connection.
Appendix A
Application Demonstrations
91
Run two instances of the emulator. One listens for incoming connections, while the
other attempts to send an image. In the first emulator, choose Obex Demo, then
Receive Image. The emulator will ask for permission to listen. Choose Yes. The
emulator will display a screen that indicates it’s waiting for incoming connections.
FIGURE 47
Waiting for an OBEX connection
In the second emulator, launch Obex Demo, then choose Send Image. You’ll see a
list of images. Select one and choose Send. The emulator will ask for permission to
make the outgoing connection. Choose Yes.
Back in the first (listening) emulator, you’ll see a prompt asking whether you want
to accept the incoming connection.
92
J2ME Wireless Toolkit User’s Guide • October 2004
FIGURE 48
Prompting to accept a connection
Choose Yes. The image you selected is transferred over the simulated infrared link
and displayed on the first emulator.
FIGURE 49
A successfully transferred image
Appendix A
Application Demonstrations
93
A.8
PDAPDemo
PDAPDemo shows how to use the PIM and FileConnection APIs that are part of
the JSR 75 specification.
A.8.1
Browsing Files
To run the file browser, you’ll need to give the MIDlet appopriate security
authorization. The easiest way to do this is to choose Edit > Preferences... from the
KToolbar menu. Click on the Security tab. Change the Security domain to trusted
and press OK.
Now open and run the PDAPDemo project. Launch the FileBrowser MIDlet. You
will see a directory listing. You can browse through the available directories and
files. By default there is one directory, root1.
FIGURE 50
Browsing files
Select a directory and press the select button to enter it. The root1 directory
contains a single file, Readme.
94
J2ME Wireless Toolkit User’s Guide • October 2004
FIGURE 51
Contents of the root1 directory
Using the commands in the demonstration, you can view the file or see its
properties. Try selecting the file and choosing Properties or View from the menu.
FIGURE 52
Viewing file properties and contents
Appendix A
Application Demonstrations
95
The actual files are located in
{toolkit}\appdb\DefaultColorPhone\filesystem, assuming you are using the
DefaultColorPhone emulator skin. You can add files and root directories as you
wish and they will be visible to the JSR 75 File API. See Chapter 10 for more
information.
A.8.2
The PIM API
The JSR75 PIM APIs example demonstrates how to access personal information,
like contact lists, calendars, and to-do lists. After you launch the example, choose a
type of list from the main menu.
In this example application, each type of list works the same way and each list type
contains a single list. For example, if you choose Contact Lists, there is a single
contact list called Contacts. Event Lists contains a single list called Events, and ToDo Lists conatains a single list called To do.
FIGURE 53
Choosing a list type
Once you've selected a list type and chosen the specific list, you'll see all the items
in the list. If this is the first time you've run the example, the list is probably empty.
96
J2ME Wireless Toolkit User’s Guide • October 2004
FIGURE 54
An empty contact list
To add an item, choose New from the menu. The application prompts you for a
Formatted Name for the item. You can add more data fields to this item using Add
Field in the menu. You'll see a list of field names. Pick one, then enter the value for
the new field.
FIGURE 55
Adding contact fields
To actually save the list item, choose Commit from the menu.
Appendix A
Application Demonstrations
97
FIGURE 56
Saving an item
You can return to the list by choosing the Back command. You'll see the item you
just created in the list.
The items that you create are stored in standard vCard or vCalendar format in the
{toolkit}\appdb\{skin}\pim directory. See Chapter 10 for more information.
The PIM API allows for exporting contact, calender, and to-do items in a standard
format. The exact format depends on the list type. When you are viewing an item
in any list, the menu contains a command for viewing the exported item.
For example, when you are viewing a contact list item, the menu contains Show
vCard. When you choose this command, the exported item is shown on the screen.
Calendar items and to-do items both get exported as vCalendar.
A.9
WMADemo
This application shows how to send and receive SMS, CBS, and MMS messages.
The J2ME Wireless Toolkit offers a flexible emulation environment to support
messaging. Messages can be exchanged between emulator instances and can be
generated or received using the WMA console utility.
Because this example makes use of the push registry, you can't see all of its features
just by using the Run button. You need to use the Run via OTA feature to install
the application into the emulator in a process that mirrors how applications are
installed on real devices. If you don’t know how to do this, read about it in
Chapter 2, “Developing MIDlet Suites.”
98
J2ME Wireless Toolkit User’s Guide • October 2004
To see the magic of the push registry, use the WMA console to send the emulator a
message. Launch the console by choosing File > Utilities... from the KToolbar
menu. Click on the Open Console button in the WMA box to launch the WMA
console.
Click on the Send SMS... button in the WMA console window. Choose the number
that corresponds to the emulator, probably +5550000. If you're not sure what
number the emulator is using, look in its title bar. Choose the number in the SMS
message window, then fill in a port number of 50000. Then type in your text
message and click on Send.
FIGURE 57
Sending a text message
The emulator will spring to life. First it politely asks if it can launch the WMADemo
application.
Appendix A
Application Demonstrations
99
FIGURE 58
The push registry springs to life
Choose Yes. The SMSReceive MIDlet is launched and immediately displays the
incoming SMS message.
FIGURE 59
An incoming text message
You can also use the WMA console to send and receive CBS and MMS messages.
See Chapter 7, “Using the Wireless Messaging API,” for more information.
100
J2ME Wireless Toolkit User’s Guide • October 2004
If you are attempting to send text messages to WMADemo using the WMA console,
make sure to specify the port number as 50000. Use port 50001 for CBS messages.
For MMS messages, use example.mms.MMSDemo as the application ID.
For example, to send an MMS message from the WMA console to the emulator,
make sure that WMADemo has been installed using Run via OTA as described above.
Leave the emulator running.
In the WMA console, click on Send MMS... to pop up the MMS composition
window. Fill in a message subject, the application ID example.mms.MMSDemo, and
the telephone number of the running emulator.
FIGURE 60
Addressing an MMS message
Next, click on the Parts tab. The WMA console allows you to select files from your
hard disk that you wish to send as parts of the MMS message. Click Add to add a
file to the message. Use the file browser to find the file you want to send and click
OK.
Appendix A
Application Demonstrations
101
FIGURE 61
Adding parts to an MMS message
Click on Send to send the message.
The emulator asks if it can launch WMADemo. Click on Yes. The image and its
information are displayed.
FIGURE 62
102
WMADemo receives the image
J2ME Wireless Toolkit User’s Guide • October 2004
APPENDIX
B
Command Line Reference
This appendix describes how to operate the J2ME Wireless Toolkit from the
command line and details the steps required to build and run an application. It also
describes the J2ME Wireless Toolkit certificate manager utility, called MEKeyTool,
and the MIDlet signing utility, called JAD Tool (Java Application Descriptor Tool).
B.1
Prerequisites
Before building and running an application from the command line, verify that you
have a version no earlier than 1.4.2 of the J2SE SDK. Run the jar.exe command
(make sure the command is in your PATH) and then run java -version at the
command line to verify that the version of the J2SE SDK that is actually being used
is 1.4.2.
For more examples, see the files build.bat and run.bat in the bin directories of
the demonstration applications. You can find these files under the
{toolkit}\apps\<demo>\bin directory where {toolkit} is the installation directory of
the J2ME Wireless Toolkit and <demo> is the name of one of the demo applications.
B.2
The Development Cycle
For a full description of developing MIDP applications, see Chapter 2, “Developing
MIDlet Suites.” This section describes how to accomplish each of the steps in the
development cycle from the command line.
103
B.2.1
Build
Using KToolbar, building a project is a single step. Behind the scenes, however,
there are actually two steps. First, Java source files are compiled into Java class
files. Next, the class files are preverified, which means they are prepared for the
CLDC KVM.
Use the javac compiler from the J2SE SDK to compile Java source files. You can
use the existing J2ME Wireless Toolkit project directory structure. You’ll need to
use the -bootclasspath option to tell the compiler to use the MIDP APIs, and
you’ll use the -d option to tell the compiler where to put the compiled class files.
The following example shows how you could compile a MIDP 2.0 application,
taking source files from the src directory and placing the class files in the
tmpclasses directory. Newlines have been added for clarity.
javac
-bootclasspath ..\..\lib\cldcapi10.jar;..\..\lib\midpapi20.jar
-d tmpclasses
src\*.java
If you want to use the optional APIs that are supported by the toolkit, add their
JAR files to the -bootclasspath option.
For more information on javac, consult the J2SE documentation.
The next step is to preverify the class files. In the bin directory of the J2ME
Wireless Toolkit lives a handy utility called preverify. The syntax for the
preverify command is as follows:
preverify [options] <files | directories>
Some of the options are as follows:
-classpath <classpath>
Specify the directories or JAR files (given as a semicolon-delimited list) from
which classes are loaded.
-d <output directory>
Specify the directory into which the preverifier should output classes. This
directory must exist before preverifying. If this option is not used, the preverifier
places the classes in a directory called output.
Following the example for compiling, use the following command to verify the
compiled class files. As before, newlines have been added for clarity.
preverify
-classpath ..\..\lib\cldcapi10.jar;..\..\lib\midpapi20.jar
-d classes
tmpclasses
104
J2ME Wireless Toolkit User’s Guide • October 2004
As a result of this command, preverified class files are placed in the classes
directory. If your application uses WMA, MMAPI, or other versions of CLDC or
MIDP, be sure to include the relevant .jar files in the classpath.
B.2.2
Package
To package a MIDlet suite, you must create a manifest file, an application JAR, and
finally, a MIDlet suite descriptor.
Create a manifest file containing the appropriate attributes as specified in the MIDP
specification. You can use any text editor to create the manifest file. A manifest
might have the following contents, for example:
MIDlet-1: My MIDlet, MyMIDlet.png, MyMIDlet
MIDlet-Name: MyMIDlet
MIDlet-Vendor: My Organization
MIDlet-Version: 1.0
MicroEdition-Configuration: CLDC-1.0
MicroEdition-Profile: MIDP-2.0
Create a JAR file containing the manifest as well as the suite’s class and resource
files. To create the JAR file, use the jar tool that comes with the J2SE SDK. The
syntax is as follows:
jar cfm <file> <manifest> -C <class_directory> . -C <resource_directory> .
The arguments are as follows:
<file>: The JAR file to create.
<manifest>: The manifest file for the MIDlets.
<class_directory>: The directory containing the application’s classes.
<resource_directory>: The directory containing the application’s resources.
For example, to create a JAR file named MyApp.jar whose classes are in the
classes directory and resources are in the res directory, use the following
command:
jar cfm MyApp.jar MANIFEST.MF -C classes . -C res .
Create a JAD file containing the appropriate attributes as specified in the MIDP
specification. You can use any text editor to create the JAD file. This file must have
the extension .jad.
Note – You need to set the MIDlet-Jar-Size entry to the size of the JAR file
created in the previous step.
Appendix B
Command Line Reference
105
For example, a JAD file might have the following contents:
MIDlet-Name: MyMIDlet
MIDlet-Vendor: My Organization
MIDlet-Version: 1.0
MIDlet-Jar-URL: MyApp.jar
MIDlet-Jar-Size: 24601
B.2.3
Run
You can run the emulator from the command line. The J2ME Wireless Toolkit’s bin
directory contains the command emulator. The syntax for the emulator
command is as follows:
emulator [options]
The general options are:
-help: Display a list of valid options.
-version: Display version information about the emulator.
-Xquery: Print emulator skin information on the standard output stream and
exit immediately. The information includes the skin name, screen size, and other
capabilities.
Options that pertain to running MIDlet suites are:
-Xdevice:<skin_name>: Run an application on the emulator using the given
skin name. For a list of skin names, see Chapter 4, “Using the Emulator.”
-Xdescriptor:<jad_file>: Run an application locally using the given JAD file.
-classpath <classpath>: Specify the classpath for libraries required to run the
application. Use this option when running an application locally.
-D <runtime_property>: Set the HTTP and HTTPS proxy servers. Valid
properties include:
com.sun.midp.io.http.proxy=<proxy host>:<proxy port>
-Xjam:<command>=<application>: Run an application remotely using the
Application Management System (AMS) to run using OTA provisioning. If no
application is specified with the argument, the graphical AMS is run.
install=<jad_file_url> | force | list | storageNames|
Install the application with the specified JAD file onto a device.
run=[<storage_name> | <storage_number>]
Run a previously installed application. The application is specified by its
valid storage name or storage number.
106
J2ME Wireless Toolkit User’s Guide • October 2004
remove=[<storage_name> | <storage_number> | all]
Remove a previously installed application. The application is specified by
its valid storage name or storage number. Specifying all, all previously
installed applications are removed.
transient=<jad_file_url>
Install, run, and remove the application with the specified JAD file.
Specifying transient causes the application to be installed and run and
then removed three times.
B.2.4
Debugging
You can use the following options with the emulator for debugging and tracing.
-Xverbose:<trace_options>
Display trace output, as specified by a list of comma-separated options:
class : trace class loading
gc : trace garbage collection
all : use all tracing options
-Xdebug
Enable runtime debugging. The -Xrunjdwp option must also be used.
-Xrunjdwp:<debug_settings>
Start a JDWP debug session, as specified by a list of comma-separated debug
settings. The -Xdebug option must also be used. Valid debug settings include:
transport=<transport_mechanism>
The transport mechanism used to communicate with the debugger. The only
transport mechanism supported is dt_socket.
address=<host:port>
The transport address for the debugger connection. You can omit providing a
host. If host is omitted, localhost is assumed to be the host machine.
server={y|n}
Start the debug agent as a server. The debugger must connect to the port
specified. The possible values are y and n. Currently, only y is supported (the
emulator must act as a server).
Appendix B
Command Line Reference
107
B.3
Launching Toolkit GUI Components
The components of the J2ME Wireless Toolkit can all be launched from the
command line. Each component is in the toolkit’s bin directory.
B.4
TABLE 12
Toolkit component commands
Command
Description
DefaultDevice
Pops up a dialog that allows you to choose the default emulator skin
ktoolbar
Launches KToolbar
prefs
Launches the toolkit preferences
utils
Launches the toolkit utilities window
Setting Emulator Preferences
You can change the emulator preferences from the command line by using the Xprefs option for the emulator command. The format is as follows:
-Xprefs:<filename>
The filename you provide should be the full path name of a property file whose
values override the values in the preferences dialog box. The property file can
contain the following properties:
TABLE 13
108
Emulator Preferences Properties List
Property Name
Property Description and Legal Values
http.version
Network Configuration > HTTP Version
Value: HTTP/1.1 | HTTP/1.0
http.proxyHost
Network Configuration > HTTP Address
Value: hostname
http.proxyPort
Network Configuration > HTTP Port
Value: integer
https.proxyHost
Network Configuration > HTTPS Address
Value: hostname
https.proxyPort
Network Configuration > HTTPS Port
Value: integer
J2ME Wireless Toolkit User’s Guide • October 2004
TABLE 13
Emulator Preferences Properties List
Property Name
Property Description and Legal Values
kvem.memory.monitor.enable
Monitor > Enable memory monitor
Value: true | false
kvem.netmon.comm.enable
Monitor > Enable Comm monitoring
Value: true | false
kvem.netmon.datagram.enable
Monitor > Enable Datagram monitoring
Value: true | false
kvem.netmon.http.enable
Monitor > Enable HTTP monitoring
Value: true | false
kvem.netmon.https.enable
Monitor > Enable HTTPS monitoring
Value: true | false
kvem.netmon.socket.enable
Monitor > Enable Socket monitoring
Value: true | false
kvem.netmon.ssl.enable
Monitor > Enable SSL monitoring
Value: true | false
kvem.profiler.enable
Monitor > Enable profiling
Value: true | false
netspeed.bitpersecond
Performance > bits/sec combo box
Value: integer
netspeed.enableSpeedEmulation
Performance > Enable network throughput
emulation
Value: true | false
screen.graphicsLatency
Performance > Graphics primitives latency
Value: integer
screen.refresh.mode
Performance > Display refresh (radio button)
Value: default | immediate | periodic
screen.refresh.rate
Performance > Display refresh (slider)
Value: integer
vmspeed.bytecodespermilli
Performance > Enable VM speed
emulation (check box)
Value: integer
vmspeed.enableEmulation
Performance > Enable VM speed emulation (slider)
Value: true | false
storage.root
Storage > Storage root directory
Value: String (relative path to appdb)
storage.size
Storage > Storage size
Value: integer
mm.control.capture
MMedia > Audio Capture
Value: true | false
mm.control.midi
MMedia > MIDI tones
Value: true | false
Appendix B
Command Line Reference
109
TABLE 13
B.5
Emulator Preferences Properties List
Property Name
Property Description and Legal Values
mm.control.mixing
MMedia > Audio Mixing
Value: true | false
mm.control.record
MMedia > Audio Record
Value: true | false
mm.control.volume
Value: true | false
mm.format.midi
MMedia > MIDI format
Value: true | false
mm.format.video
MMedia > Video format
Value: true | false
mm.format.wav
MMedia > WAV Audio format
Value: true | false
wma.client.phoneNumber
WMA > Phone Number of Next Emulator
Value: integer
wma.server.firstAssignedPhoneNumber
WMA > First Assigned Phone Number
Value: integer
wma.server.percentFragmentLoss
WMA > % Random Message Fragment Loss
Value: integer
wma.server.deliveryDelayMS
WMA > Message Fragment Delivery Delay (ms)
Value: integer
Using Security Features
The full spectrum of the J2ME Wireless Toolkit’s security features are also available
from the command line. You can adjust the emulator’s default protection domain,
sign MIDlet suites, and manage certificates.
B.5.1
Changing the Emulator’s Default Protection
Domain
To adjust the emulator’s default protection domain, use the following option with
the emulator command:
-Xdomain <domain_type>
Assigns a security domain to the MIDlet suite. Domain types include
untrusted, trusted, minimum, and maximum.
110
J2ME Wireless Toolkit User’s Guide • October 2004
B.5.2
Signing MIDlet Suites
JadTool is a command-line interface for signing MIDlet suites using public key
cryptography according to the MIDP 2.0 specification. Signing a MIDlet suite is the
process of adding the signer certificates and the digital signature of the JAR file to
a JAD file.
JadTool only uses certificates and keys from J2SE keystores. J2SE provides
keytool, the command-line tool to manage J2SE keystores.
JadTool is packaged in a JAR file. To run it, open a command prompt, change the
current directory to {toolkit}\bin, and enter the following command:
java -jar JADTool.jar <command>
The commands are as follows:
-help
Print the usage instructions for JADTool.
-addcert -keystore <keystore> -alias <alias> -storepass <password>
[-certnum <number>] [-chainnum <number>] -inputjad <input_jadfile> outputjad <output_jadfile>
Add the certificate of the key pair from the given keystore to the JAD file. The
default keystore is {toolkit}\appdb\_main.ks.
-addjarsig -jarfile <jarfile> -keystore <keystore> -alias <alias> storepass <password> -keypass <password> -inputjad <input_jadfile> outputjad <output_jadfile>
Add the digital signature of the given JAR file to the specified JAD file. The
default value for -jarfile is the MIDlet-Jar-URL property in the JAD file.
The default ME keystore is {toolkit}\appdb\_main.ks.
-showcert [([-certnum <number>] [-chainnum <number>]) |-all [encoding <encoding>] -inputjad <filename>
Display the list of certificates in the given JAD file.
The default value for:
-encoding is UTF-8
-jarfile is the MIDlet-Jar-URL property in the JAD
-keystore is %HOMEPATH%\.keystore
-certnum is 1
-chainnum is 1
Appendix B
Command Line Reference
111
B.5.3
Managing Certificates
MEKeyTool manages the public keys of certificate authorities (CAs), making it
functionally similar to the keytool utility that comes with the J2SE SDK. The keys
can be used to facilitate secure HTTP communication over SSL (HTTPS).
Before using MEKeyTool, you must first have access to a Java Cryptography
Extension (JCE) keystore. You can create one using the J2SE keytool utility; see
http://java.sun.com/j2se/1.4/docs/tooldocs/win32/keytool.html
for more information.
To run MEKeyTool, open a command prompt, change the current directory to
{toolkit}\bin, and enter the following command:
mekeytool.exe <command>
The commands are as follows:
-help
Print the usage instructions for MEKeyTool.
-import -alias <alias> [-keystore <JCEkeystore>] [-storepass
<storepass>] -domain <domain_name>
Import a public key into the ME keystore from the given JCE keystore using
the given JCE keystore password. The default ME keystore is
{toolkit}\appdb\_main.ks and the default JCE keystore is
{user.home}\.keystore.
-list
List the keys in the ME keystore, including the owner and validity period for
each. The ME keystore is {toolkit}\appdb\_main.ks.
-delete (-owner <owner> | -number <key number>)
Delete a key from the given ME keystore with the given owner. The ME
keystore is {toolkit}\appdb\_main.ks.
Note – The J2ME Wireless Toolkit contains an ME keystore called _main.ks,
which is located in the appdb subdirectory. This keystore includes all the
certificates that exist in the default J2SE keystore, which comes with the J2SE SDK
installation.
112
J2ME Wireless Toolkit User’s Guide • October 2004
B.6
Using the Stub Generator
J2ME Clients can use the Stub Generator to access web services. The wscompile
tool generates stubs, ties, serializers, and WSDL files used in JAX-RPC clients and
services. The tool reads a configuration file, which specifies either a WSDL file, a
model file, or a compiled service endpoint interface.
The syntax for the stub generator command is as follows:
wscompile [options] configuration_files
B.6.1
Options
TABLE 14
Options for the wscompile Command
Option
Description
-d <output directory>
specify where to place generated output files
-f:<features>
enable the given features
-features:<features>
same as -f:<features>
-g
generate debugging info
-gen
same as -gen:client
-gen:client
generate client artifacts (stubs, etc.)
httpproxy:<host>:<p
ort>
specify a HTTP proxy server (port defaults to 8080)
-import
generate interfaces and value types only
-model <file>
write the internal model to the given file
-O
optimize generated code
-s <directory>
specify where to place generated source files
-verbose
output messages about what the compiler is doing
-version
print version information
-cldc1.0
Set the CLDC version to 1.0 (default) (float and double become
String)
-cldc1.1
Set the CLDC version to 1.1 (float and double are ok)
-cldc1.0info
Show all CLDC 1.0 info/warning messages.
Appendix B
Command Line Reference
113
Note – Exactly one -gen option must be specified. The -f option requires a
comma-separated list of features.
TABLE 15 lists the features (delimited by commas) that can follow the -f option.
The wscompile tool reads a WSDL file, compiled service endpoint interface (SEI),
or model file as input. The Type of File column indicates which of these files can be
used with a particular feature.
TABLE 15
B.6.1.1
Command Supported Features (-f) for wscompile
Option
Description
Type of File
explicitcontext
turn on explicit service context mapping
WSDL
nodatabinding
turn off data binding for literal encoding
WSDL
noencodedtypes
turn off encoding type information
WSDL, SEI, model
nomultirefs
turn off support for multiple references
WSDL, SEI, model
novalidation
turn off full validation of imported
WSDL documents
WSDL
searchschema
search schema aggressively for subtypes
WSDL
serializeinterface
s
turn on direct serialization of interface
types
WSDL, SEI, model
wsi
enable WSI-Basic Profile features
(default)
resolveidref
Resolve xsd:IDREF
nounwrap
No unwrap.
Example
wscompile -gen -d generated config.xml
wscompile -gen -f:nounwrap -O -cldc1.1 -d generated config.xml
114
J2ME Wireless Toolkit User’s Guide • October 2004
APPENDIX
C
Internationalization
This appendix describes setting the language displayed in the J2ME Wireless
Toolkit and the localization setting of the emulation environment.
C.1
Locale Setting
A locale is a geographic or political region or community that shares the same
language, customs, or cultural conventions. In software, a locale is represented by a
collection of files, data, and code, which contains the information necessary to
adapt software to a specific location.
Some software uses a locale to tailor information for users, such as:
■
■
Messages displayed to the user
Fonts used or other writing-specific information
By default, all KToolbar strings, that is, the entire User Interface (UI), are displayed
in the language of the supported platform’s locale.
For example, Japanese characters can be displayed in KToolbar running on a
Japanese Windows machine, provided that the correct localized J2ME Wireless
Toolkit has been downloaded and installed.
You can set the wtk.locale property to have the KToolbar displayed in a
specified locale’s language. For example, you can have the toolkit running on a
Japanese machine but still have the KToolbar display shown in English by setting
the locale property to en-US, and making sure that the proper supplement has
been downloaded and installed over the J2ME Wireless Toolkit. The wtk.locale
property should be placed in the
{toolkit}\wtklib\{platform}\ktools.properties file, where {platform} is the
name of the underlying platform (Windows or Linux, for example).
115
C.2
Emulated Locale
The microedition.locale property is the MIDP system property that defines
the current locale of the device, which is null by default. For the J2ME Wireless
Toolkit emulator, this value is automatically set to the default locale for the J2SE
environment you are running. For example:
■
If you are running in an English system in the US, the microedition.locale
is set to en-US.
■
If you are running in a French system, the microedition.locale is set to
fr-FR.
For information on microedition.locale, consult the MIDP specification.
You can override the default value by adding the microedition.locale
property to the file {toolkit}\wtklib\{platform}\ktools.properties file and
define the property as desired, as shown in the following examples:
microedition.locale=en-US
microedition.locale=null
For details on setting a default locale, see the J2ME Wireless Toolkit Basic
Customization Guide.
C.3
Character Encodings
The CLDC system property, microedition.encoding, defines the default
character encoding name of the MIDP environment. In the J2ME Wireless Toolkit
emulator, this property is set according to the underlying window system you are
using. The property’s value is set to the default encoding for the J2SE environment
running on the same window system. For example, in an English window system,
the encoding setting is
microedition.encoding=ISO8859_1
You can override the default value by adding the microedition.encoding
property to the {toolkit}\wtklib\{platform}\ktools.properties file. For
example, if you want to use UTF-8 as the default setting on Windows, you can set
the property in the {toolkit}\wtklib\Windows\ktools.properties file as
follows:
microedition.encoding=UTF-8
For more information on character encoding, see the CLDC specification.
116
J2ME Wireless Toolkit User’s Guide • October 2004
Note – All the J2SE encoders are available in the emulated environment. See the
J2ME Wireless Toolkit Basic Customization Guide for information on how to limit the
list of available encoders for a specific device.
C.3.1
Java Compiler Encoding Setting
The javac.encoding property determines the encoding used by the javac
compiler to compile your source files. The property’s value is set to the default
encoding for the J2SE environment running on the same window system.
You can override the default value by adding the javac.encoding property to
the {toolkit}\wtklib\{platform}\ktools.properties file, where {platform} is the
name of the underlying platform, like Windows or Linux. For example, if you are
running in an English system but find you need to compile a Japanese resource
bundle, you can specify a Japanese character set, such as:
javac.encoding=EUCJIS
C.4
Font Support in the Default Emulator
The default fonts that are used in the emulated environment are set according to
the underlying window system locale. By default, the MIDP environment fonts are
mapped to the default J2SE environment Java fonts. These fonts usually support all
the characters that are required by the current window’s locale.
You can override these fonts to support other characters that are not supported by
the default fonts. See the J2ME Wireless Toolkit Basic Customization Guide for
information on how to configure them.
Appendix C
Internationalization
117
118
J2ME Wireless Toolkit User’s Guide • October 2004
Index
A
advanced configuration options, 26
application descriptor, 11
Application Management Software (AMS), 12
applications
running remotely, 17
applications directory, setting, 27
attributes, 21
B
building source code, 8
C
call graph, 41
CBS message, sending, 61
certificate importing, 55
certificate management, 54
certificate manager utility, 103
character encodings, 116
-classpath option, 104
command line operations, 103
command path, 103
D
debugging, 17
from command line, 107
debugging options, 107
demonstrations, 79
source code, 2
deploying on a web server, 17
descriptor, 11
attributes, 21
development cycle
full, 11
simple, 7
E
emulator, 29
keyboard shortcuts, 32
performance, 34
preferences, 32
running solo, 36
skins, 29
emulator command, 106
emulators
default font support, 117
language support, 115
encoding
javac, 27
F
FileConnection API, 71
managing roots, 72
font support, 117
G
generating stub from command line, 113
H
heap size, 33
-help option, 106
I
-import command, 112
119
IrDA, 73
J
Mobile Media API (MMAPI), 65
capture, 66
formats and protocols, 65
JAD, 11
attributes, 21
creating, 11
MIME type, 17
JAR
creating, 11
MIME type, 17
Java Cryptography Extension (JCE) keystore, 112
JSR 184, 67
JSR 75, 71
N
K
OBEX, 73
preferences, 74
obfuscation, 15
installing ProGuard, 15
installing RetroGuard, 16
optional APIs, 3
key management, 52
key pair
creating, 52
importing, 54
keytool utility, 112
KToolbar
advanced configuration options, 26
application directory, 27
starting, 1, 5
ktools.properties, 27
ktools.properties file, 115
L
libraries, 25
M
managing certificates from command line, 112
manifest file, creating, 105
memory monitor, 42
graph, 42
object details, 43
messages
sorting, 46
messaging
network simulation, 58
method profiling, 39
microedition.encoding property, 116
microedition.locale property, 116
MIDlets
in projects, 23
MIME types, 17
Mobile 3D Graphics API, 67
120
J2ME Wireless Toolkit User’s Guide • October 2004
Network Monitor
sorting messages, 46
network monitor, 44
filtering, 45
sorting, 46
using with WMA, 64
O
P
packaging
example from command line, 105
packaging from command line, 104
pausing and resuming, 35
performance, 34
permissions, 49
persistent storage, 33
Personal Information Management (PIM) API, 71
phone number, setting in emulator, 57
preverifying, 9
example from command line, 104
profiler, 39
call graph, 40, 41
projects, 5, 19
attributes, 21
building, 8
creating, 6
deploying on real devices, 14
directory structure, 25
libraries, 25
MIDlets, 23
packaging, 11
push registry, 24
running, 9
selecting APIs, 19
source code, 6
protection domains, 49, 50
proxy servers, 32
push registry, 24
R
remotely-deployed applications, 17
revision control, 27
revision control files, 27
Revision Control System (RCS), 27
RevisionControl property, 27
run options, 106
Run via OTA, 12, 51
running
from command line, 106
S
signed MIDlet suites, 49
signing MIDlet suites, 51
SMS binary message, sending, 60
SMS text message, sending, 59
source code
creating, 7
location, 6
supported APIs, 3
T
Target Platform, 20
tracing options, 107
V
version control, 27
-version optopn, 106
W
Wireless Messaging API (WMA), 57
Wireless Toolkit
certificate manager utility, 103
running from command line, 103
Wireless Toolkit, setting locale, 115
WMA console, 59
wscompile tool, 113
wtk.locale property, 115
X
-Xdebug option, 107
-Xquery option, 107
-Xrunjdwp option, 107
-Xverbose option, 107
Index
121
122
J2ME Wireless Toolkit User’s Guide • October 2004