1
CollabCAD Workflow User Manual
CollabCAD
Workflow System User Manual
July 2007
1
CollabCAD Workflow User Manual
INDEX
Contents
Chapter 1
Chapter 2
Introduction And Prerequisites
Running The Workflow Module
2.1 Server Management
2.1.1 Environment Setting
2.1.2 Application Server
2.1.3 Web Interface
2.2 Mail Configuration
Page No.
3
4
4
4
5
5
Chapter 3 Creating a Workflow
3.1 Creating Users
3.2 Listing Users
3.3 Deleting Users
3.4 Profiles of Users
3.5 Creating a Workflow Project
3.6 Importing The Project
3.7 Instantiate Project
3.8 Viewing the List of Running Activities
3.9 Accessing the TO DO List
3.10 Viewing the List of Done Activities
3.11 View and Deletion of Process
3.12 Start/Deploy/Undeploy a Process
3.13 Deletion/Termination of the Instances
6
6
9
9
10
11
15
16
16
17
17
18
19
20
Chapter 4 Setup Activity For JMS
21
Chapter 5 Log Details
Chapter 6 Trace Details
Chapter 7 History Details
22
23
24
Chapter 8 Case Study: Using XForm
8.1 Database Requirements
8.2 ProEd Action Connectors
8.3 Creating the XForm
8.4 Importing a Project
8.5 View JSP files through Bonita
26
26
28
33
35
Chapter 9 l Case Study: Setting Deadline to an Activity
9.1 Invoking Hook in a Workflow
9.2 Create a Project
9.3 Instantiate a Project
40
42
43
Chapter 10l Configuration of Database
44
July 2007
2
CollabCAD Workflow User Manual
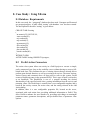
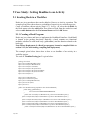
1.1 Introduction
Bonita is a workflow/BPM solution for handling long-running, user-oriented workflows.
Bonita is implemented as an J2EE application and is released under LGPL license. Bonita
implements the Workflow Management Coalitions's XPDL (XML Process Definition
Language).
Traditional workflow features like dynamic user/roles resolution, activity performer and
sequential execution are also supported. Processes are created and executed
programmatically via EJB 2 or Web services API's, processes can also be dynamically
updated at Runtime.
Main Benefits:
Improve the efficiency of collaborative work with Bonita: a team shares a common view
of the current tasks, each individual can have real-time awareness about what is going on.
Reduce costs and risks by automating person-to-person and system-to-system processes.
Processes can span over organizations and geographical locations.
Handle efficiently unexpected situations: Bonita allows you to securely and dynamically
modify the definition of a running process in order to take into account events that were
not planned.
Take benefit from several qualities of services that the integration with a J2EE
application server provides. These qualities of services include transactions, role-based
authentication and life cycle management, connection with external information systems.
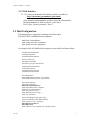
1.2 Prerequisites
1.2.1You need to have JDK 1.4 /JDK 1.5(Server) or JRE 1.4/JRE
1.4 (Client) installed.(You may download JDK 1.4.2 from
http://java.sun.com/products/archive/j2se/1.4.2/index.html
Or You may download JDK 1.5 from
http://java.sun.com/j2se/1.5.0/
Select J2SE v1.4.2/J2SE v1.5 – SDK for servers and JRE
for clients)
1.2.2 Set your environment variable $JAVA_HOME - JDK 1.5+
home
(eg: JAVA_HOME = c:\jdk1.5\ for Windows/jdk1.5 for Linux)
July 2007
3
CollabCAD Workflow User Manual
2. Running the Workflow Module
2.1 Server Management
2.1.1 Environment settings
The Administrator needs to make the following Environmental settings
2.1.1.1 JONAS_ROOT - Jonas version home
(eg. C:\CollabCAD\tools\Workflow\JOnAS-4.8.4 for Windows
/CollabCAD/tools/Workflow/JOnAS-4.8.4 for Linux)
2.1.1.2 ANT_HOME - jakarta ant home
(eg:C:\CollabCAD\tools\Workflow\apache-ant-1.6.4 for Windows
/CollabCAD/tools/Workflow/apache-ant-1.6.4 for Linux)
2.1.1.3 BONITA_HOME - Bonita home install directory
(eg: C:\CollabCAD\tools\Workflow\bonita-v3.0\bonita for Windows
/CollabCAD/tools/Workflow/bonita-v3.0/bonita for Linux)
2.1.1.4JONAS_BASE - Jonas version home
(For Linux eg. $JONAS_ROOT/BSOA_base)
(For Windows eg. %JONAS_ROOT%\BSOA_base)
2.1.1.5 Change the location of the file “bonitaLog.xml” in the file
JONAS_BASE\conf\log4j.properties
2.1.1.6 Change the location of the file “repository.xml” in the file
JONAS_BASE\conf\repository.properties
2.1.1.7 PATH variable setting
(For Linux e.g., $JONAS_ROOT/bin/unix\
$ANT_HOME/bin\
$JAVA_HOME/bin)
(For Windows e.g., %JONAS_ROOT%\bin\nt;
%ANT_HOME%\bin;
%JAVA_HOME%\bin)
2.1.2 Application Server
2.1.2.1 Start JOnAS server from command line using the command
“jonas start “.
2.1.2.2 Stop JOnAS server from command line using the command
“jonas stop “.
July 2007
4
CollabCAD Workflow User Manual
2.1.3 Web Interface
2.1.3.1 Connect to the Bonita Web Interface which is available at:
http://{hostname}:{portnumber}/jiapAdmin
where hostname and portnumber are that used by the Administrator
(default portnumber is 9000) to start the jonas server.
(Use: Login = bsoa in, password = bsoa )
2.2 Mail Configuration
The administrator is required to reconfigure the following in
$JONAS_ROOT/conf/MailSession1.properties
mail.from <from address>
mail.<protocol>.host < hostname>
mail.<protocol>.port <portname>
An example of the file MailSession1.properties is provided for reference below:
#######################
## Required properties
#######################
#Factory Name/Type
mail.factory.name Mail
mail.factory.type javax.mail.Session
########################
## Optional properties
## Each line can be removed
#######################
### Authentication
#mail.authentication.username <my.username>
#mail.authentication.password <my.password>
### Session properties
#mail.debug <true|false>
mail.from <[email protected]>
#mail.mime.address.strict <true|false>
#mail.host <my.mail.hostname>
#mail.store.protocol <pop3,...>
#mail.transport.protocol <smtp,...>
#mail.user <username>
### For each protocol: imap, pop3, smtp,...
### Ovveride default values defined aboved
#mail.<protocol>.class <class name>
mail.smtp.host 192.168.1.1
mail.smtp.port 25
#mail.<protocol>.user <username.for.a.specific.protocol>
July 2007
5
CollabCAD Workflow User Manual
3. Creating a Workflow
[
Refer to Bonita User Guide (PDF) for more details.]
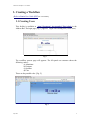
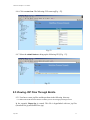
3.1 Creating Users
This facility is available at http://{hostname}:{portnumber}/jiiapAdmin in the
Address Bar. The login page [Fig. 1] appears. Login with existing user ( bsoa/ bsoa).
.
Fig-1
The workflow process page will appears. The left panel tree structure shows the
following nodes –
a) Administer
b) Designer
c) Operator
d) User
These are the possible roles. [Fig. 2].
Fig-2
July 2007
6
CollabCAD Workflow User Manual
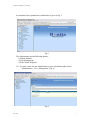
A screenshot of the expanded tree (with details) is given in Fig. 3.
Fig-3
The Administrator has the following options :
1) Engine database
2) User Management
3) Edit Custom Properties
3.1.1 To create a new user, the Administrator or user with Admin rights selects
"Administrator -> User Management" [Fig. 4]
Fig-4
July 2007
7
CollabCAD Workflow User Manual
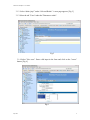
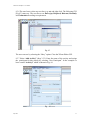
3.1.2 Select “dsrlm jiap 1” under “Selected Realm”. A new page appears. [Fig. 5]
3.1.3 Select the tab "Users" under the "Datasource realm".
Fig-5
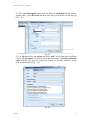
3.1.4 Select "New user". Enter valid input in the form and click on the "create"
button. [Fig. 6]
Fig-6
July 2007
8
CollabCAD Workflow User Manual
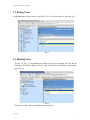
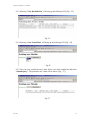
3.2 Listing Users
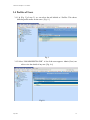
In the Datasource_Realm select “List Users” [Fig. 5] to list all users as shown in Fig. 7.
Fig-7
3.3 Deleting Users
In step 3.2 [Fig. 7], user(Admin) can delete any user by selecting the user and by
clicking on the button “Remove Users”. This will lead to the following confirmation
page. [Fig. 8].
Fig-8
Clicking “Confirm” button will delete the selected user.
July 2007
9
CollabCAD Workflow User Manual
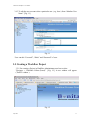
3.4 Profiles of Users
3.4.1 In [Fig. 5] of step 3.1 we can select the tab labeled as “Profiles. This shows
different profile names for the users. [Fig. 9.].
Fig- 9
3.4.2 Select “JIAPADMINISTRATOR”. A list of the users appears. Admin (User) can
edit or view the details of any user. [Fig. 4.a]
Fig-10
July 2007
10
CollabCAD Workflow User Manual
3.4.3 To edit the user account select a particular user ( e.g. bsoa ) from “Member User
Name”. [Fig. 11]
Fig- 11
User can edit “User mail”, “Roles” and “Password” of user.
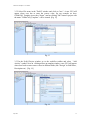
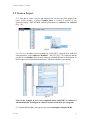
3.5 Creating a Workflow Project
3.5.1 For creating a Project in Workflow Administrator user has to select
"Designer -> Workflow Editor (Proed)" [Fig. 12.] A new window will appear
("ProEd" window ).
Fig- 12
July 2007
11
CollabCAD Workflow User Manual
3.5.2 Select File menu in the "ProEd" window and click on "new". A new GUI will
appear where user has to enter the correct value. (In our example we have
CollabCAD_Template in text box “Name”) and on clicking "OK" button a project with
the name "CollabCAD_Template" will be created. [Fig. 13]
Fig-13
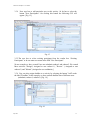
3.5.3 In the ProEd Project window go to the workflow toolbar and select "Add
Activity" symbol. Now on clicking mouse on template window a new GUI will appear
where user need to enter correct values in different fields (like "Design" in field Name ,
Description etc ). [Fig. 14]
Fig-14
July 2007
12
CollabCAD Workflow User Manual
3.5.4 Now user has to add particular user to this activity. So he has to select the
button "New Participants". On clicking this button the following GUI will
appear. [Fig. 15].
Fig-15
3.5.5 The user has to select existing participant from the combo box “Existing
Participants” or he can enter new name in the field "New Participant".
[In our example we have created Users are cadadmin,caduser1 and caduser2. We created
three activities "Design"( Assigned to user caduser1 ), "Review" ( Assigned to user
caduser2 ) and "Submit" (Assigned to user cadadmin). ]
3.5.6 User can also assign deadline to a activity by selecting the button "Add" under
the label "Deadline" In the example, we have entered deadline date of different users
(cadadmin, caduser1, caduser2). [Fig. 16]
Fig- 16
July 2007
13
CollabCAD Workflow User Manual
The complete workflow is shown in Fig. 17.
Fig-17
3.5.7 Save the workflow in the name of CollabCAD_Template_1.0.xpdl from
“File->Save” menu. We can save the project to both “Local File System” and
“workflow repository”.[Fig-18]
Fig-18
July 2007
14
CollabCAD Workflow User Manual
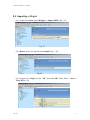
3.6 Importing a Workflow
User needs to bring the project to its workflow database so that other users can work on
it. This can be accomplished by importing the project.
3.6.1 In the browser window of workflow select "Designer" -> "Import XPDL".
Browse the ".xpdl" file from the local system. User can also import the project file from
the repository by clicking the tab “Import from workflow repository”. Now click on the
"Import" button. [Fig. 19]
Fig-19
3.6.2 On successful import, a message will be shown
CollabCAD_Template (1.0) was successfully added". [Fig. 20]
as
"Process
Fig- 20
July 2007
15
CollabCAD Workflow User Manual
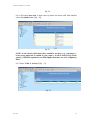
3.7 Instantiate Project
Project can be instantiated by following steps:
3.7.1 Click on "User -> Start -> CollabCAD_Template(1.0)" in left panel of the
browser. It leads to the page in Fig-21.
3.7.2 Project will be instantiated on clicking “Start” [Fig-21] (Green button ).
Fig- 21
3.8 Viewing the list of Running Activities
Click on "User -> Running -> CollabCAD_Template". The process instance details
are displayed [Fig –22].
Fig- 22
July 2007
16
CollabCAD Workflow User Manual
3.9 Accessing the “To Do” list
3.9.1 On login, User can see the "To do" list through "User -> To do [Fig- 23]
Fig-23
3.9.2 In [Fig-23] user "caduser1" has to start the activity by clicking the "start" icon
under “Action”.
3.9.3 Click the node “User->Done”.
3.10 Viewing the list of “Done” Activities
Select “User -> Done ” in left panel of the browser to view a list of the “Done”
Activities.[Fig-24]
Fig- 24
July 2007
17
CollabCAD Workflow User Manual
3.11 View and Deletion of Process
User can View and Delete the activities after login successfully.
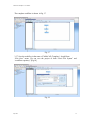
3.11.1 Select “Designer -> Process Models” [Fig-25] to view the process details.
Fig- 25
3.11.2 Selecting “CollabCAD_Template”(in our example) will give details of a
project as in Fig. 26.
Fig-26
In [Fig-11] click on the link “Delete” under the label “Action” to delete the
process .
July 2007
18
CollabCAD Workflow User Manual
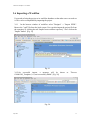
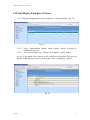
3.12 Start/Deploy/Undeploy a Process
3.12.1 From the Navigational tree select “Operator -> Process Models” [Fig. 27]
Fig- 27
3.12.2
3.12.3
Select Start/undeploy symbol under column “Action” to deploy or
undeploy the process.
Select process name (e.g. “CollabCAD_Template” ) under “Name”.
In Fig. 28 the details of the process in the workflow are described. The user can
deploy or undeploy the process by clicking the “start” or “undeploy” symbol.
Fig- 28
July 2007
19
CollabCAD Workflow User Manual
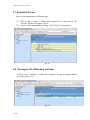
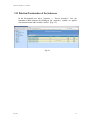
3.13 Deletion/Termination of the Instances
In the Navigational tree select “Operator -> Process instances”. User can
terminate or delete instances by clicking on the respective symbol on against
each instance name under column “Action”. [Fig. 29]
Fig-29
July 2007
20
CollabCAD Workflow User Manual
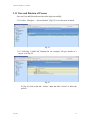
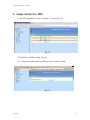
4. Setup activity For JMS
4.1 In the Navigational tree select “Operator -> Setup” [Fig. 30]
Fig-30
4.2 Select the “Modify” button. [Fig 31]
4.3 Confirm the modification by clicking on the “Confirm” button.
Fig- 31
July 2007
21
CollabCAD Workflow User Manual
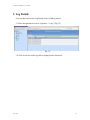
5. Log Details
User can check and search Log Details of the workflow process.
5.1 In the navigational tree select “Operator -> Logs” [Fig. 32]
Fig- 32
5.2 Click on any line of the log table to display details of that line.
July 2007
22
CollabCAD Workflow User Manual
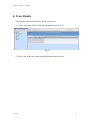
6. Trace Details
User can check and search the trace details of processes.
6.1 Select "Operator->Traces" from the Navigational tree. [Fig. 33]
Fig- 33
6.2 Click a line of the traces table to display details of that trace line.
July 2007
23
CollabCAD Workflow User Manual
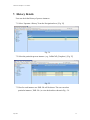
7. History Details
User can check the History of process instances .
7.1 Select “Operator->History" from the Navigational tree. [Fig. 34]
Fig- 34
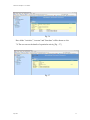
7.2 Select the particular process instance (e.g. CollabCAD_Template ). [Fig. 35]
Fig- 35
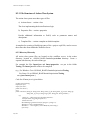
7.3 Here for each instance one XML file will be shown. The user can select
particular instance ( XML file ) to view the details as shown in Fig. –36.
July 2007
24
CollabCAD Workflow User Manual
Fig- 36
Here all the "Activities", "executor" and "Start date" will be shown as a list.
7.4 The user can see the details of a particular activity [Fig. –37]
Fig- 37
July 2007
25
CollabCAD Workflow User Manual
8. Case Study : Using XForm
8.1 Database Requirements
In this case study, the “postgresql” database has been used. Username and Password
are postgres/postgres. A table called “testing” with database “test” has been created.
The description for the table “testing” is given below:
CREATE TABLE testing
(
sn numeric(5,2) NOT NULL,
wono varchar(20),
noj varchar(60),
nop varchar(15),
qty numeric(6,2),
doa varchar(20),
dot varchar(20),
plnr varchar(16),
remark varchar(60)
)
WITHOUT OIDS;
ALTER TABLE testing OWNER TO postgres;
8.2 ProEd Action Connectors
The action class system allows an activity in a ProEd project to execute a simple,
easily constructed java class on the workflow server without having to create a fullblown hook class. This facilitates the use of existing classses that are already able to
perform some desired function, as well as accessing web services. The terms Actions,
Action Classes and connectors have all been used to refer to this system. ProEd
creates a HookScript entry in the generated XPDL. This is type of hook is referred to
as an InterHook. The HookScript is sort of a wrapper invoking the desired
functionality of the specified action class, passing information from the activity and
returning values. The HookScript is created from a user configurable template and is
based on the activity context, the action class, and the setting selected in the Add
Action dialog.
In addition, there is a user configurable properties file, located on the server,
associated with each action class, providing additional information to ProEd. This
allow ProEd to enhance the user interface by providing such things as meaningful
parameter names, parameter descriptions, and pre-defined lists of parameter value
options.
July 2007
26
CollabCAD Workflow User Manual
8.2.1 File Structure of Action Class System
The action class system uses three types of files:
a) Action classes - <action>.class
The class implementing the desired business logic
b) Properties files - <action>.properties
Provide additional information to ProEd, such as parameter names and
descriptions.
c) Template files - <action>.template or default.template
A template for creating a HookScript entry of the <project>.xpdl file, used to access
the action class from within the Workflow server
8.2.2 Directory Hierarchy
All action class system files are located on the workflow server, in the action
directory, located at: <JONAS_BASE>/bonitaScripts/action directory. Create a
separate sub directory for each action type.
For example the files Insert.java and Insert.properties
Testing. The Insert.java file needs to be compiled.
are put in the folder
(e.g., For Window: Go to %JONAS_BASE%\bonitaScripts\action\Testing
For Linux: Go to $JONAS_BASE/bonitaScripts/action/Testing
run <javac Insert.java> ).
Code for of Insert.java is given below:
package action.Testing;
import java.sql.*;
import java.util.*;
public class Insert {
int a;
public void insert (String sn, String wono, String name_of_job, String name_of_project, String qty,
String date_of_accept, String target_date, String plnr ,String remarks) {
try{
String url = "jdbc:postgresql://localhost:5432/test";
Class.forName ("org.postgresql.Driver");
Connection conn =
DriverManager.getConnection(url,"postgres","postgres");
Statement s=conn.createStatement();
ResultSet n = s.executeQuery("select MAX(sn) from testing");
if (n.next())
July 2007
27
CollabCAD Workflow User Manual
a = n.getInt(1)+1;
else
a=1;
s.executeUpdate("INSERT INTO testing
values("+a+",'"+wono+"','"+name_of_job+"','"+name_of_project
+"',"+Integer.parseInt(qty)+",'"+date_of_accept+"','"+target_date+"','"+plnr+"',
'"+remarks+"')");
conn.close();
System.out.println("SUCCESSFUL INSERTION!!");
}
catch(Exception es){
System.out.println(es);
}
}
}
The code for Insert.properties is follow:
insert.params=(String sn,String wono,String name_of_job,String name_of_project,String qty,String
date_of_accept,String target_date,String plnr,String remarks)
insert.sn.paraminfo=First Input String
insert.wono.paraminfo=Second Input String
insert.name_of_job.paraminfo=Third Input String
insert.name_of_project.paraminfo=Fourth Input String
insert.qty.paraminfo=Fifth Input String
insert.date_of_accept.paraminfo=Sixth Input String
insert.target_date.paraminfo=Seventh Input String
insert.plnr.paraminfo=Eight Input String
insert.remarks.paraminfo=Nineth Input String
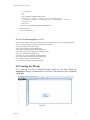
8.3 Creating the XForm
8.3.1 User has to create a Workflow/Project where he can either define the
Properties of Project or individually to an Activity. The example creates a workflow
called Test.
Fig- 38
July 2007
28
CollabCAD Workflow User Manual
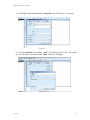
8.3.2 On Right Clicking and selecting “Properties”, the GUI in Fig- 39 comes up.
Fig- 39
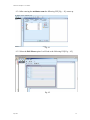
8.3.3 Select Attributes tab and then “Add”. The following GUI [ Fig. – 40] comes
up. The user has to enter the attribute Name and choose its Type :
Fig- 40
July 2007
29
CollabCAD Workflow User Manual
8.3.4 After entering the attributes name the following GUI [Fig. – 41] comes up.
Fig- 41
8.3.5 Select the Edit Xform option. It will lead to the following GUI[ Fig. – 42].
Fig- 42
July 2007
30
CollabCAD Workflow User Manual
8.3.6 The user has to select any text box (e.g. sn) and right click. The following GUI
[Fig.43] comes up. The user has to set Data type, Required, Relevant, Readonly
and Constraints according to requirement.
Fig- 43
The user can save by selecting the “Okay” option. Close the XForm Editor GUI.
8.3.7 Select “Add Activity” (Step 3.5.3). Enter the name of the activity and assign
the participant for this activity by selecting “New Participant”. In the example we
have created “Activity1” which is shown in Fig- 44.
Fig – 44
July 2007
31
CollabCAD Workflow User Manual
8.3.8 By “New Participant” option user can define the participant for that activity.
Against Filter , select HUMAN and then select any user from the list that pops up
[Fig. – 45].
Fig- 45
8.3.9 In Fig-44 select the tab Actions and select “Add”. Select from the list for Type.
Click in the parameter box and the select the radio button “Attribute parameter
value” and the value from the combo box. Repeat for the other attributes. Finally
click on ok and save it [Fig. – 46].
Fig- 46
July 2007
32
CollabCAD Workflow User Manual
8.4 Importing a Project
8.4.1 Login with id bsoa, Select Designer -> Import XPDL [Fig. –47]
Fig- 47
8.4.2 Browse for the file and then select Import [Fig. – 48].
Fig- 48
8.4.3 Logout and relogin (Userid : NK / password NK). Select User -> Start ->
Test(1.0)[Fig.- 49].
July 2007
33
CollabCAD Workflow User Manual
Fig- 49
8.4.4 Click on the start icon. A form comes up where user enters valid data and then
selects the submit button [Fig. –50].
Fig-50
NOTE: In the xform’s field name, there should be no space (e.g., your name ->
is the wrong approach. It should be your_name ). In the X-form in Fig.-50 the
asterix(*) indicated against the text fields implies that these are to be compulsory
filled.
8.4.5 Select To Do ! Activity1 [Fig. –51].
Fig- 51
July 2007
34
CollabCAD Workflow User Manual
8.4.6 Click on start icon. The following GUI comes up[Fig. –52].
Fig- 52
8.4.7 Select the submit button to bring up the following GUI [Fig. –53].
Fig-53
8.5 Viewing JSP Files Through Bonita
8.5.1 User has to create jsp files and the put them in the following directory
C:\CollabCAD\tools\Workflow\JOnAS-4.8.4\BSOA_base\work\webapps\jonas\single\ctxroot
In the example, Report.jsp is created. This file is hyperlinked with two jsp files
(DetailedView.jsp and SortedView.jsp).
July 2007
35
CollabCAD Workflow User Manual
Jsp code for Report.jsp is as follows:
<html>
<body>
<table align=center border=1><tr><td><h1><center>View of the following
pages:</certer></td></tr>
<tr><td><center><a href ="DetailedView.jsp">View Detailed data  
 </a><center></td>
<tr><td><center><a href ="SortedView.jsp">View Sorted data    </a></center></td>
</tr>
</table>
</body>
</html>
Jsp code for DetailedView.jsp is as follows:
<%@ page import="java.sql.*" %>
<% Class.forName("org.postgresql.Driver"); %>
<HTML>
<HEAD>
<TITLE>Selecting data From a table</TITLE>
</HEAD>
<BODY>
<H1>Selecting data From a Table</H1>
<%
Connection connection = DriverManager.getConnection(
"jdbc:postgresql:test", "postgres", "postgres");
Statement statement = connection.createStatement() ;
ResultSet resultset =
statement.executeQuery("select * from testing") ;
%>
<TABLE BORDER="1">
<TR>
<TH>SN</TH>
<TH>WONO</TH>
<TH>NOJ</TH>
<TH>NOP</TH>
<TH>QTY</TH>
<TH>DOA</TH>
<TH>DOT</TH>
<TH>PLNR</TH>
<TH>Remarks</TH>
</TR>
<% while(resultset.next()){ %>
<TR>
<TD> <%= resultset.getDouble(1) %></td>
<TD> <%= resultset.getString(2) %></TD>
<TD> <%= resultset.getString(3) %></TD>
<TD> <%= resultset.getString(4) %></TD>
July 2007
36
CollabCAD Workflow User Manual
<TD> <%= resultset.getDouble(5) %></TD>
<TD> <%= resultset.getString(6) %></TD>
<TD> <%= resultset.getString(7) %></TD>
<TD> <%= resultset.getString(8) %></TD>
<TD> <%= resultset.getString(9) %></TD>
</TR>
<% } %>
</TABLE>
</BODY>
</HTML>
Jsp code for SortedView.jsp is as follows:
<%@ page import="java.sql.*" %>
<%@page import="java.util.*"%>
<% Class.forName("org.postgresql.Driver"); %>
<% Vector v = new Vector();%>
<HTML>
<HEAD>
<TITLE>Selecting data From a table</TITLE>
</HEAD>
<BODY>
<H1>Existing user Details:</H1>
<form name="frm" action="SortedView.jsp">
<%
Connection connection = DriverManager.getConnection(
"jdbc:postgresql:test", "postgres", "postgres");
Statement statement = connection.createStatement() ;
ResultSet resultset1 =
statement.executeQuery("select distinct plnr from testing") ;
%>
<font color="006600" size="4">Existing users:
<% while(resultset1.next()){ %>
<TR>
<% v.addElement(new String(resultset1.getString("plnr")));%>
</TR>
<% } %>
<select name="title">
<%
for(int i=0;i<v.size();i++)
{%>
<align="center"><option><%=v.elementAt(i)%></option>
<%}%>
</select>
<input type="submit" name="btn" valu="submit">
<%! String s = null;%>
<%s= request.getParameter("title");
if (s!=null || "".equals(s) ){%>
<%! ResultSet resultset = null;%>
July 2007
37
CollabCAD Workflow User Manual
<% resultset= statement.executeQuery("select * from testing where plnr ='"+s+"'");
%>
<br><br><br>
<TABLE BORDER="1" align="center">
<TR>
<TH>SN</TH>
<TH>WONO</TH>
<TH>NOJ</TH>
<TH>NOP</TH>
<TH>QTY</TH>
<TH>DOA</TH>
<TH>DOT</TH>
<TH>PLNR</TH>
<TH>Remarks</TH>
</TR>
<% while(resultset.next()){ %>
<TR>
<TD> <%= resultset.getDouble(1) %></td>
<TD> <%= resultset.getString(2) %></TD>
<TD> <%= resultset.getString(3) %></TD>
<TD> <%= resultset.getString(4) %></TD>
<TD> <%= resultset.getDouble(5) %></TD>
<TD> <%= resultset.getString(6) %></TD>
<TD> <%= resultset.getString(7) %></TD>
<TD> <%= resultset.getString(8) %></TD>
<TD> <%= resultset.getString(9) %></TD>
</TR>
<% } %>
</TABLE>
<%}%>
</form>
</BODY>
</HTML>
8.5.2 Enter http://localhost:9000/Report.jsp in the address bar [Fig.- 54].
Fig-54
July 2007
38
CollabCAD Workflow User Manual
8.5.3 Selecting ”View Detailed Data” will bring up the following GUI [Fig. –55].
Fig- 55
8.5.4 Selecting “View Sorted Data” will bring up the following GUI [Fig. –56].
Fig-56
8.5.5 User can view a particular user’s data. Select a user from combo box and select
“Submit Query”. The particular user’s data will be shown. [Fig. –57].
Fig- 57
July 2007
39
CollabCAD Workflow User Manual
9 Case Study : Setting Deadline to an Activity
9.1 Invoking Hook in a Workflow
Hooks are java procedures that can be added to Process or Activity execution. The
example given below shows how to set deadline of an activity in a workflow project.
Create a workflow with an activity [Step 8.1.7]. In Fig. –44, select the tab Hook. In
the Hook menu select the add button. Next choose a hook from the combo box and
select a radio button under the For internal forms and click OK button.
9.1.1 Creating a Hook Program
Hooks are java classes and have to implement the NodeHookI interface. NodeHookI
is located in the package hero.hook. Basically, a hook contains two functional
methods, redefined in each hook body: getMetadata() and the function related to the
hook type.
Note: Before Deployment of a Hook java program, it must be compiled. Refer to
section 9.1.2 (for hook loading, compiling and deployment)
The example given below shows how to how to set deadline of an activity in a
workflow project.
The code of “DeadlineTesting.java” is given below:
package hero.hook;
import hero.util.HeroHookException;
import hero.interfaces.BnNodeLocal;
import hero.interfaces.Constants;
import hero.interfaces.ProjectSession;
import hero.interfaces.ProjectSessionHome;
import hero.interfaces.ProjectSessionUtil;
import hero.interfaces.*;
import java.text.DateFormat;
import java.text.ParseException;
import java.text.SimpleDateFormat;
import java.util.ArrayList;
import java.util.*;
public class DeadlineTesting implements hero.hook.NodeHookI {
public String getMetadata() {
return Constants.Nd.BEFORETERMINATE;
}
public void create(Object b,BnNodeLocal p) throws HeroHookException {}
public void afterStart(Object b,BnNodeLocal p) throws HeroHookException {}
public void afterTerminate(Object b,BnNodeLocal n) throws HeroHookException {}
public void onCancel(Object b,BnNodeLocal n) throws HeroHookException {}
public void anticipate(Object b,BnNodeLocal n) throws HeroHookException {}
public void beforeStart(Object b,BnNodeLocal p) throws HeroHookException {}
public void beforeTerminate(Object b,BnNodeLocal n) throws HeroHookException {}
July 2007
40
CollabCAD Workflow User Manual
public void onReady(Object b,BnNodeLocal n) throws HeroHookException {}
public void onDeadline(Object b,BnNodeLocal n) throws HeroHookException {
ProjectSession prjSession;
String projectName, relation;
System.out.println("Deadline Testing Programs........");
// Get the project context
try{
projectName = (n.getBnProject()).getName();
ProjectSessionHome projectHome = (ProjectSessionHome)
ProjectSessionUtil.getHome();
prjSession = projectHome.create();
prjSession.initProject(projectName);
Date dNow = new Date();
SimpleDateFormat df1 = new SimpleDateFormat("dd/MM/yyyy");
System.out.println("the system time is="+dNow);
System.out.println("get_act1=" +prjSession.getNodeDeadline("act1"));
DateFormat df = new SimpleDateFormat("dd/MM/yyyy");
Date dateLi = df.parse("20/06/2007");
prjSession.setNodeDeadline("act1",dateLi.getTime()) ;
prjSession.setNodeRole("act1","caduser2");
System.out.println("get_act2=" +prjSession.getNodeDeadline("act2"));
prjSession.getNodeDeadline("act2");
System.out.println("inside try block of ONDEADLINE ..........");
}catch (Exception e) {
System.out.println("inside catch block of ONDEADLINE...........");
e.printStackTrace();
}
System.out.println("after catch block of ONDEADLINE...........");
}
}
9.1.2 Hook Loading, Compiling, and Deployment
Hooks are stored on the file system as standard java classes. It is necessary to load the
code that has been written into the application server.
8.3.2.1 Create a source .java file. It must be within the package hero.hook.
8.3.2.2 Copy the java source file into the directory
%BONITA_HOME%\src\resources\hooks\hero\hook.
8.3.2.3 Go to %BONITA_HOME% directory and enter:
ant deployHook –DhookClass=<name of the java source file>.
In the example:
ant deployHook –DhookClass= DeadlineTesting
July 2007
41
CollabCAD Workflow User Manual
9.2 Create a Project
9.1.1 User has to create a project and add activities (at least two) and assign to the
users. In the example, a project Deadline_latest is created. It consists of two
activities namely, act1 and act2, and the participants are caduser1 and caduser2
[Fig. –58].
Fig-58
9.1.2 To set a deadline for activity act1 (eg.,19/06/2007) - right click on act1 and
select properties. Select add under Deadline. The GUI [ Fig. –59] comes up and the
user has to set deadline of the activity either by selecting the date or the duration. In
the Exception text field add the hook name.[ The hook template is given later].
Fig-59
Note: In the example, if act1 is not completed before 19/06/2007 by caduser1 it
will automatically be assigned to caduser2 because of the hook java program.
9.1.3 Import the Deadline_latest project by selecting Designer->Import XPDL.
July 2007
42
CollabCAD Workflow User Manual
9.3 Instantiate the Project
9.2.1 Select User->Start->Deadline_latest(1.0) and click on the start icon
9.2.2 Login as user caduser2. In Fig. –60, two nodes (act1 and act2) are active under
To Do ! Deadline_latest.
Fig-60
9.2.3 On selecting node act1, the following GUI [Fig’ – 61] comes up.
Fig- 61
9.2.4 In Fig. –61,click on start icon, a message “Activity act1 of process
Deadline_latest (1) was successfully started” is shown. Repeat the process for the
node act2.
July 2007
43
CollabCAD Workflow User Manual
10. Configuration of Database
If you are using the JOnAS embedded database, i.e., HSQLDB, then you don't have to do
any thing.
To configure other databases : Open the config files for your favorite database
(Name_of_Database.properties, e.g. PostgreSQL1.properties) from the JOnAS-4.8.4\conf
folder.
Edit this file : Enter the data source configuration according to your setup.
datasource.name
bonita
datasource.url
jdbc:postgresql://localhost:5432/workflow
datasource.classname
org.postgresql.Driver
datasource.username
postgres
datasource.password
mypassword
datasource.mapper
rdb.postgres
Copy the database driver jar file to the JOnAS-4.8.4\lib\ext folder. You can get the latest
database jar driver from your database vendor's site.
Configure it on your application server with your database,i.e., in
\%BONITA_HOME%\build.xml update your driver name .
In JOnAS-4.8.4\conf\jonas.properties, add the bonita datasource name:
jonas.service.dbm.datasources eg bonita,PostgreSQL1.
In JOnAS-4.8.4\conf\a3servers.xml, set the hostname value (localhost by default) at line:
server id="0" name="S0" hostname="localhost".
This value must be the same as what you've defined in BONITA_HOME\.ant.properties.
In JOnAS-4.8.4\conf\carol.properties set the value of jrmp URL:
“carol.jrmp.url=rmi://localhost:1099”. Make sure that the host name and port name
values must be the same as what you've defined in $BONITA_HOME\.ant.properties file
for "bonita.host" and "jrmp.port" properties.
In JOnAS-4.8.4\conf\ jaas.config add the following lines
bonita {
// Use the resource dsrlm_1
org.objectweb.jonas.security.auth.spi.JResourceLoginModule required
resourceName="dsrlm_1";
// Use the login module to propagate security to the JOnAS server
org.objectweb.jonas.security.auth.spi.ClientLoginModule required ;
};
July 2007
44
CollabCAD Workflow User Manual
bonita-policy {
org.objectweb.jonas.security.auth.spi.JResourceLoginModule required
resourceName="dsrlm_1";
// Use the login module to propagate security to the JOnAS server
org.objectweb.jonas.security.auth.spi.ClientLoginModule required;
};
This ends your configuration. Now you have to compile Bonita so that it gets integrated
with the JOnAS application server.
For this open a command prompt and go to Bonita home directory and issue the 'ant'
command. This will compile Bonita with JOnAS. Now it's time to start Bonita with the
application server.
Then open a command prompt and go the Bonita home directory and issue the 'ant
initDB' command. This will initialize the Bonita environment.
4.10 To access the Bonita workflow system, open a web browser and type the URL
http://localhot:9011/bonita
Here you can create new users and the users will be created in the postgresql database (in
the table “bnuser” inside your database).
July 2007
45