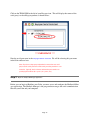
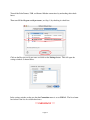
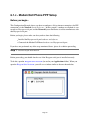
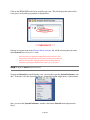
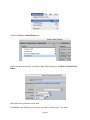
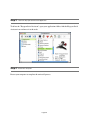
1
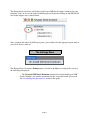
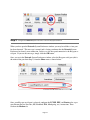
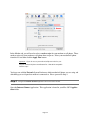
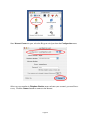
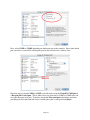
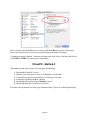
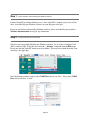
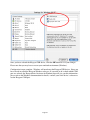
pr ch re
od an gi R Wa
uc ce ste eg rr
t— to r o is a
w w nli tra nty
w in n
w. a e tio
tri F to n
pp R da :
lit EE y f
e. T o
co ri r a
m pp
/w L
ar ite
ra
nt
y
Owner’s Manual
4-Port USB Serial Adapter
for Mac®
Model: USA-49WG
1111 W. 35th Street, Chicago, IL 60609 USA
www.tripplite.com/support
Copyright © 2010 Tripp Lite. All rights reserved. Keyspan is a trademark of Tripp Lite.
4-Port USb Serial Adapter for Mac®
Model: USA-49WG
Table of Contents
1.1 - Introduction
3
2.1 - Installation Instructions
4
3.1 - Configuring Your Serial Device
6
4.1 - Keyspan Serial Assistant
8
5.1 - Problem Solving
10
6.1 - Appendices
12
6.1.a - Configuration Examples for Mac OS X
13
6.1.b - Palm Desktop
14
6.1.c - Modem/Cell Phone PPP Setup
19
6.1.d - VirtualPC
24
6.1.e - Final Cut Pro
32
6.1.f - Un-installing Keyspan software
35
Page 2
1.1 - Introduction
The Keyspan USB Serial Adapter Software for Mac OS X allows you to add serial ports to your
Mac OS X computer. Using Mac OS X native software, you can use your Keyspan USB to Serial Adapter to communicate with various serial devices via the POSIX API.
Important Note:
The Keyspan USB Serial Adapter Software for Mac OS X will add 'Mac OS X serial ports' to your
computer. These 'Mac OS X serial ports' can only be used by Mac OS X native software (a
program that does not require the Classic environment to run). If you are not certain if your
serial device's software can access Mac OS X serial ports, please read the Serial Ports - Mac OS
X vs 'Classic' Mac OS section in this manual. Examples of serial devices that use Mac OS X serial
ports are modems using PPP (for internet access - configured via the Networking System Pref erence icon), Palm Handhelds (using Palm's HotSync Manager), and UPS devices.
Requirements
The Keyspan USB Serial Adapter Software for Mac OS X requires the following:
· Macintosh:
· At least one available USB port
· Mac OS X (10.2.8 or greater)
Page 3
2.1 - Installation Instructions
Installing the USB Serial Adapter Software for Mac OS X
Step 1 - Insert the Keyspan Serial Adapter CD-ROM
Place the CD into the CD-ROM drive. When the CD icon appears on your desktop, double click
on this icon to display its contents.
Locate the Keyspan Mac OS X folder and then locate the Keyspan USB Serial Software for Mac
OS X Installer.
Step 2 - Run the Keyspan USB Serial Software for Mac OS X Installer
Run the Keyspan USB Serial Software for Mac OS X Installer by double clicking the Keyspan
USB Serial Software for Mac OS X installer icon. This will start the installer. Once the installer
is running, follow the instructions on screen.
Note: The installer requires that you enter an administrator password
before the Keyspan software can be installed. Generally, this password
will be the same as your standard password. To enter the password,
click on the lock icon in the lower left-hand section in the installer window.
The Keyspan USB Serial Adapter software is now installed.
Step 3 - Software Installation Complete!
Now that you have installed the Keyspan USB Serial Adapter software, you are ready to install
the Keyspan USB Serial Adapter hardware. Please proceed to the installing the Keyspan USB
Serial Adapter Hardware instructions.
Page 4
Installing the Keyspan USB Serial Adapter Hardware
The following hardware installation instructions provide a basic overview on installing the
Keyspan USB Serial Adapter in a USB port. For detailed instructions on how to connect USB
devices your specific computer, please refer to the USB Device Install section in your computer's
user's manual.
Step 4 - Connect the USB Cable to the Adapter (if necessary)
If your Keyspan adapter does not have an attached USB cable, attach the included USB cable
into the Keyspan adapter's USB port.
Step 5 - Connect the Adapter to Your USB Port
Attach the Adapter to your computer by connecting the Adapter's USB cable into any built-in
USB port on your computer or USB Hub. It is not necessary to turn off your computer when attaching the Adapter.
Step 6 - Hardware Installation Complete!
Your Keyspan USB Serial Adapter is ready for use now that you have installed hardware and
software. Please proceed to the Keyspan Serial Assistant section in this manual for instructions
on what to do next.
Page 5
3.1 - Configuring Your Serial Device
Prior to using your serial device (modem,UPS, etc.) with the Keyspan USB Serial Adapter, you
must:
1. Connect your serial device (hardware) to the Keyspan port .
2. Configure your serial device's software to use the Keyspan port.
The following instructions provide a general overview of this process.
Connecting Your Serial Device (Hardware)
If your Keyspan adapter is not connected, please do so NOW.
Step 1 - Connect Your Serial Device to the Keyspan Adapter
Attach your serial device's serial cable to the serial port on your Keyspan USB Serial Adapter.
Step 2 - Determine Which Keyspan Port Your Serial Device is Connected To
If you have a Keyspan product that has more than one serial port, please note which Keyspan
serial port your serial device is connected to (the serial port on the Keyspan product, not your
USB ports on your computer or USB hub). This information will become useful as we start Configuring Your Serial Device's Software.
Configuring Your Serial Device's Software
The following configuration instructions provide a basic overview of how to configure your
software to use your Keyspan serial port(s). For specific instructions on how to operate your serial device, please refer to that device's user's manual for detailed instructions.
Page 6
Step 3 - Determine Where to Select/Configure the Keyspan Serial Port(s)
Prior to using your serial device with a Keyspan serial port, you must first tell that serial device's
software which Keyspan serial port your device is connected to.
Most serial devices will have software that will allow you to select which serial port the device is
connected to. Depending on your serial device and its software, you may have to configure: a
System Preference item (modems accessing ISPs), an application (UPSes), or some combi nation of these (modems accessing terminals using Zterm).
Please refer to your serial device's documentation on which method your serial device uses and
how to access that software's serial port "configuration" screen.
Once you've determined where to select or configure your serial device's software's serial port
settings, please proceed to Step 4.
Step 4 - Determine Which Serial Port to Select in Your Serial Device's Software
When you've found the port selection screen in your serial device's software, you may be presented with a list of serial port names.
If you have a Keyspan device that only has one serial port, simply select the port name that starts
with the letters USA.
If you have a Keyspan device that has two or more serial ports, you will have more than one
choice in your list of ports. Depending on the software, you should be able to see several ports
with the letters USA. These ports will end with a number that corresponds to the port number on
the adapter.
For example, a port named "USA28X9132 " is referencing to the second port on a Keyspan USB
Twin Serial Adapter (part number USA-28X). The numbers before the last number refer to location of that adapter on the USB bus. In this case, "913" is reporting that the adapter is on USB
bus # 9, host hub port # 1 and external hub port # 3.
Step 5 - Use Your Serial Device
Once you've configured your serial software to use the Keyspan serial port, you're ready to start
using your serial device under Mac OS X.
Page 7
4.1 - Keyspan Serial Assistant
Besides the required drivers, the Keyspan USB Serial Adapter software installer installs an application called Keyspan Serial Assistant. This application is used to:
·
·
·
·
Show the names of the installed serial ports
Show which Keyspan adapters are connected
Determine the status of the adapter software and hardware
Assist in problem solving
Launching the Keyspan Serial Assistant
To launch the Assistant, double click the "Keyspan Serial Assistant" icon in your Applications
folder. This will open the Keyspan Serial Assistant window.
Page 8
The Keyspan Serial Assistant will display any Keyspan USB Serial Adapters connected to your
computer. You can also see the names of the Keyspan serial ports by clicking on the TRIANGLE
next to the Adapter icon as shown below:
Once you know the names of the Keyspan ports, you can then select the appropriate port name in
your serial device's software.
The Settings Menu
The Keyspan Serial Assistant's Settings menu is located in the Menu bar and provides access to
the following command(s):
· The Un-install USB Serial Extension command un-installs the Keyspan USB
Serial extension. For specific instructions on how to use this feature, please read
the Un-installing Keyspan software section in this guide.
Page 9
5.1 - Problem Solving
If you are having problems with your Keyspan USB to Serial Adapter in Mac OS X, please
read the following instructions to assist you in troubleshooting.
Hardware Troubleshooting
Step 1 - Use the Keyspan Serial Assistant
Launch the Keyspan Serial Assistant application. When you open the Keyspan Serial Assistant application, you should see your Keyspan adapter in the list of available adapters.
Software/Serial Device Troubleshooting
Step 2 - Is Your Serial Device Mac OS X Compatible
Check to make certain that your serial device is compatible with Mac OS X.
Step 3 - Check the Physical Connections
Make certain that your serial device is powered on and is properly connected to the Keyspan Serial Adapter.
Page 10
Step 4 - Check Your Serial Device's Software Configuration
Check to see if your serial device's software is configured to use the Keyspan port. Please refer
to your serial device's documentation for instructions on how to select/switch/configure a serial
port in that software.
Page 11
6.1 - Appendices
· Configuration Examples for Mac OS X
Instructions on how to configure selected hardware
and software ( VirtualPC, Final Cut Pro, Palm)
· Uninstalling Keyspan software
Instructions on how to uninstall the USB Serial Adapter
software for Mac OS X
Page 12
6.1.a - Configuration Examples for Mac OS X
The following is a list of available configuration examples for Mac OS X. These example provide step-by-step instructions on configuring select serial devices. The current examples available are:
·
·
·
·
Palm Desktop for Mac OS X
Modems and Cell Phones (PPP)
VirtualPC
Final Cut Pro
Page 13
6.1.b - Palm Desktop
Before you begin...
This Configuration Example assumes that you have already done the following:
1. Installed the Keyspan serial port hardware and software.
2. Installed the Palm Desktop software.
3. Connected the Palm Serial Cradle hardware to a Keyspan serial port.
If you have not performed any of the steps mentioned above, please do so before proceeding.
Step 1 - Check the Keyspan Serial Assistant
Before proceeding, you should check to see if the Keyspan serial port is installed correctly.
To do this, open the Keyspan Serial Assistant (located in your Applications folder). When you
open the Keyspan Serial Assistant, you will see a window similar to the one shown below:
If your Keyspan hardware and software are installed correctly, the 'Serial Ports' text box will
show an icon of your Keyspan serial product.
Page 14
Click on the TRIANGLE to the left of your Keyspan icon. This will display the names of the
serial port(s) on that Keyspan product as shown below:
*** IMPORTANT ***
Note the serial port name in the Keyspan Serial Assistant. We will be selecting this port name
in the Palm software later.
Note: If you have a Keyspan product that has more than one serial
port, note the serial port name of the serial port that your Palm is con nected to. Typically, the last 2 letters indicate the port number on
your Keyspan hardware (P1 = port 1, P2 = port 2, etc.).
Step 2 - Open the HotSync® Manager application
Before you can begin to HotSync your Palm, you must access and configure the HotSync® Manager application. The HotSync Manager is the program that manages the serial communication
between your Palm and your computer.
Page 15
The easiest way to access the HotSync Manager is via the Palm Desktop software. To do this,
launch the Palm Desktop software. When the Palm Desktop software is running, go to the "HotSync" menu and select the "Setup" command.
Once the HotSync® Manager application is opened, you will be presented with the HotSync
Software Setup window.
Step 3 - Configure the HotSync Software Setup Window
In the HotSync Software Setup window, click on the HotSync Controls tab at the top of the
window. This will display the HotSync Controls options.
Click on the Disabled radio button to temporarily turn off HotSync monitoring.
the HotSync Controls tab and window
Then click on the Connection Settings tab at the top of the HotSync Software Setup window.
This will display the connection options.
Page 16
Turn off the PalmConnect, USB, and Internal Modem connections by unchecking their check
boxes.
Then turn ON the Keyspan serial port name (see Step 1) by checking its check box.
Click on the Keyspan serial port name and click on the Settings button. This will open the
settings window as shown below:
In the settings window, make sure that the Connection menu is set to SERIAL. The list of numbers below is the list of available baud rates.
*** IMPORTANT ***
Page 17
If you have a Keyspan USB PDA Adapter with the model number of USA-19, set the baud rate
to 57600. For any other Keyspan serial port product (including the Keyspan USB PDA Adapter
model numbers USA-19Q and USA-19Qi), set the baud rate to As fast as possible.
NOTE: The easiest way to determine the model number of your Keys pan serial adapter is to turn it over. On the back of the adapter is FCC,
CE, and other information. The part number is list as "P/N: USA-XXxx"
Once you have selected the correct baud rate, click the OK button to return to the Connection
Settings window. Then click on the HotSync Controls tab.
At the HotSync Controls tab, select the Enabled button as shown below:
Step 4 - HotSync Your Palm Organizer
Palm Software configuration is now complete. To initiate a 'HotSync' session, place your Palm
Organizer in its cradle and then press the HotSync button on the cradle. Your Palm Organizer
will now "HotSync."
Page 18
6.1.c - Modem/Cell Phone PPP Setup
Before you begin...
This Configuration Example shows you how to configure a dial-up internet connection (aka PPP
connection) via the Network System Preference. In this example, a modem or cell phone is connected to a Keyspan serial port and the Network System Preference is told to communicate with
that Keyspan serial port.
Before you begin, please make sure that you have done the following:
• Installed the Keyspan serial port hardware and software.
• Connected the Modem/Cell Phone hardware to a Keyspan serial port.
If you have not performed any of the steps mentioned above, please do so before proceeding.
Step 1 - Check the Keyspan Serial Assistant
Before proceeding, you should check to see if the Keyspan serial port is installed correctly.
To do this, open the Keyspan Serial Assistant (located in your Applications folder). When you
open the Keyspan Serial Assistant, you will see a window similar to the one shown below:
Page 19
Click on the TRIANGLE to the left of your Keyspan icon. This will display the names of the
serial port(s) on that Keyspan product as shown below:
*** IMPORTANT ***
Note the serial port name in the Keyspan Serial Assistant. We will be selecting this port name
in the Network System Preference later.
Note: If you have an Keyspan product that has more than one serial
port, note the serial port name of the serial port that your modem/cell
phone is connected to. Typically, the last 2 letters indicate the port
number on your Keyspan hardware (P1 = port 1, P2 = port 2, etc.).
Step 2 - Open the Network System Preference
To open the Network System Preference pane, you must first open the System Preferences window. To do this, select the System Preferences command from the Apple menu as shown below:
Once you are in the System Preferences window, click on the Network icon and proceed to
Step 3.
Page 20
Step 3 - Configure the Network System Preference to Use the Keyspan Serial Port
When you first open the Network System Preference window, you may be told that a 'new port
has been detected.' This message is normal and is letting you know that the Network System
Preference has found a new connection. In this case, the new port/connection is the Keyspan serial port. If you see this message, simply click the OK button.
Once you are in the Network System Preference window, select the Keyspan serial port (this is
the name of the port from Step 1) from the Show menu as shown below:
Once your Keyspan serial port is selected, configure the TCP/IP, PPP, and Proxies tabs as per
your Internet Service Provider (ISP; Earthlink, IBM, Mindspring, etc.) instructions. Then
click on the Modem tab.
Page 21
In the Modem tab, you will need to select a modem script for your modem or cell phone. These
modem scripts tell your modem or cell phone how to operate. Select your modem/cell phone
from this list and then click the Apply Now button.
Important : If you do not see your modem/cell phone in this list, contact your modem/cell phone manufacturer for a "Mac OS X compatible
modem script."
You have now told the Network System Preference which modem/cell phone you are using and
which Keyspan serial port that modem is connected to. Please proceed to Step 4.
Step 4 - Configure the Internet Connect Application and Connect to the Internet
Open the Internet Connect application. This application is found in your Mac OS X Applications folder.
Page 22
Once Internet Connect is open, select the Keyspan serial port from the Configuration menu.
Select an access number in Telephone Number menu and enter your account's password if necessary. Click the Connect button to connect to the Internet.
Page 23
6.1.d - VirtualPC
Keyspan Support For VirtualPC...
Information on how to use Keyspan serial products with VirtualPC is provided per the request of
VirtualPC users. Keyspan does not support VirtualPC due to the fact that VirtualPC cannot
provide the same USB and serial resources that you would find on a 'real' Windows computer.
Because of this, serial devices running under VirtualPC (or any emulator) may or may not work.
Serial and USB devices expect to communicate with hardware based serial and USB ports.
Software based emulators, like VirtualPC, cannot provide the same level of performance as
hardware based USB and serial ports. Depending on you serial device and its software, you may
or may not be able to reliably use VirtualPC as a way of using a serial device. Please keep this in
mind as you read these instructions.
Before you begin...
This Configuration Example shows you how to configure VirtualPC (with Microsoft Windows)
to use a Keyspan serial port. There are two ways of doing this depending on your Keyspan serial
product:
Method 1 involves VirtualPC emulating COM1 or COM2 by using an existing Mac serial port.
This method is compatible with all Keyspan serial ports. This method is recommended for use
with DOS programs or any software that is not compatible with Microsoft's 'Win32 Communications API' (any pre-Windows 98 or 2000 programs).
Method 2 involves VirtualPC emulating USB and installing Keyspan's Windows software. This
method is only compatible with Keyspan serial ports that have Windows software. This method is
recommended when you have: a) VirtualPC version 4.0 or later b) a Keyspan serial port that has
Windows software. This method is not compatible with Mac only serial ports (USA-28, USA28X, USA-18X, SXPRO, etc.).
IMPORTANT!!! YOU CANNOT USE BOTH METHOD 1 and METHOD 2 AT THE SAME
TIME. Remember to disable USB is you have VPC set to use COM1/COM2 or disable COM1/
COM2 if you are using the USB.
Both methods accomplish the same the same thing (adding a a serial port) but one method may
work better than the other depending on what serial device is used, what operating system is installed, which Keyspan serial port is used, etc. or neither method may work. You may be able to
find more information on the internet as to how to speed up VirtualPC as this often is a factor in
getting a successful outcome.
VirtualPC - Method 1
Page 24
This method assumes that you have already done the following:
•
•
•
•
Installed the Keyspan serial port hardware and MAC software only (not windows).
Installed the VirtualPC software.
Installed your serial device software in Windows (in VirtualPC).
Connected your serial device hardware to a Keyspan serial port.
If you have not performed any of the steps mentioned above, please do so before proceeding.
Step 1 - Check the Keyspan Serial Assistant
Before proceeding, you should check to see if the Keyspan serial port is installed correctly.
To do this, open the Keyspan Serial Assistant (located in your Applications folder). When you
open the Keyspan Serial Assistant, you will see a window similar to the one shown below:
Click on the TRIANGLE to the left of your Keyspan icon. This will display the names of the
serial port(s) on that Keyspan product as shown below:
Page 25
*** IMPORTANT ***
Note the serial port name in the Keyspan Serial Assistant. We will be selecting this port name in
VirtualPC later.
Note: If you have a Keyspan product that has more than one serial
port, note the serial port name of serial port that your modem/cell
phone is connected to. Typically, the last 2 letters indicate the port
number on your Keyspan hardware (P1 = port 1, P2 = port 2, etc.).
Step 2 - Launch and Configure VirtualPC to Emulate a COM Port
Launch VirtualPC by double clicking its icon. When VirtualPC is running, select the "...Settings" command from the Edit menu. Please note that the VirtualPC menu bar may be hidden.
You may have to hold down the Command key (aka Apple key).
Once the Settings window is open, select USB. For Method 1, you will have to disable USB.
Make sure that the Enable USB check box is not checked (disabled) and that all other check
boxes are not checked (see next image).
Page 26
Next, select COM1 or COM2 depending on which port you wish to emulate. Please note which
port you select as you will be selecting this port in your serial device's software later.
Now that you've selected COM1 or COM2, you will need to map the VirtualPC COM port to
a Keyspan MAC serial port. This is what causes data to be sent to COM1 or COM2 to be sent
to to your Keyspan serial port. To do this, turn on the Mac serial port radio button and select
your Keyspan serial port from the list of available ports (this is same port from Step 1).
Page 27
Once you have selected the Keyspan serial port, click the OK button to save your changes.
Please note that you may have to restart your emulated environment ( Windows).
Configuration is now complete. You must now open your serial device's software and tell it to
use COM1 or COM2 as per that device's instructions.
VirtualPC - Method 2
This method assumes that you have already done the following:
1.
2.
3.
4.
5.
6.
Installed the VirtualPC software.
Installed your serial device's software in Windows (in VirtualPC).
Connected your serial device hardware to a Keyspan serial port.
Uninstalled any Keyspan MAC software.
Installed the Keyspan serial port Windows software.
Installed the Keyspan serial device's hardware.
If you have not performed any of the steps mentioned above, please do so before proceeding.
Page 28
Step 1 - Launch VirtualPC and Install Keyspan Windows Software
Launch VirtualPC by double clicking its icon. Once VirtualPC is running and you are in Windows, install the Keyspan Windows software for your Keyspan serial port.
If you are not familiar with installing Windows software, please read that Keyspan product's
Windows documentation for step by step instructions.
Step 2 - Configure VirtualPC to Emulate USB
Now that you have installed the Keyspan Windows software, we are ready to configure VirtualPC to emulate USB. To do this, first select the "...Settings" command from the Edit menu.
Please note that the VirtualPC menu bar may be hidden. You may have to hold down the Command key (aka Apple key).
Once the Settings window is open, select COM1 Port and set it to None. Next, select COM2
Port and set it to None as well.
Page 29
Once the Settings window is open, select USB.
Once USB is selected, turn on or check the Enable USB check box. Below this check box, you
should see an item for your Keyspan USB device. Turn on this check box as well. This will
emulate USB and tell your emulated environment that your Keyspan USB device is connected.
Page 30
Once you have selected the Keyspan USB device, click the OK button to save your changes.
Please note that you may have to restart your emulated environment ( Windows).
Configuration is now complete. Windows will now detect the Keyspan USB device. Since you
have already installed the Keyspan Windows software, all you need to do is check which COM
port was created (the Keyspan Serial Assistant for Windows that will give you this information please refer to the Windows documentation for details) and tell your serial device's software to
use the Keyspan COM port.
Page 31
6.1.e - Final Cut Pro
This Configuration Example assumes that you have already done the following:
1. Installed the Keyspan serial port hardware and software.
2. Installed the Final Cut Pro software.
3. Connected your video deck hardware to a Keyspan serial port.
If you have not performed any of the steps mentioned above, please do so before proceeding.
Step 1 - Check the Keyspan Serial Assistant
Before proceeding, you should check to see if the Keyspan serial port is installed correctly.
To do this, open the Keyspan Serial Assistant (located in your Applications folder).
If your Keyspan hardware and software are installed correctly, the 'Serial Ports' text box will
show an icon of your Keyspan serial product.
Click on the TRIANGLE to the left of your Keyspan icon. This will display the names of the
serial port(s) on that Keyspan product.
*** IMPORTANT ***
Note the serial port name in the Keyspan Serial Assistant. We will be selecting this port name
in the Final Cut Pro software later.
Note: If you have a Keyspan product that has more than one serial
port, note the serial port name of the serial port that your Palm is con nected to. Typically, the last 2 letters indicate the port number on
your Keyspan hardware (P1 = port 1, P2 = port 2, etc.).
Step 2 - Setup the Final Cut Pro Software.
Launch Final Cut Pro.
Under the Final Cut Pro menu, select Audio/Video Settings.
Page 32
Click on the Device Control Presets tab.
Select your deck from the list and click on edit. This will bring up the Device Control Preset
Editor.
Select the correct protocol for your deck.
Under Port, select the Keyspan serial port your deck is connected to. (see above)
Page 33
Select OK and now you should have deck control with Final Cut Pro!
Page 34
6.1.f - Un-installing Keyspan software
Un-install Instructions
To un-install the Keyspan USB Serial Adapter software for Mac OS X, you will have to:
1. Launch the Keyspan Serial Assistant..
2. Select the Un-install USB Serial Extension command
(from the Settings menu).
3. Delete the Keyspan Serial Assistant application.
4. Restart.
For detailed instructions on this process, please follow these steps:
Step 1 -
Open the Keyspan Serial Assistant
Open the Keyspan Serial Assistant by double clicking the "Keyspan Serial Assistant" icon in your
Applications folder. This will open the Keyspan Serial Assistant window.
Step 2 -
Access the Settings Menu
In the Keyspan Serial Assistant, select the Un-install USB Serial Extension command from the
Settings menu and follow the on-screen instructions.
Page 35
Step 3 -
Delete the Keyspan Serial Assistant Application
To delete the "Keyspan Serial Assistant", open your applications folder, find the Keyspan Serial
Assistant icon and move it to the trash.
Step 4 - Restart Your Computer
Restart your computer to complete the un-install process.
Page 36
2-Year Limited Warranty
TRIPP LITE warrants its products to be free from defects in materials and workmanship for a period of two (2) years from the date of initial
purchase. TRIPP LITE’s obligation under this warranty is limited to repairing or replacing (at its sole option) any such defective products. To obtain
service under this warranty, you must obtain a Returned Material Authorization (RMA) number from TRIPP LITE or an authorized TRIPP LITE
service center. Products must be returned to TRIPP LITE or an authorized TRIPP LITE service center with transportation charges prepaid and
must be accompanied by a brief description of the problem encountered and proof of date and place of purchase. This warranty does not apply to
equipment which has been damaged by accident, negligence or misapplication or has been altered or modified in any way.
EXCEPT AS PROVIDED HEREIN, TRIPP LITE MAKES NO WARRANTIES, EXPRESS OR IMPLIED, INCLUDING WARRANTIES OF
MERCHANTABILITY AND FITNESS FOR A PARTICULAR PURPOSE. Some states do not permit limitation or exclusion of implied warranties;
therefore, the aforesaid limitation(s) or exclusion(s) may not apply to the purchaser.
EXCEPT AS PROVIDED ABOVE, IN NO EVENT WILL TRIPP LITE BE LIABLE FOR DIRECT, INDIRECT, SPECIAL, INCIDENTAL OR
CONSEQUENTIAL DAMAGES ARISING OUT OF THE USE OF THIS PRODUCT, EVEN IF ADVISED OF THE POSSIBILITY OF SUCH
DAMAGE. Specifically, TRIPP LITE is not liable for any costs, such as lost profits or revenue, loss of equipment, loss of use of equipment, loss of
software, loss of data, costs of substitutes, claims by third parties, or otherwise.
WARRANTY REGISTRATION
Visit www.tripplite.com/warranty today to register the warranty for your new Tripp Lite product. You’ll be automatically entered into a drawing for a
chance to win a FREE Tripp Lite product!*
* No purchase necessary. Void where prohibited. Some restrictions apply. See website for details.
Warning!
Use of this equipment in life support applications where failure of this equipment can reasonably be expected to cause the failure of the life support
equipment or to significantly affect its safety or effectiveness is not recommended. Do not use this equipment in the presence of a flammable
anesthetic mixture with air, oxygen or nitrous oxide.
FCC Notice, Class B
This device complies with part 15 of the FCC Rules. Operation is subject to the following two conditions: (1) This device may not cause harmful
interference, and (2) this device must accept any interference received, including interference that may cause undesired operation.
Note: This equipment has been tested and found to comply with the limits for a Class B digital device, pursuant to part 15 of the FCC Rules.
These limits are designed to provide reasonable protection against harmful interference in a residential installation. This equipment generates, uses
and can radiate radio frequency energy and, if not installed and used in accordance with the instructions, may cause harmful interference to radio
communications. However, there is no guarantee that interference will not occur in a particular installation. If this equipment does cause harmful
interference to radio or television reception, which can be determined by turning the equipment off and on, the user is encouraged to try to correct the
interference by one or more of the following measures:
• Reorient or relocate the receiving antenna.
• Increase the separation between the equipment and receiver.
• Connect the equipment into an outlet on a circuit different from that to which the receiver is connected.
• Consult the dealer or an experienced radio/TV technician for help.
Any changes or modifications to this equipment not expressly approved by Tripp Lite could void the user’s authority to operate this equipment.
WEEE Compliance Information for Tripp Lite Customers and Recyclers (European Union)
Under the Waste Electrical and Electronic Equipment (WEEE) Directive and implementing regulations, when customers buy new electrical and
electronic equipment from Tripp Lite they are entitled to:
• Send old equipment for recycling on a one-for-one, like-for-like basis (this varies depending on the country)
• Send the new equipment back for recycling when this ultimately becomes waste
Tripp Lite follows a policy of continuous improvement. Product specifications are subject to change without notice.
1111 W. 35th Street, Chicago, IL 60609 USA
www.tripplite.com/support
201007160 • 933034-EN