1
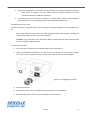
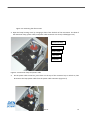
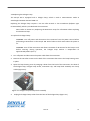
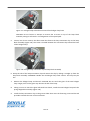
® Denville Zenyth 200 Microplate Reader USER MANUAL Issue 01 1 Except as provided in writing signed by an officer to Denville this system and any related documentation are provided “as is” without warranty of any kind, expressed or implied, including that the system is “error free.” This information is presented in good faith, but Denville not warrant, guarantee, or make any representations regarding the use or the results of the use of this system and related documentation in terms of correctness, accuracy, reliability, omissions, or otherwise. The entire risk as to the use, results, and performance of this system and related documentation is assumed by the user. Except as expressly provided herein, Denville makes no other warranty, whether oral or written, expressed or implied, as to any matter whatsoever, including but not limited to those concerning merchantability and fitness for a particular purpose, nor is freedom from any patent owned by Denville or by others to be inferred. LIMITATIONS OF LIABILITY Denville shall not be liable, to any extent whatsoever, for any damages resulting from or arising out of the use or performance of this system and related documentation or the procedures specified in this manual, the form of action, whether in contract, tort (including negligence), breach of warranty, strict liability or otherwise, and including but not limited to damages resulting from loss of data, loss of anticipated profits, or any special, indirect, incidental or consequential damages. In no event shall Denville’s liability to the user exceed the amount paid by the user to Denville The user assumes full responsibility for the results obtained from the use of this system and related documentation and for application of such results. Microsoft, Windows, and Windows NT are either registered trademarks or trademarks of Microsoft Corporation in the United States and/or other countries. IBM is a trademark of International Business Machines Corporation in the United States, other countries, or both. Pentium is a registered trademark of Intel Corporation. All other trademarks appearing in this manual are owned by their respective companies. Copyright 2011 by Denville All rights reserved. No part of this publication may be reproduced, distributed, or transmitted in any form or by any means, electronic, mechanical, photocopying, recording, or otherwise, or stored in a database or retrieval system, without the prior written permission of Denville Note: The contents of this manual are subject to change without notice. Issue 01 2 TABLE OF CONTENTS Table of Contents .................................................................................................................................... 3 Warranty and Returned Goods Requirements ....................................................................................... 4 1 Safety Information ........................................................................................................................... 6 1.1 Warning and Caution Definitions ...................................................................................................... 6 1.2 Chemical and Biological Safety ......................................................................................................... 8 1.3 Moving Parts ..................................................................................................................................... 9 1.4 Cleaning............................................................................................................................................. 9 1.5 Maintenance ..................................................................................................................................... 9 2.1 Instrument Overview ...................................................................................................................... 10 2.2 Setting Up and Operating the Zenyth 200 ..................................................................................... 10 2.2.1 Unpacking and Setting Up the Zenyth 200 .............................................................................................. 10 To unpack the Zenyth 200: ........................................................................................................................... 11 2.2.2 Setting Up and Operating the Zenyth 200 ............................................................................................... 11 To set up the Zenyth 200: ............................................................................................................................. 11 2.2.3 Setting Up and Operating the Zenyth 200 ............................................................................................... 12 2.2.4 Loading a Microplate Into the Zenyth 200 .......................................................................................... 13 2.2.5 Loading a Cuvette Into the Zenyth 200................................................................................................... 15 3 Maintenance ..................................................................................................................................... 16 3.1 Performing Preventive Maintenance.......................................................................................................... 16 3.2 Calibrating Lamp Brightness and the Plate and Optics Transports ............................................................. 16 3.4 Replacing the Fan Filter .............................................................................................................................. 17 3.5 Replacing the Deuterium Lamp .................................................................................................................. 18 3.7 Troubleshooting .......................................................................................................................................... 25 Appendix A: Specifications .................................................................................................................... 27 Issue 01 3 A.1 Instrument Specifications ........................................................................................................................... 27 A.2 Photometric Specifications ......................................................................................................................... 27 A.3 Computer System Requirements ............................................................................................................... 29 WARRANTY AND RETURNED GOODS REQUIREMENTS All standard Denville policies governing returned goods apply to this product. Subject to the exceptions and upon the conditions stated below, the Company warrants that the products sold under this sales agreement shall be free from defects in workmanship and materials for one year after delivery of the products to the original Purchaser by the Company, and if any such product should prove to be defective within such two years period, the Company agrees, at its option, either (1) to correct by repair or at the Company’s election by replacement, any such defective product provided that investigation and factory inspection discloses that such defect developed under normal and proper use, or (2) to refund the purchase price. The exceptions and conditions mentioned above are as follows: a. Components or accessories manufactured by the Company which by their nature are not intended to and will not function for one year are warranted only to reasonable service for a reasonable time. What constitutes a reasonable time and a reasonable service shall be determined solely by the Company. A complete list of such components and accessories is maintained at the factory. b. The Company makes no warranty with respect to components or accessories not manufactured by it. In the event of defect in any such component or accessory, the Company will give reasonable assistance to Purchaser in obtaining from the manufacturer’s own warranty. c. Any product claimed to be defective must, if required by the Company, be returned to the factory, transportation charges prepaid, and will be returned to Purchaser with transportation charges collect unless the product is found to be defective, in which case the product must be properly decontaminated of any chemical, biological, or radioactive hazardous material. d. The Company shall be released from all obligations under all warranties, either expressed or implied, if any product covered hereby is repaired or modified by persons other than its own authorized service personnel, unless such repair by others is made with the written consent of the Company. Issue 01 4 e. If the product is a reagent or the like, it is warranted only to conform to the quantity and content and for the period (but not in excess of one year) stated on the label at the time of delivery. It is expressly agreed that the above warranty shall be in lieu of all warranties of fitness and of the warranty of merchantability, and that the company shall have no liability for special or consequential damages of any kind or from any cause whatsoever arising out of the manufacture, use, sale, handling, repair, maintenance, or replacement of any of the products sold under the sales agreement. f. Representatives and warranties made by any person, including dealers and representatives of the Company, which are consistent or in conflict with the terms of this warranty, shall not be binding upon the Company unless reduced in writing and approved by an expressly authorized officer of the Company. g. Parts replaced during the warranty period are warranted to the end of the instrument warranty. Note: Performance characteristics and specifications are only warranted when Denville replacement parts are used. Issue 01 5 1 SAFETY INFORMATION All Warnings and Cautions in this document include an exclamation point, a lightning bolt, or a light burst symbol framed within a triangle. Please pay special attention to the specific safety information associated with these symbols. 1.1 WARNING AND CAUTION DEFINITIONS The exclamation point symbol is an international symbol which serves as a reminder that all safety instructions should be read and understood before installation, use, maintenance, and servicing is attempted. When this symbol is displayed in this manual, pay special attention to the specific safety information associated with the symbol. WARNING A WARNING calls attention to a condition or possible situation that could cause injury to the operator. A CAUTION calls attention to a condition or possible situation that could damage or destroy the product or the operator’s work. To prevent electrically related injuries and property damage, properly inspect all electrical equipment prior to use and immediately report any electrical deficiencies. Contact an Denville service representative for any servicing of equipment requiring the removal of covers or panels. High Voltage This symbol indicates the potential of an electrical shock hazard existing from a high voltage source and that all safety instructions should be read and understood before proceeding with the installation, maintenance, and servicing of all modules. Do not remove system covers. To avoid electrical shock, use supplied power cords only and connect to properly grounded (three-holed) wall outlets. Do not use power strips. The WARNINGs and CAUTIONs found within this document are listed below. CAUTION: Turn off main power to the Zenyth 200 before connecting it to the external computer. Issue 01 6 CAUTION: Warranty claims are void if transport damages are caused by improper packing. CAUTION: Operating the Zenyth 200st without a ferrite bead on the printer cable when the printer is connected to the parallel printer port on the instrument may result in interference that affects the performance of other nearby devices. CAUTION: It is recommended to use an IBM mouse (model number: 12J3618) with the Zenyth 200st. If a different mouse is used, the instrument may experience RFI or EFT/Burst problems. CAUTION: Operating the Zenyth 200st without a ferrite bead on the Y adapter when a keyboard and/or mouse is connected may result in interference that affects the performance of other nearby devices. WARNING: Turn off power to the instrument before replacing the air filter. Removing the fan cover and air filter exposes the fan. CAUTION: Depending upon the duration of the event, transient power-line interruptions may cause this equipment to lock up or reset with the possible loss of in-process data. If you suspect this has occurred and the equipment is not responding to commands, manually cycle the power to the unit and repeat in-process programs or runs. WARNING: Turn off power and disconnect the instrument from the power source before performing maintenance on the Zenyth 200. Risk of electric shock when the power is on. WARNING: Never view the lamp directly without approved eyewear. Protect skin from exposure to the light emitted by the lamp. The deuterium lamp emits UV radiation. WARNING: Turn off the instrument and allow a minimum of 30 minutes for the lamp to cool before servicing. During operation, the deuterium lamp reaches a temperature of approximately 250°C (482° F). WARNING: Handle the old deuterium lamp with caution. The old lamp may be hot. CAUTION: Do not touch the glass of the new lamp. Fingerprints on the glass may shorten the life of the lamp. WARNING: Turn off the instrument and allow a minimum of 30 minutes for the lamp to cool before servicing. During operation, the halogen lamp reaches a temperature of approximately 300°C (572° F). CAUTION: Do not loosen or attempt to remove the 4 screws on top of the lamp block assembly. Doing so will result in a misalignment of the optical path. Issue 01 7 WARNING: Handle the old halogen lamp with caution. The old lamp may be hot. CAUTION: Do not touch the glass of the new halogen lamp. Finger prints on the glass may shorten the life of the lamp. WARNING: Turn off and unplug power to the instrument before changing fuses. Failure to do so can cause electrical shock or equipment damage. WARNING: Only Biochrom-trained service engineers may perform service procedures on the instrument. 1.2 CHEMICAL AND BIOLOGICAL SAFETY Normal operation of the Zenyth 200 spectrophotometer may involve the use of materials that are toxic, flammable, or otherwise biologically harmful. When using such materials, observe the following precautions: Handle infectious samples according to good laboratory procedures and prevent the spread of disease. Observe all cautionary information printed on the original solutions containers prior to their use. Dispose of all waste solutions according to your facility’s waste disposal procedures. Operate the Zenyth 200 spectrophotometer in accordance with the instructions outlined in this manual, and take all the necessary precautions when using pathological, toxic, or radioactive materials. Take appropriate safety precautions, such as using safety glasses and wearing protective clothing when working with potentially hazardous liquids. Use an appropriately contained environment when using hazardous materials. Observe the appropriate cautionary procedures as defined by your safety officer when using flammable solvents in or near a powered-up instrument. Observe the appropriate cautionary procedures as defined by your safety officer when using toxic, pathological, or radioactive materials. Note: Observe all warnings and cautions listed for any external devices attached or used during operation of the Zenyth 200 spectrophotometer. Refer to applicable external device user’s manuals for operating procedures of that device. Issue 01 methods to 8 1.3 MOVING PARTS To avoid injury due to moving parts, observe the following: Never attempt to exchange lab ware, reagents, or tools while the instrument is operating. Never attempt to physically restrict any of the moving components of the Zenyth 200 spectrophotometer. Keep the Zenyth 200 spectrophotometer work area clear to prevent obstruction of the movement. 1.4 CLEANING Observe the cleaning procedures outlined in this user’s manual for the Zenyth 200 spectrophotometer. Prior to cleaning equipment that has been exposed to hazardous material: Appropriate Chemical and Biological Safety personnel should be contacted. The Chemical and Biological Safety information contained in this user’s manual should be reviewed. 1.5 MAINTENANCE Perform only the maintenance described in this manual. Maintenance other than that specified in this manual should be performed only by Denville service representatives. It is your responsibility to decontaminate components of the Zenyth 200 microplate reader spectrophotometer before requesting service by a Denville service representative or returning parts to Denville for repair. Denville will NOT accept any items which have not been decontaminated where it is appropriate to do so. If any parts are returned, they must be enclosed in a sealed plastic bag stating that the contents are safe to handle and are not contaminated. Issue 01 9 2.1 INSTRUMENT OVERVIEW The Zenyth 200 is a computer controlled spectrophotometer that performs photometric measurements on samples in 6- to 384-well microplates and cuvettes (Figure 1-1). A high precision monochromator allows the Zenyth 200 to perform endpoint, kinetic, multiwavelength, and scan measurements at wavelengths ranging from 190 to 1000 nm. The instrument also provides temperature control and shaking for microplate samples. The Zenyth 200 is operated remotely through an external computer using the supplied ADAP Software. The ADAP Software can configure and perform photometric measurements using the Zenyth 200 and save and evaluate measurement results. The ADAP Software may be upgraded to the ADAP Prisma Software, which provides additional qualitative and quantitative measurement and evaluation capabilities. Figure 1-1. The Zenyth 200 spectrophotometer 2.2 SETTING UP AND OPERATING THE ZENYTH 200 2.2.1 Unpacking and Setting Up the Zenyth 200 Place the Zenyth 200 on any dry, flat work area that has sufficient space for the instrument, external computer, and required cables. Issue 01 10 The Zenyth 200 packaging is specifically designed to protect the instrument during transport. Keep the original carton, foam inserts, and accessories box in case the instrument needs to be shipped in the future. CAUTION: Warranty claims are void if transport damages are caused by improper packing. TO UNPACK THE ZENYTH 200: 1. Check the box for any visible damage during transportation. In case of damage, inform the supplier immediately and keep the damaged packaging. 2. Open the box lid and remove the accessories box. 3. Carefully lift the Zenyth 200 by the molded foam packaging encasing it. 4. Remove the molded foam packaging from the instrument and place the packaging back in the shipping box. 5. Remove the plastic surrounding the Zenyth 200 and discard. 2.2.2 Setting Up and Operating the Zenyth 200 TO SET UP THE ZENYTH 200: 1. Place the instrument, external computer, and peripherals on a dry, flat work area with sufficient space for all of the equipment and the required cables. 2. Install the ADAP Software on the external computer. Refer to Chapter 1 of the ADAP Software Operating Manual for more information. 3. Connect one end of the 9-pin serial cable to the serial port on the computer. Note: Only use the original serial cable supplied with the Zenyth 200. Other serial cables with identical connectors may not establish communication between the instrument and computer. CAUTION: Turn off main power to the Zenyth 200 before connecting it to the external computer. 4. Connect the other end of the 9-pin serial cable to the serial port on the back of the instrument (Figure 1-2). Issue 01 11 Figure 1-2. Power switch and connection ports 5. Connect the power cable to the power port on the back of the instrument (Figure 1-2). 6. Turn on the power switch on the back of the instrument (Figure 1-2). Note: For optimal performance, allow the Zenyth 200 to warm up for 30 minutes before performing measurements. 2.2.3 Setting Up and Operating the Zenyth 200 1. On the external computer, start the ADAP Software. 2. Log into the ADAP Software as an administrator (Level 2) or system administrator (Level 3). user name admin/sadmin password admin/sadmin 3. In the ADAP Software, from the Setup menu, choose Instrument. Instrument appears (Figure 1-3). In the ADAP Software, configure the instrument settings by following the steps in Chapter 3 of the ADAP Software Operating Manual. Figure 1-3. ADAP Software Issue 01 12 4. After turning on the power switch at the rear of the instrument, a power indicator on the front panel indicates the current status of the instrument (Figure 1-4): Continuous green — the instrument is ready for operation. Flashing green — a problem occurred during initialization; the instrument is not ready for operation. Not illuminated — the instrument is not ready for operation. Note: For optimal performance, allow the Zenyth 200 to warm up for 30 minutes before performing measurements. 2.2.4 Loading a Microplate Into the Zenyth 200 Microplates to be read are placed on the plate carrier in the front of the instrument. To load a microplate into the instrument: 1. To connect instrument to ADAP software: Insert CD supplied with the instrument into PC, install ADAP. Open ADAP. ADAP will prompt for a user ID and password. Use the pre-set ID and passwords are sadmin\sadmin. Once logged as sadmin, set specific user IDs, passwords and administrative rights. Select Setup>Instrument in the menu bar. A dialogue box will open: Under the Instrument tab: In Baudrate: select Auto Sense In COM Port: select port or Auto Sense In Instrument Type: select Zenyth200 in the dropdown menus. 3. To measure a plate: Go to Reading>Quick or the R button in the task bar. To confirm that the instrument is connected with the computer, select the Read Configuration button. The serial number of the instrument should now appear in the Setup>Instrument dialogue box along with compatible plate types. Issue 01 13 In the Quick-Read dialogue box: Confirm that the correct format and plate type are selected. Select All in Measurement Position to read all wells. Select Endpoint Photometric for basic readings using a measurement and reference filter. Select the measurement filter and the reference filter from the drop-down menu. Note: It is important to use a reference filter to account for optical inference from the plate. Place plate with A1 in the upper left corner of the plate transport. Select Start. Absorbance measurements will appear in the open matrix in ADAP. Data can be exported to data analysis software using the Copy icon. Data will paste as a matrix with filter wavelength, time and date. 1. In the ADAP Software, from the toolbar, choose Eject Plate to move the plate carrier outside the instrument. 2. Place the microplate on the plate carrier with well A1 oriented so that it is in the back left corner of the plate carrier (Figure 1-4). Issue 01 14 Figure 1-4. Zenyth 200 with plate carrier open 3. In the ADAP Software, choose Load Plate to move the plate carrier inside the instrument. 2.2.5 Loading a Cuvette Into the Zenyth 200 Cuvettes to be read are loaded manually into the cuvette holder near the back left corner of the instrument (Figure 1-4). When performing measurements, cuvettes are not loaded into the instrument until the lamp output has stabilized. During measurements, the ADAP Software displays a visual prompt onscreen when the cuvette should be inserted in the holder. Note: Refer to Chapter 6 in the ADAP Software Operating Manual for more information about performing measurements on cuvette samples. To load a cuvette into the Zenyth 200: 1. Open the door to the cuvette holder by hand (Figure 1-4). 2. When prompted by the ADAP Software, load the cuvette into the cuvette holder with the clear sides facing to the left and right sides of the instrument. Note: The cuvette must be oriented with the clear sides facing to the left and right sides of the instrument. Note: The cuvette holder door does not need to be closed when cuvettes are being measured. Issue 01 15 3. When the ADAP Software displays a visual prompt that the measurement is complete, remove the cuvette from the cuvette holder. 3 MAINTENANCE Several maintenance procedures may be performed by users to ensure the optimum operation of the Zenyth 200. These procedures include: 3.1 Performing Preventive Maintenance To ensure optimum operation of the Zenyth 200, perform the following preventive maintenance procedures as necessary: Wipe up any spills immediately. Follow appropriate decontamination procedures as instructed by the laboratory safety officer. Contact an Denville Service Engineer to inspect the instrument every two years. Use special test plates to regularly verify the performance of the instrument. Contact an Denville Service Engineer for more details. 3.2 Calibrating Lamp Brightness and the Plate and Optics Transports Users may calibrate the brightness of the lamps and the home positions of the plate and optics transports. Calibration must be performed when a lamp is replaced, an internal mechanical, optical, or electronic component is repaired, or a crash occurs during plate carrier movement. Calibration may be performed using the ADAP Software. Note: The brightness of the lamps is automatically calibrated every 1,000 measurements. 3.3 Using the ADAP Software to Calibrate the Instrument Administrators (Level 2) and system administrators (Level 3) may use the ADAP Software to perform lamp output and transport calibrations. Adjust Lamp — checks the light output of the lamps and adjusts lamp output and gain as needed for all wavelengths. Auto Calibration — calculates the home positions for the plate and optics transports. To calibrate the instrument: 1. In the ADAP Software, open Functions 2 and choose Adjust Lamp to check and adjust the output of the lamps and gain levels. Issue 01 16 2. Choose Auto Calibration to calculate the zero positions for the plate and fork transports. Note: Refer to Chapter 4 of the ADAP Software Operating Manual for more information about the calibration functions. 3. To calibrate the plate and optics transports, in System Setup, choose Auto Calibration (refer to Section 4.2.1, Performing Instrument and Microplate Operations. 3.4 Replacing the Fan Filter The Zenyth 200 has a cooling fan with a filter. The filter should be changed after every 500 hours of use. Note: ADAP Software keep track of the time elapsed between filter changes and display a visual prompt when the filter is due to be replaced. WARNING: Turn off power to the instrument before replacing the fan filter. Removing the fan cover and filter exposes the fan. To replace the fan filter: 1. Turn off power and disconnect the power cable from the instrument. 2. Using a small flathead screwdriver, pry the fan cover off the back of the instrument (Figure 3-1). The fan cover, protective screen, and fan filter come off the instrument together. Figure 3-1. Changing the fan filter 3. Install the new filter. 4. Press the fan cover, screen, and filter back into position on the instrument. 5. Reconnect the power source and turn on power to the instrument. Issue 01 17 6. If the ADAP Software controls the instrument, open Functions 1 and choose Reset Air Filter to reset the counter that tracks the time elapsed between air filter changes (refer to Chapter 4 of the ADAP Software Operating Manual). Note: Reset Air Filter may only be performed by users with administrator (Level 2)or system administrator (Level 3) privileges. 3.5 Replacing the Deuterium Lamp The Zenyth 200 is equipped with a deuterium lamp, which is used for generating light in the UV range from 190 to 325 nm. Note: The ADAP Software and Zenyth 200st standalone software report a Deuterium lamp defect when the lamp needs to be changed. Replacing the deuterium lamp requires a 2.5 mm Allen wrench or hex screwdriver (ballpoint type recommended) and a 2.5 x 0.6mm flathead screwdriver. Both tools are provided with the instrument. Note: Refer to Section 3.6, Replacing the Halogen Lamp for information about replacing the halogen lamp. To replace the deuterium lamp: WARNING: Turn off power and disconnect the instrument from the power source before performing maintenance on the Zenyth 200. Risk of electric shock exists when the power is on. WARNING: Never view the lamp directly without approved eyewear. Protect skin from exposure to the light emitted by the lamp. The deuterium lamp emits UV radiation. WARNING: Turn off the instrument and allow a minimum of 30 minutes for the lamp to cool before servicing. During operation, the deuterium lamp reaches a temperature of approximately 250°C (482° F). 1. Turn off power and disconnect the power cable from the instrument. 2. Remove the two Allen screws on the back of the instrument that secure the lamp housing cover in place (Figure 3-2). Issue 01 18 Figure 3-2. Removing the allen screws 3. Open the lamp housing cover by swinging it down from the back of the instrument. The base of the deuterium lamp, power cable, and power cable connector are clearly visible(Figure 3-3). Deuterium Lamp Connector key Power Cable Lamp Base Connector Figure 3-3. Deuterium lamp and power cable 4. On the power cable connector, press down on the top of the connector key to unlatch it, then disconnect the lamp power cable from the power cable connector (Figure 3-3). Issue 01 19 Figure 3-4. 5. Remove the two flathead screws that secure the deuterium lamp (Figure 3-4). WARNING: Handle the old deuterium lamp with caution. The lamp may be hot. 6. Remove the deuterium lamp and discard. CAUTION: Do not touch the glass of the new lamp. Fingerprints on the glass may shorten the life of the lamp. 7. Taking care not to touch the glass bulb with bare hands, align the notch in the base of the lamp with the guide on the lamp block (Figure 3-4) and install the new deuterium lamp. 8. Tighten the two flathead screws to secure the new deuterium lamp to the lamp block (Figure 3-4). 9. Reconnect the lamp power cable, making sure the connector key is latched. Note: The lamp power cable connector is keyed, which prevents it from being connected incorrectly. 10. Close the lamp housing cover. 11. Tighten the two Allen screws to secure the lamp housing cover in place. 12. Reconnect the power cable and turn on power to the instrument. 13. Calibrate the brightness of the new lamp (refer to Section 4.2.5.1, Calibrating Lamp Brightness). Issue 01 20 3.5 Replacing the Halogen Lamp The Zenyth 200 is equipped with a halogen lamp, which is used in measurements made at wavelengths between 326 and 1000 nm. Replacing the halogen lamp requires a 2.5 mm allen wrench or hex screwdriver (ballpoint type recommended), which is provided with the instrument. Note: Refer to Section 3.5, Replacing the Deuterium Lamp for information about replacing the deuterium lamp. To replace the halogen lamp: WARNING: Turn off power and disconnect the instrument from the power source before performing maintenance on the Zenyth 200. Risk of electric shock exists when the power is on. WARNING: Turn off the instrument and allow a minimum of 30 minutes for the lamp to cool before servicing. During operation, the halogen lamp reaches a temperature of approximately 300°C (572° F). 1. Turn off power and disconnect the power cable from the instrument. 2. Remove the two Allen screws on the back of the instrument that secure the lamp housing cover in place. 3. Open the lamp housing cover by swinging it down from the back of the instrument. The base of the halogen lamp, halogen lamp socket, orientation clip, and lamp block assembly are clearly visible (Figure 3-6). Figure 3-6. Halogen lamp and lamp block assembly 4. Unplug the halogen lamp socket from the base of the halogen lamp (Figure 3-7). Issue 01 21 Figure 3-7. Halogen lamp socket disconnected from halogen lamp base CAUTION: Do not loosen or attempt to remove the 4 screws on top of the lamp block assembly. Doing so will result in a misalignment of the optical path. 5. Loosen, but do not remove, the Allen screw that fastens the lamp orientation clip to the lamp block assembly (Figure 3-8). The screw is located between the orientation clip tab and the base of the halogen lamp. Figure 3-8. Halogen lamp orientation clip and lamp block assembly 6. Grasp the tab of the lamp orientation clip and remove the clip by sliding it straight up from the lamp block assembly. WARNING: Handle the old halogen lamp with caution. The lamp may be hot. 7. Remove the halogen lamp and discard. CAUTION: Do not touch the glass of the new halogen lamp. Finger prints on the glass may shorten the life of the lamp. 8. Taking care not to touch the glass bulb with bare hands, install the new halogen lamp with the prongs aligned horizontally (Figure 3-8). 9. Install the lamp orientation clip so the groove slides down over the fastening screw and the tab protrudes towards the rear of the instrument. Issue 01 22 10. While pressing down lightly on the lamp orientation clip to maintain proper alignment, tighten the Allen screw that fastens the orientation clip to the lamp block assembly. 11. Plug the lamp socket into the base of the halogen lamp. 12. Close the lamp housing cover. 13. Tighten the two allen screws to secure the lamp housing cover in place. 14. Reconnect the power cable and turn on power to the instrument. 15. Calibrate the brightness of the new lamp (refer to Section 4.2.5.1, Calibrating Lamp Brightness). 3.6 Replacing the Fuses Figure 3-9. Fuse carrier location WARNING: Turn off and unplug power to the instrument before changing fuses. Failure to do so can cause electrical shock or equipment damage. If the instrument will not power on or shuts down due to a power loss, or if the fuses appear burned, replace them. Fuses are located in the fuse carrier on the back of the instrument next to the power switch and port (Figure 3-9). To replace the fuses: 1. Turn off the main power to the Zenyth 200. 2. Unplug the power cord from the power port. 3. Using a small flathead screwdriver, gently pry the fuse carrier loose and remove it from the instrument. Issue 01 23 4. Gently pull old fuses from the carrier by hand. 5. Gently place new fuses into carrier by hand. Note: Use 2.5A TH 250VAC slow-blow type fuses for replacement. 6. Replace the fuse carrier. 7. Plug the power cable into the power port. 8. Turn on power to the instrument. Note: If the instrument still does not power on after changing fuses, contact an Denville Service Engineer. Issue 01 24 3.7 Troubleshooting WARNING: Only Denville Service Engineers that are officially trained may perform service procedures on the instrument. Problem Possible Solution If the indicator light is out check fuses Check Fuses If the Power is on, but the Check fuses instrument does not operate The fuses appear burned or Replace fuses (refer to Section 3.7, Replacing the Fuses) filaments are broken The indicator light is out, the Contact Denville service engineer power on, the fuses are intact, and the instrument does not operate. The instrument does respond to commands not Depending upon the duration of the event, transient power interruptions may cause this equipment to lock up or reset with the possible loss of in-process data. Manually cycle the power to the instrument and repeat in-process programs or runs. Table 3-1. Troubleshooting the Zenyth 200 3.8 Storing the Zenyth 200 To store the Zenyth 200, return it to the original packaging, and store in a dry, dust-free, environmentally controlled area. 3.9.1 Repacking the Zenyth 200 for Transport The Zenyth 200 should always be placed in the original packaging for transportation by ground or aerial shipment. CAUTION: Warranty claims are void if transport damages are caused by improper packing. Issue 01 25 To repack the Zenyth 200 for shipping: 1. Turn off power to the instrument. 2. Disconnect the power cable from the wall socket and power port on the back of the instrument. 3. If repacking a Zenyth 200, disconnect the serial cable from the serial ports on the external computer and instrument. Issue 01 26 APPENDIX A: SPECIFICATIONS A.1 Technical Specifications Item Description Environment Indoor use only Power Requirements 100 – 240VAC, 50/60Hz Dimensions (W x H x L) 47.5 cm x 26.4 cm x 44 cm (18.7 in x 10.4 in x17.3 in) Weight 16.5 kg (36.4 lbs) Ambient Operating Temperature 15 – 40°C (59 – 104°F) Ambient Storage Temperature -25 – 50°C (-13 – 122°F) Humidity Restrictions 15 – 75% (non-condensing) @ 30°C (86°F) Altitude Restrictions up to 2000 m (6,562 ft) Air Pressure Restrictions 54 – 106 kPa (7.8 – 15.4 PSI) Fuses 2.5A TH250VAC, 5x20 mm, slow-blow UL recognized/CSA/VDE Data Connections RS-232 9-pin serial A.2 Photometric Specifications Table A-2. Photometric Specifications * Item Description Wavelength range 190 – 1000 nm Bandwidth 5 nm Resolution 0.1 m OD Indication range 0.000 – 4.000 OD (endpoint measurement) Issue 01 27 Reproducibility < +/- 0.5% at 1 OD and 2 OD (400 – 750 nm); < +/- 0.7% at 1 OD (190 – 399 nm and 751 – 1000 nm) Linearity < +/- 0.7% and +/- 0.005 OD from 0.1 – 3.0 OD (400 – 750 nm); < +/- 0.7% and +/- 0.005 OD from 0.1 – 2.0 OD (190 – 399 nm and 751 – 1000 nm) Accuracy < +/- 1.5% at 1 OD Wavelength reproducibility +/- 0.5 nm Wavelength accuracy +/- 2 nm *Warm-up time 30 minutes to reach specifications Issue 01 28 A.3 Computer System Requirements Component Minimum Requirements CPU Pentium® 133 Mhz minimum Pentium® II 500 Mhz recommended RAM 16 MB minimum; 64 MB recommended Hard Drive 50 MB free space CD-ROM Drive 4X Monitor 640x480 resolution Keyboard 101 key Mouse IBM® compatible Serial Port 1 free serial port per instrument connected Operating Systems Windows® 95 (Y2K update required) Windows® 98 (Y2K update 2 required) Windows® 98 Second Edition Windows® Millennium Edition Windows NT® 4 (Service Pack 5 or higher) Windows® 2000 Windows® 7 Windows® XP Windows® Vista Web Browser Internet Explorer 4.01 (Service Pack 2 or later) Table A-3. Computer System Requirements Issue 01 29