1
User Guide 5.1
SmartQ User Guide
Version 5.1
This documentation and the associated software are the property of TeleSage,
Inc. Information in this document is subject to change without notice.
Companies, names, and dates used in examples herein are fictitious unless
otherwise noted. No part of this document may be reproduced or transmitted in
any form or by any means, electronic or mechanical, for any purpose, without the
express written permission of TeleSage Inc. TeleSage cannot be held accountable
for data that is lost for any reason, including system failure.
Use of this software is restricted by the terms of the license agreement between
the parties. The license is limited to use on one designated computer and a
specified number of telephone lines.
Copyright 1998-2007. TeleSage, Inc. All rights reserved.
TeleSage, SmartQ and SmartSend are all trademarks of TeleSage, Inc.
Other brand and product names used herein are trademarks of their respective
owners.
TeleSage Inc.
Chapel Hill, North Carolina
USA
Preface - - - - - - - - - - - - - - - - - - - - - - - - - - - - - - - - - - - - - xi
This User Guide - - - - - - - - - - - - - - - - - - - - - - - - - xi
Help within SmartQ- - - - - - - - - - - - - - - - - - - - - - - -xii
Getting the Pull-Down Help Feature - - - - - - - - - - - - xii
Getting Help in a Dialog - - - - - - - - - - - - - - - - - - xii
Chapter 1: Getting Started - - - - - - - - - - - - - - - - - - - - - - - - - - - - -1
What is SmartQ? - - - - - - - - - - - - - - - - - - - - - - - - - 1
SmartQ Product Levels and Optional Features - - - - - - - - - 1
System Requirements - - - - - - - - - - - - - - - - - - - 2
Voice Board and Drivers - - - - - - - - - - - - - - - - - - 2
Software - - - - - - - - - - - - - - - - - - - - - - - - - 2
Installing Your Dialogic Voice Board- - - - - - - - - - - - - - - 2
Quick Tip - - - - - - - - - - Hardware - - - - - - - - - - Software - - - - - - - - - - Dialogic Configuration Manager
-
-
-
-
-
-
-
-
-
-
-
-
-
-
2
2
2
3
Installing SmartQ - - - - - - - - - - - - - - - - - - - - - - - - - 3
Launching SmartQ - - - - - - - - - - - - - - - - - - - - - - - - 4
SmartQ Welcome Screen - - - - - - - - - - - - - - - - - 4
How SmartQ Works - - - - - - - - - - - - - - - - - - - - - - - 4
Phone Line Setup - - - - - - - - - - - - - - - - - - - - - - - - 5
1. Port Settlings - - - - - - 2. Telephone Hardware - - 3. Signaling - - - - - - - - 4. Outbound Call Progress - 5. T-1 Outbound Call Setup Caller ID/ANI - - - - - - - Information from Caller ID/ANI
Hard Disk Space Check - - -
-
-
-
-
-
-
-
-
-
-
-
-
-
-
-
6
6
6
7
7
8
8
9
Chapter 2: Survey Design: Creating New Surveys and Items - - - - - - - - - - - 10
Overview - - - - - - - - - - - - - - - - - - - - - - - - - - - - -10
The Five Basic Steps of Survey Designing- - - - - - - - - - - -11
Step 1. Select Survey - - - - - - - - - - - - - - - - - - -12
Step 2. Select System Voice - - - - - - - - - - - - - - - -12
Step 3. Select Item - - - - - - - - - - - - - - - - - - - -12
i
Step 4. Select Item Type- - - - - - - - - - - - - - - - - -13
Step 5. Construct Item - - - - - - - - - - - - - - - - - - -14
Creating Survey Items - - - - - - - - - - - - - - - - - - - - - -14
Editing Survey Items - - - - - - - - - - - - - - - - - - - - - - -14
Changing an Item Name Moving Items - - - - - Inserting Items- - - - - Deleting Items - - - - - -
-
-
-
-
-
-
-
-
-
-
-
-
-
-
-
-
-14
-14
-14
-15
Chapter 3: Survey Design: Construct a Query - - - - - - - - - - - - - - - - - - 17
Overview - - - - - - - - - - - - - - - - - - - - - - - - - - - - -17
A. Recording - - - - - - - - - - - - - - - - - - - - - - - - - - -17
Choose Prompt Types - - - - - - - - - Recording Prompts - - - - - - - - - - Connect for recording: Alternative Method
Importing Studio Recordings - - - - - - Conditionally Skip an Item [Custom only] -
-
-
-
-
-
-
-
-
-17
-19
-20
-20
-20
B. Responding - - - - - - - - - - - - - - - - - - - - - - - - - -21
Valid Response Length - - - Question Timing - - - - - - - Validation - - - - - - - - - - Read Back to Caller - - - - - Copy Another File to Here - - Special Touchtones - - - - - Setting Up a Query: Open-End-
-
-
-
-
-
-
-
-
-
-
-
-
-
-21
-22
-22
-27
-28
-28
-29
C: Routing - - - - - - - - - - - - - - - - - - - - - - - - - - - -29
Routing Screens- - - - - - - - - General Routing - - - - - - - - - Drag to Paint - - - - - - - - - - Previous Survey - - - - - - - - - Drag-and-Drop Item Text - - - - Cut, Copy, and Paste Survey Items
Locked Items - - - - - - - - - - -
-
-
-
-
-
-
-
-
-
-
-
-29
-30
-31
-31
-31
-32
-32
Chapter 4: Email Items - - - - - - - - - - - - - - - - - - - - - - - - - - - - - 33
Email Settings - - - - - - - - - - - - - - - - - - - - - - - - - -33
To set up Item Type: Email - - - - - - - - - - - - - - - - - - - -33
Create an item in your survey - - - - - - - - - - - - - - -34
ii
Additional Email Features and Tips - - - - - - - - - - - - - - -34
Chapter 5: Survey Design: Basic Tutorial - - - - - - - - - - - - - - - - - - - - 35
Overview - - - - - - - - - - - - - - - - - - - - - - - - - - - - -35
Scenario - - - - - - - - - - - - - - - - - - - - - - - - -35
Creating the Survey - - - - - - - - - - - - - - - - - - - - - - -35
Sample Script - - - - - - - - - - - - - - - - - - - - - - -36
Set Up the Survey - - - - - - - - - - - - - - - - - - - - -37
Chapter 6: Saving and Testing - - - - - - - - - - - - - - - - - - - - - - - - - - 41
Saving - - - - - - - - - - - - - - - - - - - - - - - - - - - - - -41
Testing - - - - - - - - - - - - - - - - - - - - - - - - - - - - - -41
Auto-Test Reminders - - - - - - - - - - - - - - - - - - -41
Manual Testing - - - - - - - - - - - - - - - - - - - - - -42
Chapter 7: Conducting and Monitoring Surveys - - - - - - - - - - - - - - - - - 43
Basic Functions - - - - - - - - - - - - - - - - - - - - - - - - -43
Start SmartQ - - - - - - - - - - - - - - - - - - - - - - -43
Stop and Start Calls - - - - - - - - - - - - - - - - - - - -43
Exit SmartQ - - - - - - - - - - - - - - - - - - - - - - - -43
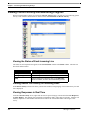
Viewing Current Activity and Monitoring Progress - - - - - - -44
Viewing the Status of Each Incoming Line - - Viewing Recent Call Activity on Incoming LinesViewing Responses in Real Time - - - - - - Printing SmartQ Windows - - - - - - - - - - Call Volume and Port Usage - - - - - - - - - Maximizing SmartQ uptime - - - - - - - - - Log Files (for troubleshooting) - - - - - - - - Fax Transfer [Custom only] - - - - - - - - - -
-
-
-
-
-
-44
-44
-44
-45
-45
-45
-46
-46
Chapter 8: Data Management - - - - - - - - - - - - - - - - - - - - - - - - - - 49
Overview - - - - - - - - - - - - - - - - - - - - - - - - - - - - -49
Storing Data - - - - - - - - - - - - - - - - - - - - - - - - - - -49
SmartQ Database Architecture- - - - - - - - - - - - - - -49
Automatic Call Statistics - - - - - - - - - - - - - - - - - -49
Viewing Data - - - - - - - - - - - - - - - - - - - - - - - - - - -50
Viewing One Record - - - - - - - - - - - - - - - - - - -50
Viewing Multiple Records - - - - - - - - - - - - - - - - -51
Data Preferences - - - - - - - - - - - - - - - - - - - - -51
iii
Manually Entering Data - - - - - - - - - - - - - - - - - -52
Exporting Data - - - - - - - - - - - - - - - - - - - - - - - - - -52
Save and Load Settings - - - - - - - - - - - - - - - - - -53
Filtering and Dividing Data - - - - - - - - - - - - - - - - -53
Database Errors and Recovery - - - - - - - - - - - - - -54
Other Data Features - - - - - - - - - - - - - - - - - - - - - - -54
Deleting Fields - - - - - - - - - - - - - - - - - - - - - -54
Suppressing Write to Database - - - - - - - - - - - - - -54
Moving Fields - - - - - - - - - - - - - - - - - - - - - - -55
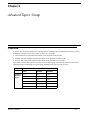
Chapter 9: Advanced Topics: Group - - - - - - - - - - - - - - - - - - - - - - - 57
Overview - - - - - - - - - - - - - - - - - - - - - - - - - - - - -57
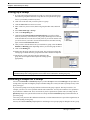
Setting up a Group - - - - - - - - - - - - - - - - - - - - - - - -58
Recording Prompts for a Group - - - - - - - - - - - - - - - - -58
Chapter 10: Advanced Topics: System Voice and Multiple Language Support- - - 59
System Voices and System Prompts- - - - - - - - - - - - - - -59
Default System Voice - - Recording a System Voice Editing a System Voice - Clip Recording- - - - - - -
-
-
-
-
-
-
-
-
-
-
-
-
-
-
-
-60
-60
-61
-61
Survey Voice - - - - - - - - - - - - - - - - - - - - - - - - - - -61
How Create a Survey Voice - - - - - - - - - - - - - - - -61
Recording Survey Voice Prompts - - - - - - - - - - - - -62
How to Create a Voice Selection Item - - - - - - - - - - -62
Chapter 11: Advanced Topics: Formula Builder - - - - - - - - - - - - - - - - - 65
Overview - - - - - - - - - - - - - - - - - - - - - - - - - - - - -65
Calculate - - - - - - - - - - - - - - - - - - - - - - - - - - - - -66
Inform Data Calculations- - - - - - - - - - - - - - - - - -66
Retrieve - - - - - - - - - - - - - - - - - - - - - - - - - -66
Basic Formula Builder - - - - - - - - - - - - - - - - - - - - - -67
Single Item Recall - - - - - - - - - - - - - - - - - - - - -67
Sum of responses - - - - - - - - - - - - - - - - - - - - -67
Count of Responses - - - - - - - - - - - - - - - - - - - -68
Advanced Formula Builder - - - - - - - - - - - - - - - - - - - -68
Response (Value) - - - - - - - - - - - - - - - - - - - - -69
Text or Number - - - - - - - - - - - - - - - - - - - - - -70
iv
Math Operators - - - - - - - Response (Exists) - - - - - - Call Information - - - - - - - Time Operators - - - - - - - Logic Operators - - - - - - - Text Operators - - - - - - - Current Date/Time - - - - - Prefix Operators - - - - - - External Operators (Advanced)
Tips and Tricks - - - - - - - Formula Tester - - - - - - - -
-
-
-
-
-
-
-
-
-
-
-
-
-
-70
-71
-72
-73
-74
-74
-75
-76
-77
-77
-77
Chapter 12: Advanced Topics: Setting up Retrieval of Data for Calculations- - - - 83
Overview of Retrieval- - - - - - - - - - - - - - - - - - - - - - -83
Retrieve Information from Previous Surveys - - - - - - - - - -84
Advanced Examples - - - - - - - - - - - - - - - - - - - - - - -84
Retrieve and Calculate- - - - - - - - - - - - - - - - - - -84
Using Formula Builder within Retrieve - - - - - - - - - - -85
Chapter 13: Advanced Topics: Setting up Retrieval of Open-End Responses - - - 87
Overview - - - - - - - - - - - - - - - - - - - - - - - - - - - - -87
Listen to Open-End Responses: Data Screen - - - - - - - - - -88
Listen to Open-End Responses: Telephone Play-back - - - - -88
Set Up a Survey to Retrieve Open-End Responses - - - - - - -89
Make the Survey Available to Callers - - - - - - - - - - - - - -90
What the Caller Will Hear - - - - - - - - - - - - - - - - - - - - -90
Advanced- - - - - - - - - - - - - - - - - - - - - - - - - - - - -90
Adding Additional Criteria - - - - - - - - - - - - - - - Setting Up A Password to Retrieve Open-End Responses
Retrieving Responses from More than one Survey - - - Avoiding Unwanted Recordings [Custom only] - - - - - -
-90
-91
-91
-92
Chapter 14: Advanced Topics: Multiple Lead Surveys [Custom only] - - - - - - - 93
Overview - - - - - - - - - - - - - - - - - - - - - - - - - - - - -93
How Multiple Lead Surveys Work - - - - - - - - - - - - - - - -94
Setting Up Multiple Projects - - - - - - - - - - - - - - - - - - -94
DNIS - - - - - - - - - - - - - - - - - - - - - - - - - - -94
Routing Callers - - - - - - - - - - - - - - - - - - - - - -95
v
Chapter 15: Organizing Surveys - - - - - - - - - - - - - - - - - - - - - - - - - 97
X-Ray Views of Surveys - - - - - - - - - - - - - - - - - - - - -97
Creating a New View - - - - - - - - - - - - - - - - - - - - - - -97
Editing Your View - - - - - - - - - - - - - - - - - - - - - - - -97
Survey Organizer [Custom only] - - - - - - - - - - - - - - - - -99
Copying a Survey - - - - - - - - - - - - - - - - - - - - -99
Moving a Survey- - - - - - - - - - - - - - - - - - - - - -99
Renaming a Survey - - - - - - - - - - - - - - - - - - - -99
Survey Power Editor (Advanced) [Custom only] - - - - - - - - -99
View By Settings - - - - - - Show only unlocked items - - Show only non-default settingsShow only item type - - - - - Additional Features and Notes -
-
-
-
-
-
-
-
-
-
-
-
-
-
-99
100
100
100
101
Auto-Export of Responses (Advanced) - - - - - - - - - - - - 101
Using Auto-Export Text File- - - - - ODBC - - - - - - eQ - - - - - - - XML- - - - - - - -
-
-
-
-
-
-
-
-
-
-
-
-
-
-
-
-
-
-
-
101
102
102
103
104
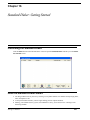
Chapter 16: Standard Dialer: Getting Started - - - - - - - - - - - - - - - - - - 105
Launching the Standard Dialer - - - - - - - - - - - - - - - - - 105
How the Standard Dialer Works - - - - - - - - - - - - - - - - 105
Chapter 17: The Standard Dialer: Creating a Job - - - - - - - - - - - - - - - - 107
Overview - - - - - - - - - - - - - - - - - - - - - - - - - - - - 107
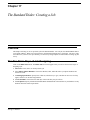
The Five Basic Steps of Job Designing - - - - - - - - - - - - 107
Step 1. Select Job - - - - - - - - - - - - Step 2. Select Phone Number Database - Step 3. Set Job Schedule - - - - - - - - Step 4. Set Dialing Specifications - - - - Step 5. Set Job Quotas (Advanced Feature)
-
-
-
-
-
-
-
108
108
108
109
109
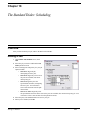
Chapter 18: The Standard Dialer: Scheduling - - - - - - - - - - - - - - - - - 113
Overview - - - - - - - - - - - - - - - - - - - - - - - - - - - - 113
Adding a Job - - - - - - - - - - - - - - - - - - - - - - - - - - 113
vi
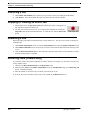
Removing a Job - - - - - - - - - - - - - - - - - - - - - - - - 114
Stopping or Pausing an Active Job - - - - - - - - - - - - - - 114
Restarting a Job - - - - - - - - - - - - - - - - - - - - - - - - 114
Recurring Jobs [Custom only] - - - - - - - - - - - - - - - - - 114
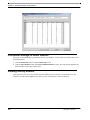
Chapter 19: The Standard Dialer: Viewing Results - - - - - - - - - - - - - - - 115
Viewing Dialer Job Results- - - - - - - - - - - - - - - - - - - 115
Permanent Storage of Dialer Results - - - - - - - - - - - - - 116
Viewing Survey Results - - - - - - - - - - - - - - - - - - - - 116
Chapter 20: The Standard Dialer: Data Management - - - - - - - - - - - - - - 117
Overview - - - - - - - - - - - - - - - - - - - - - - - - - - - - 117
Importing Data - - - - - - - - - - - - - - - - - - - - - - - - - 117
Resetting Results - - - - - - - - - - - - - - - - - - - - - - - 118
Exporting Data - - - - - - - - - - - - - - - - - - - - - - - - - 118
Table data- - - - - - - - - - - - - - - - - - - - - - - - 118
Job results - - - - - - - - - - - - - - - - - - - - - - - 118
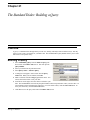
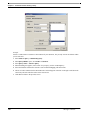
Chapter 21: The Standard Dialer: Building a Query - - - - - - - - - - - - - - - 119
Overview - - - - - - - - - - - - - - - - - - - - - - - - - - - - 119
Building A Query - - - - - - - - - - - - - - - - - - - - - - - - 119
Chapter 22: Advanced Dialer - - - - - - - - - - - - - - - - - - - - - - - - - 121
Introduction - - - - - - - - - - - - - - - - - - - - - - - - - - 121
How It Works - - - - - - - - - - - - - - - - - - - - - - - - - - 122
Jobs- - - - - - - - - - - - Database - - - - - - - - - Queries - - - - - - - - - - Compiling Your Results - - Polling- - - - - - - - - - - Transitions: Status and Result
Using Transitions - - - - - -
-
-
-
-
-
-
-
-
-
-
-
-
-
-
122
123
123
123
124
124
124
Additional Advanced Dialer Information - - - - - - - - - - - - 126
Detecting Live or Machine - - - - - - - - - - - - - - - - 126
Maximum queue duration - - - - - - - - - - - - - - - - 126
Example Queries - - - - - - - - - - - - - - - - - - - - - - - - 126
GetCalls Query - - - - - - - - - - - - - - - - - - - - - 126
vii
Update Queries - - - - - - - - - - - - - - - - - - - - - 126
CleanUp Query - - - - - - - - - - - - - - - - - - - - - 127
Chapter 23: Advanced Survey Settings - - - - - - - - - - - - - - - - - - - - 129
Overview - - - - - - - - - - - - - - - - - - - - - - - - - - - - 129
Survey-specific settings - - - - - - - - - - - - - - - - - 129
System-wide settings - - - - - - - - - - - - - - - - - - 129
Appendix A: Urn Randomization - - - - - - - - - - - - - - - - - - - - - - - - 131
Urn Randomization - - - - - - - - - - - - - - - - - - - - - - - 131
Utilization- - - - - - - - - - - - - - - - - - - - - - - - - - - - 131
Randomization Database - - - - - - - - - - - - - - - - 131
Counts Query - - - - - - - - - - - - - - - - - - - - - - 132
Assignment Query - - - - - - - - - - - - - - - - - - - - 133
Multiple Studies or Sites - - - - - - - - - - - - - - - - - - - - 133
Sample Randomizer Survey - - - - - - - - - - - - - - - - - - 133
Appendix B: Sample Surveys - - - - - - - - - - - - - - - - - - - - - - - - - 135
Overview - - - - - - - - - - - - - - - - - - - - - - - - - - - - 135
Sample Survey 1: Customer Satisfaction - - - - - - - - - - - 135
Background - - - - - - - - - - - - - - - - - - - - - - - 135
Sample Survey 2: Medical History - - - - - - - - - - - - - - - 139
Background - - - Lead Survey- - - Response Survey Blank Script Sheet -
-
-
-
-
-
-
-
-
-
-
-
-
-
-
-
-
-
-
-
139
141
141
144
Appendix C: Transferring SmartQ to Another Computer - - - - - - - - - - - - 145
Step 1: Prepare computer B - - - - - - - - - - - - - - - - - - 145
Step 2: Shut down computers and move the voice board - - - 146
Step 3: Verify voice board installation on computer B - - - - - 146
Step 4: Transfer files from A to B - - - - - - - - - - - - - - - 146
Step 5: Modify ivr.ini. - - - - - - - - - - - - - - - - - - - - - - 146
Tips - - - - - - - - - - - - - - - - - - - - - - - - - - - 147
Appendix D: T-1 Boards - - - - - - - - - - - - - - - - - - - - - - - - - - - - 149
Line Specifications - - - - - - - - - - - - - - - - - - - - - - - 149
Dialogic Board - - - - - - - - - - - - - - - - - - - - - - - - - 150
viii
Cable from the SmartJack to the Dialogic board
Installing Dialogic Drivers - - - - - - - - - - Configuring Dialogic Drivers - - - - - - - - - SmartQ configuration - - - - - - - - - - - - Additional configuration - - - - - - - - - - - -
-
-
-
-
-
150
151
151
151
152
ix
x
Preface
This User Guide
SmartQ is an incredibly flexible and powerful tool that can be used to create a wide variety of automated telephone survey solutions. For simple projects, the tutorials in this manual should be sufficient. For more help with
advanced features and functions, you may need to refer to the TeleSage website (www.telesage.com).
This user guide is set up to get you started on the basics, then to move on to more advanced topics as you need
them. Section titles marked with “(Advanced)” indicate features that require advanced knowledge of software
(especially databases).
Throughout this user guide, you may be presented with tips other important information in boxes with the labels
TIP:, NOTE: or IMPORTANT:.
IMPORTANT: You should read this!
The font and style of text assist you in understanding what is being referred to.
• Items in SmartQ’s graphical user interface are printed in bold in this manual (such as “the Survey Design
screen” or “the Stop Calls button”).
• The first time that terms are defined, they are shown in italics (such as “The lead survey is the survey which
collects information about a caller…”).
• Filenames, directories, URLs, the values of variables and text from files are shown in the Courier font (such
as “save the ivr.ini file to …”).
The manual uses a shorthand notation to represent the selection of a menu or pull-down list item by first indicating the name of the menu and then the item on the menu. In the case of a hierarchical menu, the entire “path” of
the menu hierarchy is indicated. For example, File > Save As… represents pulling down the File menu and
selecting the Save As… menu option.
SmartQ 5.1 Manual
xi
Preface
Help within SmartQ
Getting the Pull-Down Help Feature
If at any time you need assistance within SmartQ, select Help > Contents and Index. You can quickly locate
information using an index or browse through topics to find what you need.
Getting Help in a Dialog
A Tooltip is text that appears highlighted in a yellow box to give you more information about something. They
appear when you point to something with the cursor of your mouse without clicking any buttons on the mouse
(also called “hovering”).
To turn the Tooltip feature on or off, check or uncheck the Show Tooltips checkbox on from Preferences pulldown menu on the Survey Design or Data screens.
xii
SmartQ 5.1 Manual
Chapter 1
Getting Started
What is SmartQ?
The TeleSage SmartQ product line aims to increase the efficiency and affordability of gathering and
disseminating information over the telephone. SmartQ do-it-yourself-software enables you to automate solutions
for your survey, interview, research, hotline, and communications needs.
SmartQ surveys can gather numeric or spoken information and can relay information tailored to the individual
caller. The results of telephone calls are instantly stored (and scored) in a standard database, ready for analysis or
automated reporting to third parties.
The standard SmartQ system includes a Survey Designer that makes it easy to create complex surveys which can
perform database lookups, calculations and conditional branches. There are optional packages you can purchase
for SmartQ which add further functionality. These packages are covered in later sections of this manual and
include:
• Standard Dialer is an ideal solution for batch call-out jobs with set lists of phone numbers, dialing times and
conditions.
• Advanced Dialer allows for more complex and flexible call-out jobs that need to calculate phone numbers,
dialing times or conditions dynamically.
• NightOwl ensures that your SmartQ dialing system does not suffer any unnecessary down-time. Night Owl
monitors the operation of SmartQ independently and will inform an administrator when there is a problem.
If you are interested in these additional features, contact TeleSage for pricing options and installation
instructions.
SmartQ Product Levels and Optional Features
SmartQ can be purchased in two different configurations: Professional (the standard level of operation) and
Custom (a level which allows you to customize special features). Text in this manual containing the words
“[Custom only]” indicates functionality which is only to be found in the Custom level of SmartQ.
SmartQ also has several optional features that can be purchased to enhance its functionality. The names of these
features will appear in square brackets in this manual to indicate when the text is referring to these additional
SmartQ 5.1 Manual
1
Chapter 1 : Getting Started
features (such as [Standard Dialer]); alternatively, the section of text may just be labeled with the word
[Optional].
System Requirements
•
•
•
•
•
•
•
•
•
•
•
Computer: 100% IBM-compatible PC
Platform: Windows NT 4 SP5, Windows 2000 or Windows XP
Memory: 128 MB of RAM, 256 MB recommended (+ 256MB for each T-1 span)
Mouse: Point-and-Click device required
Hard Disk: Minimum 1 GB available
Drive: 4x CD-ROM drive required
Display: VGA monitor and adapter (minimum 1024 x 768 resolution)
Bus: One free PCI slot per four telephone lines or per T-1 span
Voice Board: Dialogic PCI board
Telephone: At least one standard telephone
Telephone Lines: One ordinary analog line per Dialogic port or one T-1 line per Dialogic board
Voice Board and Drivers
Set up your phone lines and your voice board first. Instructions for setting these up should be included with the
voice board you purchased. SmartQ-specific instructions begin on the next page in this manual.
The voice board and drivers must be installed and configured before you begin installing SmartQ. Install all
drivers in SmartQ’s default directory.
SmartQ will only work with the Dialogic line of voice boards. The D/4PCI and D/240JCT-T1 are recommended
and are available for purchase from TeleSage.
Please see Appendix D in this manual if you are using, or are considering using, T-1 boards.
Software
Microsoft Access is recommended, but not required, for use with SmartQ.
Installing Your Dialogic Voice Board
Quick Tip
If you have already installed the Dialogic drivers, make sure that the Dialogic Configuration Manager Service
Startup Mode is set to Automatic.
Hardware
Install your voice board into the computer on which SmartQ will run. Any PCI slot will work. If you are
unfamiliar with the installation procedure, please see the installation documentation that accompanies your
Dialogic card.
Software
The Dialogic installation disk contains 4 install folders. Find the board you have from the list below and run the
setup.exe file from the folders listed. Make sure you reboot the computer after each component install.
2
SmartQ 5.1 Manual
Installing SmartQ
For all SmartQ installations except those with a T-1 and ISDN, choose the TYPICAL installation.
D/4PCI
• Dialogic 5.1.1 Install (choose TYPICAL installation)
• Dialogic 5.1.1 SP1 Install
D/4PCI-U
• Dialogic 5.1.1 Install (choose TYPICAL installation)
• Dialogic 5.1.1 SP1 Install
• Dialogic 5.1.1 PCI-U board support
D/4PCI-UF
•
•
•
•
Dialogic 5.1.1 Install (choose TYPICAL installation)
Dialogic 5.1.1 SP1 Install
Dialogic 5.1.1 PCI-U board support
Dialogic 5.1.1 FP 1 Install
D/240PCI-T1 or D/240JCT-T1
• Dialogic 5.1.1 Install (choose CUSTOM install and check the options ISDN Package and GlobalCall API
Package)
• Dialogic 5.1.1 SP1 Install
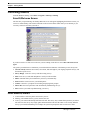
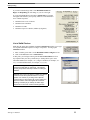
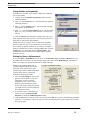
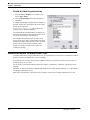
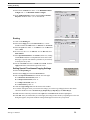
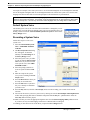
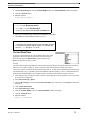
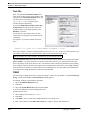
Dialogic Configuration Manager
Now that you have installed your software and
restarted your computer, open the Dialogic
Configuration Manager by selecting Program
Files > Intel Dialogic System Software >
Configuration Manager - DCM)
The critical setting for SmartQ to operate
properly is located under the Service menu,
where you need to select Startup Mode as
Automatic (Service > Startup Mode >
Automatic).
You are now ready to use SmartQ!
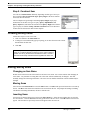
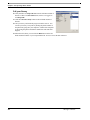
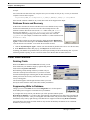
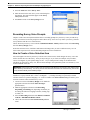
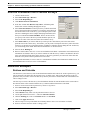
Installing SmartQ
SmartQ should begin to automatically install as you insert the SmartQ Install CD into your CD-ROM drive.
If SmartQ does not automatically install, follow these steps:
1.
Insert the CD-ROM labeled SmartQ Install into the CD-ROM drive.
2.
From the Windows desktop, select Start > Explore.
3.
In Windows Explorer, double-click the CD-ROM drive (Default: D:).
4.
Double-click the TeleSage SmartQ folder and then double-click the blue Setup icon.
5.
Follow the Setup Wizard instructions for installing the files.
6.
On the Setup Complete window, select Yes, I want to restart my computer now. Click Finish.
SmartQ 5.1 Manual
3
Chapter 1 : Getting Started
Launching SmartQ
From the Windows desktop, select Start > Programs > SmartQ > SmartQ
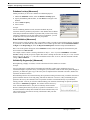
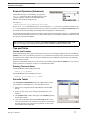
SmartQ Welcome Screen
The first time you open SmartQ, the SmartQ Welcome screen will appear highlighting the different screens you
can access within SmartQ. The column of buttons on the left will remain visible while you use SmartQ so you
can easily switch screens when you need to.
If you do not wish to see this screen each time you use SmartQ, check the box next to Don’t show this screen
again.
The guide is provided below to familiarize you with the different functions of the SmartQ screens at any time.
• Current Activity: Monitor current calls, call volume, and call length of your ongoing telephone surveys, and
the number of ports in use.
•
•
•
•
•
•
•
Survey Design: Create new surveys and edit existing surveys.
Data: View survey results and manipulate or send your collected data.
Dialer: Schedule dialer jobs to administer your surveys automatically.
Print: Print the current screen to your default printer.
Connect: Connect to your phone for recording and playing back prompts.
Start Calls: Start or stop the lines from automatically administering surveys.
Exit: Exit the system and stop administering your survey.
How SmartQ Works
4
1.
A caller makes a call to the phone connected to your PC.
2.
SmartQ, your automated survey system, answers the call.
3.
A survey you created with SmartQ will answer the call. This survey may contain all the questions you wish to
ask. However, this survey may simply gather information that will route the caller to one of many different
surveys you created with SmartQ. For example, the system can prompt the caller to enter one or more
SmartQ 5.1 Manual
Phone Line Setup
identification numbers, such as a survey ID, personal identification number (PIN), or a provider ID. If you are
running multiple surveys, these responses will tell SmartQ which survey to run.
4.
Using voice prompts, the system asks questions that the client answers using the touchtone keypad on the
telephone.
5.
The caller hangs up. SmartQ detects this and hangs up too.
6.
SmartQ gathers the information from your survey and simultaneously stores it in a Microsoft Access
database on your computer's hard drive. It is immediately available for easy export and analysis.
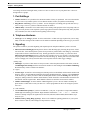
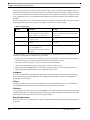
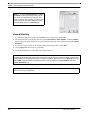
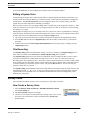
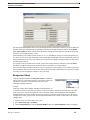
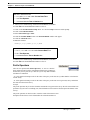
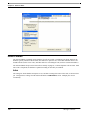
Phone Line Setup
When you start SmartQ or when you click on the Current Activity button, you will see a screen showing system
activity. You will also see a list of the current line settings. To change any of these settings, click the Change
button. This will bring up the Phone Line Setup window.
SmartQ 5.1 Manual
5
Chapter 1 : Getting Started
Line settings need not be changed unless you have T-1 lines or extra services on your phone lines. These are
arranged into five groups.
1. Port Settlings
• Number of Lines is set by default to the maximum number of lines you purchased. You can set the number
of active lines to any number equal to or lower than the number of lines you purchased with SmartQ.
• Rings Before Answering is set to 1 by default. You can change this so SmartQ picks up and starts surveys
after 1-4 rings. Set to 2 if you have Caller ID and wish to enable it.
• Offhook Delay is the number of seconds to delay before SmartQ starts playback of the first prompt. This setting is necessary because some telephone systems ring a phone before the audio path is ready and if playback
were immediate, the caller would miss the beginning of the message.
2. Telephone Hardware
• Line Type is set to Analog by default. It can be switched to T-1 if that is the type of phone line you are using.
Many of the other settings on this window will be enabled or disabled depending on the line type you choose.
3. Signaling
The options available to you under Signaling will depend upon the Telephone Hardware you have selected.
• Phone Lines Provide Hangup: SmartQ detects when a caller has hung up by detecting the presence of dialtone on the line. Some internal phone systems do not provide any sound when a caller hangs up. This makes
it impossible to detect a terminated call easily. SmartQ provides the next best thing. If you do not check
Phone Lines Provide Hangup, then if a caller does not respond in any way to a question, even after hearing
the prompt three times, SmartQ will assume that the caller has hung up. SmartQ will not treat invalid touchtones as a hangup, nor will any items that don't seek a response from the caller trigger a hangup.
(Analog only)
• DID Digits: If you have Caller ID service and you want to collect the phone number of the caller, check the
Get DID Digits after Pickup checkbox and enter the number of collected digits in the Number of DID Digits field and they will be recorded to the database.
(T-1 types)
• Transfer Type: To transfer a call on analog lines, SmartQ will issue a hookflash, dial the transfer number and
hang up. Some T-1s with AMI D4 signaling do not support hookflash transfers. For these, select Conference
as the transfer type. When you route a caller to another phone number (from the Routing tab in the Survey
Designer), SmartQ will choose another unused channel, call the transferree with that channel and conference
that channel with the original caller. Both channels remain in use until the conversation is finished.
• Number of DNIS Digits: Set to the number of DNIS digits that your T-1 delivers. DNIS is normally the
phone number a caller dials to reach your IVR. A T-1 can be programmed to deliver all 10 digits or just the
first 4 or 5.
(T-1 with AMI D4)
• Get ANI-DNIS after pickup: If you have an AMI D4 T-1, ask your T-1 provider to setup ANI & DNIS as
DTMF digits after SmartQ goes off hook. Digits should be formatted as * ANI * DNIS *. Check this
checkbox. SmartQ will parse the signal and save the ANI (caller ID) and the DNIS (dialed number) separately for you.
• Initialize, Pick Up, Ring, Hang Up, Drop: These are the robbed-bit signaling parameters. If your system
doesn’t answer or dial out, call TeleSage for help with these settings.
6
SmartQ 5.1 Manual
Phone Line Setup
4. Outbound Call Progress
In order to set the Outbound Call Progress parameters properly, you should have a basic understanding of how
SmartQ determines the results of a dialout operation:
1.
The dialer goes off-hook, dials a number and listens.
2.
The dialer establishes a cadence for the ring signal and then times the duration of the first sound that does not
fit the pattern of the ring signal. This is called the salutation. It is either the words of the person or machine
answering the phone, or some other signal generated by the phone system.
3.
When establishing the cadence of the ring signal, SmartQ can detect rising tri-tone operator intercept and
busy signals.
You can change the parameters used in the algorithm that guesses who is answering the phone. The duration of
the salutation is used to determine whether a person, an answering machine or voice mail answered the phone:
the assumption is that a person answering will say one or two words, while a machine will deliver a much longer
greeting.
• Live Person Max Hello Length is the maximum number of seconds it is assumed that a live person (rather
than a pre-recorded message) would speak before stopping and waiting for a response.
• Timeout for Dial-For-Recording is how long SmartQ will wait for a call to be answered and an audio
response to be registered after you press the Connect button.
• Max Nonsilence to Ignore is used to filter out clicks, beeps, etc. Any sound of duration shorter than this time
(measured in 100ths of a second) will be ignored. If you suspect that your phone line is carrying extraneous
sounds longer than this setting, increase the value.
• Answer Deglitch is used to account for the normal breaks in the stream of speech, such as between words or
during plosive consonants like "t" or "k." The default of 50 (measured in 100ths of a second) will allow a
half-second break without considering the greeting terminated. If you think you are receiving longer breaks
(for example between a voice mail tone and the beginning of a greeting) increase the setting.
• Time Allowed for Answer is the length of time (measured in 100ths of a second) allowed between beginning
of dial out and the end of the salutation. The Time Allowed for Answer setting in the Dialer job definition
also supplies this parameter; in operation, the actual time permitted is whichever of these two is shorter. If the
sound assumed to be the salutation lasts longer than this time, SmartQ hangs up.
• Max Time Between Rings is the length of time (measured in 100ths of a second) the dialer will wait between
ringbacks before concluding that the call has been answered. If the time delay is too short, SmartQ may think
that the phone has been answered when it hasn't.
5. T-1 Outbound Call Setup
Some T-1 outbound signaling uses Wink Start, meaning that after SmartQ goes offhook to make a call, the T-1
line sends a wink signal to the voice board to indicate that the line is ready for dialing. A wink signal is a brief
digital offhook-onhook sequence that serves the same function as dial-tone to a person calling out. Normally the
wink comes within a second of SmartQ going offhook.
• Expect Wink after Pickup should be checked if your T-1 outbound signaling uses wink signals.
• Time to wait for Wink is the maximum amount of time (in seconds) to wait for a wink signal to be sent after
SmartQ goes offhook. If it does not arrive before this time, the call disposition is categorized as an error with
an associated message (stored in the log file and shown in the Recent Activity pane of the Current Activity
screen) reading "No wink received."
• Time between Pickup and Dial is the number of seconds that SmartQ waits after the wink is received (if the
wink checkbox is checked) to make sure the line is ready to receive digits.
• Use MF dialing should be checked if the MF frequencies are used for touchtones (rather than the traditional
DTMF frequencies).
SmartQ 5.1 Manual
7
Chapter 1 : Getting Started
• Enclose dialstring with * and # should only be checked if your T-1 carrier requires the touchtone sequence
to begin with a “*” tone and end in a “#” tone (for example, “8881231234” gets transformed as
“*8881231234#”.
Caller ID/ANI
Caller ID or ANI must be ordered through the phone company in order to be enabled on your phone line. Most
voiceboards that fit in a PCI slot support Caller ID, including the D/4PCI boards (D/4PCI, D/4PCI-U, D/4PCIUF, D/4PCI-US) and JCT boards (D/41JCT-LS).
Please contact technical support or visit www.dialogic.com for information on the features of particular
voiceboards.
The phone company sends the Caller ID information between the first and second ring. You must set Rings
Before Answering to 2 to receive Caller ID information. Any Caller ID information collected is stored in a builtin field called CALLERID and can be used for calculations, retrieval, or simply additional information about the
call stored in the database.
Information from Caller ID/ANI
Caller ID will deliver the following information (provided the phone company sends it):
{Date} {Time} {Caller's phone #}{Caller's name}
Alternatively, one of the following may appear in the CALLERID field:
• BLOCKED: Indicates the caller did not want Caller ID information sent out
• OUT OF AREA: Caller ID is not compatible with the caller's phone service or the call was placed from a
system that does not transmit Caller ID information (like some cellular phones and international calls)
• UNAVAILABLE: (same as OUT OF AREA)
NOTE: If you leave Caller ID unchecked as a line feature, it will show a blank in the CALLERID field in the
database. However, if you check the Caller ID feature and the Dialogic board does not support Caller ID, the
database field will always show UNAVAILABLE.
DID/DNIS
DID or DNIS must be ordered through the phone company in order to be enabled on your phone line. You
specify exactly how many digits you want when you order the phone service.
When the phone rings, SmartQ will pause two seconds (after providing a wink if using T-1 lines), then collect all
digits and begin the survey.
Information from DID/DNIS
DID/DNIS will deliver the following information: {Last several Digits of Dialer's phone #}
Any DID/DNIS information collected is stored in a built-in field called DIDDIGITS. Alternatively, the field
may be blank. The information from this field can also be used for calculations, retrieval, or simply additional
information about the call stored in the database.
DNIS (Dialed Number Identification Service) is a service provided by the phone company on certain types of
lines, where the phone number that was dialed is presented to the receiving equipment. It is analogous to Caller
ID. The difference is that if you dial 1-800-555-1234 from home, Caller ID would show your own phone
number, while DNIS would show 8005551234. Sometimes DNIS is set up to only present the last 5 digits of the
phone number, and sometimes you can order several numbers that all present the same “virtual” DNIS.
8
SmartQ 5.1 Manual
Phone Line Setup
Hard Disk Space Check
At the beginning of every call (both inbound and outbound), SmartQ checks how much space is available on the
hard disk where it is installed. If there is less than 10 megabytes available, a system prompt will say “I'm sorry,
the system cannot take calls now because it is out of disk space. Please try again later.” and then SmartQ will
hang up.
SmartQ 5.1 Manual
9
Chapter 2
Survey Design: Creating New Surveys and Items
Overview
Lead surveys collect information about the caller and route them to the appropriate response survey, where they
will answer survey questions. When clients call into your automated telephone survey system, the lead survey
will answer the call first. Typically a caller’s ID code, zip code, or other type of identifying information is
collected at this time. Once callers answer these few key questions, they are routed to a response survey to
answer the questions for which you are collecting your primary data.
The process for setting up lead and response surveys is exactly the same. The only difference is their function. It
is not mandatory that you design your surveys in this manner, especially if you have a very short set of questions.
However, the lead survey with response surveys method will prove the most straightforward to design and
maintain and we strongly recommend it.
SmartQ’s Survey Designer allows you to route callers to as many response surveys as you would like. For
example, you might create a survey for a large chain of theaters that routes callers to different surveys depending
on whether they want to find out what movies are currently showing, to buy a ticket, or to find out what movies
are scheduled for the future.
Before you begin creating your surveys in SmartQ, we suggest that you outline a version of your main lead
survey and then decide how it will route callers to your various response surveys. Once you have a lead survey,
you should create your response surveys.
SmartQ 5.1 Manual
10
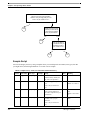
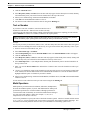
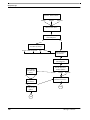
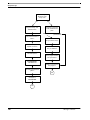
The Five Basic Steps of Survey Designing
Lead Survey
"Please enter your zip code."
"To find out what's playing now,
press 1. To buy tickets, press 2.
To find out what's coming in the
future, press 3."
Caller Presses 1
Response Survey
Play Current Showings
Caller Presses 2
Response Survey
Buy Tickets
Caller Presses 3
Response Survey
Listen to future
releases
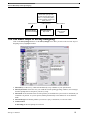
The Five Basic Steps of Survey Designing
Click on the Survey Design button to see the Survey Design screen. Here you will see the five basic steps of
designing a survey highlighted in blue:
1.
Select Survey: Add a survey, which will automatically set up a database to your specifications.
2.
Select System Voice: Select the voice you would like to hear speaking greetings, numbers, error messages
and other prompts that are not part of your survey script.
3.
Select Item: Create and name items for each question you would like the system to ask or calculations you
would like it to perform. As you set up items, SmartQ automatically creates Microsoft Access database
fields.
4.
Select Item Type: Tell SmartQ whether your item is a query, a calculation, or a retrieval of data.
5.
Construct Item
A.
Recording tab: Record prompts for each item.
SmartQ 5.1 Manual
11
Chapter 2 : Survey Design: Creating New Surveys and Items
B.
Responding tab: Indicate valid responses (or set up calculate or retrieve formulas according to the item
type).
C.
Routing tab: Route answers to other items or surveys.
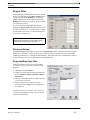
Step 1. Select Survey
1.
Select Select Survey > Add New Survey.
2.
A dialog box will appear where you can set the following options:
A.
B.
C.
D.
E.
New Survey:
•
Type or select a 2-digit ID for the survey.
•
Type a name for the survey.
Select one option for New Survey Format:
•
Select the New blank survey option if you are adding your first survey to SmartQ or if the survey
you will be making is completely different from all other surveys in your system.
•
Select the Copy existing survey option if you want to make a survey that is very similar to a survey
that already exists and you simply wish to make a few minor changes. Use the pull-down menu to
select a survey.
Select one option for Database:
•
Select Make New Database if you wish to make an entirely new Access database to store
information. Type the name of your new database.
•
Select Use Existing Database if this data should be written to a previously designed database.
Select one option for Table:
•
Make a New Table to have all call data for a survey stored in a new table (this option is mandatory
if you selected Make New Database).
•
Use an Existing Table to have call data written to an existing table. You may want to use this
option when you administer the same survey in multiple languages. Use the pull-down menu to
select an existing table.
•
Use the Create Survey Items Matching Fields in Database checkbox to include preexisting
database records in your new survey. Once you click OK, a Select Fields screen will appear.
Lead Survey (Optional):
•
3.
Designate which of your surveys will be the lead survey.
When all settings are correct, click OK.
NOTE: Another way to designate your lead survey is to check the Set as Lead Survey box beneath Select
Survey in the Survey Design window. An asterisk will appear next to the survey’s name to help you keep
track of which survey is set as the lead survey.
Step 2. Select System Voice
Use the Select System Voice pull-down menu. The default setting is American English (spoken in a female
voice) but you may select an alternative system voice. The system voice includes built-in numbers, dates and
confirmation prompts.
Step 3. Select Item
Once you have set up a database and named your survey, you are ready to begin creating and naming items. An
item corresponds to one data value stored in one Access database field. Each survey can have up to 99 items.
There are several types of items, one of which you will select in the next step.
12
SmartQ 5.1 Manual
The Five Basic Steps of Survey Designing
Step 4. Select Item Type
When you Select Item Type, you choose the mode of data collection (collect digits, do a calculation, or retrieve
a history). There are several options under the Select Item Type pull-down menu. You must select an item type
for each item before continuing to design your survey.
If you wish to pose a question to the caller and collect their numeric response, select Query: Digits (this is the
default). Query: Digits and Query: Alphanumeric allow you to record all parts of a question such as an
introduction, an inform prompt, a question, and instructions on which responses are valid. These categories
(introduction, inform prompt, question and instructions) combine to form one item; you can use as many or as
few parts as you wish depending on the information you need to give and the answers you would like to obtain.
There is usually no prompt recording associated with Calculate and Retrieve; these are items you create to help
your survey perform advanced tasks.
• Query: Digits: Set up questions to collect numeric responses. SmartQ collects callers' responses and stores
them in the database as a single-digit or multi-digit responses. This is the most common item type where you
set up a series of questions and answers.
Example: “Do you own any pets? Press 1 for yes, 2 for no.” or “How many times have you visited our store in
the last month? Please enter the number of visits followed by the pound sign.”
• Query: Alphanumeric: Set up questions to collect caller responses in the form of numbers and letters
together.
Example: “Please enter your last name using the letters marked on your telephone keypad.” or “Please enter
your five digit alphanumeric code now using the numbers and letters marked on your telephone keypad. Continue pressing the key associated with the letter or number you wish to enter until you hear that letter, then
press the pound key.”
• Query: Open-End: Set up questions to collect long-answer responses left in the form of messages the caller
can record for you to hear later.
Example: “Please leave your comments after the tone. When you are finished press any touchtone to end the
recording.”
• Group: Group brings together a set of items. This is particularly useful if you wish to randomize or rotate
questions in your survey.
• Calculate: Calculate using caller responses gathered during the survey. You can score a set of questions at
any point in your survey to store the answers or to route callers based on the calculation.
• Email: Email the result(s) of your survey to recipients of your choice. Can be used to attach files, distribute
orders, and notify staff of survey results, among other functions.
• Retrieve: There are three types of retrieval:
A.
Retrieve Data for Calculations looks up information such as the date of the last call or an answer to a
particular question during a previous call and makes the data available to perform calculations.
B.
Retrieve Spoken Responses sets up the ability for authorized callers to retrieve spoken responses (messages) from any touch-tone telephone. This is ideal for offices with multiple locations, but only one computer running SmartQ software.
C.
Resume Incomplete Survey looks for a previous incomplete survey from this caller. If one is found, the
data is read in and the survey resumes where they had left off.
SmartQ 5.1 Manual
13
Chapter 2 : Survey Design: Creating New Surveys and Items
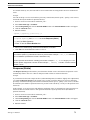
Step 5. Construct Item
You will use Construct Items differently depending on what type of item you
have selected in Step 4: Select Item Type. Query: Digits is the most common
and easiest Item to construct.
The next chapter will go through constructing Query: Digits step-by-step.
Instructions for the other two types of query, Query: Alphanumeric and
Query: Open-End, will follow the instructions for Query: Digits since all three
types of query are similar. Group, Calculate and Retrieve are more advanced
features that are discussed in detail in later chapters.
Creating Survey Items
Follow these steps to create a new item:
1.
Click on a number in the Select Item box.
2.
A dialog box will automatically pop up requiring you to name the item. Enter a name
that identifies the data item.
3.
Click OK.
TIP: Name your item something descriptive such as "clientid" or
"client_id" (no spaces allowed) so that if you move, insert or delete a
question in a survey, the data name will remain accurate. Choose a
name that will be easily understood and recognizable for future use.
Editing Survey Items
Changing an Item Name
Double-click on the item in the Select Item box and enter a new name. Use extreme caution when changing an
item's name. Any formulas or routing that refer to this item will not automatically be changed. You must
manually change all referencing information. The item’s Access database field name will not automatically be
changed.
Moving Items
Select an item in the Select Item box. Press the Move button. The Move with up-arrow button moves an item up
the list. The Move with down-arrow button moves an item down the list. All prompts and settings (including
calculations and routing information) will move with the item.
Inserting Items
An item may be inserted between two items in the Select Item box. Select the item number that you want the
new item to have. Click the Insert button and type the name of the new item. Click OK and the new item will
appear. The item that was previously selected will appear below the new item.
14
SmartQ 5.1 Manual
Editing Survey Items
Deleting Items
If you want to delete an item, simply select the item in the Select Item box and click the Delete button. A Delete
Item window will require that you confirm deletion. Once an item is deleted, it is completely erased from the
system and cannot be restored.
SmartQ 5.1 Manual
15
Chapter 2 : Survey Design: Creating New Surveys and Items
16
SmartQ 5.1 Manual
Chapter 3
Survey Design: Construct a Query
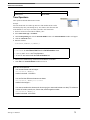
Overview
Construct Item is the final step in designing your
survey. It allows you to record prompts, choose
settings, and route answers.
Three tabs appear under Construct Item:
1.
Recording
2.
Responding
3.
Routing
This chapter will provide instructions for Query:
Digits, the most commonly used Item Type. Query:
Digits uses the basic features of all three tabs.
When you feel comfortable with this chapter, you
may want to advance to the end of the chapter where
Query: Alphanumeric and Query: Open-End are
described.
Later chapters provide instructions for advanced item
types (Group, Calculate, Retrieve). The Construct
Item screen will change depending on the Item Type
and prompt you have selected.
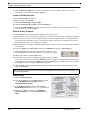
A. Recording
Choose Prompt Types
You can record up to four types of prompts as part of a single item. Only the question prompt is required.
Question prompts are different from the other types of prompts because their purpose is to wait for the caller to
respond, rather than merely provide the caller with information. Examples include “Please enter your code.” or
“Are you satisfied with your experience” or “Please indicate your feelings toward this product.”
SmartQ 5.1 Manual
17
Chapter 3 : Survey Design: Construct a Query
You may want the caller to hear more than just a question: that is why you can also record Introduce, Inform, or
Repeat Instructions prompts as part of the same item. An example of each kind of prompt is outlined in the chart
below. Different combinations of prompts can be recorded to suit the situation. If the question prompt is left out
of any combination, however, no information will be gathered and the field for that item in the database will be
left blank.
When you design your survey, you should map out all of the questions you want to ask first. Then you can record
all the prompts (Introduce, Inform, Question, and Repeat Instructions) in a logical manner.
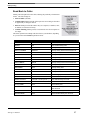
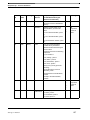
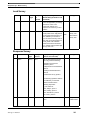
TABLE 1. Prompt
Types
Prompt
Description
Example
Introduce
An introduction to a survey item or
present information to a caller such as
facility information or office hours.
“We are interested in learning about your experience at our facility. Please answer the following questions.”
Inform
Information to present to the caller, such
as a date or score.
"The last time you completed a survey for us
was …"
Question
The question to which the caller should
respond.
"Were you satisfied with the services you
received?"
Instructions to repeat:
"If yes, press 1. If no, press 2."
Repeat Instructions
1. for an invalid answer
2. when the time allowed for a response
has expired
You should enter the text for your prompts into the Script textbox. The Script textbox is provided for your
convenience: SmartQ does not interpret or act upon the text.
• Prompt types are listed in the order in which they are played to the caller. The arrows between prompts also
indicate this sequence. Only those prompts that have been recorded will be played.
• Descriptions of each prompt type are given to remind you of their functions.
• Click on the radio button to the left of each prompt to switch to it and work on it.
• SmartQ will check the Script checkbox to the right of each prompt once text has been typed into the box.
SmartQ will check the File checkbox after a prompt has been recorded.
Introduce
If you have an introduction that explains the item, type the text in the script box on the right side of the screen
and record the prompt (using the instructions on recording prompts later in this chapter). The introduction is
played only once to the caller.
Inform
The Inform prompts can be used to create information for the caller programmatically. (See section about the
Formula Builder in this manual.) The Inform prompts are played only once to the caller.
Question
To record a Question prompt, type the text in the Script box on the right side of the screen and record the prompt
(using the instructions on recording prompts later in this chapter). Question prompts will be repeated to the caller
if they enter an invalid response or if they wait too long to respond.
Repeat Instructions
You can use this type of prompt for shorter versions of instructions that are repeated each time that the question
is repeated.
18
SmartQ 5.1 Manual
A. Recording
You may want to reuse these repeated instructions in other
items. To do so:
1.
Click on the item where you would like the instructions
repeated
2.
Check the checkbox to the left of Repeat Instructions.
3.
Check the checkbox next to Use Repeat Instruction Prompt From:.
4.
Use the pull-down menu to select the item that contains the Repeat Instruction prompt you would like to
apply to the currently selected item.
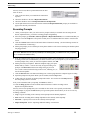
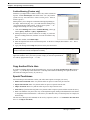
Recording Prompts
1.
Unless you already have files you wish to use for prompts (which you can attach to items using the File
button, explained below), you will be recording prompts using SmartQ.
2.
Select the prompt type (Introduce, Inform, Question or Repeat Instructions). It is recommended that you
enter the text in the Script box to keep track of what you've recorded and allow the reader to read from the
screen.
3.
Click the Connect button in the far left hand column of buttons of SmartQ. (See the following sections for
advanced methods of connecting.)
4.
SmartQ will prompt you for a dialout port and a phone number to call. Choose a dialout port that has a phone
line plugged into it.
TIP: When recording prompts, the sound quality is often improved if you hold the receiver an inch away from
your mouth. Make the room as quiet as possible (turn off buzzing lights, put a blanket over noisy computers,
etc., to cut down the ambient noise).
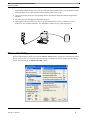
5.
In the next dialog box that appears, enter the telephone number of the telephone that you are using for the
recording session. (We recommend that you choose one that is near your computer so you can operate it and
read the prompts easily.) After you enter the telephone number, click OK.
6.
SmartQ will call your telephone. When the telephone rings, pick up the
handset and say “Hello.” You are now ready to begin recording voice
prompts. If the Record button does not change from grayed out to
active, make a sound (such as blowing on the receiver, whistling, etc.) to
activate the microphone.
7.
Click the Record button. The button will change into a red stop sign when the computer begins recording.
8.
Speak the prompt into the phone. When you are finished, click the Stop button.
9.
At this point you can switch to another prompt and record it. You can also click the Play button to
hear the prompt you have recorded.
10.
If you are unsatisfied with your prompt, click Erase to delete it.
11.
Click the Hang Up button in the left hand column of buttons to end the recording session.
Replace the telephone handset.
You may want to reuse prompts that you've recorded for other items or use specially recorded files
for your prompts. If you press the File button you’ll get menu options that will allow you to use or reuse any
recordings you'd like:
•
•
•
•
Copy: Copy the recording of the currently selected prompt into the SmartQ clipboard.
Paste: Paste the recording in the SmartQ clipboard into the currently selected prompt.
Insert file…: Specify a file to use for the currently selected prompt.
Import Prompt Set: See the “Importing Studio Recording” section below.
SmartQ 5.1 Manual
19
Chapter 3 : Survey Design: Construct a Query
TIP: You can click the File and Erase buttons at any time; you do not have to be connected to use them. You do
have to be connected to use Record.
Connect for recording: Alternative Method
Ordinarily, to connect for recording, you would have SmartQ call your phone. However, where this is not
possible (such as when phone lines are not configured for outbound dialing or with ISDN lines), you can use the
following method:
1.
Click Connect.
2.
Choose a port when prompted.
3.
A dialog box appears prompting you to call in.
4.
Call the IVR system.
5.
When you see the port status change to Record/Playback, click the OK button in the dialog box.
6.
You will hear “You are connected for playback and recording,” which indicates your connection is successful.
Importing Studio Recordings
You can have your voice prompts recorded professionally by a studio and then import them into your survey. To
make the import easy, ask for the prompts to be named 1.vox, 2.vox, 3.vox, etc., with the numbers
corresponding to the order that the Views menu of Survey Design places them when you print a script. Then, to
import the prompts:
1.
Place the recorded prompts (n.vox) into a separate folder.
2.
Go to the Recording tab in your survey. Any item or prompt will do.
3.
Click the File button.
4.
Choose Import Prompt Set from the menu.
5.
Browse to the directory that contains the vox files.
6.
Confirm the mapping of file names to script, when prompted.
7.
All of the prompts to their proper locations.
Conditionally Skip an Item [Custom only]
SmartQ routes the caller from item to item according to the settings in the C. Routing tab. By default, this is a
simple linear order (item 1 to item 2 to item 3, etc.). You might, however, wish to skip past items depending on
the past responses of the caller.
To conditionally skip an item:
1.
Under B. Responding, click on the Formula Builder button in the lower right, just under Skip Item if
formula result is 1:.
2.
Build your formula so that SmartQ returns a numeric value (see Chapter 11). SmartQ will only skip the item
if the value is “1” or 1.
3.
If the formula returns anything other than “1” or 1, SmartQ will ask the question to the caller. Otherwise, the
caller will not know that an item was skipped.
You can provide a default value for items which are skipped on the Advanced Survey Settings window (see
Chapter 23).
Example
20
SmartQ 5.1 Manual
B. Responding
Sometimes you might want to ask callers follow-up questions based on questions they previously answered.
Suppose you design a survey for a grocery store, and you want to ask the callers only targeted questions (i.e. if
they did not shop in the deli, you do not want to ask them questions about the deli).
One of your first questions might be, “Do you regularly shop at any other grocery stores?” Later in the survey,
you ask, “Did you visit our new bakery?” Finally, you want to ask, “Compared with other grocery stores, did
you like our bakery better?” But you wouldn't want to ask a caller to compare bakeries if they already indicated
that they do not shop at other grocery stores.
B. Responding
The appearance of the Responding section will depend upon your choice for 4. Select Item Type on the Survey
Design screen. The following sections describe the settings when your choices are Query: Digits and Query:
Alphanumeric, which are the most common choices.
Valid Response Length
Valid Response Length allows you to specify how many digits you will accept from a caller. Fill in the correct
number of digits under Minimum Number of Digits (or Characters) and Maximum Number of Digits (or
Characters). The default is 1 for Minimum Number of Digits and 1 for Maximum Number of Digits, which
will accept an answer containing just one digit (0-9). You can change this so SmartQ will accept answers with
multiple digits (55, 7#, 00924, etc.)
Example 1
“Were you satisfied with our customer service? Press 1 for yes, 2 for no.”
In this example both minimum and maximum digits are set to 1. The numbers 1 and 2 can be set as valid choices
to further restrict what answers are accepted.
Example 2
“Please enter the number of paid hours you work during a typical work day.”
In this example, the lowest possible answer is 0 (a 1 digit answer) and the highest is 24 (a 2 digit answer).
Therefore, our minimum number of digits is 1 and maximum is 2.
Example 3
“Please enter the five-digit code that appears on the upper left-hand corner of the materials mailed to you.”
In this example the smallest and largest answer should both have 5 digits. Therefore, the minimum and
maximum number of digits are both set to 5. SmartQ will wait for 5 digits before entering the data into the
database.
TIP: How does SmartQ know when to accept an answer? Suppose you ask, "On a scale of 1 to 10, how did you
like our product? Choose 1 if you strongly disliked it and 10 if you liked it enormously."
How does SmartQ know whether you have pressed 1 and are still trying to locate the 0 or if you have pressed 1
and are waiting to move on to the next question? SmartQ will accept an answer with fewer than the maximum
digits allowed after 2 seconds (a long enough pause to ensure that the caller is finished entering their answer
and will not enter more digits). SmartQ will accept answers containing the maximum number of digits
immediately since no more digits are expected.
Alternatively, you can instruct callers to enter the pound sign when they are finished entering their answer. In this
case, you should treat the pound sign as a digit when setting the maximum number of digits. (The pound sign
will not appear in your response data.)
SmartQ 5.1 Manual
21
Chapter 3 : Survey Design: Construct a Query
Question Timing
• Allow response during question allows callers to anticipate a reply and enter a response during a question
rather than waiting until the prompt has completely finished. (Default: checked box).
• Time allowed for response (seconds) indicates the number of seconds that the system will wait for a caller’s
answer before playing the Repeat Instruction prompt. If no Repeat Instruction Prompt is present, the Question
will repeat. (Default: 3 seconds).
• Time before repeating question (seconds) indicates the number of seconds that the system will wait for a
caller's answer before replaying the Question prompt (Default: 3 seconds).
• Maximum number of tries (question cycles) determines the number of times the Question will play. If a
caller does not enter digits, the Question and Repeat Instructions prompts will replay. If the caller enters
invalid digits, the Invalid Answer prompt will play before the Question and Repeat Instructions replay.
(Default: 3 tries). To specify what happens after the third try, go to the C. Routing tab under No Answer.
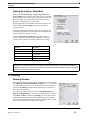
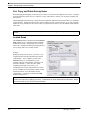
Validation
Check the Reject Invalid Response checkbox under the B. Responding tab of the corresponding survey item if
you want the system to validate numeric or alphanumeric user entry.
The Responding tab is shown to the right for single-digit responses.
• Indicate valid responses by typing them into the Valid Choices
text box.
• If you check the Translate Response checkbox you will be able
to press the associated button. This will bring up a window that
allows you to change the values of keys on the telephone touchpad (so that, for example, pressing “1” is translated as though “2”
were pressed).
22
SmartQ 5.1 Manual
B. Responding
If you enter a number larger than 1 into Maximum Number of
Digits, the Responding tab will change, as you see to the right.
If you press the List button to the right of Valid Choices, a window
will appear which allows you to specify which of several methods to
use to validate responses:
•
•
•
•
Validation from a List of Choices
Validation from a Database
Validation of a Date
Validation of part of a number (Validate by Segment)
List of Valid Choices
Much like the single-digit validation, the List of Valid Choices allows you to type
in acceptable individual responses or ranges of responses. To bring up the
Validation window:
1.
Enter a number greater than 1 in the Maximum Number of Digits text box.
2.
Click on the List button next to Valid Choices.
At this point, you can begin entering into the List of Valid Choices text box
any responses that your survey should accept. SmartQ allows you to enter
individual numbers (for example, “47”), ranges of numbers (for example, “2133”), or comma-delimited lists (for example, “1,5,6,7-9”).
TIP: For a well-organized survey, spend some time on
specifying the data that you will accept. This reduces
errors by respondents and helps maintain a meaningful
database.
TIP: Make sure you do not assign a number as a Special
Touchtone if it is also a potential answer to a survey
question. For instance, if you assign 0 as a Special
Touchtone but you also accept 0 as a query answer, the
Special Touchtone action will register first. Instead of
gathering 0 as data (as you intend), the caller might
Repeat Current Item and no data would be gathered!
SmartQ 5.1 Manual
23
Chapter 3 : Survey Design: Construct a Query
Database Lookup (Advanced)
SmartQ will allow you to access a database for validation purposes.
1.
Within the Validation window, select the Database Lookup option.
2.
Specify the database path and name, or click Browse to navigate to the
database.
3.
Select a Table or Query.
4.
Select a Field.
Example
You are conducting market research, and want feedback only from
customers who have purchased your product. Your database has a field that
tracks unique identification numbers of products that you have sold, and by
setting the validation to accept only products from your database, you will
acquire data from only those callers who own your product.
Date Validation (Advanced)
When your survey needs to gather a date, it can validate a caller’s response in many different formats, depending
on your needs. To enable date entry and validation, enter a number greater than 1 into the Maximum Number
of Digits on the Responding tab, check the Reject Invalid Response checkbox and press the List button.
Date is one of the options that appear on the Validation window. Select the appropriate format from the pulldown menu next to Date Format.
For example, assume a caller is entering a birth date of July 11, 1974. If you select DDMMYY as the Date
Format, SmartQ will only accept user input in this format. SmartQ will not allow an entry of “71174,” because
there is only one “D” entry (“7”). The caller would then need to enter “071174”, which is consistent with this
setting of Date Validation.
Validate By Segment(s) (Advanced)
When gathering a lengthy set of data, it can be critical that all of the numbers are accurate.
Example
You own and operate a small chain of restaurants and would like to gather some information from your
customers through a 19-question survey. Knowing that your customers would not wait on the phone through 19
questions, you hand out a paper copy of the survey that is completed in the restaurant or at home, and have the
customers call in their answers.
When SmartQ takes the call, instead of having all 19 questions waiting to be answered, you ask the customers to
put down all their answers in one long string, which saves them time. However, if they accidentally skip one
question in the survey, the remainder of the 19 questions would be recorded inaccurately in your database,
ruining your data. How do you solve this without making your customers wait through 19 separate questions?
The answer is Validation by Segment. If a customer answers the survey
with “1263489786245102147”, they have no idea they made a mistake.
However, SmartQ knows that on your survey question 13 cannot have “5” as
an answer and thus it is likely that a mistake was made on the data entry. The
caller can then retype the answers correctly, which ensures that your data
will be more accurate.
24
SmartQ 5.1 Manual
B. Responding
Using Validate by Segment(s)
From the above example, we are going to validate the 13th digit of
our 19-digit number.
1.
To begin, select the Validate by Segment(s) option from the
Validation window.
2.
Enter “13” into the Start text box. This means that the validation
will begin on digit 13.
3.
Enter “1” into the Length text box. This means that a one-digit
long segment will be validated.
4.
Enter “1-3,7” into the Allowed Values text box. This means that
digits 1, 2, 3, and 7 will all be valid selections. (Do not use any
spaces!)
5.
Click the Add button to include this validation into your survey.
These steps will ensure that your survey will accept only those four
digits that you specified for digit number 13.
Imagine that you are creating a survey for which only telephone
prefixes of 448, 456, and 338 were allowed (as in 919-448-1111).
You could set up segment validation for the valid set of telephone
numbers with these prefix codes by entering a Start value of 4 and a
Length value of 3. Then enter the three Allowed Values. This
would help to minimize mistakes in ten-digit telephone numbers
entered by the user.
Setting Up Query: Alphanumeric
If you select Query: Alphanumeric as your choice for 4. Select Item Type on the Survey Design screen, the
user will be able to enter letters as well as numeric digits. The controls on the Responding tab will change to
allow you to supply the appropriate parameters to validate the input.
SmartQ comes preprogrammed with a
system prompt that explains how to enter
letters that will be played for the caller
automatically. It also has additional prompts
to guide callers who are experiencing
difficulties with this style of entry.
1.
First, on the Recording tab, record your
question with an option to “press # for
instructions” on how to enter an
alphanumeric entry. Callers will be
guided by your instructions to make
answer entry simple. Sample instructions
you might want to record are included in
the examples that follow.
2.
If you wish to restrict what entries you
will accept, check the Reject Invalid
Response box under the Validate Response heading.
3.
Click the List button to enter the values you will accept. Click OK when you have finished listing acceptable
responses. As with numeric entries, any entry not on the list will prompt the system to ask the caller to enter
the response again.
SmartQ 5.1 Manual
25
Chapter 3 : Survey Design: Construct a Query
4.
Set up the rest of the Responding tab as you would any response. The Special Touchtones are not available
when alphanumeric entry is activated since they are needed to backspace and enter the alphanumeric string.
TIP: If the caller pauses for more than 3 seconds when entering an answer, SmartQ will begin to repeat what
has been entered so far and prompt the caller to finish the entry. Depending on the type of calls and responses
you expect to receive, this may make the Confirm Input feature redundant.
5.
You can now move on to the Routing tab (described later in this chapter) to route the alphanumeric answers.
Alphanumeric Special Characters
Special characters are available by pressing the “1” phone button. The cycle includes: Q, Z, 1, at symbol, period,
space, dash, underscore, tilde. If you plan to request email addresses or other information that will require a
special character, make sure to include instructions on where to find the special symbols. The special characters
include:
TABLE 2. Special
symbol
symbols
explanation
@
at symbol
.
period
space
-
dash
_
underscore
~
tilda
Example 1
You wish to have callers enter the first three digits of their last name.
Record a prompt on the Recording tab that says “Please enter the first three digits of your last name. For
instructions, press the pound key.”
On the Responding tab, enter “3” as minimum and maximum text lengths. If you expect a small set of people to
call into your survey and you only want to accept answers from those people, you would check the Reject
Invalid Response box and list the letter combinations you will accept. In this case, however, it is likely that you
would leave the Reject Invalid Response box unchecked in order to accept all responses. On the Routing tab,
route all answers to the next question or divide up names to route to different questions (or surveys) as you wish.
Example 2
You wish to have callers enter their email addresses.
Record a prompt on the Recording tab that says, “Please enter your email address. The letters Q, Z, and the ‘at’
symbol are on the 1 key. For more instructions, press the pound key.”
On the Responding tab, fill in the maximum and minimum text lengths you expect (perhaps allow 1 to 30
characters for email addresses). On the Routing tab, route the answers as you wish.
26
SmartQ 5.1 Manual
B. Responding
Read Back to Caller
SmartQ can read input back to the caller, reducing the possibility of inadvertent
entries. The four settings are:
• Don’t Confirm (Default)
• Confirm Input: SmartQ will ask if the input was correct and give the caller
an opportunity to change if desired.
• Read As SmartQ can read the caller's entry as a sequence, a number, a date,
an ordinal, or an amount of money.
• Confirm Meaning: SmartQ will use a customized voice file in response to
user input.
This chart explains how SmartQ reads the values in your database, depending
on your selection on the Read As pull-down menu:
Method
Caller Enters
SmartQ Reads Back:
Characters
123
One, Two, Three
Number
123
One hundred twenty three
Date-MMDDYYYY
01232006
January twenty-third two thousand and six
Date-YYYYMMDD
20060123
January twenty-third two thousand and six
Date-DDMMYYYY
23012006
January twenty-third two thousand and six
Date-YYYYDDMM
20062301
January twenty-third two thousand and six
Date-MMDDYY
012306
January twenty-third two thousand and six
Date-DDMMYY
230106
January twenty-third two thousand and six
Date-YYMMDD
060123
January twenty-third two thousand and six
Date-YYDDMM
062301
January twenty-third two thousand and six
Date-MMDD
0123
January twenty-third
Date-DDMM
2301
January twenty-third
Date-MM
01
January
Date-YYYY
1984
Nineteen eighty-four
Dollars
123
One hundred and twenty-three dollars
Dollars and Cents
1*45 (with * set to input as “.”)
One dollar and forty-five cents
Ordinal
65
Sixty Fifth
Time-(H)HMM
1124
Eleven twenty-four
Duration-HHMMSS
112433
Eleven hours twenty-four minutes thirtythree seconds
Duration-HHMM
1124
Eleven hours twenty-four minutes
Duration-MMSS
1124
Eleven minutes twenty-four seconds
SmartQ 5.1 Manual
27
Chapter 3 : Survey Design: Construct a Query
Confirm Meaning [Custom only]
Sometimes you might want to confirm a caller’s entry with a customized
response. With Confirm Input, if the caller enters “123”, they hear the
system voice say “You entered 123. If this is correct, press 1. If this is
incorrect, press 2.”
SmartQ allows you to change the confirmation message depending on
user input. Instead of saying “123”, you could customize SmartQ to say,
“You entered The Rose Hill Location. If this is correct, press 1…” To
configure the meaning of a survey item's prompts:
1.
Click on the Meanings button below Confirm Meaning. (Item type
must be Query: numeric or Query: alphanumeric)
2.
SmartQ will ask if you want to connect for recording. If you do not
plan on recording at this time, click No. You can record later at any
time.
3.
In the new window, click Add Prompt.
4.
Enter the input that will cue the customized response. In the above example, that would be “123”. This is
known as key text.
5.
Type your message in the Script field, and record at your convenience.
NOTE: The System Voice will still preface your recording with “You entered…” At this point, try calling your
survey to see how it sounds, and adjust as necessary.
You can also import other scripts in the .vox file format by clicking on File in the top
right of the window. Once you record your new scripts, you can also export them for
use with any program that accepts .vox files.
Copy Another File to Here
If you have a meaning already specified in another item, you can use the Copy Another File to Here button to
copy the .vap file directly to the current item. This helps when numerous meanings are required, and saves
time while increasing the accuracy of your survey.
Special Touchtones
You can define special touchtones to allow your callers more options to navigate your survey.
•
•
•
•
•
Return to Previous Item: Enter a key that the caller can press to return to the previous item.
Repeat Current Item: Enter a key that the caller can press to repeat the current item.
Skip to Next Item: Enter a key that the caller can press to skip to the next item.
Pause Survey: [Professional Only] Enter a key that the caller can press to pause and later resume the survey.
Save * as: When the user presses the * key on the telephone keypad, SmartQ will understand it as the character designated in this field instead of *. This is how you could allow entry of a decimal point, for example, for
numeric entry.
The first four of these special commands can be two-key sequences (such as “*1” for Return to Previous Item
and “*3” for Skip to Next Item).
28
SmartQ 5.1 Manual
C: Routing
Setting Up a Query: Open-End
If you select 4. Select Item Type > Query: Open-End on the
Survey Design screen, the caller will be able to leave a recorded
audio message as the answer to a survey question. The caller will
hear any prompts you recorded followed by a beep. They can
then leave a message that you can hear later.
Repeat instructions are not available with open-end queries. All
other settings on the Recording tab operate as described in
previous sections.
If an open-end item is visited several times on the same call, the
responses are appended to each other (the later recording does not
erase and record over the previous one).
Check the Allow Review of Message box to allow callers to
review or delete their message before finalizing it. If this box is
checked, callers will hear five options after leaving a message:
Number
Explanation
1
Save
2
Replay
3
Record Again
4
Add to Message
5
Delete Message
TIP: The maximum length of an open-ended response is set on the Advanced Survey Settings window (see
Chapter 23). Any touchtone will end the recording, as will 5 seconds of silence. You may want to record this
information as part of the prompt the caller will hear so they know the length of message you expect and so they
know how to signal the end of their response.
C: Routing
Routing Screens
Routing tells SmartQ how to proceed when valid digits are entered. If you
have Minimum and Maximum Number of Digits set to “1” (the default)
you only expect answers of 0-9, * or #. Those options will automatically
appear on the Routing tab. Follow the directions below to learn how to
route the pre-filled answers.
If you entered a number larger than 1 for the Maximum Number of
Digits on the Responding tab, you will need to fill in the range of answers
in the Min: and Max: columns on the Routing tab. These are the actual
minimum and maximum values, not the number of digits they contain.
After you have filled in these ranges, follow the directions below to learn
how to route according to the ranges you’ve supplied.
SmartQ 5.1 Manual
29
Chapter 3 : Survey Design: Construct a Query
NOTE: If you select 4. Select Item Type > Query:
Open-End on the Survey Design screen, you can
only choose one destination for routing (in other
words, you cannot route the caller according to their
spoken response). The option settings for routing
will automatically appear on the Routing tab.
General Routing
1.
If you want the caller to be routed to the Next Item, leave it checked (it is the default).
2.
You can instead choose to route the caller to a specific Item Number, Phone Number, or Survey Number.
Specify which item, phone number or survey they should be directed to in the pull-down menu under Specific
Destination.
3.
If you want to route the caller to the Goodbye prompt at the end of a survey, select End.
4.
Use the Apply Now button to save your settings.
5.
Use the Test Now button to ensure that your settings will work.
TIP: # has a special meaning when routing to a Phone Number. The response the caller enters for an item will
automatically be substituted for the # symbol in the phone number. This type of setup can allow a caller to enter
a desired extension and get transferred to the number they entered. Make sure that on the Routing screen the
Min and Max ranges encompass all possible extensions, set the destination to Phone Number, and set the
Specific Destination to #.
NOTE: The Advanced Survey Settings screen allows you to disable the playing of the Goodbye prompt at the
end of the survey (see Chapter 23).
30
SmartQ 5.1 Manual
C: Routing
Drag to Paint
To select multiple routing options with one click of the
mouse, click and hold the black Drag to Paint field in
the upper right of the C. Routing tab. As the name
implies, drag the field over the option buttons on the
Routing screen to select, or “paint in” the options that
you want for your survey.
As seen in the picture on the right, clicking and
dragging the Drag to Paint field enables the user to use
one click, instead of up to 13 separate clicks, to change
options within a given item. It is provided simply as a
convenience to SmartQ users.
TIP: In the Specific Destination pull-down box,
quickly insert the same entry as the above line by
selecting the text and typing a quote sign ( " ).
Previous Survey
The Previous Survey button appears on all of the Construct Item screens. Clicking on this button toggles
between the current survey and the previous survey, which is useful for modeling one survey off another,
comparing similar surveys, or simply for troubleshooting. This button will not be available unless you have
viewed at least two surveys since launching the SmartQ application.
Drag-and-Drop Item Text
SmartQ conveniently allows you to drag-and-drop
text within a survey or from other word processing
programs:
1.
Highlight text in the Script box
2.
Drag the text to any of the prompt types buttons on
the left (Introduce, Inform, Question or Repeat
Instructions).
3.
The cursor will display an arrow or plus sign when
you are in the correct area
4.
SmartQ will then make a duplicate of your
selected text in the Script field for prompt where
you dropped it
This will also allow you to write a survey script in a
word processing program and then copy it to desired
locations within SmartQ.
SmartQ 5.1 Manual
31
Chapter 3 : Survey Design: Construct a Query
Cut, Copy, and Paste Survey Items
When managing and designing several surveys, it becomes very useful to cut-and-paste survey items. Using the
keyboard shortcuts Control+X (Cut), Control+C (Copy), and Control+V (Paste), you can easily rearrange your
survey items.
Simply highlight an item and copy it using the keyboard shortcut, and then find a location where you would like
to place the item. Pasting the item will place it above whichever item you have selected. If you copy and paste
within one survey, SmartQ will ask you to rename your pasted item in order to prevent duplicate items with the
same name.
TIP: Use the cut, copy and paste functions along with the Previous Survey button to quickly work between two
surveys.
Locked Items
The Locked checkbox at the bottom of the Construct
Item window acts as a safeguard against accidental
modification of items. The primary use of locking
items is as a reminder tool during the editing phase of
survey design, and is not a security feature.
Example
During the design of your survey, you create a very
complicated (and critically important) item named
“Supermarket”. Once complete, you check the
Locked checkbox as a reminder that you are
complete with item “Supermarket” and that you do
not want to modify it. A few days later, while
completing the design of your survey, you
accidentally click on item “Supermarket” but when
you try to modify the item, SmartQ reminds you that
it has been locked. If you intended to modify
“Supermarket”, you simply un-check the Locked
checkbox and proceed.
IMPORTANT: Locking will not protect an item against data loss in the event of a computer malfunction or
prevent other users from modifying your survey. Locked items can still be deleted like unlocked items. Always
remember to back up your surveys whenever possible.
32
SmartQ 5.1 Manual
Chapter 4
Email Items
Email Settings
Some possible uses for Item Type: Email are:
• Distributing phoned-in orders to staff
• Notifying staff when a certain number of calls are complete
• Emailing survey results to a list of users
To set up Item Type: Email
Set up your email account information:
1.
From the Current Activity screen, select Tools > Email Setup. This inputs
your account information into SmartQ; only one account can be used at a
time.
2.
Enter your User Name, Password, SMTP Host, and Reply Address
(optional). If you do not know what to enter in these fields, contact the person
in charge of your network.
3.
Click Save.
SmartQ 5.1 Manual
33
Chapter 4 : Email Items
Create an item in your survey
1.
From the Survey Designer screen, make a new
item of Type: Email.
2.
Select the Responding tab and enter the desired
information.
A completed email item is displayed in the example on
the right. In this case, the results of the Grocery Store
survey will be emailed to
[email protected] with a subject line
reading “Grocery Satisfaction Report”.
Created through the Formula Builder (see Chapter 11),
this email will include the date and time of the call, as
well as selected responses from the survey.
This example email will be sent at the end of every
Grocery Store survey taken. If this results in too many
emails (for example, callers take this survey 100 times
per day), then you may wish to selectively email
results: for example, email all survey results for a
certain store location.
Additional Email Features and Tips
To send an email only if certain conditions are met, use a Calculation or Custom item to evaluate the condition
and have it route to the Email item (or not) accordingly.
To control who receives the e-mail, perform a database lookup in a Custom item, and refer to this value as a
formula in the To: or CC: field.
The To: and CC: fields can include more than one recipient, if separated by semicolons, just like any email
program.
The From, To, Subject, Attachments and Message fields may all contain SmartQ formulas (i.e., values that are
calculated live during the survey).
Email can be customized to your needs and is yet another excellent way to manage important survey data.
34
SmartQ 5.1 Manual
Chapter 5
Survey Design: Basic Tutorial
Overview
Large surveys are often broken into two smaller survey types: a lead survey and multiple response surveys. This
chapter will introduce you to survey design with a very simple survey. If you create a survey more complex than
this example you should keep the lead and response organization in mind.
Scenario
You own a used car dealership and your primary expense is repairing cars before you sell them. You are
interested to see whether people who purchased used cars from your dealership during the past year are happy
with their cars and whether those who are unhappy have had maintenance difficulties with their cars. You also
need to screen out maintenance problems that are due to accidents that may have occurred after purchase.
Creating the Survey
The first step is to sketch out the questions you would like to ask, break these up into the introductions and
questions, and so on. Here's a very simple example:
1.
(Introduce) “Welcome to Jack’s Cars Satisfaction Survey. Thank you for your recent purchase.” (Question)
“Are you happy with your car? Press 1 for yes. Press 2 for no.”
2.
(Question) “Please enter the number of times you have had the car serviced or repaired since you purchased
it.”
3.
(Question) “Has your car been in any accidents since you purchased it? Press 1 for yes. Press 2 for no.”
Another design technique is to draw a flow chart of the survey:
SmartQ 5.1 Manual
35
Chapter 5 : Survey Design: Basic Tutorial
Intro: "Welcome to Jack's Cars Satisfaction Survey.
Thank you for your recent purchase."
Question: "Are you happy with your car?
Press 1 for yes. Press 2 for no."
2 (no)
1 (yes)
"Please enter the number
of times you have had the
car serviced or repaired
since you purchased it."
end
1-10
11-99
end
"Has your car been in
any accidents since you
purchased it? Press 1
for yes. Press 2 for no."
1 (yes)
2 (no)
end
end
Sample Script
You can also design your survey using a template where you can add specific item names, item types, the data
you might collect, and routing destinations. Let’s look over an example.
TABLE 1. Sample
Survey: Jack's Car Customer Satisfaction Survey
Item #
Item Name
Item Type
Prompt
Script
1
happy
Query: Digits
Intro
"Welcome to Jack's Cars Satisfaction Survey. Thank you
for your recent purchase."
Question
"Are you happy with your
car?
Data
1, 2
Routing
Route "1" to End.
Route "2" to Item 2.
Press 1 for yes. Press 2 for
no."
2
3
repair
accident
Query: Digits
Query: Digits
Question
Question
"Please enter the number of
times you have had the car
serviced or repaired since you
purchased it."
1-99
"Has your car been in any
accidents since you purchased it?
1, 2
Route 1-10 to Goodbye.
Route 11-99 to Item
3.
Route all answers to
End.
Press 1 for yes. Press 2 for
no."
36
SmartQ 5.1 Manual
Creating the Survey
Set Up the Survey
Open Survey Design Window in SmartQ
1.
Open SmartQ. Click OK for any greeting messages that appear.
2.
Click on the Survey Design button in the left-hand column of the screen to bring up the Survey Design
window.
Create the Survey
3.
Select 1. Select Survey > Add New Survey.
4.
Under New Survey, select a two-digit ID for the survey and enter “Car Survey”
as the Survey Name.
5.
Select New blank survey.
A.
Select Make New Database and enter “carsurvey” into the box.
B.
Select Make a New Table and enter “Car Survey” into the box.
C.
Click OK. Click OK again in the next box that appears.
D.
Check the This is a Lead Survey checkbox (located beneath Select
Survey).
Create First Survey Item
6.
In the 3. Select Item list, click on 1.
7.
Enter “happy” into the pop-up dialog and click OK.
“happy” is the name of your first item.
8.
In the 4. Select Item Type box, verify that Query:
Digits is selected from the pull-down menu (it is the
default).
9.
Under 5. Construct Item: happy, click the Recording
tab (it may already be active as the default).
10.
Click the Introduce Prompt. Enter “Welcome to Jack’s
Cars Satisfaction Survey. Thank you for your recent
purchase.” into the Script box. You can read from the
Script box when you record.
11.
Click the Question Prompt. Enter “Are you happy with
your car? Press 1 for yes. Press 2 for no.” into the Script
box.
Create Second Survey Item
12.
In the 3. Select Item box, click on 2.
13.
Enter “repair” as the item name and click OK.
14.
Select 4. Select Item Type > Query: Digits.
15.
Under 5. Construct Item: repair, click the Recording tab.
SmartQ 5.1 Manual
37
Chapter 5 : Survey Design: Basic Tutorial
16.
Click the Question Prompt. Enter “Please enter the number of times you have had the car serviced or
repaired since you purchased it.” into the Script box.
Create Third Survey Item
17.
In the 3. Select Item box, click on 3.
18.
Enter “accident” and click OK.
19.
Select 4. Select Item Type > Query: Digits.
20.
Under 5. Construct Item: accident, click the Recording tab.
21.
Click the Question Prompt. Enter “Has your car been in any accidents since you purchased it? Press 1 for
yes. Press 2 for no.” into the Script box.
Record Survey Prompts
22.
Click Connect in the left-hand column of buttons on the SmartQ screen.
23.
SmartQ will ask, “You are not currently connected. Do you want the system to dial your phone?” Click Yes.
24.
In the next box you will see “Enter your phone number.” Enter the telephone number of the telephone that
you are using for the recording session. This can be any telephone, but must be a telephone that is located
near the computer where you are working. Click OK.
25.
SmartQ will call your telephone. When the telephone rings, answer it. You are now ready to begin recording
voice prompts.
26.
Click on 1. happy under Select Item and click on the Introduce prompt (on the Recording tab).
27.
Click the Record button. Speak the prompt into the telephone. (The
prompt should be written out in the Script box so you can easily read it.)
28.
When you are finished, click the Stop button.
29.
At this point you can switch to another prompt and record it by repeating
steps 6 and 7. For this survey, click on the Question prompt to complete recording prompts for the first Item.
Next, switch to the second Item (2. repair) and record the Question prompt. Finally, click on the third Item
(3. accident) to finish recording the Question prompt there.
30.
Click the Hang Up in the left-hand column of buttons on the SmartQ screen to end the recording session.
Hang up the telephone.
TIP: The prompts will appear in bold on the left side of the Record screen after they have been recorded so you
know what prompts exist.
Responding
38
31.
Click on the Responding tab.
32.
Select the 1. happy item (in the Select Item box). Enter
“1” for Minimum Number of Digits and “1” for
Maximum Number of Digits.
33.
In the Validate Response section, check the Reject
Invalid Response checkbox. Enter “1,2” as valid choices.
34.
Select the 2. repair item. Enter “1” for Minimum
Number of Digits and “2” for Maximum Number of
Digits.
SmartQ 5.1 Manual
Creating the Survey
35.
Select the 3. accident item. Enter “1” for Minimum Number
of Digits and “1” for Maximum Number of Digits.
36.
In the Validate Response section, check the Reject Invalid
Response checkbox. Enter “1,2” as valid choices.
Routing
37.
Click on the Routing tab.
38.
Select the 1. happy item (in the Select Item box). 1 and 2
should be marked as Valid. Route 1 to End and 2 to Next Item.
39.
Select 2. repair item. Enter “1” for Min and “10” for Max and
route to End.
40.
In a new row, enter “11” for Min and “99” for Max and select
Item Number.
41.
Select Specific Destination > 3. accident. (In this case, routing
to Next Item would have accomplished the exact same result.)
Routing to a specific item number is preferable if you are likely
to modify the survey later.
42.
For the 3. accident item route 1 to End and 2 to End. Click the
Apply Now button at the bottom right of the screen.
Setting Special Touchtones/Copying Settings
43.
Select the Responding tab.
44.
Select the 1. happy item from the Select Item list.
45.
Fill in the Special Touchtones box like the one at the right:
A.
For Return to Previous Item, enter “*”
B.
For Repeat Current Item, enter “0”
C.
For Skip to Next Item, enter “#”
D.
For Pause Survey, enter “9”
46.
Click the Copy Settings button at the bottom of the window.
47.
A window will appear where you can select the settings you wish to copy and apply them to other Items.
Check the checkboxes next to Go back key(s), Repeat key(s), Skip Key(s), and Pause Key(s).
48.
Hold down the Control key and click on 2. repair then 3. accident. Both should be highlighted.
49.
Click OK. After you confirm that you wish to apply the settings to these items by responding Yes to the next
dialog that appears, the special touchtone settings should appear for the items you specified.
SmartQ 5.1 Manual
39
Chapter 5 : Survey Design: Basic Tutorial
Call your Survey
40
50.
Verify that there is a Stop Calls button on the left-hand column of
buttons. If there is a Start Calls button, click it so it toggles to
read Stop Calls.
51.
Click the Current Activity button on the left-hand column of
buttons.
52.
Call your survey and watch the progress from this screen. You
can call your survey at any time by dialing the phone number of
the phone line going into your computer. (Think of the computer
as answering the phone and dial the number that will make that
happen).
53.
When the call is done, you can click the Data button on the lefthand column of buttons or you can open Microsoft Access to access the data collected.
SmartQ 5.1 Manual
Chapter 6
Saving and Testing
Saving
SmartQ automatically saves your settings when you switch screens, switch surveys or when you switch items. If
you wish to save a setting without switching screens, click the Apply Now button on the lower right hand corner
of the Survey Design screen. That will save your work immediately.
Testing
As you create a lead survey and name items, SmartQ automatically creates database fields in the lead survey’s
Microsoft Access table. When you are finished creating the lead survey, you should check the Lead Survey
checkbox in the Select Survey section. Then, as you are designing your response surveys, lead survey fields are
automatically associated with new response survey fields.
This allows all the data collected from a single caller to be shown in the database, whether it is the identifying
information that is collected with the lead survey or the survey responses that are corrected with the response
survey.
If you add fields to your lead survey after you have already created a response survey, you must test the survey to
ensure that the new fields will be associated with your response survey!
IMPORTANT: You should test your surveys as you work so that all the settings are correct and all the call data
has the correct destination field. You can either set up auto-testing (recommended) or manually run testing as
you work.
Auto-Test Reminders
1.
On the Survey Design screen, verify that Remind me to Auto-Test Surveys is checked under the
Preferences pull-down menu (it is checked by default).
2.
A small test box will pop up when you exit the Survey Design screen (to the Data or Current Activity
Screen) or if you switch to another survey. SmartQ will ask “Test this survey now?” Click Yes.
3.
SmartQ will ensure that the survey’s settings are complete and consistent with each other (such as verifying
that the survey has no extra settings and checking that all required item settings have been completed). It also
SmartQ 5.1 Manual
41
Chapter 6 : Saving and Testing
checks that there is a database configured for the survey and that all items have field names in the database.
A log detailing any problems will appear at the end of the test.
If you wish to turn this feature off and test your surveys manually without prompting (not recommended), use the
Preferences pull-down menu at the top of the Survey Designer window to deactivate the Remind me to AutoTest Surveys feature.
Manual Testing
If you are in the early stages of survey development, you may find the Auto-Test reminders bothersome. You can
turn them off from the Preferences menu, but if you do, be sure to use the Test Now button. The Test Now
operation not only checks settings, it will also create any fields, tables or even databases missing from your data
configuration.
If you do not have Remind me to Auto-Test Surveys checked in the Preferences menu you should use the Test
Now button periodically to test your survey.
42
SmartQ 5.1 Manual
Chapter 7
Conducting and Monitoring Surveys
Basic Functions
Start SmartQ
SmartQ will load ready to answer calls, administer surveys, and store clients’ responses on the hard disk.
Stop and Start Calls
One of the buttons on the left-hand column controls SmartQ’s activity status. The label on the
button will change from “Start Calls” to “Stop Calls” depending on your connection status.
This is helpful if you wish to discontinue incoming calls to work on a survey (for example, to record
a voice prompt or delete a survey question). Click on Stop Calls in the column of buttons on the
left-hand side of the screen. Calls will stop and the button will toggle to say “Start Calls”. When you
are ready to receive calls again, click on the Start Calls button. Calls will be answered and the
button label will change to “Stop Calls”.
TIP: If calls are in progress, don't hesitate to click Stop Calls. When Stop Calls is clicked and calls are currently
in progress, SmartQ gives you the option to allow current callers to finish their surveys, while not accepting any
more incoming calls.
Exit SmartQ
SmartQ must be open and running for calls to be answered. However, if you do wish to exit the program
completely and not answer calls, click on the Exit button in the column of buttons on the left-hand side of the
screen.
SmartQ 5.1 Manual
43
Chapter 7 : Conducting and Monitoring Surveys
Viewing Current Activity and Monitoring Progress
When you start SmartQ or when you click on the Current Activity button, you will see a screen showing system
activity. This window is divided into two main sections: Current Status and Recent Activity.
Viewing the Status of Each Incoming Line
The status for each telephone line appears in the Current Status window in the Status column. The lines can
have three different states:
Status
Description
Ready for Call
The incoming line is available and ready to take calls.
Doing Survey
The incoming line is administering a survey.
[Off]
The incoming line is not active. Click on the Start Calls
button to activate, or refer to the troubleshooting section.
Viewing Recent Call Activity on Incoming Lines
In the Recent Activity section in the lower portion of the window, an ongoing log of recent call activity for each
line is displayed.
Viewing Responses in Real Time
From the Current Activity screen, right-click on an active port to bring up a menu and select View Responses
As They Happen. The resulting screen will help you determine what a caller enters in real time. After the call
finishes, responses are still available from this screen and are not cleared until another caller begins a new
survey.
44
SmartQ 5.1 Manual
Viewing Current Activity and Monitoring Progress
You might use this to determine what is wrong with a call taking a very long time, to check responses on a busy
system, or simply out of curiosity for how callers react to your survey.
Printing SmartQ Windows
On the left column of your SmartQ screen, the Print button allows you to print any screen that you have open.
Open the window that you would like to print and click on the Print button.
Call Volume and Port Usage
Accessed through the Current Activity screen’s Tools menu, Call Volume and Port Usage can help maximize
the use of your system.
There are 1,440 minutes in every day. SmartQ shows how these minutes were divided among the number of
lines you have:
# Ports In Use
# Minutes
0
917
1
230
2
152
3
86
4
55
In the above example on a 4-line system, all four lines were in use for a total of 55 minutes on this day. These 55
minutes could have occurred at any time that SmartQ was taking calls, but for 55 minutes, SmartQ could take no
more calls. In other words, a caller would receive a busy signal during those times.
Depending on the type of surveys you run, this is not necessarily a problem. If SmartQ mostly makes outbound
calls having all lines busy is efficient. However, if you do not want to alienate callers with a busy signal, perhaps
you require additional capacity. In any case, the call statistics are yet another useful way to monitor your
surveys.
Maximizing SmartQ uptime
The ability of SmartQ to work when you are away is one of its primary functions. Below are some tips to
maximize the uptime of SmartQ:
1.
Minimize the chance of power failure
•
If your building has emergency backup power on certain circuits, use one of those circuits for
SmartQ
•
Use a UPS (Uninterruptible Power Source) for SmartQ. These typically provide backup power for
about 30 minutes
By keeping SmartQ running, you will avoid the delays associated with restarting the computer, loading the
drivers, and restarting SmartQ.
2.
Configure SmartQ to start when power is restored to the computer
•
Adjust the BIOS setting on the computer so that it powers on automatically when it is plugged in
•
Set Windows to Auto-Logon (but beware that this may require disabling some passwords)
•
Set SmartQ to run automatically. Place a shortcut to Start_IVR_SEND.EXE (located in the
TeleSage folder) in the Startup folder (typically C:\Documents and Settings\All
Users\Start Menu\Programs\Startup). This program displays a countdown while
waiting for the Dialogic drivers to load, then runs SmartQ.
SmartQ 5.1 Manual
45
Chapter 7 : Conducting and Monitoring Surveys
3.
4.
Call Coverage
•
When SmartQ is unavailable, you have two choices. Callers can either receive a no-answer, or
callers can receive a recorded message informing them that your survey is temporarily unavailable
•
If the no-answer ring is acceptable during downtime, no additional configuration is necessary. This
is the default. If you have a T-1 circuit, callers may hear a busy signal or a message that circuits are
busy/unavailable.
•
If a recorded message is desired, then the SmartQ phone lines should be set up to forward to
voicemail on no-answer. In an office PBX environment, a voicemail box could be set up for
SmartQ, with an appropriate greeting message. If the SmartQ lines come directly from the Central
Office, then the voice mail feature should be ordered from the phone company for each of the lines.
Notification of Problems: NightOwl
TeleSage’s NightOwl product can be used to monitor SmartQ externally and to notify personnel if SmartQ
stops operating properly. Contact TeleSage for more information about NightOwl.
Log Files (for troubleshooting)
SmartQ generates log files for system events, viewable in the Logs folder.
These include error messages, the exact timing when lines are started or
stopped, which lines were active during which times, and when SmartQ
begins operating, to name a few examples. These log files are very useful
for troubleshooting your system setup.
Log files record from the time SmartQ starts until the program is
closed. On larger systems (i.e. large numbers of surveys running
simultaneously), writing these log files can occasionally slow the
entire system. Thus, for surveys on which you expect high volume
and know that few problems exist, you may wish to disable logging.
To enable/disable logging, go to the Current Activity screen and
select Tools > Enable Logging per survey. When the dialog
appears, deselect the surveys for which you do not want a log file to
be written.
NOTE: When logging is turned off, the beginning and end of each
survey are recorded, along with any errors.
Fax Transfer [Custom only]
If the fax machine in your office can be attached to a phone system extension and share the phone lines with the
IVR system, SmartQ can save you the cost of having a dedicated fax line.
46
SmartQ 5.1 Manual
Viewing Current Activity and Monitoring Progress
Configuring Fax Detection
On the Current Activity Screen, click the Change button on
the bottom of the screen to access Phone Line Setup. Select
the Hangup and Fax Detection button.
Not only can you enable or disable fax transfers from this
window, but you can adjust the frequency and cadence so that
SmartQ can recognize incoming faxes from your system. This
function would be used if you were having trouble with faxes
not being recognized properly.
SmartQ 5.1 Manual
47
Chapter 7 : Conducting and Monitoring Surveys
48
SmartQ 5.1 Manual
Chapter 8
Data Management
Overview
This chapter will explain how SmartQ collects and stores data, as well as how you can view and manipulate the
data once it has been collected.
When a client calls your automated telephone survey and answers questions, SmartQ stores the responses on
your computer's hard disk. Using the buttons on the Data Screen, this call data can be viewed, exported to a text
file, and/or imported to a separate program to create reports.
To view the Data Screen, click the Data button, which will always appear as part of the left-hand column of
buttons under the SmartQ logo.
Storing Data
SmartQ Database Architecture
SmartQ stores data directly into a Microsoft Access database. For each lead and response survey on your
system, data is stored in the database, table, and fields that you configure when you design each survey in Survey
Designer. If a client terminates a call before finishing the lead survey, data from that call is stored in the lead
survey table. If a client completes the lead survey and at least a portion of the response survey, all of the call data
is stored in the response survey table.
Each response survey can write its data to only one table. However, multiple surveys may write to the same
table. You may wish to have multiple surveys write data to the same table if, for example, you have the same
survey given in multiple languages. Every item in a survey is assigned its own unique field.
Automatic Call Statistics
All data in your database is organized into fields. Each field has a field name. Each item name you created in
Survey Designer will show up in your database as a field name. Data collected as part of that item (the answer to
a query, a calculation, or a retrieval of information) appears with the appropriate Field Name in the database.
SmartQ 5.1 Manual
49
Chapter 8 : Data Management
Similarly, call statistics (such as time of call), are automatically collected by SmartQ and have field names. They
are stored in your database table, along with the responses to your survey items. No configuration is required
from you for them.
Field Name
Friendly Name
Definition
CALLPORT
Port (phone line)
The port that the call came in on.
If manual entry, the port will be 999.
CALLDATE
Date of call
Date of the call.
If manual entry, this is the administration date of
entry.
CALLTIME
Time of call
Time of the call.
If manual entry, this is the administration time of
entry.
LEADNAME
Lead Survey
Name
Name of the lead survey.
LEADMINS
Lead Survey
Duration
Duration in minutes of the lead survey (a decimal
number to two decimal places).
RESPNAME
Response
Survey Name
Name of the response survey.
RESPMINS
Response
Survey Duration
Duration in minutes of the response survey (a
decimal number to two decimal places).
Viewing Data
Viewing One Record
SmartQ allows you to sort through and view each caller's individual survey
records.
1.
Make sure you are viewing the Data screen (if not, click the Data
button).
2.
In the Select Survey pull-down menu, select the survey that contains the
information you wish to view.
3.
Select View should be set to Data.
4.
Use the Select Record arrows to scroll through the data records. Data will
appear in the order that it was entered into the survey.
TIP: If you want to sort data by a particular field, click on the field name you
want to sort by and all records will sort in ascending order alphabetically or
numerically.
50
SmartQ 5.1 Manual
Viewing Data
Viewing Multiple Records
If Microsoft Access is installed, you can launch it from within SmartQ to sort through and view multiple records
at once.
1.
Make sure you are viewing the Data screen (if not, click the Data button).
2.
Select Data > Launch Microsoft Access. This will open the table you were viewing on the Data screen.
Data Preferences
Make sure you are viewing the Data screen (if not, click the Data button).
Under the Preferences pull-down menu you can choose from the following options:
Allow Editing of Data
Allow editing of data is unchecked by default to avoid altering any data in the database. Use caution in turning
this preference on, as once data is entered in a field it is permanently changed in the database.
Confirm Deletions
The Confirm Deletions option is checked by default. A dialog box will pop up when you delete something to
safeguard your data against accidental deletion.
Display Surveys Alphabetically
Surveys display numerically by default. Check this preference to display surveys alphabetically instead.
Show Tooltips
When enabled, SmartQ will show you additional information if you hover the mouse above individual fields or
buttons.
Colors . . .
SmartQ allows you to customize colors of fields to make it easier to scan the screen visually. You can set colors
to differentiate:
•
•
•
•
Built-in call statistics
Lead survey fields
Response survey fields
Fields that aren't part of this survey
SmartQ 5.1 Manual
51
Chapter 8 : Data Management
Manually Entering Data
You may want to enter data by hand
if you have a pencil and paper
version of your survey that needs to
be compiled with the rest of the
surveys collected by SmartQ.
1.
Make sure you are viewing the
Data screen (if not, click the
Data button).
2.
In the Select Survey pull-down
menu, select a survey.
3.
Go to the Preferences pulldown menu and uncheck Allow
Editing of Data.
4.
To enter a new record, click the
New Record button.
5.
Type the information in the
appropriate fields.
TIP: The record number, call port, call date (present date), and call time (present time) automatically appear in
the first four fields. When manually entering a survey, you may want the call date and time fields to reflect the
date and time that the survey was actually administered, rather than when it was typed into the computer. To
change this data, simply type over the existing information. The record number uniquely identifies the record
and cannot be edited. The call port number 999 identifies the record as manually entered data.
Exporting Data
SmartQ can export data to
Microsoft Excel and other
programs that can import data from
text files. You can also view and
edit the exported text files in text
editors.
52
1.
Make sure you are viewing the
Data screen (if not, click the
Data button).
2.
Select Data > Export…. The
Export Data window will
appear.
3.
Specify the data to be exported
by selecting a survey and range
of dates from the 1. Select
Survey and Dates group.
4.
Under Fields Available, doubleclick each data field name you would like to include in the exported data file. It will then be listed in the
Fields to Output box.
5.
Double-click a field name from the Fields to Output list to remove it. To clear all of the field names from
the Fields to Output list, click the Clear button.
SmartQ 5.1 Manual
Exporting Data
6.
Select a Separator between data (such as a comma, tab, pipe, or none) from the pull-down menu. Each data
value will be separated by this character in the output file. This is necessary if you plan to import the file into
a database.
TIP: If you wish to select multiple fields, hold down the Control key and click on each field you want until you are
finished. Click the right arrow to move them to the Fields to Output list. If you wish to select consecutive
multiple fields, hold down the Shift key while you click the first and last fields of the group. Click the right arrow to
move them to the Fields to Output list.
7.
If you check the Include field names as the first line of output checkbox, the first line of the output file will
contain the names of the fields. The actual data will begin on the second line of the file.
8.
If you check the Export open-end IDs checkbox, the numeric IDs of any open-ended responses will be
exported to the data file.
9.
If you check the Export open-end transcriptions checkbox, values entered by the user will be exported to
the data file.
10.
When you are ready, click the Export button to name the data set and specify where the data should be saved.
11.
To view a list of all activities in the Export Data window, click the View Log button.
12.
Click Close to close the Export Data window and return to the Data Screen.
Save and Load Settings
If you export the same type of data periodically and want to ensure that the format remains consistent, you can
save your settings by using the controls in the 2. User Saved Export Format group.
1.
Press Save to enter a name for the settings. Typical names would include the survey name and the purpose,
such as “Grocery Monthly.” All the settings except the dates will be saved.
2.
The next time you want to use these saved settings, select the name that corresponds to your settings from the
pull-down list.
Filtering and Dividing Data
If you select Calculate file name by formula from the 4. Options group (rather than Let me select file name)
you can use the Formula Builder so that the name of the file will be generated dynamically.
You can also use the Calculate file name by formula feature to filter the data that is exported or distribute the
data into separate files based on the contents. For example, you may want to:
• Export only calls that are completed surveys
• Create a separate file for each month
• Export only calls that surpassed a certain threshold score.
When SmartQ does an export, for each record it will evaluate a formula based on the content of that record. You
define that formula so that it evaluates to the appropriate target filename.
The export formula is stored with your other settings in an export (.exp) file saved with the Use Saved Export
Format controls, so you can reuse it later.
Example
You wish to divide the data into different files by month:
C:\Data\Grocery_",&,(,$CALLDATE,FORMAT,"YYYY_MM",),&,".txt
will divide your data into as many files as months that you have data. You will end up with a folder with a name
like: C:\Data\ 2008_02.txt 2008_01.txt 2007_12.txt 2007_11.txt
SmartQ 5.1 Manual
53
Chapter 8 : Data Management
Example
You wish to filter the data so that only complete surveys are recorded, one file per day. A survey is considered
complete if item 59 has a response:
IF,@Item59,THEN,"C:\Completes\",&,YEAR,&,MONTH,&,DATE,&,".txt",ENDIF
If the formula evaluates to blank for any record, that record will be skipped in the output.
Database Errors and Recovery
If data from a call cannot be written to the Microsoft Access database for any reason,
the data will automatically be saved to a text file. These backup files have the
filename extension .dbe and are stored in the Data folder within your Install
directory (the default is C:\Program Files\telesage\Data). Files are
saved with the following naming convention according to the date of the call:
yyyymmdd.dbe (for example, a call that came in October 17, 2004 would be stored
as 20041017.dbe).
SmartQ notifies you that an error has occurred by displaying the Try Data Export
Again… button on the bottom right of the Current Activity screen. When no errors
exist, this button is not available. To reconcile the errors that occurred:
1.
Click the Try Data Export Again… button. (You can alternatively double-click a file to view the raw data.)
2.
In the Data Errors window that pops up, click Export for each file in the list.
Assuming your database is operational when you click Export, SmartQ will fill in the missing data. If you are
still having trouble exporting, be sure to check the status of the database that encountered the error.
Other Data Features
Deleting Fields
While in the Data screen with the Data view selected, you can
delete fields from your database simply by right-clicking on the
field, and selecting Delete This Field.
When deleting a field, SmartQ will always confirm with you
when there is data present in that field. If you choose to delete
the field and SmartQ begins collecting data for that deleted field,
SmartQ will create the necessary field on-the-fly while your
survey is taking place.
The menu that appears with the right-click also allows you to sort
data by the selected field as well as find values within your database.
Suppressing Write to Database
Change your view on the Data screen to the Configuration view for the option to
make SmartQ omit or suppress certain data from your database.
If you right-click on any field in your database you will be presented with the option
Don’t Write to Database. If you choose this option SmartQ will withhold any new data entries into that field
until you specify otherwise. Your pre-existing data will remain intact, and you can resume writing that data to
the database at any time by right-clicking a field that has been suppressed and selecting Write to Database.
You might choose this option for fields which are only used for intermediary calculations or for conditional
branches in your survey logic.
54
SmartQ 5.1 Manual
Other Data Features
Moving Fields
To rearrange your Data screen fields, simply drag-and-drop fields to change their order. This affects only the
Data screen itself; it does not actually alter the arrangement of fields in your database, nor does it affect your
other surveys.
TIP: Arrange fields in your Data screen for easy analysis of data. This keeps you from spending time searching
for a select few fields when viewing data. For example, if you have three separate items in your survey that
relate to customer service (and the rest relate to product features), bring the three items together in order to find
them quickly.
SmartQ 5.1 Manual
55
Chapter 8 : Data Management
56
SmartQ 5.1 Manual
Chapter 9
Advanced Topics: Group
Overview
A group is an item type that consists of a collection of items. Defining a group is particularly useful if you wish
to randomize questions in your survey. There are three types of groups:
• Fixed: Start with a fixed question and continue to ask questions in a fixed order.
• Random: Start with a random question and continue to ask questions in random order.
• Rotating: Start with a random question but continue to ask questions in a fixed order.
For example, you have three questions in your survey you wish to group. The following chart shows the order in
which the questions could appear for a given caller depending on the type of group you select.
Group Type
Possible
Question
Order
Fixed
Random
Rotating
1,2,3
1,2,3
1,2,3
1,3,2
2,3,1
2,1,3
3,1,2
2,3,1
3,1,2
3,2,1
SmartQ 5.1 Manual
57
Chapter 9 : Advanced Topics: Group
Setting up a Group
1.
If you are interested in placing items in a group, it is easiest to set up the items
first and then group them afterward. Set up all items to be placed in the group
first (as you normally would for any item).
2.
Click once on the first item you wish to place in a group.
3.
Click the Insert button to insert a new item.
4.
Enter a name for your new item (which will group the other items) and click
OK.
5.
Select Select Item Type > Group.
6.
Click on the Responding tab.
7.
Under the heading Select Items To Include In Group, you will see all the
items in your survey. Select items for your group by checking boxes to the left
of the desired Items. You can select as many items as you want or unselect items
you do not want. If you wish to clear all the checked boxes and start selecting
again, click the Clear Selections button.
8.
Once you have selected all the items you would like to group, select the Fixed,
Random, or Rotating option depending on how you want the group to behave.
9.
Click on the Routing tab.
10.
Each item in the group routes back to the group. The group item itself has the
routing logic to decide when the group items can all be considered completed.
11.
Decide how to route your caller once the questions in the
group have been completed and complete the routing options
appropriately.
NOTE: Items in the group may also route to follow-up questions, which then could route back to the group. You
could alternatively have routing logic that in some cases never routes back to finishing the group.
Recording Prompts for a Group
You can record Introduce and Inform prompts if you have Group selected as the Item Type. The procedure for
writing in the script and recording the prompt on the Recording tab is exactly the same as prompts for any of the
Query item types.
If you record a prompt, it will be played before each item in the group is played. This may be useful if, for
example, you have a set of five questions with the same instructions. You may also want these five questions to
be presented in a random order. First, record each of your five questions as separate items (recording only the
Question prompt). Next, put all of these items in a Group. Record the Introduce prompt (with instructions) as
part of the group.
Conversely, if all your items have different instructions, record each instruction set as part of the original item; do
not record anything for the group.
You may also find the Inform prompt helpful for calculating scores as people progress through items in a group.
58
SmartQ 5.1 Manual
Chapter 10
Advanced Topics: System Voice and Multiple
Language Support
In many real-world settings, you will need your survey to be in more than one language. SmartQ allows you to
use the same survey for multiple languages, rather than forcing you to create a separate survey for each language.
System Voices and System Prompts
The prompts that you record to welcome your callers, ask them questions and guide them through the survey are
called the survey voice. SmartQ comes with a set of built-in prompts for numbers, letters, dates, times and
currency. These prompts are recorded for each system voice. The system contains built-in logic to use these at
the appropriate time. In a single-language system, you don't need to change them. Your survey voice prompts
will be recorded as the native voice and you can use the default system voice called Amer. English-female.
Type of Prompt
Wording of Prompt
Goodbye
“That concludes our survey. Thank you and Goodbye.”
Invalid Answer
“Your entry is not recognized by the system. Please try again.”
Please Hold
“Please hold while I transfer your call.”
System Pause
“Survey Paused. Press any key to resume the survey.”
Confirm Number
“You entered [SmartQ reports entry]. If this is correct press 1, if incorrect press 2.”
Numbers and
Letters
Any numbers and letters specified for playback for the Inform prompt will be
spoken by the SmartQ system voice.
In a multilingual system, you can record multiple prompt sets by creating additional survey voices and either use
one of the built-in SmartQ system voices for that language or record your own system voice. Each system voice
is associated with a language with grammatical rules for constructing dates, times, numbers, and so on. Your
callers can select which voice (language) they prefer to hear with a voice selection item. This is just an ordinary
survey item that you designate for the purpose of choosing a survey voice. SmartQ provides a screen for you to
select what response leads to which survey and system voice.
System voices can be in English, Spanish or German. Future releases of SmartQ will support more languages.
Once you create a system voice, it can be used in any survey.
SmartQ 5.1 Manual
59
Chapter 10 : Advanced Topics: System Voice and Multiple Language Support
You might, for example, create four system voices: one for American English, one for the English of Scotland,
one for the English of England, and one for the English of India. All of these four system voices use the same
language rules but will have their own recorded prompts to reflect differences in pronunciation.
NOTE: You can record a system voice in any language you'd like: the limitation is that the grammar rules will
follow one of the built-in languages. For example, some languages parse 24 as "four-and-twenty" while others
parse it as "twenty-four." You can only choose from these language rules, not change them or add to them.
Default System Voice
The default system voice is the voice that will be used until it is changed by a voice
selection item. You can choose the default system voice for any particular survey by
making a selection from the 2. Select Default System Voice pulldown menu on the
Survey Design screen.
Recording a System Voice
Follow these steps to create a new
system voice.
60
1.
Select 2. Select Default System
Voice > ADD/EDIT SYSTEM
VOICES
2.
The Record System Voice dialog
box will appear. It functions
similarly to the Recording tab on
the Survey Design screen.
3.
Select the system voice you’d like
to work on from the Select System
Voice menu; if you want to create
a new system voice, select ADD
SYSTEM VOICE…
4.
Select the prompt you'd like to
create or replace from the Name
list.
5.
Enter the script for the system
voice you are recording in the New
Script textbox.
6.
Press the Record button when you
are ready to record the item.
7.
Press the File button if you have a
file you’ve already recorded that
you'd like to use.
8.
Press the Play button (to the left of New Script) to listen to the recording you’ve made for the current
selection.
9.
You can test the items in your new system voice by entering text into the Test Prompts with Sample Phrase
textbox and specifying how that text should be interpreted with the Play as… pulldown menu. Press the
New: Play button to hear it played.
10.
Make sure that you select the appropriate linguistic rules from the Select Language Rules pulldown menu.
If you don’t, the way in which language elements are combined will seem illogical.
11.
Nothing you have done will be saved unless you press the Save Changes button.
SmartQ 5.1 Manual
Survey Voice
12.
Press the Exit button to close the dialog box and return to the main SmartQ window.
Editing a System Voice
System prompts are almost always small elements that are combined together into phrases and sentences. It is
therefore much more important that they be consistent in pitch, volume, inflection, and amount of leading and
trailing silence. The Record System Voice screen is designed to allow you to compare changes you make
against what you started with before committing your changes.
When you open a system voice for editing, SmartQ makes a working copy of the original file, called New. Most
of the screen elements occur in pairs: one for your original system voice and one for the new version reflecting
the changes you’ve made.
Editing and rerecording items you’ve created previous for a system voice works as explained above, although
there are features which allow you to listen to and compare the versions of items you recorded previously. These
previous items will not be replaced unless you press the Save Changes button.
1.
The script you wrote previously for the currently selected item will appear in the Original Script textbox.
2.
Press the Play button to the left of Original Script to hear the currently selected item as you recorded it
previously.
3.
To listen to the text in the Test Prompts with Sample Phrase with your previously recordings, press the
Original: Play button.
Clip Recording
The Clip Recording option can automatically clean up your voice recordings. The Clip Recording option is
made visible or invisible via the Preferences > Enable Clip Recording menu command.
The Clip Recording option saves time because it automatically stops recording when there is silence. This is
useful for words that do not contain breaks in sound, such as “one” or “done”. If you do not use the Clip
Recording option, the recording may have “white noise” before and after the speech you recorded, which sounds
messy and takes up time. Recording with this option enabled takes practice, but the results sound much cleaner.
To use this method, you will need to speak as soon as you press the Record button. You can rerecord your
prompts as many times as you wish.
The Clip Recording option should be turned off for words that have momentary breaks in sound, such as words
that contain the letters “T”, “K”, or “X”, or any type of phrase. This is because your natural pauses in speech
sound (of which you are probably not even conscious) will automatically stop the recording before you are
finished with your prompt.
Survey Voice
You can define any number of survey voices for each survey, each with its own name.
How Create a Survey Voice
1.
Select 2. SELECT SURVEY VOICE > ADD/EDIT SURVEY VOICES
from the Recording tab.
2.
The Voice Selection dialog box will appear.
3.
The survey voice must be associated with a pre-existing system voice. Choose
the system voice with which it will be associated from the System Voice
pulldown menu.
SmartQ 5.1 Manual
61
Chapter 10 : Advanced Topics: System Voice and Multiple Language Support
4.
Press the Add button below Survey Voice.
5.
Enter the name for this new survey voice in the dialog box
that appears. The name will then appear in the Survey
Voice pulldown menu.
6.
Press Exit to return to the Survey Design screen.
Recording Survey Voice Prompts
Chapters 2 and 3 have already discussed the basics of recording prompts for your survey. Once you add survey
voices, you will need to record a prompt for each of these survey voices for every item in your survey (after the
survey branches with the voice selection item).
Choose between your survey voices with the 2. SELECT SURVEY VOICE pulldown menu on the Recording
tab of the Survey Design screen.
Notice that all of the boxes, checkboxes and buttons will change after you select a different survey voice to
reflect what scripts have been entered and what prompts have been recorded for it.
How to Create a Voice Selection Item
You can designate one item in your survey to be the voice selection item, which changes the survey voice that
will be used for the rest of the survey. It may be any item type, so you could, for example, ask your callers,
“Press 1 for English, or, para espanol empuje el dos.” Or you could perform a lookup or calculation with a
calculation or custom item. In any case, this will cause SmartQ to use a particular system voice and survey voice
for the remainder of the call.
IMPORTANT: If one survey routes to another, the second survey will attempt to use a survey voice with the same
name chosen by the first survey. If a survey voice of that name does not exist in the second survey, the second
survey will automatically use its Native prompts.
The voice selection item will cause a survey voice to be chosen for the rest of the survey. The result of the item whether it is a query from the user (“Select 1 for English …”), a lookup (referring to a previously recorded
selection of the user’s preferred language), etc - must be a number. The Voice Selection dialog box allows you to
associate a numeric values with the survey voices.
62
1.
Create a new item on the Survey Design screen. Make the
appropriate selection from the 4. Select Item Type
pulldown menu.
2.
Make the appropriate selections on the Recording,
Responding and Routing tabs, depending on whether you
are asking the caller for a language selection, looking it up
in a table, etc.
3.
Select the Recording tab and select 2. SELECT SURVEY
VOICE > ADD/EDIT SURVEY VOICE.
4.
Choose the item from the Voice Selection Item pulldown
menu.
SmartQ 5.1 Manual
Survey Voice
5.
The Voice Selection Response list will be empty initially. You will need to add the possible numeric
outcomes to the list and associate each one with a survey voice.
6.
Press the Add button in the bottom left corner.
7.
The Add Voice Selection dialog box will prompt you for a numeric value. Enter a value.
8.
That value will appear in the Voice Selection Response list.
9.
Select the value and then select a voice from the Survey Voice pulldown menu to associate with it. This is
the voice that will be chosen if this value is the result of the item.
SmartQ 5.1 Manual
63
Chapter 10 : Advanced Topics: System Voice and Multiple Language Support
64
SmartQ 5.1 Manual
Chapter 11
Advanced Topics: Formula Builder
Overview
After your call information is collected, it is likely that you will analyze the data in another program. However,
you can also make calculations from within SmartQ. Formula Builder helps to score questions, collect the right
data to read it back to callers, route answers based on calculations, and more.
The three places in SmartQ where you might use Formula Builder most often are.
• If you choose Calculate as your item type, you will use Formula Builder to recall or score your data.
• If you use the Inform Prompt to read back data to a caller, you may calculate information using Formula
Builder (under Inform Data).
• If you use Retrieve as your item type, you can route callers according to data from previous surveys using
Formula Builder.
Many advanced features of SmartQ rely upon the Formula Builder to make calculations dynamically.
SmartQ 5.1 Manual
65
Chapter 11 : Advanced Topics: Formula Builder
Calculate
If Calculate is highlighted under Select Item Type,
you will find a Formula Builder button on the B.
Responding tab. Useful applications include:
• Score calculations (either for immediate storage
or for further branching based on scores).
• Route callers during a survey based on a previous
answer in the same survey.
Inform Data Calculations
You will find a Formula Builder button on the A.
Recording tab when Inform is selected as a prompt.
SmartQ can read any Inform calculations back to the caller
using the Inform Prompt. Useful applications include:
• Score calculations (to read back to the caller).
• Calculate the next time a caller will call (to read back to
the caller).
Retrieve
If Retrieve is highlighted under Select Item Type, you
will find a Formula Builder button on the B. Responding
tab. Useful applications include routing or calculating
answers that have been retrieved from past surveys.
66
SmartQ 5.1 Manual
Basic Formula Builder
Basic Formula Builder
In the initial screen of Formula Builder, you can recall a response to a Single Item, create a Sum of responses
or generate a Count of Responses. If you wish to do anything more sophisticated, you will need to use the
Advanced Formula Builder.
Single Item Recall
Normally you would ask questions, gather the answers, and route callers right away based on their answers using
the Routing tab. But what if you want to ask a series of questions, gather the answers, and at the end of that series
of questions route based on the answer to just the first question?
SmartQ allows you to recall the answer to a previous item in your survey. Create an item, specify Calculate as
the type, bring up the Formula Builder and select Single Item to choose the item with the answer you would like
to recall. Finally, use the Routing tab to direct the answers to the correct destinations.
Example
One of your first questions (called “location”) is “Which store do you frequent most often? Enter 1 for
Downtown or 2 for Uptown.” You ask several more questions that apply to the store in general. After that you
ask a set of questions that apply specifically to the downtown or uptown location. You don't have to ask the
question again in order to branch; just use a calculation to recall the response to a previous item.
1.
Insert or create a new item called “store_calc” at the point in the survey where you wish to start branching
questions.
2.
Select Select Item Type > Calculate.
3.
On the B. Responding tab, click the Formula Builder button. The Formula Builder window will appear.
4.
Check Single Item.
5.
Choose the item name location from the pull-down menu.
6.
Click OK.
7.
Click on the C. Routing tab to route the responses to the correct places based on the answer to the previous
question.
Sum of responses
You can add the numeric values of caller responses quickly and simply by selecting the Sum of responses option.
You can use this function to add response scores at any point in your survey at the end.
If you are only adding together two values, you should choose the two values from the first and last pull-down
menus and then choose and from the middle menu. If you have a continuous range of menu items you’d like to
sum (such as responses 4 through 7), you can select the first and last items from the menu and then choose
through from the middle menu.
SmartQ 5.1 Manual
67
Chapter 11 : Advanced Topics: Formula Builder
Example
You want to sum two items named “clean” and “checkout”.
1.
Insert or create a new item called “positives”.
2.
Select Select Item Type > Calculate.
3.
On the B. Responding tab, press the Formula Builder button. The Formula Builder window will appear.
4.
Check Sum of responses.
5.
Choose clean from the first pull-down menu.
6.
Choose and from the second pull-down menu.
7.
Choose checkout from the third pull-down menu.
8.
Click OK.
9.
Click on the C. Routing tab to route the responses to the correct places.
Count of Responses
The Count of Responses option on the Formula Builder window works similarly to the Sum of Responses
option, except that it counts the number of items that were answered rather than adding together their numerical
values.
Advanced Formula Builder
The Advanced Formula Builder allows you to make sophisticated formulas tailored to your exact specifications.
Click the Advanced button in Basic Formula Builder to bring up the Advanced Formula Builder.
68
SmartQ 5.1 Manual
Advanced Formula Builder
The Advanced Formula Builder has several pull-down menus that contain all the elements you need to build your
formula. Select what you need from the appropriate pull-down menu and SmartQ will enter it into the Build
your own Formula bar. When you follow this procedure, SmartQ automatically places commas between each
element of your formula for proper syntax.
Your formula may also contain symbols such as “$” or “@” depending on the type of values and operators you
use. These are a necessary and normal part of the formulas that SmartQ adds in for you automatically when you
use the pull-down boxes to create your formula. As you become more adept at creating formulas you may wish to
type directly into the box.
If you need to erase an element of the formula, use the back and forward arrow buttons as well as the Delete
button. Do not edit the formula in the formula bar directly without the use of these buttons.
The rest of this chapter contains examples of how you can build your own formulas. Unless otherwise specified,
use the pull-down menu to select each element of the formula. Item names and numbers are used in the examples
for clarity, but you can adapt the examples to suit your needs.
Response (Value)
Click the pull-down menu next to Response (Value) to include the
caller’s answer to a particular question in your formula. Almost all
calculations will involve a selection from this menu, as the
subsequent examples will show.
Example
In the first example in this chapter with Basic Formula Builder, we
recalled the response to a previous item (named “location”) in order to branch based on that answer in a later
point in the survey. You can accomplish the same result using Advanced Formula Builder instead of Basic
Formula Builder. In a simple example like this one it makes no difference which method you use. We use the
example here to allow you to see how Advanced Formula Builder works so that you can create more complex
examples later.
1.
Insert or create a new item called “store_calc”.
2.
Select Select Item Type > Calculate.
3.
On the B. Responding tab, click the Formula Builder button. The Formula Builder window will appear.
SmartQ 5.1 Manual
69
Chapter 11 : Advanced Topics: Formula Builder
4.
Click the Advanced button.
5.
Select Response (Value) > location (the item name will only appear if it has already been created). SmartQ
will automatically enter your selection into the formula box at the top of the screen.
6.
When you are finished using Advanced Formula Builder, click Save.
7.
Click OK in the Formula Builder window to close it.
8.
You can now route callers based on their answers using the C. Routing tab.
Text or Number
If you want to enter text or numbers, enter them into the Text or
Number box and click the > button to enter it. This is the only
exception to the pull-down menu format. SmartQ will automatically add quotes to anything you enter into the
Text or Number box (unless it is a number, which does not require quotes).
TIP: It is important to use this box (instead of just inserting the cursor and typing in the formula box) because
SmartQ will add the proper syntax (quotes and commas) to make your formula work correctly.
Example
One of your previously created items, named “visits”, asks how many times the caller visits a clinic in a typical
month. You wish to multiply the answer to this item by 12 to get an idea of how many times they visit in a year.
1.
Insert or create a new item called “visit_calc”.
2.
Select Select Item Type > Calculate.
3.
On the B. Responding tab, click the Formula Builder button. The Formula Builder window will appear.
4.
Click the Advanced button.
5.
Select Response (Value) > visits (the item name will only appear if it has already been created). SmartQ will
automatically enter your selection into the formula box at the top of the screen.
6.
Select Math Operators > * (for multiplication). SmartQ will automatically enter it into the formula box at
the top of the screen.
7.
Enter “12” into the Text or Number box and click the > button to enter it into the formula box at the top of
the screen.
8.
“$visits,*,12” should now appear in the formula box at the top of the screen. To avoid erasing essential parts
of the formula, use the back and forward arrows underneath the formula box as well as the delete button to
highlight and delete parts of a formula if you make a mistake.
9.
When you are finished using Advanced Formula Builder, click Save. Next, click OK in the Formula Builder
window to close it.
10.
You can now route callers based on a previous answer using the C. Routing tab.
Math Operators
Math operators provide functions for addition, subtraction, multiplication,
division, the modulus operator (%), floor, and randomization. SmartQ will
perform the operations as it reads the formulae, although operations are
executed in the order in which they are encountered rather than according to
any order associated with the symbols (for example, “5,+,20,*,4” is
interpreted as 25*4=100, not 5+80=85)
You can use parentheses to specify the order in which the formula is parsed. The above formula could be written
as “5,+,(,20,*,4,)” to agree with the order of precedence recognized by most modern computer languages. You
will still need to use the pull-down menus to enter your commands to avoid making syntax errors.
70
SmartQ 5.1 Manual
Advanced Formula Builder
If a formula divides by zero, the result will be zero no matter what was being divided. No error condition will
result.
Example
You wish to add up a set of scores from three previously created items (named “speed”, “quality”, and “service”)
and divide them by the number of questions asked (3).
1.
Insert or create a new item called “satisfaction_calc”.
2.
Select Select Item Type > Calculate.
3.
On the B. Responding tab, click the Formula Builder button. The Formula Builder window will appear.
4.
Click the Advanced button.
5.
Build the formula
$speed,+,$quality,+,$service,/,3
TIP: How to build the formula
• $speed, $quality and $service are under Response (Value).
• + and / are Math Operators.
• Enter “3” into the Text or Number box.
6.
When you are finished using Advanced Formula Builder, click Save.
7.
Click OK in the Formula Builder window to close it.
TIP: Other Math Operators
The modulus operator (%) will divide and retain only the remainder. Example: 12345,%,100 will result in
45 in the database. (12345/100 is 123 with a remainder of 45.)
The floor operator will round down a floating-point number. Example: 1.6, FLOOR will give you 1. The
random operator will generate a random number. Example: 1, RANDOM, 6 results in a random number
between 1 and 6.
Response (Exists)
The Response (Exists) operation allows you to determine whether or not a caller answered a question. It will
automatically return a value of 1 if there is data present and 0 if there is no data for that item.
Example
If you wanted to do the same example as above (under Math Operators) but make it slightly more sophisticated,
you could add Response (Exists) to the formula. Let’s say that you wish to add up a set of scores from three
previously created items dealing with customer satisfaction (named “speed”, “quality”, and “service”) and then
divide them by the number of questions answered (you don’t want to divide by 3 if only 2 of the questions were
answered).
In this example, we set up two items with different calculations. First, we determine how many questions were
answered. Then we take the answer to each question and divide it by the previous answer (the number of
questions answered).
1.
Insert or create a new item called “satisfaction_calc”.
2.
Select Select Item Type > Calculate.
3.
On the B. Responding tab, click the Formula Builder button. The Formula Builder window will appear.
4.
Click the Advanced button.
5.
Build the formula
SmartQ 5.1 Manual
71
Chapter 11 : Advanced Topics: Formula Builder
@speed,+,@quality,+,@service
TIP: How to build the formula
• @speed, @quality and @service are under Response (Exists).
• + is a Math Operator.
6.
When you are finished using Advanced Formula Builder, click Save.
7.
Click OK in the Formula Builder window to close it.
8.
Insert or create a new item called “satisfaction_calc2”
9.
Select Select Item Type > Calculate.
10.
On the B. Responding tab, click the Formula Builder button. The Formula Builder window will appear.
11.
Click the Advanced button.
12.
Build the formula
$speed,+,$quality,+,$service,/,$satisfaction_calc
TIP: How to build the formula
• $speed, $quality, $service and $satisfaction_calc are
under Response (Value).
• + and / are Math Operators.
13.
When you are finished using Advanced Formula Builder, click Save.
14.
Click OK in the Formula Builder window to close it.
Call Information
Call Information includes statistics on the call such as the port the call
came in on, the time and date of the call or the amount of time spent
on a survey. The pull-down menu shows the friendly version of what
will appear in the actual formula.
72
Friendly Name (listed in pull-down menu)
Item Name (as it will appear in formula)
Port (Phone line)
$CALLPORT
Date of Call
$CALLDATE
Time of Call
$CALLTIME
Lead Survey Name
$LEADNAME
Lead Survey Duration
$LEADMINS
Response Survey Name
$RESPNAME
Response Survey Duration
$RESPMINS
SmartQ 5.1 Manual
Advanced Formula Builder
DID/DNIS digits
$DIDDIGITS
Caller ID info
$CALLERID
Time Operators
Time operators add and subtract units of time.
Example
You call clients back for a follow-up interview four months and two weeks
after the day they take your SmartQ survey. You want to store that exact date
in the database so it is easy to see when you need to call clients back.
1.
Insert or create a new item called “callback_calc”.
2.
Select Select Item Type > Calculate.
3.
On the B. Responding tab, click the Formula Builder button. The Formula Builder window will appear.
4.
Click the Advanced button.
5.
Build the formula
$CALLDATE,+MONTHS,4,+WEEKS,2
TIP: How to build the formula
• $CALLDATE is under Date of Call from the Call Information menu.
• +MONTHS and +WEEKS are Time Operators.
• “4" and "2" are entered with the Text or Number box.
6.
When you are finished using Advanced Formula Builder, click Save.
7.
Click OK in the Formula Builder window to close it.
TIP: Other Time Operators
You can add a date and an integer:
"11/14/2012",+WEEKS,1
results in the date: 11/21/2012.
You can find the difference between two dates:
"11/14/2012",-WEEKS,"11/7/2012"
results in the integer: 1
You cannot combine the elements in other ways (you cannot add a date to a date). To subtract a
number of months, weeks, etc, from a date, add a negative number:
"11/14/2012",+WEEKS,-2
results in the date: 10/31/2012
SmartQ 5.1 Manual
73
Chapter 11 : Advanced Topics: Formula Builder
Logic Operators
Example
Your first item “age” includes the question “Please enter your age.” You
want to route callers to different questions based on their ages. If you want
to route callers starting with the subsequent question, you can use the
Routing tab as usual.
However, let’s say you want to route callers based on that question, but not until later in the survey. You ask the
age, then you have a set of questions you want everyone to answer, then you route to a particular set of questions
for those under 15 and another set of questions for those 15 and over.
1.
Insert or create a new item called “age_calc” at the point where you want to begin routing callers.
2.
Select Select Item Type > Calculate.
3.
On the B. Responding tab, click the Formula Builder button. The Formula Builder window will appear.
4.
Click the Advanced button.
5.
Build the formula
IF,$age,<,15,THEN,0,ELSE,1,ENDIF
TIP: How to build the formula
• IF, <, THEN, ELSE, and ENDIF are Logic Operators.
• $age is under Response (Value).
• "15", "0", and "1" are entered with the Text or Number box.
6.
When you are finished using Advanced Formula Builder, click Save.
7.
Click OK in the Formula Builder window to close it.
TIP: Other Logic Operators
You can either build an IF…THEN…ELSE…ENDIF statement or an IF…THEN…ENDIF statement.
ELSE is not a required part of the syntax, but all the other elements (including ENDIF at the end)
are required.
Text Operators
Example
Your callers enter a 10-digit code at the beginning of the survey as a response
to an item named “code”. This number breaks down into smaller parts: the
first 3 digits signify the county, the next 3 signify the city, and the last four
digits signify the hospital.
1234567890
county city hospital
You are interested in isolating the city code for a later calculation. The following calculations are set up so that if
a caller enters “1234567890”, you can isolate “456”, the city code. The first part of the calculation isolates the
leftmost six numbers, “123456”. The next part of the calculation takes the number from the first part and isolates
the rightmost three numbers, giving you your desired numbers 456.
74
1.
Insert or create a new item called “code_calc”.
2.
Select Select Item Type > Calculate.
SmartQ 5.1 Manual
Advanced Formula Builder
3.
On the B. Responding tab, click the Formula Builder button. The Formula Builder window will appear.
4.
Click the Advanced button.
5.
Build the formula
$code,LEFT,6,RIGHT,3
TIP: How to build the formula
• $code is under Response (Value).
• LEFT and RIGHT are Text Operators.
• "6" and "3" are entered with the Text or Number box.
6.
When you are finished using Advanced Formula Builder, click Save.
7.
Click OK in the Formula Builder window to close it.
TIP: Other Text Operators (See the Quick Reference Guide)
& is another useful string operator. It concatenates numbers,
or strings them together without adding. For example, the
formula 1,&,1 will return "11" not "2".
Current Date/Time
To use the Current Date/Time in your calculation, choose one of the
appropriate unit of time from the pull-down menu. This feature is
most often used with the Inform Data prompt (with item type
Query) to read back the date to a caller.
Example
You want to place an Inform prompt after your Introduce prompt so that the caller hears “Welcome to our Survey.
The time is 11:35 AM on January 1, 2010” (with the real time calculated and read back to the caller).
“The time is” can be recorded as the First Inform Prompt and “11:35 AM” can be calculated and read back using
First Inform Data. “On” is recorded as the Second Inform Prompt and “January 1, 2010” is calculated and read
back using Second Inform Data. The item that currently contains your introduction is called “welcome”.
1.
Select the previously created item called "welcome". Inform prompts do not record data, so you can set them
up as part of an existing Item.
2.
Select Select Item Type > Query.
3.
On the A. Recording tab, click on the First Inform Prompt. Type “The time is” in the Script box and record
the prompt.
4.
Click on First Inform Data.
5.
Select Select Data Type > Date.
6.
Click the Formula Builder button. The Formula Builder window will appear.
7.
Click the Advanced button.
8.
Build the formula
HOUR,&,":",&,MINUTE
SmartQ 5.1 Manual
75
Chapter 11 : Advanced Topics: Formula Builder
TIP: How to build the formula
• HOUR and MINUTE are under Current Date/Time.
• & is a Text Operator.
• : is entered with the Text or Number box.
9.
When you are finished using Advanced Formula Builder, click Save.
10.
Click OK in the Formula Builder window to close it.
11.
Click on the Second Inform Prompt. Enter “on” into the Script box and record the prompt.
12.
Click on Second Inform Data.
13.
Select Select Data Type > Date.
14.
Click the Formula Builder button. The Formula Builder window will appear.
15.
Click the Advanced button.
16.
Build the formula
MONTH,&,"/",&,DATE,&,"/",&,YEAR
TIP: How to build the formula
• MONTH, DATE and YEAR are under Current Date/Time.
• & is a Text Operator.
• / is entered with the Text or Number box.
17.
When you are finished using Advanced Formula Builder, click Save.
18.
Click OK in the Formula Builder window to close it.
Prefix Operators
There are two options under Prefix Operators, ~F~ and ~P~. Both of
these operators must be used in conjunction with the item type Retrieve
because they refer to past surveys. Past surveys are only made available
after Retrieve finds them.
~F~ is the signal for SmartQ to look for the value of the query in the first survey rather than the value from the
current survey.
~P~ is the signal for SmartQ to look for the value of the query in the most recent (previous) survey rather than
the value from the current survey.
Example
The prefix operators may be used in formulas constructed at any point in the survey after the retrieval has been
performed. (If you retrieve something once, that information can be used for all subsequent calculations in the
survey.)
The prefix operators can also be used to route the results of the Retrieve item.
Examples of both of these can be found under the section about Retrieve.
76
SmartQ 5.1 Manual
Advanced Formula Builder
External Operators (Advanced)
SmartQ has the ability to call functions in a registered
COM DLL. This feature allows the SmartQ user to create
specialty functions (typically created through Visual
Basic®) customized for unique projects.
The syntax is:
XXXX.xxxxx,DLL,yyyy,FUNCTION,zzzzz,RUN
Where XXXX.xxxx is the qualified name of a class in the DLL, yyyy is the name of the desired function, and
zzzz is the argument to be passed to the function. (If you hover your mouse over the External Operators menu
the Tooltip associated with calling External Operators will display the command syntax.)
The External Operator function would be useful in a situation where the user has an existing DLL component that
is currently used with other software, or in a situation that requires a tremendously complex calculation, beyond
the capacity of the Formula Builder.
TIP: To create your own DLL from a template, select External Operators > [Show Sample Code]. From
there, you can simply copy and paste the necessary format and adapt or add to it in order to meet
Tips and Tricks
Quotes and Commas
SmartQ automatically enters quotes and commas correctly if you are using the pull-down menus or the Text or
Number box to enter your formula. In general, every element of the formula needs a comma between it and the
next element of the formula. The only exception includes the prefix modulators, which attach to the following
element without a comma.
Quotes are automatically added if you enter text into your formula using the Text or Number box. If you enter a
number, quotes are not necessary so they are not automatically added.
Entering Times and Dates
In Formula Builder, time should take the form
HOUR,&,":",&,MINUTE
In Formula Builder, dates should take the form
MONTH,&,"/",&,DATE,&,"/",&,YEAR
Formula Tester
The Advanced Formula Builder dialog has a Test button to ensure
your formulas are working the way you expect them to work.
1.
When you are using Advanced Formula Builder, click the Test
button.
2.
If there are any syntax errors, SmartQ will bring them to your
attention.
3.
The Formula Tester window will appear. The Variables appear in
the left hand column.
4.
Click in the right hand column labeled Test Value to fill in a test
value for each variable. The variables are the parts of your formula
the caller provides as he or she answers questions, so enter in test
values that the caller might enter.
SmartQ 5.1 Manual
77
Chapter 11 : Advanced Topics: Formula Builder
5.
Click Test. The result will appear in the Result box.
If the result is not what you expected, check your formula for errors and test it until it works properly. Click the
OK button to return to the Advanced Formula Builder window.
Quick Reference Guide to Symbols in Formula Builder
Symbol
Category
Usage Details
Example
-
Math
Operator
Place a - between the numbers
you wish to subtract.
12345,-,100
Result:12245
%
Math
Operator
Divides and retains only the
remainder.
12345,%,100
Result: 45 (12345/100 is 123 with a
remainder of 45.)
(modulus
operator)
&
(concatenation
operator)
Place % between a number, and
the number you wish to divide by.
Text
Operator
Concatenates numbers (joins
them together as text).
1,&,1
Result: 11
Place & between two values you
wish to string together.
$concern,&, $budget
Logic
Operators
Used to affect order of execution.
Values are resolved in innermost
parentheses first.
5,-,(,3,-,2,)
Result: 4 (not 0)
*
Math
Operator
Place a * between the numbers
you wish to multiply.
12345,*,100
Result: 1234500
/
Math
Operator
Integer division: place a /
between the numbers you wish to
divide.
18,/,6
Result: 3
(,)
(Parentheses)
5,/,2
Result: 2
Refers to the first or most recent
(previous) survey value. Enter
~F~ followed by the Item you
want from the first survey, or ~P~
for the previous survey.
~F~$score
Math
Operators
Place a + between the numbers
you wish to add.
12345,+,100
+DAYS
+WEEKS
+MONTHS
+YEARS
+HOURS
+MINUTES
+SECONDS
(future date
operators)
Time
Operators
Add a date and an integer to find
a date. Enter a number or Item
first, then the operator, then the
number you wish to add.
"11/14/2002",+WEEKS,1
Result: 11/21/2002.
<
Logic
Operators
~F~ ~P~
(first and
previous call
operators)
+
(Less than)
78
Prefix
Operators
~ P~$CALLDATE
Result: 12445
“2:00PM”, HOURS, 3
Result: 5:00PM
Returns true if left operand is less
than right operand.
IF,1,<,2,THEN,”True”,
ELSE,”FALSE”,ENDIF
Result: “True”
SmartQ 5.1 Manual
Advanced Formula Builder
Quick Reference Guide to Symbols in Formula Builder
=
(Equals)
>
(Greater than)
Logic
Operators
Logic
Operators
Returns true if left operand value
is the same as the right operand
value. For text values, case does
not matter.
IF,1,=,1,” True”,
ELSE,”False”,ENDIF
Result: “True”
Returns true if left operand is
greater than right operand.
IF,2,>,1,”True”, THEN,
ELSE,”FALSE”,ENDIF
Result: “True”
“a”,=,”A”
Result: 1
IF,$answer,>,0,”True”,
ELSE,”False”,ENDIF
AND
Logic
Operators
Used to combine logic tests.
IF,(,1,=,1,),AND,(,2,=,
2,),THEN,”True”,ELSE,
”False”,ENDIF
Result: “True”
APPLYMASK
Text
Operators
Inserts characters into a string.
Place APPLYMASK between a
string and a mask to apply.
$ENTERDATE, APPLYMASK,
“??/??/????”
Result: “12/31/2008” if user enters
“12312008”
CASEEQUALS
Text
Operators
Compares two strings with case
sensitivity. Numbers and
symbols are acceptable.
"Cat",CASEEQUALS,"cat"
Result: 0
"CAT",CASEEQUALS,"CAT"
Result: 1
"*#9",CASEEQUALS,"*#9"
Result: 1
COPYFILE
-DAYS
-WEEKS
-MONTHS
-YEARS
-HOURS
-MINUTES
-SECONDS
(date
difference
operators)
SmartQ 5.1 Manual
Text
Operators
Time
Operators
Copies a file on the hard disk with
one name and location to
another. Formulas can be
evaluated, but the right side must
be enclosed in parenthesis
because of precedence rules.
“oldfile.txt”,COPYFILE,
“newfile.txt”
Use to subtract a date from a
date to find an integer. Enter a
number or Item first, then the
operator, then the date or Item
you wish to subtract.
"11/14/2002",-WEEKS,
"11/7/2002"
Result: 1
“C:\MyFiles\”,&,$DocID,
&, ”.txt”,COPYFILE,(,
”C:\FaxOutFiles\”,&,$FaxNum,
&,”.txt”,)
79
Chapter 11 : Advanced Topics: Formula Builder
Quick Reference Guide to Symbols in Formula Builder
DLL
FUNCTION
RUN
[Show sample
code]
External
Operators
[Custom
only]
Invokes a function in an external
Visual Basic COM dll that you
create. Returns the value that
your function returns. To see
sample Visual Basic code,
choose [Show sample code] from
the pulldown box.
Syntax: '"DLLName.ClassName",
DLL,"MyFunctionName",
FUNCTION,params,RUN
Example:
"MyDll.MyIVRClass",DLL,
"CustomerPasswordForID",FUNC
TION,"369158",RUN
Result: The function call
CustomerPasswordForID(
"369158") is run synchronously by
your DLL, and the result is passed
back to SmartQ as the result of this
calculation.
FLOOR
Math
Operators
Rounds down a floating-point
number to the nearest integer.
1.6, FLOOR
Result: 1
Place FLOOR after a floatingpoint number.
FORMAT
IF,THEN,ELSE
,ENDIF
Text
Operators
Flow Control
(Conditional
classifier)
Used to convert a string to a
format you specify. All Visual
Basic string formats are
supported. Place FORMAT
between a string and the format
to convert it to.
"June 6 2002", FORMAT,
"GENERAL DATE"
Result: 6/6/2002
Performs a Boolean test on what
exists between the ‘IF’ and
‘THEN’ statements. If the test
passes (resolves to TRUE),
whatever is between the next
‘THEN’ and the following ‘ELSE’
or ‘ENDIF’ is returned. If the test
fails (does not resolve to TRUE),
execution of the formula resumes
following the next ‘ENDIF’, or
‘ELSE’ statements.
Tests are performed by invoking the
following Logic Operators
(Boolean: 0 =True, 1=False)
INLIST
Text
Operators
0.97,FORMAT,"percent"
Result: 97.00%
IF,1,THEN,”
True”,ELSE,”False”,ENDIF
Result: “True”
IF,0,THEN,”
True”,ELSE,”False”,ENDIF
Result: “False”
ELSE is optional. If there is no
ELSE and the condition is false,
the result is blank (zero-length)
IF,0,THEN,1,ENDIF
Result: Nothing
Checks whether a value is
contained in a comma-delimited
list of values and ranges. List
must be in quotes!
3,INLIST,"1,2,4,5"
Result: 0
15,INLIST,"9,10,14-15,99"
Result: 1
"Bean",INLIST,"Ant, Be-Bz"
Result: 1
80
SmartQ 5.1 Manual
Advanced Formula Builder
Quick Reference Guide to Symbols in Formula Builder
INSTRING
INFILE
Text
Operators
(search
operators)
INRANGE
ISALPHA
ISNUMERIC
ISFILE
Math
Operators
Text
Operators
Text
Operators
Search for a string in a string, file,
or range. Returns 1 for true, 0 for
false. Place the operator between
the string to be searched and the
string to find.
123,INSTRING,23
Result: 1
Place INRANGE between a
constant and a range, or between
two ranges. Result will be 1 if the
first parameter is entirely within
the range of the second
parameter.
“5”, INRANGE,“1-5”
Result: 1
Used to check if a string contains
only alpha or only numeric
characters. Place ISALPHA or
ISNUMERIC after a string to be
checked. Returns 1 for true, 0 for
false. “Alpha” means upper or
lower case letters, including
international letters but not space
(“ “), numbers or punctuation.
“test”, ISALPHA
Result: 1
Search for a file on the hard disk
or network. Returns 1 if found, 0
if not found. If path is a directory,
it must have a trailing backslash
(\). Returns 1 if it contains files, 0
if empty or not found.
"C:\WINNT\",ISFILE
Result: 1, because files exist within
c:\winnt
“test”,INFILE,
“myfile.txt”
Result: 1 if found, 0 if not
“1-5”, INRANGE, “4-10”
Result: 0
“test”, ISNUMERIC
Result: 0
"C:\WINNT",ISFILE
Result: 0 because folder does not end
with trailing backslash
"C:\MyFile.txt",ISFILE
Result 1 if file exists, 0 if not
LEFT
RIGHT
Text
Operators
RIGHTFROM
Returns the leftmost or rightmost
characters you specify. Place
LEFT or RIGHT between a text
segment (or “string”) and the
number of digits you wish to
keep.
12345,LEFT,2
Result: 12
12345,RIGHT,2
Result: 45
45678, RIGHTFROM, 2
Result: 5678
12345, RIGHTFROM, 3, LEFT, 1
Result: 3
LENGTH
Text
Operators
Returns the length of a string.
Place LENGTH after a string
“test”, LENGTH
Result: 4
LOOKUP
Text
Operators
Looks up a key value in a text file
containing key-value pairs. Place
LOOKUP between the key and
the file to be searched.
1, LOOKUP,“myfile.txt”
Result: The associated value for the
SmartQ 5.1 Manual
key 1 in myfile.txt
81
Chapter 11 : Advanced Topics: Formula Builder
Quick Reference Guide to Symbols in Formula Builder
MIN
MAX
Text
Operators
Returns the minimum or
maximum of two values. If both
strings are numeric, their values
are compared. Otherwise strings
are compared as ASCII values.
9,MIN,100.1
Result: 9
"A",MIN,"a"
Result: "A"
"abc",MIN,"abcd"
Result: "abc"
"[",MIN,"a"
Result: "["
"[",MIN,"A"
Result: "A"
NTHTOKEN
Text
Operators
Parses a comma-delimited string,
and returns a chosen token from
the string.
"These,are,4,tokens",
NTHTOKEN,2
Result: "are"
OR
Logic
Operators
Used to combine logic tests.
IF,1,=,1,OR,1,=,2”
True”,ELSE,”False”,ENDIF
Result: “True”
RANDOM
Math
Operators
Gives a random number between
two integers. Place RANDOM
between two integer values. The
values must be between -32,768
and 32,768, but order does not
matter.
1, RANDOM, 6
Result: random between 1 and 6
REMOVECHARS
Text
Operators
Removes characters. Place
between a string and the
character you want to remove.
45678,REMOVECHARS,6
Result: 4578
“ABACAD”, REMOVECHARS, ”A”
Result: BCD
REORDER
Text
Operators
Reorders the string. Place
REORDER between a string to
be ordered and a string to specify
the order.
“ABCD”, REORDER, “4321”
Result: “DCBA”
WRITETOFILE
Text
Operators
Writes a string to the end of a file.
Creates the file if it does not exist.
Does not erase the current
contents – just adds to the end,
with a carriage return. Returns 1
if successful, 0 if not.
"Some text", WRITETOFILE,
"c:\myfile.txt"
Result: 1. Creates c:\myfile.txt if
it didn't exist already.
"My lost text", WRITETOFILE,
"c:\invalidfilename***"
Result: 0
82
SmartQ 5.1 Manual
Chapter 12
Advanced Topics: Setting up Retrieval of Data for
Calculations
Overview of Retrieval
The Retrieve item type allows you to access data from previous surveys. It will retrieve data from the first survey
taken by the caller and the most recent survey taken by the caller. Once retrieved, this information is available for
the rest of the call. This is useful for different purposes:
• Route a caller to a specific set of questions based on an answer to a previous survey
• Use information from a previous survey in a calculation
The Retrieve item type is easy to use: you specify criteria for lookup and SmartQ will search through past
surveys for a match. Whether the data was in the first survey taken by the user or the most recent, the information
will be made available to you in the current survey. You will know if SmartQ was successful in finding past
surveys because there will be a value of 1 in the database field if the Retrieve item was successful.
If SmartQ does not find any information (because either no previous survey exists or the caller did not answer
any of the questions you wished to match), a value of 0 will be stored in the database field. The survey
information will not be available for later routing or calculations.
The values 1 and 0 are especially important for routing, as you will see in the following instructions.
TIP: Once you retrieve data from a previous survey, that information can be used for all subsequent
calculations in the current survey.
SmartQ 5.1 Manual
83
Chapter 12 : Advanced Topics: Setting up Retrieval of Data for Calculations
Retrieve Information from Previous Surveys
1.
Create or insert an item.
2.
Select Select Item Type > Retrieve.
3.
Select the B. Responding tab.
4.
Click Retrieve Data for Calculations.
5.
In the first column under Retrieve only where:, tell SmartQ what
field to look at when searching through past surveys.
6.
Select Current Call Data to look for past surveys with the same field
entry as the current caller. For instance, if you always want to bring up
the current caller's most recent survey, you would specify ID or code
(the item containing the caller’s unique identifying information) and
then you would check Current Call Data. The box in between lets
you specify if the value of the item you find should be equal to, less
than, etc. the value of the same item in the current caller's survey.
7.
Select Other Value if you want to find surveys with a specific value that may not be the same as that
particular item in the current survey. For instance, you may want to look up the first survey where the caller
entered "4" as an answer to a particular question, regardless of what they answer during this call. In that case,
you would simply check Other Value and enter the number "4" into the text box.
8.
Select on the C. Routing tab.
9.
Retrieve returns either a value of 1 or a 0 to its own database field. Route 1 (information was found) and 0 (no
information was found) to Next if you want to continue on with the survey or make a calculation in the next
item. You could also branch at this point, routing 1 to the survey questions you want to ask if the caller has
taken the survey before and 0 to questions for a new caller.
If SmartQ finds information, it stores a value of 1 in the database and makes the information available for use. If
the information does not exist, it stores 0 in the database.
Advanced Examples
Retrieve and Calculate
The first item in your lead survey asks for an identification number and is called “id”. In the response survey, you
ask five questions. The last item in the response survey is called “score” and averages the answers to the five
questions. Now you want to retrieve the last survey taken by the caller to calculate and store in the database the
caller’s change in score.
The first step is to retrieve the last survey from the database that has the same ID number as the current caller’s
ID. Then the caller will be routed so that the survey continues and the information is calculated.
84
1.
Insert or create an item in the response survey. Name it “id_retrieve”.
2.
Select Select Item Type > Retrieve.
3.
Select the B. Responding tab.
4.
Under 1.Retrieve only where: use the pull-down menu to select id.
5.
Use the pull-down menu to select =, and select Current Call Data.
6.
On the C. Routing tab, route 0 to Next Item. Route 1 to Next Item.
7.
Click on the Apply Now button.
8.
The next step is to set up a calculation to tell SmartQ what to do if a score is found or not found.
9.
Insert or create the next item. Name it “change_score”.
SmartQ 5.1 Manual
Advanced Examples
10.
Select Select Item Type > Calculate.
11.
On the B. Responding tab, click the Formula Builder button. The Formula Builder window will appear.
12.
Click the Advanced button.
13.
Using Advanced Formula Builder, build the formula:
IF,~F~$score,=,"",THEN,0,ELSE,1,ENDIF
TIP: How to build the formula
•
•
•
•
•
•
IF, THEN, ELSE, and ENDIF are Logic Operators.
~F~ is a Prefix Operator.
$score is under Response (Value).
"0" and "1" are entered with the Text or Number box.
"" is entered with the Text or Number box by simply pressing the > button.
= is a Logic Operator.
14.
When you are finished using Advanced Formula Builder, click Save.
15.
Click OK in the Formula Builder window to close it.
16.
On the C. Routing tab, route 0 to Goodbye. Route 1 to Next Item.
The final step is to calculate the change in score.
TIP: ~F~ is the signal for SmartQ to look for the value of the query in the first survey rather than use
the value from the current survey.
~P~ is the signal for SmartQ to look for the value of the query in the most recent (previous) survey.
17.
Insert the next item. Name it “calc_score”.
18.
Select Select Item Type > Calculate.
19.
Under Construct Item, select the B. Responding tab.
20.
Click on the Formula Builder button to bring up Formula Builder.
21.
Click the Advanced button.
22.
Using Advanced Formula Builder, build the formula:
$score,-,~F~,$score
TIP: How to build the formula
• $score is under Response (Value).
• - is a Math Operator.
• ~F~ is a Prefix Operator.
23.
When you are finished using Advanced Formula Builder, click Save.
24.
Click OK in the Formula Builder window to close it.
Using Formula Builder within Retrieve
The first item in your lead survey asks for an identification number and is called “id”. The response survey
contains a question called “concern”. It asks the following question:
“Which of the following issues is of the greatest concern to you in this election right now? Press 1 for Healthcare
or 2 for the Economy.”
SmartQ 5.1 Manual
85
Chapter 12 : Advanced Topics: Setting up Retrieval of Data for Calculations
You want callers to be routed based on their answer to “concern” unless they have already taken the survey.
SmartQ can look up the id of the caller and see if it is already in the database. If it is, you can route the caller to a
different set of questions.
1.
Insert or create an item in the response survey. Name it “id_retrieve”.
2.
Select Select Item Type > Retrieve.
3.
Select the B. Responding tab.
4.
Under 1. Retrieve Only Where, use the pull-down menu to select id.
5.
Use the next pull-down menu to select =, then select Current Call Data.
6.
Select 2. Route Using: > Other Value or Formula.
7.
Click the Formula Builder button.
8.
Click the Advanced button.
9.
Build the formula:
$concern,&,$id_retrieve
TIP: How to build the formula
• $concern and $id_retrieve are under Response (Value).
• & is a Text Operator.
& is a text operator that joins text together. The possible answers for the item "concern" are "1" (healthcare most
important) or "2" (economy most important). The possible answers for the item "id_retrieve" are "0" (no previous
survey found) or "1" (previous survey found). Consequently, all the possible results will be:
•
•
•
•
10 = healthcare most important & no previous survey found
20 = economy most important & no previous survey found
11 = healthcare most important & previous survey found
21 = economy most important & previous survey found
10.
When you are finished using Advanced Formula Builder, click Save.
11.
Click OK in the Formula Builder window to close it.
12.
On the C. Routing tab, route 10, 20, 11 and 21 to the appropriate places. For this example, route 10 to a later
item called “ed_stand”, 20 to a later item called “health_stand”, and 11 to an item called “still_agree” and 21
to the same item called “change”.
To complete the example, the items referenced might be the following:
13.
86
•
ed_stand: “Do you think there is enough attention focused on healthcare issues in this election?
Enter 1 for yes, 2 for no.”
•
health_stand: “Do you think there is enough attention focused on the economy in this election?
Enter 1 for yes, 2 for no.”
•
change: “Has the issue most important to you received more attention since you last took this survey
one month ago? Enter 1 for yes, 2 for no.”
Click on the Apply Now button.
SmartQ 5.1 Manual
Chapter 13
Advanced Topics: Setting up Retrieval of Open-End
Responses
Overview
If you have created open-end responses items in your response surveys, there are two methods for enabling users
to listen and transcribe them:
• Data Screen: the user has direct use of the computer on which the database is stored and plays back messages
using SmartQ
• Telephone Play-back: the user(s) call in from remote locations and listen to the messages played back to
them.
The advantages of each type of access and play back are described below:
Data Screen
Telephone
Allows saving, deleting, and flagging messages for priority.
Must be heard at the
computer where SmartQ is
installed.
Can be heard from any touchtone telephone.
Can see data in context with
the rest of the response data
for that call.
Can be configured to present a filtered subset
of the messages, such as comments only
from certain sites.
Can transcribe calls and
save text directly to
database.
Hands-free message presentation.
Can be set up with password protection.
IMPORTANT: SmartQ will discard messages that contain only silence.
SmartQ 5.1 Manual
87
Chapter 13 : Advanced Topics: Setting up Retrieval of Open-End Responses
Listen to Open-End Responses: Data Screen
1.
Click on the Data button to view the Data Screen.
2.
Select the survey with the open-end responses you wish to hear.
3.
All of the items in your survey should appear on the
screen with their associated data values displayed. Click
the data box next to the open-end response item. Select
Transcribe Open-Ends from the pop-up screen.
4.
The Edit Open-Ends dialog box will appear. To hear the
message, press the Play button. If you wish to play only
those open-end responses that meet specific
requirements, check the desired boxes under Show Only
Selected Items. Options include:
5.
•
Flagged Responses
•
Unheard Responses
•
Saved Responses
•
Deleted Responses
•
Transcribed Responses
•
Untranscribed Responses
You can mark each message you hear with one of the following buttons:
•
Flag
•
Mark as Unheard
•
Mark as Heard
•
Delete
6.
If you wish to transcribe the message, enter it in the Transcription box.
7.
Click the Previous or Next buttons to go to same item in other surveys (i.e. to hear other callers’ open-end
responses to the same question). The First and Last buttons will allow you to jump to the first and last
surveys containing the same item.
TIP: Shortcuts include:
• Control-Shift-Return starts or stops playing message (same as pressing the Play/Stop button)
• Control-Return moves to the next record (same as pressing the Next button)
• Shift-Return moves to the previous record (same as pressing the Previous button)
Listen to Open-End Responses: Telephone Play-back
You can also listen to open-end responses stored by SmartQ from any touchtone telephone. After you have set up
lead and response surveys for callers, you can add the capability to listen to the open-end responses.
In a typical survey design, a lead survey collects information about the caller and routes them to the appropriate
response survey where they will answer survey questions. For example, in this diagram the lead survey prompts
callers to enter site IDs. Callers are then routed to the appropriate survey based on their answer.
The lead survey can also be used to allow call managers access to a hidden menu that lets them hear and organize
their messages. For example, you might set up a survey structure similar to the example below:
88
SmartQ 5.1 Manual
Set Up a Survey to Retrieve Open-End Responses
Lead Survey:
"Enter Site ID"
(99)
Response Survey:
RetrieveFeedback
"Enter Password"
Retrieval: Open-end
responses
Delivers Open-end
responses
01
02
Response Survey: Site01
Questions for survey
Response Survey: Site02
Questions for survey
end
end
end
To accomplish this, set the site ID item on your lead survey to also accept an input (“99” in this example) that
will route to the retrieval item, but do not record in the prompt that the option to hear open-end responses exists.
You can safely distribute a number that will not be entered by a survey-taker (like “99”) to those who will call in
to hear open-end responses. Instruct the staff to enter the access number at any time during the first prompt to
hear the open-end responses.
Set Up a Survey to Retrieve Open-End Responses
1.
Add New Survey. Name it something that will remind you of its
purpose, such as “RetrieveFeedback”.
2.
Add an item. Name it something that will remind you of its
purpose, such as “Retrieve_All”.
3.
Select Select Item Type > Retrieve.
4.
Select the Responding tab.
5.
Click Spoken Responses.
6.
Under Select Survey, select the survey that contains the responses
you would like to make available.
7.
The Select Open-End Item(s) box contains all items that are
open-end responses. Use the checkbox next to each item to
indicate the responses you would like to make available.
SmartQ 5.1 Manual
89
Chapter 13 : Advanced Topics: Setting up Retrieval of Open-End Responses
8.
Under Presentation, select whether you would like the Message ID and the Time and Date to play with the
rest of the open-end response.
9.
Click the Apply Now button to save these settings. Either continue with advanced options or simply click on
the Routing tab to route callers to the “End” item.
Make the Survey Available to Callers
Now that you have created the survey, you will want to make it available to certain staff members and hidden
from survey-takers. Distribute the access number that branches to open-end responses only to those who need it.
1.
In the lead survey, click on the first item that contains routing information.
2.
Select the Routing tab.
3.
Choose a number that staff members can enter to access the open-end response survey, such as 99, 9#, or
another combination of keys that a survey-taker would not enter by mistake. Fill in this number and route it to
the open-end response survey that you just created.
4.
Check to ensure that the following settings are correct:
•
On the Recording tab, make sure Allow response during question is checked.
•
On the Responding tab, verify that your code is within the range of the minimum and maximum
digits allowed. If you have a list of Valid Choices make sure that the number you distribute is
included in the list.
What the Caller Will Hear
Once the access number is entered, the open-end responses will play. The following options are also available
during and immediately after playback of open-end responses:
Option
Key
Save Open-End Response as new (Skip)
1
Save Open-End Response as old
2
Delete Open-End Response
3
Rewind 5 seconds
4
Pause
5
Fast forward 5 seconds
6
Hear ID & Time/Date
8
Exit
*
Flag message for priority
#
TIP: Skip will leave current message marked as unheard.
Advanced
Adding Additional Criteria
To add additional restrictions for the open-end responses that are played back, set them using the boxes under
Retrieve Only Where: on the Construct Item screen.
90
SmartQ 5.1 Manual
Advanced
For example, you have an item in one of the response surveys called “feedback” that asks, “Please leave a brief
statement describing the quality of your experience at our office.” The next item, called “callback”, asks “Would
you like a call back from our office? Press 1 for yes. Press 2 for no.” You want to assign someone to listen to all
the open-end responses for people who pressed 1 so that they can be called back immediately and their concerns
can be addressed.
1.
If you do not yet have a survey created to allow retrieval of open-end responses, follow all the steps under Set
Up a Survey to Retrieve Open-End Responses above, checking the box next to the item called “feedback”.
2.
Select Retrieve Only Where: > callback.
3.
Select = in the second pull-down box.
4.
Enter “1” into the third pull-down box.
5.
Click the Apply Now button to save the settings.
6.
You can now continue with other advanced options or simply click on the Routing tab to route callers to the
item named “End”.
Setting Up A Password to Retrieve Open-End Responses
For extra security, you may want to distribute individual passwords along with the hidden access number (99, 9#,
etc.) for retrieval of the open-end responses.
1.
Add an item to your open-end response survey. Call it “password”.
2.
On the Recording tab, record a prompt such as “Enter your password now, followed by the pound sign.”
3.
On the Responding tab, enter the Minimum and Maximum Number of Digits (remembering to include an
extra digit for the pound sign).
4.
Check Reject Invalid Response and list all the passwords distributed as Valid Choices.
5.
Route all responses to next item, or route individuals based on passwords if you wish.
Retrieving Responses from More than one Survey
You must set up separate items if you want to retrieve open-end responses from more than one survey. If you
have different groups of people who are calling and who need to hear different responses (from different surveys
or different items from the same survey) simply route these callers to multiple items set up to retrieve open-end
responses.
For example, in the survey outlined above, some staff members might be monitoring the responses from Site 01
and others might be calling for Site 02. You can repeat this process for as many different response surveys as you
wish.
1.
Add New Survey. Name the survey something that will remind you of its purpose, such as
“RetrieveOpenEnd”.
2.
Add an item. Name it “Site_Choice”.
3.
On the Recording Tab, record a prompt such as “Please enter the Site ID of your institution such as 01 or 02.”
4.
Select the Responding tab and enter “2” for Minimum Digits and “2” for Maximum Digits.
5.
Add an item. Name it “Retrieve_01”.
6.
Select Select Item Type > Retrieve.
7.
Select the Responding tab.
8.
Click Play responses to open-end survey items.
9.
Under Survey, select the response survey for Site 01. Check all the open-end responses that you want to
make available.
10.
Add an item. Name it “Retrieve_02”.
11.
Select Select Item Type > Retrieve.
SmartQ 5.1 Manual
91
Chapter 13 : Advanced Topics: Setting up Retrieval of Open-End Responses
12.
Select the Responding tab.
13.
Click Spoken Responses.
14.
Under Survey, select the response survey for Site 02. Check all the open-end responses that you want to make
available.
15.
Go back to the first item (“Site_Choice”). On the Routing tab, route 01 to the item Retrieve_01 and 02 to
item Retrieve_02 so the correct open-end responses are played for the caller.
Avoiding Unwanted Recordings [Custom only]
Sometimes callers will reach an open-ended question and will simply hang up, or attempt to key in a response
(which has the effect of creating a very short and useless recording).
The Minimum open-end message length setting on the Advanced Survey Settings window is meant to help
minimize this problem (see Chapter 23).
The minimum open-end message length is set by default to 0. This means that SmartQ retains any message,
regardless of how short. If you do not wish to keep these short messages, a greater number is required.One
second takes 8000 bytes.
IMPORTANT: This is a system-wide setting, which means that every survey in SmartQ will be bound by this
setting.
92
SmartQ 5.1 Manual
Chapter 14
Advanced Topics: Multiple Lead Surveys
[Custom only]
Overview
The use of multiple lead surveys is an advanced feature that is only needed when you have several completely
independent multi-survey projects running concurrently. (Routing among several surveys is a standard feature of
SmartQ and does not require this option.)
In a typical SmartQ usage scenario, you create a lead survey, which asks questions that you want all callers to
answer (such as ID number or location). You can then use that value to route among one or more response
surveys.
TIP: When data for a response survey is saved, the answers to the lead survey are saved in the same record in
the database. Calculation items in a response survey may refer to items in the lead survey. Automatic testing
and configuration of the Microsoft Access database will ensure that fields for the proper lead survey are included
in the table for the response survey.
Example
Let’s say that you have a project with a lead survey that asks for a Customer ID number and a survey choice. It
then routes the caller to one of three response surveys. Your supervisor hears about how well the IVR survey is
going and asks you to do another survey, completely unrelated to the first one. You could extend your lead
survey, adding additional prompts for the new project and putting in calculation items to route callers to the
correct subset of prompts.
There are three problems you may encounter:
1.
As the number of projects grows, your lead survey’s complexity will grow geometrically.
2.
Each response database will contain fields for all items in the lead survey, not just the ones relevant to the
project.
3.
Modifying the lead survey while projects are live introduces risk to the ongoing projects. A mistake in the
new project could route callers to the wrong questions.
The multiple lead surveys feature solves these problems.
SmartQ 5.1 Manual
93
Chapter 14 : Advanced Topics: Multiple Lead Surveys [Custom only]
How Multiple Lead Surveys Work
• Any survey can be designated as a lead survey. There is no limit on how many surveys can be lead surveys.
• Any survey that is not a lead survey is by definition a response survey.
• Each response survey is associated with one and only one lead survey. If no selection is made, the response
survey is associated with the default lead survey (shown on the Current Activity screen).
• Your callers are routed to the correct lead survey by the phone number that they dialed.
Setting Up Multiple Projects
1.
Click on the Multiple button from the Survey Design screen or Current
Activity screen.
2.
On the Multiple Lead Surveys screen, check the Enable Multiple Lead
Surveys checkbox. Click OK.
3.
Create a new lead survey, even if you are not yet ready to set it up. Check
the Lead Survey checkbox.
4.
Create the first response survey and immediately associate it with the lead survey in the Multiple Lead
Surveys screen by clicking the Multiple button again. This will ensure that no fields from the default lead
survey are created in your response survey's database.
5.
Create any additional response surveys and associate them with the appropriate lead survey.
6.
Create items, record prompts, set calculations, routing, etc. for the lead and response surveys.
7.
Click the Multiple button again to assign ports or DNIS numbers to route callers to your new surveys.
DNIS
DNIS (Dialed Number Identification Service) is a service provided with T-1 lines. It allows the T-1 carrier to
indicate what phone number was dialed by the caller to reach your IVR system. Thus, you can have several
distinct phone numbers all answered by the same pool of IVR lines and SmartQ will know which survey to use
for each caller by checking which phone number they dialed.
94
SmartQ 5.1 Manual
Setting Up Multiple Projects
Routing Callers
1.
You can create and edit new surveys without any effect on the calls already in progress. Your new surveys
don’t become “live” until you set a port or DNIS to route to them.
2.
The simplest way to route callers to the appropriate project is to designate certain lines to certain projects.
For example, you assign ports 1 through 5 to a product order survey, and ports 6 through 8 to a customer
satisfaction survey. You will designate which line goes to which survey from the multiple lead surveys
screen.
3.
If you have a T-1 or DID line, you will probably have DNIS or DID information coming into SmartQ. If you
know the DNIS or DID numbers, you can route to the appropriate lead survey using the DNIS or DID.
SmartQ 5.1 Manual
95
Chapter 14 : Advanced Topics: Multiple Lead Surveys [Custom only]
96
SmartQ 5.1 Manual
Chapter 15
Organizing Surveys
X-Ray Views of Surveys
SmartQ can create customized cross-sectional or X-Ray Views of your survey. Some examples of the use of this
feature include:
• Quick Quality Assurance: Easily check all of your survey settings.
• Survey documentation: Provide a snapshot of your survey for later reference.
• Recording script: Create a printout suitable for a recording session by selecting only the item name and script.
Creating a New View
To create a customized view of your survey:
1.
Go to the Survey Design screen.
2.
Select Views >ADD/EDIT.
3.
This causes the Edit Views window to appear. To begin
building your customized view, click the New button near
the top left.
4.
Name your new view (for example, “Digit Range Check”).
Editing Your View
The Edit View window will build a template based on the elements you select from the Settings list. Each
element (or setting) corresponds exactly to settings on the Survey Design screen.
SmartQ 5.1 Manual
97
Chapter 15 : Organizing Surveys
1.
Double-click an element to add it to your view. Sample output appears in the Preview field and the name of
the element appears in the Template field.
2.
To remove items, click on the element or setting in the Template field that you wish to remove and press the
Delete key on your keyboard.
3.
When you are finished customizing your view, click OK to return to your survey.
4.
To see the final output of your customized view, click the Views menu and select the name of the view that
you created. Remember that this view is not survey-specific and that it can be used with any of your surveys.
Example
You would like to check that each item in your
survey is allowing the correct range of digits.
Create a new view from the Settings menu, first
selecting Item Name and then Min-Max Digits
Accepted (the order determines the output).
Open your new view for the final output, shown
below.
This view shows both the name of each item and
the minimum-maximum digits that are allowed.
The first item, 1. happy, yields a result of “1” for
the minimum and “1” for the maximum allowable digits. We see that item 2. repair will allow anywhere from 1
to 2 digits in our survey.
TIP: For an easy recording session, select Item Name and Script, and print the final output. This also helps you
screen your survey scripts for errors.
Typically, this output is easiest to read when Item Name is included. However, SmartQ allows the user to select
any desired combination of settings.
These customized views can be useful when troubleshooting, designing multiple or very large surveys, or
preparing for a recording session. You can add your own text in the Template box to make the data more
meaningful to your surveys.
98
SmartQ 5.1 Manual
Survey Organizer [Custom only]
Survey Organizer [Custom only]
You can use the Survey Organizer to copy, move, and rename any SmartQ survey from within SmartQ. To open
the Survey Organizer, go to the Survey Design screen and select Survey > Organize….
Copying a Survey
1.
Browse to the destination Directory on
the lower right.
2.
Select the survey to copy in the Surveys
menu on the left.
3.
Click the Copy button.
Moving a Survey
1.
Follow the instructions in “Copying a Survey” above to move the survey to a new location.
2.
Delete the original survey.
Renaming a Survey
1.
Select the survey you wish to rename, and click Rename.
2.
A dialog will warn you that if you rename a survey, other surveys currently routing to that survey (if any) will
not route properly. Click OK if you want to continue renaming your survey.
3.
Follow the prompts, which will ask you to enter a new survey ID first and then to enter a new name for your
survey. You do not need to change the survey ID in order to change the survey’s name.
Survey Power Editor (Advanced) [Custom only]
SmartQ’s Survey Power Editor enables the survey designer to change entire surveys with only a few clicks of the
mouse.
To open the Survey Power Editor, go to the Survey Design screen and select Survey > Power Edit Survey….
Select the survey to edit from the top left pull-down menu.
Let’s look at a sample version of the “Car Survey” from Chapter 5.
View By Settings
1.
On the right side of the screen in the Basic Settings list, click Valid Keys. You will see a list of all items in
your survey and their respective Valid Keys settings (if any).
2.
Click on the checkboxes of items you will be changing. Here we have selected happy and accident.
SmartQ 5.1 Manual
99
Chapter 15 : Organizing Surveys
3.
The current setting of Valid Keys is “1, 2”. To change this setting, enter the desired setting into the field
above the items. Here we will enter “1, 2, 3, 5, 9”. Click Apply to Selected Items. (This enables callers to
press 1, 2, 3, 5, or 9 when answering the happy and accident items during the survey.)
This is a simplified example of the method you can use to alter your survey items.
Show only unlocked items
This checkbox filters the resulting list by only showing items that have
been left unlocked. This prevents items which you can't change anyway
from appearing on the screen.
Show only non-default settings
This checkbox filters the resulting list by only showing items that
have been edited or changed from the default settings. This can be
helpful when you want to edit only those items in your survey that
you have already customized, as opposed to viewing all items and then trying to remember which item values
you meant to change.
Show only item type
This checkbox filters your results by item type, which allows for
simple editing of large groups of similar items.
Example
Let’s say that you have created a 99-question survey to ask your
customers to rate your company's service on a scale of 1 through 5, but you accidentally allowed only the digits
100
SmartQ 5.1 Manual
Auto-Export of Responses (Advanced)
0, 1, 2, 3, and 4. To quickly remedy this problem, you could open the Survey Power Editor, select your survey
and then select Show only item type Query: Digits to restrict your results.
You would then click select all, enter “1, 2, 3, 4, 5” and click Apply to selected items. Within a matter of
seconds you just saved the time it would have required to review your entire survey using the Survey Design
screen.
Additional Features and Notes
Get current setting will put the value of the highlighted item into the text box, so that you do not have to re-enter
the information. This is useful if your values are difficult to type accurately.
Invert Selection refers to the checkboxes next to the items. If you have 4 items in your survey and items 1 and 3
are checked, clicking Invert Selection will check items 2 and 4, leaving items 1 and 3 unchecked.
Some item settings, such as the Reject Invalid setting, have binary values of either 0 or 1. As in many other
computer programming languages, 0 corresponds to False while 1 corresponds to True. A value of 1 in the
Reject Invalid setting means “Yes, Invalid numbers will be rejected”.
All changes are permanent within your survey (there is no "undo" option), so be sure to back up your survey
beforehand, and refer to the user's manual or SmartQ technical support if you are unfamiliar with certain settings
or phrases.
Auto-Export of Responses (Advanced)
By default, SmartQ stores responses in a Microsoft Access© database at the end of each call. You can also have
data exported to a text file, to an ODBC-compliant database, to an XML file or to a TeleSage web survey format
file.
This feature is useful if you use a SQL server database or other external tool, because SmartQ can export the type
of data that is most useful to your current application. For example, in an organization that uses IVR as one of
several data collection methods, data might need to be passed to a centralized SQL server. SmartQ can be
configured to save survey responses directly to a chosen table in the SQL server. Similarly, when XML output is
needed SmartQ can define the exact format of the XML files and create an XML file when each survey is
completed.
Using Auto-Export
1.
From the Data screen, select Data > Auto-Export.
2.
Select the survey that you would like to configure from the list on the left.
3.
Select which export type(s) to generate from the checkboxes in section 2: Select Exports To Use.
4.
Configure each export type under the appropriate tab.
SmartQ will continue to write to the Microsoft Access© database regardless of how many exports are selected.
Each export operates independently, so you can use more than one at a time.
SmartQ 5.1 Manual
101
Chapter 15 : Organizing Surveys
Text File
Enter a file path in the Destination Folder field
(files can be on either a local or network drive) and
a file name in the Destination Filename field. The
file name can be a fixed name (such as
exportdata.txt) or a formula used to
calculate the name dynamically.
If you check Field Names: Include as First Line
in Export File, the first line of the text file will
contain the names of the fields separated by the
Delimiter you choose.
If a file already exists with this name, the autoexport function will append any new data into the
existing file.
For example, if you use this formula for the file
name:
MONTH,&,"/",&,DATE,&,"",&,YEAR,FORMAT,"YYYYMMDD",&,".txt"
If the date is August 5, 2006 the resulting filename will be 20060805.txt. In the case of this formula, a new
file would be created each day and data would be written to this file until the end of the day.
TIP: Use the date, time, and port fields in the formula to ensure unique file names.
The Saved Export Format option allows you to use any format previously defined from the Export Data feature
(Data > Export). An export format lets you specify which survey items are to be included and in what order.
Select a previously-saved export format to edit. You will then be able to modify the justification, space-padding,
and re-ordering as desired. Fields are left-justified, space-padded and not restricted to a certain width by default.
These defaults are acceptable for comma-delimited or tab-delimited files. For fixed-width, non-delimited files,
you would need to change the defaults to match your desired format.
ODBC
The auto-export to ODBC function uses a connection string to connect to your database. Click Get Connection
String. The Microsoft Windows Select Data Source dialog appears.
For SmartQ, TeleSage recommends this procedure:
1.
Choose the Machine Data Source tab.
2.
Click New.
3.
Choose the System Data Source option and click Next.
4.
In the next dialog box, choose the appropriate driver.
For Microsoft Access©:
102
1.
Choose Microsoft Access Driver (*.mdb).
2.
Click Next.
3.
Click Finish. Now you will see the ODBC Microsoft Access Setup screen.
4.
Enter a short identifier for the Data Source Name (for example, “Project ABC Responses”).
SmartQ 5.1 Manual
Auto-Export of Responses (Advanced)
5.
Enter an explanation into the Description field, such as “ABC Phase 1, started January 2006”. This
description will be visible if you select Administrative Tools > Data Source in Windows’ Control Panel,
but it is not visible in SmartQ.
6.
Select Database > Select... and browse to your Microsoft Access© database file.
7.
Leave system database with None selected.
8.
Click OK on the next two screens.
9.
The second OK is on the Select Data Source screen where you will see your new connection displayed and
selected.
After this step is complete, the connection string that tells SmartQ how to find the database is automatically
placed in SmartQ’s Connection String field.
For SQL Server (the driver may be listed last, and not prefaced with “Microsoft”.)
1.
Select SQL Server and click Next.
2.
Click Finish.
3.
Enter a short name, optionally a description, and choose your server.
4.
Click Next.
5.
Select your authentication method and click Next.
6.
Click Change the default database to… and then select which database should be used.
7.
On the next screen, accept the defaults unless you have reason to change them and click Finish.
8.
A summary screen will appear. Click Test Data Source to verify that the connection can be made and
authentication works properly.
9.
Click OK until the wizard exits.
Once you have created the connection string, SmartQ will connect to your database and populate the Table
dropdown list. Select your desired destination table for export.
Click Map Fields. The resulting screen lets you pair up each SmartQ item to a destination field in your database
table. You are not required to export every survey item.
The ODBC auto-export function is set up on a per-survey basis, so each survey can write to a different table.
SmartQ writes the data when the call has ended.
Some database systems (such as Oracle) do not allow brackets around field names in a SQL statement, while
others (Access and SQL Server) require brackets if the field or table name contains spaces or is a reserved word.
The checkbox Bracket table and field names in SQL lets you choose the appropriate setting.
eQ
eQ is TeleSage’s web survey product. It uses a vertical structure for saving survey responses. Instead of having
a column for each item in the survey, and a table for each survey, eQ uses two tables called “SESSION” and
“RESPONSE”. Each call is a session with an ID, date and time.
The SESSION table has eight columns:
•
•
•
•
•
•
•
SESSION_ID: Autonumbered primary key
SESSIONDATE: Date of the call
STARTTIME: Time of the call
PORT: Line that the call came in on
LEADNAME: Name of first survey in call
LEADMINS: Duration in minutes of first survey in call
RESPNAME: Name of last survey in call
SmartQ 5.1 Manual
103
Chapter 15 : Organizing Surveys
• RESPMINS: Duration in minutes of last survey in call
The RESPONSE table has five columns:
•
•
•
•
•
RESPONSE_ID: Autonumbered primary key
SESSION_ID: Foreign key that references the SESSION table
SURVEY_ID: Contains the eQ survey ID, which you set on the Auto-Export screen
DATANAME: Contains the name of the SmartQ item
ANSWER: Contains the response entered by the caller
If you have a database with these two tables, the connection to the database and the Survey ID for each survey
are all you need to configure: all of the table and field mapping is done for you. When the data is written, a
separate row is written in the RESPONSE table for each survey item with the name of the item, the response and
the relevant IDs that tell you which call from which the data was retrieved.
XML
Data collected by SmartQ can also be exported in XML files.
Use the XML tab to specify a custom Destination Filename and Destination Folder for the exported XML file.
The Destination Folder can be either a local or a network drive. Be sure to choose a file naming convention that
yields unique filenames: unlike the text file export function, SmartQ will overwrite an existing XML file. The
filename must end with .XML.
The format of the XML output is controlled by a saved XML format file. There is one of these files per survey,
with extension .exm. A default file is created automatically when you first enable XML export for a survey.
When you click Edit XML Format, the file will be opened for you in Notepad. This file provides a template for
the contents of your output files. Insert a SmartQ formula, enclosed in curly braces {}, in each place where you
need to insert a survey response or other conditional text. These formulas are evaluated when SmartQ writes the
output file so that the appropriate values are filled in. The curly braces themselves will not be included in the
output.
Export Existing Data
You can have the data collected from calls exported in XML format at any time. When you click Export
Existing Data on the Auto-Export screen, you will be prompted for a starting and ending date. All calls
completed during that date range (inclusive of both start and end) will be exported to XML files.
NOTE: When you export existing data, XML filenames are calculated at the time of export. This means that the
current date or time will most likely be quite different from the time that the call was originally placed. For this
reason, it is preferable to use CALLDATE or CALLTIME rather than YEAR, MONTH, HOUR, etc. in your
filename formula.
104
SmartQ 5.1 Manual
Chapter 16
Standard Dialer: Getting Started
Launching the Standard Dialer
Click the Dialer button on the left-hand menu. This will open the Standard Dialer and take you to the Dialer
Job Schedule screen.
How the Standard Dialer Works
1.
You design a Dialer Job on your PC by selecting a set of phone numbers in a database and specifying dates,
times, and quotas to call.
2.
At the specified date and time, your PC begins calling your list of phone numbers.
3.
SmartQ, your automated survey system, will administer a survey you created or leave a message on an
answering machine.
SmartQ 5.1 Manual
105
Chapter 16 : Standard Dialer: Getting Started
If you have a license for the Advanced Dialer, the Advanced Dialer button will be enabled. See Chapter 22 for
information about the Advanced Dialer.
If you have a license for NightOwl, the NightOwl Sites button will be enabled.
106
SmartQ 5.1 Manual
Chapter 17
The Standard Dialer: Creating a Job
Overview
This chapter will help you to set up a dialer job in the Standard Dialer. For each job, the Standard Dialer dials a
set of phone numbers. When a live person answers, the designated SmartQ survey will begin. The survey logic
will continue as you have set it up in SmartQ. See the survey design chapters for instructions on setting up your
survey.
The Five Basic Steps of Job Designing
Click on the Define Jobs button. The Dialer Jobs screen will appear. Here you will see the five basic steps of
designing a job:
1.
Select Job: Create, delete, or modify a dialer job.
2.
Select Phone Number Database: Choose the database, table, and fields where your phone numbers and
results are stored.
3.
Set Dialing Specifications: Specify how to dial out, which survey to give, and what to do in case of a busy
signal, no answer, or an answering machine.
4.
Set Job Schedule: Choose the times and days of the week that your job will run.
5.
Set Job Quotas: Specify whether the Standard Dialer should dial all of the numbers in your database or only
numbers that meet certain requirements.
SmartQ 5.1 Manual
107
Chapter 17 : The Standard Dialer: Creating a Job
At any time, you can click OK to save changes and return to the Dialer Job Schedule screen.
• Click Cancel to return to the Dialer Job Schedule screen without saving changes.
• Click Apply to save changes and continue working in the Dialer Jobs screen.
• Click Refresh to add any new databases, tables, fields, or surveys to the pull-down menus.
Step 1. Select Job
1.
Select Select Job >Add New Dial Job. You can also click
the Add Job button.
2.
A dialog box will ask you to enter a name for your job.
When you are finished, click OK.
Step 2. Select Phone Number Database
3.
You will need to create a database and a table that contains your set of phone numbers. This database must be
located in the same directory as SmartQ (in a standard installation, this directory will typically be
C:\Program Files\TeleSage).
4.
On the Dialer Jobs screen, make a selection from the Database pull-down menu.
5.
After you have selected your database, the tables and queries your database contains will appear in the Table
or Query pull-down menu. Select the table or a query that contains your set of phone numbers. (Importing
data and building a query are discussed in Chapters 5 and 6.)
6.
After you have selected your table or query, the fields that the table contains will appear in the Phone Field
and Result Field pull-down menus. For the Phone Field, select the field that contains the phone numbers to
be dialed. For the Result Field, select the field reserved for the Standard Dialer to report the result of each
dial attempt.
TIP: In the database, the phone field should be populated with phone numbers and the result field should be
blank so that the Standard Dialer can write information about the dial attempt. If the result field is not blank, it will
not call the corresponding number in the phone field.
Step 3. Set Job Schedule
This feature allows you to choose when the Standard Dialer will make calls. Use the checkboxes to select which
days of the week calls will be made. Use the pull-down menus to set the range of hours calls will be made.
108
SmartQ 5.1 Manual
The Five Basic Steps of Job Designing
TIP: If your database contains phone numbers from across the country, schedule different jobs for different time
zones. All times refer to the real-time clock on your PC.
Step 4. Set Dialing Specifications
You can specify settings for your Dialer Job, such as which survey to administer and how to dial out of your
phone system.
7.
Enter any prefix your phone system requires to dial out (such as “9”) in
the Dialing Prefix box. If all the numbers in your database are in the
same area code, you can leave out the area code in the database and enter
it here in the Dialing Prefix box instead. If you need a prefix to dial out
and you also wish to use an area code, simply separate with a comma
(example: 9,206).
8.
In the Time Allowed for Answer box, enter the number of seconds you
would like the Standard Dialer to try each number. If no busy signal,
answering machine, or live person is obtained, the Standard Dialer will
continue to ring for the number of seconds you enter here.
9.
You may want the Standard Dialer to redial phone numbers that initially
return busy or unanswered results. Check the box next to Retry busy
numbers and/or Retry unanswered numbers and then use the pull-down
menu to select the number of times you would like the Standard Dialer to
redial the phone numbers.
10.
Select the survey you want SmartQ to administer when a person answers the phone. Use the pull-down menu
under If person answers, do survey to select your survey. If you do not select a survey here, SmartQ will
administer its current lead survey.
11.
You may want SmartQ to use a different survey if an answering machine is detected. Use the pull-down
menu under If answering machine detected, play survey to select the survey you would like to playback
when a machine answers the phone. If you do not select a survey here, the Standard Dialer will hang up when
a machine answers the phone.
Step 5. Set Job Quotas (Advanced Feature)
You may want the Standard Dialer to stop dialing when a certain number of calls have been placed, a certain
number of surveys have been completed, or other criteria have been fulfilled. For instance, you may have a job
that consists of phone numbers across a city and you want to make sure you get 10 completed surveys from each
zip code. Defining quotas can help you reach your specific goals.
If you want the Standard Dialer to dial all the numbers in your table as per your dialing specifications (described
in the previous section), regardless of the result of the calls, select Dial all the numbers.
If, however, you want the Standard Dialer to stop dialing when certain criteria have been fulfilled, select Stop
when quotas are reached and then click the Set Quotas button. This will take you to the Set Job Quotas
screen to define your criteria. Once your quota has been met, busy and unanswered numbers will not be retried,
regardless of the dialing specifications you set in Step 4 above.
Define A Complete Call
The Standard Dialer can consider a call complete if the Number Was Dialed, a Live Person Was Reached, or
the Survey Was Completed:
SmartQ 5.1 Manual
109
Chapter 17 : The Standard Dialer: Creating a Job
• Number was dialed: If you want the Standard Dialer to
call a set of phone numbers and count all outcomes (live
person, answering machine, busy signal, etc.) toward
meeting the quota, choose Number was dialed.
• Live person was reached: If you want the Standard
Dialer to call a set of phone numbers and count only
responses where a live person was reached toward meeting the quota, choose Live person was reached.
Example
You want to reach 200 live people. Choose Live Person
Was Reached and enter “200” into the Make Only ___
Calls Total box below. After the Standard Dialer has
detected 200 live people answering the phone, it will consider the quota met and stop dialing. Over 200 calls
will be placed overall since the Standard Dialer will not count answering machines, busy signals, etc. toward
the 200 call quota.
• Survey Was Completed: If you want the Standard Dialer to call a set of phone numbers and count only the
outcomes in which your survey was completed, choose Survey Was Completed. If the person completes the
survey logic, the call will be counted toward the quota total. If no one picks up, a busy signal is returned, an
answering machine picks up, or the person answers some questions but does not reach the end of the survey,
the call will not be counted toward the total.
TIP: If the call is only useful to you if a particular survey question is answered, you can define the call as
complete if the person answered that particular Item. Click Define Survey Completion. Select your survey in
the right-hand column and select the item in the left-hand column, then click OK.
Limit Number of Complete Calls
Tell the Standard Dialer how to limit the number of complete calls. Options include:
• Make Only __ Calls Total: If you want the Standard Dialer to make a certain number of calls from your
database, choose Make Only __ Calls Total and enter the number of completed calls you need.
• Make Only __ Calls for Each Category as Defined in the Database: If you have several categories and
need a certain number of calls for each one, choose Make Only __ Calls for Each Category as Defined in
the Database and enter the number of completed calls you need per category. The Phone Database and
Phone Table or Query settings contain values according to what you have selected on the Dialer Jobs screen
(see Step 2). Select your Category Field from the pull-down menu.
Example
You want to survey 15 households in each zip code in your database and you have a field named “Zip Code”
in your table. Enter “15” in the text box to indicate that you want 15 completed surveys from each category.
Below, select Zip Code from the Category Field pull-down menu to indicate that you want the Standard
Dialer to categorize your records by zip code.
• Use Table of Calls Per Category: If you have several categories and need a different number of complete
calls made in each category, choose Use Table of Calls Per Category. In your database, you will need to
create a table that links each category with a quota. Before each call, the Standard Dialer will check this table
and determine if the quota has been met for the category. It will meet the quota for each category before considering the dialer job complete. Point the Standard Dialer to the Quota database, Quota table or query, Category field and Quota field by selecting them from the pull-down menus. Use separate tables for the phone
numbers and the quotas.
When you are finished, click Save to return to the Dialer Jobs screen.
110
SmartQ 5.1 Manual
The Five Basic Steps of Job Designing
NOTE: If there are not enough available numbers to meet the quotas you establish, the job will finish without
meeting the quota. For example, if you establish your quota as 1000 complete calls but there are only 500
numbers in your table, the quota will not be met.
Example
You want to survey households in several zip codes, but want to survey a different number of households in each
zip code.
1.
In your database, create a table called “quotas” that has two fields: “Zip Code” and “Quota”. The name “Zip
Code” should correspond to the “Zip Code” field in your Phone table.
2.
In the Zip Code field in your new table, enter each unique zip code from your Phone table.
3.
In the Quota field, enter the number of surveys you need from each zip code.
4.
On the Set Job Quotas screen, the Phone Database and Phone Table or Query are filled in according to
what you have selected on the Dialer Jobs screen. Select Category Field > Zip Code.
5.
From the Quota Database pull-down menu, select the database in which your new “quotas” table is
contained.
6.
Select Quota Table or Query > quotas.
7.
Select Category Field > Zip Code to indicate the field in which the category is contained.
8.
Select Quota Field > Quota to indicate the field in which the quota is contained.
SmartQ 5.1 Manual
111
Chapter 17 : The Standard Dialer: Creating a Job
112
SmartQ 5.1 Manual
Chapter 18
The Standard Dialer: Scheduling
Overview
After you have defined your job, add it to the Dialer Job Schedule.
Adding a Job
1.
On the Dialer Job Schedule screen, click
Add.
2.
Select the job you wish to add from the Job
Name pull-down menu.
3.
Select a starting time and priority for your job.
Options include:
•
Start Now: Begin the job,
interrupting all active jobs.
•
Start Next: Begin the job as soon as
the ports are available, but do not
interrupt any job.
•
Start At: Begin the job at the
specified date and time, interrupting
all active jobs. You will need to
select a date and time from the pulldown menus.
•
Start At or After: Begin the job at
the specified date and time and as soon as the ports are available, but do not interrupt any job. You
will need to select a date and time from the pull-down menus.
4.
Select the port(s) the Standard Dialer will use for your job.
5.
When you are finished, click OK.
SmartQ 5.1 Manual
113
Chapter 18 : The Standard Dialer: Scheduling
Removing a Job
1.
On the Dialer Job Schedule screen, select the job you wish to remove by clicking on its ID number.
2.
Click Remove. This will not delete the job; it will remove the job from the schedule.
Stopping or Pausing an Active Job
1.
When a job is active, the Stop Active Job button will become visible. Clicking the red
stop sign will stop the active dialer job.
2.
You may want to pause an active job. You can pause jobs in SmartQ by clicking the
Stop Calls button on the main left-hand menu. To restart the job, click the Start Calls
button.
Restarting a Job
Dialer jobs that get interrupted will automatically re-queue themselves. You may wish to restart a cancelled or
interrupted job.
1.
On the Dialer Job Schedule screen, click on the View Results button to open the Dialer Job Results screen.
2.
On the Dialer Job Results screen, select the job you wish to restart from the pull-down menu at the top of the
screen.
3.
Click the Restart Selected Job button. This will open a dialog box that will ask if you would like to restart a
particular job ID number. Click OK.
Recurring Jobs [Custom only]
If you need to call the same people repeatedly (for a daily checkup, for example), you can easily set a job to run
for any number of days.
114
1.
Check the box Reset All When Done on the Dialer Jobs screen.
2.
When you click Add from the Dialer Job Schedule screen, the Add Dial Job dialog gives a Recurring Job
option. Check this checkbox
3.
Enter the number of consecutive days for which you want the job to run.
4.
If the job runs only certain days of the week, set its schedule on the Dialer Jobs screen.
SmartQ 5.1 Manual
Chapter 19
The Standard Dialer: Viewing Results
Viewing Dialer Job Results
Dialer job results are stored in your database, but you may occasionally want to check your progress. The Dialer
Job Results screen allows you to view the results from previous or current jobs.
1.
On the Dialer Job Schedule screen, click on the View Results button to see the Dialer Job Results screen.
2.
Select a job from the Select Job pull-down menu at the top of the screen.
Job details are listed in the Select Job box. After the job name, you can see the date and time the job ran, which
ports were used, and the status of the job (e.g. active, finished, cancelled).
Results are listed in the Results box by category (if no categories were defined, all results are listed in the
category “ALL”). For each category, you can see the number of attempts, complete calls, answers by a live
person, busy signals, answers by a machine, and calls with no answer. A complete call is defined when you set
quotas. If no quotas have been set, then the number of complete calls will be zero. The quota and number of
calls made toward the quota are also listed.
If you wish to see results sorted by a column, click on the column heading. To view results in a tab-delimited
file, click the Export button.
When you are finished viewing results, click OK to return to the Dialer Job Schedule screen.
SmartQ 5.1 Manual
115
Chapter 19 : The Standard Dialer: Viewing Results
Permanent Storage of Dialer Results
The result of each call attempt is permanently stored in your database. You can open your database easily from
the Standard Dialer.
1.
Click the Define Jobs button to open the Dialer Jobs screen.
2.
Click the Open Database button in the Phone Number Database section. This will open the database and
table selected in the pull-down menus above.
Viewing Survey Results
The responses to your survey are stored the response database, just as responses to an in-bound survey. The
results are viewable from the Data screen. Please see the “Viewing Data” section in Chapter 8.
116
SmartQ 5.1 Manual
Chapter 20
The Standard Dialer: Data Management
Overview
The phone database that the Standard Dialer uses to store phone numbers and the results of call attempts is
independent of the survey database that SmartQ uses to store survey responses. To manage your survey
database, see Chapter 8 (“Data Management”).
When dialing, the Standard Dialer looks in the Phone database at the Phone table you selected on the Dialer Jobs
screen. The Phone table has a field that contains phone numbers and has an unpopulated field in which the
Standard Dialer records information about the dial attempt. It will dial each phone number whose corresponding
Results field is empty. You can manipulate the contents of your Phone database by importing data or resetting
some results. You can also export data if you need to transfer it to another location.
Importing Data
Instead of entering a list of phone numbers by hand, you may want to import your phone numbers directly into
your Phone database. Using the Standard Dialer, you can import data from a text file to a table in your database.
From the Dialer Jobs screen or the Set Job Quotas screen, click the Import/Export button. This will open the
Database Import/Export dialog.
1.
Enter the name of your import file either by
typing the pathname into the Text File field or by
browsing to it using the Browse button on the
right.
2.
Select the destination database either by selecting
it from the Database pull-down menu or
browsing to it using the Browse button on the
right.
3.
Select the destination table from the Table pull-down menu.
4.
Backup cycles refers to the number of copies of the current database you want to create. Select a number from
the Backup Cycles pull-down menu. Set this to 0 if you don't need to view the data again.
SmartQ 5.1 Manual
117
Chapter 20 : The Standard Dialer: Data Management
5.
Click the Import button to import the data from the text file into your destination table and database. This
will not append the data; it renames the existing database to a backup name and then creates a new database
with only the records imported from the text file.
Resetting Results
You may want to edit your Phone database to clear the Results Field for phone numbers that previously returned
“Busy” or “No Answer” results so that the Standard Dialer will call these phone numbers the next time you run
the job. You can do this from the Dialer Jobs screen.
• To clear the results field of Busy results, click the Reset Busy Numbers button.
• To clear the results field of No Answer results, click the Reset No-Answers button.
Exporting Data
Table data
Using the Standard Dialer, you can export data from the tables in your database to a text file. From the Dialer
Jobs screen or the Set Job Quotas screen, click the Import/Export button. This will open the Database
Import/Export dialog box.
1.
Enter the name of your text file either by typing the path or browsing to it using the Browse button on the
right.
2.
Select the database that contains the data you want to export either by selecting it from the pull-down menu or
browsing to it using the Browse button on the right.
3.
Select the table that contains the data you want to export from the pull-down menu.
4.
Select the number of backup cycles from the pull-down menu. This is the number of copies of the current
database you want to create as backups.
5.
Click the Export button to export the data.
Job results
You may want to export your job results to a tab-delimited text file. From the Dialer Job Results screen, click
the Export button. This will generate and open a text file with the name
JobID_NameOfJob_UniqueTwoDigitNumber.txt
containing the results for the currently selected job.
118
SmartQ 5.1 Manual
Chapter 21
The Standard Dialer: Building a Query
Overview
A Query is a database filter through which you can view, modify, and analyze data in different ways. You may
want to create a query specifically for your Dialer Job. The Standard Dialer Query Builder allows you to create
Microsoft Access queries easily.
Building A Query
1.
Select Add/Modify Query from the Table or Query pulldown menu on the Dialer Jobs screen. This will open the
Query Builder.
2.
Select your table from the pull-down menu.
3.
Select Query Name > Add New Query.
4.
A dialog box will appear. Enter a name into the Query
Name field. When you are finished, click OK.
5.
Make a selection from the Category pull-down menu. You
will use this field to filter or sort your data.
6.
From the list on the right, select the values to include in your
filter. The Standard Dialer will call only the phone numbers that correspond to the values you select here. To
select multiple values, hold down the Control key. To select all the values, click the Select All button. To
clear your selection(s), click the Clear All button.
7.
Click Save to save the query and return to the Dialer Jobs screen.
SmartQ 5.1 Manual
119
Chapter 21 : The Standard Dialer: Building a Query
Example
You have a table named “Customers” that contains all your customers, but you only want to reach those within
your tri-state area.
120
1.
Select Table or Query > Add/Modify Query.
2.
When Query Builder opens, select Table > Customers.
3.
Select Query Name > Add New Query.
4.
When the dialog box appears, enter a name for your query, such as “TriStateQuery”.
5.
Select the field that contains the customer’s state from the Category pull-down menu.
6.
The list of values contained in the StateOrProvince field will appear in the box on the right. Hold down the
Control key and select the three states in the tri-state area.
7.
Click Save to return to the previous screen.
SmartQ 5.1 Manual
Chapter 22
Advanced Dialer
Introduction
The Advanced Dialer will link to the contents of any database and follow complex rules for dialing out using the
data there. You might think of the Advanced Dialer as a complex control system whose behavior is determined
by SQL statements and the contents of a database. By defining SQL queries, you can control which survey is
given to each caller and how each survey defines the “result” to return to your database.
All of these settings are saved as a job and you can have as many jobs as you wish on your system. Potential uses
include:
•
•
•
•
Triggering calls according to a condition in a database, such as a service coming due
Allowing callers to specify when they would like to receive the next call
Defining individual call-retry patterns, such as calling in the afternoon if there is no answer in the morning
Making a batch of calls during a specific time window, but adjusting for individual time zones
To access the Advanced Dialer, click the button on the bottom of the Dialer screen.
SmartQ 5.1 Manual
121
Chapter 22 : Advanced Dialer
How It Works
The Advanced Dialer continually polls a database for calls to be made. In addition to the phone numbers, the
database typically includes fields for status, date and time to place the call, criteria that determine when a call
should be made (such as a time zone), and other data to be used during the call (such as a customer ID number).
The Advanced Dialer keeps track of what calls are already in progress, so that no duplicate calls are made. Each
time a call is completed, the database is updated according to rules that you establish.
Jobs
The settings for which database and queries to use, and how to manage the results of the calls, are all stored in a
job. Configure these settings from the Advanced Dialer’s Job Definitions screen. Multiple jobs can run
concurrently.
122
SmartQ 5.1 Manual
How It Works
Database
SmartQ uses an ADO connection string to connect to your
database. If you know how to make a connection string, you can
simply type it in. Alternatively, you can browse to your database
with the database connection wizard.
To set up a connection string to your database:
1.
Go to the Advanced Dialer’s Databases and Queries screen.
2.
Under Database Connections, click New. This will open the
Windows Data Source wizard.
3.
Browse to your database. This will create a Data Source
Name (DSN) for you and place the connection string in the
appropriate box on the SmartQ screen.
4.
Click the Test button to verify that SmartQ can open the
database. If successful, you will also have the option to view
the table and field structure of the database.
5.
When the connection has been successfully configured, click Save.
Queries
The right side of the Databases and Queries screen lets you define queries to use with your databases. The
queries you define here are saved within SmartQ, not in your database. You must type in the SQL statement for
each query, an optional description, and give the query a name.
On the Jobs screen, you can select from the list of queries you define.
To create a query:
1.
Select Queries > New. Enter the name you want to use for this
query. Names may include any characters except equals sign or
square brackets. Spaces and other special characters are allowed.
2.
Enter your SQL statement. If you need to refer to the database for
table or field names, just click the Test button under Database
Connections and choose Yes when prompted if you would like to view the database structure.
3.
Test your statement with the Test button. If the query returns records, they will be displayed in a grid so you
can check whether it works as intended. If the query is an UPDATE, INSERT or DELETE statement, it will
be run as a transaction with the option to roll back. This means that the query will temporarily run, reporting
back how many records would be affected.
You may also refer to the example queries at the end of this chapter.
Compiling Your Results
You may want to link information in the dialer database with responses made by the people you called. The
Standard Dialer uses a different table for storing information than SmartQ uses for survey responses. If you want
to access the data created or used by it, you will need to create a bridges between the two databases. Here are
two strategies to accomplish this:
Strategy 1 - Passing all data to the SmartQ Response table
Pass all the data you will need from the Standard Dialer database into the Response database by creating a
SmartQ item for each needed field. These SmartQ items would be Calculation items, with formulas that
reference the field, such as ^MyField. This method makes it simpler to analyze the data on the back end, but is
cumbersome to set up.
SmartQ 5.1 Manual
123
Chapter 22 : Advanced Dialer
Strategy 2 - Joining tables via an ID
This approach uses a common ID in the Dialer database and the Response database. To link dialout records with
response records, therefore, you will need to include a unique ID field from your dialout database in your
GetCalls query and put an item in the SmartQ survey that brings it into the response data. That would be a
Calculation item with formula ^MyUniqueID.
Polling
Polling is the operation of querying the database on an on-going basis.
The dialer keeps a list of calls that are already in progress. If a query
happens before a call is completed, which can happen frequently,
SmartQ recognizes the duplicates and does not redial them. In order to
recognize duplicates, there must be a field or combination of fields that
contains a unique ID in the database.
To begin polling continuously (until the conditions you specified for
your survey are met), click Start on the Advanced Dialer screen. Poll Now (Once) is used for testing your
survey. A Poll Interval setting between 45 and 60 seconds is typical for most applications.
Transitions: Status and Result
“Status” and “Result” are values used by Advanced Dialer applications in conjunction with GetCalls and Update
queries. A Status list is compiled to indicate when or whether a call should be made. Then a table is created to
control how a call that originates in each Status record should be updated, based on the Result of the call. The
final Status is determined based on the initial Status combined with the data retrieved from the survey (the
Result).
The Result is the response to an item in a survey. The simplest example is to make a Calculation item through
the Survey Designer called “Result” with a formula of 1. The Result item can be named anything you like.
Using Transitions
1.
Create an item named “Result” (or something similar) in the survey in
Survey Designer. Include a formula that contains information you want as
factors in the Status determination. Make sure your survey routes to this
item.
2.
Click on Survey ‘Result’ Items and identify your survey’s item which will
act as a Result of the call for this survey.
3.
Define Status transitions for all possible Results and initial
statuses. To access this screen, click on Job Definitions from the
Advanced Dialer window, select Use Status Transition Table,
and then click on Details.
4.
This will bring up the transition table. The Result can be any
number, a blank, or “ERROR”. You specify these transition rules
as discussed in the example below.
Example
Your survey calls people in the morning on their birthday and asks
them if they would like flowers delivered to their house. If they do
not answer in the morning, your survey tries again in the afternoon. If
they answer “no” either time, your survey does not call again. If the
answer is “yes” either time, your survey calls the flower shop and
orders flowers.
124
SmartQ 5.1 Manual
How It Works
This can be implemented using two surveys. We will name them “01 Happy Birthday” and “02 Order Flowers”.
This example assumes that other items have already been created for the contents of the surveys. The Result
item in the Happy Birthday survey would be an item called Want Flowers. This item will be a “press 1 for yes,
press 2 for no” question.
The Order Flowers survey will also have a Result item which we will call “Order Confirmed”. This item will
have a script asking “Press 1 to confirm that your order was received and press 2 if your order was not received.”
It is now time to set up the transition table. We need to define every possible outcome within your survey and to
assign a number to each outcome. These are the possible states of this survey:
0: Do Not Call
1: Try in the morning (would come through GetCalls query)
2: Try in the afternoon
3: Order flowers
4: Flowers ordered
5: Flower order failed
6: No Flowers desired
7: Person could not be reached
From the Advanced Dialer window, click on Job Definitions. Select your survey and click on Use Status
Transition Table. Click on the Details button to open the transition table.
The column headings represent values taken from your survey, while the row headings represent statuses for
which a call will be made. In this example, states 1, 2, and 3 above will be used because no call will be made for
any of the other possibilities. The possible values are seen in the row across the top. These are taken from the
“press 1 for yes, press 2 for no” result items from both surveys. The table would appear as follows:
1 (caller’s response)
2 (caller’s response)
<blank>
ERROR
1 (status)
3 (result)
5
2
2
2
3
6
7
7
3
4
5
5
5
Your GetCalls query would select records from your table, where the BirthDate field is today, and:
• The status is 1 and it is now morning calling hours, OR
• The status is 2 and it is now afternoon calling hours, OR
• The status is 3.
Your Update query would simply update the field you have designated for
Status in your database, with the _FINAL_STATUS from the call. Advanced
Dialer uses your settings for the Results and Transitions, plus the setting of
which field contains Status, to provide the proper value in _FINAL_STATUS.
A Status will only change based on the Result of a call. When a call is
complete, the dialer can refer to the transition table to determine how to update the status field through an Update
query described above.
NOTE: Not all applications require a transition table. A simpler survey would take the caller's entry and use that
entry as the final Status of the call. Thus, if the caller enters a "2" on the Result question of the survey, "2" will
become the Status. Your queries can use this Status to update the database.
SmartQ 5.1 Manual
125
Chapter 22 : Advanced Dialer
Additional Advanced Dialer Information
Detecting Live or Machine
SmartQ decides whether a live person has answered the call
by listening to the duration of the first sound after the ring is
interrupted. If the sound is longer than 1.8 seconds, it is
deemed to be a machine. If the sound is shorter than 1.8 seconds, then it is treated as a connection to a live
person. This setting can be altered by clicking on the Change button on the Current Activity screen.
Maximum queue duration
By default, if a call is not completed within 5 minutes of being placed on the dialout queue, it is cancelled and
removed from the dialout queue. If this happens, no Update query is run for the cancelled call. If the call is
selected again by a GetCalls query, it will be queued up for dialout.
Calls can be cancelled if you stop dialer ports for some time while a job runs, or if the dialer is overloaded and
cannot get to the queued call in a timely manner. Calls are cancelled so they are not placed long after they are
due (for example, after a certain hour or event). The time limit can be changed under Dialing Rules on the
Advanced Dialer screen.
Example Queries
GetCalls Query
Your database has one table with people, their phone numbers, and other personalized information. Your
database has another table containing the time a call should be made, the ID of the person, and a CallStatus field.
The person should be called when the date and time in the CallDateTime field has been reached, and tried a
second time 10 minutes later if they didn’t answer the first time:
SELECT Calls.*, People.PhoneNumber FROM People, Calls WHERE
(People.PersonID=Calls.PersonID) AND ((([CallDateTime]<Now()) AND
([CallStatus]='0')) OR ((DateAdd("n",10,[CallDateTime]))<Now()) AND
([CallStatus]='1')) ORDER BY [CallDateTime];
Update Queries
Your GetCalls query returned a uniquely-identifying field named “CallID” and another field containing the status
named “CallStatus”. This query will simply update the correct record in the Calls table with the calculated final
status:
UPDATE [Calls] SET CallStatus={_STATUS_FINAL} WHERE CallID={CallID};
This next example saves the date and time when the database update was done and identifies itself as the
TeleSage product (SmartQ). It also uses three fields which, together, uniquely identify the record:
UPDATE [Calls] SET [status]='{_STATUS_FINAL}',
last_mod_dttm=Now(), last_mod_user_nm='TeleSage'
WHERE
((asst_request_id={asst_request_id}) AND (vndr_id={vndr_id}) AND
(purch_order_id={purch_order_id}));
126
SmartQ 5.1 Manual
Example Queries
CleanUp Query
If a call was supposed to have been made (CallStatus equal to 0 or 1), but 45 minutes have elapsed since the call
was due, set the CallStatus to an “expired” value of 4:
UPDATE [Calls] SET CallStatus='4' WHERE (((CallStatus='0') OR
(CallStatus='1')) AND (((DateAdd("n",45,[CallDateTime]))<Now())));
SmartQ 5.1 Manual
127
Chapter 22 : Advanced Dialer
128
SmartQ 5.1 Manual
Chapter 23
Advanced Survey Settings
Overview
The Advanced Survey Settings window allows you to set advanced parameters, some of which are applied only
to the current survey and others of which operate system-wide. Go to the Survey Design page and select Survey
> Advanced Survey Settings.
Survey-specific settings
• Select the checkbox to indicate whether Logging is enabled
for this survey. It will be checked by default.
• If you check the Play “That concludes this survey…” at
end of call checkbox, this message will be played for the
caller once the survey is complete to indicate that the system
is just about to hang up.
• The value you enter into the Default response when an
item is skipped field will be stored as the response value for
items that a user skips over. This can be empty or may contain one or more numbers, letters, spaces or any other characters.
• If SmartQ detects a fax tone on the line, it will automatically
transfer the call to the phone number that you specify in the
Fax transfer number field. If this field is left blank,
SmartQ will take no action when a fax is detected.
System-wide settings
• Minimum open-end message length contains the size (in bytes) of the smallest file the system will record
from open-end queries. If the recorded response is smaller than this setting, the system will not keep the file.
SmartQ 5.1 Manual
129
Chapter 23 : Advanced Survey Settings
• Maximum duration (in seconds): Item is the maximum length of time that SmartQ allows a single item to
last. It is assumed that an item that lasts longer than this has a problem and will be terminated. This prevents
SmartQ’s phone lines from being tied up indefinitely.
• Maximum duration (in seconds): Survey is the maximum length of time that SmartQ allows a session with
a single survey to last. It is assumed that a session that lasts longer than this has a problem and will be terminated. This prevents SmartQ’s phone lines from being tied up indefinitely.
• Maximum duration (in seconds): Call is the maximum length of time that SmartQ allows a call (which may
include multiple surveys) to last. It is assumed that a call that lasts longer than this has a problem and will be
terminated. This prevents SmartQ’s phone lines from being tied up indefinitely.
NOTE: It is a good idea to be generous in these limits, especially if you allow use of a pause key (see section on
Special Touchtones in Chapter 5). Some legitimate calls may be taking longer than average, especially when a
pause key is available.
130
SmartQ 5.1 Manual
Appendix A
Urn Randomization
Urn Randomization
SmartQ can assign subjects to experimental cohorts according to the standard Urn Randomization method. This
method adaptively weights the probability of assignment to a given cohort in order to balance the cohorts
according to each of an arbitrary number of qualifications.
For real projects:
• Any number of qualification questions can be used.
• Qualification questions may have any number of possible answers, up to a total of 250 possible qualification
categories.
• The number of cohorts is also not limited.
For example, you could randomize a sample of 65,000 subjects into 7 cohorts randomized by race, age decade,
blood type, and several aspects of medical history.
TIP: Survey 91 Sample Randomizer (included in SmartQ) is a sample survey using the Urn Randomization
technique. See below.
Utilization
To use this feature, you need a separate randomization database, an SQL query to retrieve the counts associated
with each cohort from the randomization database (the counts query), and an SQL query that updates the
randomization database with the cohort assignments (the assignment query).
Randomization Database
The randomization database must have fields for:
• a SubjectID
• the cohort assigned
• a field for each qualification.
SmartQ 5.1 Manual
131
Urn Randomization
Counts Query
The counts query returns the cohort name in the first column. Each of the other columns must represent the count
of subjects having that qualification. Each possible answer to a qualification question merits a column. For
example, if you are randomizing based on whether the subject is employed, you would need two columns, for the
number that are employed and for the number that are not. This way you will get balancing of those who don't
have a qualification as well as the number that do. This is easy to understand if you consider a qualification like
gender: you wouldn't want to only balance one gender and leave the other to chance.
• Every possible group must have a row. If there are no subjects assigned to that group, the other field values
will be 0.
• First field is the group name (not an ID).
• The order of the fields after the first field matters. They must be the qualification counts in a consistent order.
Within the SmartQ survey, you ask the qualification questions and then invoke the randomization. This is done
with a Custom item as follows: In the [Database] section, invoke the query of counts of those already
assigned.
• The [Database] section must invoke the counts query
• In the [Variables] section (or in another item if that is more convenient), assemble a string consisting of
1s and 0s that act as flags for each qualifier for the subject you want to assign.
• In the [Output] section, for the DataValue= entry, put RANDOMIZESUBJECT,YourCalculatedStringOfQualifierFlags. You may reverse the order: DataValue=QualifierFlags,RANDOMIZESUBJECT. It is not case sensitive.
Example
;Hard-coded subject flags.
[Output]
DataValue=RANDOMIZESUBJECT,"0110"
Example
;Calculated within this item
[Variables]
V1=IF,$Gender,=,"1",THEN,"1",ELSE,"0",ENDIF
V2=IF,$Gender,=,"1",THEN,"0",ELSE,"1",ENDIF
V3=IF,$UsesDrug,=,"1",THEN,"1",ELSE,"0",ENDIF
V4=IF,$UsesDrug,=,"1",THEN,"0",ELSE,"1",ENDIF
V5=V1,&,V2,&,V3,&,V4,&,V5
[Output]
DataValue=RANDOMIZESUBJECT,V5
Example
;Flags are assembled in an earlier item called QualifierFlags
DataValue=RANDOMIZESUBJECT,$QualifierFlags
132
SmartQ 5.1 Manual
Multiple Studies or Sites
Assignment Query
After the subject has been randomized in this Custom item, you must save this subject to your randomization
database, including the Subject ID, all the qualifications, and any other associated non-qualification data.
Multiple Studies or Sites
You can allow for multiple independent randomizations at the same time, for different sites, for example. Your
survey collects or calculates a site identifier. The site identifier needs to be included in the WHERE clause of the
counts query. The assignment query must also save the site identifier.
Sample Randomizer Survey
The following is the script for the sample survey included with SmartQ, 91 Sample Randomizer.
1. Login
QUERY: Hello, this is the randomizer demo. Please log in with your
password. For this demonstration, use 87654321.
2. ValidateLogin
[Check the Login that was entered]
3. InvalidLogin
QUERY:
The password is invalid.
Please try again.
4. SubjectID
QUERY:
Please enter a 3-digit SubjectID
5. ValidateSubjectID
[Check that the Subject hasn't already been randomized]
6. InvalidSubjectID
QUERY:
The Subject ID is invalid. Would you like to try again?
For Yes, press 1
For No, press 2
7. AlreadyAssigned
INTRODUCEPROMPT1:
INTRODUCEDATA1:
Subject
[Read Subject Id to caller]
INTRODUCEPROMPT2:
QUERY:
is already assigned to group
To hear this again, press 1.
Otherwise press 2.
8. Q1
QUERY:
Gender: Is the subject male or female?
For Male, press 1
For Female, press 2
9. Q2
QUERY:
Age: Is the subject over 35?
For Yes, press 1
For No, press 2
SmartQ 5.1 Manual
133
Urn Randomization
10. Q3
QUERY:
Education: Has the subject completed some college or more?
For Yes, press 1
For No, press 2
11. Q4
QUERY:
Doctor: Has the subject seen a doctor in the last year?
For Yes, press 1
For No, press 2
12. AssignToGroup
[Invoke Counts Query here]
13. SaveResult
[Invoke the Assignment query here]
14. ShowResult
INTRODUCEPROMPT1:
INTRODUCEDATA1:
INTRODUCEPROMPT2:
QUERY:
Thank you.
The subject
[Read Subject Id to caller]
has been assigned to group
To hear this assignment again, press 1, otherwise press 2.
15. DoAnother
QUERY:
Would you like to randomize another subject?
For Yes, press 1
For No, press 2
134
SmartQ 5.1 Manual
Appendix B
Sample Surveys
Overview
The materials in the manual are designed to help you understand how the sample surveys included with SmartQ
were designed and scripted. The method outlined here is the method we recommend for creating your own
surveys.
1.
Define the questions you would like to ask.
2.
Organize the questions into logical groups: should you create a lead survey for gathering basic information or
routing to different surveys? Should you create a response survey? How many response surveys do you need
branched from your lead survey? Etc.
3.
Create a flow chart of questions and where their answers lead for each survey.
4.
Fill in the details using a blank script sheet. You can copy the one provided in this manual and use it to create
your own survey scripts.
5.
Create your survey with SmartQ.
Sample Survey 1: Customer Satisfaction
Background
There is a customer satisfaction sample survey included within SmartQ. Here, an owner of a grocery store chain
might want to know if customers are satisfied at each store. He would like to know if anyone has difficulty
finding a particular item. Finally, he wants to find out how many callers who regularly come to one of his stores
with a new childcare facility are aware of and/or use the resource.
SmartQ 5.1 Manual
135
Sample Surveys
"Welcome. Which location?"
Rosehill
Lakeside
Downtown
"Was the store clean?"
"Did you fnd the items you
were looking for?"
No
Yes
"What item did you have
most difficulty finding?"
Produce
Meat and Seafood
Deli
Other
"Was the checkout
line efficient?"
"Was the service friendly
and courteous?"
"Are you aware of
new chiild-care
center"?
Yes
FORMULA BUILDER:
Recalls response to
Location question
Rosehill
Lakeside
Downtown
No
"Are you likely to return to
Wholesome Grocery?"
"Have you used
the service"?
Yes
No
"Would you use it
again?"
End
End
136
SmartQ 5.1 Manual
Sample Survey 1: Customer Satisfaction
Item
#
Item
Name
Item Type
1
location
Query
Prompt to
Record
Script (for Query) or
Intro
“Welcome to the Wholesome
Groceries Customer Satisfaction
Survey.”
Question
“Please consider which of our
store locations you visit most
often.
Data
Routing
1
all
responses
routed to
Next
Formula Builder Entry (for
Retrieve and Calculate)
For our Rose Hill location, press
1.
2
3
For our Lakeside location, press
2.
For our Downtown location, press
3.”
2
clean
Query
Intro
“For the next few questions,
consider all of your visits to
Wholesome Groceries during the
last 6 months.
Please choose from the following
responses:
If your answer is:
“Yes, Always,” press 1.
“Yes, Often,” press 2.
“Yes, Sometimes,” press 3.
“No, never,” press 4.
At any time you may press the
following:
To Go Back to the Previous
Question, press *.
To Repeat the Current Question,
press 0.
To Skip to the Next Question,
press #.”
Question
“Was the store clean?”
1
2
3
4
Repeat
Instructions
all
responses
routed to
Next
“For always, press 1.
For often, press 2.
For sometimes, press 3.
For never, press 4.”
SmartQ 5.1 Manual
137
Sample Surveys
3
Find
Query
Question
“Did you find the items you were
looking for?”
1
2
3
4
4
difficult
Query
Repeat
Instructions
“For always, press 1…”
Question
“Please indicate the category of
item you had the most difficulty
finding in our store.
For Produce, press 1.
For Meat and Seafood, press 2.
1
2
3
4
1 and 2,
routed to
item 5:
checkout
3 and 4,
routed to
Next
all
responses
routed to
Next
For Bakery and Deli, press 3.
For Other, press 4.”
5
checko
ut
Query
Question
“Was the checkout line efficient?”
1
2
3
4
6
service
Query
Repeat
Instructions
“For always, press 1…”
Question
“Was the service friendly and
courteous?”
1
2
3
4
Repeat
Instructions
7
8
rose_hil
l
childcar
e
Calculate
Query
[Use Basic Formula Builder to
recall a single item: location.]
Intro
“We recently created a new
supervised childcare center to
assist you when you visit our
Rose Hill store.”
Question
“Were you aware that this
complementary service existed?
1
2
Query
Question
“Have you used this service?
2,3 routed to
Item 11:
return
1
1 routed to
Next
2
2 routed to
Item 11:
return
1
2
For yes, press 1.
For no, press 2.”
138
1 routed to
Next
3
For no, press 2.”
used
all
responses
routed to
Next
“For always, press 1…”
For yes, press 1.
9
all
responses
routed to
Next
1 routed to
Next
2 routed to
Item 11:
return
SmartQ 5.1 Manual
Sample Survey 2: Medical History
10
future
Query
Question
“Do you plan to use this service in
the future?
1
2
For yes, press 1.
all
responses
routed to
Next
For no, press 2.”
11
return
Query
Question
“How likely are you to return to
Wholesome Groceries?
1
2
3
For very likely, press 1.
all
responses
routed to
End
For somewhat likely, press 2.
For not likely, press 3”.
Sample Survey 2: Medical History
Background
SmartQ also includes a client information survey comprised of one lead and two response surveys for a total of
three surveys. This is a medical history survey that will assist a doctor in finding out the quality of care clients
are receiving and their level of satisfaction. Materials are mailed out beforehand in this survey, so that clients are
pre-assigned which survey to take.
SmartQ 5.1 Manual
139
Sample Surveys
Lead survey:
"Welcome. Enter
survey code"
100
Response survey 100:
"Did staff listen?"
200
Response survey 200:
"Enter treatment time
point"
end-treatment
post-treatment
mid-treatment
"Did staff work well as a
team?"
"Do you intend to stay?"
"Did staff allow you to
express concerns?"
"Are you satisfied?"
"Did staff explain?"
"Is the program meeting
your expectations?"
Formula Builder:
Calculate Score
"Did staff review treatment
plans?"
"Would you recommend
the program?"
end
Call again on
Calculate Date
end
140
SmartQ 5.1 Manual
Sample Survey 2: Medical History
Lead Survey
Item #
Item Name
Item
Type
Prompt
to
Record
Script (for Query) or Formula
Builder Entry (for Retrieve and
Calculate)
Data
Routing
1
code
Query
Intro
“Welcome to the Medical Survey
Line. We appreciate your taking
the time to call us. Your
responses will help us to
improve our service to you and
others.”
Question
“You will find a three-digit survey
code (either 100 or 200) printed
in the upper left-hand corner of
the materials you received. If
you do not see a survey code, or
the code you received does not
work, please call 1-800-5555555 and someone will assist
you. Please enter the three-digit
survey code now. “
100
100 routed to
Survey 100.
Data
Routing
1
all responses
routed to Next
200
200 routed to
Survey 200.
Response Survey
Item
#
Item Name
Item
Type
Prompt to
Record
Script (for Query) or Logic (for
Retrieve and Calculate)
1
listen
Query
Intro
“At any time during the survey
you may press the following:
Go Back to the Previous
Question, press *.
To Repeat the Current Question,
press 0.
To Skip to the Next Question,
press #.
To Pause the survey, press 9.
The following questions relate to
the treatment you received.
Please choose from the
following responses:
If your answer is:
“Yes, Always,” press 1.
“Yes, Usually,” press 2.
“Yes, Sometimes,” press 3.
“No, never,” press 4.”
Question
“Did the staff listen carefully to
you?”
2
3
4
SmartQ 5.1 Manual
141
Sample Surveys
Repeat
Instructions
“For:
Always, press 1.
Usually, press 2.
Sometimes, press 3.
Never, press 4.”
2
team
Query
Question
“Did the staff who treated you
work well as a team?”
1
2
all responses
routed to Next
3
4
3
concern
Query
Repeat
Instructions
“For:
Question
“Did the staff allow enough time
for you to express all of your
concerns?”
Always, press 1…”
1
2
all responses
routed to Next
3
4
4
explain
Query
Repeat
Instructions
“For:
Question
“Did the staff explain things in a
way you could understand?”
Always, press 1…”
1
2
all responses
routed to Next
3
4
Repeat
Instructions
5
score
Calc
“For:
Always, press 1…”
$listen,+,$team,+,$concern,+,
0-16
0-16 routed to
Next
1
all responses
routed to Next
$explain
[Use Basic Formula Builder to
sum listen through explain.]
6
post_treatment
Query
Question
“Did the staff review with you the
plans for your continued
treatment after you leave this
program?
2
3
For Yes, press 1.
For No, press 2.
If you are unsure, press 3.”
7
call_again
Query
Inform 1
Prompt
“Thank you for taking the time to
call us today.
None routed to
End
Please call again 4 weeks from
today on:”
142
SmartQ 5.1 Manual
Sample Survey 2: Medical History
Inform 1
MONTH,&,"/",&,DATE,&,"/",&,
Data
YEAR,+WEEKS,4
[Use Advanced Formula Builder
to find current month, date, and
year then add four weeks to it.
The Inform prompt will report this
date back to the caller.]
SmartQ 5.1 Manual
143
Sample Surveys
Blank Script Sheet
Item
#
144
Item Name
Item
Type
Prompt
to
Record
Script (for Query) or
Logic (for Retrieve
and Calculate)
Data
Routing
SmartQ 5.1 Manual
Appendix C
Transferring SmartQ to Another Computer
Step 1: Prepare computer B
A: computer which has SmartQ on it already (source)
B: computer to which SmartQ will be moving (destination)
NOTE: Broadband internet connection is highly recommended.
1.
Install Microsoft Windows®.
2.
Install latest Microsoft service packs and critical updates.
3.
Install Microsoft Office® 2000 or newer (optional) and service packs (available at
office.update.microsoft.com)
4.
Install an antivirus program (optional, but recommended).
5.
Install the Dialogic driver package version 5.1.1.
6.
Install the Dialogic Service Pack 1.
7.
If your Dialogic board is a “U” board (such as the D/4PCI-U), then install the PCIU patch.
8.
Install TeleSage SmartQ. If you do not have it, you can download it from www.telesage.com/latest.
Use UserID: telesage, password: customer.
9.
Download the update for SmartQ as well (from the same web location as the full install), but do not run it yet.
10.
Put this computer on the same network as computer A.
11.
Call TeleSage at 919-942-8849 and acquire a key code for the unique Product ID and PCID of this computer.
A.
To find the PCID, start SmartQ. In the dialog boxes, choose Full Capacity and Purchased Software
Package successively.
B.
The next window will display the PCID and request the ProductID and KeyCode.
C.
[Very important] Write the ProductID down and put it in a safe place. THIS WILL BE OVERWRITTEN
when files are copied from Computer A.
SmartQ 5.1 Manual
145
Transferring SmartQ to Another Computer
Step 2: Shut down computers and move the voice board
12.
Stop SmartQ on both computers by clicking Exit. Wait for any calls on A to complete.
13.
Shut down both computers and be sure they are powered off and unplugged.
14.
Unplug the phone lines from the Dialogic board(s) on computer A and leave unplugged.
15.
Move the Dialogic board(s) to computer B. Do not yet plug in the phone lines.
Step 3: Verify voice board installation on computer B
16.
Plug in and start up both computers.
17.
If SmartQ starts on computer A, ignore any errors and close the SmartQ program.
Computer B may invoke the Found New Hardware wizard. If this occurs:
A.
Click Next on the Welcome to the Found New Hardware Wizard dialog box.
B.
Select Search for a suitable driver for my device (recommended) and click Next.
C.
Select Specify a location and click Next.
D.
Click Browse and navigate to (or enter by typing): c:\program_files\dialogic\drvr\dlgcsram_nt4.inf. Click OK.
E.
In the Driver Files Search results dialog box, verify that the file dlgcsram_nt4.inf was found by
Windows as a driver for the new device.
18.
The next dialog is labeled Completing the Found New Hardware Wizard. Click Finish.
19.
Open Dialogic Configuration Manager by selecting Start > Programs > Intel Dialogic System Software >
Configuration Manager (DCM)
20.
It will detect the voice board.
21.
Within DCM, select Service > StartUp Mode > Automatic.
22.
Start the Dialogic service.
23.
Plug in the phone lines. If you have a T-1, it will take 15 seconds before the light that was red on the board
itself should turn green.
Step 4: Transfer files from A to B
24.
Make sure that TeleSage SmartQ is not running on either computer.
25.
Copy files from computer A to the corresponding locations on computer B:
• C:\WinNT\vvoice32.ini
• C:\Program Files\Telesage\*.*
• C:\Program Files\Telesage\Data\*.*
•
C:\Program Files\Telesage\Msgs\*.*
26.
Copy any databases that you may have set up outside of the C:\Program Files\Telesage directory
on computer A to a corresponding location on computer B.
27.
DSNs (advanced): If you have any custom calculations that make queries to external databases via a DSN, set
up and test these DSNs on computer B.
Step 5: Modify ivr.ini.
28.
146
On computer B, open c:\program files\telesage\ivr.ini with Notepad by selecting Start >
Programs > Accessories> Notepad
SmartQ 5.1 Manual
Step 5: Modify ivr.ini.
29.
In the ivr.ini file, modify or add key 26=xxxxxxxxxxxxx, where xxxxxxxxxxxxx is your 13-digit
product ID.
30.
Modify (or add, if necessary) 27=XXXXXX, where XXXXXX is your 6-character KeyCode.
31.
Save ivr.ini
32.
Run the SmartQ update that you downloaded in step 2. Update.exe
33.
Start TeleSage SmartQ on computer B.
34.
Verify that the lines come up as “Ready For Call”.
35.
Observe call activity on the lines, and call into the system to test.
Tips
If you want SmartQ to start automatically when your PC starts up, add a shortcut to c:\Program
Files\TeleSage\Start_IVR_Send.exe to your Startup folder.
If you had GoToMyPC or pcANYWHERE programs on computer A, install or transfer them to computer B.
For further help, consult the Technical Support section of the TeleSage website: www.telesage.com
SmartQ 5.1 Manual
147
Transferring SmartQ to Another Computer
148
SmartQ 5.1 Manual
Appendix D
T-1 Boards
The use of a T-1 board requires you to go through a fairly elaborate set-up process:
•
•
•
•
•
•
Give line specifications to the service carrier
Create cabling from the demarcation point to the board
Install Dialogic drivers
Configure Dialogic drivers
Configure SmartQ
Coordinate with TeleSage support staff when the T-1 circuit is operational
Please follow these instructions as carefully as possible and consult the TeleSage website
(www.telesage.com) for further suggestions.
There should also be an application on your SmartQ installation CD which helps you diagnose problems relating
to T-1 technology.
Line Specifications
Your local carrier will give you several options for setting up your T-1 line:
• Trunk type and framing (ISDN PRI with B8ZS ESF or AMI D4 with SF)
• Start Method (Wink, Ground, Loop or Immediate)
• ISDN Protocol (e.g., DMS 100, NI2, or none)
SmartQ cannot dial out or transfer calls on an ISDN PRI. Dialouts can only be made on an AMI D4 trunk using
SF framing (not ESF or B8ZS). ISDNs are more common, so you may have to emphasize this choice when
ordering your service.
For an inbound-only application, order:
• ISDN PRI with B8ZS ESF framing
• Immediate Start
• ISDN Protocol either DMS100 or NI2
For an outbound-only or two-way application, order:
SmartQ 5.1 Manual
149
T-1 Boards
• AMI D4 with SF framing
• Wink Start outbound, Immediate Start inbound
• No ISDN protocol
Notes
An ISDN T-1 uses channel 24 for signaling (ring, drop, pickup, hang-up), so only the first 23 channels will
accept calls. An AMI D4 T-1 uses all 24 voice channels for calls, as it does not utilize a “D” channel for
signaling.
An ISDN provides DNIS (dialed number) and ANI (Caller ID) digitally via the D-channel. You only need to tell
the carrier how many DNIS digits you would like. Typically you would ask for the last 5 digits of the dialed
number.
For AMI D4, ask your carrier to provide ANI and DNIS in the form “star - ANI - star - DNIS star.” This means that when SmartQ goes offhook, it will immediately receive touchtone digits from the T-1.
For example, if the caller dials 1-800-555-1212 from their home at 919-555-1212, SmartQ will receive the digits
as *9195551212*8005551212*. There is a checkbox on SmartQ’s Phone Line Setup screen that tells
SmartQ to expect this protocol and automatically interpret it.
Dialogic Board
The D/240JCT-T1 has jumpers and a rotary switch.
• If there is only one board in the system, the jumpers aren't needed: set the rotary switch to ID 0.
• The CT Bus cable is required if there are multiple T-1 boards in the same computer. There is a limit of 4 T-1
boards (96 lines) per computer.
There is an indicator light nearest the jack on the board.
• The light is red if there seems to be a problem with the signals.
• The light is green if the signals seem to be correct and consistent.
If the line is giving you trouble, make a “hard loopback” connector and plug it directly into the board. If this
doesn’t turn the light green when the Dialogic service is running, then the board is faulty. It may take 15 seconds
after insertion for the board to detect and analyze the signals.
The pin out for the board is
•
•
•
•
1 Receive Tip
2 Receive Ring
4 Transmit Tip
5 Transmit Ring
Therefore, to make a hard loopback, take an RJ-45 plug and two short wires. Connect pin 1 to pin 4 and pin 2 to
pin 5. Twist the wires.
Cable from the SmartJack to the Dialogic board
Use a straight-through LAN cable (ABAM or Cat 5e) to connect the SmartJack (the phone interface box) to the
Dialogic board. The cabling should be less than 133 feet in length.
If you are making a cable, the wires are the same on each plug. Place the plug so that the tab is away from you
and the wires would stream out to the left. Pin 1 will be on top. The wire order could be as follows:
• 1 Green white
• 2 Green
150
SmartQ 5.1 Manual
Dialogic Board
•
•
•
•
•
•
3 Orange white
4 Blue
5 Blue white
6 Orange
7 Brown white
8 Brown
OR
•
•
•
•
•
•
•
•
1 Orange white
2 Orange
3 Green white
4 Blue
5 Blue white
6 Green
7 Brown white
8 Brown
The first is called 568A and the second is 568B. Either will work as long as both plugs are the same. This cable
works because the SmartJack has transmit and receive pins reversed to mate with the Dialogic board or other
equipment.
Installing Dialogic Drivers
Use installation version 6.1.1. ISDN support is not included in the “Typical” or “Compact” installations.
Therefore, you must choose Custom Install and check the ISDN and GlobalCall checkboxes. When the
installer asks what ISDN protocols to install, choose all of them. You will only need one protocol, but this keeps
your options open.
Reboot and apply Service pack 1.
Configuring Dialogic Drivers
Run the Dialogic Configuration Manager. The Dialogic board should be auto-detected.
1.
Double-click the board to get its properties.
2.
Choose ISDN under the Interface tab.
3.
Choose the appropriate protocol, such as DMS-100, to match the protocol on your T-1 line.
4.
Under the Misc tab, there is a setting for parameter file. If you are using DMS, then enter “DMS.PRM”.
For another protocol, enter protocolname.prm. These files are in the folder c:\program
files\dialogic\data. They are highly-commented text files that contain settings such as enabling
ISDN, B8ZS, ESF and so on. They may be redundant with the protocol choice, but this redundancy should
not cause any problems.
SmartQ configuration
On the Phone Line Setup screen (see Chapter 1), you need to select the T-1 setting and the number of DNIS
(Dialed Number Identification Service) digits to capture (typically 10). These settings are saved in items 32 and
37, respectively, in the ivr.ini file.
SmartQ 5.1 Manual
151
T-1 Boards
Additional configuration
You may need to contact TeleSage so that can walk you through several more steps of the configuration and
testing. Please call your account manager to arrange this at 866-942-8849.
152
SmartQ 5.1 Manual
153
A
F
ADO connection string 123
Advanced Dialer 1
Allow editing of data option 51
Allow response during question
setting 22
AMI D4 signaling 6
Answer Deglitch setting 7
Answering machine 109, 126
Apply Now button 30, 41
Auto-Test 41
Fax Detection 47
Fax transfer number field 129
Fields Available setting 52
Fields to Output setting 52
Flagged Responses option 88
Formula Builder 65
C
Calculate file name by formula 53
Call
Maximum duration 130
Call statistics 49
Caller ID/ANI 8
Clip Recording option 61
Colors settings 51
Configuration
custom 1
Professional 1
Confirm Deletions option 51
Connection string
ADO 123
Current Activity screen 44
Custom configuration 1
D
Data button 49
Data Errors window 54
Data folder 54
Data Screen 87
Default response when an item is
skipped field 129
Define Jobs button 107
Deleted Responses option 88
Dialing Prefix setting 109
Dialogic Voice Board 2
DID Digits setting 6
DID/DNIS 8
Display Surveys Alphabetically
option 51
DLLs
Invoking 77
DNIS 94
Drop setting 6
E
Enable Multiple Lead Surveys
checkbox 94
Enclose dialstring with * and #
setting 8
Expect Wink after Pickup setting 7
Export open-end IDs checkbox 53
Export open-end transcriptions
checkbox 53
Maximum duration of survey 130
Maximum number of tries setting
22
Minimum open-end message
length 129
Multiple lead surveys 93
N
G
Get ANI-DNIS after pickup setting
6
Goodbye Prompt 59
Group
Fixed 57
Random 57
Rotating 57
H
Hang Up setting 6
Help xii
Hookflash 6
I
Importing recordings 20
Include field names as the first line
of output checkbox 53
Incomplete surveys 13
Inform 59
Initialize setting 6
Item
Maximum duration 130
K
NightOwl 1, 46, 106
Number of Digits settings 21
Number of DNIS Digits setting 6
Number of Lines setting 6
O
ODBC output 102
Offhook Delay setting 6
Open-end item 29
Open-end responses 88
Outbound Call Progress settings 7
P
Password 91
Pause Survey setting 28
Phone Lines Provide Hangup
setting 6
Pick Up setting 6
Play end of call checkbox 129
Poll Interval setting 124
Polling 124
Power Editor 99
Preview field 98
Previous Survey button 31
Professional configuration 1
Prompt types 17
Key text 28
Q
L
Lead survey
checkbox 94
Multiple 93
Lead surveys 10
Line Type setting 6
Live Person Max Hello Length
setting 7
Locked checkbox 32
Log files 46
Logging is enabled for this survey
setting 129
M
Max Nonsilence to Ignore setting 7
Max Time Between Rings setting
7
Maximum duration of call 130
Maximum duration of item 130
Quotas
Dialer Job 109
R
Record System Voice screen 61
Recording 19
Reject Invalid Response checkbox
22
Remind me to Auto-Test Surveys
checkbox 41
Repeat Current Item setting 28
Response survey 10
Retrieve item type 83
Retry busy numbers setting 109
Retry unanswered numbers setting
109
Return to Previous Item setting 28
Ring setting 6
Rings Before Answering setting 6
Robbed-bit signaling parameters 6
154
S
Save * as setting 28
Saved Responses option 88
Scheduling
Dialer jobs 114
Security 91
Separator setting 53
Show Tooltips option 51
Skip to Next Item setting 28
Specific Destination pull-down
box 31
Standard Dialer 1
Status of incoming lines 44
Survey
Maximum duration 130
Survey Organizer 99
System Prompts 59
System Voice 12, 59
T
Telephone Play-back 87
Test Now button 30, 42
Text file output 102
Time Allowed for Answer setting
7, 109
Time allowed for response setting
22
Time before repeating question
setting 22
Time between Pickup and Dial
setting 7
Time to wait for Wink setting 7
Timeout for Dial-For-Recording
setting 7
Tooltip xii
Transcribed Responses option 88
Transcription 88
Transfer Type setting 6
Translate Response checkbox 22
Try Data Export Again button 54
Two-key sequences 28
U
Unheard Responses option 88
Untranscribed Responses option
88
Use MF dialing setting 7
V
Valid Choices settings 23
View Responses As They Happen
setting 44
Voice Selection dialog 62
W
Welcome Screen 4
Wink signal 7, 8, 150
Wink start 7, 150
X
XML output 104