1
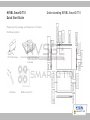
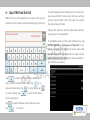
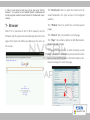
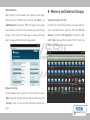
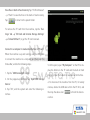
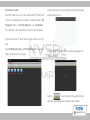
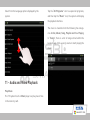
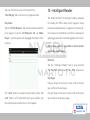
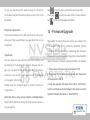
SmartQ T10
MID USER MANUAL
Designed in Mars. Made in Pluto.
COMPATIBLE
INDEX
- NVSBL SmartQ T10 Quick Start Guide
- Outline
1 - Basic Uses
2 - Basic Operations
3 - Main Interface
4 - Input Method Switch
5 - Wi-Fi Network Connection
6 - Bluetooth
7 - Browser
8 - Memory and External Storage
9 - Manage Applications
10 - Settings
11 - Audio and Video Playback
12 - Intelligent Reader
13 - Firmware Upgrade
14 - FAQ - Frequently Asked Questions
SmartQ T10
NVSBL SmartQ T10
Quick Start Guide
Understanding NVSBL SmartQ T10
Please open the package, and make sure it contains
the following items.
DC 5V 2A Charger
Quick Start Guide (with warranty
certificate)
USB Cable
NVSBL SmartQ T10
SmartQ T10
Outline:
Welcome to use NVSBL SmartQ T10
NVSBL SmartQ T10 uses Google Android2.2 operating system, which is different from the traditional PC in that the
Tablet PC is mainly operated through the touch screen, assisted with physical buttons.
This Quick Start Guide is written based on NVSBL SmartQ T10 Android2.2 V1.0 firmware. For the subsequent firmware update features, please refer to NVSBL official website about firmware upgrade instructions.
Firmware is similar to traditional computer operating systems, and NVSBL will update the product’s firmware to
enhance the T10 features and fixe identified problems. Please regularly check updates of the NVSBL official website download center for the latest firmware. If you have system problems in the use of T10, please also follow the
firmware upgrade method to reinstall the T10 firmware. Reinstallation of the firmware, similar to reinstallation of
the computer system, can restore T10 to its original state so as to solve the usage problem caused by the system.
The Quick Start Guide gives general introduction of the use of NVSBL SmartQ T10 in the following 15 categories:
Basic Uses, Basic Operations, Main Interface, Input Method Switch, Wi-Fi Network Connection, 3G Network Connection, Bluetooth File Transfer, Browser, Memory and External Storage, Manage Applications, Settings, Audio and
Video Playback, Intelligent Reader, Firmware Upgrades and FAQ.
SmartQ T10
1 - Basic Uses
Charge
Please connect the charger to the 220V mains power
outlet, the other end into the T10 charging port. The
logo backlight will blink, indicating it is being charged.
When the battery is fully charged, the logo backlight
will remain on but no longer blinking. If it is in the
power-on state, the battery charging icon on the upper
right corner of the screen will appear animation tips.
Power-on / Sleep / Shutdown:
Power-on: Press the power button, the screen will display the boot prompt. At this time, please wait a moment till the Android system is fully started and enters
the main interface.
Sleep:
When the system is powered on and you will not be
using it for a while, you can always press the power
button to get T10 into sleep state, it will then turn off
the screen and get Into standby state,
SmartQ T10
in which very little power will be consumed. When you
1. Touch:
need to continue to use T10, just press the power but-
Use finger to lightly touch the icon, option or menu on
ton again to wake up T10 to resume your operations
the screen to start or execute the appropriate proce-
suspended by the sleep state.
dures and functions.
Shutdown:
When you expect not to use T10 for more than a week,
hold the power button for two seconds, the “Options”
window will be pop up. Choose the shutdown option to
completely shut down the T10 power.
If the system crashes and can not be properly turned
off, please press the power button for 6 seconds to
force power off.
2 - Basic Operations
Android operating system’s touch screen operations
have the following three main types:
2. Press and Hold:
Press and hold down the icon on the screen for more
than 1 second, to simulate the mouse’s right button
click function for more options display.
3. Drag:
Press and hold down a list or a control bar, then move
your finger up and down or left and right to drag the list
or control bar.
If the pointing at the touch screen is not accurate,
touch screen calibration will be needed. Tap the Settings tab -> “screen calibration.”
SmartQ T10
(Settings menu)
According to the system prompt, orderly and accurately
Tap “Yes” to complete the calibration, and the accu-
tap the center of the five cross icons, until the system dis-
rate response of the touch screen will be restored.
plays the following window:
SmartQ T10
Volume up key: Increase the volume
Volume down key: Decrease the volume
Screen rotation switch: Move up the switch to turn
on the automatic screen rotation, move down to turn
off feature.
3 - Main Interface
1
2
3
Menu key: Bring up the menu function
Main interface key: Tap to return to the main screen. Hold
down to display the list of recently run applications. You can
switch the current application in the list
Return key: Get back to the previous screen;
1 - Status Bar
2 - Quick Power Switch
3 - Tab Bar
SmartQ T10
The main interface contains three items: the status bar, fast
power switch and the tab bar, in which the tab bar from left
to right has the Settings tab, Intellectual Reading tab, All
Programs tab, Media Player tab and Browser tab.
The main interface consists of three screens. View the content of each screen by dragging around.
Tab for all programs:
Tap the tab for all programs to expand the list of application
programs, and browse all the installed applications. In this
list, tap an icon to run the corresponding application program.
Holding in different directions, the screen layout may
be different.
The firmware factory default functionalities of th
applications are as follows:
SmartQ T10
Multi-tasking switch:
Long press the main interface key to display the most
recent program. Tap the window application icon to
return to the application of last exit.
Status Bar:
The status bar can prompt various local conditions
of current executions, of which the commonly used
icons and their meanings are as follows:
SmartQ T10
Power switch shortcut:
Power switch shortcut has the four switches – WiFi, Bluetooth, account synchronization, screen-off,
placed together in the main interface, so that you can
adjust the switches for quick settings. For example,
when you want to disconnect the Wi-Fi Internet connection, just tap the shortcut Wi-Fi icon in the main
Drag down the status bar to expand it. The following figure is the expanded status bar after T10 is connected to
the computer.
interface to turn off the Wi-Fi module, so as to save
T10 power consumption, and extend battery life.
For specific adjustments of these settings, tap the
Settings tab to operate.
Shortcut icons:
By shortcut settings, you can place the icons of frequently used application software in the main interface. To do it, tap the All Programs tab -> press and
hold an application icon, this application will be automatically placed in the main interface as the current
screen. Then release the icon.
SmartQ T10
Deleting a shortcut icon from the main interface is demon-
Add shortcuts and widgets.
strated as follows. Take the browser icon as an example.
Press the
icon, the tab bar becomes
Replace the wallpaper of the main interface.
icon.
Drag the icon to the recycle bin location, and when the
Use keywords entered for Google search.
shortcut icon color turns red, release the icon to delete it.
Tap to start the status bar.
You can also long press an icon, and drag it to place it to a
Desktop Setup Options
different location.
Parameter settings for Wi-Fi connection,
Main interface menu:
display and language.
The current screen is the main interface, short press the
Menu key to pop up the main interface menu.
Tap
->“Widgets”->“Multi-button switch” to add
power switch shortcut in the T10 main interface.
SmartQ T10
4 - Input Method Switch
Tablet PC uses soft keyboard for text input. Tap any text
input box, and the system will automatically pop up the soft
Quick search box
Search button
To switch between input methods, press any text editing area and hold for two seconds, the menu will pop
up. Tap “input method”, and in the Input menu, select
the desired input method.
Tap any text input box, and the system will automatically pop up the soft keyboard.
To update the options of the input method menu, tap
the Settings tab -> “Language and Keyboard” to select or cancel an input method, the menu content will
be updated accordingly. (To install an input method,
please follow this step, and set the newly installed input method as an option.)
Tap
to switch between Chinese and English
input. Under the English input mode, tap
able word association; tap
to enter symbols; tap
to en-
to enter digits; tap
to clear the text before
the mouse pointer;
tap
tap
to switch between upper and lower case;
to confirm.
SmartQ T10
5 - Wi-Fi Network Connection
Fi Settings" and then enter the "Wi-Fi Settings" interface.
Tap one of the searched wireless hotspots, the system
will pop up the connection setup window. Follow the
prompts to enter the password, and then wait for ten
seconds till the system prompt connected.
For manual connection, in the Wi-Fi setup interface,
short press the Menu key to have the system pop up
Check the "Wi-Fi" option, the system will automatically
the menu
Please use a wireless router to connect the machine to
Wi-Fi network.
Tap the Settings tab -> "Wireless and Network" -> "Wi-
search for nearby wireless hotspots.

Tap "Advanced" option to set up static IP, IP address,
gateway and other parameters. Enter the DNS IP address in the "domain name 1" option, and enter the
secondary DNS IP address in "domain name 2". After
this, turn off Wi-Fi, and then turn in on again. The T10
Wi-Fi settings now take effect.
SmartQ T10
6 - Bluetooth File Transfer
T10 has a built-in Bluetooth module, which can be connected to other devices for file transfer. For Bluetooth file
transfer, T10 needs to pair with other Bluetooth device
first.
Pairing:
The first time when two Bluetooth devices pair, one of
these two devices has to have its Detection option started.
Tap "Settings" tab -> "Wireless and Network", check the
Bluetooth to turn it on, and then tap the "Bluetooth Settings" option.
Here is an example of starting the Detection option of other
Tap the Bluetooth device to be paired, the NVSBL
SmartQ T10 and the device to be paired will simultaneously display pairing request along with their random keys for the pairing.
Bluetooth devices so that T10 can search for them:
Tap the "Search for Device" tab, the system will search for
nearby detectable Bluetooth devices, and prompt with the
1
detected ones.
2
3
SmartQ T10
1 - Bluetooth Paring Request
Tap Bluetooth option, the system will prompt with
2 - To pair
detected Bluetooth devices. Tap to select one of the
3 - Not to pair
paired devices, and you are ready to send files to that
To pair with “Nvsbl SmartQ T10”. Check whether the pair-
paired device.
ing key is:126469
Receiving Files:
Sending Files:
For T10 to receive files transferred from other devices,
After the Bluetooth is started and the T10 is paired with
drag down the Status Bar, tap the prompt window, and
other device, tap the
in the pop-up window tap “Receive” option, you are now
tab to open all programs, and
then tap the "ES File Browser" to open the browser, select
able to receive files sent by other Bluetooth devices.
a file to send, press and hold, the system will pop up
To view the received files, drag down the prompted Sta-
operating options.
tus Bar, tap the prompt window of successful Bluetooth
file receiving, the system will start the viewing procedures.
Tap the
tab to open all programs and then tap
the “ES File Browser” to open “sdcard” folder and its
“Bluetooth” subfolder, so you can view the files received via Bluetooth.
Note: 1. T10 must have a TF card in order to receive files via
Bluetooth.
SmartQ T10
2. Files of some other formats may not be sent using “ES File
Browser”. It is advised to use Android Market to download and
install programs related to these formats for the Bluetooth transmission.
The "Bookmarks" tab is to open the historical list of
saved bookmarks for quick access to the targeted
website;
7 - Browser
The "Window" tab is to switch the currently opened
pages.
After T10 is connected to 3G or Wi-Fi network, tap the
Browser tab, the system will automatically open the home
page. Short press the Menu key to pop up the menu on
the screen.
The "Refresh" tab is to reload the current page;
The "More" tab contains options of Add Bookmarks,
Downloads and Settings.
T10 supports multi-touch, so when browsing a web
page, you can use two fingers to press and hold on the
touch screen and then pull or shrink the distance between two fingers to zoom the page.
SmartQ T10
Add Bookmarks:
8 - Memory and External Storage
After getting into the browser and opening a web page.
Short press the T10 Menu key, and then tap “More” ->
View files stored in TF card:
“Add Bookmark” and select “OK”, this page is then saved
Insert the TF card into the machine, and wait until this
as a bookmark, so that in the future when you get into the
card is identified by the machine. Then tap “ES File
browser, short press the Menu key to easily select and
Browser” tab under “All Programs” to open the “SD-
open the pages of the bookmarks you saved.
card” folder, and read the contents of the TF card. Tap
the icon to return to the parent folder.
Browser Settings:
On the Browser page, press the T10 menu button, select
“More” tab, and drag the selection list, and then select the
“Settings” item, so you can do the Browser-related settings.
SmartQ T10
View files in built-in flash memory:Tap "ES File Browser"
-> "Flash" to view the files in the built-in flash memory.
Tap
to return to the parent folder.
To remove the TF card from the machine, tap the “Settings” tab -> “SD Card and Internal Storage Settings”
-> “Unload SD Card”, to get the TF card removed.
Connect to a computer to read and write files in TF card
When the machine is up and running, use the USB cable
to connect the machine to a computer, and then start the
Status Bar, and do the following steps:
1. Tap the “USB Connected” column.
2. On the popped-up interface, tap “Open USB Storage
Device”.
3. Tap “OK”, and the system will enter the following interface:
5. At this point, open "My Computer" on the PC to display the folders in the TF card and the built-in flash
memory. Open the folders to read and write the files.
6. To disconnect the machine from the PC, for safety
remove, delete the USB device from the PC first, and
then tap the above icon
to finish the discon-
nection.
SmartQ T10
View files in U-disk:
Press and hold the file to be copied, and the following
Use OTG cable to connect the U-disk with T10. After the
window will pop up.
U-disk is identified by the system, orderly tap the "All
Programs" tab -> "ES File Browser" -> "sda Folder".
The contents in the sda folders are the U-disk contents.
Copy files among TF card, built-in flash memory and Udisk
Tap "All Programs" tab -> "ES File Browser" to open the
folder of the files to be copied.
Select “Copy” or “Cut”, and the system will appear the
clipboard label.
Tap the
icon to return to the parent folder,
and then select and enter the destination folder.
SmartQ T10
9 - Manage Applications
Application program installation:
Under the Android system, all software applications and
games are APK file format. To install the application software to T10 Tablet PC, you can copy the APK files of the
applications to the TF card for local installation or you can
install via e-market.
Uninstall applications:
Tap “Settings” -> “Applications” -> “Manage Applications”, and drag the page up and down to select
the application to be deleted, and then tap to start the
un-installation.
For local installation, use the computer to transmit the
downloaded APK files via a data cable or card reader
to the TF card. Then use “ES File Browser” of another
browser to open the “sdcard” folder to start the installation.
SmartQ T10
10 - Settings
For manual adjustment, cancel the automatic brightness adjustment option, and then drag the brightness
Set time and date:
bar to adjust brightness to the desired level and then
Tap the "Settings" tab, and then drag the window to se-
tap “OK” to save the setting.
lect "Date and Time", and in the "Date and Time Settings"
set the time, date, time zone and format.
Volume adjustment:
Tap the "Settings" tab, and then tap "sound" -> "Volume", and then drag the volume bar to adjust the volume,
and then tap "OK" to save the setting; volume can also be
directly adjusted by using the volume key on the side of
the machine.
Set screen standby time:
Set screen brightness:
Tap “Settings” -> “Display” -> “Screen Time-out”,
Tap the “Settings” tab, and then “Display” -> “Bright-
and then drag the window to select a setting value to
ness”, the system will display the automatic brightness
determine the delay before the screen automatically
adjustment dialog box. T10 has light sensitivity to auto-
locks.
matically adjust screen brightness according to the environment brightness.
SmartQ T10
Calibrate the touch screen:
Tap “Settings” -> “Screen Calibration”, and do calibration according to the system prompts. For detailed information, please see the basic instructions of the touch
screen operations.
Gravity sensing:
The T10 built-in accelerometer supports gravity sensing
game.
When the screen rotation switch is moved up, the automatic screen rotation will be enabled and T10 rotates
After getting into the "Language and Keyboard" settings page, tap "Select Language",
screen according to the direction of screen holding. Move
down the switch to fix the screen without orientation.
Language setup:
Tap “Settings” -> “Language and Keyboard”.
SmartQ T10
Select from the language options displayed by the
Tap the “All Programs” icon to expand all programs,
system.
and then tap the “Music” icon, the system will display
the playback interface.
The music is classified into the following five categories: Artist, Album, Song, Playlist and Now Playing.
In “Songs”, there is a list of songs stored within the
local storage. Click a song’s name to start playing the
music.
11 - Audio and Video Playback
Play Music:
The T10 system built-in Music player can play music files
in the memory card.
SmartQ T10
Tap one of the three icons on the right of the
"Now Playing" tab to set the music playback mode.
12 - Intelligent Reader
The Nvsbl SmartQ T10 intelligent reading software
Play Video:
for reading the PDF e-book, which supports online
Tap the “ES File Browser” tab, and then tap the video file
purchase and download of e-magazines. The descrip-
to be played; or tap the “All Programs” tab -> “Media
tion is based on SmartQ V4.0, and for the subsequent
Player”, and the system will display all the folders of the
updates, please refer to SmartQ upgrade instructions.
machine.
PDF e-book reader (It´s possible to install another
“pdf reader from Market).
Directory:
Tap the "Intelligent Reader" tab to open SmartQ.
The machine will show all the PDF documents.
Flip Pages:
Put your finger on the touch screen, slide to the left,
you can flip to the next page.
The “nand” folder is a system memory folder, while “sd-
Put your finger on the touch screen, slide to the right,
card” folder is a TF card folder. Tap to open a folder, and
you can flip to the previous page.
then tap the desired video file in it for playback.
SmartQ T10
Or you can directly tap the white triangle on the left to
Tap
flip forward, and tap the white triangle on the right to flip
tions; tap
backward.
tap
Brightness adjustment:
13 - Firmware Upgrade
Press and hold down on the left side of the touch screen,
to do the share, annotation and setup functo switch on-and-off the screen rotation;
to add and management labels.
slide your finger up and down, you can adjust the screen
Upgrade to the latest firmware version can enhance the
brightness.
T10 features and fix the problems identified. System

problems can be resolved by reinstalling the firmware.
Page Zoom:
Please visit our official website regularly to download the
Use two fingers to tap and hold the touch screen, and
latest firmware. Firmware upgrade method is as follows:
by widening or narrowing the distance between two fingers, you can zoom in and out the page. When the page is
1. Please save a backup of personal data in T10.
zoomed in, the current screen position will be displayed
2. Prepare a TF card with enough space, and make sure
on the upper right corner.
its file system is FAT32.
Double-click the enlarged page to instantly restore its
3. Copy the upgrade firmware file to the TF card root di-
original size.
rectory and make sure the firmware file name is correct
Quick flip, share, setup, screen rotation, and bookmarks:
(system firmware file name is “SmartQT10”).
Tap the Menu button to call up the progress bar and a variety of options.
SmartQ T10
4. Insert the TF card when the machine is in off state, and
then connect the power adapter, hold down the “volume
down” key, then long press the power button until the
upgrade icon appears on the screen, to enter the firmware upgrade interface.
5. After the upgrade is complete, T10 will be restarted.
Tip: Some versions of the firmware may have different upgrade
methods from the one in this guide. Be sure to read the firmware
upgrade instructions, or it may result in an unbootable situation.
SmartQ T10
14 - Frequently Asked Questions
- When the Tablet PC is running slow, how to improve its speed?
When the Tablet PC is running slow, you can terminate some programs to free up memory so as to improve its speed.
For program termination, please see the section of "Manage Applications" .
- What should I do when the touch screen’s responding position and the actual touched position are inconsistent?
Touch screen after being used for some time may appear misidentified touch position, and need to be calibrated.
Please follow the instructions in the second of "Basic Operations" about the basic operations of touch screen for the
calibration.
- How to connect to the Wi-Fi network?
Please see the section of "Wi-Fi Network Connection" for instructions.
- How to connect to the 3G network?
Please see the section of "3G Network Connection" for instructions.
- How to view the files in the TF card?
Please see the section of “Memory and External Storage” for instructions.
- How to uninstall the TF card?
Please see the section of “Memory and External Storage” for instructions.
- How to view the files in U-disk?
Please see the section of Memory and External Storage” for instructions.
SmartQ T10
- How to copy the files in the U-disk to the Flash memory?
Please see the section of “Memory and External Storage” for instructions.
- How to uninstall U-disk?
In the Android 2.2 kernel, there is no uninstall option for the U-disk device. However, it supports hot swap. Before pulling out the U-disk, make sure there is no U disk read and write.
- When T10 crashes or error occurs in operation, how to force shutdown?
Please long press the power button for at least 6 seconds to force the shutdown.
- What to do when the T10 does not boot?
First, determine whether T10 is in the crash state. If it is, press the power button for more than six seconds to force
shutdown, and then reboot; Second, determine whether the T10 battery power is depleted. If so, insert the charger and
then reboot. If this two causes are excluded, the unbootable status of T10 may result from system destruction. If so,
connect the charger first, and then reinstall the firmware according to the firmware upgrade instructions, so that T10
can be restored to its initial state, and unbootable problem can be solved.
- How to download and install application programs?
Please see the section of “Manage Applications” for instructions.
- How to install application programs on Tablet PC?
Please see the section of “Manage Applications” for instructions.
SmartQ T10
- When an unfamiliar language is accidentally selected and the screen messages become not understandable, how
to get back to the original language?
Please see the language setup in the section of “Settings” for instructions. To do this, tap the main menu key to return
to the main interface. Tap the
icon to set up, and then tap the
icon and follow the instructions of language setup
to select the desired language.
SmartQ T10
- Can I use ADSL modem to connect T10 to Internet?
T10 system has no dial-up software. But if the ADSL modem is capable of wireless routing to connect to other device,
you can directly access the Internet without the need of dial-up. Otherwise, there will be no way of using ADSL modem
to connect T10 to Internet.
- What if when the T10 Internet connection via a wireless router has been established, entering the URL can not
open the page?
When T10 is connected to Internet but entering URL on the browser can not open the web page, check whether the DNS
domain name settings are correct.
Here are the steps of doing this:
Tap the “Settings” tab -> “Wireless and Network” -> “Wi-Fi” to set up.
On the Wi-Fi setup page, short press the menu button, and the system will pop up the menu. Tap the “Advanced” option
to enter the advanced options interface:
SmartQ T10
If T10 uses a static IP address (shown above), please check whether the IP addresses in domain name 1 and domain
name 2 are local DNS server addresses. If not, please change the domain name 1 using a local DNS server address,
and then turn off Wi-Fi, and then re-open it, the new DNS domain name will take effect.
If the T10 is not using a static IP, please check whether the parameters of the wireless router settings have local DNS
server address. If not, change the wireless router’s DNS server address into the local DNS server address, and restart
the wireless router and then reboot to reconnect.
- I installed the Adobe Flash plug-in program, but still can not watch online videos of the Flash version?
This is because the system default browser identification is iPad, therefore the online videos acquired are Html5 formats. To use the Adobe Flash Player to watch video, change the T10 browser identification to Android, so that you can
get videos in Flash format. Steps of changing the browser identification are as follows:
Tap the “Browser” tab to open the browser, and then tap the Menu button to call up the browser options menu.
SmartQ T10
Then tap “More” -> “Settings” -> “User-Agent String”, the system will pop up the following window:
The browser identification is changed to Android for the conversion.
- How to determine whether T10 is charging?
When T10 is up and running, Smatdevices logo on the front of the machine cabin will blink and on the upper right
corner of the system main interface there will appear an battery capacity indicator, showing T10 is in normal charging.
When T10 is in power-off state, the logo on the front of the machine cabinet will blink, showing T10 is in normal charging.
SmartQ T10
- How to determine T10 is fully charged?
When T10 is in power-on state, and the battery capacity indicator on the top right concern of the system main interface
is no longer showing battery capacity change, the T10 is fully charged.
When T10 is in the power-off state, the logo on the front of the machine cabinet changes from blinking to constant
bright state, the T10 is fully charged.
- If T10 is inadvertently tainted with water, how to deal with this?
Do not turn on the power. First, remove peripheral devices such as the TF card, Fling dry its internal water, and use
a soft cloth to wipe off the water droplets on T10 surface. And then contact the after-sales engineer to for cleaning
inspection.
*This guide is only for daily reference, and there will be no further notice for any changes.
*This guide is based on NVSBL SmartQ T10 Android2.2 V1.0 firmware, for subsequent update features please refer to
the NVSBL official website about the firmware upgrade instructions.
For more information, please check NVSBL official website at:
http://www.nvsbl.es or http://www.nvsbl.es/foros/
and download detailed upgrading user guide.
SmartQ T10
Product comercialized by:
Nvsbl Unusual Technology SL
CIF B85751790
Email: [email protected]
Web: http://www.nvsbl.es
Made in China.