1
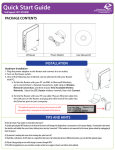
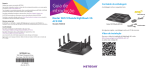
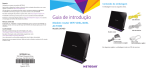
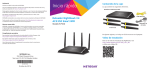
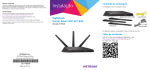
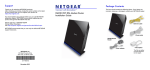
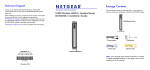
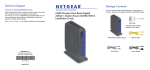
Trademarks
NETGEAR, the NETGEAR logo, and Connect with Innovation are trademarks and/or registered
trademarks of NETGEAR, Inc. and/or its subsidiaries in the United States and/or other
countries. Information is subject to change without notice. © NETGEAR, Inc. All rights
reserved.
Installation
Package Contents
The box contains the following items.
Compliance
For the current EU Declaration of Conformity, visit
Ethernet cable
http://support.netgear.com/app/answers/detail/a_id/11621/.
For regulatory compliance information, visit
http://www.netgear.com/about/regulatory/.
See the regulatory compliance document before connecting the power supply.
Nighthawk X6
AC3200 Tri-Band WiFi Router
Model R8000
AC3200 Tri-Band WiFi Router
Power adapter
In some regions, a resource CD is included in the package.
Installation Video
To view the Nighthawk installation video, visit
http://www.netgear.com/R8000_vid1
or use this QR code:
NETGEAR, Inc.
350 East Plumeria Drive
San Jose, CA 95134 USA
June 2014
You can use this diagram to connect your router or follow the detailed instructions in this booklet.
Thank you for purchasing this NETGEAR product.
1. Extend the antennas.
Position the antennas for the best WiFi
performance.
6. Log in to the router.
Launch a web browser.
NETGEAR recommends that you position
all of the antennas vertically as shown.
NETGEAR genie displays.
If you do not see genie, enter
www.routerlogin.net in the address
field of the web browser. When prompted,
enter admin for the user name and
password for the password.
2. Prepare your modem.
Unplug your modem’s power. If it has a
battery backup, remove the battery.
Follow the genie steps to connect to the
Internet.
3. Connect your modem.
Plug in your modem. Put the battery back
in. Then cable the modem to the yellow
Internet port on the router.
Ethernet cable
4. Power on the router.
The Power LED lights amber and then
turns white when the router is ready.
5. Connect a computer.
You can use an Ethernet
cable or connect with WiFi.
To connect with WiFi, use
the WiFi network name and
password on the product
label.
Support
7. Get free apps.
During the installation process, genie
prompts you to download two free apps:
• genie app. A personal dashboard that
lets you monitor, control, and repair
your home network.
• ReadySHARE Vault app. Enables
automatic continuous backup of a
Windows computer to a USB drive
that’s connected to your router.
Internet
DSL or cable
Router
Ethernet cable
Modem
Power
adapter
8. Get the user manual.
You can get the user manual online at
http://downloadcenter.netgear.com
or through a link in the product’s user
interface.
After installing your device, locate the serial number on the label of your
product and use it to register your product at https://my.netgear.com.
You must register your product before you can use NETGEAR telephone
support. NETGEAR recommends registering your product through the
NETGEAR website.
For product updates and web support, visit http://support.netgear.com.
NETGEAR recommends that you use only the official NETGEAR support
resources.
You can get the user manual online at
http://downloadcenter.netgear.com or through a link in the product’s
user interface.
Contents
Install Your Router........................................................................................................ 2
LEDs................................................................................................................................. 6
WiFi Network Name and Password.......................................................................... 7
Join the WiFi Network................................................................................................. 8
View or Change the Router Settings....................................................................... 9
Share a USB Drive on the Network.......................................................................12
ReadySHARE Vault Backup App..............................................................................14
Share a USB Printer....................................................................................................15
More Premium Features...........................................................................................16
NETGEAR genie App..................................................................................................19
1
Install Your Router
Make sure that your Internet service is active before you install
your router.
¾¾ To install your router:
1. Extend the antennas.
Position the antennas for the best WiFi performance.
NETGEAR recommends that you position all of the antennas
vertically as shown.
2. Prepare your modem.
Internet
DSL or
cable
Modem
a. Unplug your modem’s power.
b. If the modem has a battery backup, remove its batteries.
c. If your modem was already connected to another router,
disconnect the cable between your modem and that router.
Make sure that your modem is turned off and is cabled only to
the wall jack for your Internet service.
2
3. Connect your modem.
Router
Internet
DSL or
cable
Ethernet
cable
Modem
a. Plug in, then turn on your modem.
b. If you removed the batteries, replace them.
c. With the yellow Ethernet cable that came with the router,
connect your modem to the yellow Internet port on your
router.
4. Add power to the router.
Router
Internet
DSL or
cable
Ethernet
cable
Power
adapter
Modem
a. Connect the power adapter to the router and plug the
power adapter into an outlet.
b. Wait for the Power LED on the front panel to light amber
and turn white.
If no LEDs are lit, press the Power On/Off button on the
rear panel of the router.
3
5. Connect a computer.
Ethernet cable
Router
Internet
DSL or
cable
Ethernet
cable
Power
adapter
Modem
You can use an Ethernet cable or connect with WiFi:
• For a wired connection, use an Ethernet cable (not included)
to connect your computer to a black Ethernet port on your
router.
• To connect with WiFi, use the WiFi settings on the product
label.
6. Launch a web browser.
The first time that you connect to the router, the genie screen
displays. Follow the genie steps to connect to the Internet.
If the genie screen does not display, try the following:
• Close and reopen the browser.
• Make sure that your computer is connected to one of the
four black Ethernet ports on the router, or that you are
connected to your WiFi network.
• Make sure that the router has full power, and that its Power
LED is lit.
4
• If your computer is set to a static or fixed IP address (this is
uncommon), change it to obtain an IP address automatically
from the router.
If you still do not see the genie screen, log in to the router so
that genie can detect your Internet connection.
¾¾ To log in to the router:
1. Launch a web browser.
2. Enter www.routerlogin.net in the address field of the
browser.
A login screen displays.
3. Enter admin for the user name and password for the
password.
The BASIC Home screen displays. If your Internet connection
is not set up yet, genie automatically detects your Internet
connection.
5
LEDs
The LEDs on the top of the router light to indicate router activity:
Power
Internet
2.4 GHz WiFi
5 GHz WiFi 1
5 GHz WiFi 2
USB 3.0 port
USB 2.0 port
Ethernet ports 1–4
WiFi On/Off button with LED
WPS button with LED
You can use the LED On/Off switch on the rear panel of the router
to turn the LEDs on the top of the router on or off.
Note:  The Power LED stays lit even if the LED On/Off switch is in the off
position.
LED On/Off switch
6
WiFi Network Name and Password
The preset WiFi network name (SSID) and password (network key)
are unique to your router, like a serial number. Because the router
automatically uses WiFi security, you don’t need to set it up. The
WiFi settings are on the product label.
NETGEAR recommends that you use the preset WiFi settings
because you can check the product label if you forget them.
NETGEAR genie lets you change these settings. If you do so, write
down the new WiFi settings and store them in a safe place.
You can write the WiFi settings from your product label in this space
for easy reference.
WiFi network name (SSID):
Network key (password):
If you change the WiFi settings, write the new settings here for
easy reference and store this booklet in a safe place.
WiFi network name (SSID):
Network key (password):
7
Join the WiFi Network
You can either use Wi-Fi Protected Setup (WPS) or select your WiFi
network and type its password. For help with the WPS button on
your computer or WiFi device, check the instructions or online help
that came with that computer or device. Some older equipment
cannot use WPS.
¾¾ To join the network using WPS:
1. Press the WPS button on the router for 3–5 seconds.
The WPS LED on the router blinks white.
2. Within two minutes, on your computer or WiFi device, press its
WPS button or click its onscreen WPS button.
The WPS LED on the router lights solid white when the
computer or WiFi device connects to your router.
3. Repeat this process to add other computers or WiFi devices.
¾¾ To select your network and enter its password:
1. Open the software utility that manages your WiFi connections
on the computer or WiFi device that you want to connect to
your router.
This utility scans for WiFi networks in your area.
2. Find and select your router’s WiFi network name (SSID).
The SSID is on the product label.
3. Enter the router’s password (or your custom password if you
changed it) and click the Connect button.
The password is on the product label.
4. Repeat Step 1 through Step 3 to add other computers or WiFi
devices.
8
View or Change the Router Settings
After you use genie to set up the router, you can log in to the router
to view or change its settings.
Log In to the Router
¾¾ To log in to the router:
1. Connect a computer or WiFi device to the router.
You can use an Ethernet cable or connect with WiFi.
• For a wired connection, use an Ethernet cable (not included)
to connect your computer to a black Ethernet port on your
router.
• To connect with WiFi, select and join your WiFi network.
2. Launch a web browser.
3. Enter www.routerlogin.net in the address field of the
browser.
A login screen displays.
4. Enter admin for the user name and password for the
password.
The BASIC Home screen displays.
Change the admin Password
¾¾ To change the admin password:
1. Launch a web browser.
2. Enter www.routerlogin.net in the address field of the
browser.
A login screen displays.
9
3. Enter admin for the user name and password for the
password.
The BASIC Home screen displays.
4. Select ADVANCED > Administration > Set Password.
5. Type your old password and type the new password twice.
6. To be able to recover the password, select the Enable
Password Recovery check box.
NETGEAR recommends that you enable password recovery.
7. Select two security questions and provide answers to them.
8. Click the Apply button.
Your changes are saved.
Recover a Forgotten admin Password
The default password for the admin user name is password. If you
changed the password and enabled the password recovery feature,
you can retrieve this password.
¾¾ To retrieve a forgotten admin password:
1. Launch a web browser.
2. Enter www.routerlogin.net in the address field of the
browser.
A login screen displays.
3. Click the Cancel button.
If password recovery is enabled, you are prompted to enter the
serial number of the router. The serial number is on the product
label.
4. Enter the serial number of the router.
The serial number is on the product label.
5. Click the Continue button.
10
A screen displays requesting the answers to your security
questions.
6. Enter the saved answers to your security questions.
7. Click the Continue button.
A screen displays your recovered password.
8. Click the Login again button.
A login screen displays.
9. With your recovered password, log in to the router.
Find a Forgotten WiFi Security Password
The preset WiFi password is on the product label. If you changed
your WiFi password and forgot what it is, log in to the router to
view its current WiFi password.
¾¾ To connect to the router and view its WiFi password:
1. Use an Ethernet cable to connect your computer to a black
Ethernet port on the router.
2. Launch a web browser.
3. Enter www.routerlogin.net in the address field.
A login screen displays.
4. Enter the router user name and password.
The default user name is admin and the default password is
password. You can use the default credentials if you did not
change them.
The BASIC Home screen displays.
5. Select Wireless Settings.
The Security Options section of the screen displays your WiFi
password.
11
Share a USB Drive on the Network
ReadySHARE lets you access and share a USB drive connected to
the router USB port. (If your USB drive has special drivers, it is not
compatible.)
¾¾ To access the USB drive from a Windows computer:
1. Insert your USB storage drive into the blue USB 3.0 port on the
router.
2. If your USB drive has a power supply, you must use it when you
connect the USB drive to the router.
When you connect the USB drive to the router USB port, it
might take up to two minutes before it is ready for sharing. By
default, the USB drive is available to all computers on your local
area network (LAN).
3. Select Start > Run.
4. Enter \\readyshare in the dialog box.
5. Click the OK button.
12
¾¾ To access the USB drive from a Mac:
1. Insert your USB storage drive into a blue USB 3.0 port on the
router.
2. If your USB drive has a power supply, you must use it when you
connect the USB drive to the router.
When you connect the USB drive to the router USB port, it
might take up to two minutes before it is ready for sharing. By
default, the USB drive is available to all computers on your local
area network (LAN).
3. Select Go > Connect to Server.
4. Enter smb://readyshare as the server address.
5. Click the Connect button.
13
ReadySHARE Vault Backup App
Your router comes with free backup software for all the Windows
computers in your home. Connect a USB hard disk drive (HDD)
to the USB port on your router for centralized, continuous, and
automatic backup.
¾¾ To back up your Windows computer:
1. Connect a USB HDD to a USB port on the router.
For best performance, connect a USB 3.0 HDD to the blue USB
3.0 port on the router.
2. Install the genie app on each Windows computer.
3. Download ReadySHARE Vault from
www.netgear.com/readyshare and install it on each Windows
computer.
4. Launch ReadySHARE Vault.
5. To set up and run your backup, click the Dashboard or the
Backup tab.
14
Share a USB Printer
You can connect a USB printer to a USB port on the router and print
wirelessly.
¾¾ To set up ReadySHARE Printer:
1. Connect the USB printer to a USB port on the router with a USB
printer cable.
2. On each computer that will share the printer, do the following:
a. Install the current USB printer driver software (available
from the printer manufacturer).
b. Download the NETGEAR USB Control Center utility from
www.netgear.com/readyshare.
c. Select the language.
3. If prompted, select the printer and click the Connect button
for each computer.
When the first computer connects, the status changes to
Manually connected by xxx.
For each computer, when you complete Step 3, the printer
status displays as Available.
15
More Premium Features
Your router lets you do the following and more:
• Play music from a USB drive with iTunes Server.
• Set up a secure VPN service connection to your home network.
• Create a personal FTP server with a custom URL.
iTunes Server
iTunes Server lets you play music with your Windows or Mac iTunes
app from a USB drive that is connected to the router USB port.
You can also use the Apple Remote app from an iPhone or iPad to
play music on any AirPlay devices, such as Apple TV or AirPlaysupported receivers.
¾¾ To specify iTunes Server settings:
1. On your iPhone or iPad, find and connect to the WiFi network.
2. Launch the Remote app.
3. Click the Add a Device button.
A passcode displays.
4. Specify the passcode in the router.
a. Launch a web browser.
b. Enter www.routerlogin.net in the address field of the
browser.
A login screen displays.
c. Enter the router user name and password.
The default user name is admin and the default password
is password. You can use the default credentials if you did
not change them.
The BASIC Home screen displays.
16
d. Select ADVANCED > ReadySHARE > ReadySHARE
Storage > Media Server.
e. Make sure that the Enable iTunes Server (Music Only)
check box is selected.
f. Enter the passcode and click the Allow Control button.
g. Click the Apply button.
Your changes are saved.
On your iPhone or iPad, the ReadySHARE music library displays
in the Remote app. You can play this music on any Airplay
devices.
VPN Service
VPN service allows remote access to your home network with a
secure connection. After you set up VPN service, you can use VPN
to access the router’s USB drive and media and to access your
Internet service at home. To set up VPN service, follow these highlevel steps:
1. Specify the VPN service.
2. Install OpenVPN software on your computer.
3. Use a VPN tunnel.
These steps are explained in detail in the user manual, which is
available online at http://downloadcenter.netgear.com or through a
link in the router’s user interface.
17
Personal FTP Server
With your customized free URL, you can use FTP to access your
network when you aren’t home through Dynamic DNS. To set up
your FTP server, follow these high-level steps:
1. Register for a free NETGEAR Dynamic DNS (DDNS) service
account.
2. Provide the account settings to your router.
3. Connect a USB hard disk to your router and set up FTP access
through the Internet.
These steps are explained in detail in the user manual, which is
available online at http://downloadcenter.netgear.com or through a
link in the router’s user interface.
18
NETGEAR genie App
The free NETGEAR genie app lets you easily monitor, connect, and
control your home network from a Windows or Mac computer,
tablet, or smartphone. You can share and stream music or videos,
diagnose and repair network issues, set up parental controls, and
more:
• Access your router and change its settings or diagnose and
repair network issues.
• Make a printer AirPrint compatible so that you can print from
an iPad or iPhone.
• Use MyMedia to find and play media files in your network.
• Use Turbo Transfer to quickly send files from your computer or
smartphone to another device on the network.
• Set up parental controls.
• Connect your smartphones and tablets to your home WiFi by
scanning the WiFi QR code from genie.
Download the free genie app from www.NETGEAR.com/genie.
19
20