1
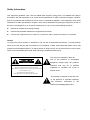
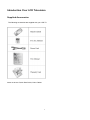
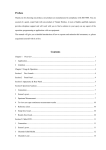
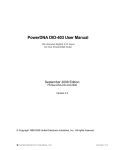
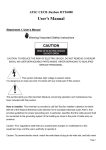
USER MANUAL
For: DLCD26, DLCD32, DLCD42 & DLCD42P
LCD Televisions
BEFORE USING THIS PRODUCT ...................................................................... 2
COMMUNICATION REGULATION ........................................................................................................ 2
IMPORTANT SAFETY INSTRUCTIONS ................................................................................................. 3
SAFETY INFORMATION..................................................................................................................... 4
MAINTENANCE AND PRECAUTION..................................................................................................... 5
GETTING STARTED (PREPARATION)............................................................... 6
INTRODUCTION YOUR TELEVISION ................................................................ 7
SUPPLIED ACCESSORIES ................................................................................................................ 7
TV CONTROL FUNCTIONS ............................................................................................................... 8
SETTING UP THE REMOTE CONTROL ............................................................................................... 9
REMOTE CONTROL FUNCTIONS ..................................................................................................... 10
INPUTS AND OUTPUTS .................................................................................................................. 11
TURNING ON AND OFF THE TV ..................................................................................................... 12
SELECT ON SCREEN LANGUAGE ..................................................................................................... 12
VOLUME ADJUST ........................................................................................................................... 13
HOW TO ADJUST THE OSD SCREEN ............................................................................................... 13
CHOOSE A TV CHANNEL ............................................................................................................... 14
SELECTING INPUT SOURCE ............................................................................................................ 14
PICTURE MENU OPTIONS ............................................................................................................... 15
AUDIO MENU OPTIONS .................................................................................................................. 16
SETUP MENU OPTIONS .................................................................................................................. 17
FEATURE MENU OPTIONS .............................................................................................................. 19
FEATURE MENU OPTIONS FOR VGA ............................................................................................... 22
FEATURE MENU OPTIONS FOR COMPONENT ................................................................................... 23
FEATURE MENU OPTIONS FOR HDMI ............................................................................................. 24
FEATURE MENU OPTIONS FOR IDEO AND COMPOSITE REAR ............................................................. 24
GENERAL SPECIFICATIONS ........................................................................... 25
RGB FREQUENCY TABLE ............................................................................... 26
1
Before Using This Product
Communication Regulation
FCC Compliance
This equipment has been tested and found to comply with the limits for a class B digital device, pursuant to
Part 15 of the FCC Rules. These limits are designed to provide reasonable protection against harmful
interference in a residential installation. This equipment generates, uses, and can radiate radio frequency
energy and, if not installed and used in accordance with the instructions, may cause harmful interference to
radio communications. However, there is no guarantee that interference will not occur in a particular
installation. If this equipment does cause harmful interference to radio or television reception, which can be
determined by turning the equipment off and on, the user is encouraged to try to correct the interference by
one or more of the following measures:
z
Reorient or relocate the receiving antenna;
z
Increase the separation between the equipment and receiver;
z
Connect the equipment into an outlet on a circuit different from that to which the receiver is
connected;
z
Consult the dealer or an experienced radio/TV technician for help.
This device complies with Part 15 of the FCC Rules. Operation is subject to the following two conditions:
1. This device may not cause harmful interference.
2. This device must accept any interference received, including interference that may cause un- desired
operation.
Canada Class B Statement
This Class B device meets all requirements of the Canadian interference-causing equipment regulations.
Cet appareil numerique de la Class B respecte toutes les exigencies du Reglemensur le materiel
brouilleur du Canada
2
Important Safety Instructions
Improper use of this electronic device may cause body injury and property damage as well. This LCD TV
device has been designed and manufactured to meet international industrial safety standards. The same
standards as other home electronic devices, you need to operate this equipment carefully in order to obtain
the best performance from this equipment and to ensure safe use of the LCDTV.
Before you start to use this
equipment, please read and thoroughly understand what is explained below.
z
If you notice any weird symptom from your TV when it is turned on and operating, such as a strange
smell or smoke, please unplug the power cord and inform our nearby service center.
z
This device uses and contains high voltage inside the plastic housing; please keep it in a dry place.
Never open the back cover to do any adjustments or cleaning of the components inside the unit. It is
easy to get electric shock and serious injury and is a fire risk.
z
Please do not use any peripheral with this LCD TV set, which is not recommended by the manufacture.
Improper use of this device may damage the device and or cause an accident.
z
Before moving this device, please remember to unplug the power cord. Never try to move this device
while its power cord is still plugged to the power outlet on the wall. It may cause a fire and damage to
your property if you drop the unit while plugged into a wall outlet. If you do drop this device while moving
it, please have the unit inspected by a service center immediately to get a safety checking.
z
In order to avoid fire and property damage, please do not place this LCD TV in a place which the
temperature will go beyond 95 degrees Fahrenheit or below 41 degrees Fahrenheit, or in a humidity
condition that is lower than 10% or higher than 80%.
z
When you place the LCD TV in a cabinet or in a narrow location, please keep this area well ventilated.
z
The mesh screen on the back cover is for air flow, which prevents over heating from occurring. This
area should not be covered at any time!
z
z
Keep the LDC TV away from any heat source, such as portable heater, gas heater, or stove.
When you know the LCD TV will not be used for a extended period, please unplug the power cord.
Doing this will protect your LCD TV from damage which can happen due to sudden power surge.
z
Don’t plug the LCD TV to a power outlet, which is already overloaded. It may create a fire and/or
electrical shock.
z
Keep a safe distance between electrical devices, which have power applied, keep good ventilation in
the area to prevent overheating of the units which may lead to a fire.
z
Remove the batteries from the remote control unit if it is not going to be used for a long period of time.
Keep the batteries in a dry ,cool place.
z
Do not spill or allow any liquid to come in contact with your LCD TV.
z
Install this TV device so it stable, keep children from touching or playing around the LCD TV.
z
Due to the large size, it is recommended to have at least two adults install this device.
z
Please don’t place this device on a table with wheels to avoid any damage if falls down.
3
Safety Information
This equipment generates, uses, and can radiate radio frequency energy and, if not installed and used in
accordance with the instructions, may cause harmful interference to radio or television reception. However,
there is no guarantee that interference will not occur in a particular installation. If this equipment does cause
interference to radio and television reception, which can be determined by turning the equipment off and on,
the user is encouraged to try to correct the interference by one or more of the following measures:
z
Reorient or relocate the receiving antenna;
z
Increase the separation between the equipment and receiver;
z
Connect the equipment into an outlet on a circuit from that to which the receiver is connected.
Caution
To prevent fire, shock hazard, or interference, only use the recommended accessories. To prevent electric
shock, do not use the plug with an extension cord, receptacle, or other outlet unless the blades can be fully
inserted to prevent blade exposure. To reduce the risk of electric shock, do not remove the unit cover or back.
There are no serviceable parts inside. Refer servicing to qualified personnel only.
This symbol is intended to alert the
user to the presence of un-insulated
RISK OF ELECTRIC SHOCK
DO NOT OPEN
dangerous voltage within the product’s
enclosure that may be of sufficient
magnitude to constitute risk of fire or
CAUTION: TO REDUCE THE RISK OF ELECTRIC SHOCK,
GROUNDING OF THE CENTER PIN OF THIS PLUG MUST BE MAINTAINED
electric shock.
DO NOT REMOVE COVER
NO USER-SERVICEABLE PARTS INSIDE
REFER SERVICING TO QUALIFIED SERVICE PERSONNEL
This symbol is intended to alert the user
to the presence of important operating
and
maintence
instructions
in
literature accompanying this product.
4
the
Maintenance and Precaution
z
Do not remove the cover or back of the LCD TV. Any unauthorized changes or modification to the
product will void the user’s warranty.
z
Do not place the LCD TV in a closed compartment. This will cause the LCD TV to overheat.
z
Turn off the product if any liquid is accidentally spilled into the LCD TV. Contact your local dealer for
assistance.
z
Do not expose the LCD TV to rain or moisture.
z
According to the industrial standards, when pulling the power cord from the outlet, hold the power plug
instead of the cord.
z
If the LCD TV is to be left unattended and unused for a long period make sure the power cord is
unplugged from the AC outlet and the antenna is disconnected. This will prevent damage to the LCD TV
from lightning and power-line surges.
z
Do not expose the LCD TV to heat sources such as radiators, heaters, stoves and other heat-generating
products (including audio amplifiers).
z
Unplug the power cord from the AC outlet before cleaning the LCD TV. Use specific screen cleaner kit for
LCD screens. Do not use liquid cleaners or aerosol cleaners.
z
Do not use this LCD TV with an extension cord or power bar; this can cause a fire or an electric shock...
z
Do not place heavy items or any other item on the top of the LCD TV.
z
Hand carry the LCD TV with at least one other person to prevent injury to yourself or the LCD TV.
5
Getting Started (Preparation)
Distance recommendations:
Avoid improper installation and never position the unit where ventilation is impossible. When installing this
LCD TV, distance recommendations must be maintained between the set and the wall, as well as inside a
tightly enclosed area or piece of furniture. Refer to the minimum distance guidelines shown for a safe operation.
Cleaning the screen:
The screen is coated with a special thin film to reduce reflection. If this film is damaged, uneven colors,
discoloration, scratches, and other problems that cannot be repaired may occur. Pay attention to the following
for proper care and cleaning of the LCD TV screen.
z
Do not use glue or adhesive tape on the screen.
z
Do not write on the screen.
z
Do not allow the screen to come in contact with any hard objects.
z
Do not allow condensation to form on the screen.
z
Do not use alcohol, thinner, benzene or other harsh solvents on the screen.
z
Do not forcefully rub the screen.
CAUTION:
z
Operate only from the power source specified for this Unit (AC 120V) on the LCD TV.
z
Avoid damaging the AC plug and cord.
z
When you are not using this unit for a long period of time, it is recommended that you disconnect the
power cord from the main outlet.
POWER CORD CONNECTION:
Connect the power cord, after completing all other connections.
1. Connect the power cord to the LCD TV.
2. Connect the power cord to the power outlet.
6
Introduction Your LCD Television
Supplied Accessories
The following accessories are supplied with your LCD TV:
Items not shown: Quick Start Guide, Video Cables
7
TV Control Functions
1
Button (Underneath)
Button (profile)
1
MENU
SOURCE
6
5
–VOL+
4
-CH+
POWER
3
2
1
LED Indicators
2
POWER
3
-CH+
The LED indicator lights up in 2 different colors green and red. Each color
represents a different status.
Green - Power is on; Red - Standby.
Press this button to turn the power on/standby.
Press to change channel/when in the menu mode, these acts as navigation
keys.
4
-VOL+
Press to adjust the volume/when in the menu mode, these acts as
navigation keys.
5
SOURCE
Video input selection. Press this button to change the video source.
6
MENU
Press this button to display the OSD menu. It contains all the options to
configure your TV's settings.
8
Setting Up the Remote Control
1.
Open the lid of your remote control battery compartment on the back of the remote control.
2.
Insert two AA batteries. Use the (+) and (-) marks to guide you. The (+) marks on your batteries
correspond to the (+) marks on the compartment. The (-) marks on your battery correspond to the (-)
marks on the compartment.
Note: Do not mix new and old or different kind of batteries
3. Put the lid back onto the remote control battery compartment.
9
Remote Control Functions
The table below explains each button’s function.
1
POWER
Power on/off.
2
INFO
3
EPG
4
ASPECT
5
MTS
6
FREEZE
Press this key to freeze current frame on the
screen.
7
SLEEP
Activates the sleep timer.
8
VOL
Press these keys to adjust volume.
9
MENU
Press this key to display the OSD menu. In
the OSD menu, press this key to exit the
menu.
10
OK
Press this key to confirm selection.
11
RECALL
Recall last channel.
12
• /DRF
Minor channel indicator or DRF (Direct Digital
RF Channel tune)
13
0~9
Numerical keys to select desired channel
Press to display information about the
current input source.
Opens the program guide & shows all active
channels. (For digital channels only).
Choose from widescreen, NORMAL, CINEMA,
ZOOM.
Switch among MONO, stereo and SAP or
DIGITAL AUDIO LANGUAGE
Navigation keys in Setup menu.
14
Navigation keys in Setup menu.
15
EXIT
To exit menu or function select.
16
Press these keys to change the channels.
Press this key to turn off the sound.
Press the "MUTE" button again or press
"VOL +" to enable sound.
17
MUTE
18
CC
19
FAVORITE-
Press to switch your favorite channels down
20
FAVORITE
Press to Add current channel to favorite
channel table or Erase current channel from
favorite channel table
21
FAVORITE+
Press to switch your favorite channels up
22
SOURCE
Press this key to change the video source.
Turns the closed caption on or off or CC
MUTE
10
Inputs and Outputs
Your LCD TV has five types of video connections. You should capitalize
Cables
on the best connection available to your LCD TV to get the best display
1.RCA composite video cable
2. S-video cable
quality. For example, if you have a progressive DVD player that
supports a component video connection, you should connect the DVD
player to your LCD TV using component video connections instead of
3. RCA component video cable
4. RGB (VGA) video cable
5. HDMI A/V Cable
composite video or S-video connections.
1
2
Available Interface
Description
Component audio
Audio connections for
Inputs
Component Video inputs
AV audio Inputs
Recommended Devices
Component 2 Input
5
6
Component1 Inputs
PC Input
HDMI
D-VHS, digital media player
DVD player, set-top- box,
Composite Video inputs
VHS, home stereos
Definition programs
(720p/1080i) and standard
definition programs (480i/ 480p)
4
HDTV set-top- box, HD PVR,
Audio connections for
Component support both High
3
Progressive DVD player,
Same as above
Progressive DVD player,
HDTV set-top- box, HD PVR,
D-VHS, digital media player.
Same as above
VGA input (PC Input) and audio
PC.
inputs.
HDTV, Set-top Box,
HDMI input
Progressive HD DVD Player.
7
AV and S-Video
Contains S-video, composite
Inputs
video, a pair of R/L audio inputs.
8
SPDIF output
9
TUNER
NTSC-M / ATSC
11
Camcorder, non-progressive
DVD player, digital camera,
VCR.
Turning the LCD TV ON and OFF
TURN ON THE LCD TV
1. Connect the AC input cord to apply power to LCD TV. At this time the TV will enter standby mode and
indicator will show red.
2. Use POWER button to turn ON LCD TV from the standby mode.
TURN OFF THE LCD TV
1. Press the POWER button or the button on the remote control to enter standby mode. The indicator is now
red.
2. Unplug the AC cord to turn off LCD TV completely.
Select on screen language
NOTE: If you use your LCD TV for the first time, you should select the language, which will be used for
displaying menus and other information.
Picture
Tuning Band
DTV-Signal
Auto Ch Search
Audio
Add On Ch Search
Air
Manual Ch Set
Setup
Feature
Channel Labels
Menu Language
Reset
To Move
OK
English
To Select
EXIT To Exit
Press MENU to display the main menu
repeatedly and use OK to select the Setup menu
Press
Press
to select Menu Language
Press OK button repeatedly to select your desired language
When you are satisfied with your choice, press the MENU or EXIT to exit the setup page
12
Volume adjust
1.
Press VOL+/- to adjust the volume of the LCD TV.
2.
If you want to switch the sound OFF, press the MUTE button.
3. You can cancel this function by pressing the MUTE or VOL+.
How to adjust the OSD screen
Press the MENU button to display the main menu.
Press
buttons to select and adjust the available menus.
13
Choosing a TV Channel
1. Using the CH+/CH- on the front panel or on the remote control.
Press CH+ to increase channel number.
Press CH - to decrease channel number.
2. Using 0-9 numeric buttons and – button.
You can select the channel number by pressing 0 to 9 and pressing OK to confirm you selection.
Press the - button to enter a program number for multiple program channels.
3. Example:
To select 1-digit channel (e.g. Channel 5): Press the 5 and OK button.
To select 2-digit channel (e.g. Channel 20): Press the 2 and 0 buttons, then press OK button.
To select 3-digit channel (e.g. Channel 103): Press the 1 and 0 and 3 buttons, then press OK button.
To select a program number for multiple program channel (e.g. Channel 2-1): Press the 2 button, then
press. /DRF and 1 button.
Note: After you select the numeric button, the number will be memorized.
Selecting the input source
1.
Press the “SOURCE” button on either the remote control or the front panel of the LCD TV.
2. Repeat pressing the “Source” button to select the desired “source”.
TV→ Composite Rear → Component–1 → Component–2 → VGA →HDMI–1 → HDMI–2 → S–VIDEO
Note: When the selected source has no signal input, the LCD TV will “Auto Power off” after 15 minutes.
14
Picture menu options
Press the MENU on the LCD TV front panel or on the remote control and then use the
and OK to
select the Picture menu.
buttons to move the cursor to the item to be selected.
1.
Press
2.
Use OK button to select what you want to adjust in the Picture menu.
3.
Press
buttons to make the desired adjustments.
4.
When you are satisfied with your adjustments, press MENU or EXIT to exit the main menu.
Picture Mode
Select the type of picture that best corresponds to your viewing requirements by selecting
Picture Mode in the PICTURE menu. Press the OK button to select the picture mode
such as User/Standard/Vivid/Bright.
Contrast
Press
buttons and then use
to adjust the contrast of the picture.
buttons and then use
to adjust the brightness of the picture.
Sharpness
Press
buttons and then use
to adjust the sharpness level of picture.
Color
Press
buttons and then use
to adjust the color saturation.
Brightness
Press
Tint
button and then use
to adjust the tint of picture.
Press
But this function is available in the NTSC that is one of the color systems.
Aspect Ratio
Press the OK button to select the ratio of the picture display such as Normal/ Zoom/ Wide and Cinema.
15
Audio menu options
Press the MENU button on the LCD TV front panel or on the remote control and then use
and
OK to select the AUDIO menu.
1.
2.
3.
4.
buttons to move the cursor to the item to be selected.
Press
Use the OK button to select what you want to adjust in the Audio menu.
button to adjust.
Press
When you are satisfied with your adjustments, press the MENU or EXIT to exit the main menu.
Audio Mode
You can select the type of sound which best corresponds to your listening preferences by selecting
Sound in the SOUND menu. Press the OK button to select one of the audio modes such as
User/Voice/Concert/Jazz.
Audio Language
buttons to select one of the audio languages such as English/ French and Spanish, but the
Press
language code must be programmed for this option to be available. If there is no selection it has not
been programmed for this model.
Bass
Press
Treble
Press
Balance
Press
speakers.
buttons and then use
button to increase or decrease the level of the bass response.
buttons and then use
buttons to increase or decrease the level of the treble sounds.
buttons and then use
buttons to adjust the audio output level between left and right
Digital Audio Output
Press
buttons to select one of the audio modes of the digital audio output , such as PCM and RAW.
This function is available, when the channel that you are viewing is DTV or the input source is HDMI.
16
Setup menu options
Press the MENU button on the front panel of the LCD TV or on the remote control, and then use
buttons and OK to select the Setup menu.
Picture
Tuning Band
DTV-Signal
Auto Ch Search
Audio
Add On Ch Search
Air
Manual Ch Set
Channel Labels
Menu Language
Reset
Setup
Feature
1.
2.
3.
4.
To Move
OK
English
To Select
EXIT To Exit
Press the
button to move the cursor to the item to be selected.
Use the OK button to select what you want to adjust in the Setup menu.
buttons to make adjustments.
Press the
When you are satisfied with your adjustments, press the MENU or EXIT button to exit the main
menu.
Tuning Band
Press the OK button to select Air, Cable, Cable HRC, Cable IRC or Cable Auto. When you select Air, the
range of channels is 2-69.And when you select Cable; the range of channels is 1-135.
DTV-Signal
In DTV mode, you can refer to the signal strength of the current channel, and then you can manually
tune the TV antenna by adjusting the angle and orientation for the best signal strength.
Auto Ch Search
Press the
keys to move the cursor to the item to be selected (item selected is highlighted in
yellow). Press the OK key to enter your selection and scan. During the scan, the following menu will be
displayed. The channels found are automatically saved as below:
17
Add On Ch Search
When the all of the channels are found, use
to add new channels to the channel list
Manual Ch Set
Press the OK button to display a channel list where you can select a channel as below.
Channel labels
This allows you to name the channel that is selected. Use
input the name as following:
to move the cursor and use
Manual Language
Press the OK button to select a language of the OSD such as English/ French and Espanol.
Reset
Press the OK button to return to the default setting.
18
to
Feature menu options
Press the MENU button on the LCD TV front panel or on the remote control and then use
buttons and OK to select the Feature menu.
1.
2.
3.
4.
buttons to move the cursor to the item to be selected.
Press
Use OK button to select what you want to adjust in the Feature menu.
buttons to make adjustments.
Press
When you are satisfied with your adjustments, press the MENU or EXIT button to exit the main
menu.
Time Set
Press
buttons and then use OK button, the time set menu as below that allows you to set the time
the TV will display.
Time Set Mode
You can select one of auto or manual to set the time. When auto is selected, the
year/date and time will be disabled and can’t adjust it. When the manual mode is
and
to set the corresponding functions.
selected , you can press
Time Zone
buttons.to select the correct time zone- Pacific/Alaska/Hawaii/ Eastern/
Press
Central/Mountain time.
Sleep Timer
Press the OK button to select the amount of time before your TV turns off automatically. Such as 15
min/30 min/45 min/ 60 min/90 min/120 min/180 min/240 min/Off.
19
Advanced Video Menu
Press the OK button to enter the advanced video menu as shown below:
to select on or off.
Noise Reduction--Spatial: press
to select on or off.
Noise Reduction--Speckle: press
Noise Reduction--Temporal: press
to select on or off.
Color Temperature: press
to select one Normal/Cool or Warm.
to select on or off.
3D Y/C: press
Password Set
Press OK button to enter the “Enter Old Password menu”, and then input the numbers between 0-9 as
below, and then you can change the password when you input the new one twice.
Parental Control
Press the OK button to enter the sub-menu and then use the 0-9 buttons to enter the correct password.
20
NTSC CC
Press the OK button to select CC1/CC2/CC3/CC4/TEXT1/TEXT2/TEXT3/TEXT4.
ATSC CC
Press the OK button to select CS1/CS2/CS3/CS4/CS5/CS6.
Digital Closed Captions
This item allows you to set the closed caption, and then press OK button to enter Closed Caption
Options menu as below:
Style: press
to select one of Automatic and Custom, when you select automatic,
the others are disable and can’t be adjusted.
Size: press OK to select one of Normal/Large and Small.
Font: press OK to select one of the Defaults and from Font1 to Font7.
Text Color: press OK to select one color, choose Red / Green / Blue / Yellow / Magenta /
Cyan / Black and White.
Text Opacity: press OK to select one of the following, Solid / Flashing / Transparent /
Translucent.
Background Color: press OK to select one of the following, Black / White / Red / Green
/ Blue / Yellow / Magenta / Cyan.
Background Opacity: press OK to select one of the following, Solid / Flashing /
Transparent / Translucent.
Edge Effect: press OK to select one of the following, None / Raised / Depressed /
Uniform / Left Shadow / Right Shadow.
Edge Color: press OK to select one of the following, Black / White / Red / Green / Blue /
Yellow / Magenta / Cyan.
21
Feature menu options for VGA
Press the MENU button on the LCD TV front panel or on the remote control and then use
buttons and OK to select the Feature menu in VGA mode.
1.
2.
3.
4.
VGA Set
Press
Press
buttons to move the cursor to the item to be selected.
Use OK button to select what you want to adjust in the Feature menu.
buttons to make your adjustments.
Press
When you are satisfied with your adjustments, press the MENU or EXIT key to exit the main
menu.
buttons and then use OK to enter the VGA set menu as below:
H-Pos
Press
buttons and then use
adjust the horizontal position of the
picture (this function is to adjust the picture to Left/Right as to your
preference).
V-Pos
buttons and then use
adjust the vertical position of the picture
Press
(to adjust the picture to Left/Right as to your preference).
Clock
buttons and then use
to adjust the clock of the picture (this
Press
function is to minimize any vertical bars or stripes visible on the
background screen. And the horizontal screen size will also change).
22
Phase
Press
buttons and then use
to adjust the phase of the picture (this
function allows you to remove any horizontal noise and to sharpen the
image of characters).
Auto Adjust
buttons and then use OK button to do a auto adjust that
Press
automatically adjusts the available options for the best viewing configuration.
Setting
Press OK to do a preset that can return everything to the factory settings.
Feature menu options for Component
Press MENU on the front panel or on the remote control and then use
Feature menu in YPbPr mode
1.
2.
3.
4.
and OK to select the
Press
buttons to move the cursor to the item to be selected.
Use the OK button to select what you want to adjust in the Feature menu.
buttons to adjust.
Press
When you are satisfied with your adjustments, press the MENU or EXIT to exit the main menu.
Component Set
Press
buttons and then use OK to enter the Component set menu as below:
23
Feature menu options for HDMI
Press the MENU button on the LCD TV front panel or on the remote control and then use
OK to select the Feature menu in HDMI mode.
and
1.
Press
buttons to move the cursor to the item to be selected.
2.
Use OK button to select what you want to adjust in the Feature menu.
3.
Press
buttons to adjust.
4.
When you are satisfied with your adjustments, press the MENU or EXIT to exit the main menu.
Time Set
buttons and then use OK, the time set menu as below that allows you to set the time on the
Press
TV will be displayed.
Sleep Timer
Press
buttons to select the amount of time before your TV turns off automatically and then press
the OK so that you can select 30 min/60min/90min and OFF.
Advance Video Menu
Press the OK button to enter the advance video menu.
Feature menu options for video and Composite Rear
Press the MENU on the LCD TV front panel or on the remote control and then use
select the Feature menu in S-Video or Composite mode.
24
and OK to
General Specifications
LCD Panel
Input/Output
Audio
Compatibility
Compatibility
Screen Size
32" diagonal
Resolution
Display Color
Aspect Ratio
WXGA (H) 1366 X (V) 768pixels
16, 777, 216 Color
16:9 WIDE
Video in
1.0 Vp-p+/-5%
S-VIDEO in
Y 0.714 Vp-p+/-5%, C 0.286 Vp-p+/-5%
Y / Pb/Cb / Pr/Cr
480i, 480p, 720p, 1080i
Audio L/R in/out
S-Video and CVBS share 1 and 1 YPbPr use 1
Analog RGB in
D-Sub X 1
HDMI in
HDMI X 2
PC Audio in
Phone Jack X 1
Antenna input
ATSC / NTSC-M
Built-in speaker
10W X 2
Color Temperature
Normal/Warm/Cool
Screen
adjustment
Size
Normal/Zoom/Wide/Cinema
Progressive Scan
Yes
3-2 pull down
Yes
Color system
NTSC
SDTV/HDTV
480i, 480p, 1080i, 720p
PC
VGA/SVGA/XGA
Power
AC 120V, 190W
Operating temperature
0°F - +40°F
Storage temperature
-10°F ~ +60°F
.1 / .2 *(W)32.32 X (D)
Dimension
9.45 X (H) 24.49 inch (with speaker/stand)
*(W) 40.31 X (D) 10.40 X (H) 23.39 inch (with speaker/stand)
*(W) 27.00 X (D) 10.40 X (H) 32.30 inch (with speaker/stand)
Other
.1 / .2 *43.6 lbs
Net Weight
*44.2 lbs
*45.1 lbs
.1 / .2 *55.5 lbs
Gross Weight
*56.1 lbs
56.6 lbs
*Refer to page 44
25
RGB Frequency Table
The table below shows the frequency ranges supported by the LCD TV. It supports from
VGA to XGA. If you are connecting your PC to the LCD TV via the RGB port, please use the following table in
order to setup your PC’s VGA output for maximum optimization.
Source
Resolution
Vertical Frequency (HZ)
480p (720x480)
60.00
480i (720x480)
59.94
720P (1280x720)
60.00
1080i (1920x1080)
60.00
Component
480p (720x480)
60.00
(Y/PbCb/PrCr)
480i (720x480)
59.94
720P (1280x720)
60.00
1080i (1920x1080)
60.00
HDMI
Source
Horizontal Frequency (KHz)
Vertical Frequency (Hz)
31.50
60
37.90
72
37.50
75
31.50
70
37.90
60
47.20
72
46.90
75
48.40
60
56.50
70
60.00
75
1280 x 768
47.77
60
1360 x 768
47.72
60
Resolution
640 x 480
720 x 400
800 x 600
PC input
1024 x 768
26
Please do not return this product to the store you purchased from.
If you experience problems with this Digital Research product, you can contact Digital Research’s Technical
Support Staff. Please have the following information ready when you call:
•
The name of the product you are having problems with.
•
A detailed description of the problem.
Contacting Digital Research
You can contact Digital Research Technical Support staff at the following numbers:
•
Phone: (949) 707-4888 (M-F 8:00AM – 5:00PM PST)
•
Internet: http://www.dr-tech.com (Go to the technical support section and fill out support form.)
Digital Research Inc.
4 Marconi,
Irvine, CA 92618
Register Your New Product
For your convenience, you may fill out a product warranty registration card online at
www.registeryourproduct.com. Registration of this information helps us serve you better. You may also view
the complete terms and conditions of your product warranty online at www.registeryourproduct.com. Failure
to complete and return this form does not diminish your product warranty rights.
27