1
Rockablepress.com
Envato.com
© Rockable Press 2012
All rights reserved. No part of this publication may be
reproduced or redistributed in any form without
the prior written permission of the publishers.
Dedication
To my parents, Louis and Marie; I wouldn’t be who I am without
you. Thank you for encouraging and supporting me, even though I
could be a pain in the neck sometimes.
4
Table of Contents
Contents
Dedication3
Introduction7
Why I Wrote This
7
Who is this Book for?
7
What this Book Includes
8
WordPress Basics
8
Posts9
Pages9
Menus10
Coding Conventions
11
Plan of Action
12
Converting HTML to a WordPress Theme
15
Building Our HTML Theme
15
Files & Structure
16
Markup & CSS
16
style.css/CSS20
Functions.php22
Theme Template Hierarchy
26
Header & Footer
28
The Loop
37
The Post Pages
39
The Index
39
Single Page Template
44
Content Pages
47
Auxiliary Template Pages
49
The Sidebar Template
49
Archives Template
52
The 404 Error Template
54
Building Our Own Framework
56
Principles of Reuse
56
5
Table of Contents
Define Your Needs
Existing Theme Frameworks
Coding Tips for Frameworks/Child Themes
Creating Custom Post Types
Designing the Custom Post Type
Building it into the Theme
Setting up the Custom Post Type
Modifying the Businesses Admin Panel
Listing Custom Post Types
Creating a Custom Post Type Single Template
Creating the Homepage
Querying Posts
Creating a Theme Options Page
Creating the Admin Page
Adding Settings to the Template
OptionTree Plugin by Envato
Creating Widgets
Plugin Development
Defining the Plugin
The Shortcode
The Template Tag
57
59
60
63
63
65
65
77
80
85
90
91
101
101
109
112
113
122
122
126
129
Resources131
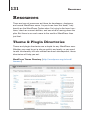
Theme & Plugin Directories
Coding Resources
Final Thoughts
Stay Up to Date!
131
135
137
138
About The Author
139
Your Download Links 140
INTRODUCTION
7
Introduction
Introduction
When I first got into web development, all the way back in 2002, a
tool like WordPress did not exist yet. As a matter of fact, it wouldn’t
be until almost a year later that WordPress would be released to
the public for the first time; not that I was ready to use WordPress
at initial release. I actually didn’t start using it until 2004 (around
WordPress 1.5), when my friend told me about this new blogging
platform that I should consider instead of writing my own.
I instantly fell in love, hacking away, learning the platform, making
my own changes (sometimes to the core1), and watching it grow
over the years. What started out as a simple, open source blogging
platform is now a super-powerful content management system
(CMS) that can boast that it’s the most widely-used CMS on the
Internet.2 In this book, I plan to teach you how to use WordPress,
as well as how to leverage the API to create your own custom
themes, plugins, and content types. In other words, I will show you
how to make WordPress your own.
Why I Wrote This
WordPress is living platform with constant updates and major
enhancements released every 6-12 months. At the time of this writing, WordPress 3.3 had just been released with quite a few new,
really nice features. Because of this ever-changing landscape, it’s
important to keep users updated on the latest and greatest WordPress capabilities.
Who is this Book for?
I’d like to say that this book is for anyone interested in WordPress,
regardless of background. However, to keep it streamlined, I do
make some assumptions about you, dear reader. I assume that you
1 This
is really, really not recommended.
2 http://trends.builtwith.com/cms
8
Introduction
have a solid understanding of HTML, CSS, Javascript, PHP and
MySQL. I also assume that you’ve at least looked at the WordPress
Codex, which can be found at codex.wordpress.org. I will be looking at converting HTML to a WordPress theme, building plugins,
and more, all from scratch. So, if you’ve never done that, this book
should be right up your alley. I do assume you have programmed
before, however, which brings us to…
What this Book Includes
Packaged with this book, you will find:
1. A set of PSD files for the Homepage, Directory Page, Blog,
and Single Business Page.
2. A set of HTML files created from the PSDs. They will be
used to create the Director WordPress theme. On top of
the four pages created from the PSDs, the HTML folder
includes a /css/ folder for four CSS files: style.css,
reset.css, master.css, and ie.css. All images used in
the HTML template are also included.
3. A fully functioning WordPress theme called Director. This
can be found in the /director/ folder.
These files and themes may be used freely in your projects, both
commercial and non-commercial. However, they may not be redistributed or resold in any way. As you work through this book you
may choose to either construct your own set of files from scratch,
or use the example files as a guide. The link to download these files
is at the end of the book.
WordPress Basics
In this book, I assume you have at least used WordPress as a blogging platform or CMS. Because of that, during each section I will
not explain how to create a post, a page, or a menu item. I will offer
9
Introduction
some quick how-tos here. If you’d like to read more, the WordPress
Codex has a great “Getting Started” site.2b
Posts
Here are the basics for creating a post in WordPress. It’s in the
Posts section that you will add blog posts, news articles, and
anything else that gets updated regularly. This is also how you
will create custom post types. Just replace “Posts” in the first
step with the menu name of the Post Types (you will read more on
that later).
• Click the Posts tab.
• Click the Add New sub-tab.
• Start filling in the blanks: title, body text, etc.
• As needed, select a category, add tags, and make other
selections from the sections below and to the right of
the post.
• When you are ready, click Publish.
• To view a post, click the View Post button beneath the
post title.
Pages
Adding and editing pages are essentially the same as adding and
editing posts.
• Click the Pages tab.
• Click the Add New sub-tab.
• Start filling in the blanks: title, body text, etc.
• Select the parent, template, and order as needed.
2b http://codex.wordpress.org/Getting_Started_with_WordPress
10
Introduction
• When you are ready, click Publish.
• To view a page, click the View Page button beneath the
page title.
Menus
Since WordPress 3.0, WordPress has added the ability to create
and manage navigation menus from right within WordPress.
To create new menus:
1. Go to Appearance � Menus.
2. Create a new menu by pressing the “+” tab.
3. Fill out the menu name and press Create Menu.
4. You can then add custom links, pages, categories, and
custom post types by checking off the corresponding items
on the left and clicking Add to Menu.
5. You can reorder the menu items by dragging and dropping
them. If you want to create a sub- or drop-down menu,
select the menu item, place it underneath the item you want
to be the parent, and drag it slightly to the right.
6. Once your menu is complete, press Save Menu.
7. If your theme supports multiple menus, you may need to
associate your new menu with a “theme location.” You
can do so using the drop down box on the left, under the
Theme Locations heading. We will see how these work
later in the book.
WordPress has its own extensive documentation on creating
menus in the codex.2c
2c http://codex.wordpress.org/Appearance_Menus_SubPanel#Create_a_Menu
11
Introduction
Coding Conventions
I plan on using the best practices that I know, including the ones
laid out in the WordPress Codex.3 This means that I will do my best
to write correct markup, name variables properly, create constants
when necessary, and include thorough, clear comments within all
of my programming.
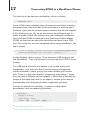
I will also take on the following convention for printing code as
used in previous WordPress books published by Rockable. This
means that all lines of code will appear against a light grey background in a fixed-width typeface, like this:
<?php echo 'Hello World!'; ?>
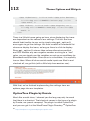
Sometimes a line of code is too long to fit entirely on one line. In
this case, the grey background of the following line (or lines, for a
really long line) will be slightly indented. In most cases, a space
character is permissable between the last character on the initial line and the first character on the next line. If a space is not
allowed, there will be a continuation marker ( ▶ ) to remind you. For
example, here a space is permitted between “dog.' ” and “?>”:
<?php echo 'The quick brown fox jumped over the lazy dog.'
?>
But in the following code, there is no space intended after the
underscore. Therefore “pingback_url” is correct:
<link rel="pingback" href="<?php bloginfo('pingback_
▶
url'); ?>" />
Note: when copy-pasting the code out of the book, you’ll need to
take out these arrows and accompanying space. With this in mind,
let’s take a look at the plan of action for the rest of this book.
3 http://codex.wordpress.org/WordPress_Coding_Standards
12
Introduction
Plan of Action
This book should read much like a long, multi-part tutorial. I want
to take you through my design process, explaining what I do (and
why I do it) on every step of the way. Here’s what I’ll be doing:
• Converting HTML/CSS to a Dynamic WordPress Theme
– I’ve been provided with a PSD (included with the book)
that I’ve transformed into HTML. The first part of this book
will be taking the resulting HTML/CSS and converting it to
a WordPress theme. Along the way, I’ll talk about the various theme pages we’re working with, the WordPress theme
hierarchy, and of course, the WordPress Loop.
• Creating a Custom Post Type – This, in my humble
opinion, is one of the best additions to WordPress in
recent releases. With the ability to make your own content
types — each with its own theme template — you can take
WordPress from being a CMS limited to blog posts and
pages, to a CMS that can manage any kind of content you
can imagine. In this book, we’ll be creating a business listing
type, which will allow us to create a business directory.
• Theme Options and Widgets – With WordPress, you can
make a theme your own by adding a theme options page
and custom widgets. In these sections, we’ll make it very
easy for people who use our themes to add their own customizations without delving into the code or creating a child
theme.
• Creating a Plugin – One of the most powerful facets of
WordPress is the fact that it’s pluggable. We can add functionality to our installation of WordPress without changing
the core WordPress files. There are vast directories of free 4
and premium5 plugins that vastly expand the capabilities of
4 http://wordpress.org/extend/plugins/
5 http://codecanyon.net/category/plugins/wordpress
13
Introduction
WordPress. In the final section of this book, we will build our
own plugin.
This book should serve as a very linear guide to WordPress development. That being said, my hope is that you can visit any chapter
of the book (or at least any of the four sections I’ve laid out) for
quick reference. So without further ado, let’s get started!
15
Converting HTML to a WordPress Theme
Converting HTML to a
WordPress Theme
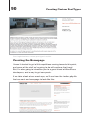
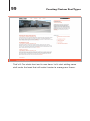
Building Our HTML Theme
Included with this book are a few things: the Photoshop files
(PSDs) from which the design came, the HTML templates I created
from the PSDs, and the fully functional WordPress theme. While
we won’t be going over slicing and dicing the PSDs, I will take this
opportunity to explain the HTML template to an extent, because I
want you to be somewhat familiar with the basis for our WordPress
theme. Going forward, keep in mind that we’re building a business
directory website. Here is a screenshot of what the design will
look like:
16
Converting HTML to a WordPress Theme
Files & Structure
You will find four HTML files we’re going to convert (one for each
PSD):
• index.html – The homepage design
• blog.html – A blog post listing page
• directory.html – A business listing page
• business.html – A single business page
All of our themes pages will be derived from the markup on these
pages.
You will also find two folders: an /images/ folder, where all theme
images will go (there are not many), and a /css/ folder, where all of
the CSS will go. Within the /css/ folder, there are four CSS files that
make up a simple framework I use for styling my websites (thank
you, Dan Cederholm). They are:
• reset.css – Your standard CSS reset for maximum browser
compatibility.
• master.css – The crux of the matter. All of the main CSS
lives here.
• ie.css – Any IE fixes go here. Luckily there aren’t too many.
• style.css – This will simply import the other three style
sheets (in the order I’ve listed them here. That is very
important).
You will also find a /img/ folder within the /css/ folder. Any images
that are called within the CSS go in this folder.
Markup & CSS
If you take a look at one of the HTML files, I think you will see some
pretty standard markup. I am using HTML5, which requires a few
lines of code to make it work.
17
Converting HTML to a WordPress Theme
The first line is the doctype declaration, which is simply:
<!DOCTYPE html>
Once HTML5 sees adoption from all browsers and older browsers
are phased out, this is all that will be necessary in order to use it.
However, right now we do have older browsers that do not support
it (I’m looking at you, IE), so we need some JavaScript magic in
order to make it work. We will be using the invaluable html5shiv,6
which will add HTML5 elements to the Document Object Model
(DOM), so that we can add style definitions for them in our CSS,
and if we so desire, we can manipulate them using JavaScript. The
line is simply:
<!--[if lt IE 9]> <script src="http://html5shim.googlecode.▶
com/svn/trunk/html5.js"></script> <![endif]-->
In plain English, this is saying, “If the browser is IE8 or lower, call
this JavaScript.” That’s all we need; we can now use HTML5 as we
please!
The CSS (most of which is in master.css ) is also pretty selfexplanatory. I will point out that I tried to use percentages for
widths whenever I could, giving us a more flexible grid to work
with. There is a big trend toward “responsive web design,” which
aims to make a website device agnostic.7 While that is outside the
scope of this book (not that I’m an expert), flexible grids help us
considerably with designing flexible, responsive websites.
In order to achieve this flexibility, I created a class called
#container with the following definition:
#container {
margin: 0 auto;
text-align: left;
width: 70%; /* Target: 940px; */
6 http://code.google.com/p/html5shim/
7 http://www.abookapart.com/products/responsive-web-design
18
Converting HTML to a WordPress Theme
padding: 10px 0;
}
This will ensure that our entire layout takes up 70% of the browser
window and centers the content. The comment tells the reader that
from here on out, I will base my widths on a 940 px wide layout.
In reality, the layout will expand and contract with the size of the
browser window.8
I also have a few general CSS classes I use throughout the template. Since this is a 2-column layout, I created classes for both the
left and right columns:
.left-col {
width: 66%;
float: left;
}
.right-col {
float: right;
width: 32%;
margin-left: 2%;
}
As you can see, .left-col (for left column — I’m very clever) will
take up 66% of #container and float to the left. Conversely,
.right-col (for… well, I think you’ve got it) will take up 32% of
#container, floating right. This leaves 2% wiggle 9 room, which
I used for a margin to separate the two columns. I also have two
separate but similar CSS classes to easily float individual elements
left or right:
.left {
float: left;
}
8 For
more on flexible grids, Ethan Marcotte has an excellent article: http://www.
alistapart.com/articles/fluidgrids/
9 …
wiggle, wiggle, wiggle, wiggle. Yeah.
19
Converting HTML to a WordPress Theme
.right {
float: right;
}
These classes are also aptly named. To ensure none of these four
classes extend past where they should and end up eating the rest
of the page, I employ a nice little hack that Dan Cederholm came
up with for self-clearing floats:
.group:after {
content: ".";
display: block;
height: 0;
clear: both;
visibility: hidden;
}
Now, for any containing div that has floating elements, we can
also apply the class name group and everything will stay within the
container:
<div id="main" class="group">
<div class="left">One Fish</div>
<div class="right">Two Fish</div>
</div>
There is a fix we need to apply to make it work in IE 6 and 7, which
you can find in the ie.css file:
* html .group { /* IE6 */
height: 1%;
}
*:first-child+html .group { /* IE7 */
min-height: 1px;
}
To read more about self-clearing floats (and better CSS in general),
I strongly recommend Handcrafted CSS by Dan Cederholm.10
10 http://handcraftedcss.com/
20
Converting HTML to a WordPress Theme
I’ll explain any other markup or CSS along the way. Right now, let’s
get in to actually building the theme! We’ll start by creating our
theme folder — let’s call it /director/ 11 and copying the /css/ folder
into it.
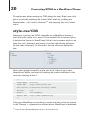
style.css/CSS
Whenever I convert an HTML template to a WordPress theme, I
start first with style.css, since it’s the easiest file to convert (plus,
it defines the theme in WordPress). What I do is remove style.css
from the /css/ directory and move it into the root theme directory
(in this case /director/). At this point, our file structure looks like
this:
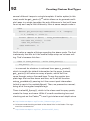
Now, we’re going to modify style.css a bit. Open it up in your
favorite text editor, and start by adding the theme definition at the
very top, starting at line 1:
/*
Theme Name:
Director
Theme URI:
http://www.envato.com
Description: A business directory theme.
Version:
1.0
Author:
Joe Casabona
Author URI:
http://www.casabona.org
*/
This gives WordPress everything it needs to know to list our theme
in the Themes � Appearance section of our WordPress installation.
11 Later
on we’ll be uploading this to wp-contents/themes/
21
Converting HTML to a WordPress Theme
There is one more thing we need to do to this file, and that’s adjust
the references to the other stylesheets. Since we moved style.css
up one directory, we’ll need to change each import to include
“css/” like so:
@import url("css/reset.css");
@import url("css/master.css");
@import url("css/ie.css");
Much better! Our CSS is now all set up and ready to use. Before
we move on though, I want to add some CSS to css/master.css
to account for WordPress’s default classes to position images
through the editor. So let’s open up master.css and add this code:
img.centered, .aligncenter, div.aligncenter {
display: block;
margin-left: auto;
margin-right: auto;
}
.alignright {
float: right;
}
.alignleft {
float: left;
}
This will ensure that when a user positions an image using the
WordPress editor, the image will behave properly.12 Next, let’s add
some default styles to be used when the user adds a caption:
.wp-caption {
border: 1px solid #ddd;
text-align: center;
background-color: #d4d4d4;
padding-top: 4px;
12 We
can actually consolidate .left and .alignleft, and .right and
.alignright. I left them separate for illustration purposes.
22
Converting HTML to a WordPress Theme
margin: 10px;
}
.wp-caption img {
margin: 0;
padding: 0;
border: 0 none;
}
.wp-caption p.wp-caption-text {
font-size: 0.85em;
line-height: 1.214em;
padding: 0 4px 5px;
margin: 0;
}
Perfect! With that taken care of, let’s move on to the second half of
our theme prep-work, which is creating the functions.php file.
Functions.php
The functions.php file is where you make your theme magic
happen. It’s worth noting that you do not need this particular file,
but according to the WordPress codex:
“
This file basically acts like a plugin, and if it is present
in the theme you are using, it is automatically loaded
during WordPress initialization (both for admin pages
and external pages). 13
”
You can add features like sidebars, navigation menus, thumbnail support, and more. We’ll also employ the help of our
functions.php file later on to declare our custom post type,
but for now, we’re just going to:
• Define two constants that we’ll use in our theme.
13 http://codex.wordpress.org/Theme_Development#Functions_File
23
Converting HTML to a WordPress Theme
• Add menu support.
• Add support for a sidebar.
So in the /director/ folder, create a functions.php file and add the
following lines:
<?php
define( 'TEMPPATH', get_bloginfo('stylesheet_directory'));
define( 'IMAGES', TEMPPATH. "/images");
?>
What we’re doing here is creating two constants. TEMPPATH will be
the path to our theme’s directory. This will make it easier to link to
any extra files we might want to include, such as other stylesheets,
JavaScript, and more. We do this using the get_bloginfo()
function.
The functions get_bloginfo() and bloginfo()14 are incredibly
useful functions that pull all kinds of general information about
the WordPress installation. Besides the site name, it will grab
the description (or tagline), the RSS URL, the full theme path, the
home/blog URL, the admin email, and more.15 We will be using
bloginfo() quite a bit as we move forward.
IMAGES uses TEMPPATH and appends our images folder to it, so
that we’ll have an easier time linking to any theme specific images.
Speaking of the /images/ folder, why don’t we go ahead and add
that to the /director/ theme.
Next, we’ll add menu support so that the theme user will be able
to change the navigation without having to rely on a developer or
having to know how to write their own code. Before the closing
PHP tag (?>), add in this code:
add_theme_support('nav-menus');
if ( function_exists('register_nav_menus')) {
14 bloginfo()
15 Read
prints the value, get_bloginfo() returns it.
all about it here: http://codex.wordpress.org/Function_Reference/bloginfo
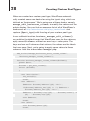
24
Converting HTML to a WordPress Theme
register_nav_menus(
array(
'main' => 'Main Nav'
)
);
}
There are a couple things going on here. First, we’re using WordPress’s built-in function, add_theme_support(), to tell WordPress
that we want to be able to have dynamic nav menus. Then, after
making sure the function is defined,16 we call register_nav_
menus(), sending it an array of menus that we’d like to create as
key => value pairs, where the key is the slug and the value is the
display name. In this case, we are only sending one key => value
pair, because we only need one menu, but we could send several
if the theme called for it.
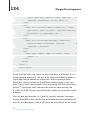
Our last step (for now) is to add in sidebar support for our theme.
Just like with the menu, we’ll make sure the proper function (in
this case, register_sidebar) works, then we’ll call it to create the
sidebar:
if ( function_exists( 'register_sidebar' ) ) {
register_sidebar( array (
'name' => __( 'Primary Sidebar', 'primary-sidebar' ),
'id' => 'primary-widget-area',
'description' => __( 'The primary widget area', 'dir' ),
'before_widget' => '<div class="widget">',
'after_widget' => "</div>",
'before_title' => '<h3 class="widget-title">',
'after_title' => '</h3>',
) );
}
16 We
should code our theme to work properly with current and older WordPress
installations.
25
Converting HTML to a WordPress Theme
With register_sidebar(),17 we’re creating a highly customizable sidebar based on a list of arguments sent as an array. We’re
assigning the sidebar a name, ID, and description, and then we’re
telling WordPress the markup for each section (or widget). The last
four arguments can list any HTML markup, and WordPress will
print it appropriately, but if you look at our HTML template, you’ll
see this markup matches our template perfectly. The arguments
before_widget and after_widget list the markup that the widget
will be wrapped in, and before_title and after_title list the
markup that the widget’s title will be wrapped in. So this:
… will be displayed using this markup, as defined in our functions
file:
<div class="widget">
<h3 class="widget-title">Hello World!</h3>
<p>Here is some content for a widget!</p>
</div>
Later, we’ll define our entire sidebar using the sidebar template.
That’s everything we’ll need for our functions.php file at this
point, but we will come back to it, I promise! Right now, let’s get
into the good stuff; we will actually convert our HTML template into
a working WordPress theme.
17 Codex
link: http://codex.wordpress.org/Function_Reference/register_sidebar
26
Converting HTML to a WordPress Theme
Theme Template Hierarchy
When deciding how to display content to the user, WordPress
relies on a very sophisticated template hierarchy based on the
theme’s template names. The only pages that are actually required
to make a theme work properly are style.css, which has the
theme definition in it, and index.php, which is the template that’s
used if WordPress cannot find any other template files. In addition to these two essential template files, we can also design different templates for pages, single posts, category pages, tags,
taxonomies, and more. For even more control, we can get specific
with pages, tags, categories, and post-types. For example, if
we had a custom post type named “movies,” we could create a
template named single-movies.php, which would automatically
be used to display posts of that type. Of course, we don’t need a
single-movies.php template. The drill down in WordPress would
look like this:
1. single-movies.php
2. single.php
3. index.php
We have similar templates drilling down for categories, pages,
tags, etc. We can also create page templates that we can apply to
specific pages. The convention (though this is not a requirement) is
to give the template’s PHP file a name that semantically describes
it. For example, if we wanted a one-column page template, we
could name it page-one-column.php. The only extra code we’d
need to add is a comment at the beginning of the template that
looks like this:
/*
Template Name: One Column
*/
27
Converting HTML to a WordPress Theme
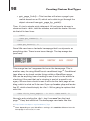
This PHP comment will tell WordPress to offer the “One Column”
page as a template in the WordPress editor:
This template will supersede any other page-specific template that
can be applied to the page. For example, if our page ID is 13, and
we have a page-13.php template, the One Column template will
override the page-13.php template. Similar to our single templates,
there WordPress applies a hierarchy (or drill down) to pages, applying them in this order of preference:
1. A specific page template (like page-one-column.php ) that
was chosen within the WordPress editor
2. page-<slug>.php. If our page’s slug18 is “about-us,” the
template name would be page-about-us.php
3. page-<id>.php
4. page.php
5. index.php
Finally, WordPress accounts for certain non-content specific sections of the theme by assigning them their own templates. These
sections include, but are not limited to:19
18 A
URL-friendly version of the page name.
19 I’ve
included the template name, a description, and the WordPress function
used to call that template.
28
Converting HTML to a WordPress Theme
• header.php – Anything above the content area. This will
likely include the HTML, head, and beginning body tags, as
well as possibly the site name, searchbar, and navigation.
Function call: get_header()
• footer.php – Anything below the content area. This will
close out the body and HTML tags, and it will also (appropriately) include the site footer. Function call: get_footer()
• sidebar.php – This determines the site’s sidebar. There can
also be multiple implementations of the sidebar by creating sidebar-<name>.php. So if we want a different sidebar
for the “About” page, we can create sidebar-about.php.
Function call: get_sidebar() or get_sidebar('about')
• searchform.php – This will customize the display of the
search bar. Function call: get_search_form()
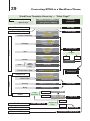
The WordPress Codex 20 has extensive documentation on the template hierarchy here: http://codex.wordpress.org/Template_Hierarchy, which includes a handy flow chart (see following page 29).
Let’s start our conversion by creating the header and footer files for
the template.
Header & Footer
While these are also relatively easy conversions, there are a few
things we need to keep in mind with each template; Let’s start with
the header first. What we’re going to do is look at all four of our
HTML files to see where they begin to diverge. Once we find the
point at which the HTML begins to differ, we’ll stop and consider
everything before that point our header. In this case, it looks like
that happens around line 41, where we begin to define the main
content area.
20 If
I haven’t mentioned this yet, the Codex is your best friend for development.
29
Converting HTML to a WordPress Theme
WordPress Template Hierarchy — “What Page?”
What kind of page is it?
Serve specific page…
Specifically?
If nothing
particular…
… then general category.
404.php
Error 404
Search Result
Custom Taxonomy
taxonomy.php
category-$slug.php
category-$id.php
Archive
Category
category.php
Tag
{
Year
Month
Day
archive.php
tag.php
Paged
Single Post
Attachment
}
date.php
archive-$posttype.php
index.php
$mimetype.php
$subtype.php
$mimetype_$subtype.php
attachment.php
single-$posttype.php
Blog
single-post.php
Site Front
false
paged.php
Custom
Static
true
author.php
Custom Post-Type
Singular
tag-$slug.php
tag-$id.php
author-$nicename.php
author-$id.php
Author
Date
search.php
taxonomy-$taxonomy$term.php
taxonomy-$taxonomy.php
Page
Template
{
single.php
Custom
$custom.php
Default
page-$slug.php
page-$id.php
front-page.php
Shown on
Front
{
page.php
Page
Posts
Blog Posts Index
home.php
Comments Popup
comments-popup.php
30
Converting HTML to a WordPress Theme
That means, for starters, that we’ll copy everything from line 41
up and add it to a new file that we’ll create in the /director/ theme
called header.php. At this point, the header.php file should look
exactly like the screenshot above. Now, we’ll start WordPressifying21 it. We’ll take it a section at a time, starting with the head.
This is what we have currently:
<head>
<title>Director Theme</title>
<meta http-equiv="Content-Type" content="text/html;
charset=UTF-8" />
<!--[if lt IE 9]> <script src="http://html5shim.
googlecode.com/svn/trunk/html5.js"></script>
<![endif]-->
<link rel="stylesheet" type="text/css" media="screen,
projection" href="css/style.css" />
</head>
21 Dibs
if this is not a real word.
▶
31
Converting HTML to a WordPress Theme
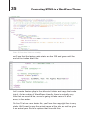
There are a couple of things that we’re going to need to replace
or add. First, we’ll want to replace our title with something more
dynamic:
<title><?php bloginfo('name'); ?> | <?php wp_title(); ?>
</title>
The first function listed, bloginfo('name'), will grab the name of
the blog as defined on the Settings � General page of the WordPress admin. wp_title() will grab the name of the page or post.
Next, we will properly link to the stylesheet and add a trackback
(or pingback URL) for when other websites link to us:
<link rel="stylesheet" href="<?php bloginfo('stylesheet_
▶
url'); ?>" type="text/css" media="screen" />
<link rel="pingback" href="<?php bloginfo('pingback_url');
?>" />
We’re using bloginfo() again to grab those values. The last thing
we need to do in the head is the most important part. This will
allow us to use any hooks and filters that use the wp_head hook;22
essentially, it makes theme additions and plugins work.
<?php wp_head(); ?>
So with that important final line, we’re done customizing the head,
which should look like this:
<head>
<title><?php bloginfo('name'); ?> | <?php wp_title(); ?>
</title>
<meta http-equiv="Content-Type" content="text/html;
charset=UTF-8" />
<!--[if lt IE 9]> <script src="http://html5shim.
googlecode.com/svn/trunk/html5.js"></script>
<![endif]-->
22 More
on that in “Setting up the Custom Post Type.”
32
Converting HTML to a WordPress Theme
<link rel="stylesheet" href="<?php bloginfo('stylesheet_ ▶
url'); ?>" type="text/css" media="screen" />
<link rel="pingback" href="<?php bloginfo('pingback_
▶
url'); ?>" />
<?php wp_head(); ?>
</head>
Next up is the <header> section, which currently looks like this:
<header class="group">
<h1><img src="images/logo.png" alt="Director" /></h1>
<div class="searchbar">
<form name="search" method="get" action="/">
<input type="text" name="s" value="Search..." />
<input type="submit" name="submit" value="Search!" />
</form>
</div>
<nav>
<ul>
<li><a href="#">Home</a></li>
<li><a href="#">Directory</a></li>
<li><a href="#">Blog</a></li>
</ul>
</nav>
</header>
We’re going to change three sections: the <h1> contents, the
search bar, and the navigation. Since we’re actually going to use
the /images/ folder now, go ahead and add that to the /director/
folder.
So, first we’ll change the heading so that it accurately grabs both
the title and the source for the logo:
<h1><img src="<?php print IMAGES; ?>/logo.png" alt="<?php
bloginfo('name'); ?>" /></h1>
33
Converting HTML to a WordPress Theme
You should notice two things here. The first is that we’re using
the IMAGES constant that we set up in functions.php. This pulls
the full images path, so all we need to do is tack on the actual file
name. Next, we once again use bloginfo() to grab the alternate
text, which should also be the title of the site in this case.
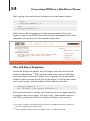
Next, we’re going to make the search bar more dynamic. Let’s start
by copying the search bar information:
<div class="searchbar">
<form name="search" method="get" action="/">
<input type="text" name="s" value="Search..." />
<input type="submit" name="submit" value="Search!" />
</form>
</div>
Paste the above HTML into a file in the /director/ folder that
we’ll call searchform.php. Now we can use a simple function
call — get_search_form() — anywhere in our theme. The Search
widget will use the same template. One more thing we should do
(though it’s not always necessary) is change the form “action” from
“/” to <?php bloginfo('url'); ?>. This will ensure our search
always calls the blog’s homepage. If it doesn’t, the search will not
work.
Now we can replace the code above with this single line:
<?php get_search_form(); ?>
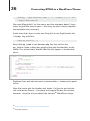
Much easier, right? Our final step will be to replace the nav, making
it more dynamic; we’ll make it so users can update the site navigation from within WordPress. Here’s what the new nav section looks
like:
<?php wp_nav_menu( array('menu' => 'Main', 'container' =>
'nav' )); ?>
The function used to print the site navigation as defined in WordPress is wp_nav_menu(), which can accept several arguments.
34
Converting HTML to a WordPress Theme
Most have to do with displaying the menu, which by default prints
it in an unordered list. This, as well as class, container, id, and
more, are all changeable using the arguments defined in the WordPress Codex.23 You’ll notice we took advantage of the container
argument to print our <nav> and </nav> tags. We could also apply
a class or ID using the container_class or container_id arguments, respectively. The other argument that we use in our theme,
menu, is used to identify which menu to use, as WordPress allows
for the creation of multiple menus. menu can accept ID,24 slug, or
name. We defined the latter two in our functions.php file; “main”
is the slug and “Main Nav” is the name.
And with that, our header is complete. Let’s take a look at what we
have now:
<header class="group">
<h1><img src="<?php print IMAGES; ?>/logo.png" alt=
▶
"<?php bloginfo('name'); ?>" /></h1>
<?php get_search_form(); ?>
<?php wp_nav_menu( array('menu' => 'Main', 'container'
=> 'nav' )); ?>
</header>
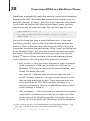
As you can see, we’ve saved quite a bit of room and have made
that section much more dynamic. On the following page you’ll see
a screenshot of the entire header, line count and all. Now, let’s take
care of our footer.
Let’s go back to our HTML templates and see what we should
copy into the footer. Since our header ends with opening a <div>
with the ID of “content”, we should definitely start the footer by
closing that. Luckily, I’ve placed comments in my code marking the
beginning and end of important sections. If we look at index.html,
23 http://codex.wordpress.org/Function_Reference/wp_nav_menu
24 Which
you can select from the WordPress admin.
35
Converting HTML to a WordPress Theme
Over 10 lines less! Not too shabby.
we’ll see that the footer code starts on line 103 and goes until the
end of the index.html file:
Let’s create footer.php in the /director/ folder and copy that code
into it. As for making it WordPress-friendly, there is actually very
little that we need to do, so we’re going to take care of it all at
once, in line order.
On line 10 of our new footer file, you’ll see the copyright line is very
static. We’ll want to use the actual name of the site, as well as give
it an actual year. So let’s replace that line with this:
36
Converting HTML to a WordPress Theme
<p>© <?php bloginfo('name'); ?>, <?=date('Y');?>. All
Rights Reserved</p>
We used bloginfo() for the name, and the standard date() function25 to grab the current year — that way, we don’t have to update
the template every January.
Aside from that, there is only one thing left to do. Right before the
</body> tag, add this:
<?php wp_footer(); ?>
Much like wp_head in our header.php file, this will fire the
wp_footer hook, calling any plugins that add functionality to the
footer. Our entire footer should look like this (again, in screenshot
form):
Eighteen lines and not too much customization — looks pretty good
to me.
Now that we’ve got the header and footer, it’s time to get into the
red meat of the theme — the posts and pages! Before we do that,
however, I need to tell you about the famous26 WordPress Loop.
25 http://php.net/manual/en/function.date.php
26 Actually
famous.
37
Converting HTML to a WordPress Theme
The Loop
Oh the Loop; it’s a living, breathing thing. It’s the backbone of
WordPress — what makes everything tick. Without the Loop, there
would be no dynamic content.27 Using the Loop, we can print any
content, however we want. Who would be better to describe the
Loop than the actual makers? Here’s what the WordPress Codex
has to say about the Loop:28
“
The Loop is used by WordPress to display each of
your posts. Using the Loop, WordPress processes
each of the posts to be displayed on the current
page and formats them according to how they match
specified criteria within the Loop tags. Any HTML or
PHP code placed in the Loop will be repeated on each
post. ”
Essentially, WordPress has a set of tags to: a) make sure that we
have posts to display, and b) display those posts. The tags, called
Template Tags,29 allow us to fully customize how we display the
information from each post.
We start off the Loop this way:
<?php if ( have_posts() ) : while ( have_posts() ) :
the_post(); ?>
Three things are happening here:
1. have_posts() is making sure there are posts to display.
2. The same function will continually keep track of whether we
still have posts, which is why it’s used as the while condition
3. the_post() unpacks the next post in the queue.
27 Well,
very little anyway.
28 http://codex.wordpress.org/The_Loop
29 http://codex.wordpress.org/Template_Tags
38
Converting HTML to a WordPress Theme
WordPress automatically grabs the posts by querying the database
based on the URL. You could also overwrite the original query by
using WP_Query() or query_posts() to get your own information.
In any case, as long as that query returns posts, have_posts()
returns true and we enter the Loop. We end the Loop with this:
<?php endwhile; else: ?>
<p><?php _e('No posts were found. Sorry!'); ?></p>
<?php endif; ?>
We end the Loop and have a simple fallback here, in the case
that have_posts() returns false, that tells the user we have no
posts for them. Inside the Loop, we can do all kinds of things to
completely customize the post display. While I won’t go through all
of the Template Tags, I will point out some of the most commonly
used ones. All of the following functions print out their value by
default.30 Some of these functions also accept Boolean values,
which determine if the value should be printed or returned.
• the_title() – Gets the title of the post or page. It accepts
three arguments: HTML tag for before the title (named
$before), HTML tag for after the title (named $after), and
$echo, the actual title itself.
• the_time() – Gets the date the post or page was published. The only argument it accepts is the format in which
that the date should be printed. These arguments are the
same ones that the PHP date function31 accepts. The
default is whatever is listed in the WordPress admin panel,
under Settings � General.
• the_content() – This will display the content of the post or
page (that is, whatever you entered as the body text in the
visual editor of the WordPress admin. It accepts two arguments, the first of which tells WordPress what to display as
30 Each
of these tags has a corresponding function prepended with get_ (e.g.
get_the_title) that will return the value instead of printing it.
31 http://php.net/manual/en/function.date.php
39
Converting HTML to a WordPress Theme
the “more” text. I’ll talk about this at length in the next section. The second argument, called $stripteaser is simply
documented as a Boolean that will, “Strip teaser content
before the “more” text.”32 There are no examples on the
Codex, and there is some debate over what it actually does.
• the_excerpt() – Gets the first 55 words of the post,
appending “ […] ” to the end of the string. It accepts no arguments. Both the number of words and the ellipsis (…) can be
changed within the functions file using filters.
• the_category() – Gets the category (or categories) in
which the posts are listed. For arguments, it accepts: the
separator, which will be printed in between categories, how
to handle displaying parent categories, and the post ID,
which of course defaults to the current post.
• the_tags() – Gets the tags added to the post. The arguments it accepts are: what to print before the list of tags,
how to separate each tag, and what to print after each tag.
• the_permalink() – Gets the post’s or page’s URL in the
format defined by the WordPress admin panel in Settings �
Permalinks.
You can write an entire book on WordPress’ template tags for
techniques inside and outside of the Loop;33 I just wanted to familiarize you with some of the more common ones that will appear in
this book.
The Post Pages
The Index
Now that we are Loop experts, let’s create some pages that use it,
starting with index.php. As you know from the template hierarchy,
32 http://codex.wordpress.org/Function_Reference/the_content#Parameters
33 Someone probably did.
40
Converting HTML to a WordPress Theme
index.php is the fallback template for all of the other WordPress
template pages; it would make sense to develop this one first.
Create an index.php file in your /director/ theme. The first thing
we should do is include the header and footer in the file using the
get_header() and get_footer() template tags. This is what our
entire index.php file should look like right now:
<?php get_header(); ?>
<?php get_footer(); ?>
Now, let’s open up blog.html and see how we want our posts to
be displayed. We want to cut out everything that we’ve already
included in header.php and footer.php, which leaves us with this:
Copy and paste that code in between the get_header() and
get_footer() tags. Converting this will be a little more difficult
because we will need to determine what belongs in the Loop and
what does not, as well as separate out our sidebar, which belongs
in its own template.
41
Converting HTML to a WordPress Theme
We can tell what should go in the Loop based on what’s repeating in the mock-up; here, you can see anything in-between <div
class="post"> and the corresponding </div> belong within the
Loop. Armed with that knowledge, let’s get the index.php template in order. Anything above our first <div class="post"> tag
goes before the Loop, so the top34 of index.php looks like this:
<?php get_header(); ?>
<div id="main" class="group">
<div id="blog" class="left-col">
That’s easy enough! Now let’s get started on that Loop. We will
start it the same way you start every Loop:
<?php if ( have_posts() ) : while ( have_posts() ) :
the_post(); ?>
Now, we’ll use our mock-up as a guide for filling in the template
tags. We’re going to add the following tags inside the Loop:
the_title(), the_date(), the_author_posts_link(), and
the_content(). We will also get rid of each repeating post <div>,
since we’ll only need to print the post once. Replace lines 5-19 with
the following code:
<div class="post">
<h2><a href="<?php the_permalink(); ?>"><?php the_title();
?></a></h2>
<div class="byline">by <?php the_author_posts_link(); ?>
on <a href="<?php the_permalink(); ?>"><?php the_time( ▶
'l F d, Y'); ?></a></div>
<?php the_content('Read More...'); ?>
</div>
You should recognize most of what we see here from earlier in this
book, under “The Loop.” One template tag that I didn’t explain
before is the_author_posts_link(), which is a function that
34 That
is, everything before the Loop.
42
Converting HTML to a WordPress Theme
prints the author’s display name 35 as a link to all of his or her posts.
It accepts no arguments. I also want to take this opportunity to talk
about the_content()’s $more_link_text parameter.
As you might know, in the WordPress editor, you can add
<!--more--> into a post as a way to identify teaser text or an intro
paragraph for your post. The first argument of the_content()
gets appended to only have content above the <!--more--> tag.
Of course, this will only happen on pages designed to show multiple posts. On the single.php template, the entire post will be
displayed.
With that last addition, we now have the entire contents of our
Loop. Now it’s time to close it out36 using the same code that I
mentioned above. Place it right after the </div> that closes out the
post div:
<?php endwhile; else: ?>
<p><?php _e('No posts were found. Sorry!'); ?></p>
<?php endif; ?>
With the Loop finished, let’s move onto the page navigation. Right
now, we have the previous and next links hard coded:
<div class="navi">
<div class="right">
<a href="#">Previous</a> / <a href="#">Next</a>
</div>
</div>
This is easy enough to replace with dynamic links, as WordPress
has native template tags for this information. We’ll just replace that
code with:
<div class="navi">
<div class="right">
35 Configurable
in the WordPress admin area under Users.
43
Converting HTML to a WordPress Theme
<?php previous_posts_link('Previous'); ?> / <?php
next_posts_link('Next'); ?>
</div>
</div>
Both previous_posts_link and next_posts_link work outside
the Loop and will link to the previous and next post pages. They
accept as their first argument any string that you want displayed
as the link. There is also an optional second argument in which you
can define the maximum number of pages the next/previous links
are displayed. There is by default, no limit. It’s worth noting again,
these refer to the order of the pages, not the order of the posts.
“Next” will take you to older posts, and vise versa for “Previous.”
This is the last bit of content in the larger left column of our template. After closing out the main <div> with </div>, it’s time to
move on to the sidebar. For now, we’re going to cut and paste the
entire sidebar into its own template file and worry about making
it dynamic later. Cut everything from the start of your HTML
file’s sidebar to the end of it, and paste it into a new file named
sidebar.php. Now add the following to where our sidebar was
(around line 25):
<?php get_sidebar(); ?>
Perfect! Now to close out the “main” <div> and finish index.php:
</div>
We now have a fully functional WordPress theme! Of course, we’re
going to make some more customizations to it. As for index.php,
that should now look like this (top of page 44).
It’s a perfect copy of our mock-up, with our own blog content! 37
36 Unless
37 Or
you want things to be really, really broken.
in this case, content from wpcandy ( http://wpcandy.com/made/the-samplepost-collection ).
44
Converting HTML to a WordPress Theme
Our revised index.php file.
The index page in action matches our mockup.
Single Page Template
Next, we’ll create the single.php template, which is designed to
display a single post. Admittedly, it won’t be much different from
our index.php template. I do want to illustrate the small differences between the two, as well as the template hierarchy. Go
ahead and add a single.php file the /director/ folder, and copy the
contents of index.php into it.
45
Converting HTML to a WordPress Theme
One of the changes we are going to make is to remove the permalink references, since we are now on that post’s page. There
are currently two, for the title and the date. We should replace this
code:
<h2><a href="<?php the_permalink(); ?>"><?php the_title();
?></a></h2>
<div class="byline">by <?php the_author_posts_link(); ?>
on <a href="<?php the_permalink(); ?>"><?php the_time(
▶
'l F d, Y'); ?></a></div>
With this:
<h2><?php the_title(); ?></h2>
<div class="byline">by <?php the_author_posts_link(); ?>
on <span class="date"><?php the_time('l F d, Y'); ?></a> ▶
</div>
Notice that in order to keep consistent styling for the date, we
wrapped it in a span element with the class of “date”.
Next, we’ll want to change the post navigation to move to the next
or previous post, not the next of previous page of posts. Two
things need to happen. We need to:
• Move the “navi” section inside the Loop.
• Replace the current, previous, and next functions with ones
that will display posts instead of pages.
Copy the following code and place it right above endwhile; — right
before the end of the Loop:
<div class="navi">
<div class="right">
<?php previous_posts_link('Previous'); ?> / <?php
next_posts_link('Next'); ?>
</div>
</div>
46
Converting HTML to a WordPress Theme
Now we’ll replace previous_posts_link() and next_posts_
link() with previous_post_link() and next_post_link()
respectively. While there isn’t much difference in their names
(besides a single “s”), the latter two accept a few more arguments
and are very flexible.38 Because of that, we'll also want to remove
the arguments 'Previous' (from previous_post_link() ) and
'Next' (from next_post_link() ). Now by default, they will display the title of the next/previous post as a link, which is exactly
what we’re looking for. What we have now is simply:
<div class="navi">
<div class="right">
<?php previous_post_link(); ?> / <?php next_post_
▶
link(); ?>
</div>
</div>
That will give us this:
If we’d like, we could also add the categories and tags using the
template tags mentioned earlier. Just amend the byline div to read
like this:
38 http://codex.wordpress.org/Function_Reference/next_post_link
47
Converting HTML to a WordPress Theme
<div class="byline">
by <?php the_author_posts_link(); ?> on <span class=
▶
"date"><?php the_time('l F d, Y'); ?></span><br/>
Posted in: <?php the_category(', '); ?> | <?php
the_tags('Tagged with: ', ', '); ?>
</div>
That code will result in this byline:
While this is all the customization that I’m going to make to
single.php, you don’t have to stop here. single.php a great template to experiment with. Then again, so is the next one.
Content Pages
What really brought WordPress to the next level as a platform was
the ability to create pages that were separate from traditional blog
posts. It went from being simply a blogging platform to being a
CMS. We are going to harness that power to create a page template designed specifically to display page content.
Once again, there won’t be too many differences between this
template and index.php or single.php, but there are some noteworthy adjustments that we need to make.
• What’s often referred to the “post meta data” (author, categories, tags, etc.) are not important on pages, so we can
remove them.
• Similarly, when traversing through pages, we can safely
assume the user will look to the site’s navigation. We can
remove the previous and next post functions.
Go ahead and create a new file in the /director/ folder named
page.php and copy the contents of single.php into it. Once we
do that, we will simple remove the following two sections:
48
Converting HTML to a WordPress Theme
<div class="byline">
by <?php the_author_posts_link(); ?> on <span class=
▶
"date"><?php the_time('l F d, Y'); ?></span><br/>
Posted in: <?php the_category(', '); ?> | <?php
the_tags('Tagged with: ', ', '); ?>
</div>
and
<div class="navi">
<div class="right">
<?php previous_post_link(); ?> / <?php next_post_
▶
link(); ?>
</div>
</div>
That leaves our Loop looking very lean:
<?php if (have_posts()) : while (have_posts()) :
the_post(); ?>
<div class="post group">
<h2><?php the_title(); ?></h2>
<?php the_content('Read More...'); ?>
</div>
<?php endwhile; else: ?>
<p><?php _e('No posts were found. Sorry!'); ?></p>
<?php endif; ?>
Save it, and we’re done! The top of page 49 (following) shows what
the resulting pages look like.
It is worth noting that since posts and pages are inherently the
same, most template tags for posts behave the same way for
pages. The obvious exceptions are the_category() and the_
tags(), since you cannot assign either to pages in WordPress.
With these template files, we have several unique displays that will
allow the user to differentiate between post listings, single posts,
49
Converting HTML to a WordPress Theme
and pages. Since we did not create custom search or archive templates, they will default to index.php. For this theme, that is fine.
There is one page that we haven’t created yet, however, and that’s
our custom homepage. This will have to wait until after we create
our plugin, since the homepage relies on that.
There are also several auxiliary template pages that we haven’t
customized/created yet. In the next section, we’ll create templates
for the sidebar, archives, and 404 errors.
Auxiliary Template Pages
These pages are important because we can distinguish them from
the rest of the theme. There are fewer dependencies, which means
less to change, which means more customization. Let’s start with
the sidebar.php template page that we’ve already created.
The Sidebar Template
Our sidebar template ( sidebar.php ) as it stands now looks like
this:
<aside class="right-col">
<div class="widget">
<h3>ABOUT US</h3>
50
Converting HTML to a WordPress Theme
<p>Ac, vestibulum at eros. Praesent commodo cursus
magna, vel scelerisque nisl consectetur et. Maecenas
faucibus mollis interdum. Lorem ipsum dolor sit amet,
consectetur adipiscing elit.</p>
<p>Vestibulum id ligula porta felis euismod semper.
Curabitur blandit tempus porttitor. Praesent commodo
cursus magna, vel scelerisque nisl consectetur et.
</p>
<p><a href="#">MORE ABOUT US...</a></p>
</div>
</aside>
We actually aren’t too far off from what we want here. Remember,
back in our functions file, we defined a sidebar named “Primary
Sidebar.” After the <aside> tag, we’re going to make sure that
sidebar exists.
<?php if ( !function_exists( 'dynamic_sidebar' ) ||
!dynamic_sidebar('Primary Sidebar') ) : ?>
The code above is saying “if Primary Sidebar does not exist, print
the following.” Now we can throw <?php endif; ?> right before
</aside> and be done, but we probably want to put something
useful there, in the case that either: no dynamic sidebar is defined,
or the user has not defined a sidebar. I usually like to include a
searchbar:
<div class="widget">
<h3>Search</h3>
<?php get_search_form(); ?>
</div>
Remember that while the sidebar we defined does include all of the
markup for us, we still need to write in a fallback. Now we’re ready
to close the conditional statement. Our entire sidebar.php file
looks like this:
51
Converting HTML to a WordPress Theme
<aside class="right-col">
<?php if ( !function_exists( 'dynamic_sidebar' ) ||
!dynamic_sidebar('Primary Sidebar') ) : ?>
<div class="widget">
<h3>Search</h3>
<?php get_search_form(); ?>
</div>
<?php endif; ?>
</aside>
And, if you’d like to see what it looks like (left is by default, right is
with some widgets):
We can also create multiple sidebars fairly easily. We would just
create a new template page called sidebar-other.php using similar code to what’s in sidebar.php. Instead of checking !dynamic_
sidebar('Primary Sidebar'), we would simply check !dynamic_
sidebar('Other') and define Other in our functions.php file,
as we did with Primary Sidebar. The final piece of the puzzle comes
when calling that get_sidebar() in the template. As I explained
earlier, instead of just calling get_sidebar(), we would pass an
argument, explicitly telling WordPress what sidebar template we
want to use. In this case, it would be get_sidebar('other').
52
Converting HTML to a WordPress Theme
Archives Template
Next up, we’re going to create a general archives page. You should
note that this will display links to month and category archives, not
actual posts, which could be done by creating an archive.php
template page. However, our index.php template is handling that.
Also, this is going to be a page template so we’ll need to create a
page in WordPress that uses the template. WordPress does not
have a reserved “Archives” page template.
Create a file named page-archives.php39 and place it in the
/director/ theme. Next, we’ll start the file off with this text:
<?php
/*
* Template Name: Archives
*/
?>
<?php get_header(); ?>
<div id="main" class="group">
<div id="blog" class="left-col archives">
Our first few lines tell WordPress that this is a page template
named “Archives,” which WordPress will use when a user is creating or editing a page. The rest should look familiar since it’s everything before the Loop on the page.php template, with the addition
of the CSS class .archives after .left-col. This will apply some
special CSS to our archives page.
Next, we’ll want to add in the information for our archives. Since
we’re not pulling any direct content from WordPress, we do not
need the Loop. Instead, we’ll be using two other template tags:
• wp_get_archives() – This will return a list of posts organized by date, based on the value of an argument named
“type”. The value can be: daily, weekly, monthly, yearly,
39 In
some themes, developers will just name this archives.php. I’m following the
convention that any page template has the prefix page-
.
53
Converting HTML to a WordPress Theme
postbypost, and alpha. The only difference between
postbypost and alpha is that postbypost sorts by date,
and alpha sorts by title.40
• wp_list_categories() – This function will return a list of
category links based on the criteria you send it. You can
customize things like which categories to display, how to
display them, if you want to include a count, and more.41
We’re going to use these with what are mostly the default settings.
Starting on the next line of archives.php, add this:
<h2>Archives by Month:</h2>
<ul>
<?php wp_get_archives('type=monthly'); ?>
</ul>
<h2>Archives by Subject:</h2>
<ul>
<?php wp_list_categories('hierarchical=0&title_li='); ?>
</ul>
As you can see, we aren’t using too many custom settings for
either function here. With wp_get_archives(), we’re calling the
monthly archives, and for the rest, we are using the defaults.42 With
wp_list_categories(), again, we are primarily using the default
settings. However, we are making a couple of notable changes.
The first is that we aren’t displaying the categories hierarchically.
By default, child categories would display as nested unordered
lists under their parents. For display purposes, we’ve set this to
false (or 0). There is also an argument called title_li. By default
this argument will make the first list item the title (which is “Categories” unless otherwise noted) and make all of the categories a
nested list. By setting title_li to nothing, the categories become
the top-level list.
40 http://codex.wordpress.org/Template_Tags/wp_get_archives
41 http://codex.wordpress.org/Template_Tags/wp_list_categories
54
Converting HTML to a WordPress Theme
We’re going to round out our template using the same familiar:
</div>
<?php get_sidebar(); ?>
</div>
<?php get_footer(); ?>
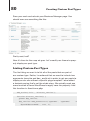
We’re done with the page-archives.php template! Once you
create a page in the WordPress admin panel and apply the Archive
template, you will end up with something like this:
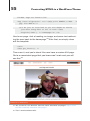
The 404 Error Template
Unlike the archive template, our 404 page is not one we need to
create in WordPress.43 We’ll simply create a file named 404.php
and add it to our /director/ folder. This is going to be a somewhat
stripped down version of the rest of the pages. It will include some
text, a silly image, and no sidebar. We’re starting with this:
<?php get_header(); ?>
<div id="main" class="group fourohfour">
Pretty standard stuff, except you’ll notice that we’ve again applied
a custom class to our page. The only thing .fourohfour does in
the CSS is center all of the text. Next we’ll add in our content:
42 Actually,
monthly is the default type too, but I wanted to illustrate sending at
least one argument to the function.
43 That
would be kind of weird, considering 404 is “Page not Found.”
55
Converting HTML to a WordPress Theme
<h2>404: Page not Found!?</h2>
<img class="aligncenter" src="<?php print IMAGES;?>/404.
▶
jpg" alt="404'd!"/>
<p>I am just as surprised as you are! Maybe we should
just move along back to the <a href="<?php
bloginfo('home'); ?>">homepage</a>.</p>
Here’s our page. Just a heading, an image, and some text redirecting the user back to the homepage.44 After that, we simply close
out the template:
</div>
<?php get_footer(); ?>
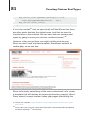
Then save it, and you’re done! You now have a custom 404 page.
Go to a nonexistent page that you know won’t work and you will
see this:45
44 You,
of course, can do more. Here are some awesome 404 pages: http:// list25.
com/25-creatively-awesome-404-pages/
45 That
is one handsome fella.
56
Converting HTML to a WordPress Theme
With that, we’re actually done developing our theme (except for the
homepage, which we’ll get to later). Before we move on to creating
custom post types, I do want to talk bit about theme frameworks
and creating our own.
Building Our Own Framework
I find when building themes, I’m usually starting in the same place
every time. Because of this, I started writing blocks of code that
I could reuse. One of the best things about my education at the
University of Scranton was the recurring lesson we learned about
reuse. Reuse is incredibly important in programming for many
reasons: easier testing, saving time, the ability to focus on more
advanced things, etc. Once I graduated and entered the wonderful
world of full-time freelancing, I decided that if I was going to keep
doing WordPress work, I would need to apply those reuse lessons
to my everyday life. The first thing I did was develop those blocks
of code into a full blown theme framework.
I want to go over some thoughts about reuse, and coding; these
are things you can keep in mind if you decide to build your own
framework. I personally think the theme that we just developed is
a pretty good starting point.46
Principles of Reuse
Anyone with formal education in Computer Science or Software
Engineering can attest to the fact that there are countless theories,
libraries, and classes (programming classes, not school classes)
dedicated to some very advanced forms of reuse and generic
programming. While I think those are overkill for the simple theme
framework I had in mind, there are some principles I tried to follow:
46 I
also have a four-part series on this topic over at WPTuts+: http://wp.tutsplus.
com/ series/diy-theme-framework/. Most of this section was taken from the 1st
and 2nd articles.
57
Converting HTML to a WordPress Theme
• Design Your Code – I know when talking about WordPress,
design usually implies the front-end design, but it’s just as
important to design the code. Lay out what your functions,
classes, and pages will be before you start to code them up.
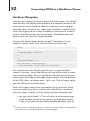
• Generalize When Possible – Possibly the most important
principle is to always recognize when you’re reusing code
snippets and to generalize them into functions. This will
make managing and updating your code much, much easier.
• Document and Test Thoroughly – This is something you
should do with all code, but especially code that you plan
on reusing frequently. Documenting will help you remember
what you were thinking six months or a year down the line.
Testing will ensure your code works before implementing it
5, 10, or 20 times.
Define Your Needs
Now that we’ve laid out some principles to keep in mind, we need
to define what we want our framework to accomplish. Remember,
each of us has our own needs, and while I’m going to talk about
mine, yours may be different. My needs were fairly simple at first;
I wanted a simple framework that did my initial work for me.
While creating WordPress themes for my clients, I noticed my
process was the same: copy K2 (the default theme at the time),
remove the stuff I didn’t want to use, replace it with my code. A lot
of my code was similar: the same CSS reset, the same CSS structure, the same style header, navigation, etc. After a while, I found it
was easier just to copy my last client’s theme and build from that.
It was then that I decided to build my own framework.
With that decided, I needed to define my needs: what work I was
doing repeatedly, and which parts of that work I could generalize.
My list of requirements was as such:
58
Converting HTML to a WordPress Theme
• Pluggable CSS – There are several parts of my CSS that
rarely change. This includes in WordPress class definitions,
my CSS reset, some general classes I use (.hide, .left,
.right, .clear, etc.), and (usually) my IE Fixes. If I could
abstract that all away, all I would need to do is dump in a
site-specific CSS file (called master.css after Dan Cederholm’s simple CSS framework) and I know everything else
would work properly.
• Constants for the Theme URL and Image Paths – These
are two variables I need with every theme. If I could easily
define them somewhere, I wouldn’t need to worry about
replacing the URLs for every site I create. You’ll notice I
implemented these when creating the functions.php file
earlier in this book.
• Common WordPress Functionality – This is the menus,
sidebar definitions, and anything else I could think of that I’d
be typing over and over again.
• Generally Defined Template Pages – The common theme
pages (header, footer, index) with enough on them to make
them useful, but not so much on them that I’d have to really
change the theme every time I developed a new theme.
• Common Folders – I always have an images folder, css
folder, and a css/img folder. I had to include these too.
• Lightweight – It’s got to be lightweight. I don’t want to have
to sift through pages and pages of code to find what I want.
My thought is that WordPress itself is a complex framework;
why build a second complex framework on top?
I also wanted to build some functions for features of several pages,
like the “page not found message” and the posts page navigation.
This goes back to the mentality that a single function will help me
more quickly change multi-page features.
59
Converting HTML to a WordPress Theme
If you are going to start with what we’ve laid out here, make sure to
cut away anything you don’t think will be useful across all sites and
to create functions for what you think you’ll use a lot. It’s possible
that our Loop could be thrown into a function, or the 404 page
could be generalized to fit the needs of any site (granted, it’s pretty
general now). A framework should also include a comments template, especially if you’ll be applying it to blogs.47
There are some things to keep in mind when coding your framework, especially if you’re going to apply it to child themes. My first
tip, however, is to see what’s already out there.
Existing Theme Frameworks
You don’t want to reinvent the wheel. As a matter of fact, the whole
idea behind creating a theme framework is to prevent that very
thing. So you might as well check out what’s already out there.
Below are some of the more popular ones I’ve seen and/or used.
• Thematic
• Thesis
• Carrington
• Genesis
• Atahualpa
• From the WordPress Codex
While exploring these frameworks, keep your requirements in mind.
Test these properly: download, install, enable; then try building a
child theme and playing with the settings. See what you find, then
make your decision.
If you do decide to go the way of coding your own, like I did, there
are some things you should keep in mind.
47 To
be honest, I usually do not include comments when setting up sites; most of
the time it’s not something my clients or I want to deal with.
60
Converting HTML to a WordPress Theme
Coding Tips for Frameworks/Child Themes
First, you should know how child themes work when creating your
framework. When creating one, the style.css file will have the
same theme definition, with one additional line:
/*
Theme Name:
Child Theme
Theme URI:
http: //example.com/
Description: Child theme for Your Framework Theme
Author:
Your Name
Author URI:
http://your-site.com/
Template:
parent-theme
Version:
1.0
*/
The line labeled “Template” will tell WordPress where the child’s
parent resides. This should match the name of the folder exactly; it
is case-sensitive.
Also, regarding the style.css file, the child theme will completely
overwrite the parent’s. That means that none of the CSS from the
parent theme will automatically be pulled in to the child theme. In
order to grab the CSS from the parent, you’ll have to include this
line right after the theme definition:
@import url("../parent-theme/style.css");
You would replace “parent-theme” above with the folder name of
your theme’s parent theme, of course.
The way WordPress child themes handles the style.css file is
pretty much the same it handles every template file — the parent
file will be overwritten by the child. All other files (that is, ones that
do not exist in the child theme) will be imported from the parent
theme. There is one exception: functions.php.
In the case of the functions.php file, the child’s version of the
file is loaded, followed immediately by the parent’s version. This is
61
Converting HTML to a WordPress Theme
great news because the child can use any function you have in the
parent. You will need to be careful though; if you have a function
in the child theme with the same name as one in the parent theme,
you’ll get an error (or the parent’s function will overwrite the child’s).
What I recommend doing for your framework, to allow for function
customization, is this:
if ( ! function_exists( 'this_cool_function' ) ):
function this_cool_function(){
//some stuff would probably go here.
}
endif;
What this bit of code is essentially saying is to only create that new
function if an identically-named function doesn’t already exist. This
will prevent any errors or overwrites from happening.
The last thing I want to point out before moving onto Custom Post
Types is the difference between bloginfo('template_directory
') and bloginfo('stylesheet_directory'). As you’ll recall,
when we created our functions.php file for the Director theme,
we used stylesheet_directory. While either would have been
fine here, there is a key difference that applies to parent and child
themes. With template_directory, we’d get the full URL of the
parent theme returned. With stylesheet_directory, the full URL
to the child theme is used instead. That means if we use Director
as a parent theme, template_directory would grab the wrong
path.
If you do decide to create a theme framework, I recommend
checking out my 4-part series on WPTuts+, which takes you from
planning to development, including a child theme and repurposing
the framework, much like a boilerplate. That can be found here:
http://wp.tutsplus.com/series/diy-theme-framework/.
63
Creating Custom Post Types
Creating Custom Post
Types
Quite possibly the best addition to WordPress 3.0 was Custom
Post Types. This took WordPress from being a CMS that can
manage posts and pages to being able to manage anything the
user can think of rather easily. You no longer have to add custom
fields to posts — you can add high level support to your own
types, creating their own theme page files and admin areas. Since
this is a theme based around a business directory, we’ll leverage
this to create a custom post type to store and display business
information.
Designing the Custom Post Type
The first thing we need to do is decide what information we want
to store, and the best way to store it.48 Here is the list of features I
came up with:
• Business Name
• Phone Number
• Email Address
• Physical Address (Street, City, State, Zip)
• Website
• Photo
• Description of the Business
• A Category for the Business
Now, we certainly have some overlap between features themselves
as well as the capabilities of WordPress. For example, we want
48 I
will assume that these are businesses based in the United States.
64
Creating Custom Post Types
to list both the physical address and display a Google Map of the
business’ location. In this case, we can derive the map from the
full physical address, so we don’t need a separate field for the
map. As far as overlap with WordPress features, by default, WordPress posts include a title, post text area, categories (and custom
taxonomies), tags, media uploader, and the ability to designate a
featured image within a post. We will make use of all of these, as
well as add in our own fields. When we map our features to form
fields in the WordPress editor, we get this:
• Business Name � Post Title
• Contact Person � Textbox (custom field)
• Phone Number � Textbox (custom field)
• Fax Number � Textbox (custom field)
• Email Address � Textbox (custom field)
• Physical Address:
• Street � Textbox (custom field)
• City � Textbox (custom field)
• State � Textbox (custom field)
• Zip � Textbox (custom field)
• Website � Textbox (custom field)
• Photo � Media Uploader � Featured Image
• Description of the Business � Post Text though the main
editor
• A Category for the Business � Taxonomy
As you can see, through a combination of stock WordPress features and our own custom fields, we are able to come up with a
nice Business Entry page for our theme.
65
Creating Custom Post Types
Building it into the Theme
When working with Custom Post Types (CPTs) we have a couple of
options as to how we want to approach them; the two main implementations you might consider are:
1. As part of the current theme (usually through the
functions.php file).
2. As its own standalone plugin.
There are pros and cons to each. For example, if we’re building a
CPT that we plan to use in more than one theme, we might want to
build it as a plugin, since it will be much easier to move from theme
to theme. If we’re looking for a CPT that deeply integrates with a
theme that we are building, we’d want to build it into the theme
itself. Since our CPT is part of our theme, we will be opting for the
latter.
Setting up the Custom Post Type
The first thing we need to do is go to our theme and open up the
functions.php file. We’re going to put our custom post type
code in a different file (just so it’s easier to read/manage), so we’ll
call that file towards the top of our functions file (I put it at line 31,
below the sidebar declaration:
require_once('business-manager.php');
Now let’s actually create the file. Add business-manager.php to
the /director/ theme. Open it up and add the <?php and ?> tags.
The first actual code we’re going to add here will define and create
our new custom post type.
add_action('init', 'business_manager_register');
function business_manager_register() {
//Arguments to create post type.
$args = array(
66
Creating Custom Post Types
'label' => __('Business Manager'),
'singular_label' => __('Business'),
'public' => true,
'show_ui' => true,
'capability_type' => 'post',
'hierarchical' => true,
'has_archive' => true,
'supports' => array('title', 'editor', 'thumbnail'),
'rewrite' => array('slug' => 'businesses', 'with_front'
=> false), );
//Register type and custom taxonomy for type.
register_post_type( 'businesses' , $args );
The first line here is a hook in WordPress that will call our function,
business_manager_register() on initialization. The function
itself sets up an array of arguments to send with our custom post
type. Most notably, we’re setting our admin labels, giving this type
all of the capabilities of a standard WordPress post — adding support for the title, editor, and featured image fields, and allowing
URL rewrites (for pretty permalinks).
There is one important note about both rewrite, and
has_archive. These arguments are necessary if you want to
be able to view an index of your posts without having a specific
page template dedicated to it. Using these two arguments, you
can now to go www.your-domain.com/businesses (or in general,
/<post-type-slug>.)49
This function actually has a really extensive list of arguments,
giving you a lot of control over the custom post type. Here, I’ve
included what I consider the most important and necessary arguments. You could add many more, such as more of the labels
(which can be sent over an as array), the menu position, a custom
49 Actually,
there is one more function we’ll need to add to make permalinks
behave properly. We’ll add that in a little bit.
67
Creating Custom Post Types
menu icon, etc. You can read more about all of the arguments for
register_post_type() on the WordPress Codex.50
After setting up the arguments array ($args), we pass that along
with the custom post type name to the function register_post_
type().
The next thing we want to do is register a custom taxonomy
for our custom type. This will allow us to add our businesses to
categories.
On the next free line of the business-manager.php file, add this
code:
register_taxonomy("business-type", array("businesses"),
array("hierarchical" => true, "label" => "Business
Types", "singular_label" => "Business Type", "rewrite"
=> true, "slug" => 'business-type'));
This function (which has been part of WordPress since 2.8 — two
versions before custom post types!) sends the following
information:
• The name of the new taxonomy
• An array of what post types it should be applied to
• An array with:
• If there can be parent/child categories
• The menu label for both the plural and singular
• If we can use this type in mod_rewrites (for permalinks)
• What the category slug should be
As with register_post_type(), register_taxonomy() has several more arguments we can use to further customize labels and
displays. Once again, you can read more about the function on the
Codex.51
50 http://codex.wordpress.org/Function_Reference/register_post_type
51 http://codex.wordpress.org/Function_Reference/register_taxonomy
68
Creating Custom Post Types
Now, we wouldn’t have much of a custom type without having
some extra info to add to the post. We’ll add that info in the form of
custom fields. Specifically, we’ll be adding several extra fields for
the information we outlined above. Since this is quite a bit of code,
we’ll take it one section at a time. Add the following code to your
business-manager.php file:
if (function_exists('add_theme_support')) {
add_theme_support('post-thumbnails');
set_post_thumbnail_size( 220, 150 );
add_image_size('storefront', 620, 270, true);
}
add_action("admin_init", "business_manager_add_meta");
function business_manager_add_meta(){
add_meta_box("business-meta", "Business Options",
"business_manager_meta_options", "businesses",
"normal", "high");
}
There are a couple of things going on here. In the first few lines,
we’re adding thumbnail support, which is necessary to have featured business images. In the subsequent lines, we’re telling WordPress what sizes we want our images to be. In set_post_thumb
nail_size(), we’re setting thumbnails site-wide to 220 × 150.52
There is a third argument set_post_thumbnail_size() will accept,
and that is whether or not to crop the image (named $crop). We’re
going with the default, which is false. When $crop is set to false,
WordPress will proportionally resize the image to our specified
dimensions. When $crop is set to true, WordPress will do a hard
crop, which will not resize the image it all. It will crop it to the
proper dimensions.
In the next line, we call another function, add_image_size(),
which allows us to define new image sizes on top of the ones built
52 Since
this is for our own theme, this is OK. I would avoid doing this in
plugins since it might cause conflicts with the user’s theme. Instead use
add_image_size().
69
Creating Custom Post Types
into WordPress. The ones already built into WordPress, which
are reserved words, are: thumb, thumbnail, medium, large, and
post-thumbnail. The Codex strongly advises against messing
with these.53 These words allow us to call a particular image size
in our themes, using the template tag the_post_thumbnail(),
passing the image size name as an argument. So getting back to
add_image_size(), we want to create a new image size that corresponds to the main image on the business.html page in our
mock-ups. To do that, we pass the following arguments:
• Name, which in this case is “storefront”
• Width (in pixels), which is 620
• Height (in pixels), which is 270
• Crop, which is set to true
With that, we can freely call the_post_thumbnail('storefront')
to display a nicely resized image of the business’ storefront. There
are a couple of important things to note about hard crop: it will
resize the image to exact dimensions, so some of your results
may be undesirable. However, in this case I felt it was better, so
long as we use big enough images. Also, these techniques will not
increase the size of the images, which means that if it’s smaller that
620 × 270, it will remain smaller.
After we define the images, we use the WordPress hook admin_
init to call our function business_manager_add_meta() when
the WordPress admin is created. That function will add another
box to our business type using WordPress’s built-in function,
add_meta_box().54 The arguments we pass to add_meta_box()
are:
53 They
say you should never. They also say a kitten will die if you do. Don’t kill
kittens.
54 The
reason we wrap this in our own function is so we can use the admin_init
hook without completely breaking everything.
70
Creating Custom Post Types
• ID, which is given to the new meta box as an HTML attribute.
In this case, it’s business-meta.
• Title of the meta box, which is displayed on the screen. We
call ours, “Business Options.”
• The callback function that will build the meta box (the fun
part!). Ours is called business_manager_meta_options.
We’ll get to that in a minute.
• Post types that this box should be applied to (using the
post’s slug). For us, it should only be applied to our custom
type, which has the slug, “businesses.”
• Where on the WordPress editor’s screen the box should
be (referred to as the context). This is referring to high
in the main column ( normal ), low in the main column
( advanced ),55 or the sidebar ( side ). We’ve given our meta
box a “normal” context.
• Finally, we pass along the priority of the box, which we say
is high (options are high, core, default, and low ).
So as you can see, this function doesn’t actually populate the meta
box, it just creates it. For populating the box, we look to the callback function we sent as the third argument, business_manager_
meta_options(). Let’s go ahead and add that to our businessmanager.php file:
function business_manager_meta_options(){
global $post;
if ( defined('DOING_AUTOSAVE') && DOING_AUTOSAVE )
return $post_id;
$custom = get_post_custom($post->ID);
$address= $custom["address"][0];
$address_two= $custom["address_two"][0];
$city= $custom["city"][0];
55 http://wordpress.stackexchange.com/questions/2026/what-is-the-advanced-
context-in-add-meta-box
71
Creating Custom Post Types
$state= $custom["state"][0];
$zip= $custom["zip"][0];
$website = $custom["website"][0];
$phone = $custom["phone"][0];
$email = $custom["email"][0];
?>
<style type="text/css">
<?php include('business-manager.css'); ?>
</style>
<div class="business_manager_extras">
<?php
$website= ($website == "") ? "http://" : $website;
?>
<div><label>Website:</label><input name="website"
value="<?php echo $website; ?>" /></div>
<div><label>Phone:</label><input name="phone"
value="<?php echo $phone; ?>" /></div>
<div><label>Email:</label><input name="email"
value="<?php echo $email; ?>" /></div>
<div><label>Address:</label><input name="address"
value="<?php echo $address; ?>" /></div>
<div><label>Address 2:</label><input name="address_two"
value="<?php echo $address_two; ?>" /></div>
<div><label>City:</label><input name="city"
value="<?php echo $city; ?>" /></div>
<div><label>State:</label><input name="state"
value="<?php echo $state; ?>" /></div>
<div><label>Zip:</label><input name="zip"
value="<?php echo $zip; ?>" /></div>
</div>
<?php
}
It looks like there is a lot going on here, but I assure you it’s easy to
understand! Let’s take it a couple of lines at a time.
72
Creating Custom Post Types
global $post;
if ( defined('DOING_AUTOSAVE') && DOING_AUTOSAVE )
return $post_id;
Here, we are doing two things: grabbing the global $post array,
which we’re going to need to get our custom post values. Then
we’re doing something very important; we’re checking to see if
WordPress is currently autosaving. If it is, we’re going to want to
exit out of this function so we don’t accidently overwrite anything.
We’ll do the same thing later on.
$custom = get_post_custom($post->ID);
$address = $custom["address"][0];
$address_two = $custom["address_two"][0];
$city = $custom["city"][0];
$state = $custom["state"][0];
$zip = $custom["zip"][0];
$website = $custom["website"][0];
$phone = $custom["phone"][0];
$email = $custom["email"][0];
?>
Here is where we get any preexisting values so that the user
doesn’t have to enter them in every time they want to edit a given
post. The function get_post_custom() accepts a post ID as an
argument and will return a 2D associative array containing all of the
post’s custom data. We then assign each value its own variable,
which will make it easier to manage in the next set of code.
Note: since we can technically have multiple values for each
custom post type, that information is also returned as an array, so
we need to grab the first value of each array, which is at index 0.
Next up, we define and include a stylesheet that will be used specifically to style our meta box:
<style type="text/css">
<?php include('business-manager.css'); ?>
</style>
73
Creating Custom Post Types
Come to think of it, we should probably create that stylesheet.
Go ahead and add a business-manager.css file to the /director/
folder. We’ll populate it later.
<div class="business_manager_extras">
<?php
$website= ($website == "") ? "http://" : $website;
?>
Now, we start the markup for our meta box. The first thing we do
after our wrapper is a check to make sure the website either has a
value, or automatically adds the http://. Many end users forget to
add this information, so it’s good to make sure it’s there.
<div><label>Website:</label><input name="website"
value="<?php echo $website; ?>" /></div>
<div><label>Phone:</label><input name="phone"
value="<?php echo $phone; ?>" /></div>
<div><label>Email:</label><input name="email"
value="<?php echo $email; ?>" /></div>
<div><label>Address:</label><input name="address"
value="<?php echo $address; ?>" /></div>
<div><label>Address 2:</label><input name="address_two"
value="<?php echo $address_two; ?>" /></div>
<div><label>City:</label><input name="city"
value="<?php echo $city; ?>" /></div>
<div><label>State:</label><input name="state"
value="<?php echo $state; ?>" /></div>
<div><label>Zip:</label><input name="zip"
value="<?php echo $zip; ?>" /></div>
</div>
<?php
}
Here’s the form’s markup and the subsequent end of the function.
This should look pretty standard, but you might notice two usually
important elements missing: the <form> tag and a submit button.
74
Creating Custom Post Types
Since we’re working within the WordPress editor, we do not need
to add either of these explicitly since they are included by WordPress. However, we do need to make sure that WordPress includes
them for us. We will do that with our save function. Here’s what we
have so far:
Here are our business options in all of their unstyled glory; let’s
make them look pretty.56 Open up business-manager.css and
add this short bit of CSS code.
/**ADMIN STYLES**/
.business_manager_extras div {
margin: 10px;
}
.business_manager_extras div label {
width: 100px;
float: left;
}
Not too much here! Truth be told, with these few lines of CSS, we
could have added it inline. However, I prefer to separate out the
56 I
also went ahead and added some categories.
75
Creating Custom Post Types
CSS, especially of we decide to add more to it later, or call it on
other pages.
Much better, don’t you think?
So, our meta box looks pretty now, but it doesn’t do much. Let’s
fix that. Here’s our save function, which should go right after the
display function in business-manager.php:
add_action('save_post', 'business_manager_save_extras');
function business_manager_save_extras(){
global $post;
if ( defined('DOING_AUTOSAVE') && DOING_AUTOSAVE ){
//if you remove this the sky will fall on your head.
return $post_id;
}else{
update_post_meta($post->ID, "website",
$_POST["website"]);
update_post_meta($post->ID, "city", $_POST["city"]);
update_post_meta($post->ID, "state", $_POST["state"]);
update_post_meta($post->ID, "address",
$_POST["address"]);
update_post_meta($post->ID, "address_two",
$_POST["address_two"]);
update_post_meta($post->ID, "zip", $_POST["zip"]);
update_post_meta($post->ID, "phone", $_POST["phone"]);
76
Creating Custom Post Types
update_post_meta($post->ID, "email", $_POST["email"]);
}
}
First, as usual, we have our hook to call our function when the post
is saved. In the function itself, we again grab the $post array so
that we can get the post ID and check to see if the post is autosaving. If we don’t include this line, we will lose our data, so it’s important we keep that in.57
If the post is not updating, we save our custom fields using
update_post_meta(), sending the post id, the name of the
custom field, and the new value. We must do this for every value
that we want to save.
This gives us what we need to have a fully functioning Custom Post
Type! Go forth and create custom posts! Of course, there are still
a few things left to do. Out of necessity, we’ll need to create some
ways to display those posts. If you look at a business you create
right now, WordPress will default to the single.php template,
making our custom post display like this:
We have the title and description, but nothing else since we use
custom fields for the rest of the information. We will fix that, I promise. But first, let’s customize our admin panel to display the newlyminted custom information we added.
57 The
comment is a homage to Michael Heilemann, who included it in his famous
K2 theme for WordPress.
77
Creating Custom Post Types
Modifying the Businesses Admin Panel
Currently, this is what our admin panel for businesses looks like:
We can improve upon this to display more information. We’re going
to do two things with two different functions: add new columns to
the above page, then populate those columns with information. In
the business-manager.php file, add this code:
add_filter("manage_edit-businesses_columns", "business_
manager_edit_columns");
function business_manager_edit_columns($columns){
$columns = array(
"cb" => "<input type=\"checkbox\" />",
"title" => "Business Name",
"description" => "Description",
"address" => "Address",
"phone" => "Phone",
"email" => "Email",
"website" => "Website",
"cat" => "Category",
);
return $columns;
}
▶
78
Creating Custom Post Types
When we created our custom post type, WordPress automatically created some new hooks for using the type’s slug, which we
defined as “businesses.” We’re using one of those hooks, namely
manage_edit_businesses_columns, to modify the columns of the
admin display. You can find an awesome list of all of WordPress’s
hooks over at http://adambrown.info/p/wp_hooks/hook. Just
replace {$post_type} with the slug of your custom post type.
In our callback function, business_manager_edit_columns(),
we redefine the default array that WordPress uses for the columns,
aptly named $columns, without our own key => value pairs. The
keys are how we’ll reference that column, the values are the labels
that user sees. Next, we’re going to apply some values to those
columns. Add this to business-manager.php:
add_action("manage_businesses_posts_custom_column",
"business_manager_custom_columns");
function business_manager_custom_columns($column){
global $post;
$custom = get_post_custom();
switch ($column)
{
case "description":
the_excerpt();
break;
case "address":
$address= $custom["address"][0].'<br/>';
if($custom["address_two"][0] != "") $address.=
$custom["address_two"][0].'<br/>';
$address.= $custom["city"][0].', '.$custom["state"]
[0].' '.$custom["zip"][0];
echo $address;
break;
case "phone":
echo $custom["phone"][0];
break;
▶
79
Creating Custom Post Types
case "email":
echo $custom["email"][0];
break;
case "website":
echo $custom["website"][0];
break;
case "cat":
echo get_the_term_list($post->ID, 'business-type');
break;
}
}
Using the hook manage_businesses_posts_custom_column,58 we
call our callback function business_manager_custom_columns(),
which accepts a $column from WordPress as its argument.
Remember those keys we set up in the previous function? We’re
going to use a case/switch statement to display the proper information in each column.59 The first thing we do is grab the global
post array, and then our custom information. Now we’re ready to
display the post’s information within each column.
Most things should look pretty standard here. If the key matches
one of our cases, display that custom information. For the
address, we add a little bit or formatting; we also check to see if
address_two is set. If it’s not and we didn’t check, we’d have an
extra line break.
In the case of the category, we use a WordPress function called
get_the_term_list(). We are sending the post’s ID and the slug
of the custom taxonomy we set up, which is all we need to send.
We can also send some optional arguments for displaying the
taxonomy.60 In this case, that’s not really necessary.
58 The
general format is manage_{$post_type}_posts_custom_column
59 WordPress
inherently knows how to handle keys like cb and title. We do not
need to define them unless we want to replace them.
60 http://codex.wordpress.org/Function_Reference/get_the_term_list
80
Creating Custom Post Types
Save your work and refresh your Business Manager page. You
should now see something like this:
Pretty neat, huh?
Now it’s time for the coup de gras. Let’s modify our theme to properly display our post type.
Listing Custom Post Types
The first thing we want is to list all of the posts that are part of
our custom type. Earlier, I mentioned that we need to include two
arguments (rewrite and has_archive) in order to get our posts to
display on our site without a specific page template. I also added
a footnote saying that’s not the whole story. We actually need one
more function to force WordPress to apply rewrite properly. Add
this function in functions.php:
add_action('init', 'director_rewrite');
function director_rewrite() {
global $wp_rewrite;
$wp_rewrite->add_permastruct('typename', 'typename/
%year%/%postname%/', true, 1);
▶
81
Creating Custom Post Types
add_rewrite_rule('typename/([0-9]{4})/(.+)/?$',
'index.php?typename=$matches[2]', 'top');
$wp_rewrite->flush_rules();
}
It’s in this function61 that we specifically tell WordPress that there
are other posts besides the default ones, and that we want to
include them in the rewrites. We can now view our custom post
types by going to www.your-domain.com/businesses/ .62
However, when we go there, we might not like what we see.
Since we don’t have a default template, WordPress defaults to
index.php, so we see this:
Since we’d prefer something a little more customized, let’s create
a template that will display our business directory properly. WordPress doesn’t accept custom index.php pages (something like
61 Thank
you, wpAdm: http://wordpress.org/support/topic/custom-post-t ypespermalinks
62 Also
make sure you have some other Permalink structure besides the default
turned on (Settings � Permalinks).
82
Creating Custom Post Types
index-businesses.php won’t work), but if we reference the template hierarchy, we’ll know that because of the way we configured
our custom post type (namely, adding 'has_archive' => true),
we can achieve the same effect by creating archive-businesses.
php. Go ahead and add the file to the /director/ folder. Now,
we’ll start the file with the same first few lines that we have in
index.php:
<?php get_header(); ?>
<div id="main" class="group">
<div id="directory" class="left-col">
<?php if (have_posts()) : while (have_posts()) :
the_post(); ?>
The only difference is that while here we have <div id=
"directory">, on index.php we have <div id="blog">.
Now let’s go to the mock-up called directory.html and copy
what should be in the Loop, like we did earlier with index.php and
single.php. That amounts to the following code, which we will
insert right after our Loop definition:
<div class="business group">
<div class="info">
<h2>Morbi leo risus, porta ac consectetur</h2>
<p>Ac, vestibulum at eros. Praesent commodo cursus
magna, vel scelerisque nisl consectetur et. Maecenas
faucibus mollis interdum. Lorem ipsum dolor sit
amet, consectetur adipiscing elit.</p>
<p class="contact"><a href="#">Site</a> / <a href="#">
Contact</a></p>
</div>
<img src="images/biz.jpg" />
</div>
83
Creating Custom Post Types
Now we’ll go through and replace all of the static content with
information from WordPress, including calling on a function that we
saw earlier called get_post_custom(). Add this code above what
we just added:
<?php
$custom = get_post_custom($post->ID);
$website = $custom["website"][0];
$email = $custom["email"][0];
$logo = get_the_post_thumbnail($post->ID);
?>
For the listing display, we’ll only need a few pieces of information that aren’t stored by WordPress by default. Anything that we
don’t see here can be called using WordPress’s standard template
tags. Aside from grabbing the website and email from the custom
array (the same way we did earlier), we’re also grabbing the post’s
thumbnail with get_the_post_thumbnail(). This will return the
markup for the image, not just the image’s URL. The title and
description will be replaced by the_title() and the_excerpt().
Let’s take a look at what our info looks like with the replacements:
<div class="business group">
<div class="info">
<h2><a href="<?php the_permalink(); ?>"><?php
the_title(); ?></a></h2>
<p><?php the_excerpt(); ?></p>
<p class="contact"><a href="<?php print $website;
?>">Site</a> / <a href="mailto:<?php print $email;
?>">Contact</a></p>
</div>
<?php print $logo; ?>
</div>
Much better! This will properly display the business directory info
for each business. Now we may want to amend our content section
a little bit since if website or email isn’t filled out, we’ll have dead
links. Just change that to this:
84
Creating Custom Post Types
<p class="contact">
<?php
if ($website != "" || $website != "http://"){
print "<a href=\"$website\">Site</a> / ";
}
if($email != ""){
print "<a href=\"mailto:$email\">Contact</a>";
}
?>
</p>
Perfect. Now the links will only display if there is something to
display.
Finally, we’re going to finish this template the same exact way that
index.php ends:
<?php endwhile; else: ?>
<p><?php _e('No posts were found. Sorry!'); ?></p>
<?php endif; ?>
<div class="navi">
<div class="right">
<?php previous_posts_link('Previous'); ?> / <?php
next_posts_link('Next'); ?>
</div>
</div>
</div>
<?php get_sidebar(); ?>
</div>
<?php get_footer(); ?>
85
Creating Custom Post Types
Now let’s save our work and take a look at what we have:
Much better than what we originally had. Now, let’s take care of the
single post view.
Creating a Custom Post Type Single Template
As mentioned earlier, since we don’t have a specific template for
our new businesses type, WordPress falls back to the standard
single.php template; we’re going to need more than that. Luckily, WordPress supports single.php template customizations via
single-<post-type-slug>.php. With that in mind, let’s create
single-businesses.php. Add that file to the /director/ folder and
add the following:
<?php get_header(); ?>
<?php if (have_posts()) : while (have_posts()) :
the_post(); ?>
If you take a look at the mock-up (business.html), you’ll see we’re
breaking a bit from regular layout we’ve been using up until now;
86
Creating Custom Post Types
namely, we’re not using the sidebar. While it’s still a 2-column
layout, the second column is reserved for the business’ contact
information.
With that in mind, lets prepare the data that we’re going to display
on the single post page. Add this to single-businesses.php:
<?php
$custom = get_post_custom($post->ID);
$contact_name = $custom["contact_name"][0];
$address = $custom["address"][0];
$address_two = $custom["address_two"][0];
$city = $custom["city"][0];
$state = $custom["state"][0];
$zip = $custom["zip"][0];
$website = $custom["website"][0];
$phone = $custom["phone"][0];
$email = $custom["email"][0];
$impact = get_the_post_thumbnail($post->ID, 'storefront');
?>
This section is almost identical to what we’ve seen through the
theme, in both the type definition and the archive-businesses.
php page. The only difference is that with get_the_post_
thumbnail(), we’re sending a second optional argument, which is
used to get a specific size of the featured image. In this case, we’re
calling the new size we created, which is storefront. The rest, as
before, will get pulled from the standard WordPress template tags.
Now, let’s look to business.html to see what our markup should
look line on this page. We’ll grab everything in between the <div
id="content" class="group"> and </div> tags, which amounts
to this:
<div id="business-listing" class="group">
<div class="info right-col">
<h3>Contact Details:</h3>
<h4>The Business</h4>
87
Creating Custom Post Types
<p><a href="#">www.business.com</a><br/>
[email protected]</p>
<p>(123)-867-5309</p>
<address>
123 Road Street<br/>
City, State 45678
</address>
</div>
<div class="main left-col">
<img src="images/impact.jpg" />
<p>Ac, vestibulum at eros. Praesent commodo cursus
magna, vel scelerisque nisl consectetur et. Maecenas
faucibus mollis interdum. Lorem ipsum dolor sit amet,
consectetur adipiscing elit. Duis mollis, est non
commodo luctus, nisi erat porttitor ligula, eget
lacinia odio sem nec elit. Nullam quis risus eget
urna mollis ornare el eu leo. Nullam id dolor id
nibh ultricies vehicula ut id elit.</p>
<p>Ac, vestibulum [...]
</div>
</div>
Let’s copy this HTML into single-businesses.php, but before we
start filling it in, we need to treat some of the information to make
sure we don’t break anything while displaying it. Let’s add this next
bit of code under our thumbnail call, right before the closing ?> tag.
if ($website != "" || $website != "http://"){
$website= "<a href=\"$website\">$website</a>";
}else{
$website= "";
}
if($email != ""){
$email= "<a href=\"mailto:$email\">$email</a>";
}
88
Creating Custom Post Types
if($website == "" || $email == ""){
$separator= "";
}else{
$separator= "<br/>";
}
$address.='<br/>';
if($address_two != "") $address.= $address_two.'<br/>';
$address.= $city.', '.$state.' '.$zip;
We’re doing a few things here to make sure that we don’t produce
any broken links and weird spacing. The first involves the website
URL. We’re simply checking to make sure there is a link and adding
the proper markup to it. We have the “else” in the case that website is “http://”. Without the else, we’d have a rough http:// on
the page. With the email address, if it’s not blank, again, apply the
proper markup. Finally, we check to see if both website and email
are filled in. If they are, we’re going to separate them with some
marker (in this case, a <br/> tag). We only want that to show up,
however, if both are filled in.
What we’re doing with the address is essentially the same thing we
did on the admin side. If address_two is filled out, add it to the full
address. Otherwise, just do the street, city, state, and zip.
With our data now displaying properly, let’s fill it in with real information, replacing the filler content.
<div id="business-listing" class="group">
<div class="info right-col">
<h3>Contact Details:</h3>
<h4><?php the_title(); ?></h4>
<?php if($separator != "") print "<p>$website
$separator $email</p>"; ?>
<?php if($phone != "")
<?php if($address != "")
print "<p>$phone</p>"; ?>
</address>"; ?>
</div>
print "<address>$address
89
Creating Custom Post Types
<div class="main left-col">
<?php print $bigImage; ?>
<?php the_content(); ?>
</div>
</div>
By now you should be pretty familiar with how this all works. I
did wrap a conditional statement around each piece of contact
information for the same reason we treated the website, email, and
address — to prevent empty or rough tags from showing up.63
OK, it’s time to close out this template:
<div class="navi">
<div class="right">
<?php previous_post_link(); ?> / <?php next_post_
▶
link(); ?>
</div>
</div>
<?php endwhile; else: ?>
<p><?php _e('No posts were found. Sorry!'); ?></p>
<?php endif; ?>
</div>
</div>
<?php get_footer(); ?>
With this, we add the post navigation, close the Loop, and close
the footer. Now, when we visit a single business post, we see this
(see top of page 90).
Much better — all of the information we collect is there and now the
business pages are distinguishable from the regular blog posts.
There is one more thing we need to do on our theme before moving
to option pages, plugins, and resources — the homepage. I’ve been
holding off until we had everything we needed (like actual businesses to display). Now that we have those, let’s do it!
63 Notice
that I used single line if statements, so no braces are needed.
90
Creating Custom Post Types
Our single business custom post type in action.
Creating the Homepage
I know it started to get a little repetitious moving towards this point,
and some of the stuff we’re going to do will continue that trend.
But, I’m also going to introduce you to a great friend of WordPress
developers, and a way to get new posts.
If we take a look at our mock-ups, we’ll see from the index.php file
that we want our homepage to look like this:
91
Creating Custom Post Types
So, we have some fairly customized elements — a featured business, the most recent blog posts, and the sidebar (maybe even a
special one for the homepage only). Let’s get started!
First we’ll go to the WordPress admin and create a featured businesses category so that our theme knows which business to grab.
Go to Business Manager � Business Types and created a “Featured” category. Keep that title (and slug, ‘featured’) in mind, as
we’ll need them in a little bit.
Now let’s make our homepage template, which we’ll name
front-page.php. WordPress will automatically make this template
the one used for whatever you designate as the theme’s homepage
in Settings � Reading .64 Add it to the /director/ folder and add
only the line <?php get_header(); ?> to it. While we will be doing
various things with the Loop, we’ll be building custom queries for it,
so let’s do that first.
Querying Posts
There are several ways to generate a list of posts to display in your
theme. The first (and main) way is to use the function query_
posts().65 This is the main way because this is how WordPress
generates the original post or page information when you go to a
page. That means that when you use it, you can create your Loop
exactly as we’ve been doing it all along. Consequently, when you
use query_posts(), it will alter the main Loop information. That
means if we do something like this…
<?php the_title(); ?>
<?php query_post($someArguments); ?>
<?php the_title(); ?>
… we will get two different titles. Because of this, we want to be
mindful of using query_posts(), especially when we’re generating
64 index.php
will still be used for the blog posts, as opposed to home.php, which
will replace index.php as the template used for the blog and the homepage.
65 http://codex.wordpress.org/Function_Reference/query_posts
92
Creating Custom Post Types
several different Loops in a single template. A better option (in this
case) would be get_posts(),66 which allows us to generate multiple Loops in a single template; the only difference is that we’ll have
to set up our Loop a little differently. Here is some sample code.67
<?php
$posts= get_posts(array('numberposts' => 4, 'category'
=> 3, orderby => 'title'));
foreach ($posts as $post) : setup_postdata($post); ?>
<h3><?php the_title(); ?></h3>
<?php the_excerpt(); ?>
<?php endforeach; ?>
?>
You’ll notice a couple of things regarding the above code. The first
is obviously that this isn’t the normal Loop setup we’ve been writing. That’s because this line…
<?php if (have_posts()) : while (have_posts()) :
the_post(); ?>
… is reserved for whatever is retrieved from query_posts(),
which is usually the default information for the page. Instead,
get_posts() will return an array of posts, which we’ll traverse through using a foreach loop. To use the regular template tags that we now know and love, we’ll call the function
setup_postdata(), passing to it the current post information
(which is now in the variable $post). Then, we proceed as normal,
using all of the regular template tags.
There is also WP_Query(), which is the class used to query posts,
create the Loop, and more. While it’s worth mentioning here and
checking out on the Codex,68 I won’t go into too much depth since
66 http://codex.wordpress.org/Function_Reference/get_posts
67 I’d
recommend checking out both of the above links in the Codex. The argument lists are extensive.
68 http://codex.wordpress.org/Class_Reference/WP_Query
93
Creating Custom Post Types
we already have a pretty good understanding of the Loop at this
point.
Because of the differences and the fact that we’ll be calling multiple Loops on our homepage, we’ll be using get_posts() for both
the featured business and the recent blog posts. With that in mind,
let’s add this code to front-page.php:
<?php
$args= array(
'post_type' => 'businesses',
'posts_per_page' => 1,
'tax_query' => array(
array (
'taxonomy' => 'business-type',
'field' => 'slug',
'terms' => 'featured'
)
)
);
$featuredBusiness= get_posts($args);
Here we’re using get_posts() to grab our featured business. If
you look at $args, you’ll see the arguments that we’re passing to
get our post. This is the breakdown:
• post_type – This tells WordPress what kind of posts we
want. In our case, we’re using the slug from our custom
post type.
• posts_per_page – This is the number of posts. We’re doing
one recent post; WordPress will grab the most recent one.
• tax_query – This argument accept an array of arrays
of custom taxonomies. We’ll grab only one with these
parameters:
• taxonomy – The slug of the custom taxonomy.
94
Creating Custom Post Types
• field – Either slug or id. In this case, we’ll be passing
the slug of the category we want.
• terms – which categories we want. In this case, we only
want the featured posts.
We then assign what get_posts() returns to $featuredBusiness.
Now it’s time to write our loop. Let’s start with the first line:
<?php foreach ($featuredBusiness as $post) :
setup_postdata($post); ?>
We have a standard PHP foreach loop, and then as I pointed out
before, the function setup_postdata(). One thing to note is that
we have to use $post as the variable we pass to setup_data(). If
we name it anything else, the template tags will not work.
This loop is for the featured business, so let’s look at index.php
for the corresponding code to display out information properly. It
looks like this:
<div id="featured" class="group">
<div class="business-info right-col">
<hr/>
<h3>Featured Business:</h3>
<h2>Sem Consectetur Commodo</h2>
<p>Ac, vestibulum at eros. Praesent commodo cursus
magna, vel scelerisque nisl consectetur et. Maecenas
faucibus mollis interdum. Lorem ipsum dolor sit amet,
consectetur adipiscing elit.</p>
<p>Praesent commodo cursus magna, vel scelerisque nisl
consectetur et.</p>
<p><a href="#">More...</a></p>
</div>
<div class="impact-image">
<img src="images/impact.jpg" />
</div>
</div>
95
Creating Custom Post Types
I think from here, we pretty much know what to do. We’ll add in the
title, excerpt, a “more” link, and the image that we created. Make
the replacements and we’ll get this:
<div id="featured" class="group">
<div class="business-info right-col">
<hr/>
<h3>Featured Business:</h3>
<h2><?php the_title(); ?></h2>
<p><?php the_excerpt(); ?></p>
</div>
<div class="impact-image">
<?php print get_the_post_thumbnail($post->ID,
'storefront'); ?>
</div>
</div>
We’ll finish off the top part of our page by ending the loop:
<?php endforeach; ?>
One note is that we left out the “more” link. We’ll see why in a
little bit. Let’s do the bottom portion of the page, which includes
our blog posts and a sidebar. We’ll start with the code before our
next loop:
<div id="main" class="group">
<div id="posts" class="left-col">
Following this, we’ll prepare our next loop. Our call here will be
much easier, since we’re grabbing the standard blog posts and
not limiting them by any kind of custom taxonomy. Add this code,
which is the query and start of the loop:
<?php
$posts= get_posts('posts_per_page=3');
foreach ($posts as $post) : setup_postdata($post);
?>
96
Creating Custom Post Types
You can see the only argument we’re passing to get_posts() this
time is the number of posts that we want, which, according to our
mock-up, is three. Then, we begin the Loop. What we’re putting
inside the Loop should look pretty familiar, save for a couple of
small differences:
<div class="post group">
<h3><a href="<?php the_permalink(); ?>"><?php
the_title(); ?></a></h3>
<div class="byline">by <?php the_author_posts_link(); ?>
on <a href="<?php the_permalink(); ?>"><?php
the_time('l F d, Y'); ?></a></div>
<p><?php the_excerpt(); ?></p>
</div>
The only differences between this and what we have on our
index.php page are that we use an <h3> tag instead of <h2>
for the title of the post, and we use the_excerpt() instead of
the_content(). We made these two changes because if an author
forgets to use the <!--more--> tag, his or her post will run away
with our homepage. There is one small difference in display however: the_excerpt() adds an ellipsis (…) to the end of each post.
Let’s take a quick second and change that.
Open up your functions.php file and add this code:
function director_excerpt_more($more) {
return ' <a href="'. get_permalink() .'">Continue...</a>';
}
add_filter('excerpt_more', 'director_excerpt_more', 999);
97
Creating Custom Post Types
This simple bit of code runs our function directory_excerpt_
more() when the excerpt is being processed (specifically when the
“more” text is being added to it). It simply replaces the original text
with whatever we want (which in this case, is a “Continue” link).
Save your file and refresh, and you’ll see the next excerpt.
Much better! You will also notice that the “continue” link was added
to our featured business as well. Since this is a site-wide filter, it’s
added to all instances of the_excerpt(). Now, let’s get back to
our regularly scheduled programming.69
After the posts, we have a link to the blog, which we’re going to get
dynamically. While we could easily hardcode it, we want to be able
to use this on any WordPress install, not just ours.70 Add this code
to front-page.php:
<?php
$blogID= get_page_by_path('blog');
$blogLink= get_page_link($blogID->ID);
?>
<a class="visit" href="<?php print $blogLink; ?>">Visit
the Blog</a>
We’re calling a couple of functions here:
• get_page_by_path() – This function accepts a page’s slug
as the argument and returns an object with all of the page’s
information.
69 See
70 We
what I did there?
will, however, make an assumption about the page’s slug.
98
Creating Custom Post Types
• get_page_link() – This function will return a page’s permalink based on an ID, which we’re able to get through the
object returned from get_page_by_path().
Then, it’s just a simple print statement. All we have to do now is
close out each <div>, add the sidebar, and add the footer. We can
do that all in four lines:
</div>
<?php get_sidebar(); ?>
</div>
<?php get_footer(); ?>
Done! We now have a fantastic homepage that’s as dynamic as
everything else. There is one issue though. The top orange bar
(see here):
This orange bar isn’t supposed to be on the homepage. This is
another easy fix using WordPress’s conditional tags.71 Conditional
tags allow us to check certain things within a WordPress page.
We can do anything from checking to see if we’re in the admin to
checking if the post that we’re viewing is part of a specific category. We can even check to see if we’re on the front page of our
blog, which is what we’ll do now. Open up header.php and locate
line 31, which should simply be <hr/>. We’re going to replace that
with this:
<?php if(!is_front_page()) : ?> <hr/> <?php endif; ?>
No we’re only printing the <hr/> tag if we aren’t on the front
page.72 Easy and effective! The homepage now looks like this:
71 http://codex.wordpress.org/Conditional_Tags
72 Note:
depending on your WordPress settings, this could be different from the
homepage. In our case, it is not.
99
Creating Custom Post Types
That’s it! Our whole front end is now done. Let’s start adding some
stuff under the hood that will make it easier to manage our theme.
101
Theme Options and Widgets
Creating a Theme
Options Page
While we’ve managed to make most of our content dynamic — that
is, we can change it using WordPress’s admin panel — we can do
even more by creating a theme options page. An options page will
allow us to make other areas tied more closely to the templates
editable through WordPress’s ability to save other values in the
database. Specifically, we will make it so, from the admin panel,
we can:
• Change the logo
• Insert Google Analytics code
• Add social media buttons to the footer
Sounds fun! The first, modest step is to create a new file named
theme-options.php and add it to /director/. Then, we’ll include
this line in our functions.php file (I placed mine right below the
line that grabs business-manager.php ):
require_once('theme-options.php');
Creating the Admin Page
Now let’s open up the theme-options.php file and get coding!
The first thing we'll do is actually add an options page to the WordPress admin, under Themes. Open up theme-options.php and
add the following code:
<?php
// create custom plugin settings menu
add_action('admin_menu', 'director_create_menu');
function director_create_menu() {
//create new submenu
102
Theme Options and Widgets
add_submenu_page( 'themes.php', 'Director Theme Options',
'Director Options', 'administrator', __FILE__,
'wptuts_landing_settings_page');
//call register settings function
add_action( 'admin_init', 'director_register_settings' );
}
The first thing we do here is add an action telling WordPress
that when the admin menu is created, call our callback function,
director_create_menu(). In that function, we create a new submenu using add_submenu_page(),73 defining it with the following
arguments:
• themes.php – The parent page for the submenu.
• Director Theme Options – The page title.
• Director Options – The menu title
• administrator – The capability or level of access for this
menu to be displayed. In this case, only side admins can
view it.
• _ _FILE_ _ – The menu slug. This is a unique name for the
options page. We’re simply using the file’s name.74
• director_settings_page() – This is the function that will
build the page.
The result is this:
73 http://codex.wordpress.org/Function_Reference/add_submenu_page
74 _ _FILE_ _
is one of PHP’s magic constants: http://php.net/manual/en/
language.constants.predefined.php
103
Theme Options and Widgets
The next thing we’ll want to do is actually build the page. However,
before we do that, we should register our “settings.” That is, we’re
going to tell WordPress a bunch of variable names that we plan
to use in our theme. As you can see, we’ve added the hook in our
previous function, so let’s go ahead and add this new function to
theme-options.php:
function director_register_settings() {
//register our settings
register_setting( 'director-settings-group', 'director_
▶
facebook' );
register_setting( 'director-settings-group', 'director_
▶
twitter' );
register_setting( 'director-settings-group', 'director_
▶
rss' );
register_setting( 'director-settings-group', 'director_
▶
logo' );
register_setting( 'director-settings-group', 'director_
▶
analytics' );
}
This function is pretty cut-and-dry. We create a settings group
called director-settings-group and add our settings to it using the
function register_setting(). This function takes care of how to
store the data for us. The first argument is the group name — all
of the settings we’re adding will be part of the same group. The
second argument is the name of the setting. We’ll need that for the
next step. The function also takes a third argument — a function
name for validating and sanitizing data. Since only admins have
access to this page, I did not include that function. However, if any
other users, or people on the front end, can modify these values,
it’s incredibly important to sanitize your input data against injections and hacks.75
75 To
see a fun demo on SQL injections, check out this video: http:// www.youtube.
com/watch?v=h-9rHTLHJTY
104
Theme Options and Widgets
We just need to add the mechanism to add values, which we will
do in director_settings_page(). Speaking of director settings,
let’s create them. Just so you have an idea of what we’re dealing
with, here’s what the page will look like when we’re done:
This doesn’t look too bad! Here’s the entire function, which
should go in theme-options.php. I’ll explain it section by section
afterward:
function director_settings_page() {
?>
<div class="wrap">
<h2>Director Theme Settings</h2>
<form id="landingOptions" method="post" action=
"options.php">
<?php settings_fields( 'director-settings-group' ); ?>
<table class="form-table">
<tr valign="top">
<th scope="row">Logo:</th>
<td>
▶
105
Theme Options and Widgets
<input type="text" name="director_logo" value=
▶
"<?php print get_option('director_logo'); ?>" />
<br/>
*Upload using the Media Uploader and paste the URL
here.
</td>
</tr>
<tr valign="top">
<th scope="row">Facebook Link:</th>
<td>
<input type="text" name="director_facebook"
value="<?php print get_option('director_facebook');
?>" />
</td>
</tr>
<tr valign="top">
<th scope="row">Twitter Link:</th>
<td>
<input type="text" name="director_twitter" value=
▶
"<?php print get_option('director_twitter'); ?>" />
</td>
</tr>
<tr>
<th scope="row">Display RSS Icon:</th>
<td>
<input type="checkbox" name="director_rss" <?php
if(get_option('director_rss') == true){ print
"checked"; } ?> />
</td>
</tr>
<tr>
<th scope="row">Google Analytics Code:</th>
<td>
106
Theme Options and Widgets
<textarea name="director_analytics"><?php print
get_option('director_analytics'); ?></textarea>
</td>
</tr>
</table>
<p class="submit">
<input type="submit" class="button-primary" value=
▶
"<?php _e('Save Changes') ?>" />
</p>
</form>
</div>
<?php } ?>
So the first thing you’ll notice is that this is mostly HTML. Remember, this is the function that is building the theme options page, so
there will be a lot of markup.76 Let’s take the first couple of lines of
code beyond the function definition and markup:
<form id="landingOptions" method="post" action=
▶
"options.php">
<?php settings_fields( 'director-settings-group' ); ?>
This code takes us into the form that we use to save our options.
At the beginning of this snippet, we name the form and give it the
action “options.php,” which will automatically handle the form processing for us. We do not need to do any processing ourselves — we’re delegating that work to WordPress.77
The next line I want to point out is <?php settings_fields(
'director-settings-group'); ?>. The function settings_
fields() is the one that “unpacks” all of the settings that we
76 Normally,
I wouldn’t use tables either, but WordPress styles them nicely
and I wanted to focus on building the actual page. If you want to style the
page yourself, you can throw a CSS stylesheet in, the same way we did with
business-manager.php.
77 Like
a Boss.
107
Theme Options and Widgets
created in director_register_settings(). That is, we can now
retrieve the values of the settings that we defined in our earlier
function. We will do that using WordPress’s built-in function,
get_option().78 We will pass a setting name to it, and it will return
either its value, or “false” if it doesn’t have one. We can also pass
an optional second argument to it; this argument is a string to use
as the default. We will actually see this come into play later. For
now, let’s look at the next section, where we build each input box
using our settings. Since this section gets repetitive, I’ll take the
entries (one for each type of input) and explain them. First up, the
textbox.
<tr valign="top">
<th scope="row">Logo:</th>
<td>
<input type="text" name="director_logo" value="<?php
print get_option('director_logo'); ?>" /><br/>
*Upload using the Media Uploader and past the URL here.
</td>
</tr>
For each cell, we create an input box with the name of our setting, and we then use get_option() to get the current value. It’s
incredibly important that the form element’s name matches the
name of the setting, otherwise WordPress will not save the value
properly. Since our form action is options.php and we used
settings_field(), each of these fields will be processed for us;
no additional coding needed. Pretty neat, huh? Each textbox is
going to work the same way, naming them for each different setting. There are two exceptions though: the Google Analytics code,
which would be better in a <textarea>, and the RSS display,
which is just a simple checkbox. Let’s look at the <textarea> first.
<tr>
<th scope="row">Google Analytics Code:</th>
<td>
78 http://codex.wordpress.org/Function_Reference/get_option
108
Theme Options and Widgets
<textarea name="director_analytics"><?php print
get_option('director_analytics'); ?></textarea>
</td>
</tr>
As you can see, there isn’t a huge difference here; it operates as a standard HTML <textarea>, where we’re printing the
value in between the opening <textarea> tag and the closing
</textarea> tag. Note, again, the input name is the same as the
setting name. After the textarea, there is one checkbox, which
is handled slightly differently:
<tr>
<th scope="row">Display RSS Icon:</th>
<td>
<input type="checkbox" name="director_rss" <?php
if(get_option('director_rss') == true){ print
"checked"; } ?> />
</td>
</tr>
This isn’t a huge difference, but it is one worth noting. You can
handle checkboxes as Booleans, which means checked boxes
have the value “true,” and unchecked boxes have the value “false.”
That is how we’re handling our RSS icon option. If it was checked,
WordPress saved it as “true,” otherwise WordPress saved it as
“false.” We’re simply checking the value of it to see whether or not
we should print the attribute “checked.” The last thing to do is add
the submit button:
<p class="submit">
<input type="submit" class="button-primary" value=
"<?php _e('Save Changes') ?>" />
</p>
</form>
▶
109
Theme Options and Widgets
With that code, we’ve completed a fully functional theme options
page. Not too shabby, right? Now, let’s add this stuff to the
template!
Adding Settings to the Template
Alright — here’s the good part! We’re going to modify two of our
templates: header.php and footer.php. Let’s start with the
header. Open up header.php and locate this line:
<h1><img src="<?php print IMAGES; ?>/logo.png" alt=
▶
"<?php bloginfo('name'); ?>" /></h1>
Right now, it’s a static logo that can’t be changed without FTP
access. We’re going to change that. Right above this line, add this
code:
<?php $logo= get_option('director_logo', IMAGES.'/logo.
▶
png'); ?>
As you can see, we’re using get_option() to get the value of
director_logo. If there is no value, we’ll use our default logo. The
last thing to do is add this to the <h1> instead of what we have
now, so that our newly minted <header> looks like this:
<header class="group">
<?php $logo= get_option('director_logo', IMAGES.'/logo.
png'); ?>
<h1><img src="<?php print $logo; ?>" alt="<?php
bloginfo('name'); ?>" /></h1>
<?php get_search_form(); ?>
<?php wp_nav_menu( array('menu' => 'Main', 'container'
=> 'nav' )); ?>
</header>
If we check out our theme in the browser, you’ll see that nothing
has changed. That’s a good sign, as it shows our default value is
working since we haven’t added a custom logo yet. Let’s do that!
▶
110
Theme Options and Widgets
Use the media uploader to upload a logo and grab the URL. Then
paste that URL in the proper box on the theme options page:
Once you save the changes, you should see your new logo!
That’s it for the header! Now let’s move onto footer.php. Open up
footer.php and add this line of code after <?php wp_footer();
?>:
<?php print get_option('director_analytics'); ?>
Save your file. Now before we refresh the page to see nothing
(notice we didn’t add a default value here), let’s add our Google
Analytics code on the admin side79 (Note: I resized the Google
Analytics Code field in my browser to show the entire code
snippet.):
79 Really,
spot.
we can put anything in this box and it will show up in the appropriate
111
Theme Options and Widgets
Now if we save our changes and refresh the site (on the front end),
we’ll find this if we view the HTML source code:
Now, onto the last part: our social media icons. Add this code right
after the <footer>:
<?php
//social links
$facebook= get_option('director_facebook');
$twitter= get_option('director_twitter');
$rss= get_option('director_rss');
?>
<ul class="social">
<?php if($facebook): ?><li><a href="<?php print
$facebook; ?>"><img src="<?=IMAGES?>/facebook.png"
/></></li><?php endif; ?>
112
Theme Options and Widgets
<?php if($twitter): ?><li><a href="<?php print $twitter;
?>"><li><img src="<?=IMAGES?>/twitter.png" /></li>
▶
<?php endif; ?>
<?php if($rss): ?><li><a href="<?php bloginfo('rss');
?>"><img src="<?=IMAGES?>/feed.png" /></a></li><?php
endif; ?>
</ul>
There is a little bit more going on here, since displaying the icons
are dependent on the values of our settings. The first few lines
should look familiar to you: we’re simply using get_option()
once again to get the settings. We then created an unordered list
where we display the icons, as long as there is a link to display.
Since get_option() returns false unless otherwise specified,
and PHP handles any non-negative number or string as a “true”
value, we can simple use the variables we set up as conditions for
$facebook and $twitter. Since $rss is a checkbox, it is explicitly
true or false. When all of our social media inputs are filled in and
checked off, we get this (with a little help from master.css ):
With that, we’ve finished implementing the settings from our
options page into our templates.
OptionTree Plugin by Envato
Much like a math class, I showed you the long way only to reveal
that there is a shortcut. That shortcut comes in the form of a plugin
by Envato, our parent company! The plugin is called OptionTree
and you can get it at the WordPress Plugin Directory.80 OptionTree
80 http://wordpress.org/extend/plugins/option-tree/
113
Theme Options and Widgets
gives you a nice area within the WordPress admin interface to
create your own theme options without having to code them.
You can then add those options to your themes! From the official
website: 81
“
With OptionTree you can create as many Theme
Options as your project requires and use them how you
see fit. When you add an option to the Settings page,
it will be available on the Theme Options page for use
in your theme. ”
This can be a great tool, especially if you need to create theme
options on the fly, or if you’re modifying a ready-made theme. I
strongly suggest you check it out!
Next, we’re going to create another very popular WordPress theme
element: A widget!
Creating Widgets
Widgets are a great way to add secondary content to your website.
While you can do a lot with the text widget and generally find a
plugin that will give you the widget you’re looking for, there is still
plenty of opportunity to develop ones specific to your site. In this
theme, we’re going to develop one to display a featured business
right from the sidebar.
Go ahead and open up the functions.php file. We’ll start by
including a file called director-widgets.php:
<?php require_once('director-widgets.php'); ?>
Now let’s create that file, and subsequently, our featured business
widget. Add director-widgets.php to the /director/ folder and
add this code:
81 http://wp.envato.com/open-source-plugins/option-tree/
114
Theme Options and Widgets
<?php
class Director_Featured_Widget extends WP_Widget {
public function __construct() {
// widget actual processes
}
public function form( $instance ) {
// outputs the options form on admin
}
public function update( $new_instance, $old_instance ) {
// processes widget options to be saved
}
public function widget( $args, $instance ) {
// outputs the content of the widget
}
}
register_widget( 'Director_Featured_Widget' );
?>
This is a slight modification of what we find in the WordPress
Codex.82 Let me explain each function quickly before we get any
farther.
First, we have a class called Director_Featured_Widget that
extends the built-in WordPress class WP_Widget(). This class has
four functions we can use when building our class:
1. _ _construct() – If you’re familiar with object-oriented
programming (OOP), you’ll know that this is the constructor.
This is essentially how we initialize our object. In this case,
we will define our widget using the constructor.
2. form() – If we are building widget options for the user to
customize the widget, we would do that here. We will be
using this only to change the title of the widget.
82 http://codex.wordpress.org/Widgets_API
115
Theme Options and Widgets
3. update() – This is how our class would process any form
options from the admin panel. Again, we will use this only to
change the title of the widget.83
4. widget() – Here is where all of our magic will happen. This
is the function that’s used to display our widget to the user.
Alright — now let’s fill in the functions we will be using, starting with
_ _construct(). All filled in, that function should look like this:
public function __construct() {
parent::__construct(
'director_featured_business',
'Featured Business',
array( 'description' => __( 'Displays the Featured
Business'))
);
}
What we’re doing in our constructor is calling our class’s parent’s
constructor — that is, the constructor defined in WP_Widget. This
saves us from writing our own function that would do the same
exact thing.
We are sending three arguments to the parent constructor:
1. A unique ID for the widget.
2. The title of the widget.
3. An array of other settings. We’re only sending the description of the widget (which will show up in the admin).
Next, we have our two interactive functions, which I’ll show
together:
public function update( $new_instance, $old_instance ) {
$instance = array();
83 The
code for these functions is a slightly modified version of what’s here:
http://codex.wordpress.org/Widgets_API#Example
116
Theme Options and Widgets
$instance['title'] = strip_tags( $new_instance['title'] );
return $instance;
}
public function form( $instance ) {
$title = (isset( $instance[ 'title' ])) ? $instance[
▶
'title' ] : 'Featured Business';
?>
<p>
<label for="<?php echo $this->get_field_id( 'title' );
?>"><?php _e( 'Title:' ); ?></label>
<input class="widefat" id="<?php echo $this->get_field_
▶
id( 'title' ); ?>" name="<?php echo $this->get_field_
▶
name( 'title' ); ?>" type="text" value="<?php echo
esc_attr( $title ); ?>" />
</p>
<?php
}
Even though our functions are in opposite order, I’d like to start
with form() first. In the first line…
$title = (isset( $instance[ 'title' ])) ? $instance[
▶
'title' ] : 'Featured Business';
… we have a conditional assignment that will set title to either be
the title value defined by the user, or the default value of “Featured
Business.” $instance is the array of values used manipulate our
widget.
The next section of the function prints the input box used for the
title. You’ll see a set of similar functions beginning with $this ->
get_field_. These are functions that our class inherited from
WP_Widget. It uses the field name (which gets defined as we call
it — that is, if it doesn’t exist, create it) as the slug, using it the same
way slugs are used throughout WordPress.
117
Theme Options and Widgets
Since there is a singular “save” button that is include on every
WordPress widget in the admin, we also have a function within
our class to save and sanitize the information. That function is
update().
This is a pretty simple function. We’re creating a new array for a
freshly cleaned set of data. But, since in this case we’re only editing one value — title, that’s the only value we have to clean. The
argument $new_instance has the new data from the user, and we
use PHP’s built-in strip_tags()84 to remove any possibly malicious data. One thing to note is that we must match up the keys in
$instance with the keys in $new_instance. If we don’t, everything
will break.85
The fourth and final function that we’re filling in is widget(), which
will display everything to the end user. This is the fun part!
Here’s the first half of that function:
public function widget( $args, $instance ) {
extract( $args );
$title = apply_filters( 'widget_title', $instance[
'title'] );
echo $before_widget;
if ( ! empty( $title ) ) echo $before_title . $title .
$after_title;
$args= array(
'post_type' => 'businesses',
'posts_per_page' => 1,
'tax_query' => array(
array(
'taxonomy' => 'business-type',
'field' => 'slug',
'terms' => 'featured'
84 http://php.net/manual/en/function.strip-tags.php
85 Well,
not everything, but our values certainly won’t be right.
▶
118
Theme Options and Widgets
)
)
);
The first four lines of this function handle getting and displaying the title. The array $args contains all of the information
related to the widget; this includes any values that we’ve modified through form() and update(), and the information we set
when registering the sidebar ($before_widget, $after_widget,
etc). After using PHP’s built-in extract() function86 to make the
key => value pairs in $args instance variables, we use WordPress’s
apply_filters() function to prepare our title for displaying on
the front end.87 We then print the markup that goes before the
widget ( $before_widget ) as defined in the functions.php file,
where our sidebar is registered. In the next line, we do the same
thing for the title; if it exists, print it wrapped in the markup that
should go before and after the title, as defined where the sidebar
is registered.
The next assignment should look familiar to you: it is the same
exact $args array that we have in front-page.php. Since we want
to grab the featured business for the widget, we want to use the
same set of arguments. Then, it’s time to display the information in
our widget. Here’s the second half of our function:
$featuredWidget = new WP_Query($args);
while ( $featuredWidget->have_posts() ) :
$featuredWidget->the_post(); ?>
<div class="widget_featured">
<div class="thumb"><?php print get_the_post_
▶
thumbnail($post->ID); ?></div>
<h3><a href="<?php the_permalink(); ?>"><?php the_
title(); ?></a></h3>
<?php the_excerpt(); ?>
</div>
86 http://php.net/manual/en/function.extract.php
87 It
will do things like removing slashes and applying any theme-defined filters.
▶
119
Theme Options and Widgets
<?php
endwhile;
wp_reset_postdata();
echo $after_widget;
}
You will notice one difference between what we have on
front-page.php and what we have here; we are using WP_Query
to grab the post information, not get_posts(). Earlier I explained
that WP_Query was another way to get post information, and
it’s actually what both query_posts() and get_posts() use
when they are called. The reason we’re using WP_Query and not
get_posts() here is because even though get_posts() shouldn’t
conflict with the main Loop, it might; this largely depends on when
the widgets are constructed and what information we grab after the
widgets are constructed. For example, if we called the_title()
after our widgets were constructed, might get the title of the featured business, not the title of the page. With WP_Query, we create
a completely separate object for getting post information, which
has its own Loop functions to call. However, the only real change
you need to make is that when you reference have_posts() and
the_post(), you need to specify our new object:
while ( $featuredWidget->have_posts() ) :
$featuredWidget->the_post(); ?>
From there on out, it’s pretty familiar territory as far as the Loop
goes. Once outside the Loop, we called wp_reset_postdata(),
which will restore control to the main Loop for the page. Basically,
it makes sure that our widget info doesn’t bleed into the page.
The last thing we do is print the widget’s closing markup, defined
by $after_widget.
Finally, we have to register our widget and close the class. Our final
set of code is:
120
Theme Options and Widgets
}
register_widget( 'Director_Featured_Widget' );
?>
Now when we go to our Widgets page on the admin panel, we’ll
see our widget:
And on the front end:
Awesome! We now have a nice little featured business widget that
we can display on any sidebar-enabled page.
To complete our project, let’s build a plugin!
122
Plugin Development
Plugin Development
Plugins are the heart and soul of WordPress expansion. This is
what allows the WordPress community to add functionality to
WordPress, expanding it and customizing it to their every need.
In this next step, we’re going to build a very simple contact form
plugin. There are already tons of contact form plugins out there; 88
this is mainly to demonstrate how to develop a plugin. Once you
have the basics down, you can go off and develop your own plugin,
implementing not just things from this section, but from the entire
book.
Defining the Plugin
The first thing we need to do is set up the plugin. Go to the /wpcontent/plugins/ directory and create the folder /rockable-contactform/, and within it, create a file called rockable-contact-form.
php. Here, we will add all of the necessary information and code
for our plugin, starting with the plugin definition block:
<?php
/*
Plugin Name: Rockable Contact Form
Plugin URI:
Description: A simple plugin that generates a set contact
form for users to add to their theme
Author:
Joe Casabona
Version:
1.0
Author URI:
http://www.casabona.org
*/
This block tells WordPress: a) we have a plugin to include on the
Plugins page, and b) the information to display for the plugin. With
this information, the corresponding section on the Plugins page is
created:
88 http://wordpress.org/extend/plugins/search.php?q=contact+form
123
Plugin Development
Of course, you could replace my information with your information.
I also like to set up some constants for information I’ll be using a lot
throughout the plugin. Under the definition block add this info:
define('RCF_PATH', WP_PLUGIN_URL . '/' . plugin_basename(
dirname(__FILE__) ) . '/' );
define('RCF_NAME', "Rockable Contact Form");
define ("RCF_VERSION", "1.0");
define ("RCF_SLUG", 'rcf-contact-form');
I create several constants: the plugin’s path, the plugin’s name, and
the plugin’s version, which is used for upgrades, and to notify the
WordPress Plugin Directory of changes. Notice that I start all of my
constants with “RCF.” I’ll do the same thing for function names so
that we don’t create a conflict with other plugins or the WordPress
core. Now let’s actually write the function that will create the form.
In this section we’re going to create the HTML form + code to process it. Add this to rockable-contact-form.php:
function rcf_build_form($sendTo, $subject){
if(isset($_POST['rcf-submit'])){
include('rockable-process-form.php');
$rcfProcessor= new RockableProcessForm($sendTo);
$message= $rcfProcessor->email($subject, $rcfProcessor ▶
->buildMsg($_POST), $_POST['rcf-email']);
print "<h3>$message</h3>";
}
$form= '<div class="<?php print RCF_SLUG; ?>">
<form name="<?php print RCF_SLUG; ?>" method="POST">
<div>
<label for="rcf-name">Name:</label><br/>
124
Plugin Development
<input type="text" name="rcf-name" required=
▶
"required" placeholder="ex John Smith" />
</div>
<div>
<label for="rcf-email">Email:</label><br/> <input
type="email" name="rfc-email" required="required"
placeholder="ex [email protected]" />
</div>
<div>
<label for="rcf-message">Message:</label><br/>
<textarea name="rcf-message" required=
▶
"required"></textarea>
</div>
<div>
<input type="submit" name="rcf-submit" value=
▶
"Submit" />
</div>
</form>
</div>';
return $form;
}
In the first few lines, we check to see if the form is filled out; if it is,
we’re going to process it. We call a file called rockable-processform.php, which contains a class that I built to process form.
Since this class includes no WordPress-related code, I won’t go
over it here, but I commented it very well using PHPDoc style comments.89 Just know that it accepts an array of data (usually the
$_POST or $_GET array), and emails the results to a specified email
address.
You will see our function, rcf_build_form(), accepts two arguments: $sendTo, which will be the email address we’re sending the
form to, and $subject, which will serve as the subject of the email.
89 http://www.phpdoc.org/
125
Plugin Development
The first block of code in the function is what processes the form.
If the submit button was pressed, it will include my form processing class, initialize a RockableProcessForm object (sending to it
the $sendTo email address), and then process the form.
The class’s email() function accepts four arguments:
1. $subject is the subject of the email.
2. $message is the body of the email.
3. $from is the from address for the email. It defaults to null.
4. $msg is the message to display to the user. It defaults to
“Thanks! Your message has been sent.”
You will see for the $message argument, we pass another function
from the class called buildMsg(). This simply rips apart the data
array (in this case, $_POST) and emails the information, using the
keys as labels and the values as, well, values.
The second part of the function actually builds the form, storing
it into a variable that is returned. This is pretty standard, but I will
point out that we append a prefix to each input variable name.
This is, again, so that our programming doesn’t conflict with WordPress’s. Specifically, name and email are reserved for comments
in WordPress, and the page completely breaks if we name our form
fields by those names. The fact that the form is stored and returned
is very important; if we just printed it, the form would display above
all of the content, which the user may not want.
This is our form! You will notice I don’t include any validation using
JavaScript. Again, this is simple example. If you’d like to include it,
you could always use wp_enqueue_script(), which I mentioned
earlier, during theme development.
Now that we have a way to display it, let’s add in a shortcode and a
template tag. The shortcode will allow users to insert the slider into
any page or post. The template tag will allow theme developers
to insert the slider right into their theme files instead. As a theme
126
Plugin Development
developer myself, I think it’s incredibly important to include both,
and to make them easy to find in documentation. You never know
who’ll be using your plugin.
The Shortcode
Add this code after the rcf_build_form() function:
function rcf_insert_form($atts, $content=null){
extract(shortcode_atts( array('sendto' => get_bloginfo(
▶
'admin_email'), 'subject' => 'Contact Form from '.
get_bloginfo('name')), $atts));
$form = rcf_build_form($sendto, $subject);
return $form;
}
add_shortcode('rcf_form', 'rcf_insert_form');
There are a couple of things going on here. The last line that we’ve
added here is the built-in WordPress function add_shortcode(),90
which accepts two arguments. The first is $tag, which is what will
serve as the shortcode. This means we can now type “[rcf_form]”
into our WordPress editor and that will be replaced with whatever
the callback function, which is the second argument, does.
Our shortcode callback function accepts two arguments as well:
$atts and $content, which is set by default to null. $atts is a
list of attributes we can send with the shortcode. For example:
“[rcf_form foo=bar]”. In this case, foo is the attribute and bar is the
value. The attributes are sent as an associative array.
The second argument, $content, is any content in between the
opening and closing tag, which WordPress automatically looks
for. So, for example, in “[rcf_form]Yeah Buddy![/rcf_form]”, the
content would be, “Yeah Buddy!” We will not be making use of the
$content argument in our example. We do, however, want to look
for a couple of attributes.
90 http://codex.wordpress.org/Function_Reference/add_shortcode
127
Plugin Development
The first line of our function is a clever bit of code that both sets up
the attributes array, and unpacks it into a set of instance variables.
The built-in WordPress function shortcode_atts()91 creates an
array of attributes to look for, as well as a set of default values. The
PHP function extract() creates variables out of the key => value
pairs. So in our code, we have two attributes to look for — $sendto
and $subject. Anything else added by the user will not be used.
Our default values are the admin email address (as defined in
WordPress) and “Contact Form from <blogname>” respectively.
Again, these are used only if the user does not define his or her
own values in the shortcode.
We then call rcf_build_form(), passing our attributes as arguments to the function we created. Finally, we take the returned
information, which is the form, and we send it to the WordPress
editor. Here’s an example of what we could have in the WordPress
editor:
In our shortcode, we define a “sendto” address, but no subject.
That means the subject will default to what we defined in our function. Here’s what we see on the front end:
91 http://codex.wordpress.org/Function_Reference/shortcode_atts
128
Plugin Development
… and here is what we see after the form is filled out:
And there you have it! A fully-functioning shortcode. We can
achieve the same exact thing using a template tag.
129
Plugin Development
The Template Tag
Add this code after our shortcode function:
function rcf_get_form($sendto="", $subject=""){
$sendto= ($sendto == "") ? get_bloginfo('admin_email') :
$sendto;
$subject= ($subject == "") ? 'Contact Form from'.
get_bloginfo('name') : $subject;
print rcf_build_form($sendto, $subject);
}
This function is a little shorter, but very similar to what we have
in the shortcode. The only real difference is that since we don’t
have any attributes to accept, we need to assign default values
for $sendto and $subject ourselves. We do this on the first two
lines of the function. The third line prints out our form, calling
rcf_build_form(). If we were to insert this into our template, we
might add code like this:
<!--Our Loop would be here-->
if(function_exists('rcf_get_form')){
rcf_get_form('[email protected]', 'Contact Form Using
Template Tag!');
}
This code first checks to see if the function exists (that is, we have
the plugin enabled), then calls the template tag using the values
that we want. The results would be the same as what we saw with
the template tag.
There you have it! A very simple plugin for printing a contact form.
Keep in mind that everything we did for the theme (custom post
types, options page, etc.) can also be done with a plugin, using the
same exact hooks and filters. If you want to add a theme options
page for this plugin, just do it the same way we did for our theme.
Cool huh?
131
Resources
Resources
There are tons of resources out there for developers, designers,
and casual WordPress users. As you know from this book, I rely
heavily on the WordPress Codex when I’m trying to find new functions, check on current abilities, and see what’s coming down the
pike. But there is so much more to the world of WordPress than
just that.
Theme & Plugin Directories
Theme and plugin directories are a staple for any WordPress user.
Whether you need to get a site up quickly and easily, or you need
to add functionality to a site without too much development, these
directories will help you out.
WordPress Theme Directory ( http://wordpress.org/extend/
themes/ )
132
Resources
This is the official theme directory of WordPress, containing 1,515
themes, all for free and organized by by title, description, author,
and even tag. If you’re looking for a free, easy-to-use theme
without all the bells and whistles, this is a great place to look. It’s
usually the first place I go when I’m setting up a quick website for
someone. This directory is also integrated into WordPress; that is,
you can download themes from within the WordPress admin area.
Themeforest ( http://themeforest.net/category/wordpress?ref
=rockable )
If you’re looking for something a bit more upscale than the free
WordPress Themes, Envato’s very own Themeforest marketplace
is a great place to find premium WordPress themes. These themes
(ranging from $14-60, USD) are of great design and functionality,
including tightly-integrated theme options, post types, and even
plugins. Properly vetted by a team of reviewers, there isn’t much
you need to do to have a fully functioning, custom website up and
running in no time.
133
Resources
Elegant Themes ( http://www.elegantthemes.com/gallery/ )
Elegant Themes is another resource I like to use when looking for
ready-made themes. For $39/year, you get unlimited access to all
of the themes on the site. While their themes aren’t as feature-rich
as what Themeforest has to offer, you can pick up some really nice
themes at a great price.
The WordPress Plugin Directory ( http://wordpress.org/extend/
plugins/ )
In my opinion, this is the de facto place to get plugins for WordPress. With close to 19,000 in the directory, all for free, it’s likely
that you’ll find what you’re looking for. Plus, just like the Themes
Directory, the Plugin Directory is tightly integrated with WordPress
so you just search and install.
134
The WordPress Plugin Directory.
Envato’s Codecanyon.
Resources
135
Resources
Codecanyon ( http://codecanyon.net/category/plugins/
wordpress?ref=rockable )
If you do need something that’s not offered in the Plugin Directory, or maybe something that packs more of a punch, Envato also
offers a marketplace for code snippets called Codecanyon. They
have an entire area of the site dedicated to premium WordPress
plugins that are also supported pretty well by the plugin authors.
Coding Resources
On top of resources for you to download themes and plugins, there
are books and websites that will teach you how to code specifically
for WordPress.
WordPress Codex ( http://codex.wordpress.org/ )
The WordPress Codex is the best source for learning about the
WordPress API. Throughout the book, I’ve referenced it quite a
bit to direct you to specific function pages and documentation
sections. The fine people at WordPress as well as the WordPress
community have done a fine job of keeping this up-to-date and
accurate.
Resources by Envato
Envato has a bunch of resources to equip the WordPress
developer with everything he or she needs to learn more about
WordPress.
• Nettuts+: In general, their Tuts+ Network is a great place to
learn. With tutorials, news, polls, and more, you’ll get everything you need to become a master of your craft. Nettuts+ is
directed specifically at web developers, teaching you to use
HTML, CSS, JavaScript/jQuery, PHP, MySQL, and more.
This is an amazing resource if you’re looking to learn more
about developing websites. Link: http://net.tutsplus.com/
136
Resources
• Wptuts+: Wptuts+ is the part of the Tuts+ Network dedicated strictly to WordPress. You’ll learn how to develop
themes, plugins, and much more. It’s home to a lot of great
WordPress specific tutorials (including a few by yours truly).
Link: http://wp.tutsplus.com/
• Books: Aside from this book, Envato has published two
other WordPress related books: Rockstar WordPress
Designer and Rockstar WordPress Designer 2, which take
you through the process of designing a WordPress theme,
much like I did here.
WordPress Books & Sites
There are also a ton of other WordPress books and websites that
have gotten me through the learning process and to the point that
I’m at today. Here are a few I would strongly recommend:
• The WordPress Bible: This book covers everything I mention here and much more. With 744 pages, it will take you
though both using and developing for WordPress, increasing
SEO, and marketing your site, all from within WordPress.
This should be on every WordPress developer’s bookshelf.
Link: http://www.amazon.com/WordPress-Bible-AaronBrazell/dp/0470937815/ref=sr_1_9?s=books&ie=UTF8&qid=1
331831178&sr=1-9
• Professional WordPress Plugin Development: This is a
book I was reading at the time of writing this, and it’s great.
It gives you code examples, best practices, and takes
you through developing several different types of plugins.
This is a great guide if you want to develop market-ready
plugins. Link: http://www.amazon.com/ProfessionalWordPress-Plugin-Development-Williams/dp/0470916222/
ref=pd_sim_b_5
• WPEngineer.com: This blog is a WordPress tutorial site that
does some very cool and advanced stuff. The authors of the
137
Resources
site have a very deep understanding of WordPress, and they
really know how to make it work for them. It’s great that they
share their knowledge. I strongly recommend checking it
out! Link: http://wpengineer.com/
• Smashing Magazine: Smashing Mag is a great site for
all things related to web development, and they have a
site dedicated strictly to WordPress. Their goal is to show
some more advanced things and always give the readers
something new to look forward to. Their WordPress stuff,
just like the rest of their stuff, is top-notch. Link: http://
wp.smashingmagazine.com/
Of course, these aren’t the only resources out there — there are
hundreds more. These are just the ones I use regularly and can
recommend to you.
Final Thoughts
Wow! We did a lot here. I covered all of the major bases for developing your own self-sufficient WordPress theme:
• General Theme Development, including The Loop,
page templates, sidebars, and more.
• Custom Post Type Development
• Theme Options
• Widget Development
• Plugin Development
I also gave you some great resources to find more information
about WordPress development. The number one thing you need to
remember is that the Codex is your friend.
With this book, you’ll also find the PSDs, HTML files, and theme
files for everything we’ve done here. I urge you to reference and
review the files and use them as a guide for future development.
138
Resources
Stay Up to Date!
My last piece of advice to you is to stay up to date with WordPress.
You can do so with two very helpful resources:
• The WordPress Blog: This site will give you the latest news,
events, and updates surrounding WordPress. http://wordpress.org/news/
• The WordPress Roadmap: Here you’ll get a glimpse of
upcoming release and get a better idea of the features and
release dates. WordPress releases a major update every 3-4
months so make sure you stay on top of them, as it usually
means new features and tighter security! http://wordpress.
org/about/roadmap/
About The Author
Joe Casabona is a web developer, writer,
and teacher. He hails from Middletown,
NY and has been making websites since
2002. His good friend Stephen Mekosh
introduced him to WordPress in 2004
and he’s been working with it ever since.
Joe also writes for WordPress Tuts+
and the Appstorm network. Check him
out at casabona.org or on Twitter at
@jcasabona.
Since Joe is a big nerd, he’ll leave you with one of his favorite
Star Wars quotes:
“
You fail because you do not see the possibility of
success. —Obi Wan Kenobi
”
Your Download Links
Use the link below to download your Photoshop and WordPress
theme files for the Director design and theme.
http://rockable-extras.s3.amazonaws.com/wordpress-fromscratch.zip