1
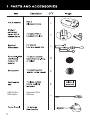
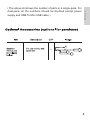
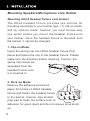
Table of Contents
1.PARTS AND ACCESSORIES
2.INSTALLATION
MOUNTING SPEAKERS/MICROPHONE ONTO HELMET
3.SET UP YOUR HOLA
POWER AND LED INDICATOR:
ABOUT PAIRING
Why Pair?
Which Devices to Pair?
How to Pair:
Pairing with a Cell Phone:
Pairing with a GPS:
Pairing with Another HOLA:
Pairing Example:
4.USING YOUR HOLA
VOLUME CONTROL
USING YOUR CELL PHONE
INTERCOM WITH ANOTHER HEADSET:
(VOX VS. MANUAL ACTIVATION) Voice Activation (VOX) Mode
Manual Activation Mode
Party Occupied
Connection Failed
USING YOUR GPS
RESET/ERASE PAIRING INFORMATION
VOICE NOTIFICATIONS LANGUAGE SELECTION
5.QUICK REFERENCE FOR OPERATIONS
6.VOICE NOTIFICATIONS QUICK REFERENCE
7.BATTERY POWER CAPACITY
8.SPECIFICATIONS
9.NOTES
1
3
3
9
10
11
11
11
11
11
13
14
17
19
19
21
23
23
28
29
29
30
30
30
31
33
34
35
36
Foreword
Thank you for choosing HOLA headset. We appreciate your trust you place
in us and our product. HOLA headset is carefully designed to satisfy all your
expectations in communication for the ride. Should you have any suggestions
or questions regarding our product, please write us at service@openroad.
com.tw.
HOLA headset provides the following functions:
1. Intercom between two HOLA headsets: HOLA headset can store
information of up to three other HOLA heads, indicated by H_1, H_2 and
H_3 headsets. AT any given time, HOLA headset can intercom with H_1,
H_2 or H_3 separately.
2. Connect to two cell phones simultaneously: the user can accept call from
any one of the two cell phones. However, HOLA headset only support A2DP
(stereo music) of one of the two cell phones.
3. Connect to one cell phone and one GPS simultaneously: The user can
accept cell phone or listen to stereo music. In addition, when the user is
receiving a call and the GPS is also announcing audio directions, HOLA
headset can mix the two voice sources so that the user can both hear the
conversation over the cell phone as well as the navigation direction.
4. Connect to one cell phone (or device similar to cell phone)
5. Connect to one GPS (or navigation device similar to GPS).
Before using HOLA headset, we suggest you read through this “Owner
Manual” to get an overview of the system, including installation, accessories
and operations. Once you’re familiar with HOLA headset, you could perform
the setting and operation quickly and efficiently.
Safety is the ultimate concern when your ride. HOLA headset is designed for
motorcycle enthusiastic, and the riding safety is integrated as the top priority
in the design. Nevertheless, the rider should still take great cautions to ensure
the safety of himself as well as his passenger while using HOLA headset
during enjoyable ride.
We wish you have a pleasant and safe ride!
USB To Mini
USB cable
1
Upgrade HOLA
firmware
ENGLISH
( The above list shows the number of parts in a single-pack. For
dual-pack, all the numbers should be doubled except power
supply and USB To Mini USB cable )
2
Mounting Speakers/Microphone onto Helmet
Mounting HOLA Headset fixture onto Helmet
The HOLA headset fixture provides two options for
mounting according to your helmet type: (1) clip-on mode,
and (2) stick-on mode. Caution: you must choose only
one option before you mount the headset fixture onto
your helmet. Once the headset fixture is mounted onto
the helmet, it cannot be changed.
1. Clip-on Mode:
Insert the spring clip into HOLA headset fixture from
below and fasten the clip to the headset fixture. Please
make sure the direction before inserting. Caution: the
spring clip cannot be
separated from the
headset fixture once
it is inserted in.
2. Stick-on Mode:
Remove the adhesive protection
paper from back of HOLA headset
fixture and fasten the headset fixture
to the helmet. Caution: Use alcohol
prep pad to clean the surface prior to
adhesion for good result and do not remove once stuck
on.
3
Step 1: Detach the inner left side lining of the helmet, and
attach the interlocking fastener for microphone to the helmet
behind the inner lining. Use an alcohol prep pad to clean the
surface before attaching. Please refrain from unnecessary
removal of the interlocking fastener from the helmet, as it may
damage the adhesive on interlocking fastener.
ENGLISH
For Open-Face (or 3/4) Helmet Installation
1: (clip-on mode)
Note: HOLA headset provides
quality voice and VOX intercom.
For optimal performance, the
microphone must be as close to
the mouth of the user as possible
when installing the microphone.
4
Step 2: Connect speakers to microphone, and adjust the left
and right speakers to desired position.
Step 3: Pull to open the clip of the HOLA headset fixture and
clip/slide onto the lower rim of the helmet. To further enhance
the fastening, remove the adhesive protection paper from the
back of HOLA headset fixture before fastening the headset
5
ENGLISH
Step 4: Slide in the HOLA headset from the top of the headset
fixture into the track of the headset fixture.
6
7
ENGLISH
Step 2: Slide the HOLA headset into the track from top down
into fixture.
Important Notice: Ensure to properly plug the mini USB cable
in the device. Failure to do so will
affect device performance and can
also result in water damage when
used in wet weather.
For Full-Face Helmet Installation:
When a full-face helmet is used, use the optional speaker/
microphone for full-face helmet and attach the microphone
to the inside of the helmet directly in front of the mouth. Use
an alcohol prep pad to clean the surface before attaching.
Please refrain from unnecessary removal of the fastener
from the helmet, as it may damage the adhesive's strength.
(Note: the optional speaker/microphone for full-face helmet is
sold separately. Please contact your local distributor or email
[email protected] to order.)
8
hearing GPS instruction,
9
1. Power ON: Press[MFB] button until the LED indicates blue. A
voice notification will inform you of the current intercom mode.
Power OFF: Press [MFB] button until the LED indicates red.
A voice notification will inform you of the remaining battery
capacity. Refer to the power capacity table.
ENGLISH
Power and LED Indicator:
2. Charging: During recharging, the LED remains red. When
charging is completed, the LED light remains green. Estimate
approximately 2.5 hours to fully recharge the battery.
3. When powering ON the device, a voice notice is heard to
inform the user of battery status. The notices are as follows;
"Battery charge full", "Battery charge above 80%", "Battery
charge above 50%", "Battery charge low approaching 25%",
"Battery charge critical 10%".
10
About Pairing
Why Pair?
The HOLA device is based on Bluetooth Protocol for
wireless connections and communication. Bluetooth Protocol
requires any two Bluetooth devices to be “paired” before
any communication can takes place between them. Once
paired, turning on and off any Bluetooth device will not affect
the pairing. In other words, after pairing has been correctly
executed, a Bluetooth device will automatically reconnect to the
originally paired device when it is powered on again.
Which Devices to Pair?
To use the HOLA with a cell phone, GPS, MP3, another HOLA
headset, or other Bluetooth devices, a pairing process must be
performed for the HOLA headset to connect with each other
device respectively.
How to Pair:
Pairing with a Cell Phone:
(1).Beginning with the HOLA headset in OFF state, press the
[MFB] button on the HOLA headset for 8 seconds until the LED
flashes red/blue.
(2).Activate the Bluetooth function on cell phone to search for
the HOLA-S/HOLA-F.
(3).Input password <0000> to complete the connection. The
LED flashes blue slowly to indicate successful pairing.
11
ENGLISH
(4).The HOLA headset can be paired with two cell phones.
When pairing, please note that the last cell phone paired
supports the functions of “voice dialing”, “re-connect with cell
phone” and “A2DP stereo music playing.” Refer to the cell
phone manual for the operation of two cell phones.
Set Cell Phone Answering Mode
Once paired, set the answering mode of the cell phone as (a)
voice answer, or (b) automatic answer.
(a) Voice Answer: Press the [V+] button for 7 seconds until the
LED turns green. A voice notification will inform you <Voice
Answering Mode>.
(b) Automatic answer: Press the [V-] button for 7 seconds
until the LED turns green. A voice notification will inform you
<Automatic Answering Mode >.
Note: After the HOLA headset has been paired with a cell
phone, the default answering mode is voice answer.
12
Pairing with a GPS:
**The GPS must support simultaneous connections to a headset
and cell phone. (Ex. Garmin Zumo 550, 660 Model. For any
specific GPS model, please consult your GPS user’s manual for
details.)
(1).On the GPS, search for cell phone and connect to cell phone
option.
(2).When the HOLA is in OFF state, press the [MFB] button on
the HOLA headset for 6 seconds until the LED flashes red/blue.
(3).Activate the GPS Bluetooth and search for the HOLA-S/
HOLA-F.
(4).Input password <0000> to complete connection. The LED
flashes blue slowly to indicate successful pairing.
** For GPS only supporting a connection to a headset: if your
GPS only supports a connection to a headset, you can pair a
GPS and cell phone to the HOLA headset separately.
(1).Beginning with the HOLA headset in OFF state, press the
[MFB] button on the headset for 6 seconds until the LED flashes
red/blue alternatingly.
(2).Activate GPS Bluetooth and search for the HOLA-S/HOLA-F.
(3).Input password <0000> to complete connection. The LED
flashes blue slowly to indicate successful pairing.
13
HOLA can also be paired with up-to 3 other HOLAs for intercom
use.
(1).To pair two HOLAs (e.g., A and B), the following operations
must be performed on both A and B, respectively.
ENGLISH
Pairing with Another HOLA:
(2).Beginning with the HOLA headset in OFF state, press the
[MFB] button on the headset (A or B) for 6 seconds until the
LED flashes red/blue alternatingly to enter the “pairing” state.
(3).For pairing between A headset and B headset, you can
designate either the [MFB] button, [V+] or [V-] buttons on
A headset to pair with B headset. Likewise, you could also
designate either the [MFB] button, [V+] or [V-] buttons on B
headset to pair with A headset. The button you choose to set
the pairing is also the button used to initiate the intercom with
that specific headset.
(a) To pair using the [MFB]: Press and hold [MFB] on A headset
until the LED on A headset flashes faster, then continue
pressing until the LED lights on both A headset and B headset
display blue to indicate successful pairing. (At this point, you
have successfully paired the [MFB] button on A headset to the B
headset.)
14
(b) To pair using the [V+] button: Press and hold [V+] on A
headset until the LED light on A headset indicates red/blue/
green alternating for about 5 seconds, and then red/blue
alternating. Then, press the [MFB] button on A headset again
so that the LED on A headset flashes faster and the LED lights
on both A headset and B headset display blue to indicate
successful pairing. (At this point, you have successfully paired
the [V+] button on A headset to the B headset.
**NOTE: For the headset in the “pairing” state, the [MFB] is
the default pairing button if you do not choose otherwise. For
example, when both A headset and B headset are in the “pairing”
state, if you choose [V+] on A headset and do not make any
choice on B headset, the [MFB] on B headset will be the default
for the pairing. In other words, [MFB] on B headset will be
paired to A headset, and [V+] on A headset will be paired to B
headset.
(c) To pair using the [V-] button: Press and hold [V-] on A
headset until the LED light on A headset indicates red/blue/
green alternating for about 5 seconds, and then red/blue
alternating. Then, press [MFB] on A headset again so that the
LED on A headset flashes faster until the LED lights on both
A headset and B headset display blue to indicate successful
pairing. (At this point, you have successfully paired the [V-]
button on A headset to the B headset.)
15
(5).The pairing between HOLAs does not necessarily need to be
symmetrical. For example, A headset can use [MFB] to pair with
B headset, but B headset can use [V+] to pair with A headset
and use [MFB] to pair with C headset.
ENGLISH
(4).The buttons [MFB], [V+], and [V-] can be selected to pair
with different HOLAs, respectively.
(6).Each button can only remember a pairing to one HOLA
headset at a time. When you use the same button to pair with a
different HOLA, the previous pairing will be replaced.
16
Although no priority exists among the [MFB], [V+] and [V-]
buttons on the HOLA, it is suggested to pair the [MFB] button
to the HOLA because of its location, size and ease of access
through feel (with riding gloves on). For example, to pair up A,
B, C and D headsets, wherein A headset and B headset are
most often in contact, while C headset and D headset are most
often in contact with each other, the following choice of buttons
for pairing can be used (for HOLA-F, which can pair up to three
other HOLA headsets):
17
ENGLISH
Alternatively, if A headset most often speaks to B headset, B
headset often speaks to C headset, C headset often speaks to
D headset and D headset often speaks to A headset (forming
a cyclic loop), then the choice of buttons for pairing in the
following table is suggested:
18
Volume Control
As a safety precaution, is it recommended that you complete
the volume control settings prior to riding. In the event where
a volume adjustment is required while riding, extreme caution
must be taken to ensure safety and that bike control is
maintained at all times.
The [V+] and [V-] buttons on HOLA are for volume control. You
will hear a double tone during adjustment to indicate volume
changes are being made. When the volume is adjusted to the
highest or lowest level, a <beep> indicates the maximum or
minimum has been reached.
To adjust the volume of any function on any device connected
to HOLA, the function of that device must be turned on. For
example, to adjust the “talk” volume of the cell phone, the cell
phone must be in ”talk” mode. Similarly, to adjust the “music”
volume on the cell phone, the cell phone must be in “music”
playing mode. Each volume must be individually controlled. The
adjustment of one volume will not affect the volume of another
function. Because HOLA is designed for bikers, the volume
is louder than the average headset. It is advisable to test and
adjust the volume first before mounting onto the helmet.
**NOTE: when adjusting music volume on cell phone,
excessively fast presses may switch the cell phone into the
AVRCP function.
19
ENGLISH
(1).Automatic volume increase function:
The automatic volume increase function will automatically
increase the volume of the headset when ambient noise levels
are high (i.e. motorcycle gaining speed), and automatically
resume to the original volume setting when the ambient noise
levels are low (i.e. Motorcycle reducing speed)(the automatic
volume increase function is only applicable to monotone, i.e.,
not stereo music. For example, the cell phone talk and the
intercom between two headsets are both monotone.)
(2).Voice Control Feature:
The HOLA headset provides voice control to both answering
phone calls and activating the intercom. The voice activation
(VOX) level can be adjusted according to your travel speed
and ambient noise levels so that the microphone will not turn
on unexpectedly because of high wind speed or louder ambient
noises (i.e. engine or loud exhaust systems can trigger the
VOX).
20
Using Your Cell Phone
The HOLA headset can be connected to two cell phones and
can receive calls from either cell phone. The last cell phone
paired with the HOLA headset must support “voice dialing”,
“reconnecting cell phone” and “A2DP stereo music playing”.
For an incoming call, the following options to answer or reject
the incoming call are available:
(1).Pressing the [MFB] button to answer the incoming call.
(2).Using VOX activation to answer the incoming call by
speaking into microphone directly, for example, “hello.”
NOTE: The Voice Answer for cell phone is set the same way
the Voice Activation (VOX) for intercom with another headset is
set. For setting Voice Answer to answer incoming call and Voice
Activation (VOX) for intercom, please refer to: HOLA Voice
Activation settings (VOX).
(3).Using automatic answering, by setting the automatic
answering function, the incoming call will automatically be
answered after 5 seconds of ringing.
21
(5).Voice Dialing: press the [MFB] button once and speak into
microphone (the cell phone MUST provide voice dial function).
ENGLISH
(4).To reject an incoming call, press the [MFB] button for about
3 seconds.
(6).To reconnect cell phone, press [MFB] once to reconnect
headset and cell phone.
NOTE: The last paired cell phone supports this function. When
two cell phones are paired with the HOLA headset, the other cell
phone needs to be connected to the HOLA headset manually.
(7).If your cell phone supports AVRCP function (consult your cell
phone user’s manual), you can play music directly:
(a)Play/Pause: Press [MFB] twice.
(b)Previous track: Press [V-] twice.
(c)Next track: Press [V+] twice.
22
Intercom with another Headset: (VOX vs. Manual
Activation)
Voice Activation (VOX) Mode
Voice activation (VOX) can be used to activate your HOLA for an
intercom transmission with another headset. However, the first
transmission between two headsets after successful pairing can
only be activated manually. Subsequent intercom transmissions
will be voice activated (VOX). During a transmission, any
silence lasting more than 10 seconds will automatically end the
intercom connection. To initiate the intercom again, speak into
the microphone, and a triple tone will indicate that the intercom
is open again.
The memory in the HOLA device automatically remembers the
last headset HOLA had initiated an intercom connection with.
Hence, the next VOX activation will automatically establish
intercom connection with the last remembered headset.
Similarly, when HOLA is turned off and on again, VOX activation
can be used to automatically establish intercom with the last
remembered headset.
23
ENGLISH
** Manual Activation of Intercom: Press the [MFB], [V+] or [V-]
button (whichever headset you pair with) until you hear a single
tone. Release the button and the voice notification <Comm A
selected>, < Comm B selected >, or < Comm C selected > is
heard. Then, a double tone sound will indicate a successful
intercom connection.
Scenario 1: After manually activating A headset to intercom with
B headset, the next time A headset is voice-activated, A headset
will automatically connect to B headset.
Scenario 2: After manually activating A headset to B headset,
and a transmission to C headset is desired, you MUST manually
activate A headset for intercom connection with C headset.
Also, the next time, you voice activate A headset for intercom
connection, A headset will still be connected to C headset,
instead of B headset.
Scenario 3: After manually activating A headset to B headset,
you receive an intercom connection from C headset. The next
time, you voice activate A headset for intercom connection,
A headset will still be connected to B headset, instead of C
headset.
24
VOX Level: The HOLA headset provides four volume levels
for setting the voice volume required to activate the intercom
connection. It is possible to adjust the required voice volume
according to your needs. Level 1 means that VOX has a lower
activation threshold, i.e., you may use a lower voice volume to
activate the headset intercom connection. The higher the level
is, the higher the voice volume required to activate the intercom
connection. The indicated speeds are only for reference, and
level selection depends on actual ambient noise levels and wind
speed.
VOX Level Control: When the HOLA is ON (i.e., ready to
connect) but not transmitting any voice signals (i.e., turn off
cell phone music and stay silent for 10 seconds to leave the
intercom mode), press [V+] or [V-] twice to raise or lower the
voice level. Different voice notifications will be provided to
indicate the transition from a level to a different level. The
following gives the details:
25
ENGLISH
Level 1: (default)
Description: A voice notification saying "Comm activation Level
1" indicates that the headset is set to Level 1. Suggested speed
reference for level 1 is: 0-90km/h
Level 2:
Description: A voice notification saying "Comm activation Level
2" indicates that the headset is set to Level 2. Suggested speed
reference for level 2 is: 0-120km/h
Level 3:
Description: A voice notification saying "Comm activation Level
3" indicates that the headset is set to Level 3. Suggested speed
reference for level 3 is: 0-150km/h
Level 4:
Description: A voice notification saying "Comm activation Level
4" indicates that the headset is set to Level 4. Suggested speed
reference for level 4 is: 0-170km/h (for safety reasons we don't
recommend using comms upwards of 150km/h)
Level 5: (Manual activation mode)
Description: Level 5 indicates you are in Manual activation
Mode. A voice notification saying "Comm activation Manual
Mode" indicates that the headset is set to manual activation
mode.
26
Note: The differentiating factors in how apparent the resolution
of multiple VOX settings are by helmet and motorcycle type
(open face or full face helmet, motorcycle with a windscreen
or not and engine noise). With an open face helmet type
(microphone more prone to being affected by wind noise), the
scale/resolution of VOX settings will have a more apparent
effect rather than on a full-face helmet type (microphone less
prone to being affected by wind noise). Our performance tests
were conducted on a Honda STS1300 Goldwing with the rider
wearing an open face Shoei J-Force helmet.
27
ENGLISH
Manual Activation Mode
Manual Activation Mode: Press [V+] twice to set the activation
mode to Level 5.
(1).In the event that prolonged intercom transmissions will
occur, it is suggested that one of HOLA headsets to be set to
Level 5 (Manual Activation Mode). In manual activation mode,
the function to automatically end an intercom connection
when detecting 10-second silence will be disabled. In manual
activation mode, you must manually terminate an intercom
connection.
(2).During an intercom transmission, any incoming call (cell
phone) to one of the two headsets will automatically pause the
intercom connection. The headset without the incoming call
will resume the state prior to the intercom connection, until the
headset with the incoming call terminates or rejects its incoming
call, then the intercom connection resumes.
** Manual Activation of Intercom: Press [MFB], [V+] or [V-]
button (on whichever headset you pair with) until you hear a
single tone. Release the button and a voice notification saying
<Comm A selected>, < Comm B selected >, or < Comm C
selected > is heard. Then, a double tone sound will indicate a
successful intercom connection.
To end the intercom, press [MFB] once, a single <beep>
indicates terminating the intercom.
28
Party Occupied
When you hear a voice notification saying <party occupied>,
it indicates that the target HOLA headset you are trying to
establish an intercom connection with is currently occupied. The
party will hear a voice notification saying <missed A Page> after
their intercom transmission is over.
Scenario 1: A headset is in transmission with B headset. C
headset intends to transmit with A headset. Then, C headset will
hear the voice notification <party occupied>. A headset will hear
a voice notification during intercom saying <missed C page>.
Scenario 2: A headset is connected to a cell phone call. B
headset intends to transmit with A headset. Then, B headset will
hear the voice notification <party occupied>. A headset will hear
a voice notification during intercom saying <missed B page>.
Scenario 3: A headset is connected to a GPS which is
giving audio instructions. B headset intends to transmit to A
headset. Then, B headset will hear the voice notification <party
occupied>. A headset will hear a voice notification during
intercom saying <missed B page>.
Connection Failed
If you hear a quadruple tone after activating the intercom, it
indicates that the HOLA headset you are trying to transmit to is
out of the reception range of your HOLA headset. The intercom
connection attempt has failed.
29
If you have paired your HOLA with a GPS, it is possible to
hear voice instructions from the GPS through the headset. If
you are on an intercom with another headset when the GPS
audio instruction comes in, the intercom connection will be
automatically paused. The intercom connection resumes
after the GPS instruction is over. When your HOLA headset is
connected to a cell phone and a GPS audio instruction comes
in, you can hear both the GPS instructions and the cell phone.
ENGLISH
Using Your GPS
Reset/erase Pairing Information
Power off the HOLA headset when the HOLA headset is ON.
After the HOLA headset turns OFF, continue pressing the [MFB]
button and press [V+]. When the red light flashes 5 times, it
indicates that the pairing information has been reset/erased.
Voice notifications Language Selection
The HOLA headset is equipped with two languages. The first is
English and the second is the local language (market specific).
To switch between languages: Power off the HOLA headset
(if already ON). After the HOLA headset turns OFF, continue
pressing the [MFB] button and press [V-]. When the blue light
flashes 5 times, it indicates that you have successfully switched
to the other language for voice notifications.
30
31
32
ENGLISH
The following items are the various voice notifications
that the headset emits when certain functions are
selected.
"Full"
"Above 80%"
"Above 50%"
"Low approaching 25%"
"Critical 10%"
6. "Answering Mode"
33
14 hr.
10 hr.
12 hr.
6 hr.
7 hr.
3 hr.
4 hr.
1 hr.
2 hr.
ENGLISH
12 hr.
34
42g
Bluetooth 3.0
35
1.The HOLA headset includes a rechargeable lithium battery.
Please do not tamper with the lithium battery. Keep the lithium
battery away from strong impacts, fire or water.
ENGLISH
Safety & Recycle:
2.Please do not open sealed hardware, tamper or modify any
part. Do not apply any chemical products on any hardware part
for cleaning or soaking. A violation may be hazardous.
3.For environmental protection, please recycle this product.
Warranty:
1.Warranty, technical support and service from Open Road
Solutions, Inc. are only extended to the original buyer of HOLA
headset.
2.For malfunctions not caused by inappropriate use, Open Road
Solution, Inc. will replace or repair parts and headset at no extra
charge or fully refund the purchase.
3.HOLA does not include any part that should be repaired by
the user. Any unauthorized repair or maintenance will render
this warranty invalid.
4.In the event of water damage resulting from improper
connection of the mini USB into the HOLA device, no warranty
coverage will be extended.
36
5.Warranty period: 24 months from the date of purchase.
6.A proof of purchase must be presented for warranty service.
7.For warranty service, please inquire with your local store or
contact authorized local distributor or dealers. The full-list of
authorized dealer is available on www.openroad.com.tw, or
email to: [email protected]
Notice:
1.This manual is provided “as-is”. For latest product information
or upgrades, please visit our website: www.openroad.com.tw.
2.For additional technical support, email service@openroad.
com.tw
Federal Communication Commission Interference Statement
This equipment has been tested and found to comply with
the limits for a Class B digital device, pursuant to Part 15
of the FCC Rules. These limits are designed to provide
reasonable protection against harmful interference in a
residential installation. This equipment generates, uses and
can radiate radio frequency energy and, if not installed and
used in accordance with the instructions, may cause harmful
interference to radio communications. However, there is
37
ENGLISH
no guarantee that interference will not occur in a particular
installation. If this equipment does cause harmful interference
to radio or television reception, which can be determined by
turning the equipment off and on, the user is encouraged to try
to correct the interference by one of the following measures:
-Reorient or relocate the receiving antenna.
-Increase the separation between the equipment and receiver.
-Connect the equipment into an outlet on a circuit different from
that to which the receiver is connected.
-Consult the dealer or an experienced radio/TV technician for
help.
38
FCC Caution: Any changes or modifications not expressly
approved by the party responsible for compliance could void the
user's authority to operate this equipment.
This device complies with Part 15 of the FCC Rules. Operation
is subject to the following two conditions: (1) This device may
not cause harmful interference, and (2) this device must accept
any interference received, including interference that may cause
undesired operation.
This equipment complies with FCC RF radiation exposure
limits set forth for an uncontrolled environment. To maintain
compliance with FCC RF exposure compliance requirements,
please avoid direct contact to the transmitting antenna during
transmitting.
39
V1.0.4